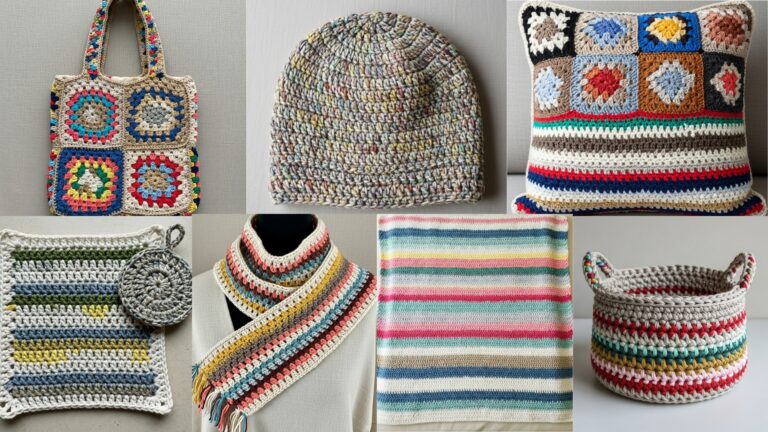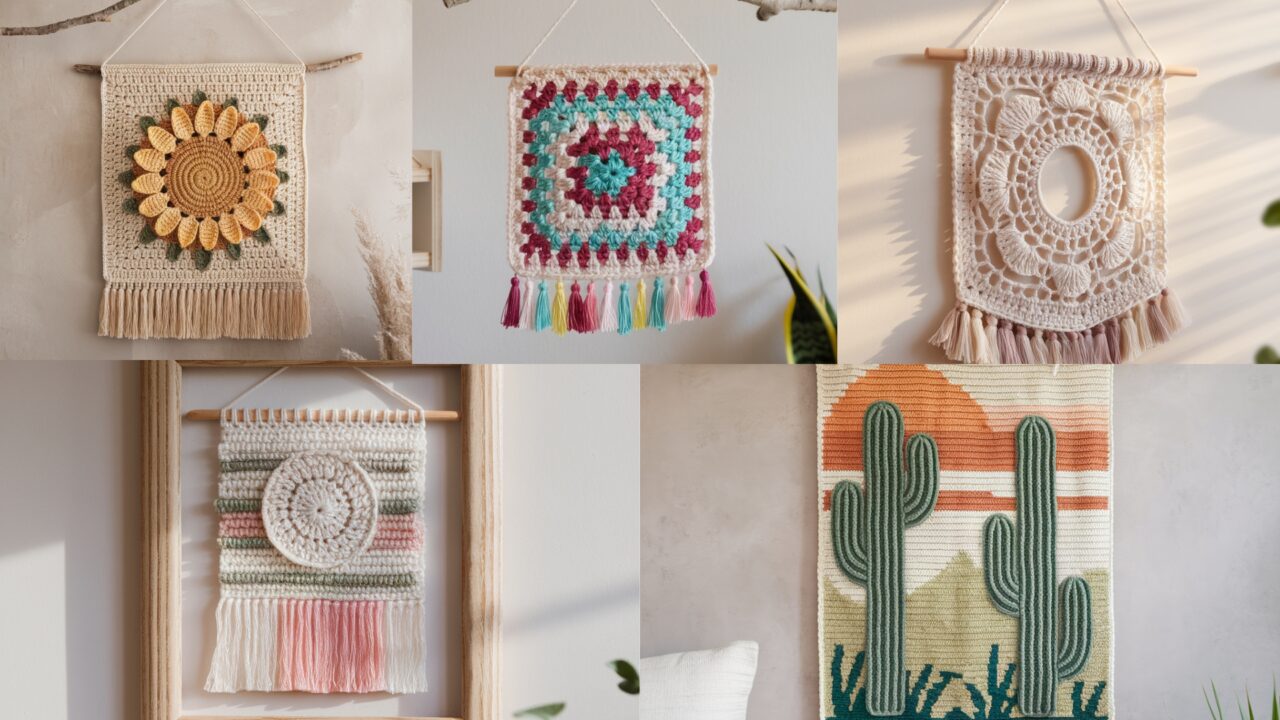
Crochet wall hangings are one of the fastest, most satisfying ways to add handmade personality to a room. They’re portable weekend projects, forgiving to make, and scale from tiny framed pieces to bold statement art. This collection of five boho-friendly wall hangings covers a range of styles — sculptural peephole panels, a granny-square quilted tapestry, a tiny “mock-rame” (mini frame) gallery, a sunflower macramé-meets-crochet hybrid, and a playful cactus tapestry. Each pattern section below includes: what it is, skill level, materials & tools, finished size & gauge notes, a step-by-step construction guide, plus variations, finishing details, hanging methods, styling tips, and care. Read the introduction and then pick the look that matches your room.
Quick general notes (read first)
- Terms & abbreviations: US crochet terms used (ch, sc, hdc, dc, tr, sl st, inc, dec, MR = magic ring).
- Yarn choice: For wall hangings, choose cotton, cotton blends, or chunky yarn depending on texture and drape. Cotton gives crisp stitch definition; a bulky acrylic or wool blend gives loft and sculptural body.
- Hook choice: Use the hook recommended for your yarn weight, but feel free to go up one size for looser, airier texture or down a size for tighter definition.
- Blocking & shaping: Many hanging elements benefit from light blocking or steam shaping. For sculptural pieces, use a spray bottle and shape by hand.
- Hanging hardware: Common options — wooden dowels, driftwood, brass curtain rods, or brass/plastic hoops. Attach yarn fringe, loops or use a fabric lining to secure hardware.
- Scale: All finished sizes below are sample sizes. If you want a larger statement piece, increase motif counts or repeat wings/panels; to make smaller, reduce repeats.
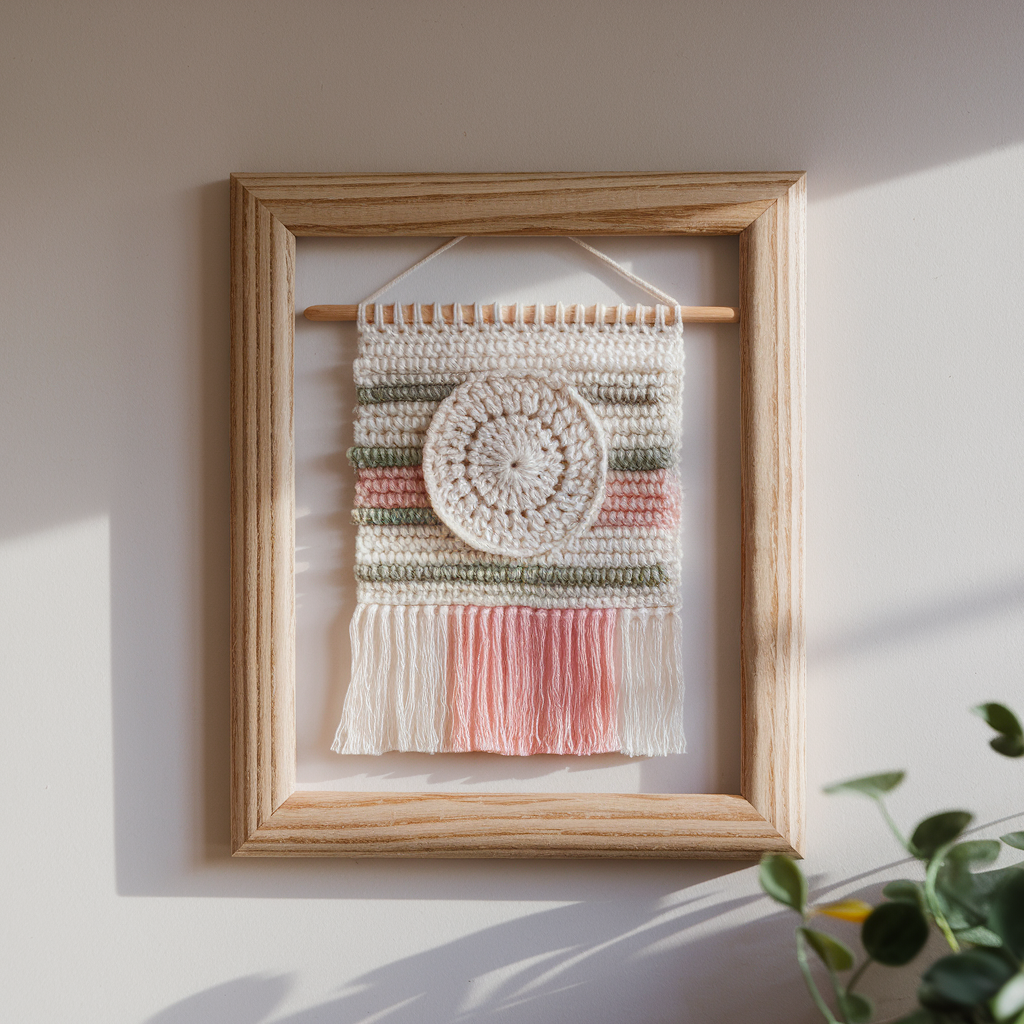
1. Crochet Peephole Wall Hanging Pattern

What it is: A textured, sculptural panel built around a circular “peephole” or round window — think modern boho with a hint of mid-century geometry. The center is open or ringed, surrounded by concentric stitch bands and layered fringe or tassels radiating outward.
Skill level: Confident beginner → intermediate (basic stitches + shaping + creative attachment).
Materials & tools
- Cotton DK or worsted for body (approx. 250–400 yds depending on size)
- Bulky yarn for fringe/tassel texture (optional)
- Hooks: 3.5–5.5 mm (body + fringe hook if using different yarn)
- 12–18 in wooden embroidery hoop or cut-to-length round dowel (for peephole)
- Small sewing needle, blocking pins, optional starch or fabric stiffener
Finished size (sample): ~18 in diameter (including fringe); inner peephole ~6–8 in diameter.
Design idea & construction overview
- The peephole hanging centers on a wooden hoop (or crocheted ring). Banding is built around that ring in rounds that combine textured stitches (puff, shell, V-stitch) and flat rounds. The outer edge is finished with layered fringe, short tassels, and small crocheted leaves or beads for visual interest.
Step-by-step guide
- Prepare the hoop/ring. If using a wooden hoop, decide whether the hoop will remain visible (natural wood) or be wrapped with yarn for a softer look. For wrapping, use a small hook or your fingers to chain and slip-stitch around the hoop.
- Work center round (optional open center): If you want an open peephole, crochet a few rounds of stitches joined to the hoop with evenly spaced sl sts. Alternatively, work a decorative ring inside the hoop (crocheted ring) to frame the opening.
- Create concentric bands: Beginning at the inner edge, work rounds of sc, dc shells, puff clusters, and V-stitch; alternate textures. Each round is placed into the previous round’s stitch spaces or into the hoop.
- Add 3-D details: Every 4–6 rounds, add a small row of puff stitches or bobble clusters to produce depth. You can also crochet small leaves or discs and sew them on.
- Finish edge with fringe/tassels: Cut fringe lengths twice the desired drop. Fold and attach into outer round with larkshead knots. For variety, alternate fringe thicknesses and add a row of short tassels.
- Block & shape: Pin outer edge and steam lightly to shape scallops; leave to dry.
- Hanging loop: Attach a loop of yarn or leather cord to the hoop and hang on a wall hook.
Variations
- Use a round mirror as the peephole for a mixed-media wall mirror.
- Make the center closed and embroider a mandala motif.
- Swap fringe for macramé knot rows for a mixed-technique piece.
Finishing & mounting
- Weave in tails; glue a thin felt circle to the back if you want a tidy finish that hides knots and hoop hardware. Mount using a screw hook or decorative peg.
Styling tips
- Hang above nightstands or small reading nooks. The circular shape pairs well with round mirrors and plants. Use natural wood and warm neutrals for a classic boho palette.
Care
- Dust with a soft brush; if needed, spot wash with mild soap and line dry flat. Avoid long exposure to direct sunlight for cotton to prevent fading.
2. Crochet Granny Square Wall Hanging Pattern

What it is: A quilted tapestry made from granny squares arranged in a grid and suspended from a wooden dowel. Granny squares are timeless and let you combine colors, textures, and embroidery for a patchwork boho look.
Skill level: Beginner → confident beginner (modular crochet + assembly).
Materials & tools
- Several colors of cotton or cotton-blend yarn (leftover yarns are perfect)
- Crochet hook to match yarn (3.5–5 mm)
- Wooden dowel or branch (24–36 in for a medium piece)
- Fabric lining (optional), sewing needle, measuring tape
Finished size (sample): 24 in wide × 30 in long (including fringe); using 12 squares 6 × 4 layout.
Design idea & construction overview
- Make a series of granny squares (classic 3–4 round or expanded 6–8 round motifs). Join them with whipstitch or join-as-you-go, add a border for unity, then attach to a dowel via a crocheted sleeve or top loops. Fringe along the bottom softens the geometric grid.
Step-by-step guide
- Plan layout & color story: Decide on square size (e.g., finished 5 in). Sketch a grid and choose a palette — neutral base with 2–3 accent colors looks modern and cohesive.
- Crochet squares: Make consistent squares — block them lightly to equalize shape. Use the same number of rounds but vary color placements for interest.
- Join: Option A — JAYG (join as you go) for seamless joins; Option B — whipstitch with invisible mattress stitch for tidy seams. Work a 2–3 round border around the assembled grid to unify the piece.
- Attach to dowel: Either crochet a top sleeve (join a long rectangle and fold over the dowel) or make evenly spaced loops along the top edge to hang. Secure with small knots or wooden beads.
- Add bottom finish: A fringe or layered tassel edge adds movement; for modern look leave raw straight edge.
- Optional lining: Sew a lightweight fabric to the back if you want a crisp flat finish and hidden seams.
Variations
- Mix granny loops with square-in-square motifs and a central medallion square for a focal point.
- Use textured squares (popcorn, bobble) for tactile interest.
- Make a mini gallery of 3-4 small grid hangings for a wall cluster.
Finishing & mounting
- Use evenly spaced twine to hang the dowel and anchor with two wall hooks for stability. For large pieces, secure with drywall anchors.
Styling tips
- A granny grid suits eclectic, vintage, or boho rooms. Place above sofas or beds; matching throw pillows with a granny motif ties the look together.
Care
- Spot clean or hand wash small pieces; avoid machine washing large assembled pieces to preserve joins.
3. Crochet Mini Mock-Rame Wall Hanging Pattern
What it is: “Mock-rame” is a playful term for tiny framed hangings — think mini canvases or framed fibers that you can group into a gallery. Each mini “rame” (mini frame) is worked on an oval or small rectangular base and finished with a wooden mini frame or glued backing for a gallery wall.
Skill level: Beginner → confident beginner (small work, precise finishing).
Materials & tools
- DK cotton or embroidery floss for fine detail
- Small wooden frames or cardboard backed with fabric (3–6 in squares/ovals)
- 2.5–3.5 mm hook, small tapestry needle, craft glue
Finished size (sample): Individual rame 3–6 in square; group of 5–9 for a gallery.
Design idea & construction overview
- Make small crocheted motifs or miniature tapestries (tiny landscapes, abstract strips, micro mandalas). Stretch and attach to small frames or mount on painted wood/cardboard. Group multiple rame on a gallery wall for maximal impact.
Step-by-step guide
- Choose motif series: Decide on a theme — monochrome abstracts, tiny botanicals, or colorful geometrics. Make 5–9 small panels with consistent backing.
- Work panels: Crochet into small rectangles or circles. For texture, use surface slip stitches, tiny tassels, or looped pile.
- Mounting method: Stretch the finished panel over a small wooden plaque or frame; staple or tack to the back. Alternatively glue to a painted card backed with chipboard and secure inside a display frame.
- Arrange gallery: Lay pieces on the floor to plan placement; stagger sizes for dynamic composition.
- Install hooks: Use picture-hanging hardware for small framed pieces or simple command strips for rental-friendly display.
Variations
- Make a mini seasonally rotating gallery — swap rame with seasons (spring florals, summer seascapes).
- Add tiny brass labels with titles for a curated look.
Finishing & mounting
- Trim stray ends, press panels flat, and use archival glue if you plan to preserve pieces long term.
Styling tips
- Mini rame are perfect above desks, in entryways, or in a nursery. A cluster of 5 looks engaging even in a narrow hallway.
Care
- Avoid damp locations; dust lightly. Replace individual rame if they fade over time.
4. Crochet Sunflower Macramé Wall Hanging Pattern
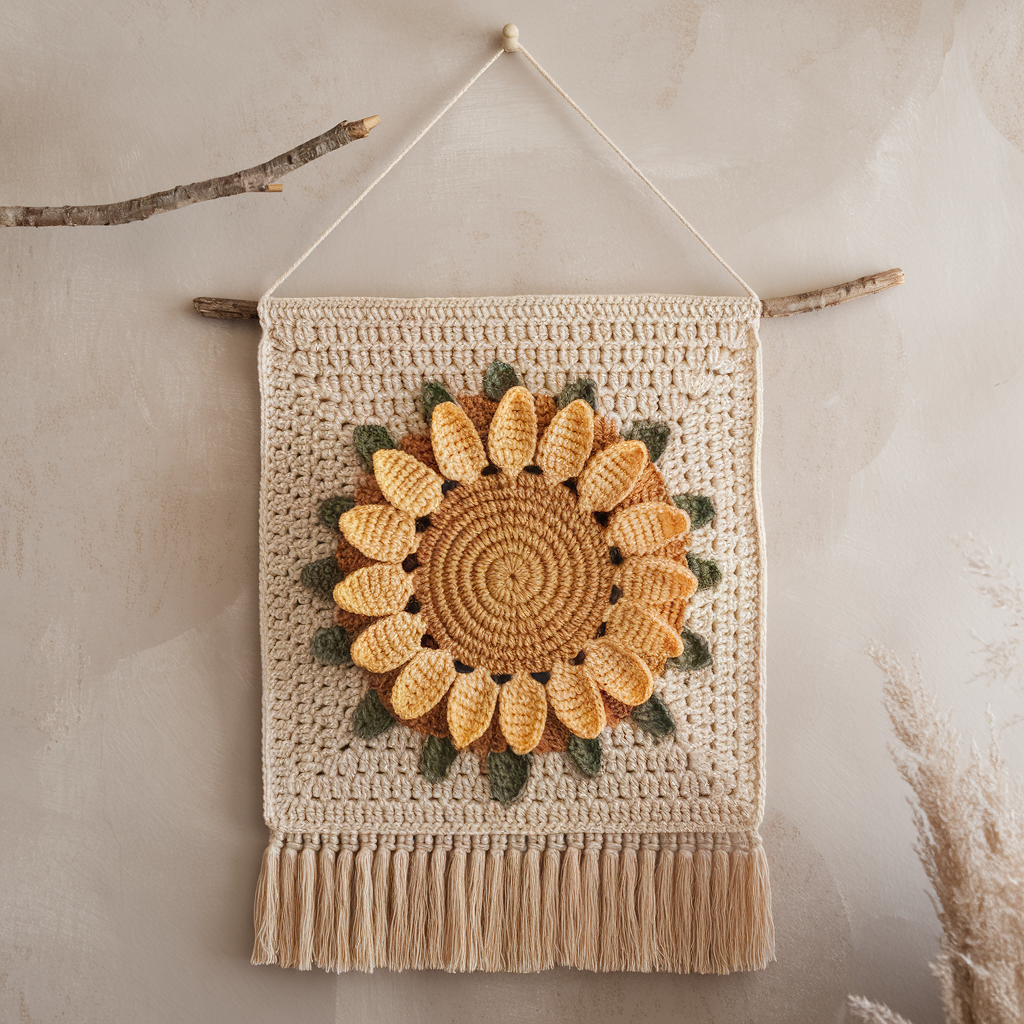
What it is: A hybrid piece that blends crocheted sunflowers with macramé rope and wooden dowel, combining two fiber arts for a bold boho statement.
Skill level: Intermediate (combines crochet motifs with macramé knots).
Materials & tools
- Bulky cotton rope for macramé base (3–6 mm)
- DK cotton or worsted for sunflowers (yellow, brown, green)
- 3.5–5 mm crochet hook for motifs
- Wooden dowel or branch (24–36 in), scissors, comb for fringe
Finished size (sample): 24–36 in wide × 30–40 in long (including fringe tails).
Design idea & construction overview
- Large crocheted sunflower motifs (3–7 in diameter) are attached to a macramé base made from repeating square knots, lark’s head joins, and half-hitch rows. The sunflowers sit amid cascading macramé fringe and are secured with hidden stitches and backing.
Step-by-step guide
- Create sunflowers: Crochet 3–5 sunflower blooms of varying sizes (center disk + layered petal rounds). Block and starch lightly for petal hold.
- Prepare dowel & cords: Cut macramé cords (length = desired drop × 2 + working length). Attach to dowel with lark’s head knots in an arranged spacing for blooms.
- Knotting base: Make background panels with repeated square knots or netted chains forming pockets where sunflowers will sit. Leave lower cords free for fringe.
- Attach sunflowers: Sew each flower to the macramé backing using a yarn needle, catch cords and secure to prevent shifting. If desired, stitch a small felt disk to the back for even distribution.
- Finish with fringe & layering: Trim fringe into layered V-shapes, comb for a soft look, and add small beads or braided accents.
Variations
- Make a meadow: sunflower + daisy mix.
- Use neutral yarn for the macramé and bright sunflower to pop.
- Add tiny LED battery lights woven into the cords for evening ambiance.
Finishing & mounting
- Hem fringe with a slight U-curve or pointed V. Tie extra knots and hide ends inside backing. Hang on sturdy wall hooks due to weight.
Styling tips
- This is a showstopper for living rooms or over beds; scale up for a dramatic headboard alternative. Pair with rattan furniture and large plants.
Care
- Spot clean macramé rope; sunflowers can be hand washed and reattached if needed. Avoid immersion of dowel/hardware.
5. Crochet Cactus Tapestry Wall Hanging Pattern

What it is: A playful, textured tapestry featuring stylized cactus motifs, decorative ridges, fringe “spikes,” and a sun or desert horizon band — great for modern boho and kid-friendly decor.
Skill level: Beginner → intermediate (color changes, surface crochet, texture stitches).
Materials & tools
- Cotton or acrylic yarn in greens, sand, terracotta, and cream
- Hooks: 4.0–5.5 mm depending on yarn weight
- Long wooden dowel or branch, tapestry needle, blocking board
Finished size (sample): 18–30 in wide × 24–36 in long.
Design idea & construction overview
- The cactus tapestry is worked in rows like tapestry crochet — a rectangular panel with color-blocked cactus shapes made by changing yarn colors and using surface slip stitch for outlines and spikes. Textured ridges (front-post stitches, popcorns) suggest ribs; fringe at the bottom mimics desert grass.
Step-by-step guide
- Plan your graphic: Sketch cactus shapes on grid paper to map color changes. Decide on horizon band placement (sand + sun).
- Work background rectangle: Crochet base rectangle in rows of sc or hdc to the desired size using neutral background color.
- Add cactus shapes: Either use tapestry technique (carrying yarn floats across the row) or appliqué separate cactus panels and sew on. For texture, add vertical FPdc column ribs or puff stitch rows.
- Surface detail: Use surface slip stitch in a contrasting green to outline cactus edges and add tiny cross-stitches for “spines.” Crochet tiny flower accents for cactus blooms and sew on.
- Bottom fringe & hang: Add fringe trimmed to resemble spiky desert plants. Attach the top to a dowel using a sleeve or loops; hang centrally.
Variations
- Make a single large cactus with embroidered flower for minimal look.
- Use chunky yarn for a tactile, kid-friendly version.
- Create a matching set with a moonlit cactus (muted blues) and a sunrise cactus (warm pastels).
Finishing & mounting
- Back with fabric for a very flat, gallery-like finish or leave raw for a rustic look. Use two anchors for wide pieces.
Styling tips
- Pop this tapestry above a console or in a nursery for a playful desert vibe. Coordinate with terracotta pots and woven baskets.
Care
- Spot clean or hand wash; use a lint roller to remove pet hair. Re-comb fringe with fingers or a wide tooth comb.
Final finishing, hanging & styling advice (applies to all patterns)
- Secure joins & hardware: Always back heavy attachment points with felt or a small wooden support to spread load. Use strong knots or small screws for dowels.
- Scale thoughtfully: Large walls need large pieces — scale motifs and repeat counts; for small nooks, use mini rame or single medallion hangings.
- Color & placement: Natural palettes (terra, cream, sage, muted ochres) harmonize with boho interiors. Use pieces in odd numbers (3, 5) for visually satisfying arrangements.
- Photo styling: Photograph with plants, woven baskets, and soft natural light; include a closeup and full-wall shot to show texture and scale.
- Care & repair: Keep a small repair kit (matching yarn + needle). For heavy soiling, remove motifs, hand wash, and reassemble.
Conclusion
These five crochet wall hangings give you a wide range of boho vibes — from sculptural peephole panels and retro granny grids to tiny framed “mock-rame” pieces, sunflower/macramé hybrids, and playful cactus tapestries. Each pattern balances texture, color, and scale so you can create pieces that fit your room and skill level. Crocheting wall art is a wonderfully immediate way to transform a space: small pieces create cozy focal points, while larger textile installations can define entire walls. Pick a pattern, choose a palette that complements your décor, and enjoy turning yarn into lasting wall art.