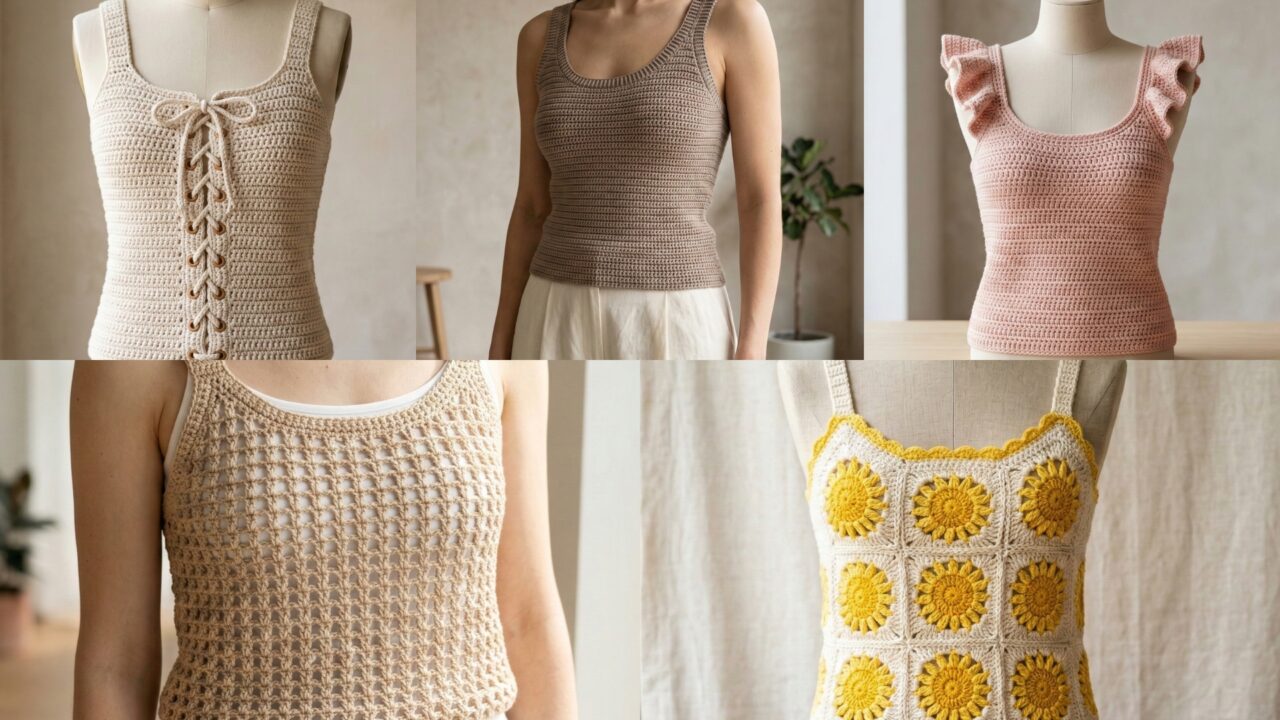
Light, flattering, and endlessly customizable — crochet tank tops are a summer staple you can make to suit your style. Below you’ll find a thorough introduction (yarn, hooks, measurements, gauge math, construction options and finishing tips) and five complete, detailed tank-top patterns: Mesh Tank Top, Minimal Tank Top, Laced Manley Tank Top, Ruffle Strap Tank Top, and Sunny Side Up Tank Top. Each pattern includes materials, stitch abbreviations, step-by-step instructions, fitting notes, and styling ideas so you can make a comfortable tank that fits and flatters.
I wrote these to be clear and friendly: follow along, try on as you go, and adapt any detail to your personal taste.
Before you start — yarn, tools, measurements & planning
Yarn & hook recommendations
- Cotton / cotton blends (sport, DK, or light worsted) — best for tanks: breathable, holds stitch definition, washable.
- Bamboo / rayon blends — soft with great drape; choose for flowier silhouettes.
- Linen blends — crisp and cool; they soften with wear.
- Avoid heavy wool for warm-weather tanks.
- Hooks: 3.0–4.5 mm are common (choose smaller for denser fabric, larger for lacy/open styles). Always swatch.
Notions
- Tapestry needle, stitch markers, measuring tape, scissors, safety pins or removable elastic (for try-on adjustments), optional sewing machine for lining/edging.
Measurements to take
Take these over the garments you plan to wear:
- Bust (fullest point)
- High bust (just under arms across upper chest)
- Underbust (if you want band and empire fits)
- Waist (for cropped tanks)
- Desired top length (from shoulder or from high bust for empire-style)
- Shoulder width and armhole depth preference (measure from shoulder to underarm)
Decide whether the tank sits at natural waist, hip, or is cropped.
Ease & fit guide
- Fitted tank (close to body): −½″ to 0″ ease at bust.
- Semi-fitted: +1″–2″ ease at bust.
- Relaxed / oversized: +3″–6″ ease at bust.
Gauge math (digit-by-digit)
Always swatch a 4″ (10 cm) square in the stitch you’ll use — blocked the way you plan to finish the garment.
Example: swatch = 5 stitches = 1 inch in the stitch pattern. Desired finished bust circumference = 36″.
- stitches per inch = 5
- desired circumference = 36
- multiply: 5 × 36 = 180 stitches.
If your pattern requires a multiple (e.g., multiple of 4), round to nearest multiple: 180 ÷ 4 = 45 (no remainder) → 180 stitches.
For top-down or bottom-up constructions use this calculation to plan starting chains or pick-up counts.
Construction choices (which pattern uses what)
- Worked flat (back + front panels, then seamed) — easiest and most controllable for fit.
- Worked in the round (top-down or bottom-up) — seamless look, ideal for circular yokes or minimal seams.
- Shaping: darts, decreases, increases, short rows, side shaping, or seams create contour at bust and waist.
- Edging: a firm single-crochet band or ribbed band at neck/armholes helps stability.
Safety & care
- Use cotton for easy care: most tanks can be machine washed gentle (check yarn label).
- If you add beads or hardware, secure them well and note washing/care instructions.
Stitch abbreviations (US)
- ch = chain
- sc = single crochet
- hdc = half double crochet
- dc = double crochet
- tr = treble crochet
- sl st = slip stitch
- sk = skip
- st(s) = stitch(es)
- inc = increase (2 sc in same st)
- dec = decrease (sc2tog)
- sk = skip
- BLO / FLO = back/front loop only
1. Crochet Mesh Tank Top Pattern
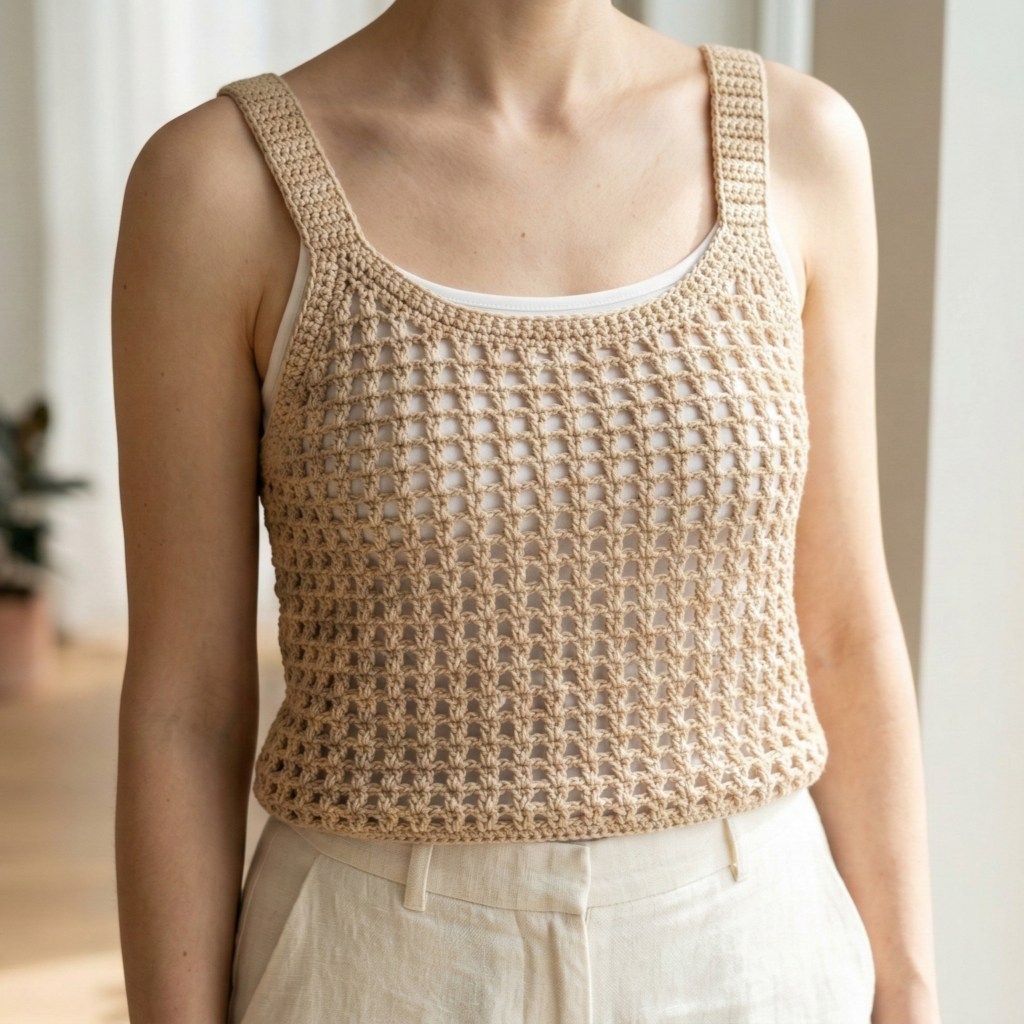
Light, breezy, and perfect for beach layers or warm days. This pattern uses a simple mesh (v-stitch) fabric that’s fast and highly adjustable.
Skill level: confident beginner
Suggested yarn & hook: DK cotton or cotton/bamboo, 3.5–4.5 mm hook
Sample finished size: Semi-fitted, bust 36″, length 21″ (adjustable)
Ease: +2″ ease used in sample
Materials (sample)
- DK cotton: ~500–650 yd (depends on length and size)
- 3.5–4.0 mm hook (choose based on drape wanted)
- Tapestry needle, stitch markers
Concept & construction
Worked flat in two panels (front & back) with mesh v-stitch (dc, ch1, dc) rows; shoulder seams or straps joined; edges finished with firm sc band. Option to work in the round as a tube and split for armholes.
Step-by-step (make front and back panels)
Gauge & foundation
- Make a 4″ swatch in mesh stitch with chosen yarn & hook. Count stitches per inch horizontally. Compute total stitches for bust using gauge math. Example: 5 spi × 38″ desired bust (including ease) = 190 sts. For two panels, each panel half that width (95 sts). If your stitch multiple is a multiple of 2 (v-stitch centers), round to nearest even number.
Panel pattern
- Chain foundation: ch (stitches for half bust) + 3 (for turning ch). Example ch 95 + 3 = 98 ch.
- Row 1 (foundation): dc in 4th ch from hook (counts as first dc), ch1, sk 1 ch, dc in next ch across. Turn.
- This row builds a row of dc anchors.
- Row 2 (mesh row): ch3 (counts as dc), sk next ch-1 sp, (dc, ch1, dc) in next ch-1 sp across, ending with dc in top of turning ch. Turn.
- Repeat Row 2 until panel measures half the desired length (e.g., if finished length 21″, make front panel 21″; you can add shaping later for bust). Keep both panels identical.
Bust shaping (optional)
- For medium contouring: work a few short decreases along side seams or central bust darts. Method (optional): when you reach bust point, decrease 1 v-stitch every 6–8 rows over a 4–5″ vertical span to shape. Try on and adjust.
Armhole & neck shaping
- When panels reach desired length, mark armholes (measure armhole depth from underarm down; typical depth 7–9″ for adult). On top rows, bind off a few stitches at each underarm edge to create armhole curves, e.g., sl st next 4 sts, then continue mesh. Work remaining shoulder straps narrower (dec stitches on top rows) or keep wide straps. Repeat for back.
Join and finish
- With right sides together, seam shoulders using mattress stitch or sc seam for visible top. Seam sides from bottom up to armhole height. For more stretch, use mattress stitch and leave small side slits on hems if desired.
- Edging: sc evenly around neck and armholes with a slightly smaller hook for a tidy finish — 2 rounds sc, and final round reverse sc (crab stitch) for polished edge.
Variations & styling
- Make it cropped by shortening length (e.g., 16″).
- Add a lining or built-in shelf bra if you want more support.
- Use thicker cotton and a smaller hook for a denser mesh that is less sheer.
2. Crochet Minimal Tank Top Pattern
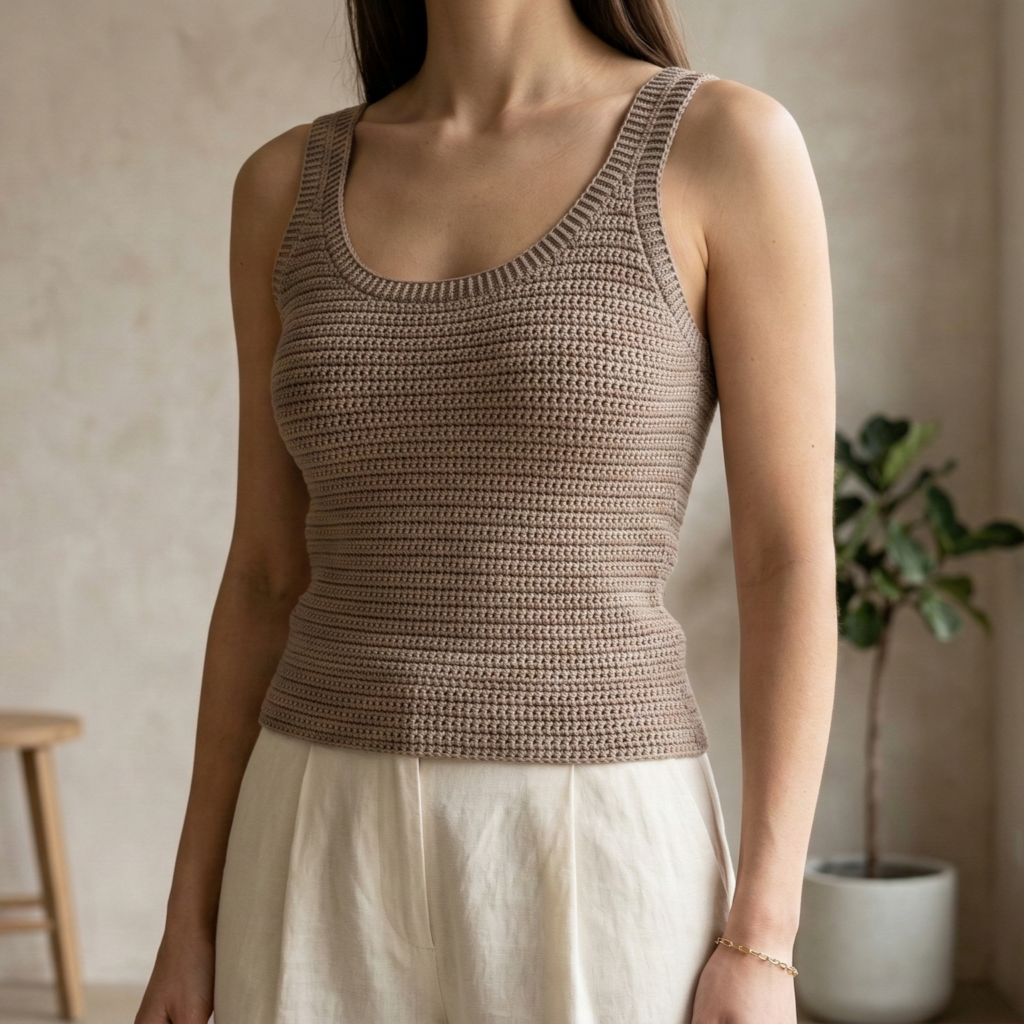
Clean lines, close-to-body silhouette, and minimalist appeal. Ideal as a closet basic to wear alone or layered.
Skill level: confident beginner → intermediate (fitting needed)
Suggested yarn & hook: sport- or DK-weight cotton; 3.0–3.75 mm hook for a firm fabric
Sample finished size: Fitted, bust 34–36″ (choose pattern gauge for correct fit)
Ease: −½″ to +0″ (close fit)
Materials
- Sport/DK cotton ~450–600 yd (varies by size/length)
- 3.25–3.75 mm hook, tapestry needle, stitch markers, measuring tape
Concept & construction
Worked in the round bottom-up with simple dc ribs or hdc for close fabric; shape for waist and bust with decreases/increases and optional bust darts for a tailored fit. Neck and armholes finished with a ribbed BLO round for stretch.
Step-by-step (bottom-up, worked in the round)
Gauge & foundation
- Swatch in chosen stitch (hdc in rounds). Determine sts per inch and compute circumference for waist/hip/bust as needed. Decide where you want decreases for waist shaping.
Foundation round / base
- Chain foundation for waist circumference (or use a foundation hdc round) and join into a loop. Example: for a 34″ bust and fitted ease of −½″ target is 33.5″; with gauge 5 spi → 167.5 → round to 168 sts. Chain 168 and join.
- Rounds 1–8 (hip / lower band): hdc in each stitch around (hdc gives firm, slightly shorter fabric), keeping stitch count even. Work 8–10 rounds to form lower band.
Waist shaping (optional)
- For slight waist shaping, increase/decrease evenly around to shape: for small waist suppression, dec 4–6 sts evenly at natural waist height or do 4 decreases repeated every 6–8 rounds for a gentle contour.
Bust shaping
- As you approach underbust, measure around; if you need bust shaping, add 1–2 front darts: mark front center and work short rows or small inc/dec shaping to accommodate bust. Example short-row dart: for 6 rows, stop 6 sts before end and wrap, come back, then later pick up wraps.
Armhole & neck split
- When body reaches desired underarm depth, divide for armholes: fold and work back-and-forth for each panel (front/back) or create armhole openings by binding off stitches for each armhole and working back and forth. Example: bind off 6–8 sts at each side to create armholes, then join the body again for yoke or work shoulder shaping flat.
Straps & neck
- For neckline, shape shallow scoop or round by decreasing evenly across front over a few rows. Finish with 2–3 rounds of BLO ribbing (BLO hdc) around neckline and armholes for stretch and neat finish. Optionally add a small ribbed strap: pick up stitches and work 6–10 rows of BLO hdc to create thin straps.
Finishing
- Block gently to settle fabric. Weave in ends. For extra polish add a narrow fabric bias tape lining in neckline.
Fitting tips
- For a fitted style always try on before final 2–3 inches; fix small fit adjustments by adding or removing small numbers of sts evenly.
- If you want more support add a band of elastic or attach a shelf bra inside.
3. Crochet Laced Manley Tank Top Pattern
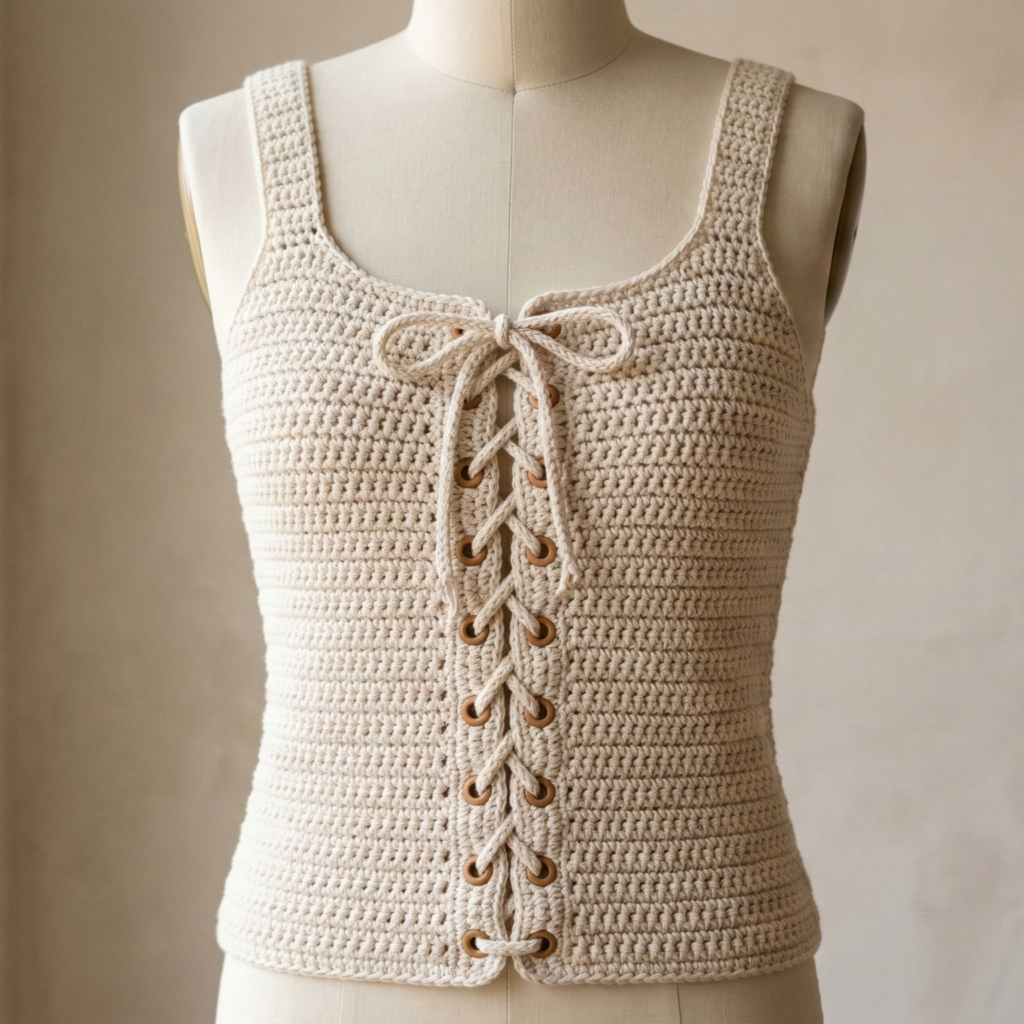
A modern tank with lace-up front detail (the “Manley” laced front) — casual edge with adjustable neckline.
Skill level: intermediate (lacing + shaping)
Suggested yarn & hook: DK cotton or blend; 3.5–4.0 mm hook
Sample finished size: Semi-fitted; bust 36″; length 22″ from shoulder
Ease: +1–2″
Materials
- DK cotton ~500–700 yd
- 3.5–4.0 mm hook
- Small wooden or metal eyelets (optional) or crochet eyelet band and cord
- Tapestry needle, stitch markers
Concept & construction
Worked flat as front and back panels. The front includes a central vertical laced placket with eyelets; back is plain. Panels joined at shoulders and sides. The lacing allows neckline width to be adjusted.
Step-by-step
Panels
- Calculate panel width: desired bust circumference ÷ 2 + ease. E.g., for 36″ bust and +1″ ease → 37″ ÷ 2 = 18.5″ → each panel should be 18.5″ wide. Use gauge to convert to stitch counts.
- Chain foundation = panel width in sts + turning ch. Work rows of a stable stitch (hdc or sc) for a structured fabric. Example Row 1: hdc across; Row 2+: hdc in each st.
- Work back panel to full length (22″ minus strap / shoulder height). For front panel: work until you reach the point you want the laced placket to start (e.g., 4–6″ below neckline). At that point, leave center opening: work left half, ch a fixed number of stitches to create the placket space, continue with right half, or work entire panel and add separate placket panel later.
Laced placket
- Option A (integrated eyelet row): Work small eyelet rows down the center by making ch-sp gaps: hdc across left half, ch 4, sk 4, hdc next, repeat down center for desired length. Later use a cord threaded through ch-spaces to lace.
- Option B (separate placket): Crochet a narrow 2-3″ strip (sc rows) with evenly spaced slits or buttonholes (ch 2 holes) and seam it onto front center; use metal eyelets for strength.
- Make a cord: cord can be crocheted i-cord (3 rnds of hdc), braided yarn, or a narrow chain with slip stitches. Measure cord length to lace comfortably, plus extra for ties.
Armholes & straps
- Shape armholes by binding off a small number of sts at underarm edges and continuing with a narrow strap top. Straps can be a few inches wide (4–6 hdc rows) and then attached to back panel.
Join & finish
- Sew shoulders with mattress stitch, and seam sides up to armhole height. Add sc band around neckline/armholes for neatness. Thread lace through eyelets and tie a decorative knot or bow.
Variations
- Make the placket longer for a deeper keyhole that laces down toward midriff.
- Use contrasting cord color or add metal tips to cord ends for polish.
4. Crochet Ruffle Strap Tank Top Pattern
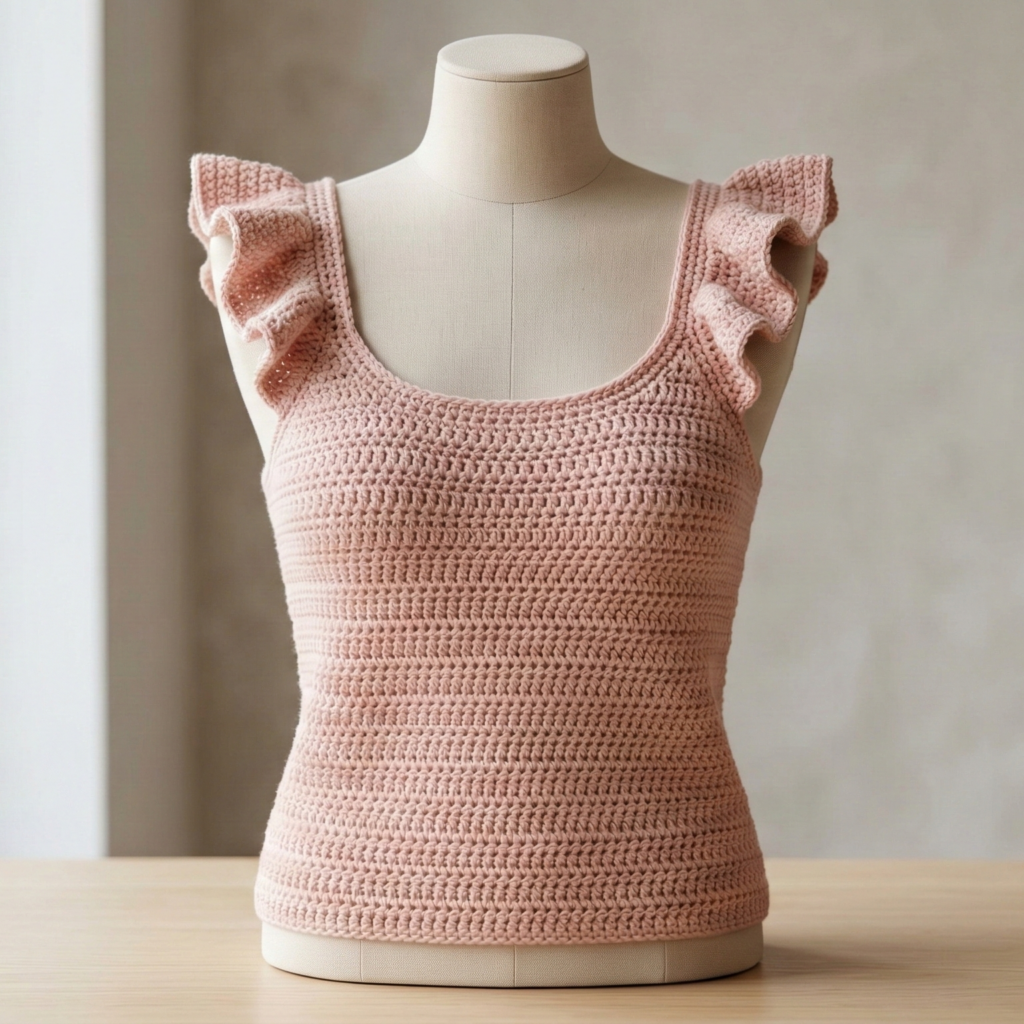
Feminine, playful, and easy to customize: this tank features delicate ruffled straps and a fitted or semi-fitted body.
Skill level: confident beginner
Suggested yarn & hook: DK cotton, 3.5–4.0 mm hook
Sample finished size: Semi-fitted, bust 36″, length 21″
Ease: +1–2″
Materials
- DK cotton ~450–600 yd
- 3.5–4.0 mm hook, tapestry needle, stitch markers
Concept & construction
Worked as two panels with simple body (sc or hdc), straps created with ruffle rows attached at the top. Hem and armholes finished with sc.
Step-by-step
Panels
- Compute stitch count per panel using gauge & bust measurement. Chain foundation for width and work sc or hdc rows until body length = desired length minus strap height (for a 21″ finished top and 2″ straps, make body 19″).
- For a fitted silhouette, work hdc in rows and add gentle waist shaping: decrease 1–2 stitches each side every 6–8 rows from underbust to waist.
Armhole & neckline shaping
- When you reach armhole depth, bind off a few sts at each side and continue on shoulders separately to shape strap anchors. For a scoop or square neckfront, shape by decreasing center stitches over 4–6 rows.
Ruffle straps (make two)
- Straps are crocheted separately: foundation chain length equal to desired strap length (e.g., 20″ long at gauge). Work rows of shell stitch for ruffle:
- Row 1: sc across strap width (e.g., 6–8 sts). Work 6 rows for sturdy strap.
- Row 2 (ruffle): skip 1 st, 5 dc in next st, skip 1 st, sc next across (creates ruffles along one edge).
- Repeat row 2 on both edges if you want double ruffles.
- Attach strap ends to panel shoulders with strong sewing. Optionally add a small gathered elastic under the ruffle at shoulder for comfort.
Finishing
- Sc around neckline and armholes for stability. Block if desired.
Styling & variations
- Make straps detachable with buttons into small loops for machine washing.
- Use two thinner ruffle straps per side for a daintier look.
5. Crochet Sunny Side Up Tank Top Pattern
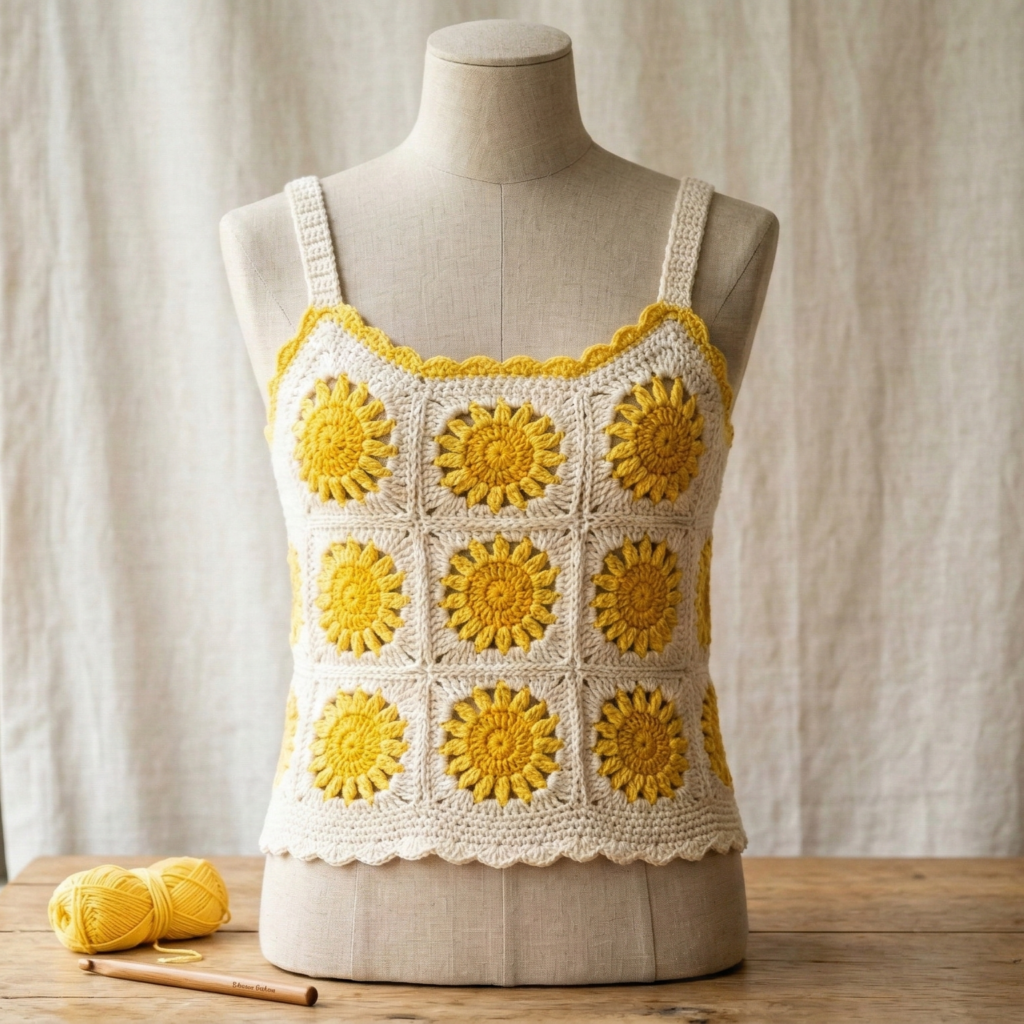
A cheerful, motif-based tank with a sunny circular motif (sunburst) inset on the front or repeated across the fabric — fun and graphic.
Skill level: intermediate (motif assembly)
Suggested yarn & hook: DK cotton (two contrasting colors), 3.5–4.0 mm hook
Sample finished size: Semi-fitted; bust 36″; length 21″
Ease: +1–2″
Materials
- DK cotton main color ~400–600 yd, accent color for suns ~150–250 yd
- 3.5–4.0 mm hook, tapestry needle, stitch markers
Concept & construction
Crochet sunburst granny motifs (sun centers with radiating petals) and join them into a front panel; back panel worked in solid stitch (or matching motif). Join and finish into a tank.
Step-by-step
Make sunburst motifs (approx. 5–7 motifs across front)
- MR, ch1. R1: 8 sc in MR — join. (8)
- R2: ch3, 3 dc in next st, ch3, sl st in next st repeat to make petal loops — use accent color.
- R3: In each petal loop work (sc, hdc, 5 dc, hdc, sc) to make sun rays. Change to main color and sc around to square up motif: sc across petal bases and place ch-2 corner spaces to create square join. Make enough motifs to cover desired front panel width and height. For example, a 15″ wide front could use 5 motifs each ~3″–3.5″.
- Block motifs to identical sizes.
Join motifs into panel
- Join motifs using join-as-you-go or whipstitch them into rows; make front panel to target width and height for your bust/length. For a tidy inside finish, we recommend whipstitch with matching yarn and weave tails in.
Back panel
- Work a solid back panel in sc or hdc to same dimensions as motif panel. Optionally add a single central motif on back for balance.
Assembly & finishing
- Seam sides and shoulders with mattress stitch. Add sc edging around armholes and neckline. Add straps: simple narrow bands in main color, or connect top motif corners into strap shape.
Variations & styling
- Scatter smaller sun motifs around a solid front for a playful pattern.
- Make motif colors pastel for soft summer tank or bold yellow & navy for graphic contrast.
Finishing touches for every tank
- Blocking & shaping: wet-block to smooth and set stitch patterns; when using natural fibers, blocking can change drape and size slightly — measure after blocking.
- Edging: a narrow 2–3-round sc band on neck and armholes prevents stretching and gives a polished finish. For ribbed look work BLO hdc rounds.
- Seams: mattress stitch for nearly invisible seams; single crochet seam for a boxed/crocheted edge look.
- Lining & support: for sheer/open stitches, consider a lightweight inner layer or a sewn-in shelf bra for support.
- Care: follow yarn label. Most cotton tanks can be machine washed gentle; reshape and dry flat or tumble low per yarn instructions.
Styling & outfit ideas
- Mesh Tank: layer over a colorful camisole or swimsuit for beach-to-street looks.
- Minimal Tank: tuck into high-waisted jeans or skirt for a clean, versatile outfit.
- Laced Manley Tank: lace it up slightly for evening or tie loosely for daytime. Pair with linen trousers for effortless chic.
- Ruffle Strap Tank: perfect with a floaty midi skirt or denim shorts.
- Sunny Side Up Tank: make vivid color combos and wear with neutral bottoms to let the motif pop.
conclusion
Crochet tank tops are wonderfully adaptable — each of the five patterns here offers a distinct look and construction approach so you can pick what fits your style: airy mesh for summer heat, minimalist basics for everyday layering, laced fronts for adjustable detail, ruffle straps for feminine flair, or motif-driven tanks for playful, sunny energy.