Crochet shorts have come a long way from cover-ups — they’re now fashion-forward, comfortable, and an excellent way to show off stitchwork in a wearable piece. Below you’ll find a full introduction that covers yarn, fit, waistband choices and gauge math, followed by five complete crochet short patterns:
Each pattern includes materials, recommended gauge, step-by-step construction, optional variations, and finishing tips. No assumptions — you’ll be able to make and adapt each design to your measurements.
Quick primer — yarn, hooks, sizing, waistbands & gauge math
Yarn & hooks (how to choose)
- Cotton or cotton blends (DK or worsted/light worsted) — best for summer: breathable and holds shape.
- Bamboo blends — lovely drape for flowy shorts.
- Acrylic blends — good for practice pairs but may be less breathable.
- Hook sizes: 3.5 mm — 5.5 mm depending on yarn and desired fabric density. Use a slightly smaller hook for fitted garments.
Waistband options
- Elastic casing — easiest and most forgiving (recommended for beginners).
- Ribbed crochet waistband — comfortable, elastic without hardware.
- Drawstring — casual and fully adjustable.
- Fitted waistband or zipper — for tailored, secure fit (requires exact measurement).
Take accurate measurements
Measure with the garment (or underwear) you’ll wear with the shorts:
- Waist circumference (where the waistband sits)
- High hip (about 3–4″ below waist; important for fitting hip/top of short)
- Full hip (widest point)
- Desired length from waistband down
Decide on ease (how roomy you want them): fitted (0 to −½” ease), comfortable (+1–2″), loose/wide (+3–6″+).
Gauge math — example (digit-by-digit)
Always make a 4″ (10 cm) swatch in your planned stitch and blocked the way you will finish.
Example: target waist 30″, swatch shows 4.5 stitches = 1 inch.
- stitches per inch = 4.5
- desired circumference = 30 in
- multiply: 4.5 × 30 = 135 stitches
So you need ~135 stitches around the waistband (adjust to nearest stitch-pattern multiple as required).
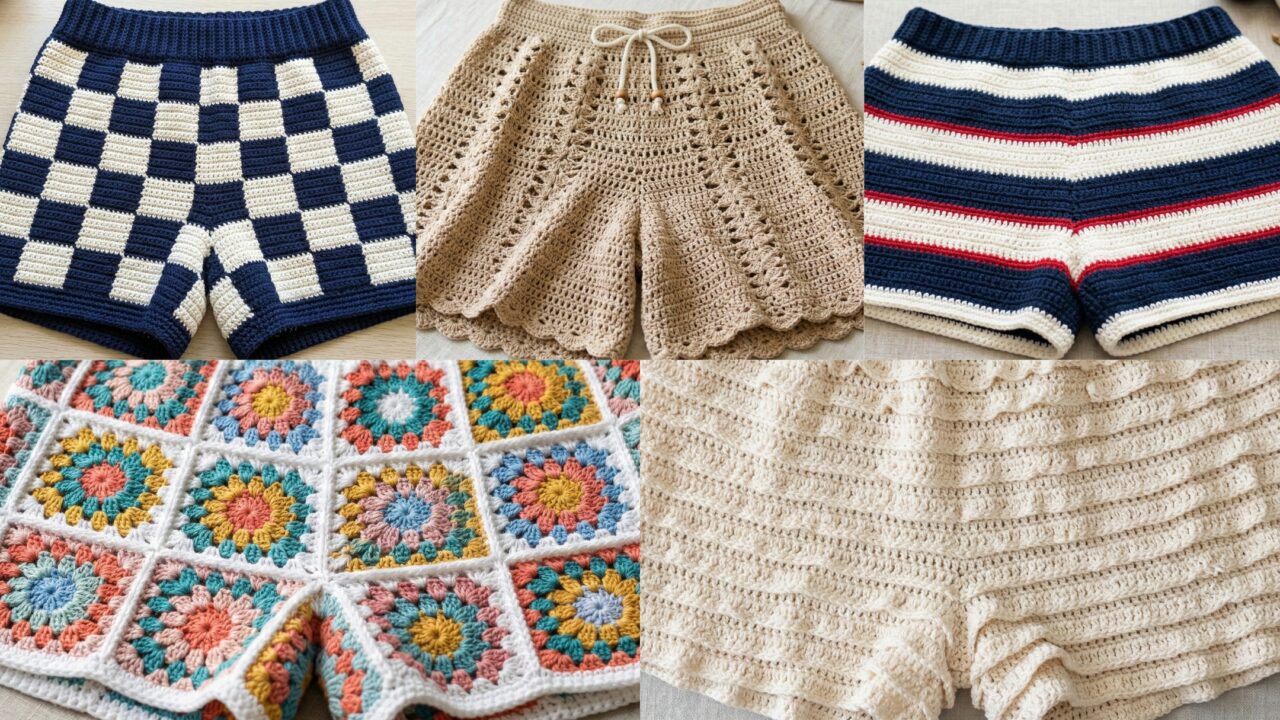
1. Crochet Wide Leg Shorts Pattern
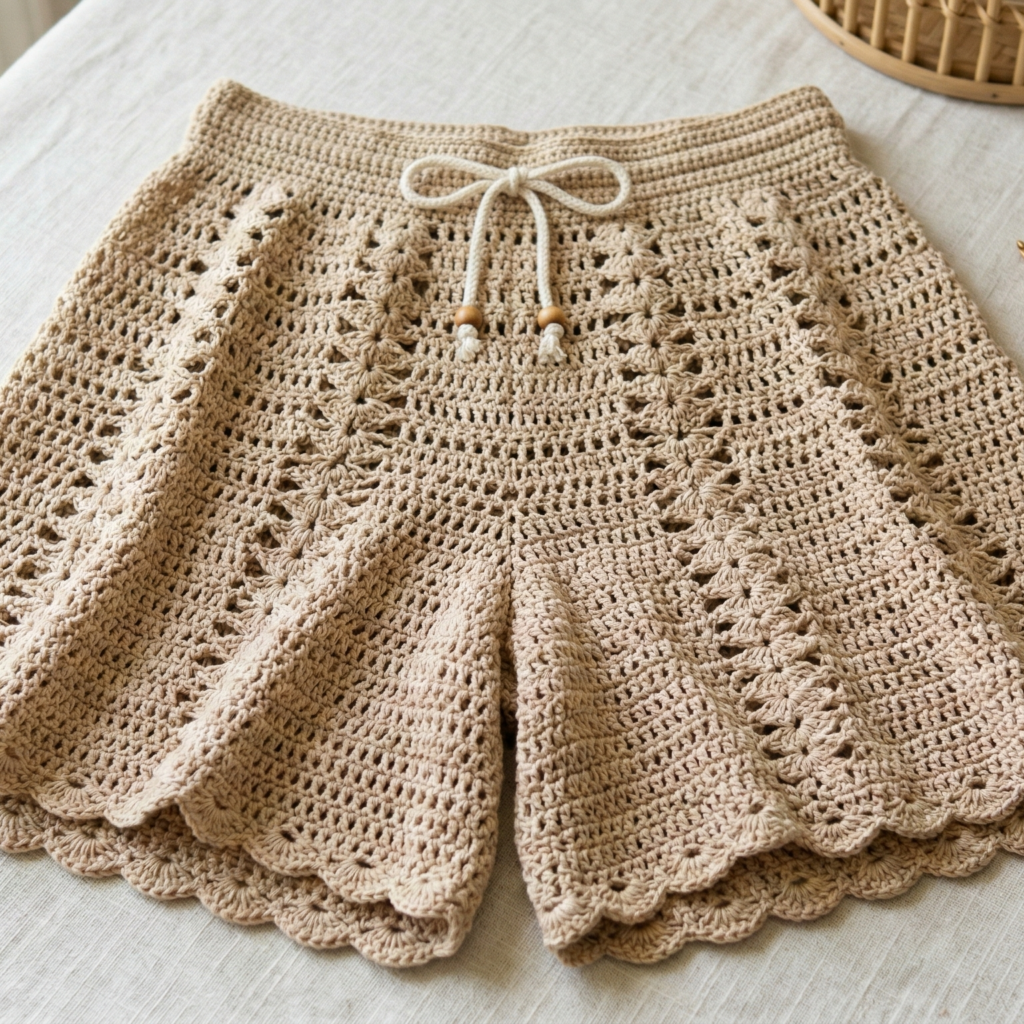
Flowy, skirt-like shorts — great as a coverup or daily wear. Worked top-down or bottom-up; here we use top-down with a comfortable elastic casing.
Skill level: confident beginner
Finished sample: waist 30″ (S/M), high hip 36″, length 16″ (adjustable)
Yarn & tools: DK cotton ~900–1100 yds (size depends on leg width/length), hooks 3.5 mm (band) & 4.5 mm (body), 1″ elastic, tapestry needle, stitch markers
Construction overview
- Elastic casing (or ribbed waistband) worked in the round.
- Short yoke for stability (hdc rounds).
- Split into two leg openings (work two panels: front & back joined at crotch), OR work full tube and later cut/shape for legs (seam method).
- Wide leg panels worked downward in an airy lace or open stitch pattern.
- Hem and optional lining.
Step-by-step (Top-Down, easiest split-into-leg method)
A — Waistband (elastic casing)
- Make a gauge swatch in hdc (as planned). Compute stitches for your waist using the gauge math example. Chain foundation = stitches needed (or foundation hdc). Join to work in the round without twisting.
- Round 1–4: hdc in every st (creates a firm band). Use smaller hook for band if you prefer extra firmness.
- Fold band inward and sc through both layers for 1 round to make a casing; leave a 2″ opening to insert elastic later. Thread elastic, sew ends securely, close casing.
B — Yoke to high hip
4. From the casing edge, work 4–6 rounds of hdc or sc to form a stable yoke (this prevents casing from rolling and distributes tension).
C — Mark leg split
5. Decide leg width and front/back panel stitch counts. Example split calculation:
- Total stitches (waist) = W.
- Leg opening allowance (2 × 1.5″ seam allowance) = subtract ~3-4″ in stitches (convert using spi).
- Distribute remaining stitches: Front panel = ½ (W − seam stitches) ; Back panel = same.
Practically: mark the first X stitches for front panel, next Y for right leg, next X for back panel, next Y for left leg. Use stitch markers to mark boundaries.
D — Work panels separately (front and back)
6. Working in rounds for each panel: join yarn at start of front panel marker and work in rounds down to desired length for front leg opening (if you want front shorter than back you can shape). Do same for back panel. Use airy stitch (v-stitch, shell rows, or dc mesh) for flow. Keep stitch count consistent across rounds so edges align when joined.
E — Crotch join (sew panels)
7. With panels completed, align inner edges and sew a neat crotch seam using mattress stitch or single crochet seam to secure. If you left a small gusset for comfort, attach it now: make a short triangular gusset piece (sc in rows) and sew into the inner seam to increase mobility.
F — Hem & finishing
8. Hem each leg with 2–3 rounds: sc round for structure, then a decorative shell/picot round if you like. Block to open lace.
G — Optional lining
9. For modesty with open stitches, sew a lightweight slip short inside using soft cotton or nylon.
Styling & variations
- Use a lacy v-stitch for maximal airflow.
- Make shorter length for casual summer shorts; lengthen for culotte style.
2. Crochet Checkered Shorts Pattern
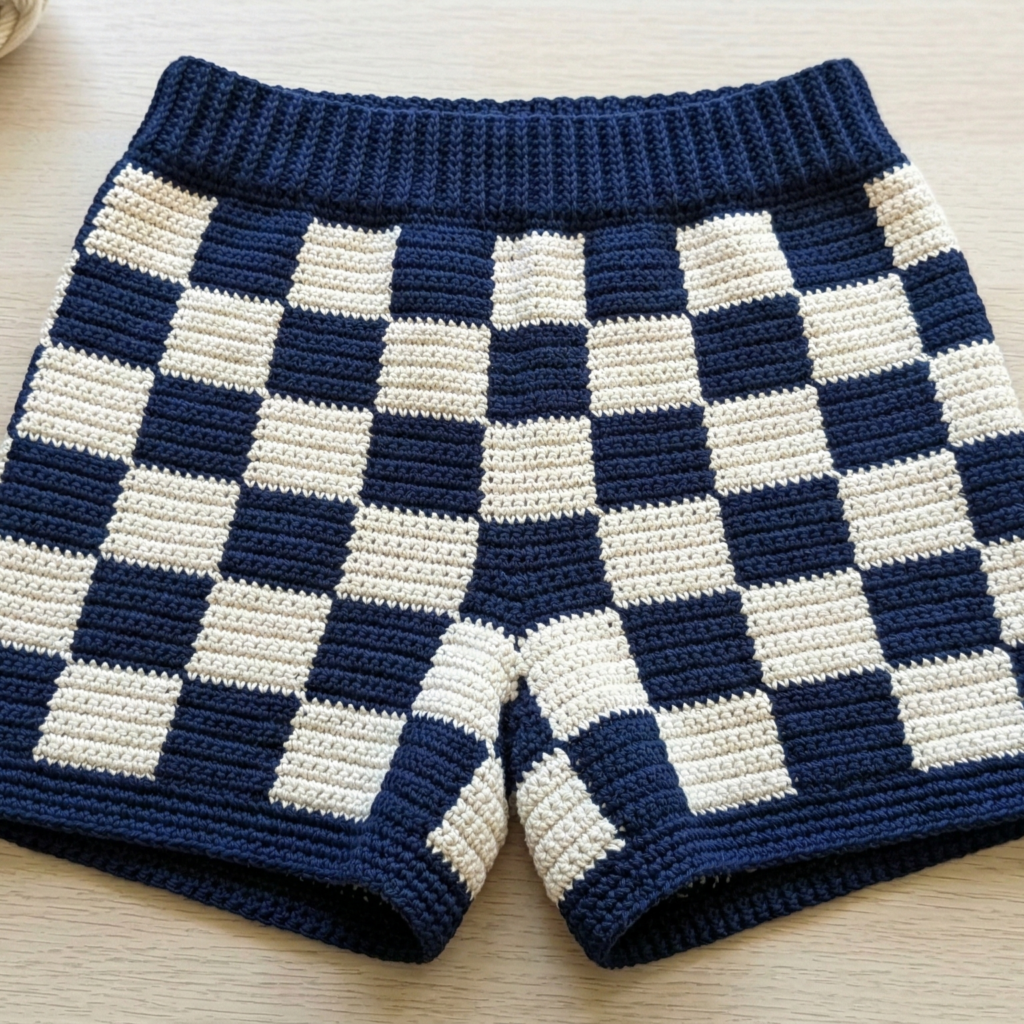
Crisp, modern check pattern using two colors; worked in dense sc for opacity.
Skill level: intermediate (colorwork)
Finished sample: waist 30″, hip 36″, length 14″
Yarn & tools: DK cotton two colors ~800–1000 yds total, 4.0 mm hook, elastic or ribbed band
Construction overview
Worked top-down in the round with color changes. You’ll create the waistband then carry out sc rounds with color blocks (using intarsia-like small bobbins or drop-and-pick color method). Split for legs and work dense legs for modesty.
Step-by-step
A — Waistband (ribbed or elastic casing)
- Make a ribbed band: foundation chain for waist as before. Work BLO hdc rows or front-post/back-post rib for 6–8 rounds to create a stretchy band. Join to form a tube and fold to make a casing OR leave as ribbed pull-on.
B — Start body
2. Work 2–4 rounds sc in base color (gives stability). Decide block size (e.g., 4 st columns × 4 rows per block). Your gauge will determine #blocks across.
C — Check pattern (color changes)
3. Use small bobbins for each color block or drop and pick yarn at block boundaries:
- Row approach: each round, change color every N stitches to create the block columns. Repeat for the next (N) rounds to build square blocks vertically.
- Keep floats short on back by carrying unused color or cutting and weaving ends (bobbins): for small market pieces bobbins are fine; for garments, carry or use intarsia-style small sections to avoid long floats.
D — Split into legs
4. After reaching high hip/where you want leg split, mark openings and divide st count into front/back panels as in Wide-Leg pattern. Work panels down to length in sc or hdc to keep fabric opaque.
E — Hem & finishing
5. Work 2 rounds sc for hem. Add elastic or drawstring if desired.
Tips & variations
- Make larger blocks for a bold look; small blocks for retro vibes.
- Switch to stripes for simpler color maintenance.
3. Crochet Horizontal Stripes Shorts Pattern
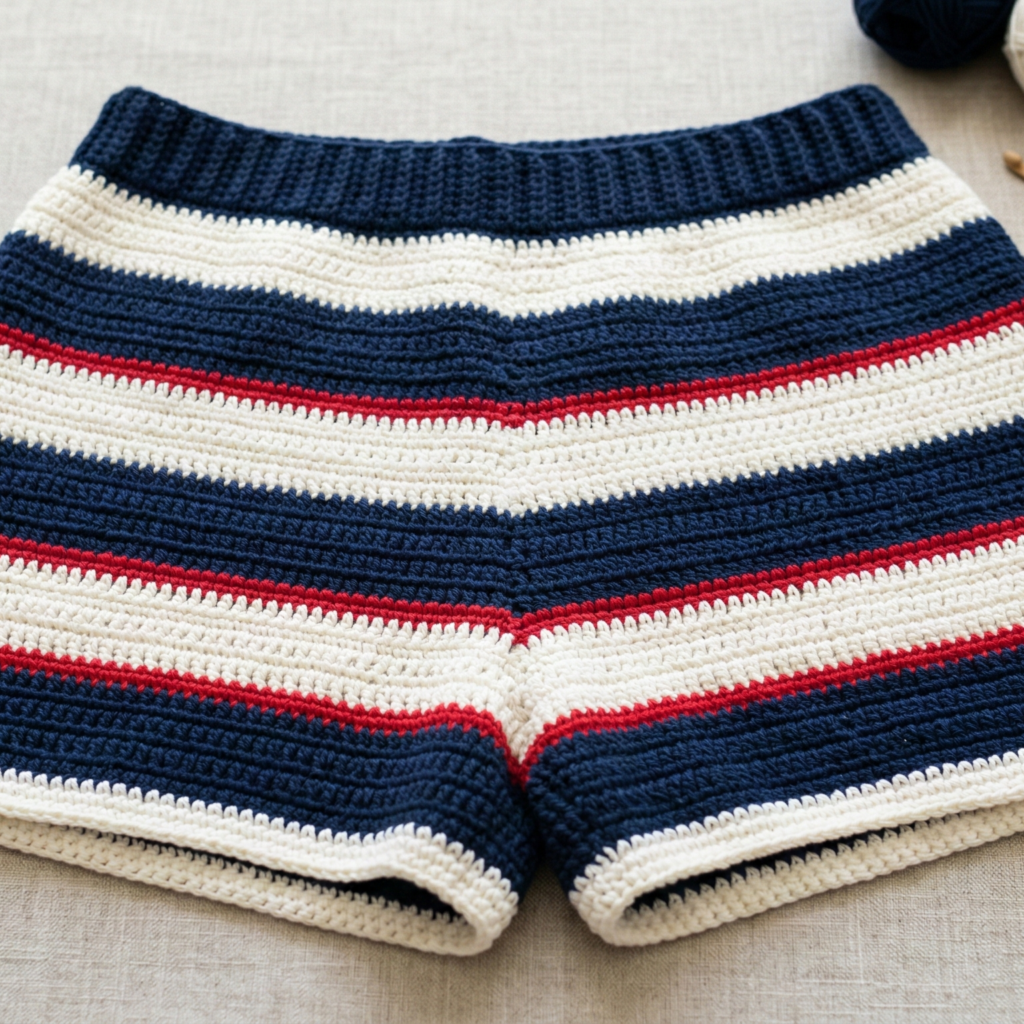
Timeless horizontal stripes — easy to make, easy to customize length and stripe size.
Skill level: confident beginner
Finished sample: waist 30″, hip 36″, length 12–14″
Yarn & tools: DK cotton 2–3 colors ~700–900 yds, hooks 3.5–4.5 mm, elastic or ribbed band
Construction overview
Top-down construction: waistband → yoke → split for legs → work leg panels in sc/dc with stripes.
Step-by-step
A — Waistband
- Work waistband as elastic casing or ribbed band (as in prior patterns).
B — Yoke & hip shaping
2. Work a stable yoke 4–6 rounds hdc. Optionally add slight increases in two opposite seams to shape for hips.
C — Split into legs
3. Mark panels and separate for two legs. Work each leg in the round (or flat and seam) using the stripe sequence of your choice: e.g., 4 rounds color A, 2 rounds color B, repeat.
D — Stitch choices
- For a close-fitting knit look, try hdc or alternating hdc/sc rounds.
- For slightly breezy texture, use dc/shell stripes for accents but be cautious with openness — consider lining.
E — Hem & finishing
4. Finish hems with 2 rounds sc and a narrow picot or crab stitch for a polished edge. Add drawstring or elastic depending on waistband choice.
Styling & variations
- Vertical stripe illusion: use wider leg panels and thinner horizontal stripes near hem.
- Ombre effect: change color gradually with decreasing rows per color.
4. Crochet Summer Granny Square Shorts Pattern
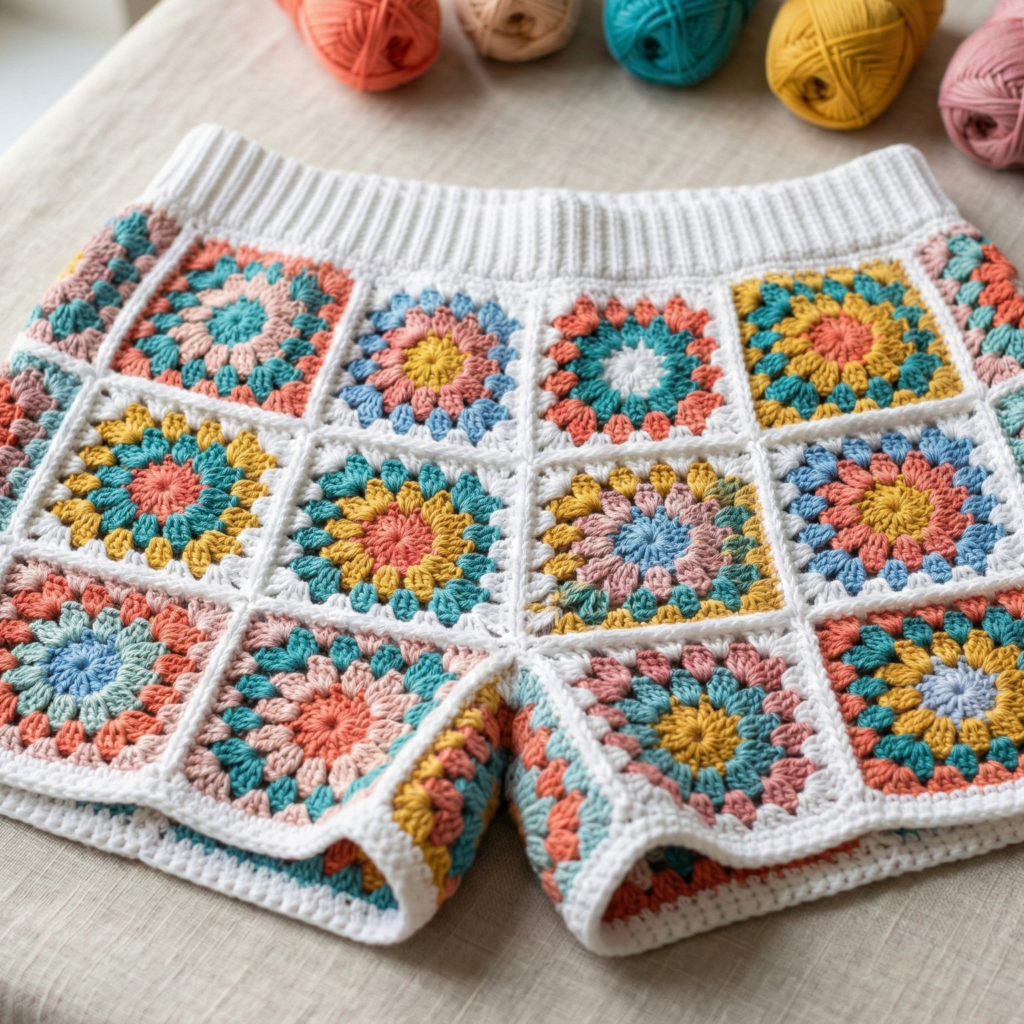
Playful granny-square shorts — small granny motifs joined into shorts panels. Great for scrap-busting and a boho look.
Skill level: intermediate (multiple motifs & joining)
Finished sample: 3×3 granny panels per side for small/medium (adjust squares for size)
Yarn & tools: DK cotton scraps or coordinated palette, 4.0 mm hook, fabric lining for modesty, tapestry needle
Construction overview
- Make a set of identical granny squares.
- Join squares into two panels (front/back).
- Add a waistband and crotch seam; finish edges and add lining or slip short for opacity.
Step-by-step
A — Make squares
- Decide square finished size (e.g., 4.5″ square). Make enough to form front and back panels (for example 3 across × 3 down per panel for 9 squares per panel). Keep all squares consistent — block if necessary.
B — Join squares
2. Join-as-you-go or whipstitch squares into rows, then join rows to make rectangular panels (front & back). Use tidy join color or contrasting join for a decorative seam.
C — Add waistband
3. Pick up stitches along top edge of each panel and work a ribbed band or attach a sewn elastic casing. For a neat finish, work 4 rounds of hdc in BLO to create a foldable casing and fold to create a channel.
D — Sew crotch & inseam
4. With right sides together, match front and back panels at side seams and crotch. Leave openings for leg holes based on square layout: you’ll typically seam up the inner legs from hem to crotch leaving the width determined by outer squares. Use strong slip stitch seam or mattress stitch.
E — Lining (recommended)
5. Create a short liner slip (stretch cotton or jersey) seamed to match inside to avoid transparency in lace/holes between squares. Sew liner to waistband or tack in place.
F — Hem & finishing
6. Add a single crochet round around leg openings and waistband fold. Add decorative picot or scallop if desired.
Styling & variations
- Use full-color granny squares for youth and festival-style shorts.
- Make mini-hex or diamond motifs for different geometry.
5. Crochet Bloomer Shorts Pattern
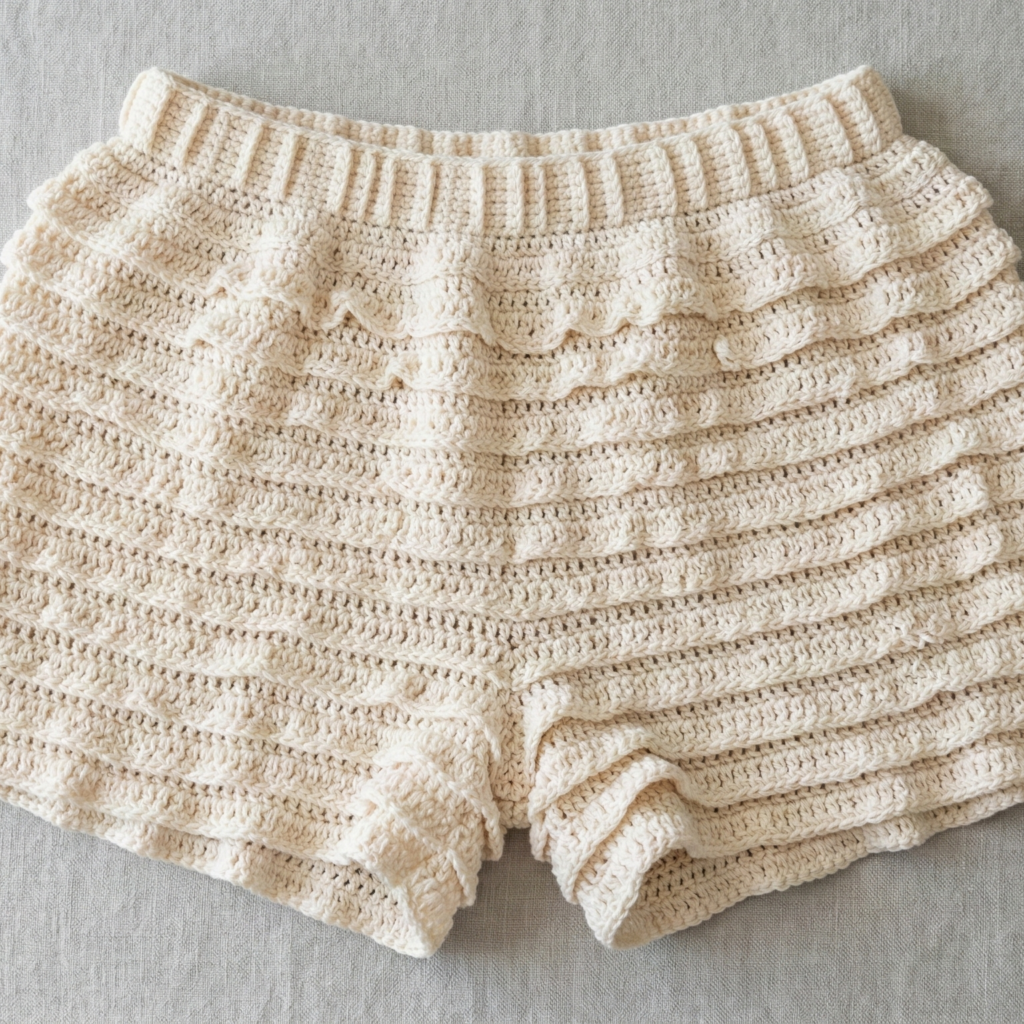
Cute, comfy bloomers with elastic at waist and leg cuffs — perfect for lounging or layered under dresses.
Skill level: confident beginner
Finished sample: waist 30″ with 2″ elastic, leg cuff elastic 12″ unstretched (adjust for thigh)
Yarn & tools: DK cotton or cotton blend ~700–900 yds, hook 3.5–4.5 mm, 1″ elastic for waist, ½” elastic for leg cuffs, tapestry needle
Construction overview
- Work a roomy body from the top down (or bottom up) and create gathered leg cuffs with elastic casings.
- Optionally add a panel/gusset for comfort. Bloomers are forgiving — aim for generous ease.
Step-by-step (Top-down pull-on with elastic waist + cuff casings)
A — Waistband casing
- Compute stitch count for waist. Chain and join as before. Work a tall ribbed band (BLO hdc rib) about 2″ tall. Fold inward and sc to create an elastic casing. Insert 1″ elastic, overlap and stitch.
B — Body (generous ease)
2. From the waistband, work full rounds in dc or hdc for about 6–8″ to create the bloomers’ body. You want a roomy, ballooned shape, so add subtle increases every few rounds: e.g., every 6th round inc 8 stitches evenly around. This flare gives the bloom.
C — Divide for legs
3. Mark front/back and locate leg openings. If you prefer a seam method, fold and seam down the inner leg lines leaving a gusset; alternatively work separate leg tubes joined to a lower panel.
D — Leg cuff casing
4. Work down to where the leg cuff sits (mid-thigh or upper thigh). Work a few rounds of sc to firm the fabric, then make a cuff casing: work 2 rounds of sc in tighter tension, then fold to make a ½” casing and sc around through both layers leaving a small opening. Thread ½” elastic (cut to comfortable thigh circumference minus ~1″ for snugness), sew ends together and close opening.
E — Gusset (optional)
5. For improved mobility and comfort, crochet a small diamond gusset and sew into inner legs before closing seams.
F — Finishing
6. Add a decorative tie to the waistband (with eyelets made by ch-spaces or a small button tab). Weave ends and block lightly.
Variations & styling
- Make bloomers short for under-dresses or longer for sleepy lounge shorts.
- Add lace or picot trim to cuffs for vintage appeal.
Finishing Tips (applies to all shorts)
- Try on as you go. For the yoke/band and hip shaping, try shorts at the high hip before splitting for legs. Adjust counts in real time.
- Check vertical ease. If the shorts feel tight across the crotch when you move, add a 1–2″ gusset.
- Neat elastic casing. Use matching thread and small stitches to avoid gaps where elastic meets fabric.
- Lining & modesty. For open stitch patterns, plan a sewn cotton liner or slip short. You can make a simple liner from lightweight knit fabric with an elastic waist and sew it inside.
- Care. Cotton shorts: machine wash gentle, reshape and dry flat or tumble low depending on yarn label.
Short troubleshooting & common fits fixes
- Too tight at hips: Unpick top few rounds and add increases every X stitches.
- Bagging at back: Add a few decrease rounds at center back of yoke to reduce excess.
- Waist too loose after wearing: Replace elastic with a shorter length or create a tighter rib waistband.
- If fabric is see-through: Use a smaller hook or tighter stitch (sc/hdc), or add lining.
conclusion
There you go — five complete crochet short patterns you can make today: breezy wide-leg shorts, graphic checkered shorts, classic horizontal stripes, boho granny-square shorts, and comfy bloomers. Each pattern is designed to be adapted — change length, add pockets, swap stitches or colors — and includes clear construction techniques for waistbands, leg openings, gussets and seams so your finished shorts fit and flatter.