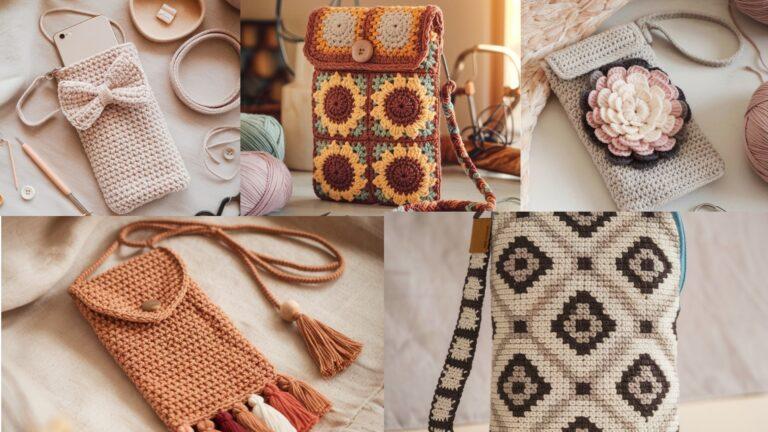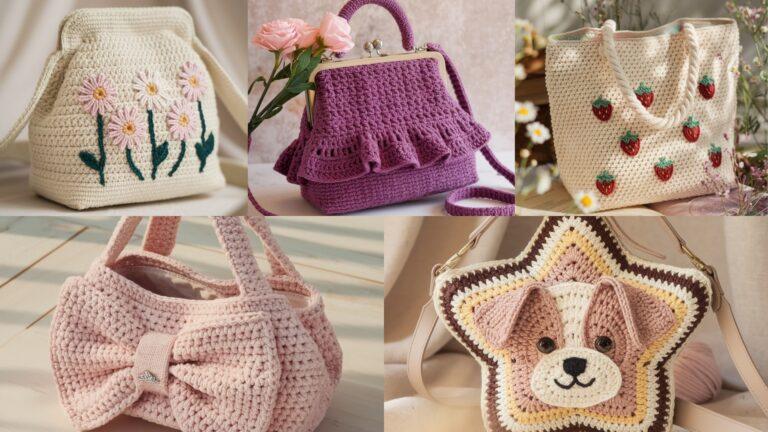
Crochet pencil cases are one of the most practical little projects you can make, especially when back-to-school season rolls around. They are small enough to finish quickly, useful enough to carry every day, and stylish enough to make school supplies feel a little more personal. Whether you are making one for yourself, a student in your life, or a handmade gift, a crochet pencil case is a project that blends creativity with everyday function in the best way.
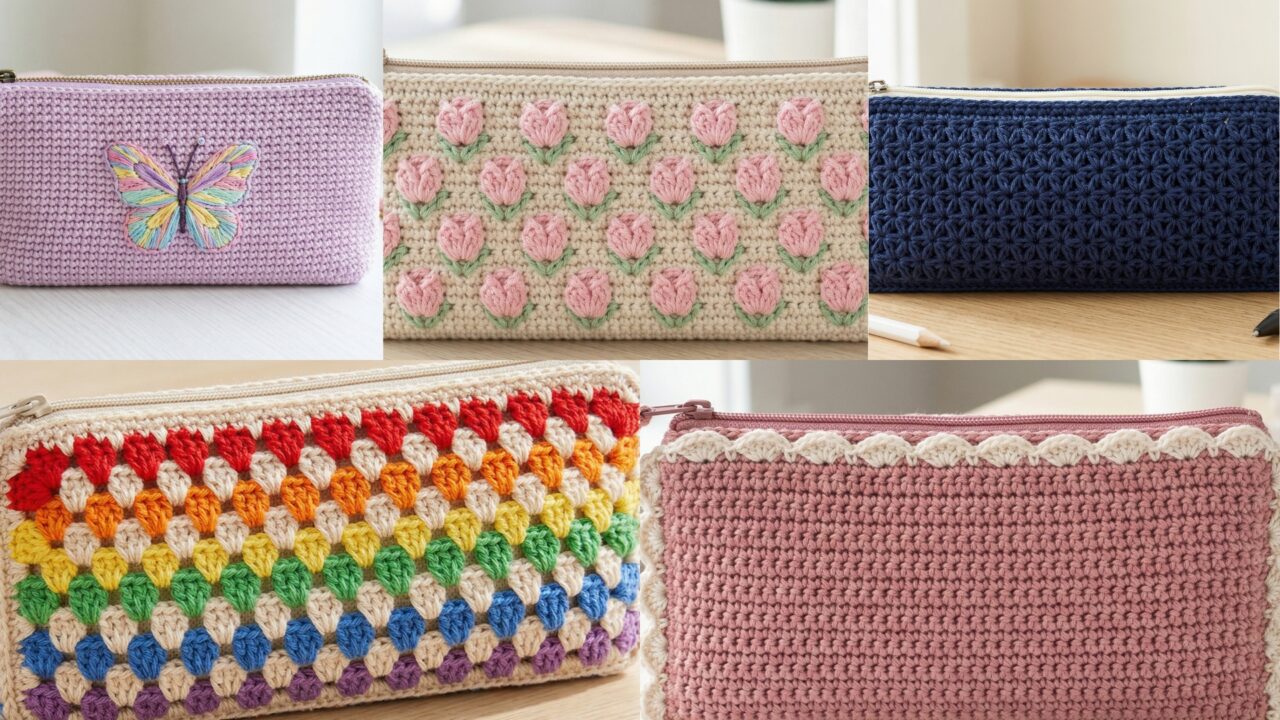
What makes crochet pencil cases so appealing is how much personality you can pack into such a compact item. A simple pencil case can become soft and textured with tulip stitch, neat and elegant with scalloped edges, playful with butterfly embroidery, classic with granny stripes, or bold and modern with star stitch texture. Because these cases are small, they are also a wonderful way to experiment with stitch patterns, color combinations, and closures without committing to a larger project.
In this post, you will find five trendy crochet pencil case ideas with detailed step-by-step guidance, helpful notes, and practical finishing tips. Each design is written to be easy to follow while still giving you enough detail to create something polished, useful, and fun to make. If you are looking for a handmade back-to-school project that is both stylish and functional, these pencil case patterns are a great place to start.
Quick Notes
Project type: Crochet pencil cases and zip pouches
Best for: School supplies, art tools, travel organizers, gifts, and craft fair items
Skill level: Beginner to intermediate, depending on stitch detail and finishing
Hook size: Usually 2.5 mm to 4.0 mm, depending on yarn weight and fabric firmness
Yarn weight: Cotton, cotton blends, DK, or light worsted yarn
Best yarn choice: Cotton yarn for structure, neat edges, and durability
Finished size: Usually 7 to 9 inches long, depending on the pencil case size you want
Time to complete: A few hours to one day depending on detail
Helpful stitches: Chain, slip stitch, single crochet, half double crochet, double crochet, increase, decrease, shell stitch, star stitch, embroidery stitches, zipper attachment, seaming
Common Materials
Most crochet pencil cases use the same basic supplies.
- Cotton yarn in your chosen colors
- Crochet hook suited to the yarn
- Yarn needle
- Scissors
- Measuring tape
- Zipper, button, or drawstring closure
- Stitch markers, if needed
- Optional lining fabric
- Optional embroidery thread or decorative accents
For pencil cases, yarn choice matters because the case needs to hold its shape and protect the contents inside. Cotton yarn is usually the best option because it is durable and gives a clean finish. If you want the case to stand up well in a backpack or desk drawer, a tighter stitch and a little lining can also help.
1. Crochet Tulip Stitch Pencil Case Pattern

A tulip stitch pencil case is soft, pretty, and full of delicate texture. The tulip stitch gives the fabric a floral, slightly raised look that feels handmade and elegant. This is a lovely pattern if you want a pencil case that feels cheerful without being too busy, making it a perfect choice for school or office use.
Quick Notes
Skill level: Beginner to intermediate
Finished size: Medium zip pouch size, around 7 to 9 inches long
Style: Floral, textured, soft, feminine, fresh
Best colors: Pink, lavender, cream, sage, soft blue, peach
Materials
- Cotton yarn
- Crochet hook suited to your yarn
- Yarn needle
- Scissors
- Zipper or closure
- Optional lining fabric
Step-by-Step Guide
Step 1: Decide on the pencil case size
Before you begin, decide how long and wide you want the case to be. A standard pencil case should fit pencils, pens, markers, and maybe a small ruler. Keep the shape simple and rectangular so it is easy to use and easy to sew together later.
A clear size plan makes the project more practical.
Step 2: Crochet the foundation row
Start with a chain long enough to match the pencil case length. Add a little extra room if you want a looser pouch. Work your first row carefully so the base remains neat and even. The foundation will determine how straight the case sits.
A smooth beginning helps the case look polished.
Step 3: Work the tulip stitch pattern
Begin the tulip stitch repeat. This stitch creates a lovely floral texture that resembles small tulip-like shapes or petals across the fabric. Keep your tension even so the stitch pattern looks balanced from row to row.
The tulip texture is what gives the case its charm.
Step 4: Continue until the panel reaches the right height
Keep working rows until the panel is tall enough to fold into a pencil case. Usually, you will need two matching panels or one long panel folded in half. Make sure the texture remains consistent throughout the piece.
A balanced panel makes assembly easier.
Step 5: Make the second panel if needed
If you are making separate front and back pieces, crochet a second panel the same size as the first. Compare them as you go so they match closely. Matching panels help the pencil case close neatly and sit evenly.
Step 6: Attach the zipper
Once the panels are ready, sew or crochet the zipper into the top opening. Take your time with this step because the zipper is one of the most important parts of the case. A clean zipper finish makes the whole piece feel much more professional.
A neat zipper helps the pencil case function well.
Step 7: Seam the sides and finish
Join the sides securely, then weave in all ends carefully. If you want extra durability, line the inside with fabric before finishing. This can help the pencil case hold its shape and protect the stitches from everyday wear.
Helpful Tips
Tulip stitch pencil cases look especially lovely in soft pastel colors. If you want a more sophisticated look, try cream with a subtle floral tone. If you want a brighter back-to-school style, use pink or lavender for a fresh, cheerful finish.
2. Crochet Scallop Edge Pencil Case Pattern
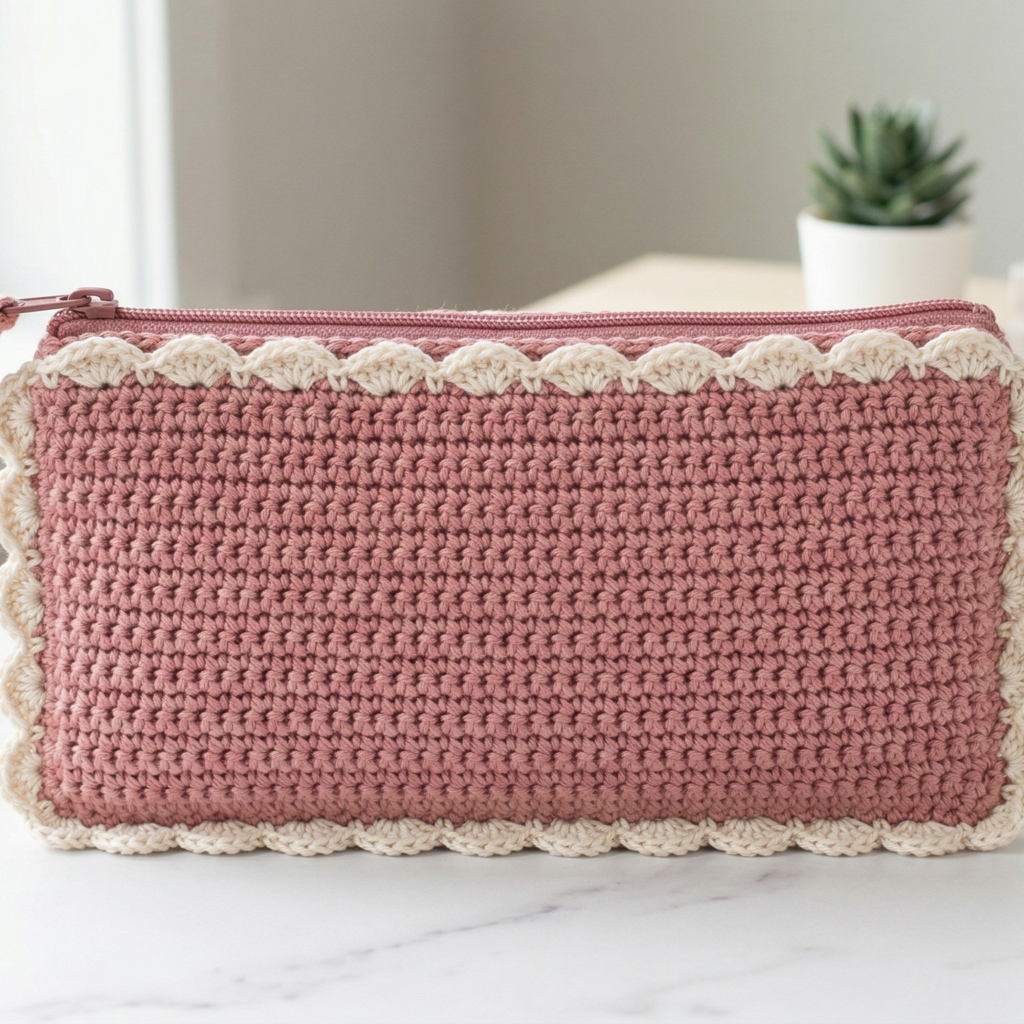
A scallop edge pencil case is neat, elegant, and timeless. The scalloped detail softens the shape and gives the case a polished, decorative finish. This is a great pattern if you want a pencil case that feels pretty but still simple enough for everyday school use.
Quick Notes
Skill level: Beginner
Finished size: Standard rectangular pencil case
Style: Clean, delicate, charming, polished
Best colors: White, cream, blush, pale blue, mint, dusty rose
Materials
- Cotton yarn
- Crochet hook suited to your yarn
- Yarn needle
- Scissors
- Zipper or button closure
- Optional lining
Step-by-Step Guide
Step 1: Plan the case shape
A scallop edge design works best on a simple rectangular pencil case. Keep the shape classic and straight so the scallop border becomes the main feature. Decide whether you want a slim case or a slightly wider pouch.
A simple shape makes the scallops stand out more.
Step 2: Crochet the main body
Work the body of the pencil case in rows or rounds using a clean stitch like single crochet or half double crochet. Keep the fabric firm and even. Since the edge will be decorative, the main body should stay simple and neat.
A smooth base helps the border look more refined.
Step 3: Add the scallop edging
Once the body is complete, work a scallop edge around the top or around the entire case. The scallops can be small and subtle or slightly larger depending on the look you want. Make sure the spacing is even so the border sits neatly.
The scalloped edge is the signature detail of this design.
Step 4: Make the second panel or fold the case
If you are working with two panels, make a matching back piece. If you prefer, you can fold one long piece in half. Match the scalloped edges so the case looks balanced and symmetrical.
Consistency helps the case feel polished.
Step 5: Add the closure
Attach a zipper, button, or flap closure. A zipper is usually best for a school pencil case because it keeps pens and small items secure. Make sure the closure is sewn in straight and evenly.
A good closure makes the case practical every day.
Step 6: Join the sides
Sew the sides together firmly. The seams should be tight enough to hold school supplies but not so tight that the case loses flexibility. Neat seams make the scallop border look even more charming.
Step 7: Finish and shape
Weave in all ends and lightly block the case if needed. This helps the scallops lay nicely and gives the pencil case a cleaner finish. If you want, add a small decorative tag or tassel for extra personality.
Helpful Tips
A scallop edge pencil case looks beautiful in soft neutral or pastel yarns. It is especially lovely if you want a slightly feminine, delicate style without making the project overly complex. A simple color paired with a pretty border can look very elegant.
3. Crochet Butterfly Embroidered Pencil Case Pattern

A butterfly embroidered pencil case is playful, creative, and full of personality. The embroidery adds a lovely handmade touch that feels special and personal. This is a great choice if you want a pencil case that stands out at school or makes a memorable gift.
Quick Notes
Skill level: Beginner to intermediate
Finished size: Medium pencil case with embroidery detail
Style: Whimsical, colorful, artistic, cheerful
Best colors: Lilac, pink, sky blue, cream, mint, yellow, soft neutrals
Materials
- Cotton yarn for the case
- Embroidery thread or thin yarn for the butterfly
- Crochet hook suited to your yarn
- Yarn needle
- Scissors
- Zipper or closure
- Optional lining
Step-by-Step Guide
Step 1: Create the pencil case base
Start by crocheting the main case in a simple stitch. Keep the fabric smooth so the butterfly embroidery will stand out clearly on the front. A plain base works best because it gives the embroidery room to shine.
A simple background makes the butterfly detail pop.
Step 2: Decide on the butterfly placement
Choose where the butterfly will sit on the case. A single butterfly in the center gives a bold look, while a few smaller butterflies scattered across the surface create a softer, dreamy effect. Mark the placement lightly if needed.
Good placement makes the design feel intentional.
Step 3: Embroider the butterfly wings
Use embroidery stitches or simple surface crochet to create the butterfly wings. Keep the shape delicate and symmetrical. You can outline the wings first, then fill them in lightly or leave them airy depending on the style you want.
The butterfly is the focal point, so keep it neat.
Step 4: Add the body and antennae
Use a thin line of embroidery thread to create the butterfly body and tiny antennae. These fine details bring the motif to life without making it too bulky. A simple outline often works beautifully.
Tiny details make a big difference in embroidery.
Step 5: Make the second panel or back
If your pencil case uses two panels, crochet a matching back. If you want to keep the butterfly embroidery on just the front, the back can stay plain. That helps balance the decorative element and keeps the case practical.
Step 6: Add the closure
Sew in a zipper or other closure of your choice. Make sure it is secure and aligned properly because the embroidery will already draw the eye to the front, and a clean closure will complete the look.
Step 7: Join the sides and finish
Sew the sides together firmly, then weave in all ends. If you want extra protection for the embroidery, line the case inside with fabric. This can also help the case hold its shape better.
Helpful Tips
Butterfly embroidery looks especially beautiful in pastel or bright spring colors. If you want a more elegant look, use a soft neutral base with a colorful butterfly. If you want a youthful back-to-school style, mix several bright shades for a playful effect.
4. Crochet Granny Stripes Pencil Case Pattern

A granny stripes pencil case is classic, colorful, and easy to customize. It has that timeless crochet feel that many makers love, while the stripe pattern makes it feel fun and modern. This is a wonderful choice if you want a quick project with lots of color options.
Quick Notes
Skill level: Beginner
Finished size: Standard pouch or zip case
Style: Retro, colorful, casual, handmade
Best colors: Bright rainbow shades, pastels, neutrals, or school-color combinations
Materials
- Cotton yarn in multiple colors
- Crochet hook suited to your yarn
- Yarn needle
- Scissors
- Zipper or closure
- Optional lining
Step-by-Step Guide
Step 1: Choose your stripe sequence
Before starting, decide how you want the stripes to look. You can use bright rainbow stripes, soft pastel stripes, or a more restrained color palette. Planning the sequence helps the case look organized and intentional.
A good stripe plan makes the finished piece more polished.
Step 2: Crochet the first panel
Start with a rectangle that will become the front of the pencil case. Work in granny stitch rows or similar cluster-based stripes. Keep the rows even so the lines look clean and balanced.
The stripe texture gives the case its vintage charm.
Step 3: Continue changing colors
Switch colors according to your plan, keeping the transitions neat and secure. Granny stripes look especially nice when the changes feel deliberate. Use the same sequence for the second panel if you want the case to match.
Color control is important for a clean result.
Step 4: Make the second panel
Crochet the back panel the same size as the front. It can match exactly or use a slightly different stripe arrangement if you want a more playful style. Just make sure the overall size is consistent.
Matching panels help the case close evenly.
Step 5: Attach the closure
Add a zipper or other closure along the top edge. Since granny stripes are often colorful, a simple zipper in a coordinating shade works very well. Make sure the top edge stays flat as you sew it in.
Step 6: Join the sides
Sew the sides together neatly. The granny stripe texture will give the case a soft handmade feel, so the seams should be tidy and secure. A good seam helps the pencil case last longer.
Step 7: Finish neatly
Weave in all ends carefully and line the interior if desired. A fabric lining is especially helpful if you want the pencil case to hold sharp or small items securely.
Helpful Tips
Granny stripes are great for stash busting because you can use leftover yarn in many colors. If you want a more minimalist look, choose two shades from the same color family. If you want a fun back-to-school vibe, try bright stripes or rainbow combinations.
5. Crochet Star Stitch Pencil Case Pattern
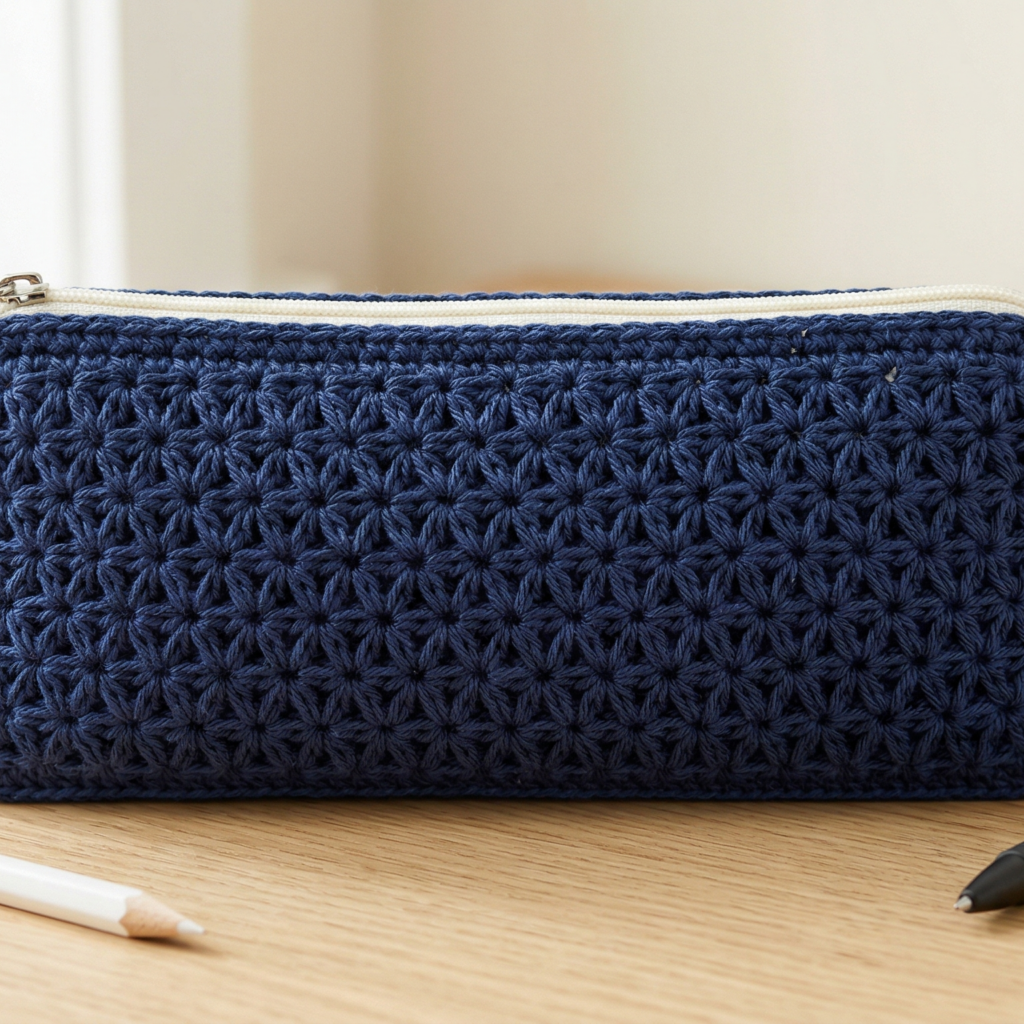
A star stitch pencil case feels bold, textured, and a little more modern. The star stitch creates a pattern that looks intricate without being too difficult to learn, which makes it a great option for anyone who wants a pencil case with a stylish, standout surface.
Quick Notes
Skill level: Intermediate
Finished size: Medium rectangular pencil case
Style: Textured, modern, eye-catching, trendy
Best colors: Navy, cream, mustard, dusty pink, sage, black, rust
Materials
- Cotton yarn
- Crochet hook suited to your yarn
- Yarn needle
- Scissors
- Zipper or closure
- Optional lining
Step-by-Step Guide
Step 1: Practice the star stitch first
Before starting the full pencil case, make a small swatch to practice the star stitch. This stitch has a rhythm of drawing up loops and closing them in a star-like formation. Once you understand the motion, it becomes much easier to work into a larger piece.
A short practice swatch can save a lot of frustration.
Step 2: Crochet the main panel
Start the first panel of the pencil case using the star stitch pattern. Keep your tension even so the stars look consistent across the fabric. This stitch creates a strong texture that looks beautiful on a small accessory like a pencil case.
The star texture is the main design feature.
Step 3: Keep the fabric firm
Since pencil cases need structure, make sure the star stitch fabric is dense enough to hold shape. If the fabric feels too loose, use a smaller hook or tighter tension. A firm fabric will help the case protect the contents inside.
Structure is especially important with textured patterns.
Step 4: Make the second panel
Crochet a second panel the same size as the first. Compare them as you go to ensure they match. If you want the case to feel extra polished, keep the stars lined up as closely as possible.
Matching panels make assembly smoother.
Step 5: Add the zipper
Sew the zipper along the top edge. The zipper should sit flat and straight so it does not interrupt the texture too much. A neat zipper finish makes the whole piece look professional.
A good zipper helps the case feel complete.
Step 6: Join the sides
Seam the case along the sides and bottom. Since star stitch fabric can be a little textured and thick, take your time to keep the seams neat. This helps the case hold up with daily use.
Step 7: Finish and optionally line
Weave in all ends carefully and line the inside if you want extra strength. A lining can also help the stars stand out more by making the case feel sturdier and cleaner.
Helpful Tips
Star stitch pencil cases look especially nice in solid colors because the texture becomes the main feature. If you want a more dramatic back-to-school look, try navy or black. If you want a softer handmade feel, cream or dusty pink work beautifully.
Conclusion
Crochet pencil cases are such a satisfying project because they are useful, beautiful, and quick enough to complete without too much stress. They are the kind of handmade item that can make school supplies feel more personal and special while also giving you a chance to practice new stitches and creative techniques. Whether you are making one for yourself, a student, or a craft fair table, they are always a smart and stylish project.
These five pencil case patterns each offer something different. The tulip stitch case feels soft and floral. The scallop edge case is elegant and neat. The butterfly embroidered case adds playful detail. The granny stripes case brings colorful charm. The star stitch case offers a modern textured finish. Together, they show how much variety you can create with just a small amount of yarn and a good idea.
A handmade pencil case is more than a place to keep pens. It is a small project that can brighten everyday routines, show off your style, and make back-to-school season feel more personal. With the right yarn, careful shaping, and neat finishing, these pencil case patterns can become favorite accessories that are both practical and fun to make.