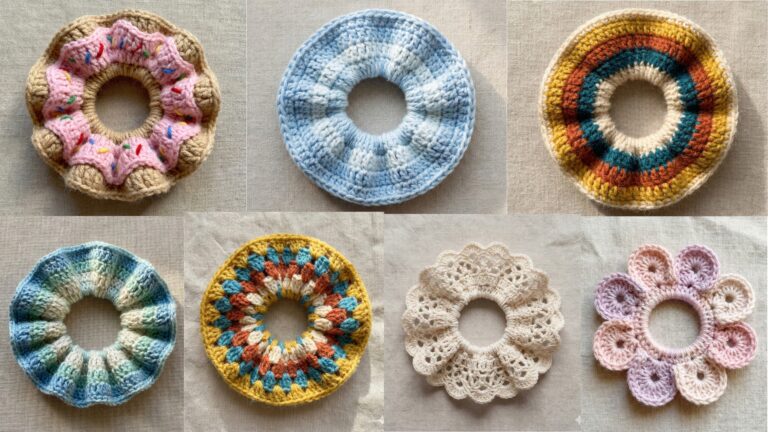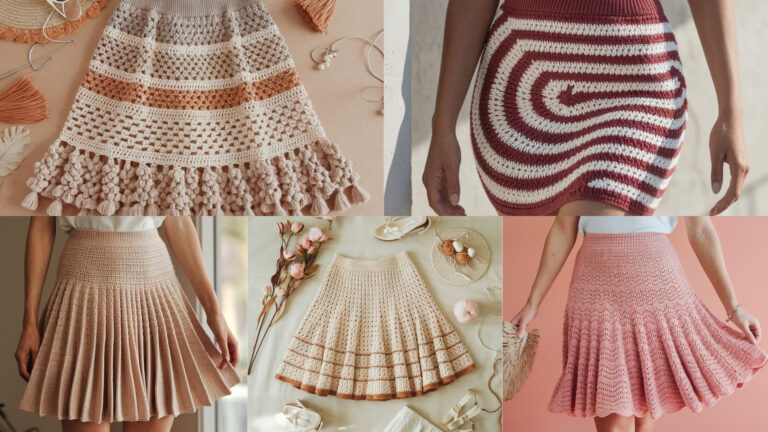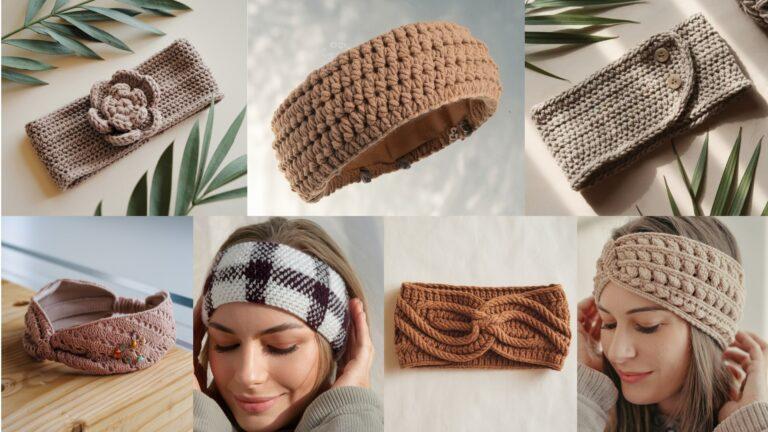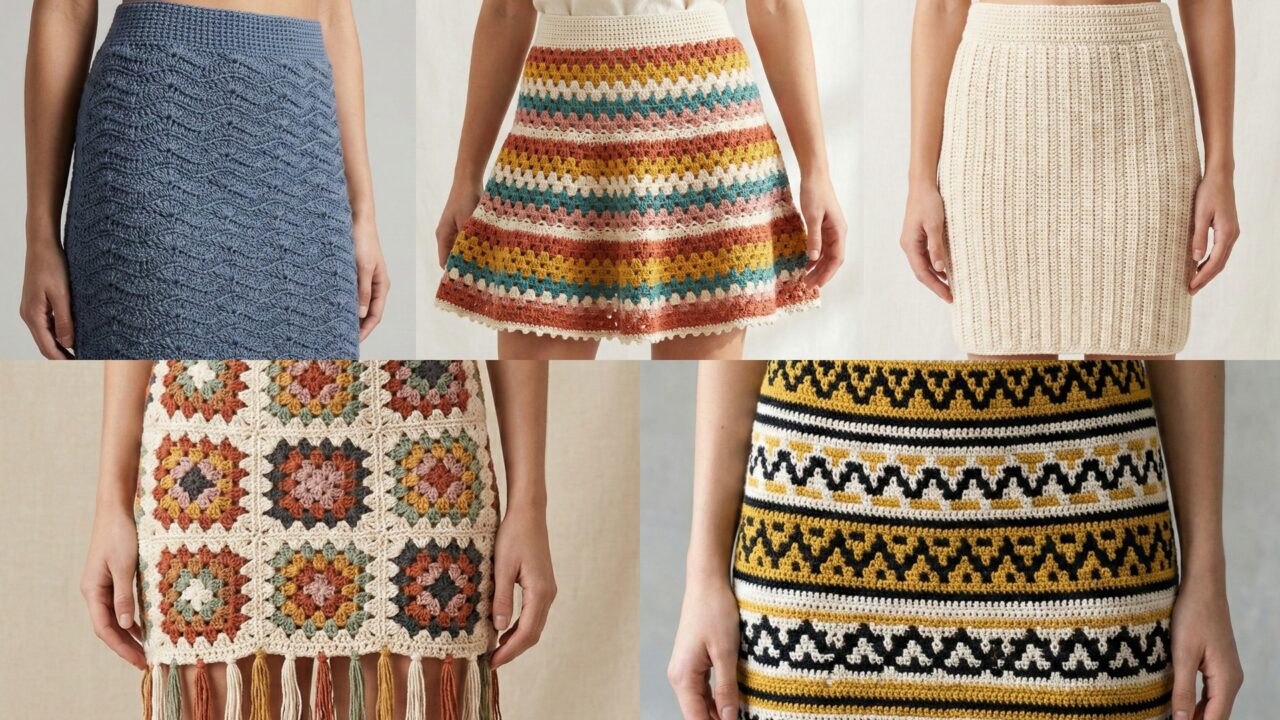
Mini skirts are a fun, fast project for summer — they’re great for practicing shaping, textures and colorwork, and they make adorable handmade wardrobe pieces. Below is a full, publication-ready blog post with one clear introduction (tools, sizing, gauge, abbreviations and general tips) followed by five detailed patterns: Ribbed Mini Skirt, Granny Stripe Tiered Mini Skirt, Caron Graphic Skirt, Wave Pencil Skirt, and Granny-Square Pencil Skirt with Fringes. Each pattern includes skill level, materials, a worked example for an adult Medium, step-by-step construction, fitting and grading tips, variations, finishing and care. Tone is clear, helpful and professional.
Quick essentials — tools, yarn, sizing, gauge & abbreviations
Tools & notions
- Crochet hooks: common sizes for these skirts are 3.5 mm – 5.5 mm depending on yarn weight.
- Yarn: for summer skirts choose cotton, cotton blends, or light-weight acrylics. DK (light worsted) to light worsted (Category 3–4) are versatile.
- Notions: tapestry needle, stitch markers, measuring tape, elastic (for waistbands), safety pins, optional fabric for lining, scissors.
Sizing & finished measurements (example)
- The worked examples below are for Adult Medium (approx. waist 30–32 in, hip 38–40 in). A mini skirt length is typically 14–17 in from waist to hem depending on styling (shorter for true mini, longer for modest/retro lengths).
- To grade sizes, I include guidelines under each pattern — you can scale by adjusting stitch counts using the stitch gauge formula.
Gauge & how to calculate foundation stitches
- Make a 4 in (10 cm) square swatch using the stitch pattern you plan to use. Measure stitches per inch (spi) and rows per inch (rpi).
- To calculate stitches for the waist (if working in the round):
target waist circumference (in) × spi = target stitch count. Add or subtract ease depending on desired fit (for a mini skirt you might want 0–2 in negative ease at the waist for a snug fit or +1–2 in for comfortable ease). Adjust to pattern multiple if the stitch requires it (e.g., multiple of 4 or 6).
Common abbreviations (US)
- ch = chain
- sl st = slip stitch
- sc = single crochet
- hdc = half double crochet
- dc = double crochet
- tr = treble crochet
- st(s) = stitch(es)
- sk = skip
- rep = repeat
- BLO / FLO = back loop only / front loop only
- RS / WS = right side / wrong side
- inc = increase (2 sts in same st)
- dec = decrease (work stitches together)
General construction notes
- Mini skirts can be worked top-down (waistband first) or bottom-up (seamless tube from hem then gather/elastic casing). Top-down gives more control for fit; bottom-up is fast if you prefer trying on as you go.
- For fitted skirts that stay in place, a folded elastic casing or a narrow elastic stitched to the inside top is recommended. For fitted rib or stretch stitches, you may skip a casing if your yarn has some give.
1. Crochet Ribbed Mini Skirt Pattern
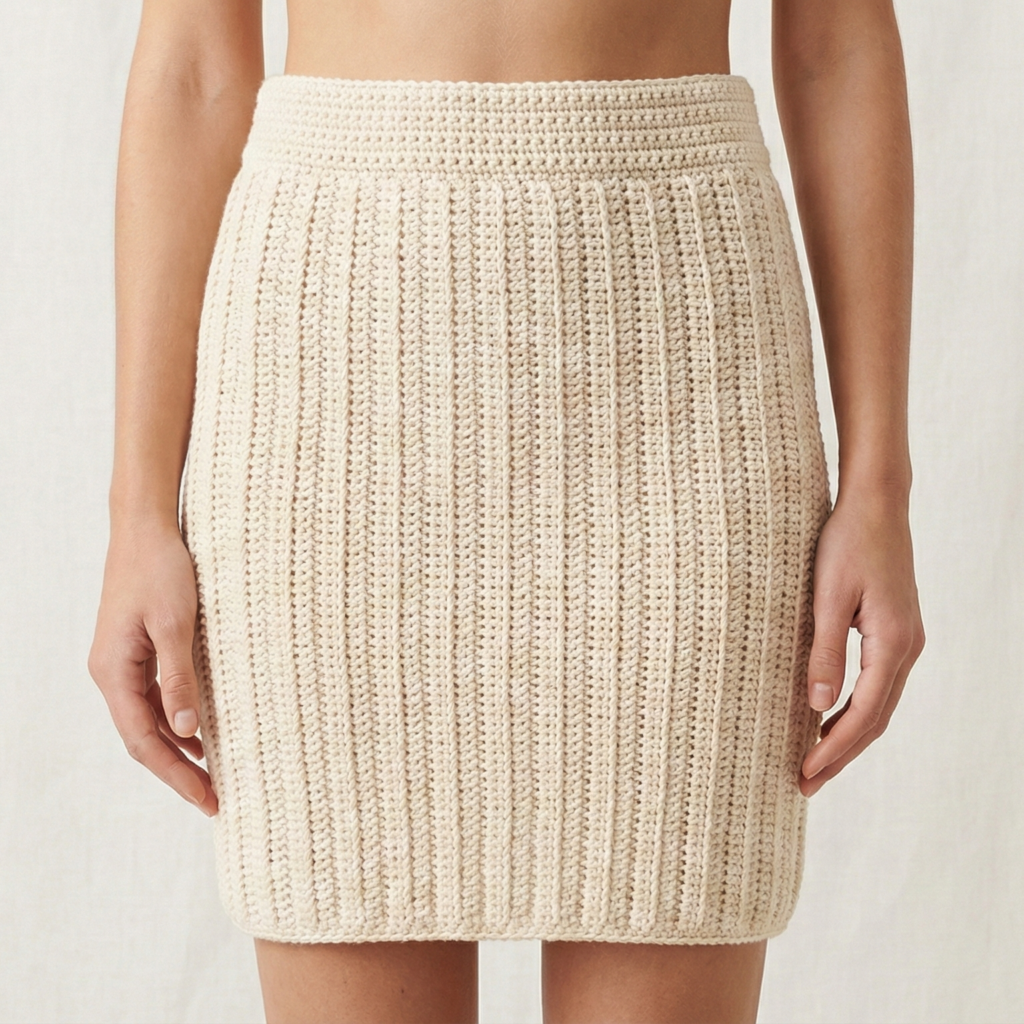
Skill level: confident beginner → intermediate (post stitches and shaping)
Vibe: sleek, body-skimming rib texture that mimics knit ribbing — flattering and versatile.
Materials (Medium sample)
- DK cotton-blend yarn — 600–800 yd (amount depends on length).
- Hook: 4.0 mm (adjust to gauge).
- 1 in wide elastic, 0.75–1 in shorter than waist for snugness if preferred.
- Tapestry needle, stitch markers.
Gauge (example)
- 16 hdc = 4 in in ribbing (BLO hdc columns); measure your swatch.
Finished (example Medium)
- Waist finished circumference: 30 in (adjustable).
- Hip: fits hips to ~38–40 in (skirt shaped to hip).
- Length: 15 in (waist → hem).
Construction overview
Worked top-down in the round: start with a ribbed waistband (hdc BLO or fp/bp post stitches) with a foldable casing, then work rib columns down with slight increases at hip to accommodate curves, then shape for pencil or slight A-line silhouette. Finish hem with a tidy edge.
Step-by-step (Medium)
1. Waistband & casing
- Swatch to get hdc per inch (spi). Example spi = 4 hdc/in. Decide finished waist circumference (30 in). For snug band target 29 in actual stretch circumference. Stitches = 29 × 4 = 116 hdc — make this a multiple of 2 for rib pattern. Chain 116 + 1 turning (or foundation hdc 116 for neater band). Join to work in the round, place marker.
- Rounds 1–6: Work hdc BLO in each st around (this creates a foldable rib). If you want a casing: after round 6 fold band inward and seam or work an extra round to create a channel; leave a small opening to feed elastic, then feed elastic and stitch closed.
2. Transition to body
3. Switch to rib post stitch pattern for body: fpHdc around the next st, bpHdc around the next st — this creates vertical ribs that stretch. Repeat around. Continue in round. This is your main skirt fabric.
3. Hip shaping
4. To accommodate hips, add small increases over 4–6 rounds distributed evenly. Example for Medium: add 12 sts total over 6 rounds → add 2 sts per round spaced evenly. Implement increase as fpHdc, hdc increase in next st where needed. Check fit by measuring the skirt on your body as you go — stop increasing when hip measurement is reached.
4. Skirt length & taper
5. Decide silhouette: For a pencil mini, continue ribbing down evenly for desired length (~10 in below hip). For slight A-line, add 8–12 evenly spaced increases every 8–10 rounds to add flare.
5. Hem
6. Finish with 2 rounds sc for clean hem or a decorative scallop: skip 2, 5 dc in next st, skip 2, sc in next for a small ruffle.
6. Finishing
7. Weave ends. If you used an elastic casing, ensure elastic is secured and opening sewn.
Fit & grading tips
- Smaller sizes: reduce foundation stitch count according to waist × spi (for S reduce by 4–8 sts per 1–2 in).
- Larger sizes: you may want to start with a more generous hip shaping and allow more ease. For hips >44 in add more increases or switch to slightly looser stitch.
Variations
- Make a high-waisted version by adding extra rows in the ribbed waistband before starting the body.
- Use a bulky DK/ light worsted yarn and a larger hook for chunkier rib texture.
2. Crochet Granny Stripe Tiered Mini Skirt Pattern
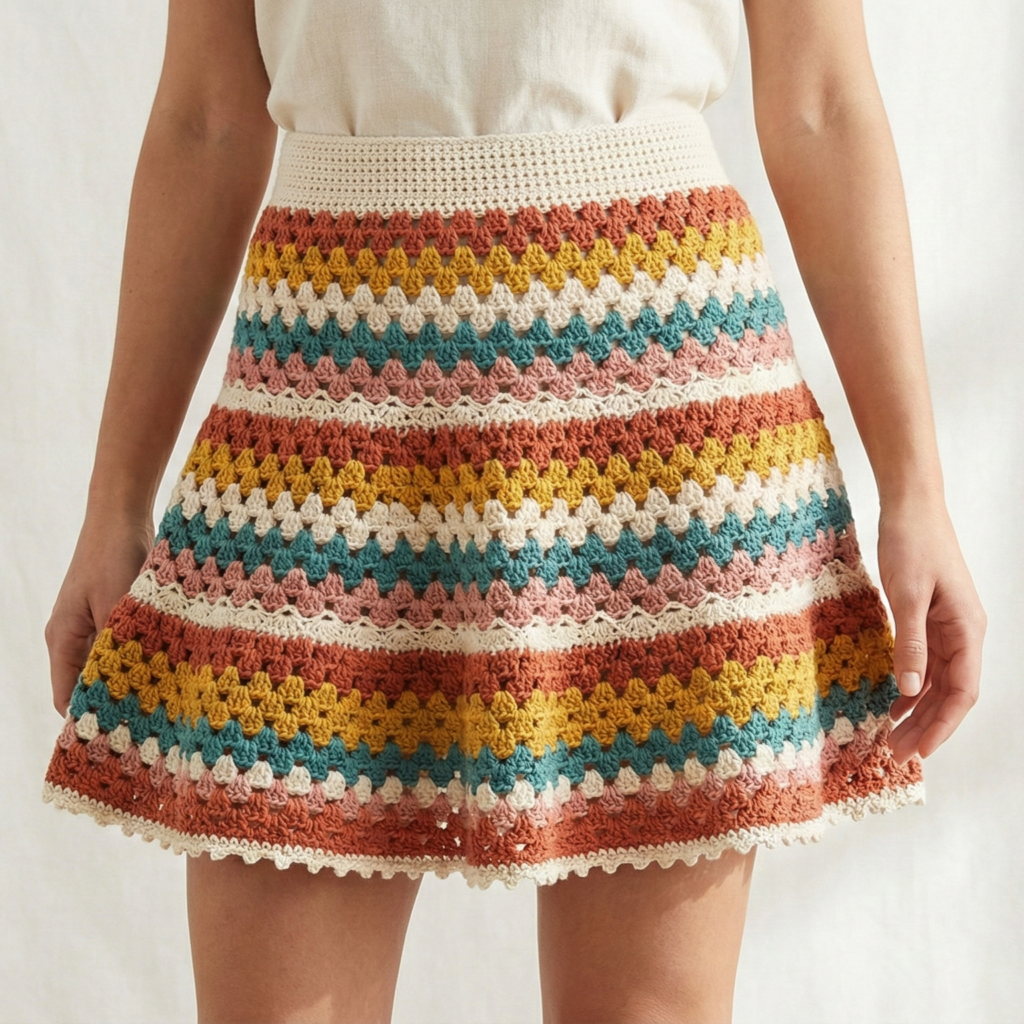
Skill level: confident beginner (granny cluster basics + joining)
Vibe: playful, boho tiered skirt with colorful granny-stripe tiers — great for scrap yarn or bold palettes.
Materials (Medium sample)
- DK cotton or cotton-blend in 3–5 colors — 700–900 yd total.
- Hook: 4.0–4.5 mm.
- Elastic for waistband (optional).
- Tapestry needle, stitch markers.
Construction overview
Worked top-down: a firm waistband (sc or hdc), then attach tiers of granny-stripe rounds. Each tier is wider than the one above to create ruffles. This skirt is forgiving and fun to customize.
Step-by-step (Medium)
1. Waistband
- Measure waist and compute foundation as before. Example 30 in × 4 hdc/in = 120 hdc. Work 6–8 rounds sc or hdc in the round for a firm band. Create casing for elastic by folding and slip-stitching if you want elastic.
2. Tier 1 (upper tier)
2. Attach color A. Round 1: ch 3 (counts as dc), 2 dc, ch 2, 3 dc in next joining point for first granny cluster if using classic square approach. But for a seamless round, work granny cluster rounds in the round: typical granny cluster pattern for round terraces: [3 dc, ch 1] in each 3-st group — adapt to circular method. Simpler approach: work rounds of shell clusters: 3 dc in next st, ch 1, skip 1, 3 dc to create a lacy clustered band. Work 4–6 rounds for the first tier.
3. Joining tiers & adding fullness
3. To add fullness for Tier 2, increase stitches at the join by adding extra shells or by increasing clusters evenly. For example: at the end of Tier 1, join color B and in the next round place 2 clusters in every 3rd space to expand circumference by about 30–40% for a gentle ruffle. Work Tier 2 for 4–6 rounds.
4. Tier 3 (if desired for full boho)
4. Repeat increase method to add final tier. For a mini look with two tiers, keep Tier 3 shorter (2–4 rounds) to keep skirt short and bouncy.
5. Hem finish
5. Finish bottom with a small shell edging or picot row: sc, picot, sc or small scallop.
6. Finishing & lining
6. Weave ends. The skirt can be unlined for cool summer wear; if the stitchwork is open and you want modesty, add a lightweight cotton lining sewn in.
Fit & grading notes
- To make the skirt fit snugly at the waist but flare at the hips, keep the waistband firm and increase more aggressively at the first tier join.
- For larger sizes, add an extra round of increase or add an additional granny tier.
Variations
- Use matching colors for color-block look, or random scrap stripes for a festival skirt.
- Add a drawstring or small belt loops at waist for an adjustable tie.
3. Crochet Caron Graphic Skirt Pattern
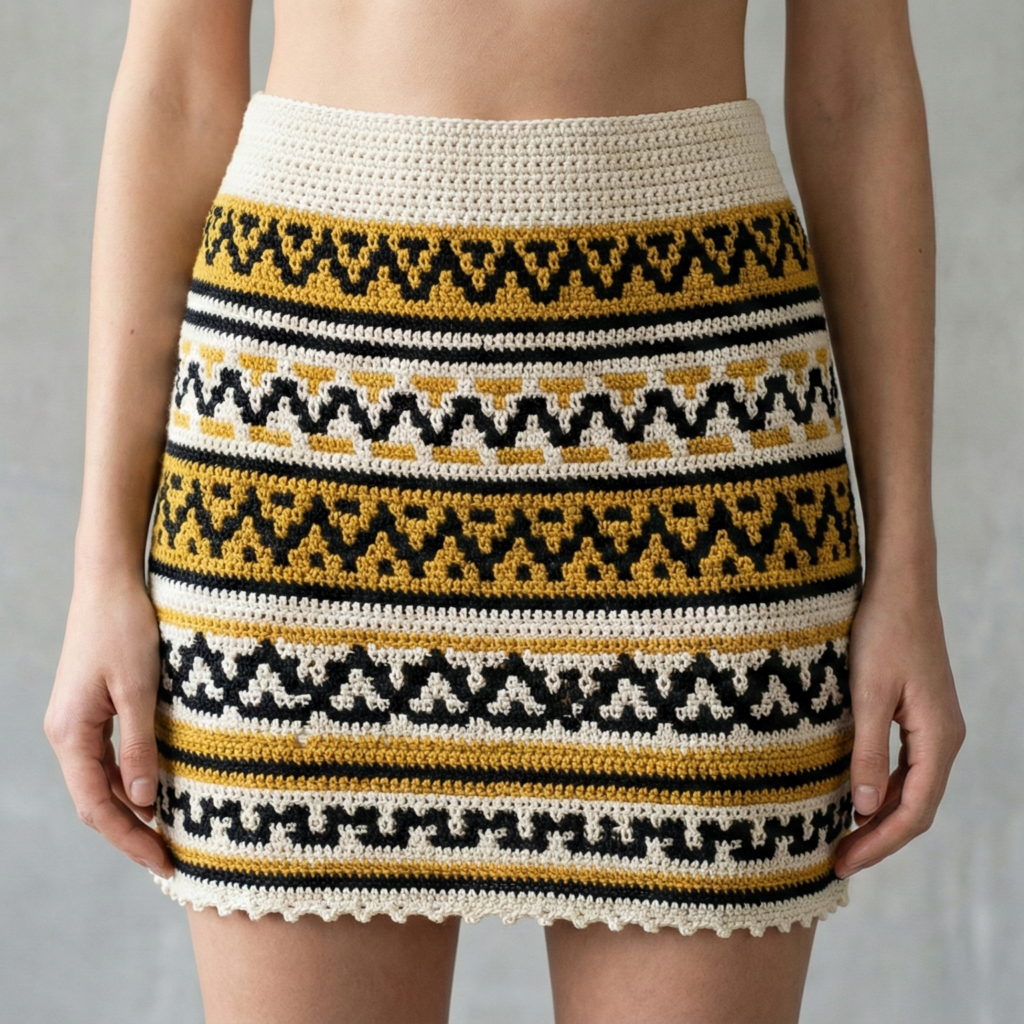
Skill level: intermediate (colorwork, tapestry or mosaic)
Vibe: bold graphic motifs inspired by tapestry C2C or mosaic crochet — chic and modern.
Materials (Medium sample)
- DK cotton yarn in 2–3 contrasting colors (MC + CC) — 700–900 yd.
- Hook: 4.0 mm (smaller for tighter colorwork).
- Tapestry needle, stitch markers, optional lining.
Construction overview
Use mosaic crochet or simple tapestry single crochet to create graphic panels (stripes, geometrics, or repeat motifs). Work the skirt top-down in the round with charted colorwork rows, and reinforce the waist with a firm band.
Planning and gauge
- Because colorwork tightens fabric, swatch in the intended method (mosaic vs tapestry) and measure sc per inch. Example: 20 sc = 4 in → 5 sc/in. For a 30 in waist → 150 sc target (make sure it matches your chart multiple).
Step-by-step (Medium)
1. Waistband
- Chain foundation per your sc spi (e.g., 150 sc). Work 6–8 rounds of sc (FLO or BLO for different effect) to form a stable waistband and enforce a casing if using elastic.
2. Colorwork body
2. Prepare a simple two-color chart. If you’re new to mosaic crochet, design a motif in a graph that repeats every 20–30 stitches. Work in rows in the round: in mosaic technique you work full rounds in MC and use slip-stitch/color-changing rounds to make blocks; in tapestry you carry or trap floats and work sc in color per chart.
- Continue rounds until you reach hip and desired skirt length. If hips are wider than waist, plan increases at hip level: add 6–12 stitches across one row by increasing evenly.
3. Hem
4. Use an optional small textured hem: a row of hdc then a scallop or picot.
4. Lining & finish
5. Because colorwork can reveal undergarments, add a lining if coverage is a concern. Sew lining to waistband interior.
Fit & grading
- For a fitted look, keep 0–2 in negative ease at the waist. If hips need more room, put increases over hip area.
- For plus sizes, distribute increases across several rows to avoid abrupt shaping.
Variations
- Use C2C (corner-to-corner) crochet to create diagonal graphic motifs for a unique look.
- Make a minimalistic block stripe version using two colors for a chic summer statement piece.
4. Crochet Wave Pencil Skirt Pattern
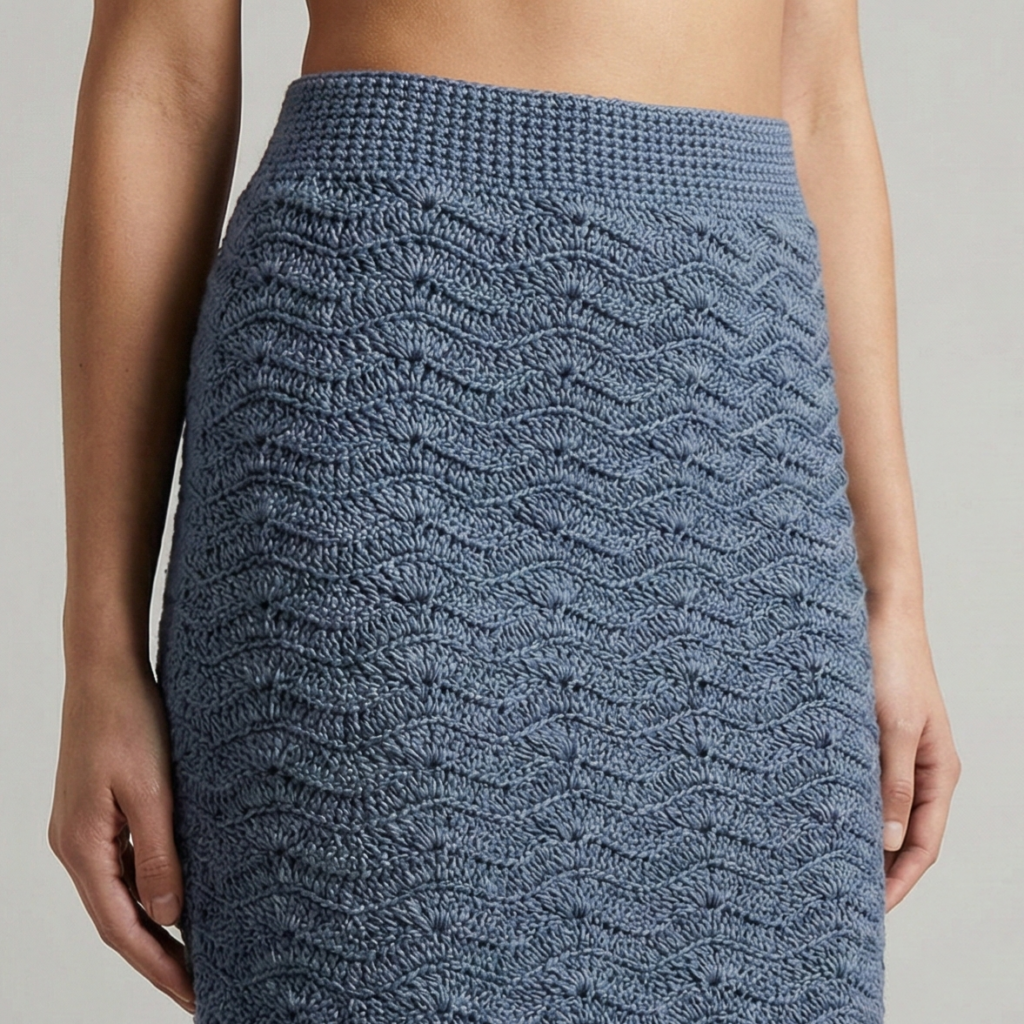
Skill level: intermediate (texture, shaping for pencil fit)
Vibe: fitted pencil mini with a textured wave motif — retro-modern and streamlined.
Materials (Medium sample)
- DK cotton-blend yarn — 700–850 yd.
- Hook: 4.5 mm.
- Elastic for waist casing.
- Tapestry needle.
Stitch & repeat
Wave pattern uses combinations of shell/staggered cluster rows to create horizontal undulating waves. Work top-down or bottom-up in the round; I recommend top-down to control fit.
Step-by-step (Medium)
1. Waistband
- As with other skirts, measure and compute foundation. Work 6 rounds of hdc or sc for a firm waistband and optional casing. Use elastic if you want the skirt to sit securely.
2. Wave pattern setup
2. Example wave repeat (multiple of 12 sts):
- Row A: dc 1 in next 4 sts, shell (5 dc) in next st, dc 1 in next 4, sc in next — creates a peak.
- Row B: offset shells by 6 sts so waves visually flow.
- After creating a 2–4 round sample and measuring gauge, compute required stitch count for waist/hip using spi.
3. Hip shaping
4. For pencil silhouette: allow small increases at hip if needed; then work a slight taper back in below hip to create smooth pencil fit to hem (or continue straight for straight pencil).
4. Length & hem
5. Work until skirt measures desired length. For mini, keep length between 14–16 in. To keep pencil fit comfortable, ensure vertical ease at back (a small slit or a couple of rounds of negative ease at hem) — for a very fitted skirt add a small back vent: leave a vertical opening of 2–3 in and reinforce edge, or add a subtle stitch decrease to shape.
5. Hem finish
6. Finish with 2 rounds sc, or a shell edge for decorative finish.
Fit & comfort tips
- Pencil skirts are fitted — add a small back vent or slightly more ease if you plan to sit/ move comfortably.
- For full mobility, add 1–2 in ease at the hip or make a short back slit of 2–4 in.
Variations
- Make the waves using Tunisian simple stitch panels for a different texture.
- Add subtle vertical rib side panels for a slimming effect.
5. Crochet Granny-Square Pencil Skirt with Fringes Pattern
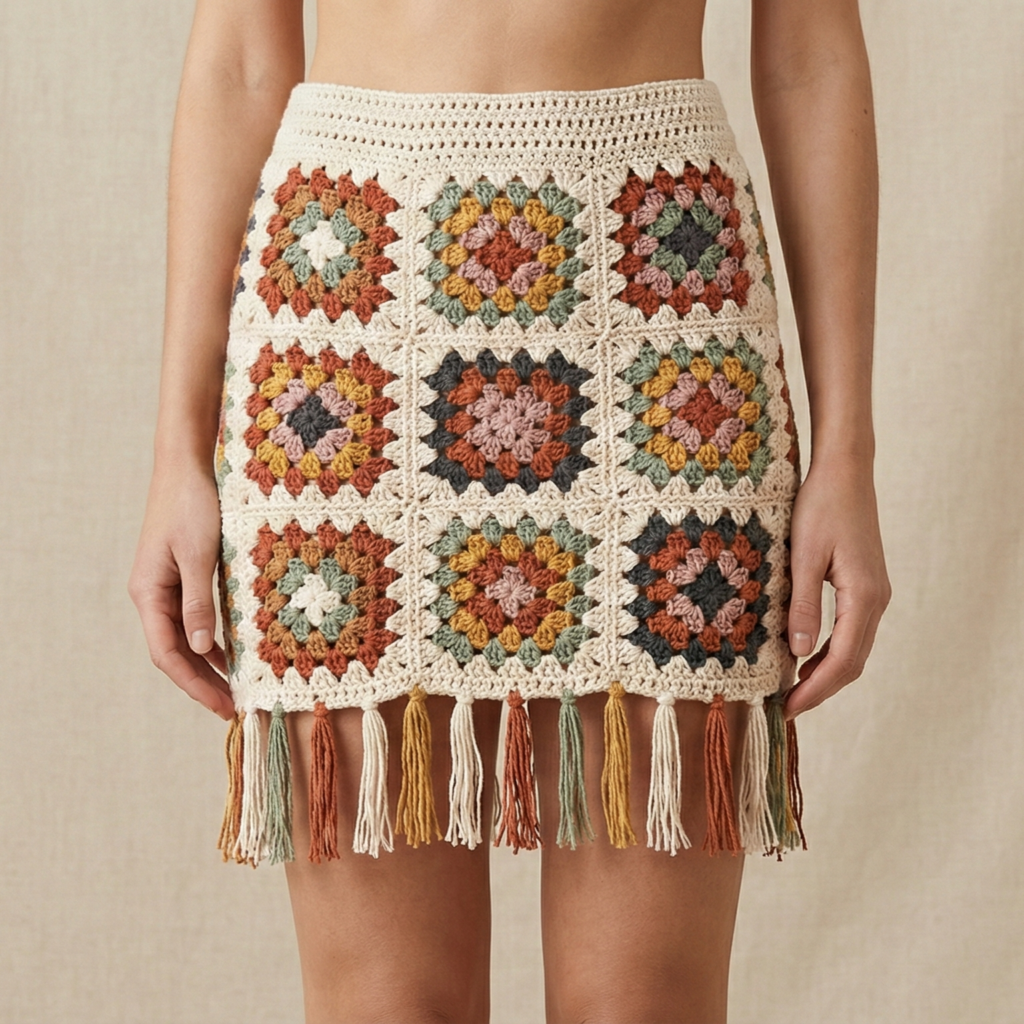
Skill level: confident beginner → intermediate (making/grand joining motifs)
Vibe: vintage-inspired granny motif pencil skirt with fringe hem — boho-retro hybrid.
Materials (Medium sample)
- DK cotton in 3–5 colors (contrasts + neutrals) — 900–1100 yd (many squares).
- Hook: 4.0 mm.
- Lining fabric optional and recommended for pencil fit.
- Tapestry needle.
Construction overview
Constructed from granny squares joined into rectangular panels (front and back), seamed at sides to make a pencil silhouette. Add a fringe trim at the hem for playful movement.
Step-by-step (Medium)
1. Make granny squares
- Decide on square size: small 4 in squares → for waist 30 in you need about 8 squares across (8 × 4 = 32 in including seam ease). For pencil skirt you’ll need two panels each with approx. 8 across × 5 down = 40 squares total (adjust as necessary). Classic 3–4 round granny squares are quick to make.
Classic small granny square (3-round):
- MR, ch 3, 2 dc, ch 2, 3 dc, ch 2 rep 3 times. Join. Round 2: in each ch-2 corner 3 dc, ch 2, 3 dc; sides: (3 dc in side spaces) to expand as needed.
2. Layout & join
2. Block squares flat. Lay out panels for front and back (e.g., 8 across × 5 down). Join squares using whipstitch or join-as-you-go to make flat seams. This yields two rectangles; seam sides to create a tube.
3. Waistband & fit
3. Pick up stitches around the top and work a firm band of sc or hdc 6–8 rows; create a casing by folding and slip-stitching inside to insert elastic, or add a drawstring.
4. Lining & shaping
4. Because granny squares have gaps, line the skirt with a lightweight woven fabric shaped to the panels for a smooth pencil fit. Sew the lining inside the skirt to the waistband before finishing.
5. Hem & fringe
5. Add fringe: cut lengths of yarn (6–8 in), fold in half and pull through bottom edge spaces with a crochet hook to make tassels. Space tassels every 1–2 squares or every 1–2 in for full fringe.
6. Finishing
6. Weave in all ends and press/steam gently. Attach a small label or tag if you like.
Fit & grading
- Because granny skirts arebuilt from discrete squares, change size by adding/removing squares across and down. For a smaller size, drop a column; for larger sizes add columns/rows.
- For a more fitted pencil shape, taper side seams slightly when seaming panels (pin and try-on).
Variations
- Make the skirt mini with a ruffled fringe, or convert to a midi length by adding more rows of squares.
- Use a single color granny for understated elegance or bold multicolor for festival feels.
Final finishing, care & styling tips (all patterns)
Weave ends and secure seams
- Always weave tails through several stitches and knot securely where needed; for stress points (waistband/elastic ends) stitch extra passes.
Lining & modesty
- If your stitch pattern is open (granny, lace) and you want opaque coverage, add a lightweight lining. Cotton poplin or rayon blends sew easily and sit comfortably.
Elastic & fit
- Use soft elastic for waist casing and test stretch before trimming length. Sew elastic ends securely and stitch the casing closed.
Blocking & shaping
- Block skirts made from cotton to even stitch patterns and set length. Pin to the correct measurements and allow to dry fully.
Care
- Follow yarn label. Cotton: hand wash or gentle machine cycle and lay flat. Avoid tumble drying if you want to preserve shape.
Styling suggestions
- For a casual festival look pair Granny or Tiered miniskirts with a cropped tee and sandals. For a more polished look, style Ribbed or Graphic skirts with a tucked blouse and flats. Add a belt at the waist for definition or a denim jacket for layering.
Conclusion
These five mini skirt patterns offer a wide range of summer styles — from a sleek ribbed pencil to playful granny-tiered minis and bold graphic statement pieces. Each pattern is written so you can adapt yarn, colors and length to create a piece you love. Key tips: swatch for gauge, check fit early (top-down makes this easiest), and use lining or elastic when you need more coverage or security.