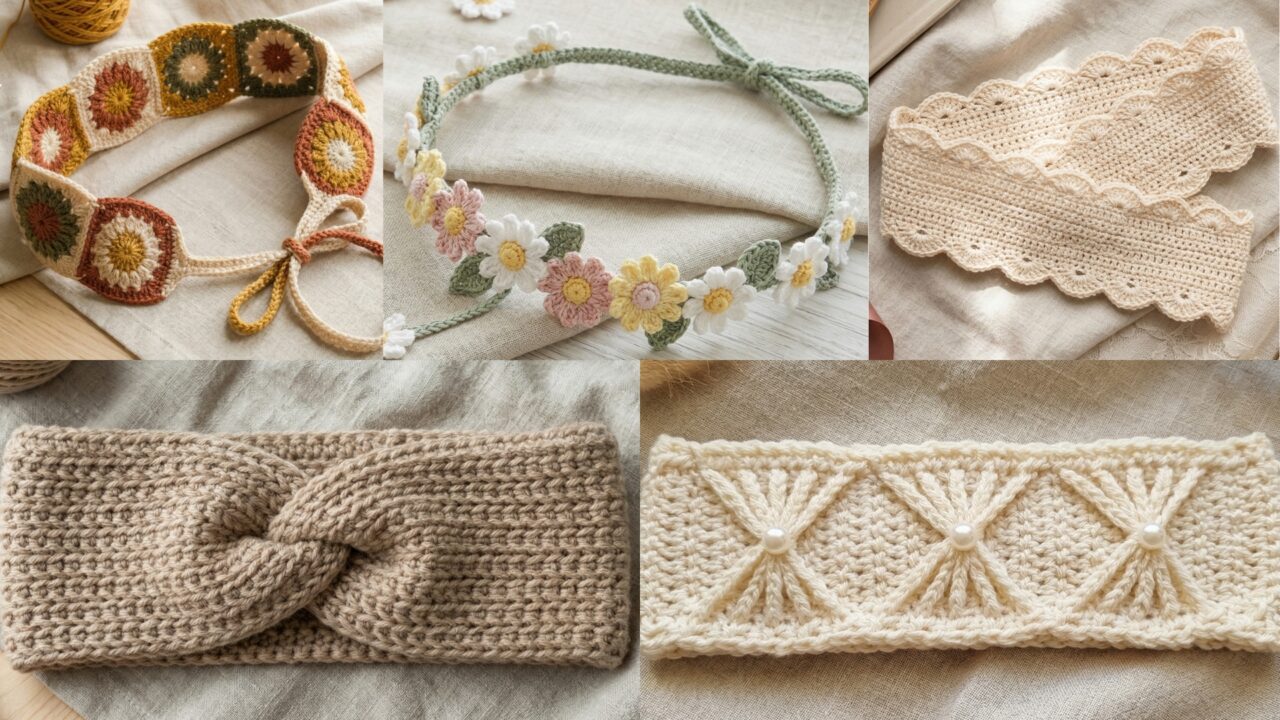
Crochet headbands are one of those small accessories that can completely change an outfit without taking a huge amount of time to make. They are practical, comfortable, and stylish all at once, which is why they are such a satisfying project for crocheters of all levels. A handmade headband can keep your hair in place, add a polished finishing touch to your look, or simply bring a little extra charm to your everyday wardrobe.
What makes crochet headbands especially appealing is how easy they are to customize. A bow can make the design feel sweet and feminine. A vintage scallop edge can add softness and elegance. A granny square-style motif can give you a playful handmade feel. A daisy vine design brings in a fresh floral touch. A thermal twist pattern creates a cozy, textured finish that feels modern and warm. Each one has its own mood, but all of them are wearable, fun to make, and ideal for daily use.
In this post, you will find five trendy crochet headband patterns with detailed step-by-step guidance, helpful notes, and practical finishing tips. These designs are written to be beginner-friendly while still giving you enough detail to make headbands that look polished and feel comfortable. If you enjoy quick projects that are useful, stylish, and easy to wear, these headband ideas are a wonderful place to begin.
Quick Notes
Project type: Crochet headbands
Best for: Everyday wear, gifts, fashion accessories, and quick handmade projects
Skill level: Beginner to intermediate, depending on stitch detail and shaping
Hook size: Usually 2.5 mm to 5.0 mm, depending on yarn weight and desired stretch
Yarn weight: Lightweight cotton, sport, DK, or soft acrylic yarn
Best yarn choice: Cotton or cotton blends for comfort, structure, and durability
Finished size: Customizable to head circumference
Time to complete: About 30 minutes to 2 hours per headband
Helpful stitches: Chain, slip stitch, single crochet, half double crochet, double crochet, shell stitch, granny stitch, thermal stitch, increases, decreases, twist shaping, appliqué, bead attachment
Common Materials
Most crochet headbands can be made with the same basic supplies.
- Yarn in your chosen colors
- Crochet hook suited to the yarn
- Yarn needle
- Scissors
- Measuring tape
- Stitch markers
- Small buttons, beads, or appliqués, optional
- Elastic thread or hair tie, optional for extra stretch
For headbands, softness and stretch matter a lot. A headband should feel secure without pressing too tightly. Cotton yarn is a great choice because it is breathable and comfortable for daily wear. If you want a warmer or softer look, a cotton blend or light acrylic can also work well.
1. Crochet Pearl Accent Bow Headband Pattern
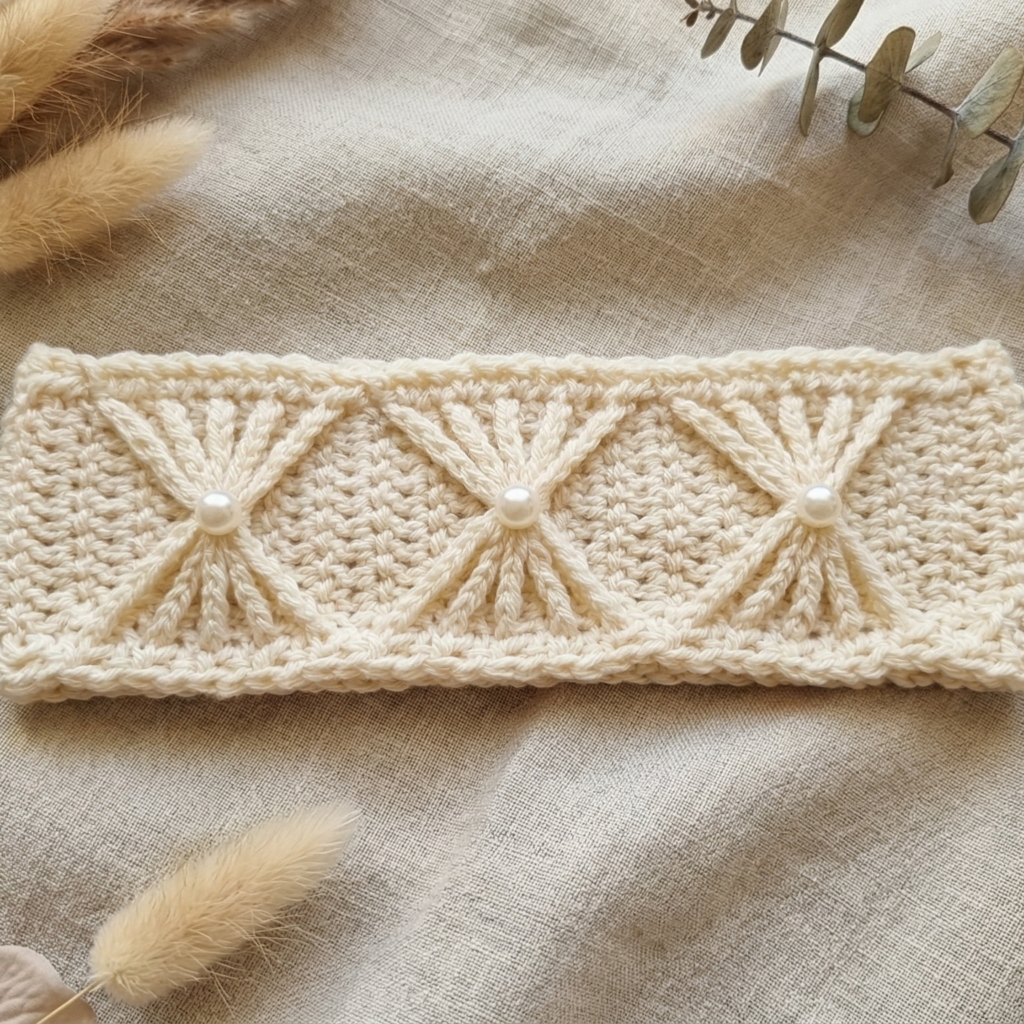
A pearl accent bow headband feels soft, elegant, and a little dressy. The bow gives it a feminine silhouette, while the pearl detail adds a touch of charm and polish. It is a lovely accessory for dressing up a simple outfit, but it is still easy enough to wear every day.
Step-by-step guide
Step 1: Measure your head
Before starting, measure around your head where the headband will sit. This will help you determine the length you need. Since a headband should be snug but comfortable, measuring first makes it easier to avoid a band that is too tight or too loose.
A proper measurement gives you a comfortable fit.
Step 2: Crochet the base band
Begin with a simple band using rows or rounds of single crochet or half double crochet. Keep the stitch tension even so the band lays flat and stretches gently. The base should be soft against the skin and wide enough to support the bow detail.
A clean base band keeps the accessory wearable.
Step 3: Shape the bow
Crochet a small separate rectangle or strip that can be folded into a bow shape. Keep the bow proportions balanced so it does not overwhelm the headband. Once the piece is complete, fold it into loops and secure the center tightly.
The bow is the main decorative feature.
Step 4: Add the pearl accent
Sew a small pearl bead or cluster of tiny pearls into the center of the bow. This detail gives the headband a refined and slightly vintage look. Keep the pearl placement neat and centered so it feels intentional rather than crowded.
The pearls make the bow feel more elegant.
Step 5: Attach the bow to the band
Choose where you want the bow to sit. The center front is the most classic placement, but a slight side angle can feel stylish too. Sew the bow securely onto the band using matching yarn or thread.
Secure placement is important for durability.
Step 6: Add finishing stretch
Try the headband on and check how it sits. It should stay in place without pinching. If the band feels too loose, make a shorter version next time or use a slightly smaller hook. If it feels tight, add a few extra rows.
Comfort should come first.
Step 7: Weave in all ends
Tuck in every yarn end carefully so the headband feels smooth when worn. Because this accessory sits against the head, neat finishing really matters.
Helpful tips
This headband looks especially lovely in cream, blush, soft pink, or ivory. If you want a more modern look, use a neutral band with a pearl accent in the center. It is a beautiful option for everyday wear, special outings, or thoughtful handmade gifts.
2. Crochet Vintage Scallop Headband Pattern
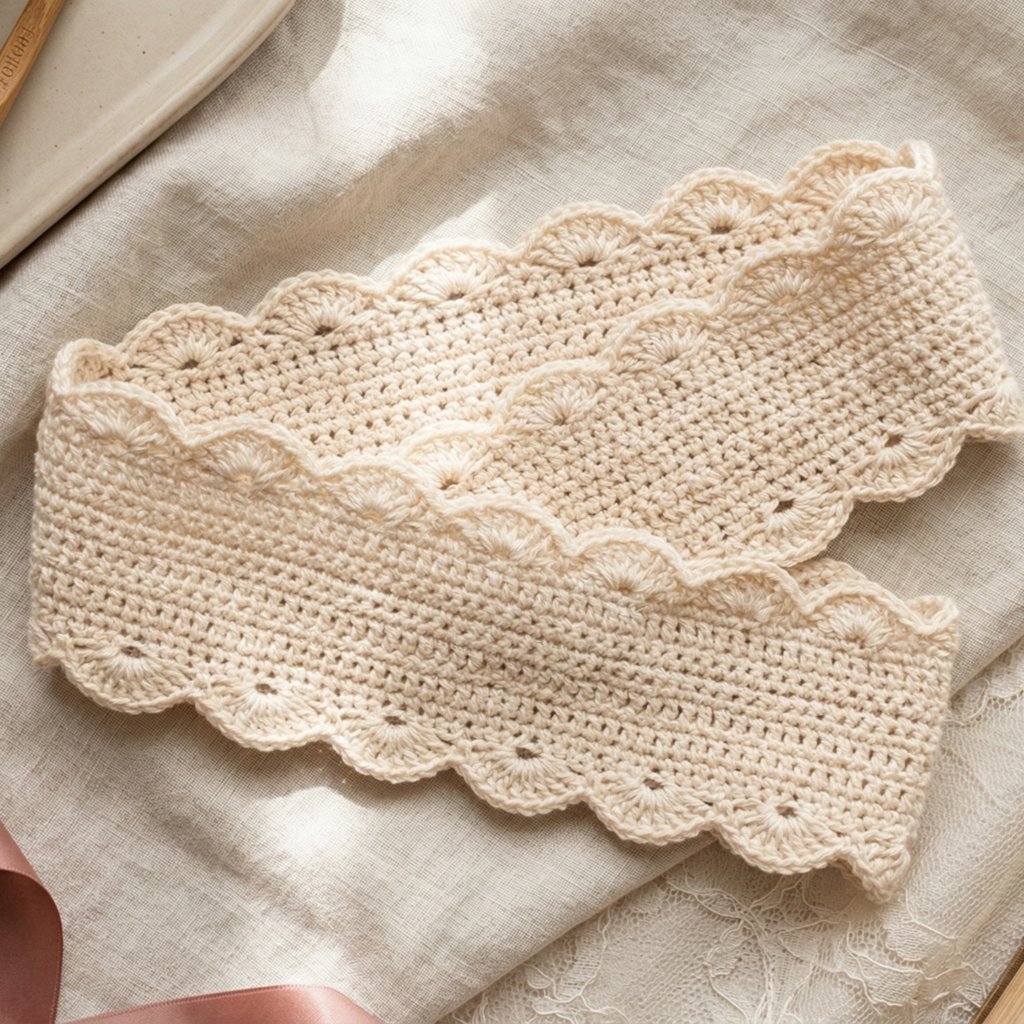
A vintage scallop headband has a soft, timeless look that feels graceful and versatile. The scalloped edge gives the headband a feminine finish without making it too ornate. It is a great choice if you want something delicate and classic that still works for everyday styling.
Step-by-step guide
Step 1: Choose a vintage color palette
Pick colors that feel gentle and slightly nostalgic. Cream, dusty rose, sage, soft blue, and muted lavender all work beautifully. The scalloped texture looks especially elegant in softer shades.
A vintage palette gives the headband its mood.
Step 2: Measure your head size
Take a measurement where the headband will sit. This helps you decide how long to make the band. Since scallop stitches may add a little texture, the band should be snug enough to stay in place but still feel comfortable.
A good fit makes the headband easy to wear.
Step 3: Crochet the base band
Start with a simple foundation row of single crochet or half double crochet. This creates a stable base for the scallop edging. Keep your rows even so the headband lies flat across the head.
A tidy base supports the decorative edge.
Step 4: Add the scallop pattern
Work a scalloped border along one or both edges of the band. Shell stitches or fan stitches can create this effect. Make sure the scallops are evenly spaced and consistent in size so the edge looks polished.
The scallops are the signature detail of the design.
Step 5: Keep the band flat
As you add the scallops, check that the band does not curl. If the edging is too full, it may cause the headband to wave too much. A balanced edge will keep the design elegant and wearable.
Step 6: Shape the ends
Finish the headband ends neatly so they join comfortably behind the head. If you plan to sew the ends together or add a tie-back finish, make sure they are aligned well and not twisted.
A smooth finish helps the headband sit comfortably.
Step 7: Join and secure
Sew or join the ends securely using matching yarn. If you want a slightly adjustable fit, you can leave a small opening or add a thin elastic section at the back. Make sure the join feels soft against the skin.
Step 8: Block gently
A light block can help the scallops open and the band sit evenly. This is especially useful if your stitches tend to curl slightly.
Helpful tips
Vintage scallop headbands look beautiful in solid colors because the scallop texture becomes the focus. If you want something that feels especially romantic, use blush or cream. If you want a more everyday version, sage or soft gray can look very chic.
3. Crochet Starburst Granny Headband Pattern
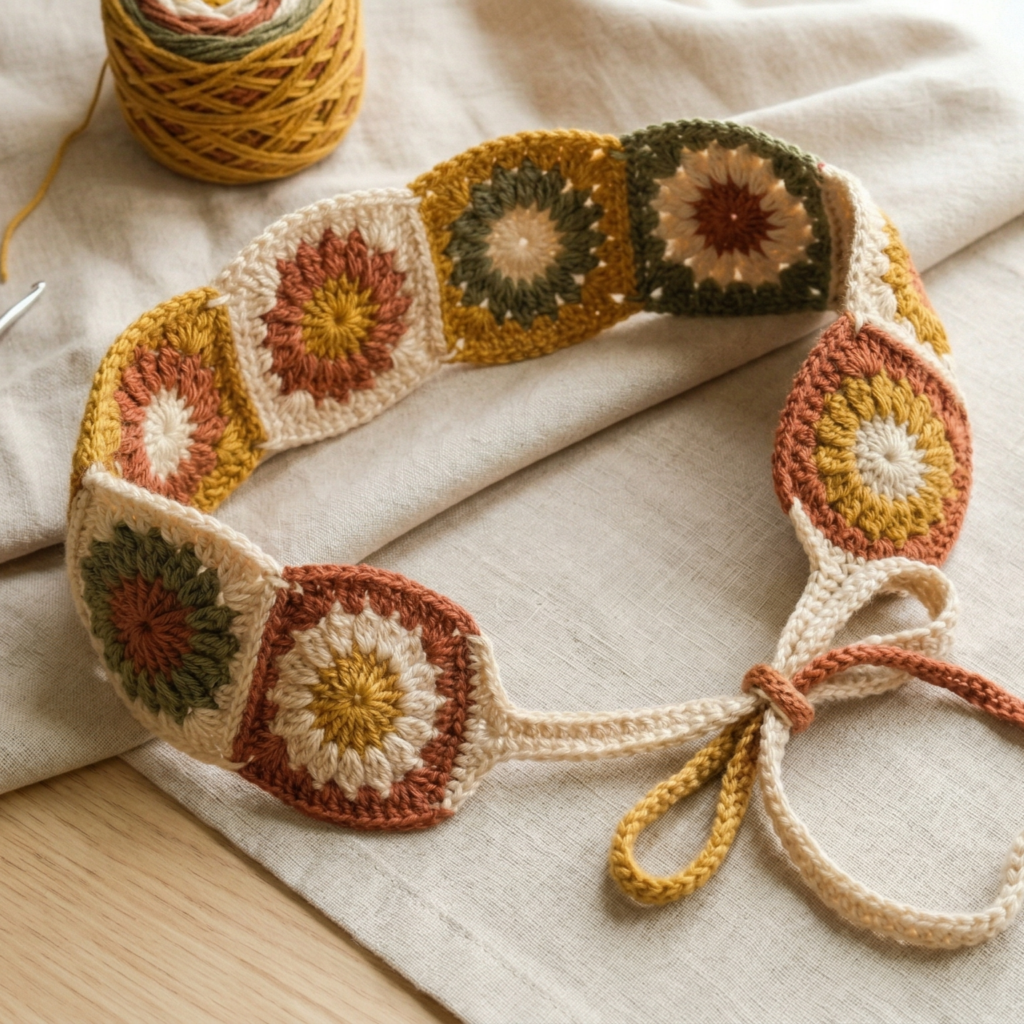
A starburst granny headband brings a playful, handmade look to a practical accessory. The motif gives it a retro-inspired feel, while the band keeps it wearable and comfortable. It is a lovely project if you enjoy motif-based crochet and want something cute enough to stand out without being too busy.
Step-by-step guide
Step 1: Crochet the starburst motif
Start by making one or more starburst granny motifs. These usually begin with a center ring and expand outward in petal-like clusters. Keep the motif balanced so the shape remains flat and neat.
The motif is the centerpiece of the headband.
Step 2: Decide the headband placement
Think about where the starburst motif will sit. Center front is a classic choice, but a slight off-center placement can feel more modern and stylish. The motif should be visible without making the band uncomfortable.
Placement changes the overall style.
Step 3: Crochet the base band
Make a simple band that fits around the head comfortably. Use a stitch that stretches a little and stays flat, such as half double crochet or single crochet. The band should support the motif without pulling on it.
The band keeps the headband wearable.
Step 4: Join the motif to the band
Sew the starburst motif onto the front or side of the band. Make sure it lies flat and is centered well. A secure attachment is especially important because the motif will be the focal point of the accessory.
The joining stage gives the headband its final shape.
Step 5: Add border rows if needed
If the motif looks slightly larger than the band, add border rows to connect them smoothly. This can help the whole headband feel more polished and balanced.
Step 6: Finish the ends neatly
Sew the back ends together or use a small elastic section for stretch. Keep the finish smooth so it does not irritate the skin behind the ears or at the back of the head.
Step 7: Check motif symmetry
Before finishing, make sure the starburst is even on both sides. A well-shaped motif will make the headband feel more professional and stylish.
Helpful tips
This headband is beautiful in bright or tonal color combinations. If you want a more vintage look, try retro-inspired shades like mustard, rust, and cream. If you want something soft and modern, pastel motifs can look lovely too.
4. Crochet Daisy Vine Headband Pattern
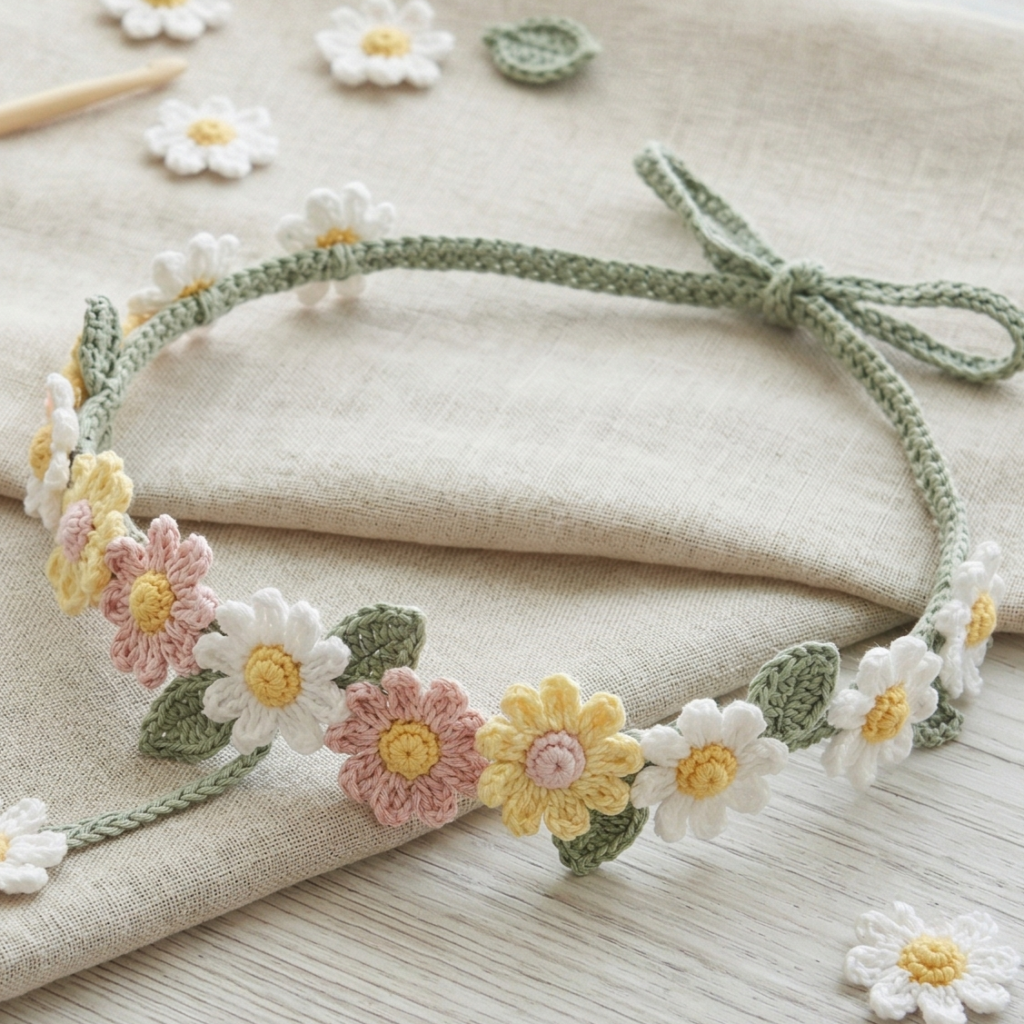
A daisy vine headband feels fresh, cheerful, and a little whimsical. The floral detail makes it perfect for spring and summer, but it is also a sweet everyday accessory if you enjoy delicate handmade pieces. It has a soft cottage style that feels easy to wear and easy to love.
Step-by-step guide
Step 1: Choose floral colors
Select a flower color and a vine color. White and yellow is the classic daisy choice, but pastel pink, cream, and green can also look beautiful. The contrast should be gentle enough to feel floral and soft.
The colors create the garden-inspired look.
Step 2: Make the vine foundation
Crochet a thin vine-like band that will serve as the base of the headband. This can be a narrow chain or a simple textured cord. Keep it flexible and lightweight so it stays comfortable.
A slim vine gives the headband its delicate feel.
Step 3: Crochet the daisy motifs
Make one or several tiny daisies separately. Each daisy should have a small center and short petal stitches so it stays compact. Tiny flowers work best because the headband should remain light and wearable.
The daisies are the main decorative elements.
Step 4: Add leaves if desired
Crochet a few small leaves to place between the flowers. The leaves make the vine feel more natural and fuller. Keep them small and neat so they do not overpower the daisies.
Leaves give the headband a fresh botanical look.
Step 5: Attach the flowers to the vine
Sew the daisies and leaves onto the band at even intervals or cluster them slightly toward one side for a more styled look. You can keep the flowers spread across the band or create a concentrated floral focal point.
Placement helps set the mood.
Step 6: Finish the ends
Join the ends of the vine band neatly. If you want a more adjustable fit, add a small tie-back or elastic section. Make sure the ends are smooth so they feel comfortable against the skin.
Step 7: Adjust the flowers
Once attached, gently shape the petals and leaves so they sit naturally. A lightly blocked flower will often look even nicer and more defined.
Helpful tips
This headband looks especially lovely in cream and yellow, but pastel blue or blush daisies can also feel sweet and modern. It is a lovely accessory for spring outfits, casual wear, or a soft feminine style.
5. Crochet Thermal Twist Headband Pattern
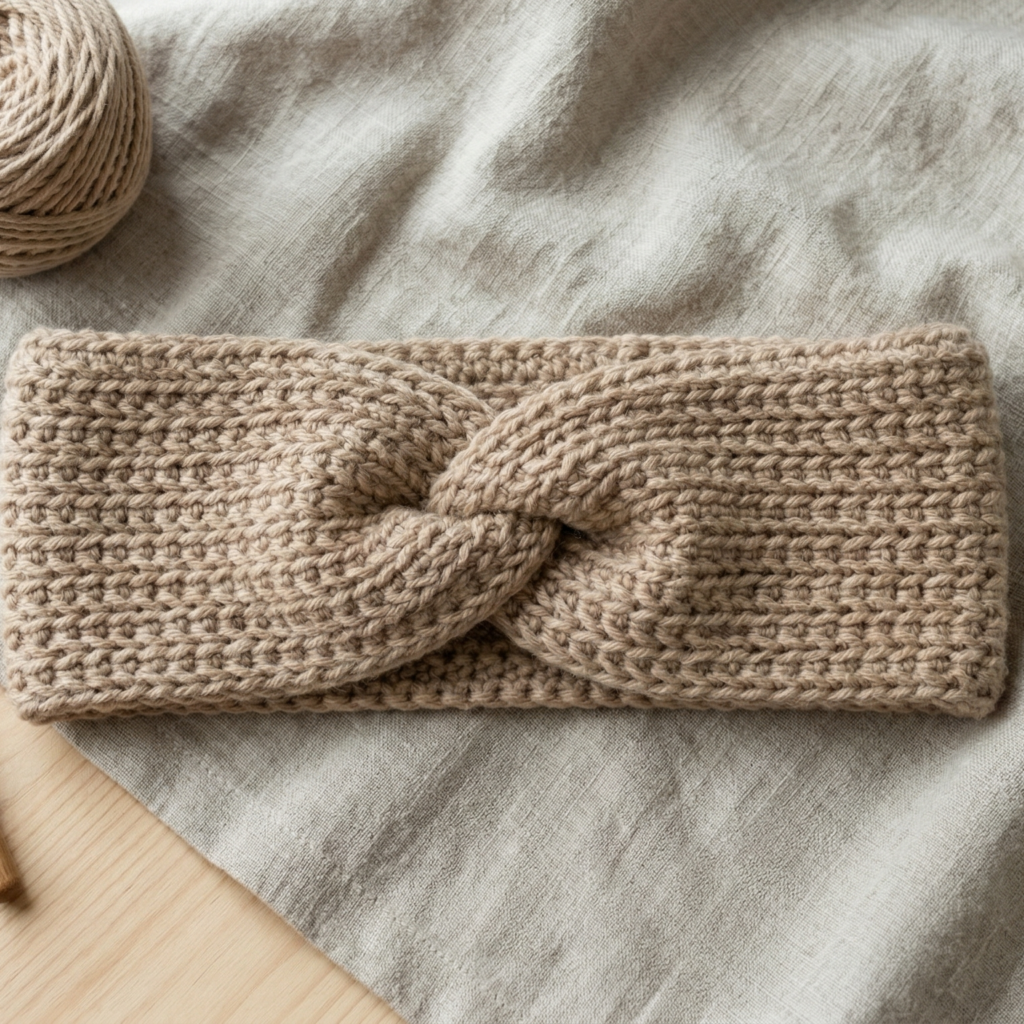
A thermal twist headband has a cozy, textured look that feels modern and practical. The thermal stitch gives the band a dense, warm feel, while the twist adds a stylish finish. It is a great choice if you want something comfortable, warm, and easy to wear in cooler weather.
Step-by-step guide
Step 1: Pick a warm, soft yarn
Choose a yarn that feels comfortable against the skin and works well with texture. Cotton blends, soft acrylic, or wool blends can all work depending on the season. The thermal stitch creates a thick structure, so the yarn should not be too stiff.
The yarn should support warmth and stretch.
Step 2: Measure the head
Measure the circumference where the headband will sit. Since thermal stitch makes a dense fabric, it is important to get the fit right. The band should stretch just enough to stay in place but not feel too tight.
A snug fit helps the twist sit well.
Step 3: Crochet the thermal stitch band
Work the thermal stitch to create a dense, warm band. This stitch produces a thick, cushioned fabric that feels especially cozy. Keep the rows even and steady so the band remains flat.
The stitch is what gives the headband warmth.
Step 4: Shape the twist
Once the band is the right length, twist the ends and sew them together so the twist sits at the front or slightly off-center. Make sure the twist is neat and balanced. This simple shaping detail gives the headband a stylish finish.
The twist makes the design look polished.
Step 5: Secure the join
Use yarn and a needle to sew the ends together firmly. The join should not feel bulky or awkward. Keep the seam soft so the headband remains comfortable to wear.
A neat join is important for comfort.
Step 6: Check the stretch
Put the headband on and make sure it stretches comfortably without loosening too much. The thermal stitch should hold its shape well. If the fit feels too loose, make the band a little shorter next time.
Step 7: Finish and smooth
Weave in all ends carefully and smooth out the twist so it sits naturally. If needed, lightly block the band to help the edges lie even.
Helpful tips
Thermal twist headbands look especially good in solid colors because the texture is the main feature. Neutral shades like beige, gray, cream, or navy make the stitch stand out beautifully, but jewel tones can also give the headband a richer look.
Conclusion
Crochet headbands are such a satisfying accessory project because they are quick, practical, and stylish all at once. They are the kind of piece you can wear every day without much effort, but they still feel personal because they were made by hand. That balance of usefulness and beauty is what makes them such a great crochet project.
These five headband patterns each bring something different to the table. The pearl accent bow headband feels soft and elegant. The vintage scallop headband is timeless and delicate. The starburst granny headband adds playful handmade charm. The daisy vine headband feels fresh and floral. The thermal twist headband is cozy and modern. Together, they show how versatile a simple crochet headband can be.
Whether you are making one for yourself, for a gift, or to add variety to your handmade accessory collection, these patterns offer plenty of inspiration. With the right yarn, a comfortable fit, and neat finishing, your crochet headbands can become favorite everyday pieces that are beautiful, wearable, and fun to make.