Hair ties are quick, practical, and a lovely way to add personality to everyday styling. This post gives one focused introduction (materials, safe elastics, sizing, tools, abbreviations, care) followed by five full patterns you can paste into a blog: Flower Hair Tie, Ribbon Hair Tie, Rose Hair Tie, Sunflower Hair Tie, and Flower Decor Hair Tie. Each pattern includes skill level, materials, finished size, a step-by-step build, variants, finishing tips and care instructions. Tone is clear and practical so readers can follow easily.
materials, safe elastics, sizing, tools, and abbreviations
Yarn & fiber
- Best choices: 100% cotton (sport or DK) and cotton blends are ideal — soft, breathable, washable, and gentle on hair. Mercerized cotton gives crisp stitches; bamboo/cotton blends are silky.
- Avoid highly fuzzy novelty yarns next to elastic (they can snag or shed). For sturdier decorative pieces you may use a short section of chenille for plush accents but sew it securely away from the elastic opening.
Elastics / bases (safety & performance)
- Types: standard hair elastics (no-metal seam), fabric-covered elastics, scrunchie elastics (C-shaped stretch), and small metal-free clear elastics.
- Recommendation: use elastic specifically made for hair (flat, braided or covered). Avoid elastics with a metal join — these can break and damage hair. For very thick hair use a heavier duty elastic or a pre-made hair elastic band (20–25 cm loop circumference relaxed).
- Replacement & testing: always test an elastic for stretch & recovery before assembly. Replace elastic if it loses elasticity.
Sizing guidance
- Decorative crochet motif sizes shown here are aimed at being lightweight and non-bulky:
- Small accent (for single-loop elastics): 1–1.75 in (2.5–4.5 cm) diameter
- Medium scrunch: 2.5–4 in (6.5–10 cm) diameter (holds more hair)
- To adapt size: increase number of rounds or chain length as noted in each pattern.
Hooks, notions & finishing supplies
- Hooks: range 2.5 mm → 4.5 mm depending on yarn weight and desired density. Specific recommendations included per pattern.
- Other supplies: tapestry needle, small scissors, stitch markers, measuring tape, thin elastic or pre-made hair elastics, small ring or jump ring (optional to attach decoration), small piece of felt (optional backing), and a needle/strong sewing thread to sew elastic ends together securely (matching yarn is fine for visible stitches).
Construction approaches
- Slip-over style: crochet piece is made with a center opening that slides over an elastic loop. Elastic is knotted and the crochet cover hides the join. Good for sturdy fit.
- Wrap-and-sew: crochet piece forms a tube which is wrapped around elastic and seamed shut; convenient for scrunchie styles.
- Sewn-on motif: small motifs are crocheted and sewn onto an existing hair elastic — simplest for fast sets.
Safety & wear notes
- Avoid long dangling parts for children under 3 — these are accessories for older kids and adults.
- Secure all sewn/knotted parts thoroughly so beads or embellishments don’t come loose.
- If adding small beads or metal findings, warn customers/giftees that these are not suitable for infants.
Abbreviations (US)
- ch — chain
- sc — single crochet
- hdc — half double crochet
- dc — double crochet
- tr — treble crochet
- sl st — slip stitch
- st(s) — stitch(es)
- inc — increase (2 sc in same st)
- dec — decrease (sc2tog)
- BLO / FLO — back/front loop only
- MR — magic ring
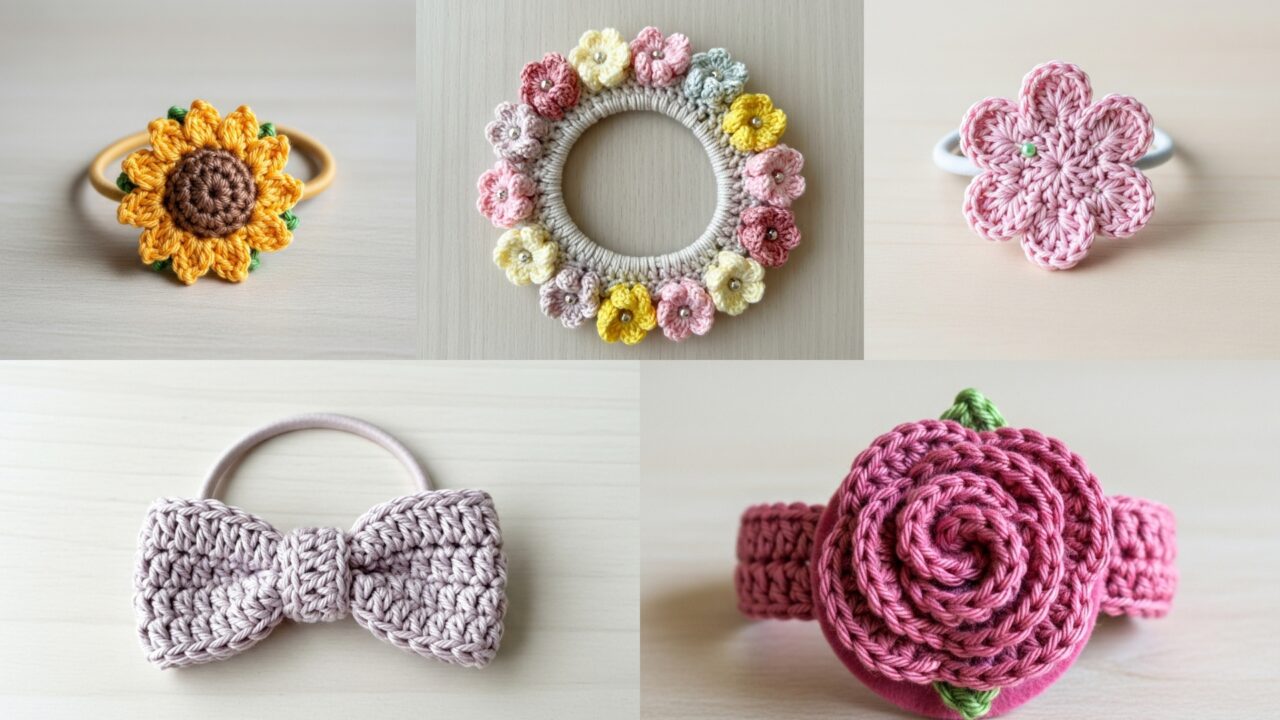
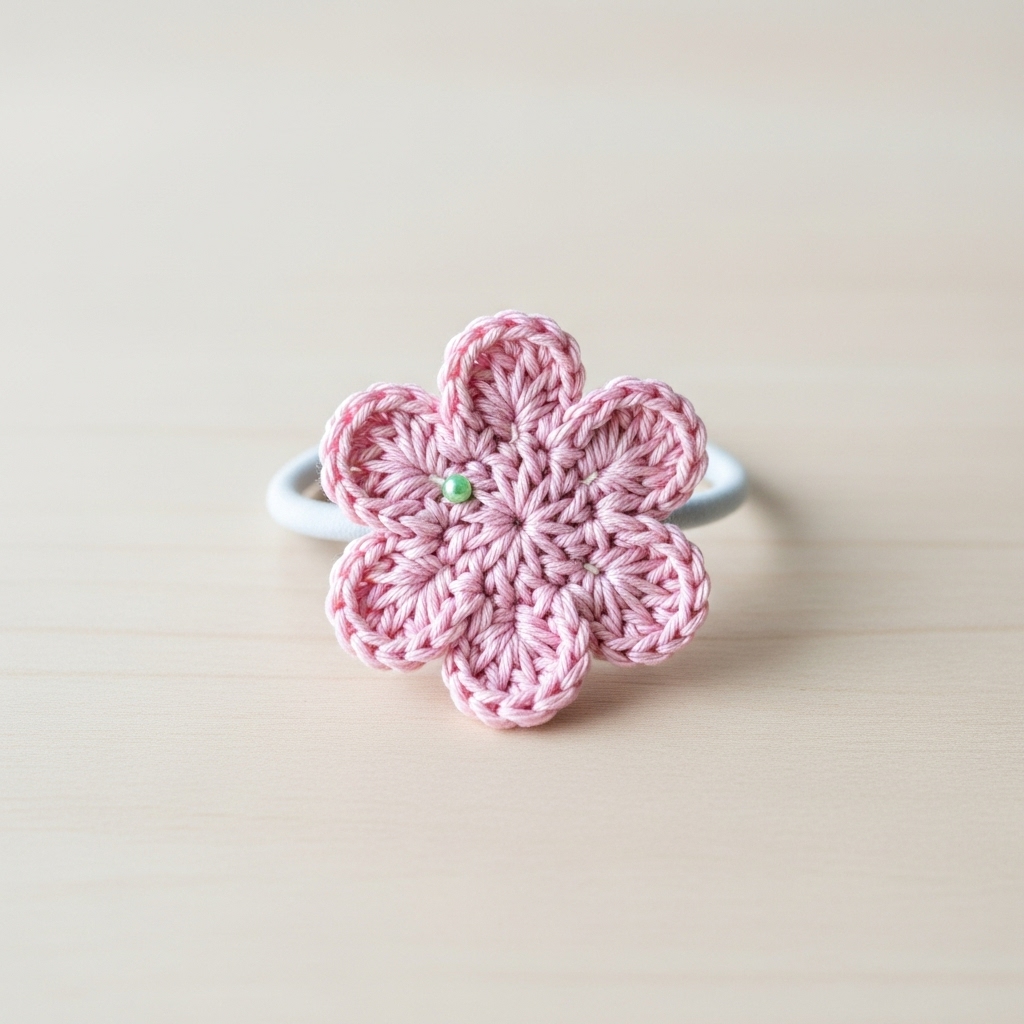
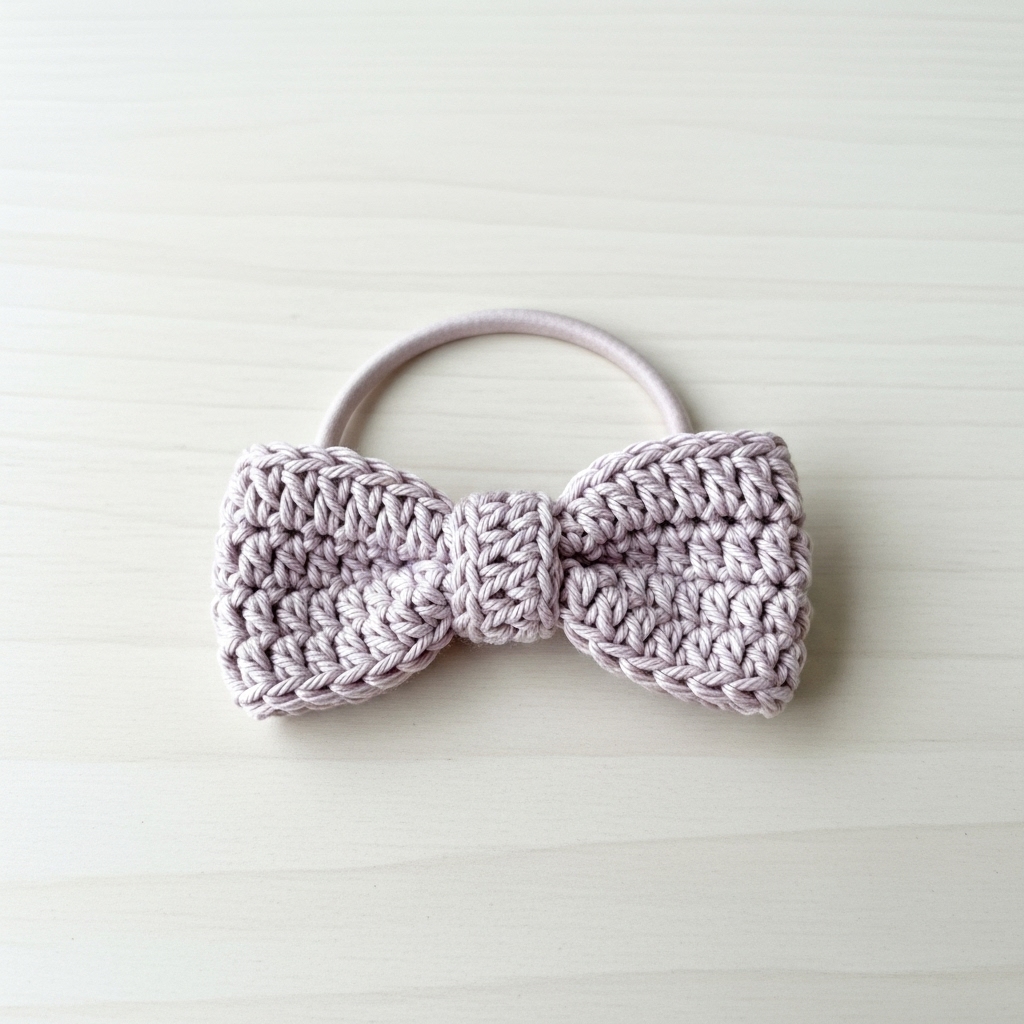
1. Crochet Flower Hair Tie Pattern
Skill level: Confident beginner
Style: Lightweight 5-petal flower that slips over a standard elastic; ideal for single-loop elastics or narrow scrunchies. Versatile, quick to make in sets.
Materials (pair)
- Sport or DK cotton yarn (small amount: ~10–15 yd per pair).
- Hook: 2.5–3.5 mm (use 2.5 mm for tighter petals with thread-like look; 3.5 mm for looser petals and larger flower).
- 2 hair elastics (no-metal).
- Tapestry needle, scissors.
Finished size
- About 1.5–2.0 in (4–5 cm) diameter with DK and 3.0 mm hook. Adjust by hook/yarn.
Step-by-step — slip-over flower for elastic
Center ring
- MR; ch1, 6 sc into MR; pull tight and join with sl st to first sc. (6 sc)
Petal round
2. Ch 3, (dc, hdc, sc) in next st, sl st into next st — repeat 5 times to make five petals. Explanation: you create a small petal cluster in one stitch, ch3 to create separation, then move to next stitch. After last petal join to base.
Forming the flower base & opening
3. Ch 8 (or longer if your elastic has larger diameter), sl st to the base right between two petal bases to make a small loop (this loop will slide over elastic). Fasten off leaving tail.
Mount & finish
4. Slip the elastic through the ch8 loop, center the flower on the elastic and snug loop close to elastic knot. Hide the knot under the petals; if using pre-knotted hair elastic, position knot to back. Weave in ends.
Alternative secure cover (wrap-style)
- Make an extra round of sc around the flower base (24 sc) then leave an opening to thread elastic through and tack ends together.
Variations
- Add a small bead or French knot center for contrast.
- Make layered flowers by adding a second petal round with smaller petals offset between the first round; sew both layers together.
Finishing & care
- Machine wash gentle and tumble low if yarn allows. For cotton, safe to wash; for bleached pearls or beads, hand wash.
2. Crochet Ribbon Hair Tie Pattern
Skill level: Confident beginner — simple looped ribbon bow attached to elastic
Style: Sleek ribbon-like band folded into a bow and attached to a hair elastic; modern, less bulky than scrunchie, good for finer hair.
Materials (pair)
- Fingering or DK cotton, or a ribbon yarn (lightweight) — ~10–15 yd.
- Hook: 2.5–3.0 mm (for fingering) or 3.5 mm for ribbon yarn.
- 2 hair elastics, tapestry needle.
Finished size
- Bow width ≈ 2–3 in (5–7.5 cm) depending on chain length.
Step-by-step — ribbon bow (no heavy bulk)
Make the ribbon strip
- Chain foundation: ch 30 (for a 2.5 in bow; adjust length to make wider/narrower bows).
- Row 1: sc in 2nd ch from hook and across. Turn. (29 sc)
- Row 2–4: sc across (3–5 rows total). Fasten off leaving long tail for sewing. This makes a thin flat ribbon strip.
Forming the bow
4. Fold the strip into a loop and bring ends together; stitch ends to make a short tube if you like or leave flat. Pinch center of the strip to form a bow shape — wrap the long tail around the center several times to make the bow center band and sew the tail into the back to secure. Alternatively crochet a small center loop: ch 6, sl st into first ch to make a ring, sc around ring 2–3 times and slip over pinned bow center, sew closed.
Attach to elastic
5. Slide the hair elastic into the back of the bow center (or wrap the elastic inside the center band while winding). Secure the band with extra stitches around the elastic so it holds and the elastic sits flush with bow. Hide any knots by sewing inside the band.
Variations
- Make ribbon wider by increasing the chain length and adding rows.
- Work strip in two colors for striped effect.
Finishing & care
- Press lightly with a warm iron (cotton only) or steam to flatten ribbon edges. Machine wash gentle depending on yarn label.
3. Crochet Rose Hair Tie Pattern
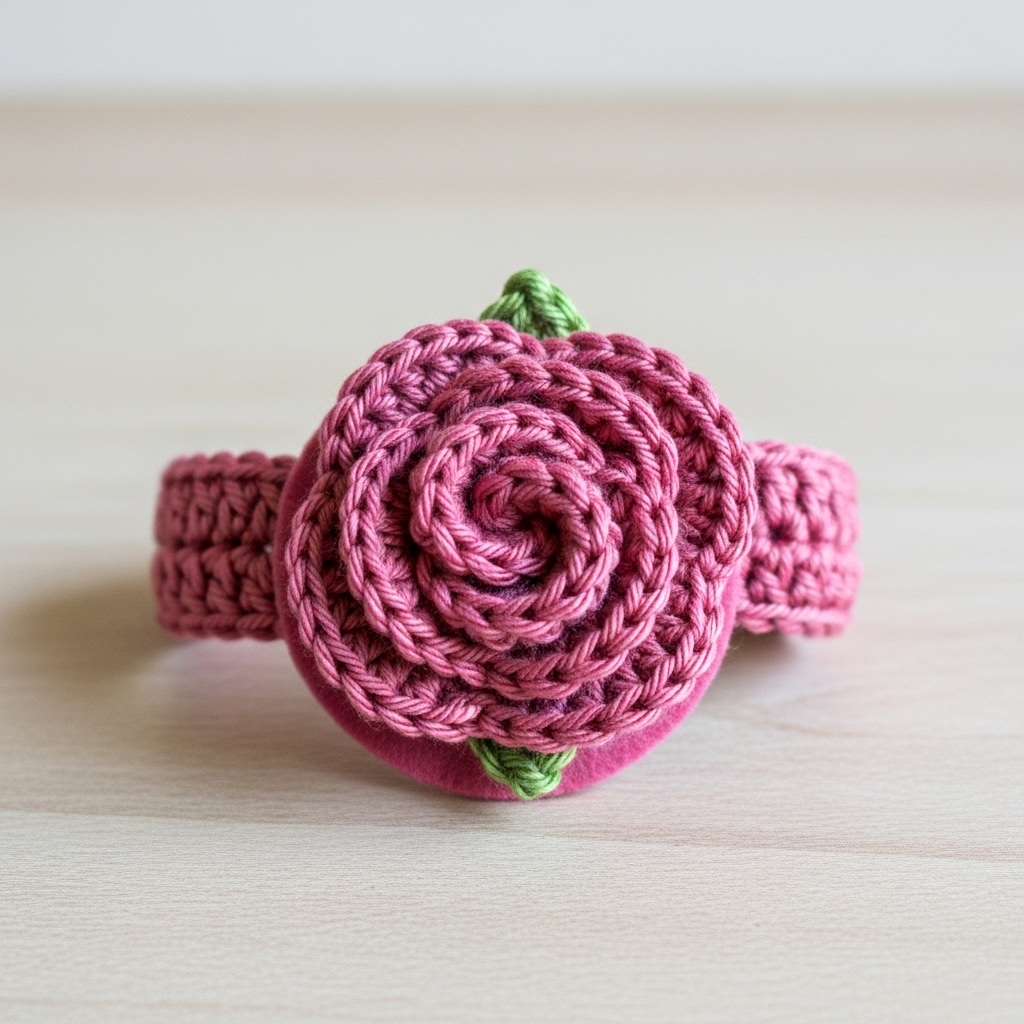
Skill level: Intermediate — layered spiral rose that gives 3-D floral effect; best used as sewn ornament onto elastic or scrunchie.
Style: A small, sculptural rose secured to a hair elastic or scrunchie; works as a focal piece for gifts or bridal accessories.
Materials (pair)
- Fingering or DK cotton yarn in rose color — ~15 yd per rose.
- Hook: 2.5–3.5 mm.
- 2 hair elastics or a scrunchie base for mounting, tapestry needle, small felt discs.
Finished size
- Rose approx 1.25–1.75 in (3–4.5 cm) diameter (thread size and number of rounds control fullness).
Step-by-step — rolled spiral rose
Make a spiral strip
- Ch 30 (for modest-sized rose; shorter chain for smaller bloom). Row 1: sc in 2nd ch from hook and across. Row 2: sc across. You can do 2–4 rows depending on how tall you want petals.
Form petals by shaping
2. Starting at one short end, roll the strip tightly into a spiral. As you roll, use a needle and yarn tail to tack the base every 4–6 mm so spiral holds its shape. Continue rolling until whole strip is coiled into a rose.
Finish & secure
3. With tapestry needle, sew through coil base multiple times to join coil to itself firmly. Add a felt circle on the back and sew through felt and coil to create flat mounting surface. Trim any excess.
Attach to elastic
4. Sew the felt base to the hair elastic with sturdy stitches (sew through elastic loops) or attach to scrunchie by stitching through scrunchie fabric at several points. Test the attachment by gently pulling elastic to ensure rose is securely anchored.
Variations
- Make a fuller rose: chain longer and use more rows; make two spirals and stack.
- Add tiny leaves: ch 6, sc 5 across and attach under rose.
Finishing & care
- Because roses are dimensional, hand wash recommended. Reshape after washing by pinching petals back into desired shape.
4. Crochet Sunflower Hair Tie Pattern
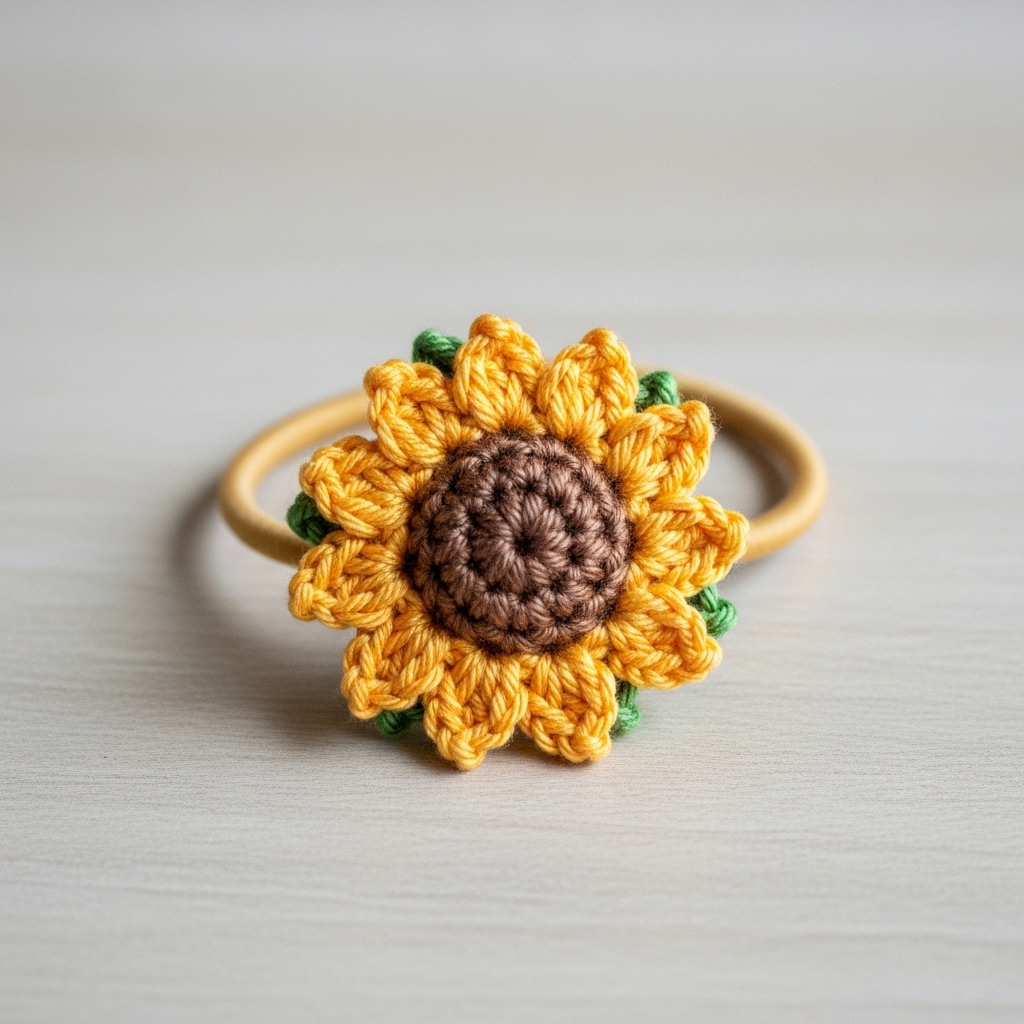
Skill level: Intermediate — two-color center (dense) and bright petals. Great for summer sets and kids.
Style: Cheerful sunflower motif that slips over elastic or is sewn atop scrunchie.
Materials (pair)
- DK cotton in golden yellow (petals), brown (center) and optional green for tiny leaves — ~20 yd total per pair.
- Hook: 2.75–3.5 mm.
- 2 hair elastics, tapestry needle, optional small felt backing.
Finished size
- Approx 1.5–2.5 in (4–6 cm) across depending on rounds.
Step-by-step — two-part sunburst
Center (nylon/dense disk)
- MR; R1: ch1, 8 sc into MR; sl st to join (8). R2: inc around (16). R3: sc 2, inc around (21–24 depending on spacing) — make center firm and slightly raised. Fasten off brown.
Petals (yellow)
2. Join yellow into any sc on R2 or R3. Ch6, sl st to next st to form loops for petals around; repeat around to form 12–16 loops depending on count.
- Into each ch6 loop work sc, hdc, 3 dc, hdc, sc then sl st to base. Repeat until all loops become petals. Fasten off and weave ends.
Assembly
4. Flatten the center over the backs of petal bases and sew through center and petal bases together multiple times to secure. Add felt circle on back and sew through felt for extra stability.
Attach to elastic
5. Slip the elastic into the back under the felt and sew multiple passes to anchor the motif to the elastic; ensure stitches go around the elastic’s band to keep it from sliding.
Variations
- Make smaller sunflowers by making fewer petals (ch4 loops with sc, 3dc, sc petals).
- Add a green leaf or two for playful look.
Finishing & care
- Cotton sunflowers are robust; machine wash gentle and lay flat to dry.
5. Crochet Flower Decor Hair Tie Pattern
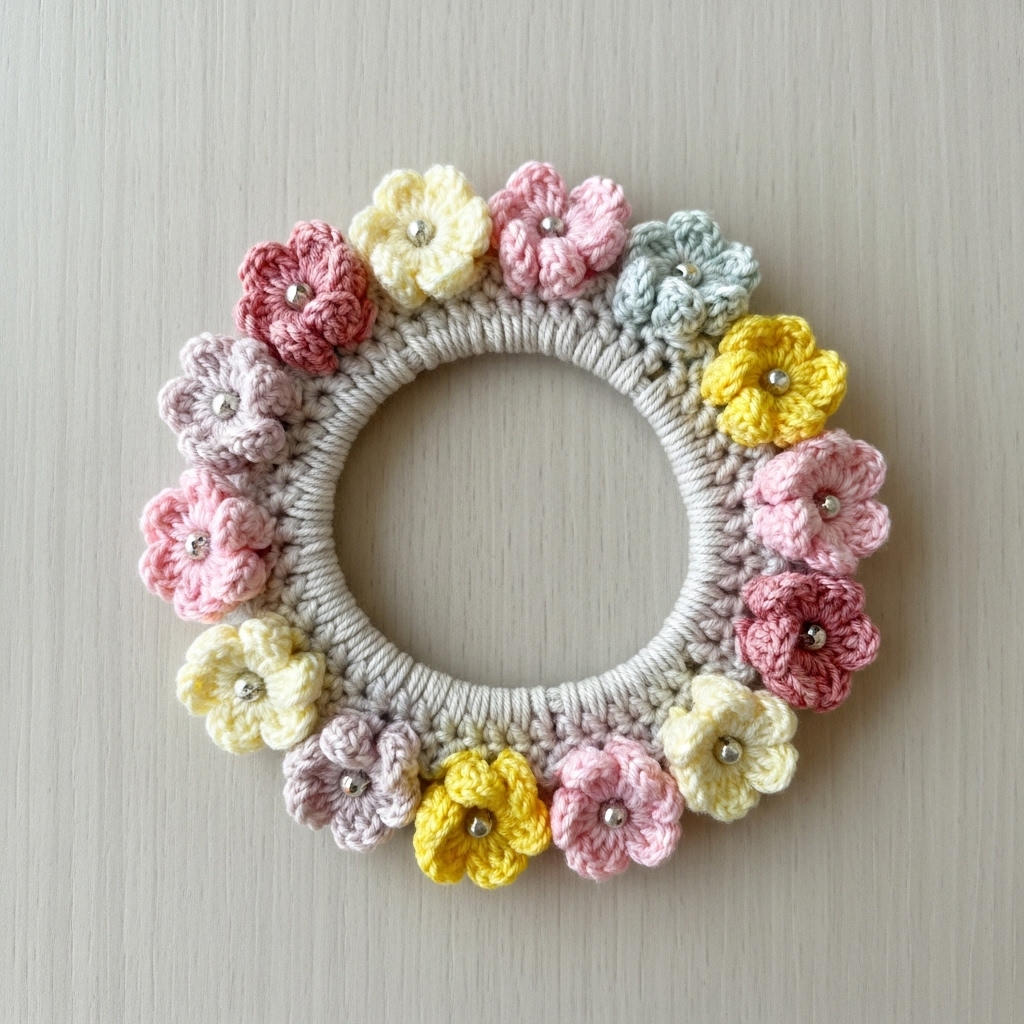
Skill level: Confident beginner–intermediate — small cluster of tiny flowers sewn together; perfect for scrunchies or elastic sets.
Style: Three small flowers clustered together for a decorative clump that sits on a scrunchie or pony elastic.
Materials (pair)
- Sport/fingering cotton in 2–3 colors — small amounts ~10–15 yd.
- Hook: 2.5–3.5 mm.
- 2 scrunchie bases or elastics, tapestry needle, small felt disc.
Finished size
- Cluster approx 2.0–3.0 in (5–7.5 cm) across depending on flower sizes.
Step-by-step — tiny flower cluster
Small flower motif (make 3 per cluster)
- MR; ch1, 6 sc into MR. R1: ch3, 3 dc in same st, ch3, sl st in next st — repeat 6 times to make 6 tiny petals. Fasten off.
Make three small flowers in complementary colors (e.g., blush, cream, green leaf).
Assembly
2. Arrange three flowers in a triangular cluster, overlapping edges slightly. Sew them together through the backs with small stitches so the cluster is rigid.
- Add optional details: tiny French knot (embroidery floss) or a tiny bead in the center of each tiny flower (if a safe size and sewn strongly).
Mount to elastic
4. Sew cluster to scrunchie base using a felt circle to distribute stress: put felt disc behind cluster, place scrunchie on top or through felt, then sew multiple passes through felt and scrunchie fabric to anchor cluster; finish on felt interior.
Variations
- Add a tiny crocheted bow tucked under cluster for feminine touch.
- Make clusters with different numbers/sizes of flowers for asymmetry.
Finishing & care
- Avoid machine drying on high heat; hand wash preferred for clusters with small beadwork.
Conclusion
Final finishing & quality checklist
- Secure elastic ends: For wrap-and-sew methods, sew elastic ends with strong thread (several passes) before covering; knot and bury the knot in the crochet fabric or felt backing.
- Hide knots: Position the knot on the back of the motif and cover with felt or extra stitches.
- Test for durability: Tug gently on motifs and elastic attachments to ensure they hold under stress before selling or gifting.
Care & labeling to include with gifts
- Example tag: “Hand wash cold, reshape and lay flat to dry. Avoid heat drying to preserve elastic life. Replace elastic as needed.”
- If metal beads/findings used: include “contains small metal parts” warning and ear/skin sensitivity note.
Packaging & gift ideas
- Package as sets (3 matching hair ties) in small organza or kraft boxes. Add a care & fiber content card. For bridal or baby showers (for older kids/adults), coordinate colors with theme.
Photography tips for blog & shop
- Get macro closeups of stitch detail, and a scale shot of the hair tie on a hand or wrapped around a hair bun to show size/fit. Use natural light and neutral backgrounds; present pairs in complementary color palettes. Vertical Pinterest pins with 2–3 closeups and a title overlay perform well.
Selling & pricing practicalities
- Price to include yarn, elastic, time spent sewing/finishing and packaging. For custom color requests, charge a small customization fee. Offer option for hypoallergenic elastics or metal-free components.