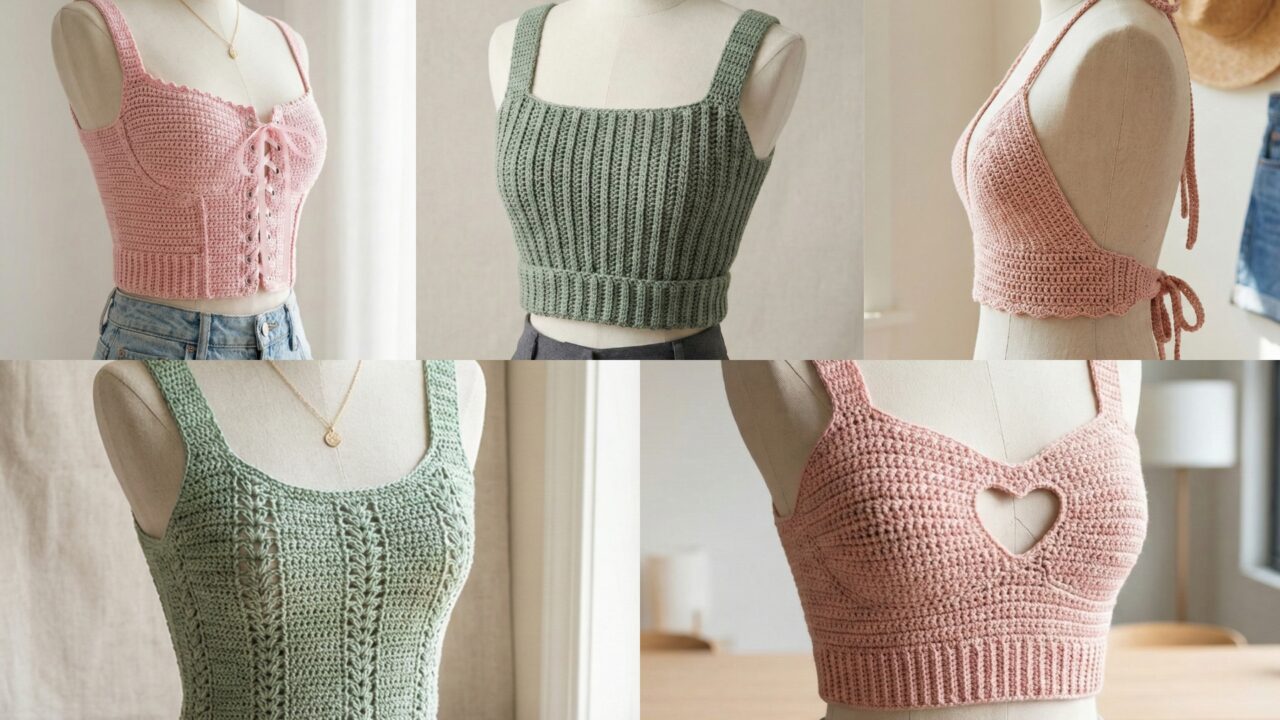
Crop tops are a perfect summer staple: quick to make, endlessly customizable, and ideal for showing off texture, color, or a flattering silhouette. Below you’ll find one complete introduction (tools, sizing, gauge and abbreviations) followed by five full patterns — Boho Summer Tank, Skylar Ribbed Crop Top, Halterneck Tank Top, Open Heart Crop Top, and Baby Pink Lace-Up Corset Style Crop Top. Each pattern includes skill level, materials, a worked example (adult Medium), step-by-step construction, fitting notes, variations, finishing and care. Read the intro once, then jump to the pattern you want.z
Quick essentials — tools, sizing, abbreviations, gauge & grading
Tools & notions
- Crochet hooks: common sizes for these tops are 3.5 mm — 5.5 mm (adjust to yarn & gauge).
- Yarn: cotton or cotton blends (DK to light worsted weights) are best for summer wear because they breathe and hold shape. Choose yarn according to the pattern’s suggested weight.
- Other notions: tapestry needle, stitch markers, measuring tape, safety pins, a small amount of elastic or narrow ribbon for adjustable features, optional fabric for lining.
Common abbreviations (US)
- ch = chain
- sl st = slip stitch
- sc = single crochet
- hdc = half-double crochet
- dc = double crochet
- tr = treble crochet
- sk = skip
- st(s) = stitch(es)
- RS / WS = right side / wrong side
- rep = repeat
- BLO / FLO = back loop only / front loop only
- tog = together
- … = repeat between asterisks
Sizing & basic math
- Target adult sizes reference: Small (S) bust 32–34″, Medium (M) 36–38″, Large (L) 40–42″. For a fitted crop top measure the full bust and subtract 0–2″ for a close fit or add 1–4″ for ease. The worked examples below use a Medium (approx 36–38″ bust) as the example unless otherwise stated.
- If a pattern tells you to make an initial chain to match a chest measurement, compute as: stitches per inch × desired finished circumference. Example: if gauge = 4 dc = 1″ and desired finished bust = 36″, foundation = 36 × 4 = 144 dc (or adjusted to pattern multiple).
Gauge
- Always make a 3–4″ swatch in the stitch pattern and measure stitches per inch and rows per inch. Garment fit depends on accurate gauge.
Grading between sizes
- Two practical grading methods:
- Change the number of pattern repeats across to hit the required bust circumference using your swatch spi (stitches/inch).
- Increase/decrease rounds or rows for length and add/subtract repeats evenly across the width for width.
1. Crochet Boho Summer Tank Top Pattern
Skill level: confident beginner
Vibe: airy, classic boho tank with lacy panels — straps, slight A-line flare, easy to customize.
Materials (Medium)
- DK cotton yarn — ~400–600 yards (adjust for desired length & flare).
- Hook: 4.0 mm (G) — adjust to get gauge.
- Notions: tapestry needle, stitch markers.
Gauge (example)
- 16 dc × 10 rows = 4″ × 4″ in pattern used (do your own swatch).
Finished measurements (example Medium)
- Bust (finished) — 36 in.
- Length (shoulder to hem) — 16–18 in (cropped to waist).
Stitch notes
- Uses a repeating lacy motif: V-stitch (dc, ch1, dc) and chain mesh alternated with solid rows for structure.
- Multiple: pattern repeat = 8 sts + edge sts (I’ll show a workable repeat for swatching).
Construction overview
Worked from top down as two panels (front & back) joined at the shoulders and sides, or worked in the round to a split then divided for front/back. Top-down gives the easiest strap shaping and fit adjustments.
Step-by-step (top-down split tank, Medium example)
1. Straps and upper yoke — start
- Make two identical strap panels (left & right cups joined at back):
- Ch 32 (this gives width across chest of ~8″ per strap area for a moderate neckline; adjust by multiples of 8 for the repeat). Work in V-stitch profile: Row 1: dc in 4th ch from hook (counts as dc + ch1 pattern), ch1, skip 1, dc across — alternative is to work 2 rows of sc to firm base. For a neater strap, work 6 rows of sc then stop.
- For each strap: work 6–8 rows of V-stitch pattern (or until strap depth = ~2–3 in). Make two and set aside.
2. Join straps to form yoke
3. Place straps so they frame the front neckline: left strap and right strap with space between for front center (or make a third center panel). Join straps at the upper back using slip stitch/whipstitch for a small back yoke — leave a small gap if you want a racer or higher back.
Alternate simpler start (single yoke in one piece)
- Chain a length to match half bust minus a couple inches (pattern multiple). Work V-stitch bands across to create a straight upper yoke, then fold and seam to create a small tube for straps, or split into front and back.
3. Divide for body
4. From the yoke, pick up stitches along the lower edge and work body in rounds (or rows) downwards. If working in the round, place markers to mark side seams and front center.
4. Body (lacy boho repeat)
5. Body repeat (worked in rounds for seamless look):
- Round A (solid): dc in each st around.
- Round B (lace): dc in next st, ch2, sk 2, dc in next st or V-stitch: dc, ch1, dc into designated sts. Alternate A & B for interest: A, B, A, B. Work until desired length (~14 in from underarm for cropped length). If you prefer waist length, add 1–2 in.
5. Hem
6. Finish with 2 rounds sc for stability and a scallop edge: skip 2, 5 dc in next, skip 2, sc next for boho scallop.
6. Seams & finishing
7. Sew side seams if worked flat. Weave in ends and block to open lace pattern.
Fit adjustments
- To make more fitted at waist, add a round of decreases at the natural waist: work each round with periodic dc2tog every 8–12 sts to reduce circumference.
- For larger bust, add extra repeats across the front before dividing for armholes.
Variations & styling
- Add a gathered lower panel for peplum effect by increasing V-stitch repeats (double the stitch count for first ruffled round).
- Make straps wider or add an adjustable tie at the shoulder via chain loops.
Care
- Cotton: machine wash gentle or hand wash, reshape while damp.
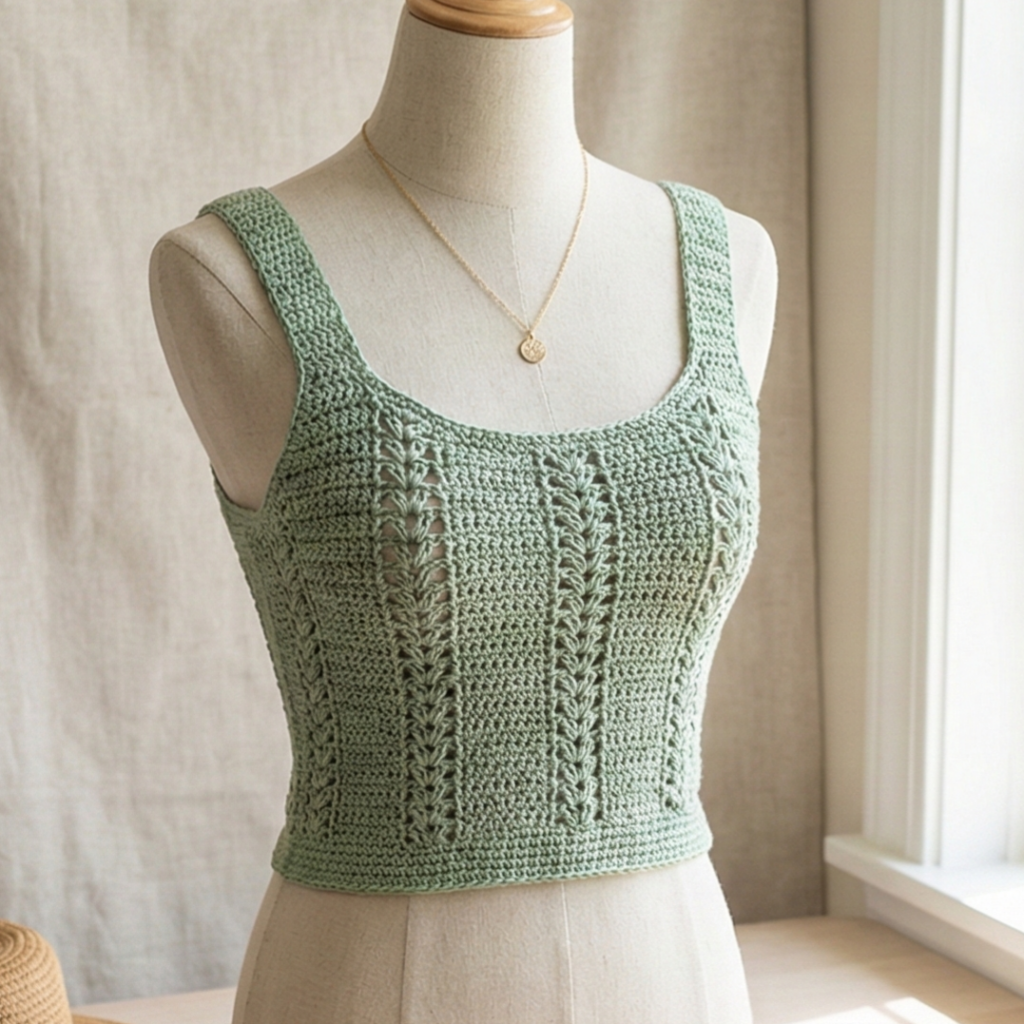
2. Crochet The Skylar Ribbed Crop Top Pattern
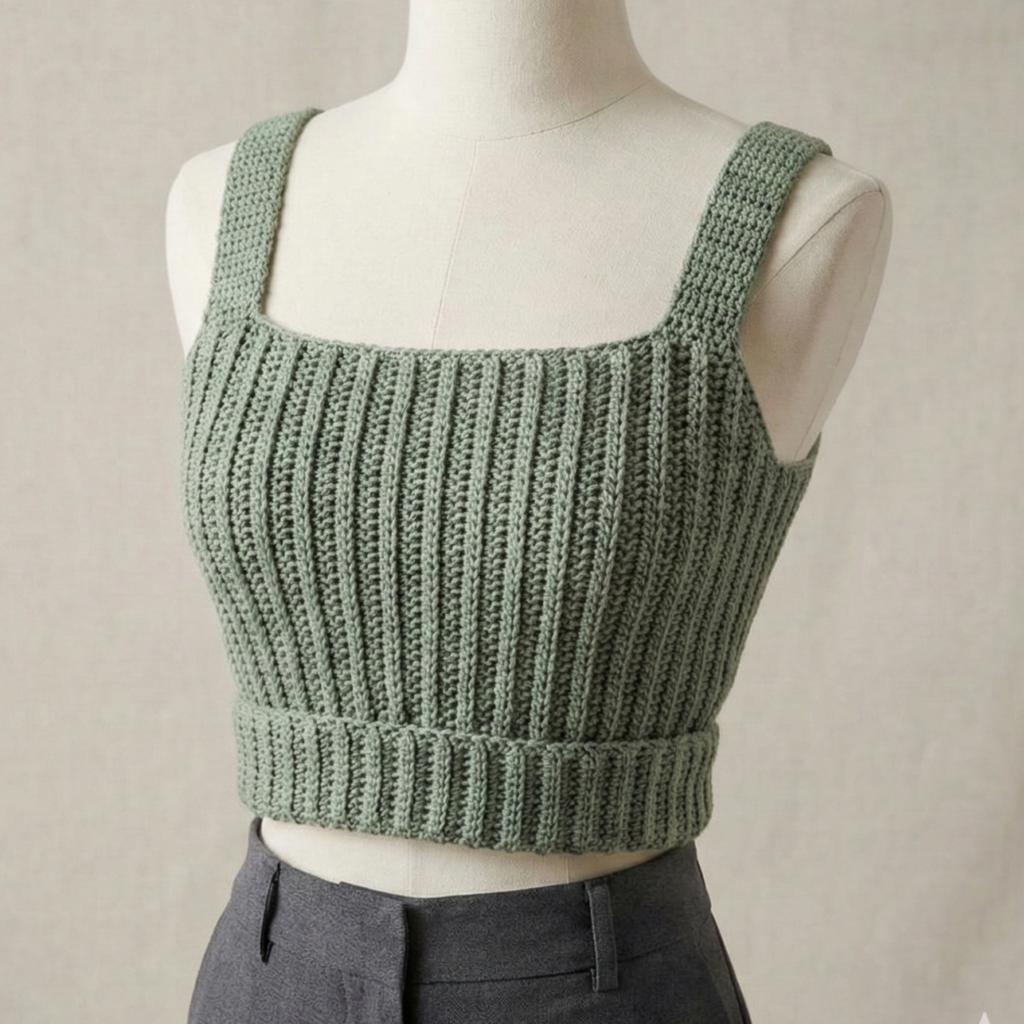
Skill level: intermediate (ribbing using post stitches & shaping)
Vibe: sleek ribbed tank (knit look) — close fit, vertical rib texture, excellent under blazers or with high-waist bottoms.
Materials (Medium)
- DK or light worsted cotton blend — ~350–500 yd.
- Hook: 4.0 mm for texture (smaller if you prefer tighter fabric).
- Notions: elastic (optional for band), stitch markers.
Gauge (example)
- 18 hdc × 12 rows = 4″ × 4″ in rib pattern (do a swatch).
Finished measurements (Medium)
- Bust (finished): 36 in (close fit).
- Length: 12–14 in (typical crop).
Stitch notes
- Rib is created with alternating front-post and back-post half double crochet (fpHdc / bpHdc) columns. Worked flat and seamed or worked in the round for a seamless look.
Construction overview
Worked bottom-up for a fitted band that hugs the waist then increases subtly through the bust for comfort, or worked top-down for ease of getting armhole depth correct. Example below is bottom-up.
Step-by-step (bottom-up, Medium example)
1. Band (foundation — rib casing)
- Measure waistband circumference desired (example target bottom circumference = 30–32″ for a cropped fitted band). Using swatch SPI (e.g., 4 hdc/in), calculate foundation chain: 32 × 4 = 128 sts. Because rib pattern works in multiples of 2, make ch 128 + 1 turning (or foundation hdc as a row).
- Row 1: hdc across. Turn.
- Rows 2–6 (BLO rib set): Work hdc in BLO across for 6–8 rows to create a foldable rib casing. If you want to insert elastic, leave an opening and fold the BLO band to create a casing.
2. Rib body
4. After cuff, switch to full rib:
- Row 1 of rib: ch 1, fpHdc around next st, bpHdc around next st rep across. This sets vertical columns. Turn.
- Row 2+: ch1, fpHdc around the fpHdc of the previous row, bpHdc around the bpHdc — the post stitches form the ribs. Continue until the body height = ~8–10 in (from waist to under-bust depending on desired fit).
3. Bust shaping
5. To accommodate bust without breaking ribs: work increases evenly across next 2–4 rows by replacing occasional fpHdc with fpHdc, hdc increase in next st (i.e., add 1 hdc between rib columns every N sts). This widens the circumference slightly (aim for finished bust circumference = your bust measurement or +1–2 inches ease).
- Alternatively make the top edge elasticized with an applied i-cord or small elastic run to keep the top snug.
4. Armholes & neckline
7. For a tank with fitted straps, stop increasing and shape armholes by binding off a small number of sts at each side for armhole depth: e.g., sc across to last 8 hdc, ch1 turn and work back across (short-row armhole shaping). Better option: work flat, then seam sides leaving an armhole opening of ~7–8 in for Medium (adjust to fit).
5. Straps
8. Pick up sts at shoulder points and work a narrow band (hdc in BLO for 6–8 rows) for straps or make two crocheted cords (chain 50 and fold in half sc to make a flat strap) and attach.
6. Hem & finish
9. Bind off with a round of sc for neatness. Weave ends and block lightly in rib direction to set columns.
Fit & grading notes
- Ribbed fabric stretches; if you want a firmer fit, reduce ease to bust – 0–1 inch.
- To size up/down, change number of repeat columns across using your stitch gauge.
Variations & styling
- Make a longer version as a crop sweater by extending height and adding long sleeves worked in rib.
- Add front seam or decorative zipper for edgy style.
Care
- Cotton blend: machine wash gentle, reshape flat.
3. Crochet Halterneck Tank Top Pattern
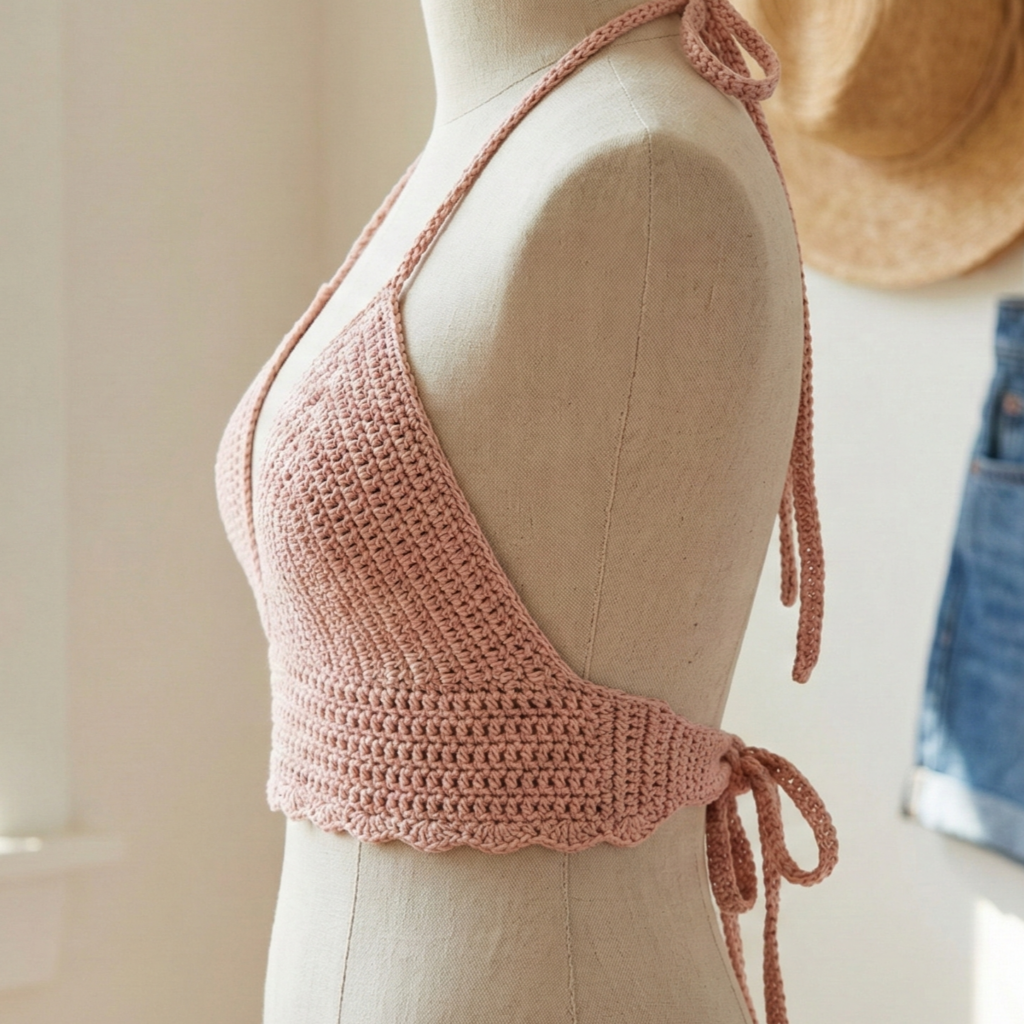
Skill level: confident beginner → intermediate (sweater shaping & strap work)
Vibe: classic summer halter with triangular front coverage and ties at the neck; flattering and adjustable.
Materials (Medium)
- DK cotton yarn — ~350–500 yd depending on coverage.
- Hook: 4.0 mm.
- Notions: two length of cord (for neck tie & back tie) or make crochet ties.
Gauge (example)
- 16 dc = 4″ in the main stitch (swatch).
Finished measurements
- Bust finished: 36 in (for medium, adjust by pattern multiple).
- Length from base of neck (center front) to hem: 15–17 in (cropped).
Construction overview
Worked as two triangular front panels joined at center back and with a band under bust. Halterneck allows for size flexibility because the ties adjust.
Step-by-step (Medium)
1. Front triangle (make 2—left & right)
- Start with a small central triangle using increasing rows:
- Row 1: MR, ch 3, 3 dc in MR, ch 2, 3 dc in MR — (one full triangular sector) — adjust to form the first triangle base, or more simply chain 3, dc 2 in 3rd ch to start. Preferred triangle start: ch 8, dc into 4th ch from hook and across to create a small triangular wedge; increase 1 dc at each end of every RS row to enlarge the triangle.
- Continue increasing at both edges by 1 st per row (work in the round or flat) until triangle base width at fullest point = half the desired front bust coverage (~9–10 in across for medium half). The triangle height (center to base) should be ~8–9 in depending on bust and how much coverage you want.
2. Neck tie
3. At the triangle top (center front point), attach a long chain that serves as the halter tie or make a crocheted cord; length ~24–36 in to allow tying.
3. Joining & underbust band
4. Make two triangles; align them over the bust (mirror them so bases meet under bust). Join bases with a simple sc band: pick up stitches along the base edges of both triangles and work several rounds of hdc to create an underbust band ~1.5–2 in wide. This underbust band will determine final bust circumference; if you need more room, increase band rounds or add a split back with tie closure.
4. Back closure
5. For tie back: leave the back open and make two long cords attached to each side of the underbust band to tie. For a fixed band: seam the back edges together leaving armhole openings (approx 7–8 in).
5. Hem & finish
6. Work 2 rounds of sc along entire lower edge for neat finish. Add decorative shells if desired.
Fit tips
- Because triangles are adjustable, halternecks can fit multiple sizes with the length of ties and band adjustments—measure as you go.
- For fuller busts, make wider triangles and a stronger underbust band (work two strands held together or hdc BLO for dense support).
Variations & styling
- Add a small racer back by sewing the triangle tops together behind the neck and sewing a loop for a button (less adjustable but sportier).
- Make a cropped halter with openwork panels for festival wear.
Care
- Cotton: hand wash or gentle machine wash; hang to dry to avoid stretching.
4. Crochet Open Heart Crop Top Pattern
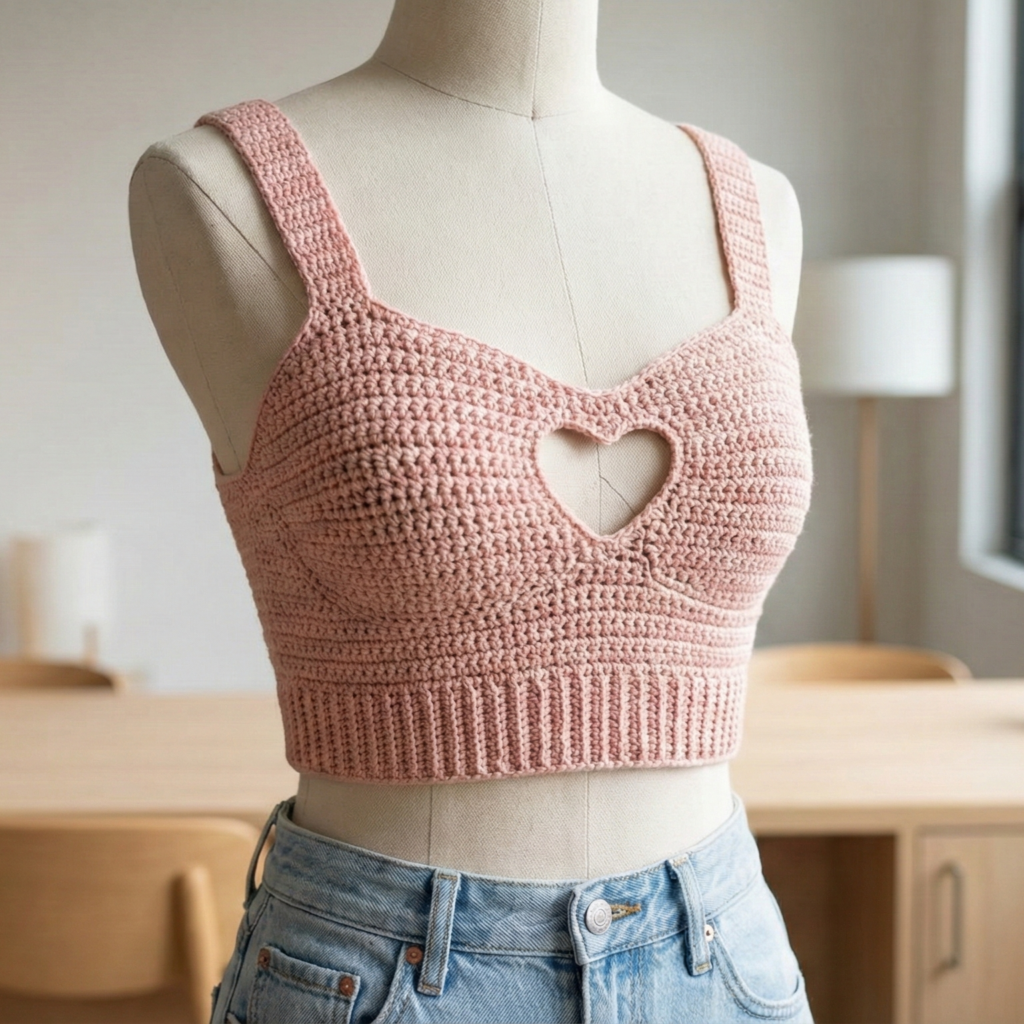
Skill level: intermediate (appliqué/mesh and shaping)
Vibe: statement front heart motif (open-work) with fitted band — romantic, playful, great layered over bralette or for festival styling.
Materials (Medium)
- DK cotton yarn — ~400 yd.
- Hook: 4.0 mm.
- Notions: tapestry needle, small stitch markers.
Gauge (example)
- 16 dc = 4″ in body mesh.
Construction overview
Main body is a mesh or V-stitch fabric worked into a fitted band with a large open heart motif worked as an overlay (either as surface crochet or an appliqué sewn to front).
Step-by-step (Medium)
1. Band
- Work foundation band for bust (similar to Skylar band): chain to measured underbust circumference (for medium ~32 in) using your stitch gauge. Work 6–8 rounds of hdc BLO to create firm band.
2. Body mesh
2. Join and work mesh V-stitch dc, ch1, dc repeats across to make lightly open fabric. Work up to height ~7–8 in from underbust to create a crop top.
3. Heart motif (appliqué)
3. Make heart as a lace appliqué (example small-to-large heart):
- Round 1: MR, ch 2, 12 dc in MR, sl st to join (12).
- Round 2: ch 3, 3 dc in next st, ch 3, sl st in pattern — shape two top lobes by working into spaced points and then expand bottom into a triangle shape with increases on each side. There are many heart charts available — use a 7–9 round heart chart to reach about 6–8 in height across.
- Block heart onto shape and center on front of body; sew appliqué around edges with matching yarn using small stitches so it lays flat.
4. Armholes & straps
4. If working flat, seam sides leaving armholes of ~7–8 in depth. For straps work narrow bands (hdc or sc) and attach at shoulder. Alternatively make racer style or adjustable tie straps.
5. Finishing
5. Work 1–2 rounds of sc around neckline and armholes for a clean finish.
Styling & variations
- Make the heart open (mesh heart) by crocheting heart outline only and sewing outline onto mesh; leaves center breezy and allows underlying bralette to show.
- For a kit-like effect, make several small hearts and scatter across front.
5. Crochet Baby Pink Lace-Up Corset Style Crop Top Pattern

Skill level: intermediate → advanced (shaping, eyelets, corset lacing)
Vibe: romantic corset-style crop with decorative lacing down the center front or back — structured but feminine.
Materials (Medium)
- DK cotton blend with a bit of elasticity (cotton + small amount of stretch or a cotton-spandex blend) — ~450–650 yd.
- Hook: 4.0 mm.
- Notions: narrow ribbon or cord for lacing, 2 small eyelets or reinforced crochet loop eyelets, optional lining.
Gauge (example)
- 16 hdc × 12 rows = 4″ × 4″ in dense corset stitch.
Construction overview
This top is built with structured panels (two front halves and two back halves) that are seamed and reinforced with eyelet rows for lacing. Optionally add boning channels (fabric) if you want more structure.
Step-by-step (Medium)
1. Panels
- Make four rectangles: two front panels and two back panels. Each front panel width (flat) for Medium = 9 in (so when joined front halves = 18 in across front), two back panels each 9 in for total 36 in circumference with seam allowances. Chain accordingly using your hdc SPI (e.g., 9 in × 4 hdc/in = 36 ch + 1 turning).
- Work panels in dense stitch (hdc or moss stitch) to create structure. Panel height = desired length from underbust band to waist ~6–8 in for a crop top, or longer if you want more corset look.
2. Underbust band
3. Work an underbust band similar to Skylar pattern: foldable BLO band or a firm multi-row band 1.5–2 in tall; seam front halves to band.
3. Lacing channel & eyelets
4. At the center front (or back if you prefer lacing at back), work reinforced rows with evenly spaced eyelets:
- After joining panels, work 1 round sc around entire top edge, then 2 rounds where you intentionally create eyelets: sc 3, ch 2, sk 2 along center seam area (or install metal eyelets after crocheting). Space eyelets vertically every ~¾–1 in, 6–8 eyelets depending on length.
4. Seaming
5. Seam panels at sides with mattress stitch using RS out for clean join, leaving armhole openings. Top edges should meet cleanly for lacing.
5. Lacing
6. Thread narrow ribbon or crocheted cord through eyelets and tie into a bow or knot. For corset look, cross lace or straight lace depending on preference. For security, tie a small loop inside.
6. Optional boning or lining
7. If you want more structure, sew a thin lightweight fabric inside and create channels (1/2 in wide) to insert flexible boning strips (plastic) or stay tape — this is optional and requires basic sewing.
7. Finishing
8. Sc around armholes and neckline. Add small decorative picots along top edge for feminine finish.
Fit & safety notes
- The lacing allows adjustability; do not pull too tight for comfort. For teens/young wearers ensure moderate tension and comfortable coverage.
- If adding boning, avoid using sharp metal boning—use plastic or soft strips for comfort and safety.
Variations & styling
- Make the corset in multiple pastel shades or add embroidered floral details.
- Convert to a strapless crop by adding elastic at top inside band and ensuring proper fit.
Care
- Because of structure and potential sewing/lining, hand wash and lay flat to dry. Avoid rough machine agitation.
Final finishing notes (all patterns)
Blocking & shaping
- Block each piece to measurements before assembling. Cotton relaxes and can stretch; blocking sets the lace and evens rows.
Weaving ends
- Weave ends back through stitches in the same direction as they were worked; double-weave tails at stress points (straps, ties).
Lining & modesty
- For openwork or lace crops, add a lightweight lining or wear a bralette underneath for modesty and support.
Sizing checks while you go
- Try on the top (or measure against a fitted tee) as you build length and before finishing the band or straps — adjusting early is easier.
Conclusion
These five crop top designs cover a broad range of summer styles — from breezy boho layers to sculpted ribbed tanks and romantic corset crops. Each pattern is written to be adaptable: change yarn weight or hook size to make the top lighter or chunkier, add rows for more length, or use color and trims to personalize the look. The key steps are accurate swatching, measuring against your own body (or the recipient’s), and testing fit at early assembly points (underbust band, armhole depth, strap placement).