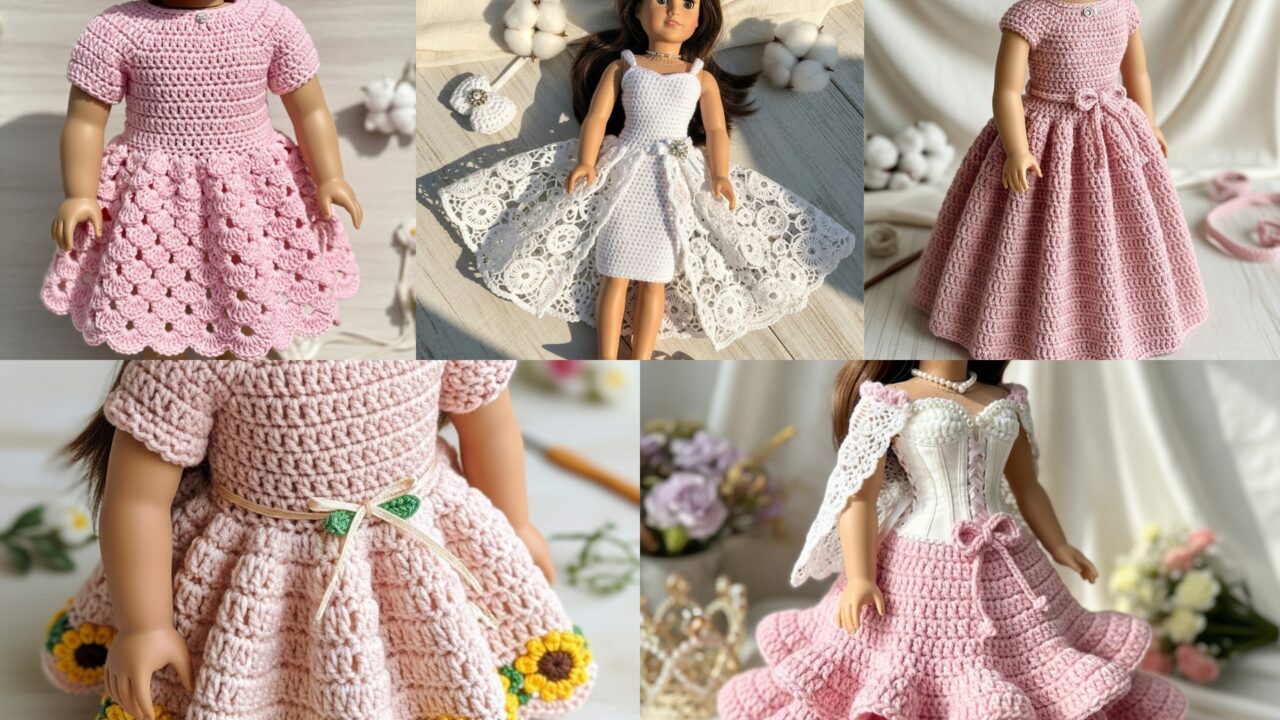
Doll dresses are tiny, fast, and wildly satisfying — the perfect small project to practice shaping, lace, and finishing while creating something adorable. Below you’ll find a friendly introduction that covers measurements, yarn choices, hooks, and basic fitting for dolls, followed by five complete doll dress patterns with materials, stitch notes, and step-by-step instructions: Scalloped Shells, Sunflower Fairy, Sophia Gown, Princess Elegant, and Cocktail & Ball. Each pattern includes fitting tips, variations, and finishing notes so you (and your readers) can make a lovely dress right away.
Quick essentials — measurements, yarn, hooks, and preparing to fit
Common doll sizes (pick the one you’re making for)
- 18-inch dolls — popular play dolls (about 45 cm).
- 14–15 inch dolls — many soft-bodied dolls / smaller fashion dolls.
- 11.5–12 inch (Barbie scale) — fashion dolls.
Before you start, measure the doll where the dress will sit:
- Chest (fullest part of torso)
- Waist (if the dress is fitted at waist)
- Shoulder-to-waist and waist-to-knee/hem for desired lengths
- Neck circumference if the dress has a buttoned neck
Yarn & hook
- For small garments, sport / DK / fingering are excellent choices — they give good detail but still work up reasonably fast. For doll clothes to be handled, cotton or cotton blends are great because they hold shape and wash easily.
- Typical hook sizes: 2.5–4.0 mm depending on yarn. Use a slightly smaller hook than the yarn label if you want a dense fabric for small details.
Gauge & how to compute foundation stitches
Always make a small swatch (4 in / 10 cm) in the stitch pattern you’ll use, then measure stitches per inch. When you compute foundation stitches, show the math step by step.
Example: you swatch in single crochet and find 4 sc = 1 in. You want a chest measurement of 8 in for a small doll. Compute required stitches:
- Stitches per inch × desired inches = required stitches.
- 4 sc/in × 8 in = ?
- 4 × 8 — calculate digit by digit: 4 × 8 = (4 × 5) + (4 × 3) = 20 + 12 = 32.
- So you need 32 stitches around the chest.
If your stitch pattern requires a multiple (for example shell repeat is multiple of 6), round 32 to the nearest multiple required by the pattern (for multiple of 6 the nearest is 30 or 36 — choose 36 for a bit more ease).
Construction choices
- Worked top-down in the round — fast, seamless, and easy to fit as you go. Common for simple dresses.
- Worked flat and seamed — good if you prefer seams or want a lined dress.
- Motif join (granny, hex, etc.) — decorative and great for colorwork.
Closures & finishes
- Tiny snaps or sew-on buttons are best for doll clothes (easy for small hands).
- Hook-and-eye or small Velcro can work but may be bulky.
- Always weave in ends securely — doll clothes are handled a lot.
1. Crochet Scalloped Shells Dress Pattern
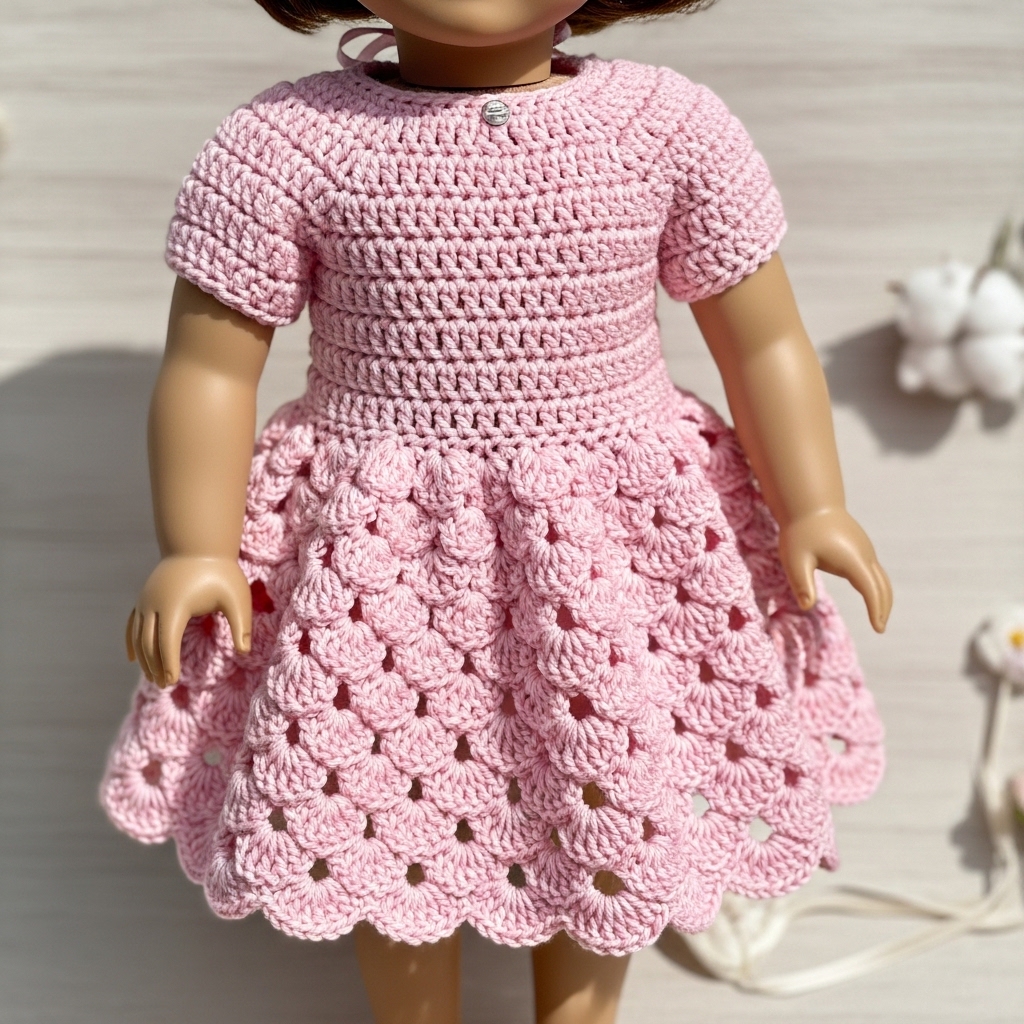
Light, flouncy, and perfect for picture-day tea parties.
Vibe: breezy summer dress with scalloped hem and shell stitch skirt.
Skill level: confident beginner → intermediate
Sample size: fits 18-inch doll; adjust with gauge notes
Materials
- Sport/DK cotton in soft pink: ~150–200 yd.
- Hook: 3.5 mm.
- 2 small buttons or snaps, tapestry needle.
Construction overview
Worked top-down in the round: a fitted yoke (hdc or short rows) then shell stitch skirt flared with regular increase rounds. Short puff sleeves are optional.
Step-by-step
A. Yoke / bodice (top-down)
- Swatch: suppose gauge in hdc in the round is 5 hdc = 1 in. For an 18-inch doll you want chest ≈ 8 in. Compute stitches:
- 5 hdc/in × 8 in = ?
- 5 × 8 = (5 × 5) + (5 × 3) = 25 + 15 = 40.
- So foundation for yoke = 40 hdc around. If shell repeat later needs multiples of 6, pick nearest multiple (36 or 42). Choose 42 for a bit more ease.
- 5 hdc/in × 8 in = ?
- Start: foundation — ch 42, join carefully to work in the round (or use foundation hdc method for neater edge). Place marker.
- Rounds 1–4: hdc in each st around to build a stable yoke (~0.6–0.8 in). Try on your doll — this is the top of shoulders / high chest.
- Shaping shoulders/armholes (optional): for a sleeveless dress keep even rounds; for small cap sleeves leave small gaps by chaining across and joining next round (ch 2 for each armhole instead of hdc in those sts). Alternatively continue as tube and add sleeves later.
B. Transition to skirt
5. At the lower edge of the yoke, work a round of sc to stabilize. Then work an increase round to prepare for shell stitch: hdc 4, inc (hdc 2 in same st) repeat → this adds distributed increases. Example: add 6 increases around.
C. Shell stitch skirt
6. Shell stitch repeat (example): (skip 2 sts, 5 dc in next st, skip 2 sts, sc in next st) — this creates shells separated by sc. Work rounds of shells: join and stagger so shells sit evenly.
7. Work shell rounds until skirt reaches desired length for doll: for a knee-length dress for an 18-inch doll aim for approx 4.5–5 in from underarm. Measure on the doll as you go.
D. Scalloped hem
8. Finish with 1–2 rounds of sc then 1 decorative scallop (sc 1, ch 3, sl st in next st) or a shell row (5 dc shells) to create a pretty scalloped edge.
E. Finishing
9. Weave ends. Add two small buttons at back of yoke with tiny loops (ch 6 loop, slip over button) or a snap closure. Block gently if cotton.
F. Variations
- Add a narrow ribbon through a row of ch spaces at waist for contrast.
- Make short puff sleeves by picking up stitches at armhole and working a couple rounds of increases and sc for a puffy cap.
2. Crochet Sunflower Fairy Doll Dress Pattern
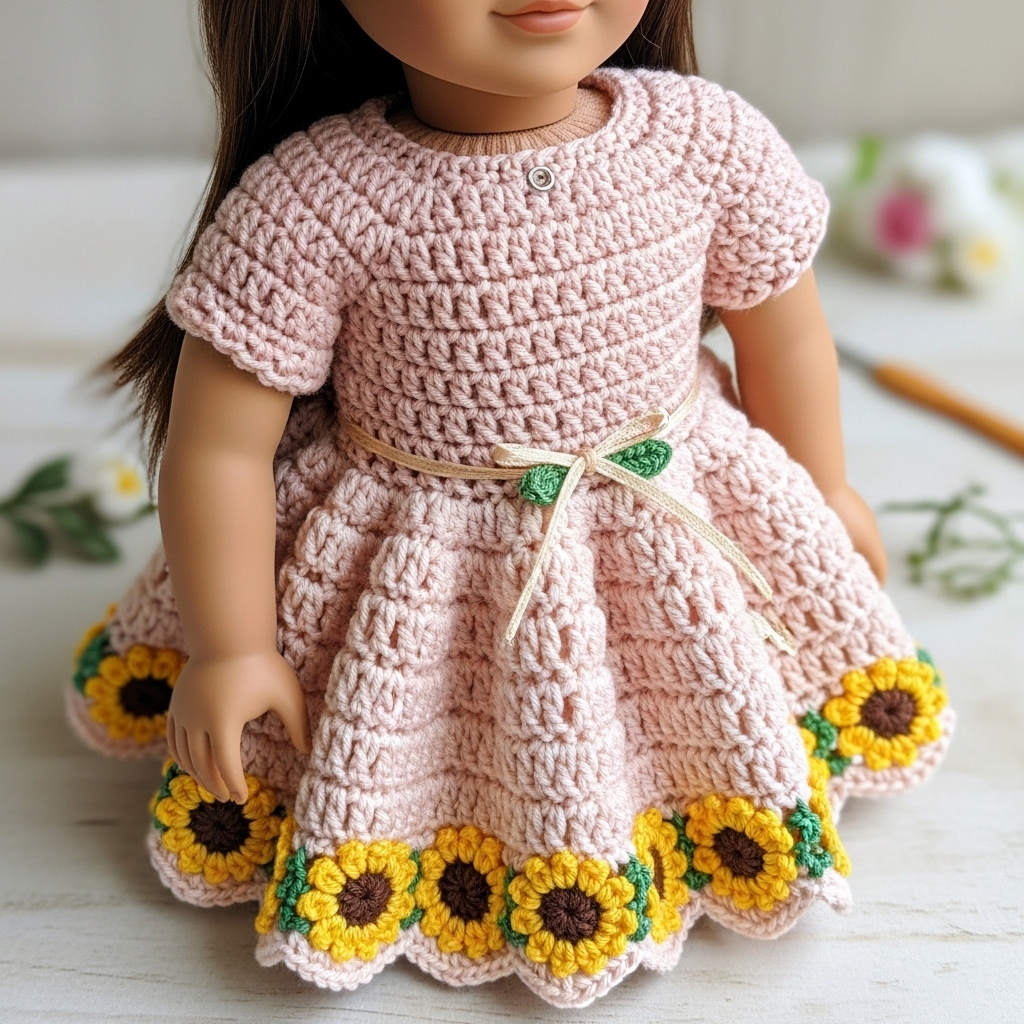
A sun-bright dress with sunflower appliqués and a fluted fairy skirt.
Vibe: whimsical floral — sunflower motifs at hem and a flutter skirt.
Skill level: intermediate (appliqué + shaping)
Sample size: fits 14–18 inch dolls depending on scale.
Materials
- DK cotton in soft yellow (petals), brown (center), green (leaves), and blush pink for dress body — ~200 yd total.
- Hook: 3.5 mm.
- Small snaps or buttons, tapestry needle.
Construction overview
Worked top-down; make sunflower appliqués separately and sew them along the hem. Flared skirt formed with increases and picot edging resembling petals.
Step-by-step
A. Bodice
- Using same gauge method as Pattern 1, compute foundation for chest. Example use 40 hdc for an 18-inch doll. Work 4–6 rounds hdc for a fitted yoke.
- Add a short round of decorative eyelets: ch1, sk 1, hdc to provide places for a tiny ribbon tie if desired.
B. Skirt — fairy flare
3. Increase round: work hdc 5, inc around to begin flaring. Repeat increase round every 3–4 rounds until skirt width is desired. This gives soft fullness.
4. Work alternating rounds: one round of dc for drape, then one round of shell/picot for texture. For example, alternate 2 rounds dc then 1 round shell (3 dc in one st, skip 2) for airy look.
C. Sunflower appliqués
5. Tiny sunflower (make 6–8):
- Center: MR, ch1, 8 sc in MR, sl st. Change to brown for center. R2: sc around 8 to build disk. Fasten off.
- Petals: join yellow into gaps around center; ch 3, (2 dc, ch 1, 2 dc) in same st, sl st in next repeat for 8 petals. Fasten off. Add tiny green leaves by making flat leaf shapes (ch 6, sc across, shape).
- Sew sunflowers evenly around hem, tucking petals into scallops for a seamless look. Secure with yarn tails and a few hidden stitches.
D. Finishing
7. Add tiny bead center (optional) or leave as yarn center. Add ribbon sash threaded through eyelet row, tied in a bow at back.
E. Variations
- Make a full sunflower skirt by placing a ring of sunflowers overlapping each other for a dramatic finish.
- For fairy sparkle, embroider metallic thread lightly into the shells.
3. Crochet Sophia Gown Doll Dress Pattern

A refined everyday gown with fitted bodice, cinched waist, and fluted skirt (Sophia = polished classic).
Vibe: classic, slightly formal but wearable.
Skill level: intermediate (waist shaping + optional lining)
Sample size: 18-inch doll sample.
Materials
- Sport/DK cotton or cotton blend in dusty rose ~250–300 yd.
- Hook: 3.5–4.0 mm.
- Tiny snaps or buttons, optional lightweight lining fabric.
Construction overview
Worked bottom-up or top-down; here we use bottom-up to shape skirt first and then form fitted bodice, then add straps or sleeves.
Step-by-step
A. Skirt
- Make a circle for the hem starting with MR. Increase evenly until hem diameter is wide enough for skirt fullness (e.g., start MR → 6 sc; R2 inc → 12; R3 sc1, inc → 18; continue until diameter ~6–7 in for 18-inch doll full skirt). You can compute rounds by measuring: aim for hem circumference ~ 18–20 in for full skirt.
- Once base is wide enough, work even rounds (sc or dc depending on desired fullness) upwards until you reach waistline (measure on doll).
B. Waist shaping
3. To shape waist reduce stitches by working decrease rounds spaced evenly: e.g., every 6th round do a decrease round sc 5, dec repeat. Continue until waist matches doll measurement (example waist 5 in). Example computation: if gauge = 5 sc/in and waist is 5 in → 5×5=25 stitches around. Do arithmetic: 5 × 5 = (5 × 2) + (5 × 3) = 10 + 15 = 25. Adjust rounding to match pattern multiples.
C. Bodice
4. Work fitted bodice in rounds or flat: pick up stitches around waist and work a few rounds in hdc to create stable band, then work shaped decreases and darting to form bust shaping. You may use short rows for better fit: work half rounds on front then back to add shaping.
5. Add straps by chaining and sewing or work short cap sleeves by picking up stitches at armhole and working a few rounds then shaping.
D. Closure & lining
6. Add small snaps at the back for dressing the doll. If you want a truly smooth interior, sew a cotton lining: cut fabric to bodice size and hand stitch inside.
E. Finishing
7. Add a narrow belt or bow at waist for decoration.
F. Variations
- Add lace trim to the skirt hem or a picot row along neckline for a sophisticated finish.
4. Crochet Princess Elegant Doll Dress Pattern
Formal, voluminous, and fit for a tea party or coronation.
Vibe: dramatic skirt, fitted corset bodice, ornate trim.
Skill level: advanced (structured bodice + heavy shaping)
Sample size: 18-inch doll sample; can be scaled down.
Materials
- DK or light worsted in pale pink for skirt and ivory or contrasting shade for bodice — ~350–500 yd depending on fullness.
- Hook: 3.5–4.0 mm.
- Wiring (optional) for hooping skirt, tiny snaps or hook/eye, decorative pearls or trim.
Construction overview
Top-down with a structured corset bodice, deep waist seam, and very full multi-tier skirt (or worked as separate skirt joined to bodice). Optionally add hooping or wire to give ballroom silhouette for a doll showpiece.
Step-by-step
A. Bodice (corset style)
- Measure bodice height (shoulder to waist) and chest. Work a shaped tube with increases/decreases to contour the bust: start with a narrow neck band, then work short rows and increases outward to form bust cups and nip in at waist using decrease rows and front laces (chain loops as eyelets).
- For boning look, work vertical front-post stitches or add a narrow sewn ribbon over internal stitches to simulate seams.
B. Skirt (full tiers)
3. Make skirt as one or multiple tiers: attach at waist and work multiple rounds of increasing shells to add volume:
- Tier 1 (upper): moderate flare — hdc 5, inc repeat every X sts.
- Tier 2 (middle): increase frequency — hdc 3, inc to add more fullness.
- Tier 3 (lower): large shell rounds for ruffles — work clusters of (5–7 dc) to create full ruffles.
- For extra volume add a tiny internal hoop: use a thin flexible wire stitched into a casing at skirt hem (only recommended for display dolls, avoid for play).
C. Trimming & embellishment
5. Add lace trim, pearls sewn along neckline, tiny bow at waist. For a vintage princess, add a detachable cape or off-shoulder ruffle.
D. Closure
6. Back lacing works well: create eyelet chain spaces on bodice and thread a thin ribbon for adjustable fit. Alternatively use snaps.
E. Finishing
7. Block each tier for neat ruffles and seam securely to bodice.
F. Variations
- Make a simpler version with fewer tiers for play; reserve hoop/wiring for display garments.
5. Crochet Cocktail and Ball Doll Dress Pattern
A shorter, chic cocktail dress that transitions to ball gown with an optional overskirt — glamorous and versatile.
Vibe: convertible: short cocktail dress + optional detachable long overskirt for a ball look.
Skill level: intermediate → advanced (detachables + shaping)
Sample size: 18-inch doll with detachable skirt.
Materials
- DK yarn ~250–400 yd depending on overskirt fullness.
- Hook: 3.5–4.0 mm.
- Tiny snaps for detachable overskirt, decorative brooch or small clasp.
Construction overview
Work a fitted cocktail sheath dress (knee length or above) with a detachable long overskirt that button-snaps at the waist.
Step-by-step
A. Cocktail sheath
- Work top-down or bottom-up as a fitted sheath: compute foundation around bust as earlier examples. Work even rounds (hdc or sc) shaping with decreases for waist and increases for bust as needed. Keep dress length short (e.g., 3–4 in skirt length for doll).
- Add a tasteful neckline: boat, sweetheart, or halter by shaping top rows and adding straps.
B. Detachable overskirt
3. Make a long full overskirt as a separate piece: a long rectangle or semicircle with lots of gathers. Add snaps to overskirt top and corresponding snaps around dress waist (secure through a tiny casing or felt backing). To tulle-like effect, work open lace rounds with picot edging for an airy ballroom look.
C. Embellishment
4. Add a small brooch or rosette at waist where the overskirt attaches. Add beadwork to the cocktail dress for evening sparkle.
D. Finishing
5. Sew snaps carefully and test the detachable action; ensure snaps sit flat and are not bulky.
E. Variations
- Use metallic thread for overskirt for a starry effect.
- Add a small shrug or capelet for winter ball styling.
Final finishing & care notes
- Try on as you go. Doll clothes are small and easy to tweak: try the garment on the doll during construction to check fit and adjust lengths and shaping.
- Fastenings: use small snaps, sew-on buttons, or ribbon ties. For children’s play, avoid tiny detachable beads that could be a choking hazard.
- Blocking: cotton and thread really benefit from gentle blocking to even lace and open scallops; pin the dress on a small foam form or the doll gently and mist.
- Washing: most cotton DK projects are machine-washable on a gentle cycle; more delicate trims or metallic threads are best hand-washed and air-dried.
conclusion
These five doll dress patterns give you a wide wardrobe for dolls — from breezy scalloped shells to sunflower fairy whimsy, refined Sophia gowns, princess pageantry, and a modern convertible cocktail/ball look. Start by measuring your doll carefully, swatch your stitch and compute foundation stitches using the arithmetic method above, and decide whether you want top-down ease or bottom-up control.