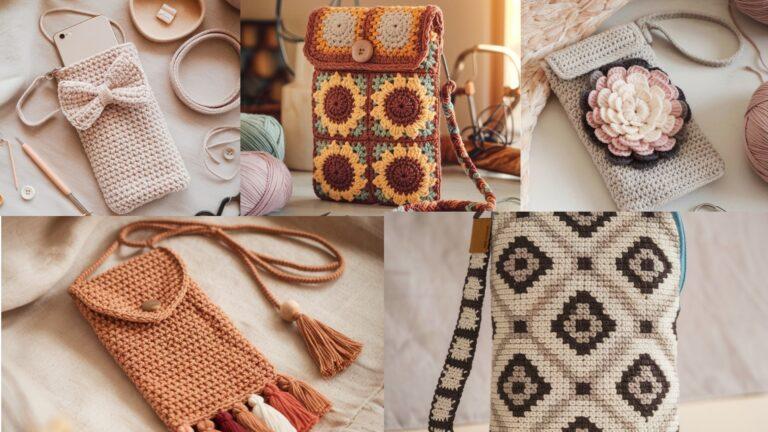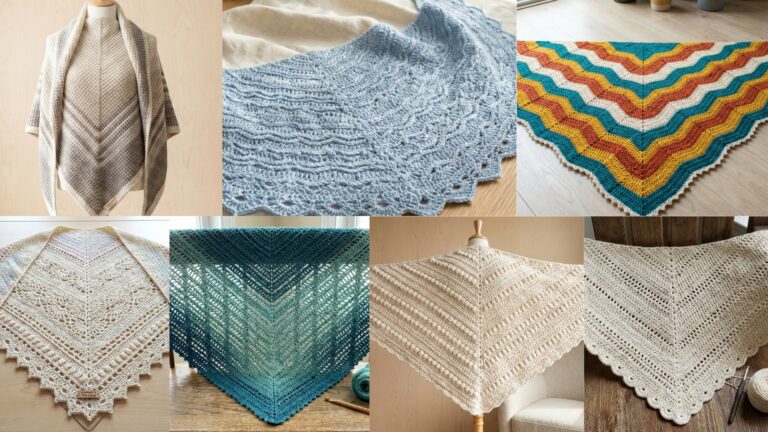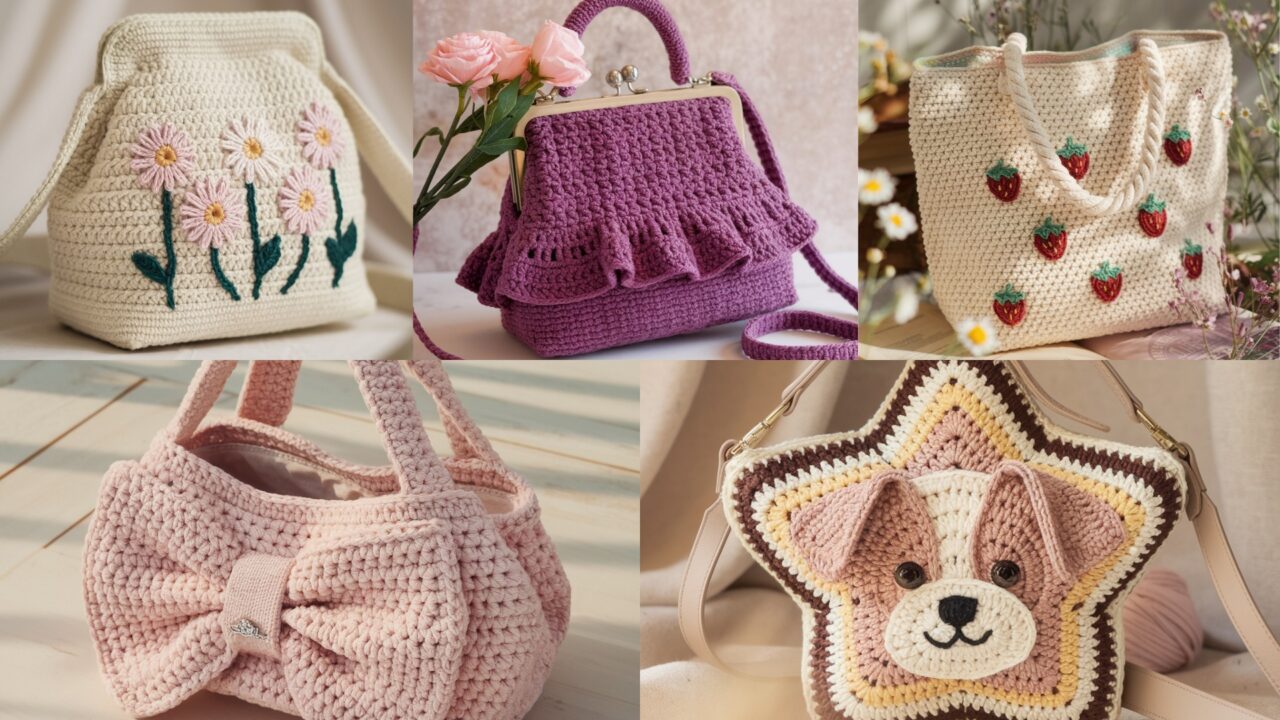
You want bags people will actually use—gifts that don’t end up in a “maybe later” pile beside the houseplants you keep forgetting to water. Good. Below are five fully worked, blog-ready bag patterns: a ruffled shoulder bag, a cottage-core strawberry tote, a puppy-star novelty handbag, a cream embroidered floral bag, and a bow bag that actually looks like you tried. Each pattern includes skill level, materials, gauge, sample finished size, clear step-by-step construction (body, base/gusset, straps), lining and finishing, tips for scaling, and variations so your readers can stop guessing and start gifting.
Yes, do a swatch. Yes, measure. No, I won’t sugarcoat it — finishing makes or breaks the whole thing.
Quick universal notes (read this once — it saves time)
Abbreviations (US): ch = chain, sc = single crochet, hdc = half double crochet, dc = double crochet, tr = treble, sl st = slip stitch, st(s) = stitch(es), BLO/FLO = back/front loop only, inc = 2 sc in same st, dec = sc2tog, MR = magic ring.
Recommended yarn & hooks:
- Use 100% cotton or cotton-blend for bags that hold shape and survive washing. Acrylic is fine for decorative bags but can stretch.
- Hooks: 3.5–5.5 mm depending on yarn weight; bulky yarns need larger hooks. I’ll list suggested hooks per pattern.
Swatch & math:
Make a 4″ × 4″ swatch in the stitch you’ll use and block it how you’ll care for the finished bag. Count stitches per inch (sts/in) and rows per inch (rows/in). Example I use in samples: 16 sc = 4″ → 4 sts/in and 8 rows = 2″ → 4 rows/in. Use your numbers to calculate foundation chains and heights. I’ll show sample math for each bag so you can plug in your own gauge if it differs.
Sizing logic:
Decide finished bag width (W). Stitches across = W × sts/in. Example: W = 12″, sts/in = 4 → stitches = 12 × 4 = 48. (Yes, arithmetic like a human. Do it once and move on.)
Straps & reinforcement:
For shoulder straps, add webbing or a second crocheted strap with internal cotton webbing sewn in. Sew strap ends through a felt or fabric patch and stitch the patch to the bag to spread stress. For heavy use, line and add interfacing at strap attachment points.
Lining:
Lining makes a bag last. Use quilting cotton for normal lining; use canvas or light denim for heavy-duty. Sew a lining slightly smaller than the crochet interior so it stays taut. Install before final top edging if possible.
Hardware:
Zippers, D-rings, toggles — fine. Reinforce hardware with webbing or extra stitches. If you plan to sell these patterns, include specific part numbers and suppliers; for now use generic terms.
1. Crochet Purple Ruffles Shoulder Bag Pattern
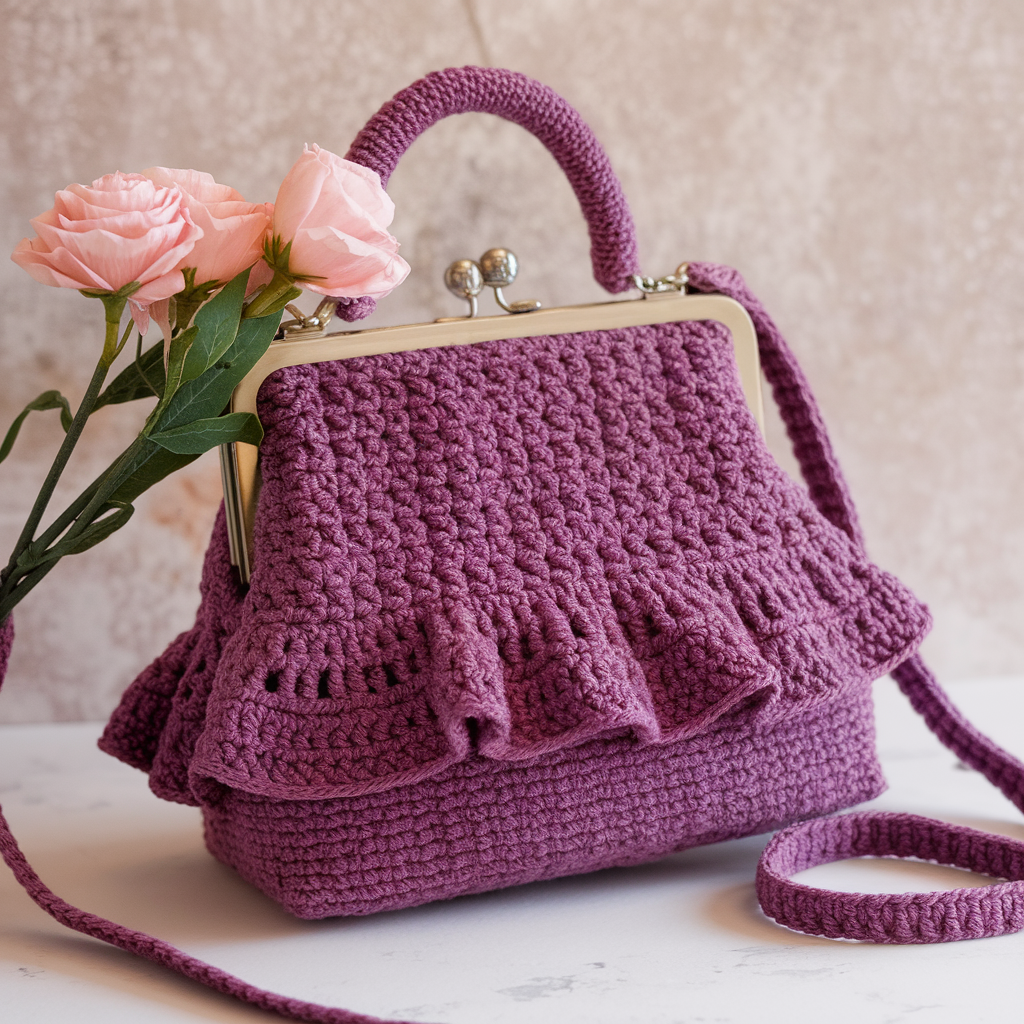
A feminine, ruffled shoulder bag with a roomy interior and a dramatic layered edge. Good gift for someone who likes a little drama without losing function.
Skill level: Confident Beginner → Intermediate
Materials (sample): worsted cotton (#4) in main color (purple) and contrast if you like, 5.0 mm hook, tapestry needle, 1/2 yd lining fabric, 1″ cotton webbing (optional for strap reinforcement), 1 magnetic snap (optional). Yarn ≈ 600–900 yds depending on ruffle density.
Gauge (sample): 16 sc = 4″ → 4 sts/in. Adjust with swatch.
Finished sample size: 12″ W × 10″ H × 3″ D (comfortable shoulder bag).
Math example for foundation
Target width = 12″
Stitches/in = 4
Stitches across = 12 × 4 = 48 stitches. So foundation chain = ch 49 (to make 48 sc across when working in 2nd ch).
Construction overview
Work a rectangular body (worked flat or in rounds), add a 3″ deep gusset (optional), join, add ruffle rounds across top edge, crochet strap with reinforcement, line, add magnetic snap, finish.
Step-by-step
Body (worked flat)
- Ch 49. R1: sc in 2nd ch from hook and across → 48 sc. Turn.
- R2–R? (body height): ch1, sc across 48 sc. Repeat until panel height = 10″ (use your rows/in: 10″ × rows/in = number of rows). With sample rows/in = 4, required rows = 10 × 4 = 40 rows. Fasten off. Make second identical panel for the back. (Two panels are optional — you can also do one long rectangle and seam bottom.)
Gusset (flat strip for base depth)
3. For 3″ deep gusset: desired depth 3″ × sts/in (4) = 3 × 4 = 12 sts. Ch 13 and sc across 12 sc, join to form loop, work rounds until strip height = bag circumference / sts? Simpler: after making front/back panels, measure perimeter and make a strip that matches the total length: width 12″ + 10″ + 12″ + 10″ (if laying flat) — easier method: seam front and back to sides and add base by stitching a rectangular strip of the same stitch (ch length = circumference + seam allowances). If that confuses you: crochet base separately: ch (desired base length in stitches +1), sc across and work in rounds until base depth = 3″.
Assembly
4. With RS together, seam sides and bottom to attach gusset using whipstitch or sc through both layers to create tidy inner seam. Leave top open.
Ruffle edge
5. With main color joined at top edge, work 2 rounds sc to stabilize top. Then work ruffle rounds: Round 1: ch3, 3 dc in same st, skip 1 st around (creates big petals). Round 2 (for fuller ruffle): in each petal make 5 dc, sl st in base. Make 1–3 ruffle rows depending on desired drama. Alternatively do small ruffles: 2 dc in next st, ch2, 2 dc in same st.
Strap
6. Crochet strap: ch 8, sc across for a narrow strap or ch 11 for a wider strap. Work in rows until length required for shoulder drop ~10″–12″. For strength, insert cotton webbing inside strap before finishing: slide webbing in and sew strap closed around it. Make two straps or a single wide strap. Attach strap ends by sewing through inner felt patches reinforced with X-box stitches using upholstery thread.
Lining & closure
7. Cut lining 1/2″ smaller than interior size, sew side seams and bottom, insert into crochet bag, fold top edge of lining to inside and hand-stitch to top 1/4″ inside the ruffle base. Sew magnetic snap to lining and to crochet top (use backing patches to reinforce).
Finishing
8. Weave ends, trim. Light steam block ruffles into shape if desired.
Variations & tips
- Use ombré yarn for a gradient ruffle.
- Make a clutch version by skipping the strap and adding a zip across top.
- To make sturdier, hold two strands of cotton together and use a larger hook.
2. Crochet Strawberry Cottage Core Bag Pattern
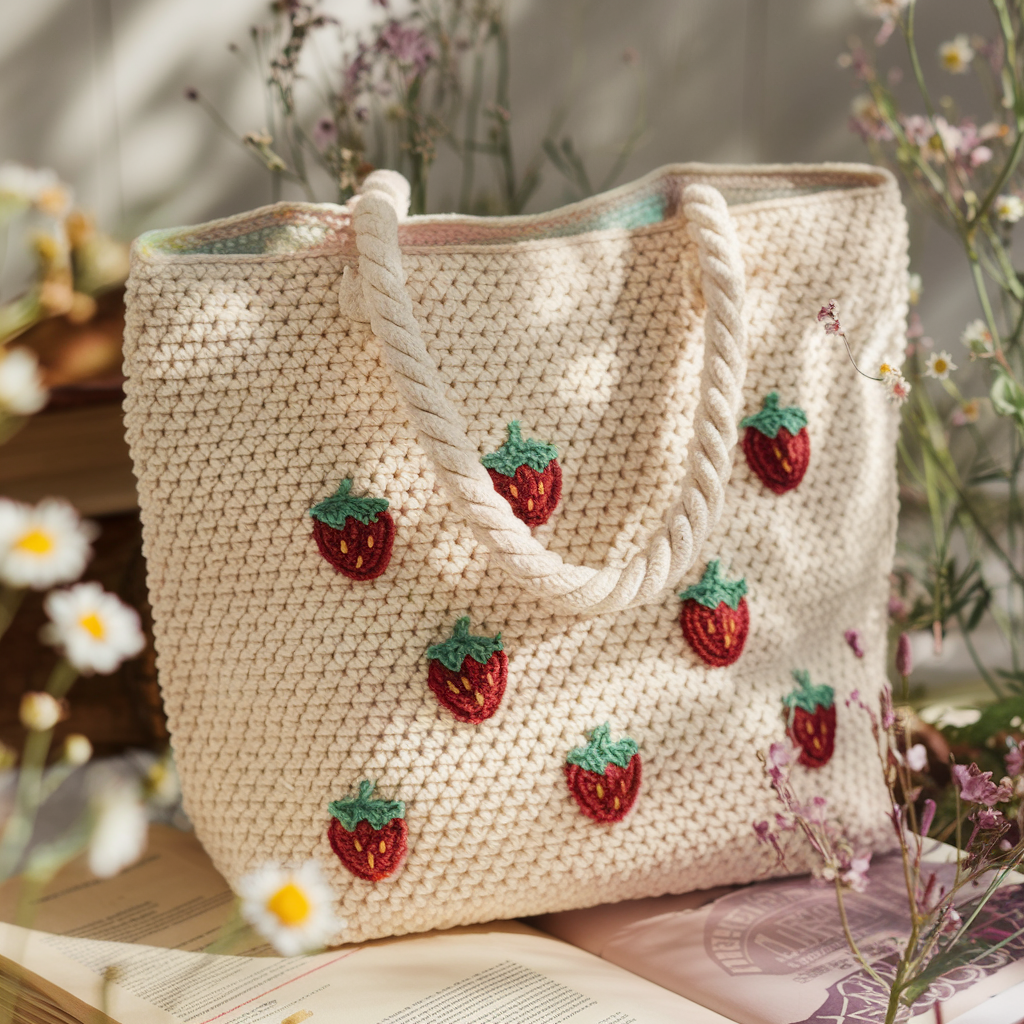
Think soft cottagecore: strawberries, soft colors, and a square granny-inspired base. Super giftable and adorable.
Skill level: Confident Beginner → Intermediate (granny/embroidery)
Materials: worsted cotton in red, green, white/cream for accents, 5.0 mm hook, tapestry needle, small amount of felt for berry backing (optional), 1/2 yd lining fabric, 1 magnetic snap (optional). Yarn ≈ 500–800 yds.
Gauge (sample): 4 sts/in.
Finished sample size: 10″ W × 9″ H × 3.5″ D — a cute tote perfect for small errands.
Construction overview
Make front & back panels in granny/motif pattern with strawberry appliqués, join sides with gusset, top with rope-style strap, line, and finish.
Step-by-step
Panel option 1 — granny stripes (simpler)
- Foundation chain for width: 10″ × 4 sts/in = 40 sts → ch 41. Row1: sc across 40 sc. Turn.
- Work granny stripe pattern: R1 decorative row in clusters or shell rows. An easy approach: alternate rows of sc and rows of dc cluster shells for cottage texture (e.g., Row2: 3 dc in same st, sk 2, sl st in next repeat). Work to 9″ height (rows = 9 × rows/in; sample rows/in=4 → 36 rows). Make second panel.
Panel option 2 — granny squares
- Make 6 small granny squares (3 × 2) each ~4″ blocked (so 3 across ~12″ width — trim if needed), join as front/back.
Strawberry appliqués (make 6–8)
- MR, ch1, 6 sc into MR — join. (6)
- R2: inc in each st → 12 sc. (12)
- R3: sc 1, inc ×6 → 18 sc. (18) — this gives a small circular berry. Flatten and shape to a teardrop by sewing a small line to form a point (or use pattern to create a small teardrop). Embroider tiny seeds in cream/yellow: small straight stitches or French knots. For leafy top: ch4, sc in 2nd ch, hdc, dc, hdc, sc and sew atop berry.
Assembly
4. Sew appliqués onto front panel in a pleasing scattered pattern; secure firmly with hidden stitches and reinforce with small felt patches inside if needed.
5. Join front & back panels with a gusset: calculate circumference: width + depth + width + depth; simpler: make a gusset strip of height = 3.5″ and length equal to your bag perimeter (measure panels and add seam allowances) — ch that many sts and sc into joining in rounds until height = 3.5″. Attach to front & back with whipstitch or sc join.
Strap
6. For a cottagey rope strap: make a 3-strand crochet chain braid or a crocheted i-cord ~30–36″ for shoulder drop. Alternatively, crochet wide strap (ch 6, sc in each ch across, make length) and slip-in a webbing strip for strength before finishing ends. Sew strap securely to interior with felt patch reinforcement.
Lining & closure
7. Add lining sewn and attached as previous pattern. Add small interior pocket for keys. Add magnetic snap or a drawstring casing with a thin cotton cord if you prefer.
Variations & tips
- Make strawberries three-dimensional (very slightly stuffed) for tactile charm.
- Use pastel colors for a soft cottagecore set of three matching items.
3. Crochet Puppy Inspired Star Handbag Pattern
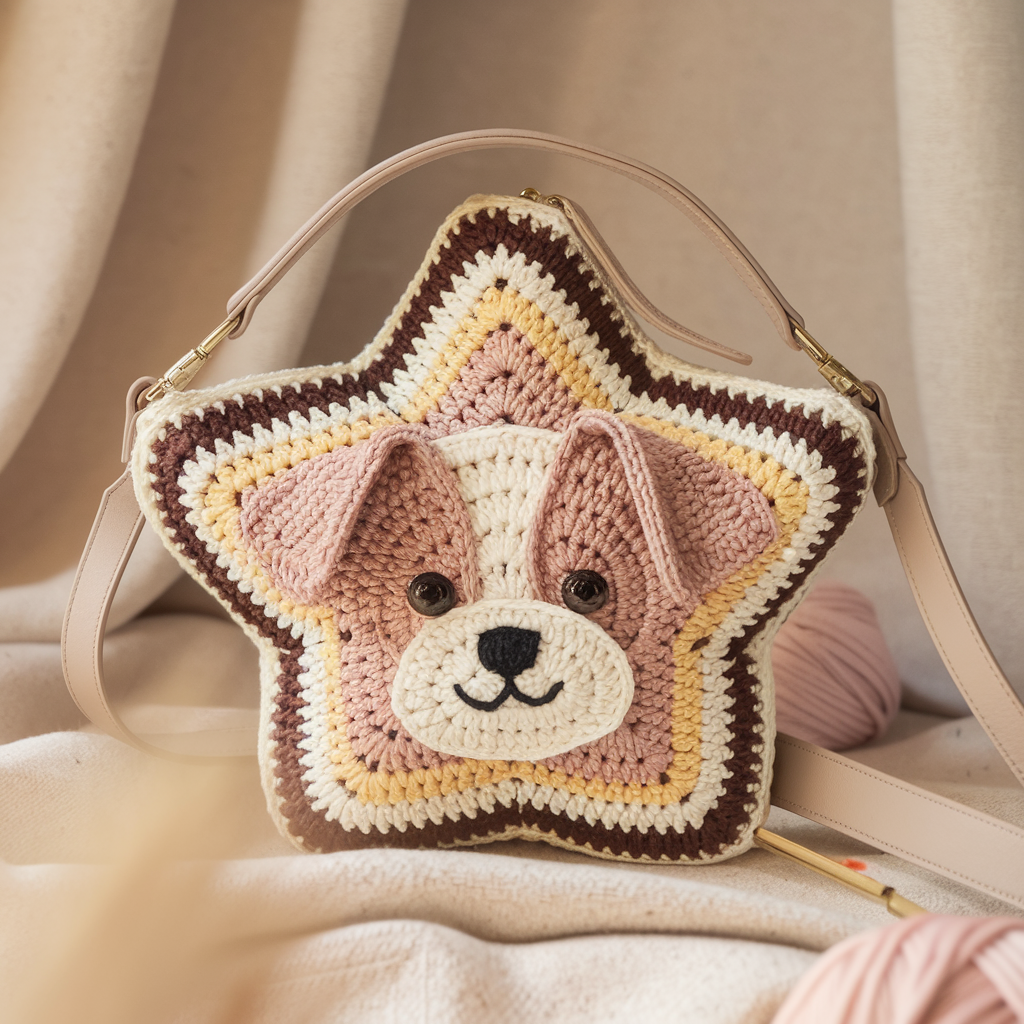
A novelty handbag shaped like a star with a puppy-face applique — playful, structured, and surprisingly functional as a small crossbody.
Skill level: Intermediate (shaping & appliqué)
Materials: worsted cotton in main color for star, contrast for puppy face (cream, brown, black), 4.5–5.0 mm hook, 1 small zipper for top, crossbody strap hardware (D-rings + strap or crocheted strap), lining fabric for a small bag, polyester stuffing for face applique if you want 3D features. Yarn ≈ 400–600 yds.
Finished sample size: 8″ diameter star (flat star; good for small essentials).
Construction overview
Make two identical star panels worked in rounds (or flat motifs seamed), seam panels together, add zipper across top point seam, line interior. Add puppy face applique to one star panel.
Step-by-step
Star panel (flat star worked in rounds)
- Start with MR, work 10 dc in MR and join (10). Or follow a star pattern: increase to create points. A simple 5-point star approach: make a pentagon center then work elongated points. For clarity use this scalable approach:
- Make a 5-sided star using short triangular points: create a base pentagon then work slip-stitch chains to form points. If you prefer a standard pattern: search for “5-point star crochet motif” and adapt to your gauge. (Because star motifs vary, give readers permission to use a tested 5-point star motif with increases per point.)
Simpler concrete method (works by shaping triangles):
A. Make 5 small triangular petals joined in a ring: MR, ch3, 5dc in ring, sl st; repeat to make 5 triangles connected — this creates a star-like motif. Make two identical panels.
Puppy face applique (flat)
2. Make a small circle for face: MR, 6 sc, inc round to 12, sc round to size ~3″ diameter. Make ears: two small teardrop-shaped triangles (ch6, sc across, decrease rows until point) in contrast color. Make nose (tiny oval) and eyes (embroidered) with black yarn or thread. Sew ears to upper sides of the circle and embed eyes/nose with embroidery. Optional: stuff lightly and sew top closed to make 3D snout.
Assembly
3. Position puppy face on front star panel and sew firmly. For a small bag you might prefer the face on a flat panel sewn before you join panels so the seam hides stitches.
- Place star panels RS together and sew around edges leaving a 3″ opening at one point to insert zipper: attach zipper to panels by machine or hand-stitch — you may find it easier to attach zipper to lining and then insert assembled lining.
Strap & hardware
5. Attach D-rings at two opposing top points with reinforced webbing tabs sewn into seam. Make a long crocheted strap or use adjustable strap hardware.
Lining
6. Make a round lining that fits the interior cavity — easiest is to machine-sew rounded lining with zipper pocket and then hand-stitch it into the star opening, sewing zipper to the crochet edges.
Finishing & care
- Weave ends, test zipper, reinforce straps with interior webbing as needed. Hand-wash recommended.
Variations & tips
- Make mini coin-purse star versions with snap closure rather than zipper.
- For a more realistic puppy style, use faux fur yarn for ears.
4. Crochet Cream Flowery Embroidered Bag Pattern
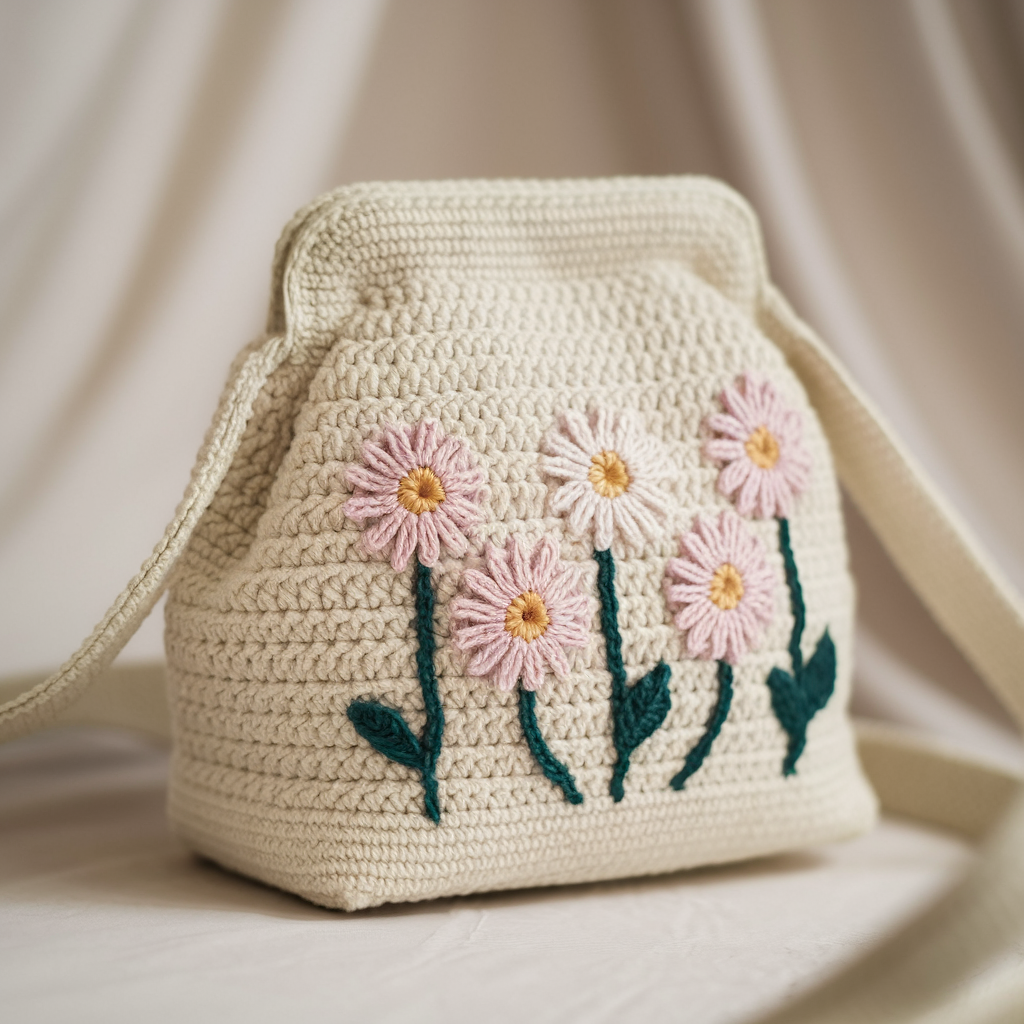
An elegant cream bag with embroidered flowers — dressy enough for events yet practical as a thoughtful gift. This is the one you give when you want people to notice you put effort into something.
Skill level: Intermediate (surface embroidery + clean finish)
Materials: worsted cotton or cotton-blend in cream, 4.0–4.5 mm hook, embroidery floss in 2–3 colors (petal/leaf/center), tapestry needle, lining fabric, optional leather strap or chain strap (for fancy vibe). Yarn ≈ 600–900 yds.
Finished sample size: 11″ W × 9″ H × 2.5″ D — roomy clutch or small shoulder bag.
Construction overview
Work an elegant textured body (waffle or moss stitch for subtle texture), add surface embroidery floral motifs, join gusset, add lining and leather/chain strap for polish.
Step-by-step
Body (waffle stitch panel)
- Foundation chain for width: 11″ × 4 sts/in = 44 sts → ch 45. R1: sc across 44 sc. Turn.
- Waffle stitch (simple): R2: dc in next st, dc in next st but working in BLO — there are several waffle variations; use a 2-row waffle repeat to create grid texture. Continue until panel height = 9″ (rows = 9 × rows/in; sample rows/in = 4 → 36 rows). Make second panel.
Embroidery layout
3. Transfer floral placement: lightly mark areas with washable fabric pen or lay out scraps of paper with stitch counts. Use French knots for centers, lazy daisy for petals, stem stitch for stems. Embroidery on cotton yarn works fine: use embroidery floss at 2–3 strands for delicate detail. For big blooms use bullion knots or layered lazy daisy petals.
Gusset & assembly
4. Crochet gusset as strip same method described earlier: height 2.5″, length equal to the perimeter needed. Join front & back to gusset with whipstitch or sc join.
Strap & hardware
5. For refined finish use a leather strap: cut strap length for shoulder or crossbody and rivet or sew to small leather tabs sewn into bag seam. Alternatively crochet a chain and insert a leather strip for a hybrid strap.
Lining
6. Make a tailored lining with internal pocket. Sew zipper or magnetic snap into lining and top stitch the lining into place with small hand stitches.
Finishing
7. Steam-block lightly to set stitches and flatten embroidered sections. Weave ends. Add small protective felt under strap end points inside.
Variations & tips
- Use tonal embroidery for a subtle classy look, or bright colors for contrast.
- Add a small detachable floral brooch that coordinates with embroidery — gives two gifts in one.
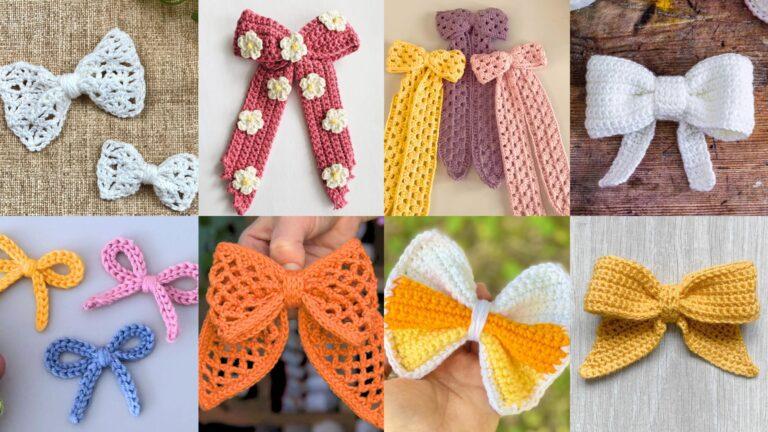
5. Crochet Bow Bag Pattern
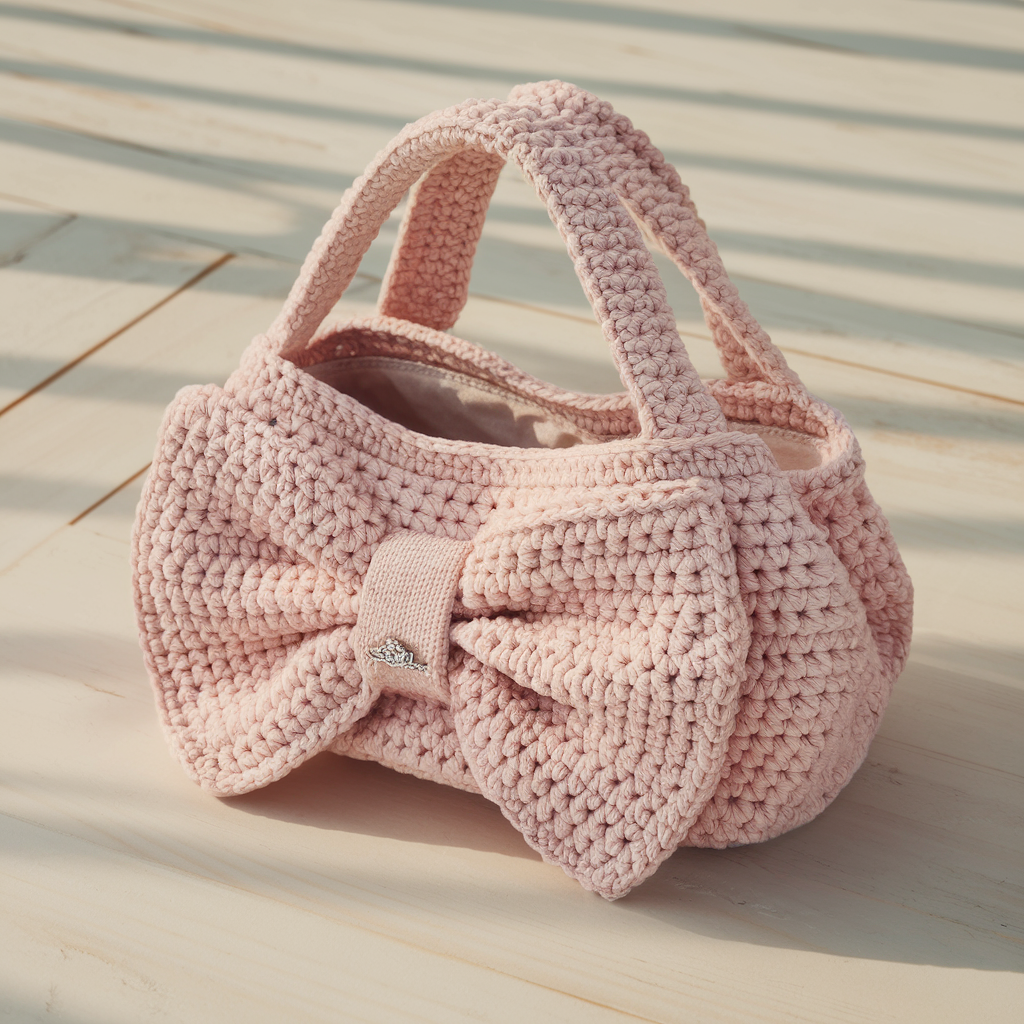
A bag shaped like a big bow — equal parts adorable and ridiculous (in a delightful way). Great for teens, gift kids, or flamboyant adults.
Skill level: Intermediate (shaping & strong straps)
Materials: bulky cotton yarn (#5) or worsted held double for structure, 6.0–7.0 mm hook, felt backing for strap joins, sturdy strap (crocheted + webbing or leather), lining fabric. Yarn ≈ 700–1000 yds depending on size.
Finished sample size: 14″ W × 10″ H × 3″ D — statement bag.
Construction overview
Make a large rectangular pouch, cinch center to form bow, add a center band, attach strap, line, and finish.
Step-by-step
Body
- Determine bag width: 14″ × sts/in (assume bulky gives 3 sts/in) → 14 × 3 = 42 sts. Ch 43. R1: sc across 42 sc. Turn.
- Work rows until panel measures 10″ high (rows = 10 × rows/in; bulky example rows/in = 3 → rows = 30). Duplicate for back panel. Or make one long rectangle and seam sides.
Gusset (optional)
3. Make a 3″ deep gusset strip or make a boxed bottom by folding bottom corners and sewing across a 3″ seam to make depth.
Form the bow
4. With front & back panels sewn together (leaving top open), pinch the center horizontally and wrap with a wide center band (crocheted strip or fabric) to cinch into a bow shape. The band should be removable (slip over center) or sewn in place. For a strong hold, pin center with a few hidden whipstitches.
Center band
5. Ch 12, sc across (11 sc), work rows until long enough to wrap around bag center with 1/2″ overlap. Insert a piece of interfacing or thin plastic inside the center band for stiffness, then stitch closed.
Strap & reinforcement
6. Crochet wide strap or use leather strap and attach with reinforced felt patches sewn into interior near the top edges. For crossbody, make adjustable strap with D-rings.
Lining
7. Sew lining slightly smaller than interior and slip into bag. Stitch lining to top edge and close with topstitching or sew-in zipper for closure.
Finishing
8. Weave ends, shape band and bow, give a light steam to set shape if yarn allows.
Variations & tips
- Make mini bow clutch by reducing dimensions and adding a short wrist strap.
- Embellish center with a pop of metallic yarn or a brooch for extra glam.
Care, Blocking & Packaging Advice
- Blocking: For cotton bags block after assembly for neater seams and edges. Ruffles and petals benefit from gentle steam shaping.
- Care: Cotton bags usually machine-washable on gentle; reshape when damp and dry flat. For lined bags with leather straps remove strap or spot-clean leather.
- Packaging: Gift-ready presentation wins fans. Include a small care tag: “Hand wash or machine-gentle; reshape flat; avoid heavy loads.” Tie with twine and attach a matching crochet keychain or tag for a nicer bundle.
conclusion
There. Five useful, giftable crochet bags that actually get used: a ruffled shoulder bag for drama, a cottagecore strawberry tote for sweet errands, a playful puppy-star handbag, a refined embroidered cream bag for events, and a bold bow bag for show-offs. The three things that will make any of these patterns work in the real world: a swatch, a reinforced strap attachment (felt + multiple passes of strong thread), and lining. Do those and your bag won’t sag after one grocery trip.