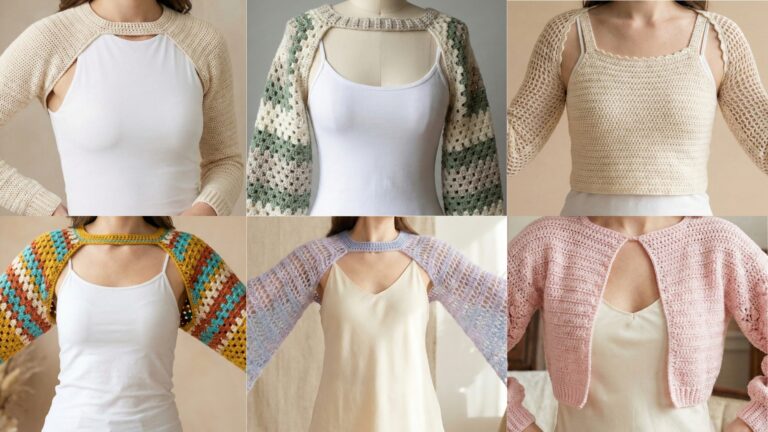
Handmade crochet tops are one of the most satisfying wearable projects: they’re showy, customizable, and can be finished in a weekend if you choose the right yarn and size. Below are five full, ready-to-use top patterns you can include in your blog post: Granny Stripes Tank, Ruffles Peplum Top, Stylish Scalloped Edges Wrap Top, Multicolor Summer Top, and Lacy Wrap Tie Top. Each pattern includes: skill level, finished measurements and how to adjust them, materials and yarn suggestions, stitch abbreviations, gauge, very detailed step-by-step construction (with counts and shaping notes), finishing, fit tips, and variations so readers of all levels can make a flattering top.
Style note: these patterns are written so a maker can choose to make a fitted or relaxed version — I show how to measure and change counts for small → large. Always make a swatch and check gauge before committing.
Universal notes (applies to every pattern)
- Abbreviations (US terms): ch = chain, sc = single crochet, hdc = half double crochet, dc = double crochet, tr = treble, sl st = slip stitch, sk = skip, rep = repeat, sp = space, RS/WS = right/wrong side, BLO/FLO = back/front loop only, inc = increase, dec = decrease.
- Yarn: I recommend breathable fibers for tops — cotton, cotton blends, bamboo blends, linen blends or light-weight acrylic for budget options. DK/sport or light worsted (category 3/4) are the most versatile for these styles. For drapier looks use a lighter yarn and larger hook; for structure choose cotton or blend and maintain gauge.
- Hooks: suggested in each pattern; adjust ±0.5 mm for personal tension.
- Sizing: Patterns give a sample adult Medium measurement; keys to resizing are explained per pattern — always measure bust circumference and desired ease first. For an accurate fit, aim for 2–4 in (5–10 cm) positive ease for a relaxed top, 0–2 in for fitted.
- Blocking: always block panels/strips before assembly to get even shaping and stitch definition.
- Safety/teen note: avoid embellishments that can be swallowed by small children if selling/making for families.
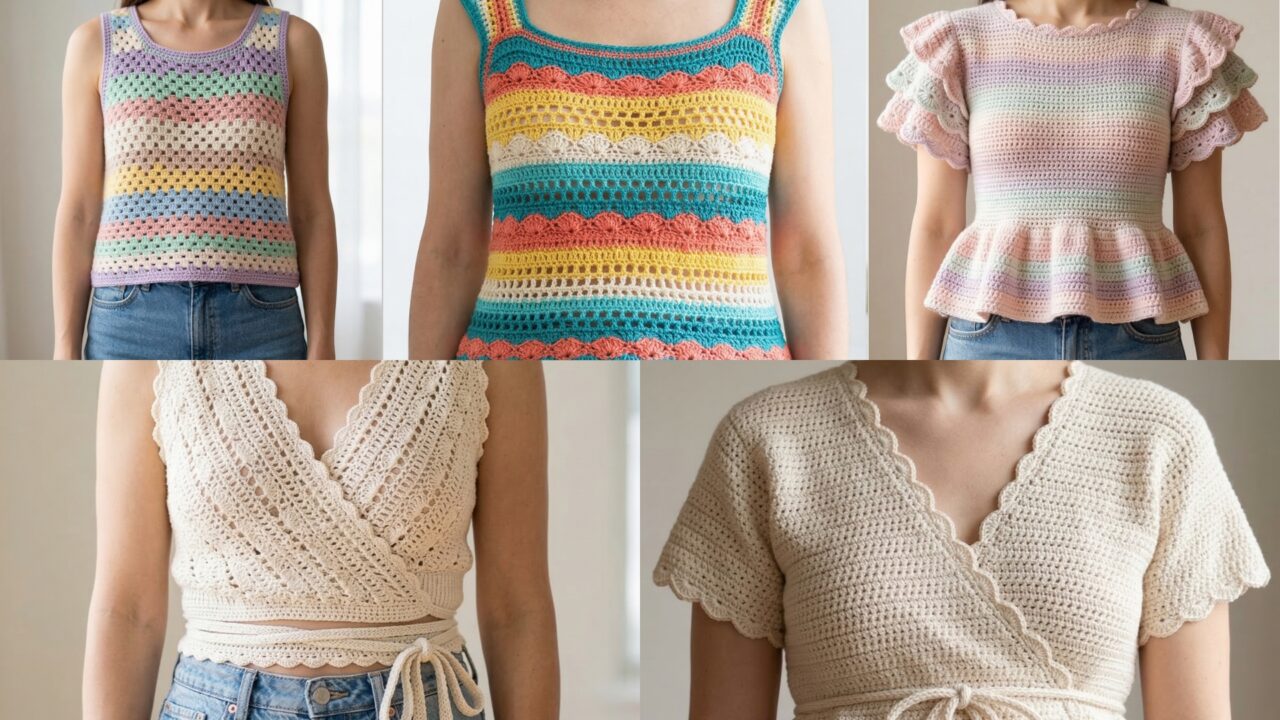
1. Crochet Granny Stripes Tank Top Pattern
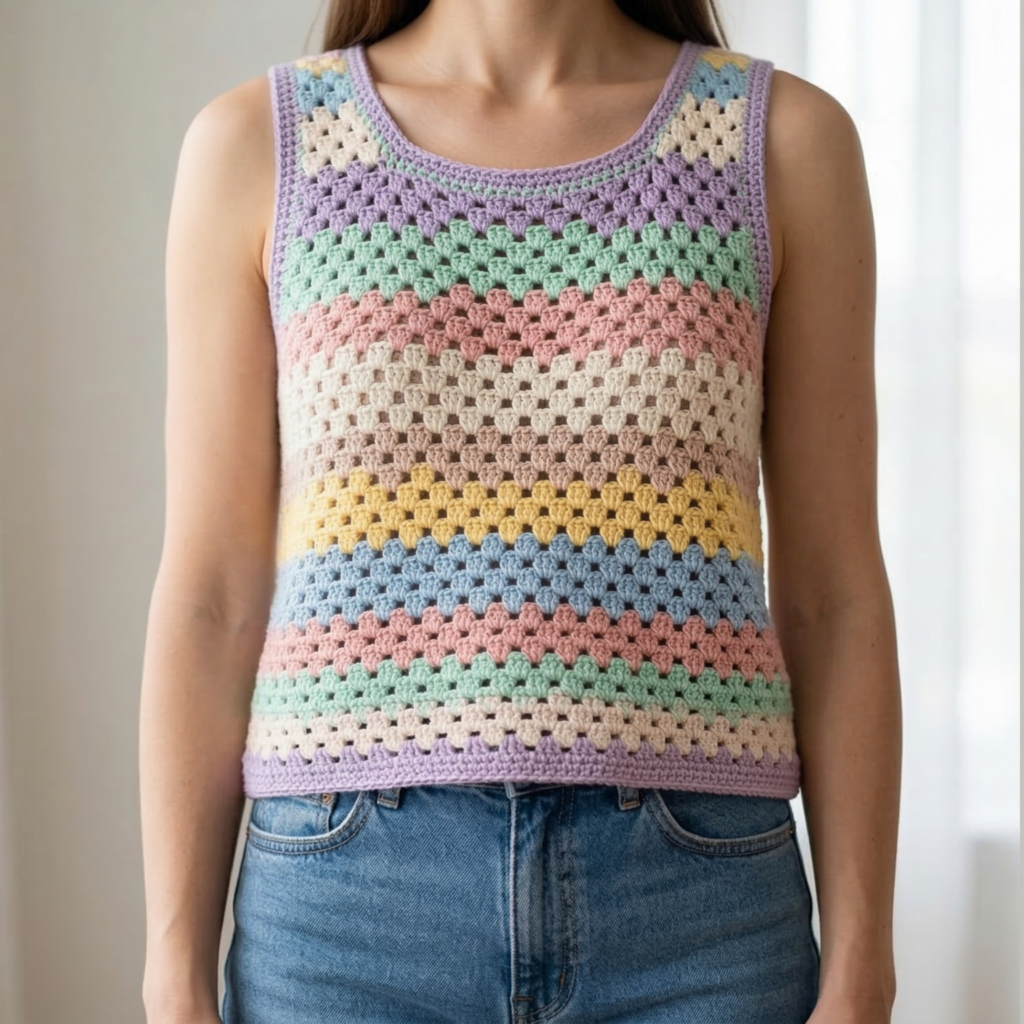
A modern take on classic granny stripes — worked as two rectangle panels (front/back) and shaped at armholes for a clean, boxy tank.
Skill level: Beginner–Intermediate (granny clusters + straight panels)
Finished sample size: Medium — Bust finished circumference = 38 in (96.5 cm), length from shoulder = 22 in (56 cm).
Materials: DK cotton, ~700–900 yds (varies by size and length); hook 4.0 mm; tapestry needle; stitch markers.
Gauge (informal): 16 dc (cluster pattern) × 8 rows = 4″ (10 cm) — do a 4×4″ swatch in the granny repeat to confirm.
Design & fit
Worked flat in two panels, joined at shoulders and sides. The granny stripe motif creates horizontal color bands; you can repeat any color sequence. Easy to lengthen into a tunic or shorten to a crop.
Stitches used
- Granny cluster = (dc, ch1, dc) or classic (3 dc cluster with ch1 or ch2 between clusters depending on desired openness). I’ll use a 3-dc cluster separated by ch1.
Step-by-step (Medium)
Panel width & chain
- Decide finished bust circumference (target 38 in). Let each panel be half that minus seam allowance: panel width = 19 in.
- Make a foundation chain long enough to reach 19 in after pattern. With your gauge, calculate number of repeats: e.g., if 1 granny cluster block (3 dc + ch1 + space) = 1″ wide, chain to multiple of 3 (for clusters) + 2 turning chains. Example: ch 58 (test measure — adjust until foundation measures ~19 in).
Row 1 (foundation row)
- Row 1: (RS) sc in 2nd ch from hook and in each chain across to create a firm base. Turn.
Row 2 (start granny stripes)
- Row 2: ch3 (counts as first dc), skip 2 sc, (dc, ch1, dc) in next sc (granny cluster) — repeat across; end last granny cluster in the last sc; ch3 and turn so edges are balanced. (The ch3 at the beginning counts as top leg of the first cluster).
Rows 3–X (repeat)
- Row 3: ch3, turn, work granny clusters into the ch1 spaces below: (dc, ch1, dc) in the ch1 space, ch1, sk next ch1 base — standard granny join. Repeat rows until panel height = desired length from shoulder to underarm + bodice length. For 22 in total length: work until panel reaches 22 in (about 40–48 rows depending on gauge). For a tank, stop around 22 in. Adjust for crop/tunic.
Armhole shaping (optional for a shaped tank)
- If you want shaped armholes: when panel reaches 16 in from bottom (i.e., you’ve created the lower body), stop the last row at a smaller width to create an armhole curve by decreasing a granny cluster at each row for 3–4 rows (skip a cluster near each side). Alternatively leave square for boxy style.
Make second panel
- Repeat for back panel exactly the same width and row count. For a scoop-back, work back panel slightly longer before shoulder shaping.
Shoulder shaping & joining
- For shoulder shaping: Option A (simple): seam shoulders with 1.5–2 in opening for neck, leaving rest joined. Option B (strap style): leave a 4–5 in space for a strap on each side. Example: if panel width is 19 in, sew shoulder seams leaving 5 in center for neck — sew the outer 7 in of each shoulder together.
Side seams
- Fold panels RS together and mattress stitch or sc-join sides leaving desired armhole depth (typical armhole depth = 8–9 in from shoulder for medium). Try on before fully sewing — you can adjust side seam length for fit.
Edging & finishing
- Work one round sc (or hdc) around armholes and neckline for a neat finish. For a polished look, do 2 rounds of reverse sc (crab stitch) to add texture. Weave in ends. Block lightly to even stripes.
Fit tips & resizing
- To size up/down: increase/decrease foundation chains in multiples of granny repeat (multiple of 3 or your cluster width) until panel width matches target half-bust. Keep length proportional.
Variations
- Add shoulder straps of a different color (work 6–8 sc wide strips and attach).
- Use variegated yarn for spontaneous stripes.
- Make it sleeved by adding short sleeve repeats after joining.
2. Crochet Ruffles Peplum Top Pattern
Feminine peplum silhouette with a fitted bodice and ruffled flared hem — great for pairing with high-waist bottoms.
Skill level: Intermediate (shaping + ruffle construction)
Finished sample: Medium — Bust 36–38 in (91–96 cm), bodice length 14 in, peplum flare adds 6–8 in.
Materials: DK yarn (cotton/bamboo blend for drape), ~1000 yds; hook 4.0 mm for body; for ruffles you can switch to 4.5 mm for lilt.
Gauge: 16 dc × 12 rows = 4″ in pattern.
Design & construction
Worked top-down in three parts: yoke (fitted), bodice tube (fitted to waist), then joined ruffle tiers for the peplum. Yoke includes increases for bust shaping and armholes left open.
Stitches used
- Basic dc rounds for body; shell or V-stitch for ruffle.
Step-by-step (Medium)
Yoke (top-down short-sleeve or sleeveless option)
- Measure neck circumference (typical 15–16 in). Start with a chain that fits comfortably around neck + join: ch 64 (adjust to neck, join with sl st to make a round). Work in rounds with a 2–3 in rib (hdc in BLO rounds for band) to form the neckline.
- Round 1–4: Work hdc in each stitch around (or use BLO ribbing) for a neat neckline band.
- Round 5 (increase round for bust): Switch to body color and dc rounds. To create shoulders and sleeve openings, mark front center and back center. Work increases evenly at four points (underarm and side increases) so garment widens for bust: example, increase 8 sts evenly across next round (work dc, inc when needed every N sts).
- Continue working rounds, placing stitch markers at armhole points where you will later split for sleeves. For a sleeveless top, at the round where yoke reaches desired depth (~8–9 in), STOP and divide to work bodice in the round or as flat panels. For short sleeves, after division, work a few rounds in the sleeve loops.
Bodice (fitted tube)
- Join yarn under arms and work even dc rounds down until reaching waist: for 14 in bodice length from shoulder to waist, work enough rounds (measure as you go). You can add waist shaping by working 1–2 decrease rounds if you want more fitted waist.
Peplum ruffle (tier 1)
- Attach yarn at waist seam, Round 1 ruffle base: ch3, dc in same st, 2 dc in each st around (this doubles the stitch count and gathers). Round 2: shell pattern — skip 2, 5 dc in next, skip 2, sc in next around to form shells. Work 1–2 rounds of shells for fullness. For a layered peplum add another tier: chain on for the next tier with 2 dc in each sc of the base, and repeat shell round.
Finish & edges
- Add a decorative edging at neckline and sleeve edge: picot or scallop round gives a pretty finish. Weave in ends and block to shape ruffles.
Fit & adjustments
- To alter peplum fullness: change increase rate at base (1.5× for gentle flare, 2× or 3× for dramatic).
- To size waist: take waist measurement and place increases so circumference at waist matches body measurement minus desired ease (2–4 in positive ease).
Variations
- Make peplum cropped for a summer look.
- Add a tie belt at waist made from an i-cord for detail.
3. Crochet Stylish Scalloped Edges Wrap Top Pattern
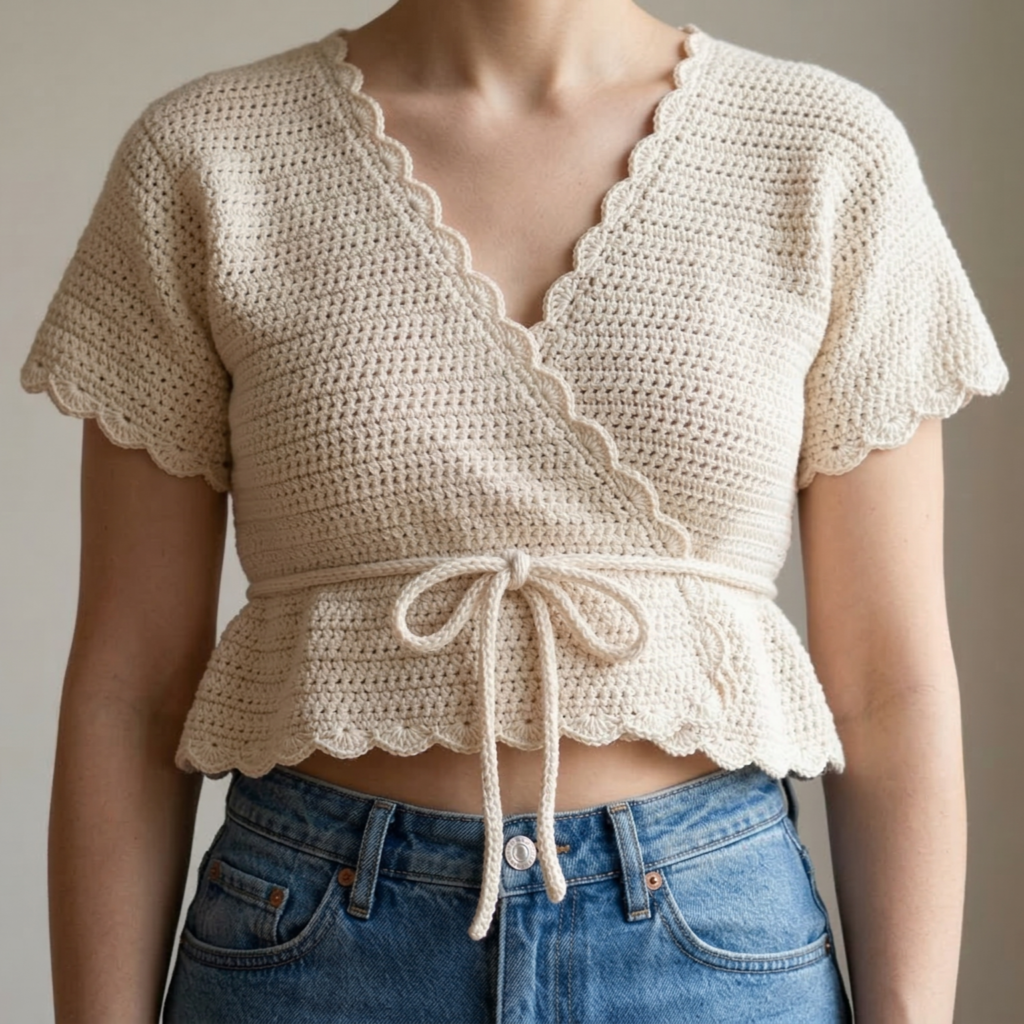
A wrap-style top that fastens at the side — elegant scalloped edges elevate a simple silhouette.
Skill level: Intermediate (shaping + wrap overlap)
Finished sample: Medium — designed to wrap and tie with adjustable coverage; bust overlap maximum 2–3 in. Typical finished across-front width per panel ~20 in.
Materials: DK yarn or cotton-blend ~800–1000 yds; hook 4.0 mm.
Gauge: 16 dc × 12 rows = 4″.
Design & key points
Two trapezoid panels (left and right) are worked and joined at shoulders; they overlap on the front to create a wrap that ties at waist with straps. Scalloped edging along neckline and wrap edges adds feminine polish.
Step-by-step (Medium)
Panel shaping (make 2)
- Foundation width: Decide how wide you want each front panel at bust: e.g., panel base = 20 in so both together cover up to 40 in before overlap. Chain foundation to multiple that matches 20 in (e.g., ch 60 — check gauge).
- Work trapezoid: Row 1 sc across. Row 2+: ch3, dc across to row end. Increase 1 cluster near outer edge at every 6th row to create slight flare (so panel is trapezoid — wider toward bottom), or keep straight for a rectangle wrap.
- Armhole/Sleeve shaping: When panels reach desired length from shoulder (e.g., 18–20 in to mid torso), shape shoulder by binding off 1–2 in at top for strap width; leave a notch where back will be joined.
- Make second panel same as first but mirror shaping so that when joined they form a symmetrical wrap.
Back panel / join
- Option A: Make a short back panel to join both front panels at shoulders and upper back (approx 6–8 in wide band). Option B: seam front panels at shoulder with small gap for neck (makes a shallower back). Sew or sc-join shoulder seams.
Ties and fastening
- Crochet long straps (I-cord or long sc strip) to attach at waist points on inside of each panel for tying. Typical strap length: 26–35 in each depending on desired knotting — measure around waist and add extra for bow.
Scalloped edging
- Work one round of sc around entire edge; scallop round: skip 2, 5 dc in next st, skip 2, sl st in next st — repeat along all outer wrap edges and neckline. This scallop finishes the wrap beautifully.
Fit & adjustments
- To adjust coverage: increase overlap by making panels wider or lengthen straps to tie in back instead of front.
- For modesty add a small snap or button inside to hold inner panel in place.
Variations
- Make one-panel wrap (poncho-style) by joining front panels at sides leaving long slits for arms for a boho look.
- Use lightweight lace for a breezier beach cover-up.
4. Crochet Multicolor Summer Top Pattern
A bright, breezy shell + mesh hybrid for hot weather — striped color bands and breathable stitchwork.
Skill level: Beginner–Intermediate (color changes + mesh stitch)
Finished sample: Medium — Bust 36–38 in, length 20 in.
Materials: Fingering or sport weight cotton in 3–5 colors (approx 900–1100 yds total); hook 3.5 mm.
Gauge: 18 dc × 10 rows = 4″.
Design
Worked in panels or in the round as a tube, alternating solid shell bands and airy mesh panels for comfort and visual interest. Color changes are frequent for a multicolor striped effect.
Stitch combos
- Shell band: 5 dc in one st, sk2 across to create texture.
- Mesh band: (dc, ch2, sk2) across for airy grid.
Construction (worked bottom-up)
Hem & body tube
- Foundation chain: Chain to hip width for a comfortable fit; for medium, chain so measurement (hip or bust placement) = 36–38 in / 90–96 cm. Example: ch 140 (measure as you go). Join to work in the round if you prefer seamless.
- Row 1–4 (solid band): Do shells or dc rounds in Color A — 4–6 rounds for a solid band.
- Row 5–9 (mesh band): Switch to Color B and work mesh: round: dc, ch2, sk2 repeat across. Repeat mesh rounds 3–4 times.
- Alternate bands: Continue alternating shells (texture) and mesh (airiness) until top reaches underarm level (about 16–17 in from hem depending on desired top length).
Armholes & neckline
- If working in the round, divide for armholes: mark front and back centers, and on next round skip corresponding stitch sets to open armholes (work separately for front and back in rows to shape neck). Alternatively work as a wide tube and fold/ seam for armholes for a boxy summer top.
- For a simple sleeveless top: simply bind off at underarm depth and work a neat sc edging around armholes.
Straps or sleeves
- Add small double-straps (2 sc cords attached at shoulder points) or short cap sleeves by picking up stitches along armhole and working a few rows of shells.
Finishing
- Work 1 or 2 rows of sc around neckline and armholes in a contrast color to frame the multicolor stripes. Weave ends.
Color tips
- Use a 3-color repeating palette for beachy vibe: e.g., coral, mint, cream. For a bold look, use high-contrast brights. Keep color transitions clean by fastening off or carrying color up side (carry across WS and trap floats every 3–4 sts).
Variations
- Make it cropped by shortening length; add an empire tie at underbust for a different silhouette.
- Add a built-in shelf bra by crocheting a tighter under-bust band in cotton-elastic yarn for support.
5. Crochet Lacy Wrap Tie Top Pattern
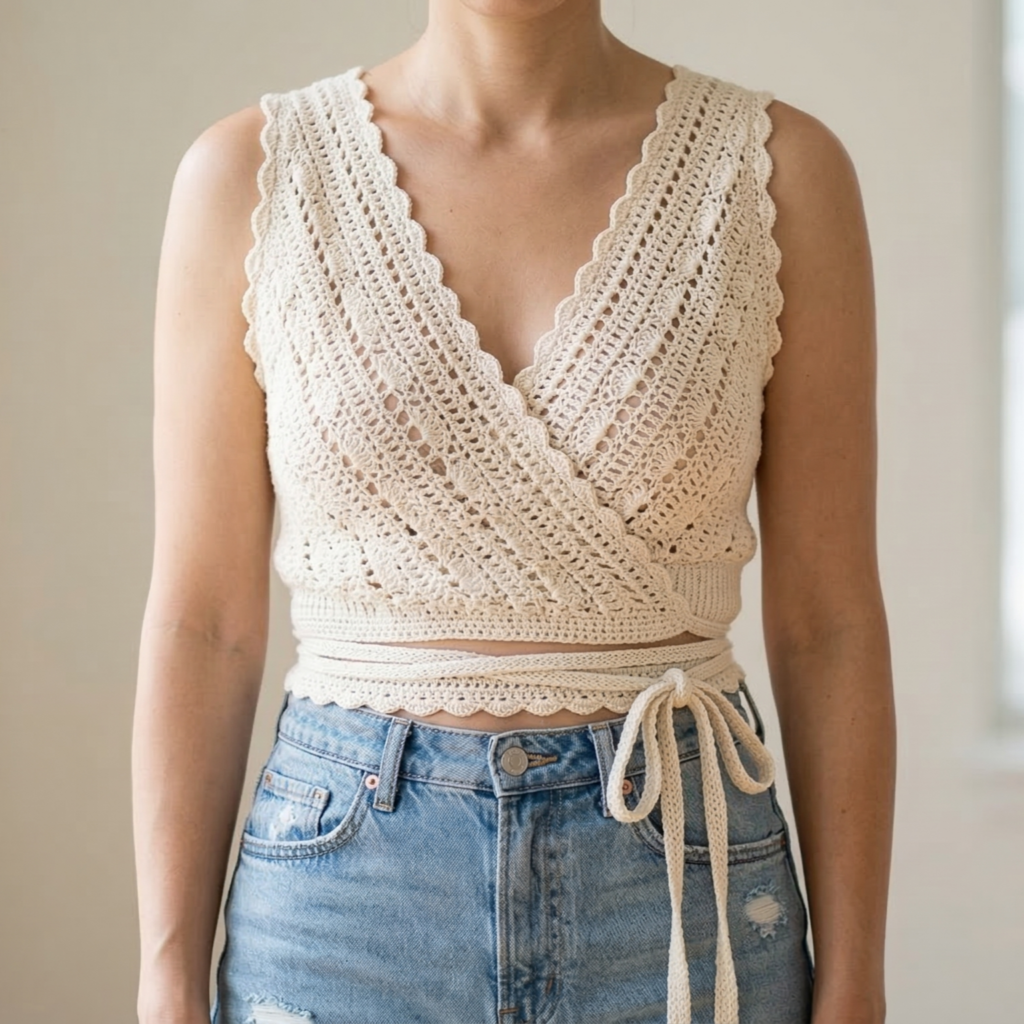
An elegant wrap tie top with deep V and long ties — lace panels create a romantic, slightly bohemian vibe.
Skill level: Intermediate–Advanced (lace shaping + ties)
Finished sample: Medium — V depth from shoulder to waist ~16–18 in; long ties ~30–40 in.
Materials: Fingering or light DK cotton or bamboo for soft drape; ~700–900 yds; hook 3.0–3.5 mm.
Gauge: variable — lace patterns are gauge-flexible; swatch to confirm desired drape.
Construction overview
Two triangular front panels (worked bottom-up or top-down) that overlap and tie, plus a back band. Lace stitch is a combination of V-stitch and shell motifs to create openwork.
Lace stitch (sample repeat)
- Row pattern: dc, ch2, dc in same st (V-st), sk 2, shell (5 dc) in next — adjust to chart for a repeating motif.
Step-by-step (Medium)
Back band (anchor)
- Chain a length to fit across upper back (example 34 in) and join; work a ribbed band in hdc for 3–4 rows to make a sturdy base to anchor ties and front panels.
Front triangular panels (make 2)
- Attach yarn at one end of back band and work lace pattern outward to form triangle shape: Start with ch4; Row 1: 3 dc in ring (or a small base row), Row 2: increase at center by adding V-stitch to create a growing triangle. On each subsequent lace round/row, increase by adding one motif at the center line so the piece expands symmetrically. Continue until panel length from shoulder to waist is ~16–18 in and width at waist equals desired front coverage (e.g., 18–20 in across).
Notes on shaping: work increases at center spine and at outer edge every other row to keep triangular shape even.
Ties
- At the tips of each triangle (lower edges) or attached to side seam, create long tie cords: i-cord or 4–6 sc in a strip worked to 30–40 in. Attach securely to panel ends. Alternatively make ties as two long strips to cross and tie around the waist.
Assembly
- Sew triangles to back band at top edge (shoulder seam) leaving depth for armholes. You can create small shoulder straps by leaving a short section of back band unjoined or by adding separate straps.
Edge finishing (scallops)
- Add a scalloped picot edge around neckline and wrap edges to make the wrap pop: sc 3, picot (ch3 sl st) across edge.
Fit & styling tips
- Wrap more for coverage or less for a deeper V. Ties allow adjustable fit so one size can cover several body shapes.
- For support, insert a narrow elastic under the bust anchored to the inner side of panels.
Variations
- Line lower chest area with a thin fabric or crocheted cami for modesty.
- Make the back band wider for more support or to create a racer-back look.
Conclusion
These five crochet top patterns cover a wide range of styles — classic granny stripes, feminine peplum, elegant scalloped wrap, breezy multicolor summer, and romantic lacy wrap tie. A few final practical tips to make the process smooth for your readers:
- Measure first. Decide intended ease and take bust, underbust, and torso length measurements — update counts accordingly.
- Make a gauge swatch. Crochet gauge varies a lot with stitch type (granny clusters vs lace vs shells) — always swatch and block before counting chains for panels.
- Try on as you go. Especially for fitted tops, assemble temporarily with large safety pins or stitch a basting seam so you can try on and tweak.
- Blocking & finishing. Block panels before assembly to get crisp shells and lace. Finish seams with mattress stitch or sc-join depending on desired look.
- Yarn choice guides. Cotton/bamboo blends for summer, mercerized cotton for sheen, or soft acrylic blends for easy care — include care tags for recipients.
- Photo-friendly tips for your blog: show each pattern with a flat-lay of the swatch showing gauge, a construction diagram (front/back panels), and at least one on-body photo to show drape and fit.