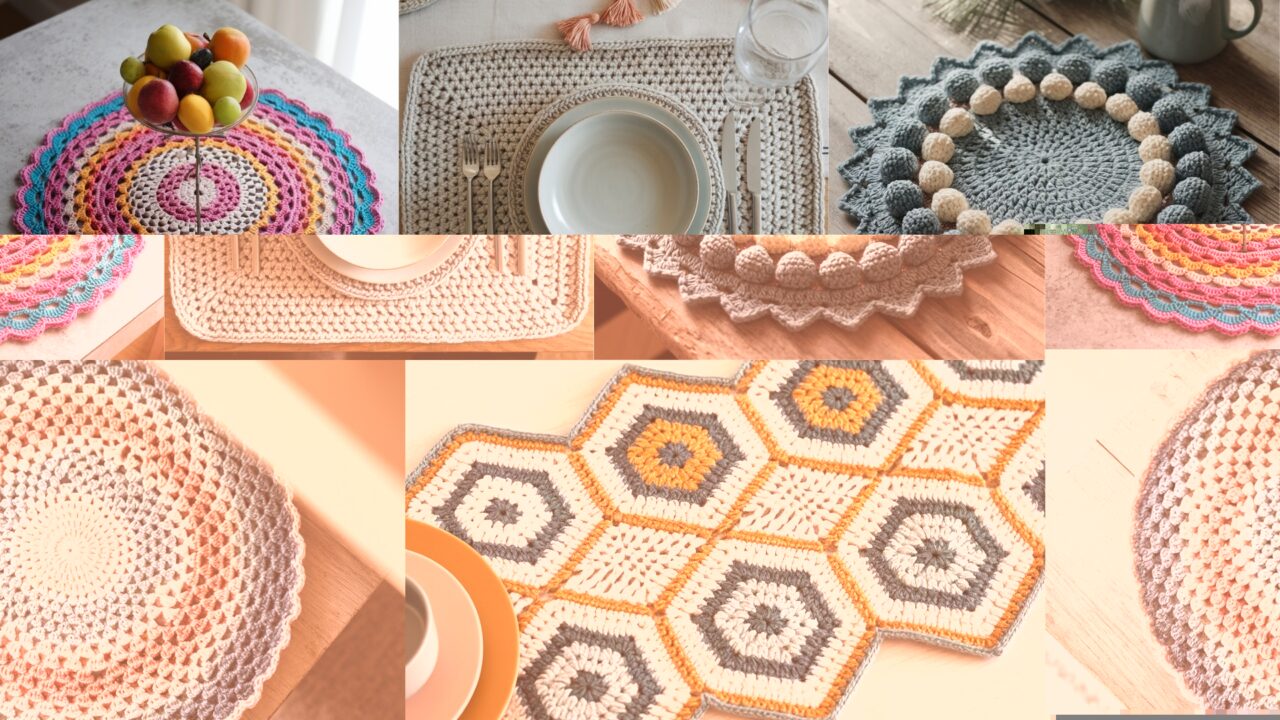
Table mats are the easy way to make a table look intentional. They’re small, fast, forgiving, and useful — no one needs another useless thing that collects crumbs. These five designs cover classic granny circles, clean geometric shapes, cozy winter palettes, simple rectangles for everyday use, and show-stopping mandalas for centerpiece drama. I give practical stitch counts and sizing guidance so you won’t spend three evenings guessing whether you’re making a coaster or a placemat.
Quick universal notes (read this — it matters)
- Best yarn: 100% cotton or cotton blends (dish-/table-friendly). Mercerized cotton is crisp and washable. For a cushioned placemat, use a cotton-blend or hold yarn doubled. Avoid pure acrylic for heat-exposed mats.
- Hooks used in samples: worsted weight yarn → 4.0–5.0 mm (G–H). If using cotton thread or sport, drop to 3.0–3.5 mm. If using bulky, go up. Always swatch.
- Standard placemat targets:
- Round mat / placemat: 11–13″ (28–33 cm) diameter (12″ is an easy target)
- Rectangular placemat: ~12″ × 18″ (30 × 46 cm)
- Small coaster: 4–6″ diameter — but we’re making mats, not coasters.
- Gauge sample (for worsted cotton + 5.0 mm hook): 14 sc × 16 rounds ≈ 4″ (10 cm) square. Use these numbers to adjust if you change yarn.
- Blocking: Always wet-block cotton mats on a flat surface to flatten and even stitches. Use pins and let dry completely.
- Abbreviations (US): ch, sc, hdc, dc, tr, sl st, st(s), sk, BLO (back loop only), FLO (front loop only), rep, sp = space. Work in joined rounds unless noted.
1. Crochet Granny Circle Mat Pattern

The classic granny made round — timeless, quick, and customizable. Neutral enough for dinner parties, colorful enough for brunch.
Skill level: Beginner → Confident Beginner
Finished size (sample): ~12″ (30 cm) diameter (adjustable)
Materials: worsted cotton ~200–275 yds depending on size/edging; 4.5–5.0 mm hook; tapestry needle; blocking pins.
Why this works: Granny clusters create a flexible fabric that lies flat if increases are even. The cluster/gap rhythm makes the circle expand smoothly.
Gauge & sizing math (practical)
- Sample gauge estimate: roughly 4 sc = 1″. For a 12″ diameter mat the circumference C = π×d = 3.1416 × 12 = 37.6992″. At 4 stitches per inch, target stitches ≈ 37.6992 × 4 = 150.7968 ≈ 150 stitches around the final round. (If your stitch density differs, recalc with your stitches/inch.)
- I’ll give an increase plan that yields ~150 sts at about Round 25 using single-crochet increases; you can switch to granny clusters earlier for the classic look.
Pattern (simple, flat method + granny finish)
Foundation circle (flat, even increases — gives a stable base)
- MR, ch1, 6 sc into magic ring; pull tight. (6)
- R2: inc around (2 sc in each) → 12.
- R3: sc, inc around → 18.
- R4: 2 sc, inc around → 24.
- R5: 3 sc, inc around → 30.
- Continue in this pattern — each round add one more sc between increases — so Round N adds 6 sts. (R6 → 36; R7 → 42; …) Work until your round count reaches ~150 sts (see math above) or until the circle measures ~10–11″ across (you’ll add a granny-shell edging to reach 12″). For reference, at a typical gauge you’ll hit ~150 sts near Round 25. Check frequently.
Convert to granny rounds for the outer texture (optional)
If you want the classic granny look instead of many sc rounds, switch after Round 6–8: work granny clusters (cluster = (3 dc) in same sp) into chain-2 or space locations, making sure to add clusters evenly so the circle stays flat. Typical granny-round sequence uses the chain-2 spaces as increase points and places clusters in each space — this keeps growth steady.
Edging (lace or tidy)
- Simple tidy edge: 1 round sc even; 1 round crab stitch (reverse sc) for a subtle finish.
- Decorative shell edge: sk 2, (5 dc) in next st, sk 2, sl st — repeat around for scallops.
- Block flat.
Tips & variations
- Use two colors and change color every 2–3 rounds for concentric rings.
- For a sturdier mat, after you reach diameter, do 2 more rounds of hdc or sc in BLO to create thickness.
2. Crochet Geometric Mat Pattern

Clean lines, sharp points — triangles, diamonds, or hexagons arranged into a single mat. This design uses modular motifs joined as you go, great for placemats or a rectangle table runner in multiples.
Skill level: Confident Beginner → Intermediate (joining motifs)
Finished size (sample): single hexagon ~12″ across (make smaller/larger by rounds); 3×2 layout for runner.
Materials: worsted cotton — 250–400 yds depending on layout; 4.0–5.0 mm hook; tapestry needle.
Design ideas
- Hexagon tiling: make hexagon motifs and join them into a honeycomb mat.
- Diamond/triangle tessellation: make repeated triangles that join into diamonds for a modern placemat.
Hexagon motif (step-by-step; single hexagon ~12″ when worked to ~9–11 rounds)
Hexagon motif (worked in rounds; increases at six corners)
- MR, ch2 (counts as 1 dc), work 11 dc into MR (12 dc total including ch2). Join.
- R2: ch4 (counts as ch2 + ch2 sp), dc in next st repeat around to create 6 ch-2 corner spaces. Join.
- R3: Into each corner ch-2 space work: (2 dc, ch2, 2 dc); along the edges between corners work dc evenly; join.
- R4+: Repeat rounds adding dc rows between corner clusters so hexagon grows evenly — each round maintain 6 corner increase points. Continue until diameter across flats equals desired measurement (measure across two opposite sides). For a 12″ hexagon you’ll likely work ~9–12 rounds — check gauge.
- Finish with a neat sc border: 1 round sc evenly, then a final crab stitch (reverse sc) for an elegant rim.
Joining hexagons
- Use slip-stitch or whip-stitch join-as-you-go: when making a connecting hexagon, on the joining round slip-st into corresponding edge stitches of adjacent finished hexagon(s) at regular intervals so seams are nearly invisible.
Variant: geometric rectangle from triangle motifs
- Make equilateral triangle motifs and seam 3 across × 2 down to create a rectangular placemat with repeating diamonds.
Finishing & tips
- Blocking is critical to get neat straight edges on geometric mats. Pin edges straight and steam-block.
- For extra heft, back the mat with a thin cotton batting and top-stitch around edge.
3. Crochet Winter Blues Mat Pattern

A cozy, seasonal mat with textured stitches (popcorns/puff + raised rib) and a winter-themed palette — think muted blues, slate, and cream.
Skill level: Intermediate (texture + color changes)
Finished size: ~12″ diameter (or make smaller for coaster sets)
Materials: worsted cotton in 3 colors (main + 2 accents) — about 250 yds total; 4.5–5.0 mm hook.
Construction logic
Start with a dense center worked in half-double and popcorns for texture, then expand outward with ribbed rounds and color changes.
Stitch vocabulary
- Puff (4-loop puff): YO, insert hook, pull up loop, YO, pull through 4 times (or pull up 4 loops total), YO and pull through all loops; ch1 to close.
- Front-post/Back-post hdc or dc create vertical ribs.
Pattern (texture-forward round mat)
Center
- MR, ch2, work 12 hdc into ring, join. (12)
- R2: hdc, inc around → 18.
- R3: Switch to pattern color; hdc in next 2, puff in next st around — stagger puffs so they alternate with hdc spacing. Join.
Textured rounds
4. R4: ch1, sc in each st around (stabilize). Join.
5. R5–R8: Work alternating rounds of fpdc/bpdc to create raised ribs: e.g., Round 5: fpdc 2, bpdc 2 repeat; Round 6: sc round. This builds a raised radial texture. Alternate color every 2–3 rounds for the winter palette.
Edge (snowflake-like scallop)
6. Final rounds: sc in next st, (3 dc, ch2, 3 dc) in next st (shell), sc in next 3 repeat around to create snowflake-ish scallops. Weave in ends.
Block & styling
- Use soft blue colorwork; a subtle metallic thread worked into the last round gives a frosty sheen when the light hits the table. It won’t taste good — it just looks good.
4. Crochet Rectangle Mat Pattern

Simple, elegant rectangular placemat — clean edges, sturdy fabric, perfect for daily use. Great first big project.
Skill level: Beginner → Confident Beginner
Finished size (sample): 12″ × 18″ (30 × 46 cm)
Materials: worsted cotton ~300–400 yds depending on size and edging; 4.5–5.0 mm hook.
Construction logic
Work a dense fabric in hdc (or sc) in rows until you hit the desired length and width. Finish edges with tidy border and optional corners.
Directions (row-based placemat)
- Decide stitches per inch: with sample gauge 14 sc = 4″ → 3.5 sc/in. For a 12″ width you need ~12 × 3.5 = 42 stitches. Chain 44 (42 + 2 turning chains). (If you’re using hdc, spacing will differ — make a quick width swatch.)
- Row1: hdc in 3rd ch from hook and across (counts as hdc turning chain); turn.
- Row2–RowN: ch2, hdc across into each st; repeat until fabric height ≈ 18″ (or less if you prefer). Keep edge tension consistent — use a stitch marker at the first and last st to avoid skinny edges.
- Finish with 2–3 rounds of sc border around entire rectangle (sc into ends of rows to encase raw edges); finish with crab stitch (reverse sc) for a polished look.
Practical tips for clean edges
- For neat ends, count your turning chains and always place hdc under both loops on the first st of each row (if using hdc) or adjust to avoid loose tails.
- When you turn, consider carrying color changes inside the work to avoid floats.
Variation ideas
- Add corner tassels or mini-fringe for a boho table.
- Make stripes by changing color every 6–10 rows for a modern look.
5. Crochet Mandala Mat Pattern

A mandala mat is the “I put actual effort into the table” option. It’s decorative, colorful, and dramatic — perfect under a fruit bowl or vase.
Skill level: Intermediate → Advanced (many stitch types & color changes)
Finished size (sample): 12–14″ diameter (expand by adding rounds)
Materials: multiple colors of cotton (plan 350–450 yds total), 4.0–5.0 mm hook, tapestry needle.
Why mandalas can go wrong (and how you fix it)
- Uneven increases make mandalas ripple. Stop and measure: keep an eye for cupping (too tight — add increases) or ruffling (too loose — reduce increases or add stabilizing sc rounds). Alternate dense rounds (sc/hdc) with openwork (dc+ch) to balance.
Suggested mandala round-by-round plan (gives variety and lies flat)
- Center (rounds 1–3): MR → 8 sc; R2: sc, inc → 12; R3: 2 sc, inc → 16 (a tidy, tight center).
- Textured band (R4–R6): Switch to dc clusters and chain loops: (dc, ch2, dc) in each st to create a lacy star.
- Popcorn/puff band (R7–R9): Work puff clusters staggered to form petals: (sc 2, puff, sc 2) across. This creates dimension.
- Openwork lace (R10–R12): introduce chain arches: dc, ch3, sk2, dc repeat to create airy space.
- Solid band (R13–R15): add rounds of hdc/sc to stabilize size and prevent rippling. If you’re too loose, do 1–2 more rounds solid.
- Final decorative edge (R16–R18): shell or picot edge: sk1, (5 dc) in next st, sk1, sl st OR sc in next st, ch3, sl st in 3rd ch for picot.
Color & rhythm
- Use a palette of 3–5 colors, change every 2–3 rounds. Keep contrast between adjacent rounds for definition. Metallic or variegated yarn in the last round gives a ‘frame’ effect.
Blocking & finish
- Block carefully: pin each scallop/point to achieve a perfectly round mat. Steam lightly if yarn tolerates it. Sew in ends neatly and hide color joins on the back with a small embroidered spiral to stabilize.
Final finishing & practical tips
- Measure, don’t guess. Lay your mat next to a plate or ruler often. If in doubt, add one more stabilizing round of hdc/sc.
- Balance open & solid rounds. Too many open rounds → rippling; too many solid rounds → stiffness. Aim for every airy round to be followed by at least one stabilizing round.
- Block every mat. Cotton relaxes and looks sloppy unless blocked. Spray or steam and pin to shape; let dry completely.
- Reinforce under heavy loads. If this mat will hold a hot pot, add a thin cork backing glued on the reverse to protect the table. (Glue and yarn care tip: glue only to backing, not the yarn surface.)
- Care: machine-washable on gentle for most cotton mats; air-dry flat. Avoid high-heat drying to prevent cotton shrinkage.
conclusion
You now have five practical, publish-ready table mat patterns — from no-fuss granny circles to architectural geometry, cozy winter texture, practical rectangles, and a mandala that will steal the table. Pick breathably washable cotton, swatch for gauge, and block aggressively. If you want, I’ll convert any one of the five into a printable one-page pattern card (materials table, row-by-row counts, and a tidy materials list). Which design do you want converted first — granny circle, geometric, winter blues, rectangle, or mandala?Think