A crochet sweater vest is the perfect transitional piece — cozy enough to layer in cool weather, light enough for spring. These five patterns span modern graphic (checkerboard), classic (turtleneck), textured (cable), comfy-easy (chunky), and preppy (collared). Each entry includes: style notes, yarn & tools, gauge, finished measurements (S–XL), step-by-step construction for the back, front(s), neck/armhole shaping, assembly, and finishing tips. Where a stitch or shaping repeats, I give a clear formula so you can scale the vest to other sizes.
Read the quick notes, then pick a style.
Quick notes before you begin (applies to all patterns)
- Sizes shown: S (34–36″ bust), M (38–40″), L (42–44″), XL (46–48″). For a looser fit add 2–4″ positive ease; for a fitted vest subtract 1–2″.
- Gauge example used across many patterns: 16 dc × 20 rows = 4″ (10 cm) using worsted weight yarn and a 5.0 mm hook. Always make a gauge swatch and change hook if needed. If you change yarn weight, adjust measurements and yarn totals accordingly.
- Yarn amounts (worsted / weight 4, approximate): S 900–1000 yd, M 1100–1250 yd, L 1300–1500 yd, XL 1500–1700 yd. Chunky pattern uses bulky yarn: S 600–700 yd, etc.
- Abbreviations: ch, sc, hdc, dc, tr, sl st, st(s), RS/WS, BLO/FLO, fpdc (front post dc), bpdc (back post dc), sk.
- Construction note: vests are easiest worked as two panels (back + two fronts) seamed at shoulders and sides. Some patterns use seamless or joined-as-you-go techniques; I describe the sew-up method for clarity.
- Blocking and seaming are essential for a polished finish.
1. Crochet Checkerboard Sweater Vest Pattern
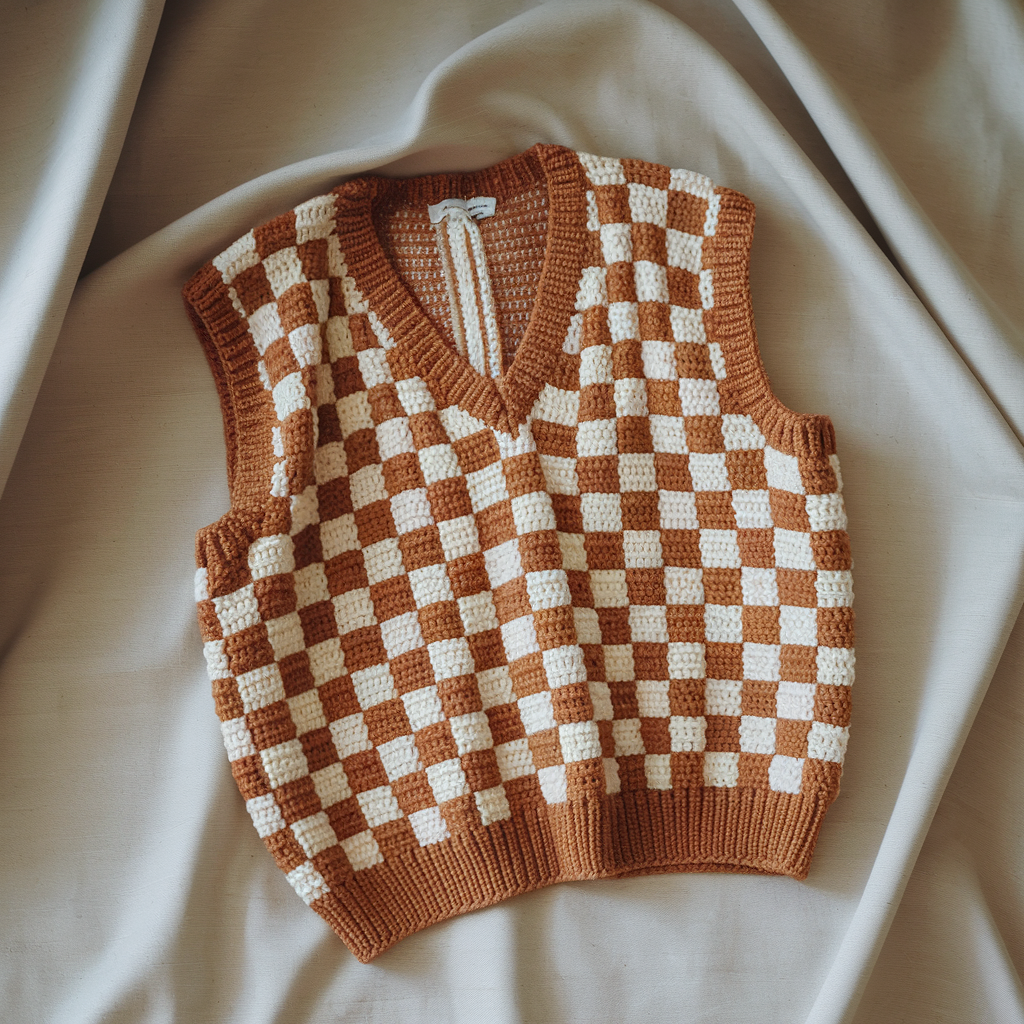
Clean, graphic checkerboard panels give a modern statement. Technique: worked in rows using color blocks (striping) and a simple color-change method; no tricky tapestry—just short color bands to form squares.
Style: slightly cropped or hip length depending on preference; boxy silhouette.
Materials
- Worsted weight yarn in two contrasting colors (A = main, B = contrast).
- Hook: 5.0 mm (or gauge).
- Stitch markers, tapestry needle, measuring tape.
Gauge
- 16 dc × 20 rows = 4″ in dc pattern. Match gauge for accurate sizing.
Finished bust width (after seaming, before neck/shaping)
- S: 36″ | M: 40″ | L: 44″ | XL: 48″
(Buttons and positive ease: pattern assumes ~2″ positive ease)
Stitch & pattern concept
- Checkerboard created by blocks of 4 dc × 4 rows per square. Each block uses either color A or B. To avoid long floats, change color every 4 rows and carry the unused color along the row back on the wrong side (or simply fasten off & weave if you prefer tidy, non-floated color changes).
Back panel (worked flat)
- Foundation: Chain to match desired width in dc. Formula: (st per 4″ × (target bust width / 4)) + edge sts. Example: if gauge = 16 dc/4″ and target back width = half bust = 18″, chain = 16 × 4.5 = 72 — make to nearest multiple of 4 for square alignment. For simplicity use multiples of 4. Example S back chain = 72, M = 80, L = 88, XL = 96.
- Row 1 (RS): ch 3 (counts as dc), dc across; turn.
- Work checkerboard in blocks: each color band = 4 rows of dc. Sequence across and up: alternate A/B in a checker pattern. To place checkerboard, plan a 4×4 grid: change color at the beginning of a 4-row set and switch every 4 sts horizontally to create square blocks. Practically: across a row, work 4 dc in color X, 4 dc in color Y, 4 dc in color X, etc. Work 4 rows with that horizontal pattern in same color sequence, then shift the horizontal order on next 4-row set to create checker offset. (Follow a simple chart or track in-row counts; using stitch markers at every 4th stitch simplifies counting.)
- Continue until back reaches desired armhole depth + shoulder height; stop when total length (from bottom hem to start shoulder shaping) measures e.g., S 20″, M 21″, L 22″, XL 23″ (adjust per desired length).
Front panels (make two mirror images)
- Chain same count as half-back width. Work checkerboard to the armhole shaping level (same as back minus shoulder shaping).
- Shape the neck: at the center front edge, after reaching the armhole row, work straight for shoulder width and leave the neck edge shorter: On RS rows, dec 1 dc every other row at neck edge until desired neck depth (S ~6″, M 6.5″, L 7″, XL 7.5″). Leave shoulder stitches unworked when continuing shoulder shaping per back shoulder depth (approx 2–3″). Keep the outer shoulder stitches the same width as back so shoulders match when seaming.
Armhole & shoulder shaping (common method)
- To make a clean armhole: after reaching armhole depth (typical armhole drop ~8–9″ from shoulder top for women, vary by body; vest often sleeveless so shallower), stop working the number of rows to create shoulder slope — or simply leave a straight bind-off for an unshaped armhole. Simpler: maintain rectangles for boxy vest — no armhole shaping; seam sides narrower than sweater for armhole hole. I’ll give a classic shaped route: when back and front reach the required height, bind off 2–3 sts at beginning of row to make shoulder slope, then decrease 1 st at each end on alternate rows until desired shoulder width remains.
Assembly
- Block pieces.
- Seam shoulders: mattress stitch or whipstitch joining right sides together, leaving neck opening per front shaping.
- Side seams: leave armhole opening (approx 8–9″) and seam from bottom hem up to armhole.
- Neckband: pick up stitches evenly around neckline (RS) and work 4–6 rows of hdc or rib (hdc BLO for ribbiness) to make a neat band; bind off. For armhole edges, single crochet around for clean finish.
- Weave in ends.
Notes & Variations
- For a subtler checkerboard, use same-color tonal yarns.
- For a cropped vest, shorten length before armhole shaping.
2. Crochet Turtleneck Sweater Vest Pattern

A polished, classic vest with a cozy turtleneck — perfect under blazers or over a shirt.
Style: fitted through the shoulders, moderate length; tall fold-over turtleneck.
Materials
- Worsted yarn (soft wool-blend recommended for drape), 5.0 mm hook, stitch markers.
Gauge
- 16 dc × 20 rows = 4″ in dc. Use this to calculate stitch counts.
Finished measurements (bust)
S 36″ | M 40″ | L 44″ | XL 48″.
Construction overview
Worked as back and two fronts with integrated ribbed hem and turtleneck worked after assembly. The turtleneck is made by picking up stitches around the neck and working in ribbed BLO hdc or front post/back post for stretch.
Back panel
- Chain to width as earlier (half-bust measurement × gauge). Example S back chains ≈ 72.
- Work straight dc rows until armhole depth from hem measures ~9–10″ (vests are shorter than sweaters). You can make a fitted waist by decreasing 1–2 dc evenly across rows if desired.
- Shoulder shaping: bind off (or leave) shoulder stitches: for a 3″ shoulder use roughly 6–8 rows of decrease or simply leave as straight rectangle and seam. For a polished neckline, create a slight shoulder slope by decreasing 1–2 sts at the armhole edge for 2–3 rows.
Front panels
- Same as back but add deeper neckline: at center-front, when you reach the neckline-depth marker (S ~5–6″ from top of shoulder), stop working center stitches to create V or round neckline. For a classic turtleneck vest pick a shallow U-neck so the turtleneck sits high; target center-front depth ~4–5″ depending on desired turtleneck height.
Assembly
- Seam shoulders leaving neck opening measured to fit the collar circumference.
- Side seams: seam from hem up to armhole; leave armholes comfortable.
Turtleneck collar (worked after seaming)
- With RS facing and yarn attached at back center neck, pick up stitches evenly around the neckline. A good rule: pick up one stitch every dc row or pick up at a density of gauge (16 sts/4″) times neck circumference to get number of stitches. Example if neck circumference after seaming is 14″, pick up ~56 sts.
- Join in the round carefully to avoid twist. Work BLO hdc (or hdc in BLO around for rib effect) for 10–14 rounds to create tall ribbing. For a fold-over turtleneck, work 16–22 rounds (tall) then fold in half and seam inside to the neckline or leave unfolded depending on desired look.
- Optional: work a final round of sc to finish edge.
Finishing
- Block collar and vest. Tuck the collar fold and stitch at four points inside to keep it neat. Weave ends.
Tips
- For a snug turtleneck, work fewer stitches (slightly tighter gauge) or use smaller hook for the collar only.
- Want a mock-neck vs tall turtleneck? Reduce rounds to 6–8.
3. Crochet Cable Stitch Sweater Vest Pattern
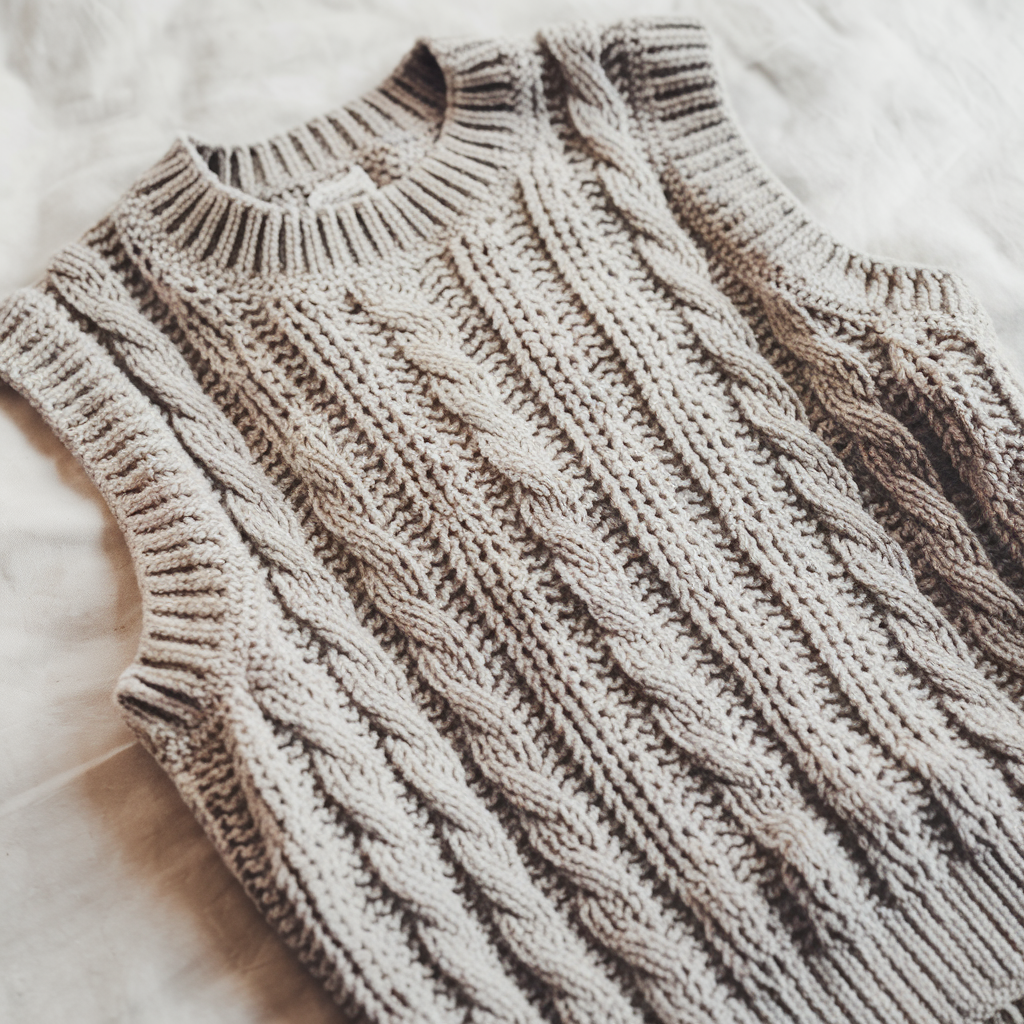
A textured, structured vest with vertical cable panels created using post stitches (fpdc/bpdc) and simple cable crossings — looks like knit cables but in crochet.
Style: sweater-vest with vertical cable columns and flat stockinette-like background.
Materials
- Worsted yarn (smooth yarn shows cables well), 5.0 mm hook, tapestry needle.
Gauge
- Because post stitches are denser, make a small swatch (e.g., 14 sts × 20 rows = 4″ in dc equivalent) to ensure cable texture sizing.
Pattern concept
- Use a repeat: background panel (6 dc) + cable panel (8 sts wide cable using fpdc/bpdc crossings) + background 6 dc across.
Back panel (sample repeat & counts)
- Chain a multiple that accommodates: [6 bg + 8 cable + 6 bg] × repeats + edge sts. For example for S: 72 chain may work (fits 3 repeats).
- Row 1: ch 3, dc across in regular dc. Turn.
- Set-up row for posts: Row 2 ch 3; dc in background sts, for cable sts work fpdc or bpdc as indicated — follow established cable chart:
Cable panel (8-st cable sample)
- The cable is made over 8 sts in repeated rows:
- Row A (right side): fpdc around each of the 4 right cable sts, bpdc around left 4 cable sts — this creates ribbed columns.
- Row B: reverse the order or do dc — to create a crossing every Nth row:
- Cross: On a cable-cross row, hold first 4 post stitches on a cable needle (or skip), work the next 4 fpdc, then return to work the held 4 as fpdc — in crochet you simulate crossing by working fpdc in later columns first: do fpdc around stitches 5–8, then fpdc around stitches 1–4—this visually crosses the columns. Because crochet doesn’t have slip cable tools by default, implement crossing by changing the order you work the fpdc along the row.
- Repeat rows to build vertical cable columns, crossing every 6–8 rows to form the cable twist. Continue until desired vest length.
Front panels
- Mirror cable repeats to create balanced symmetry at center-front: e.g., half cable at the edge if needed. Shape neckline as earlier by decreasing at center front edge while preserving cable alignment: when decreasing near the cable, shift cable set one stitch over to keep look symmetric.
Assembly & finishing
- Seam shoulders and sides using mattress stitch. Cable panels look best when seams are invisible.
- Add ribbing to neck and armholes using BLO hdc or sc in BLO for elastic look. Work 4–6 rounds for neat finish.
- Block gently to open and align cable twists.
Tips
- Practice the cable cross on small swatch: make a 8-st cable and practice crossing order before making the full vest.
- For a heavy cable vest, hold yarn doubled or use a slightly larger hook to emphasize texture.
4. Crochet Chunky Sweater Vest Pattern

The fastest make — chunky yarn, simple texture (waffle or seed stitch), great for last-minute cozy layering.
Style: boxy, oversized silhouette with wide armholes — ideal as a layering piece.
Materials
- Bulky yarn (weight 5 or 6), 8.0–10.0 mm hook depending on yarn, tapestry needle.
Gauge (example bulky)
- 10 sts × 12 rows = 4″ (adjust per yarn).
Stitch choice
- Waffle or seed stitch works beautifully with bulky yarn; waffle gives squishy texture and warmth.
Simple waffle stitch (bulky variant):
- Row A: dc across.
- Row B: ch 1, fpdc in next st, dc in next st repeat.
- Repeat A–B.
Construction
- Chain a width to match half bust + seam allowance in bulky gauge — S example chain ~36, M 40, L 44, XL 48 (these are much smaller stitch counts due to bulky yarn wide gauge).
- Work waffle stitch until length measures desired (shorter vest works great — 18–20″). Bulky gauges grow fast — check after few rows.
- For front panels: work two panels with a center-front opening: you can make V-neck or round neck by decreasing center stitches at top of front panels leaving shoulder width consistent.
Finishing
- Seam shoulders and sides. For a clean edge use one round sc along the hem and armholes. Bulky yarn looks great with a simple 1–2 row crochet border.
- Optional: pick up stitches at neck and work a tall rib collar in BLO hdc for 6–8 rounds if you want mock neck. Otherwise leave raw edge with single crochet for relaxed look.
Tips
- Chunky vests are forgiving for sizing. If in doubt, make larger and seam less.
- Use a detachable belt for shaping if you want more fitted look.
5. Crochet Collared Sweater Vest Pattern
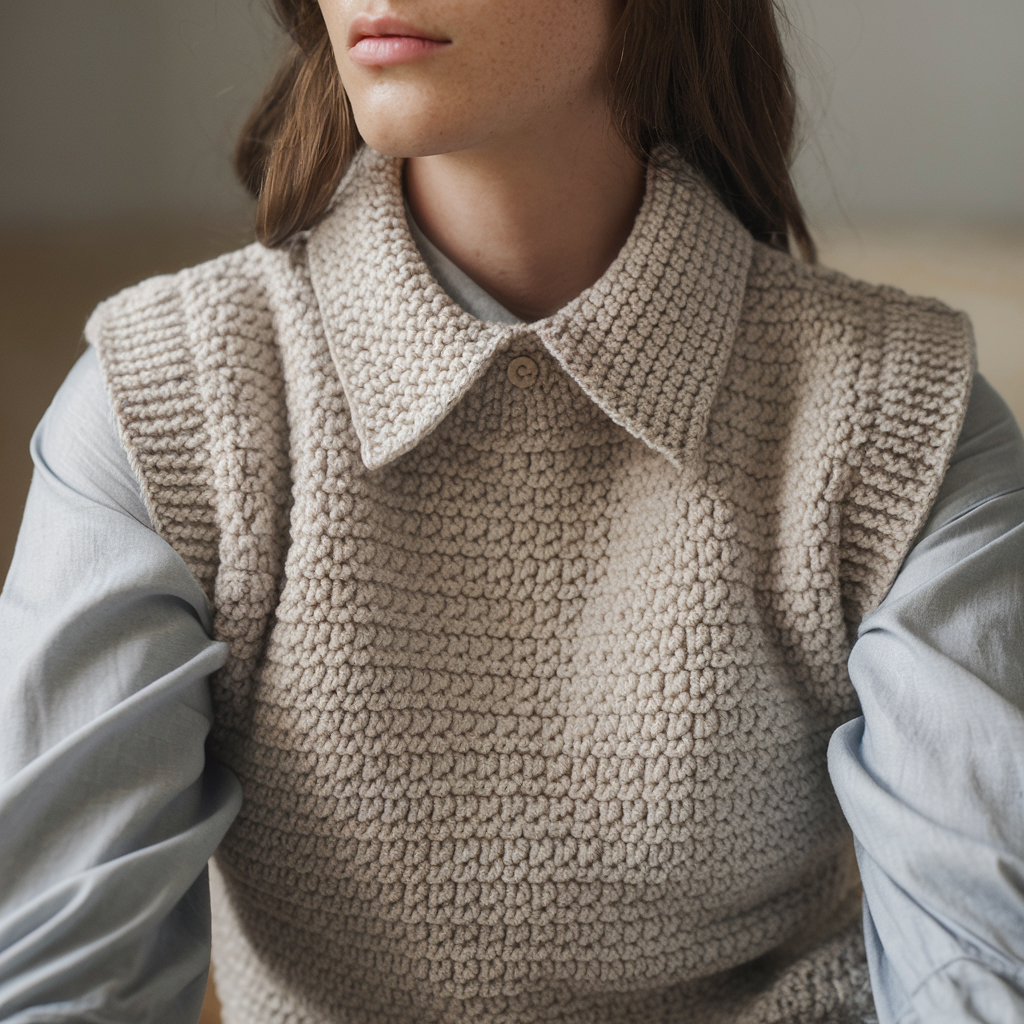
A preppy, classic vest with a simple fold-over collar — looks sharp over shirts.
Style: fitted to semi-fitted vest with a pointed or rounded collar worked by picking up stitches.
Materials
- Worsted yarn, 5.0 mm hook. Buttons optional (if you add buttoned front) or make open-front vest.
Construction overview
- Make back and two fronts as rectangles with slightly shaped neck and shoulders, seam, then pick up stitches around full front and neck to work a shawl or fold-over collar.
Back and Fronts
- Make back and fronts in st pattern of choice: moss, double crochet, or seed for texture. Work to armhole depth similar to other patterns.
- Fronts: if you want buttoned vest, add a button band: after finishing the front panel, pick up an extra 6–8 stitches along the center front edge and work a band of sc / hdc for the button placket (6–8 rows) leaving buttonholes spaced as needed (create buttonhole by ch 3 skipping corresponding stitches). Or simply work both fronts and sew buttons on one side and make button loops on the other.
Collar
- After seaming shoulders and sides (or before final side seam for easier handling), pick up stitches evenly around the neckline: count and pick up 1 stitch for roughly each dc across. Example pick up 60–80 sts depending on neck circumference.
- Work collar in chosen stitch: fold-over collar method — work 10–16 rounds of hdc or dc in the round (or back-and-forth if you prefer seam at center back). For a shaped collar, work increases every few rows at the ends to flare shoulders slightly.
- For a pointed collar: work shorter rounds to shape points, or for a shawl collar, use longer rows and one-side tapering.
- Fold collar in half to create classic fold-over and mattress stitch the inner edge to the neckline on the wrong side if you want it anchored.
Button band (if buttoned)
- On each front, work a neat 4–6 row sc band along the center front edge. On one side create buttonholes (ch 3 and skip 3 sts) evenly. Sew buttons on the opposite side aligning to holes.
Finishing
- Block collar so it folds neatly and keeps shape. Sew down the collar at shoulder points gently to keep it in place.
Final Finishing Notes (applies to all vests)
- Seaming: mattress stitch gives an invisible join; for a chunkier look try whipstitch.
- Blocking: wet-block or steam-block to measurements — this aligns cables, evens checkerboard squares, and sets drape.
- Adjusting length/fit: lengthen/shorten by adding/subtracting pattern repeats or rows before armhole shaping. Change bust width by adding stitches in multiples relevant to pattern repeat (e.g., checkerboard in multiples of 4).
- Care: follow yarn label — most worsted/wool blends wash gentle cycle (cold) or hand-wash, lay flat to dry. Avoid tumble drying for structured garments.
Conclusion
These five sweater vest designs give you a full range: bold geometric checkerboard, cosy turtleneck, sculptural cable panels, rapid chunky makes, and preppy collared styles. Each pattern is designed to be adaptable — change yarn weight or hook for fitted vs. oversized vibes, and tweak length or ease to match your wardrobe.