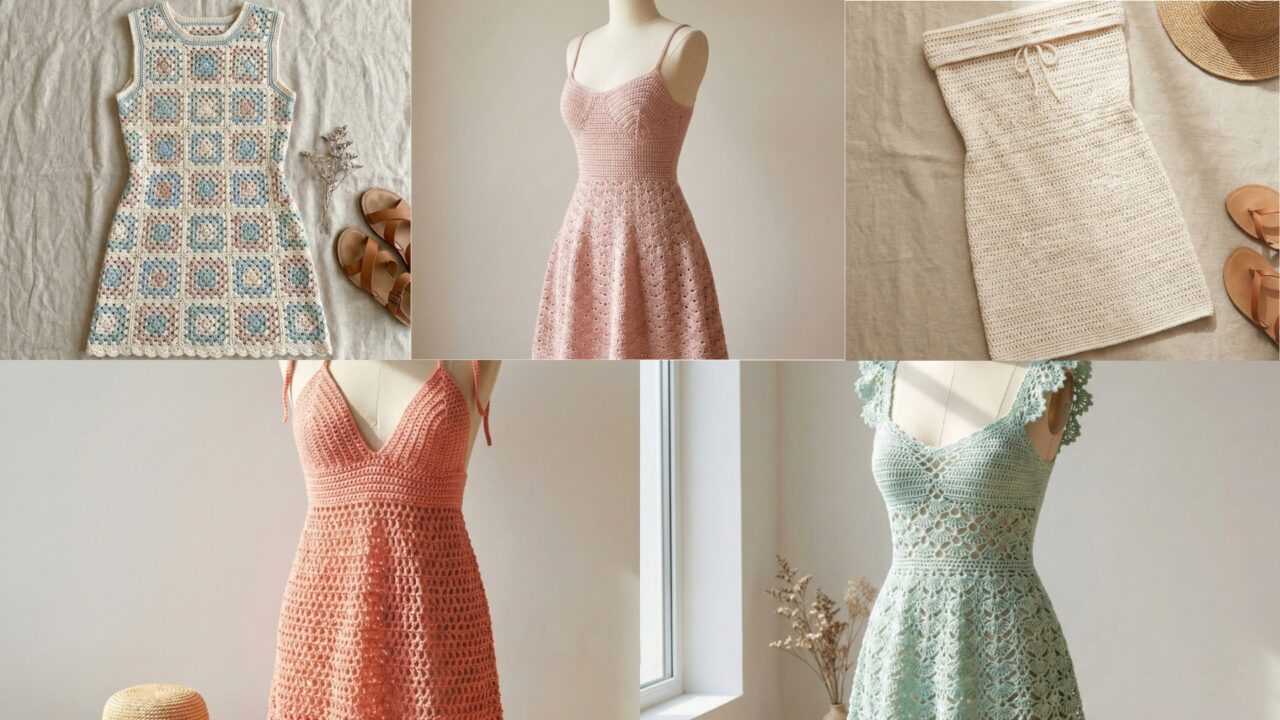
Crochet mini dresses are the perfect mix of craft and wardrobe magic — quick enough to make in a weekend (depending on yarn and time), endlessly customizable, and flattering in every season. Below are five distinct mini dress patterns that range from boho-granny to elegant evening and breezy beach styles. Each pattern includes materials, stitch abbreviations, gauge guidance, very clear step-by-step instructions, sizing notes and finishing tips so you can pick one (or five!) and get stitching.
Quick note before you start: these patterns are written to be adaptable. Yarn weight, hook size, and tension affect sizing — always make a small swatch and measure gauge before committing to the entire piece. I include adjustment tips in each pattern.
Common abbreviations & notes (used across patterns)
- ch = chain
- sl st = slip stitch
- sc = single crochet
- hdc = half double crochet
- dc = double crochet
- tr = treble (UK = tr is UK treble = US double treble; this uses US terminology)
- sk = skip
- st(s) = stitch(es)
- BLO = back loop only
- FLO = front loop only
- RS = right side, WS = wrong side
Measure carefully at bust, waist, hips and desired hem circumference. When patterns say “work to desired length,” measure on your body or a dress form.
1. Crochet Granny Square Fabric Dress Pattern
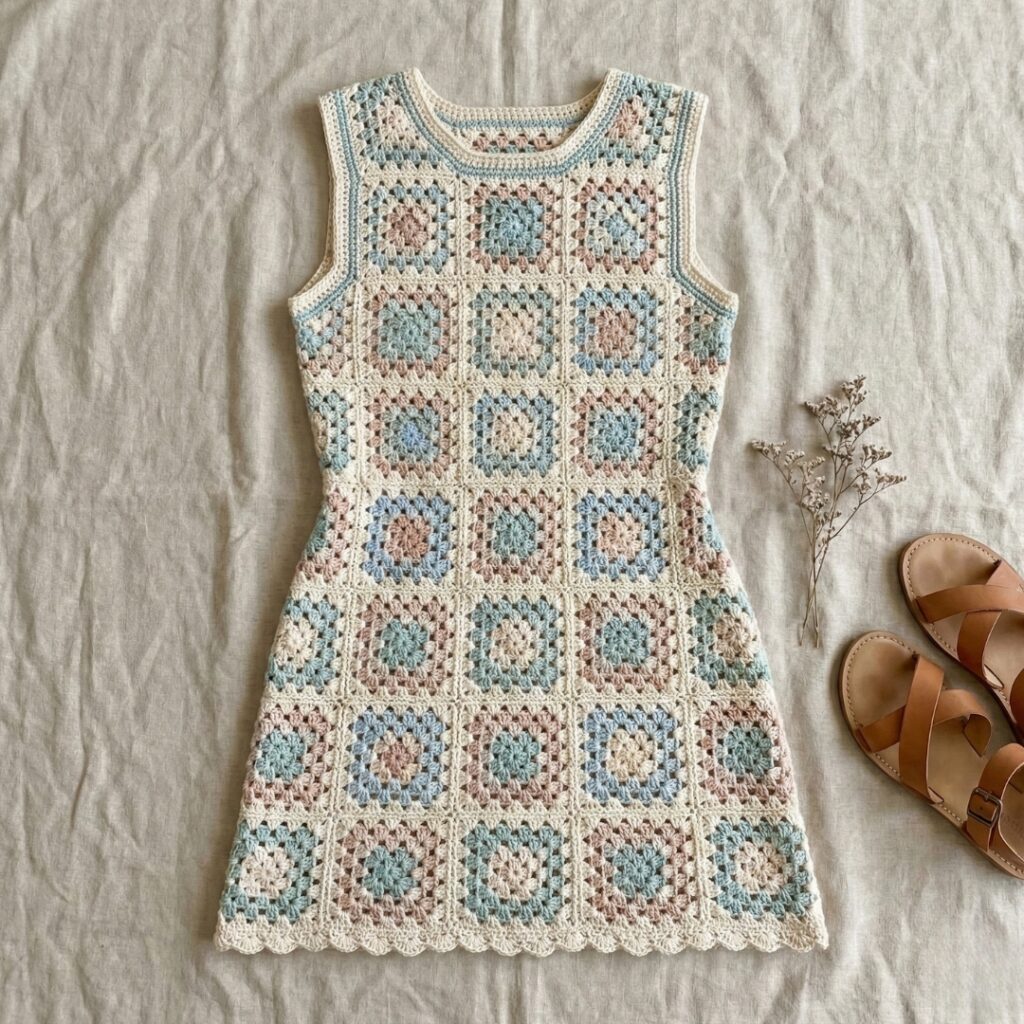
Style: Feminine boho mini made from connected granny squares — excellent for colorful scraps or a curated palette.
Difficulty: Easy–intermediate (basic granny knowledge + joining)
Materials:
- Worsted weight (aran/8 ply) or DK for lighter drape — about 800–1200 yds depending on size and skirt fullness
- 4.5 mm (G) hook (adjust for gauge)
- Tapestry needle, scissors, stitch markers
- Optional: lining fabric and needle for sewing if you want a non-sheer dress
Finished size (example): Bust 34–36″ (adjust by making more/fewer squares)
Gauge: Each granny square after blocking ≈ 4.5″ square (adjust by hook/yarn)
Construction overview
Make a grid of granny squares, join into front and back panels, seam shoulders and sides leaving armholes, add neckline/armhole edging and optional lining or straps.
Step-by-step
1. Make granny squares (classic 3-round)
- Round 1: Make a magic ring. ch3 (counts as dc), 2 dc, ch2, 3 dc, ch2 repeat 2 more times, join with sl st to top of ch3. (4 clusters)
- Round 2: Sl st into first ch-2 space. ch3, 2 dc, ch2, 3 dc (corner made). (3 dc, ch1, 3 dc) in each side ch-1 space, and repeat corners of (3 dc, ch2, 3 dc) in remaining ch-2 corners. Join.
- Round 3: Repeat corners as above but with (3 dc, ch2, 3 dc) in each corner and (3 dc in each ch-1 side) to enlarge. Fasten off. Weave ends.
2. Plan layout
- For a mini: layout 3 squares across × 4 rows high (3×4) for front and 3×4 for back = 24 squares total. Adjust for bust width: more squares = wider dress; fewer = narrower.
3. Block squares
- Wet-block or steam-block to even size. Measure and trim if necessary.
4. Join squares
- Use whipstitch or join-as-you-go (JAYG) to assemble rows. Then join rows to form front panel and back panel separately. JAYG produces a seamless look; whipstitch is faster.
5. Shape shoulders & sides
- Place front and back RS together. Seam top two squares at shoulder on each side leaving a neck opening: for example, on a 3×4 grid seam 1.5–2 square widths from each side (experiment for neckline width).
- Seam sides from hem up, leaving armhole openings approx 6–8″ depending on size and style (i.e., leave 2 square heights free for armhole).
6. Neckline & armhole finishing
- With RS facing, attach yarn to neckline edge. Round 1: sc evenly around neckline, placing 3 sc in each corner to avoid puckering. Join.
- Rounds 2–3: hdc in each st for 2 rounds for a soft facing.
- Repeat for armholes (2 rounds of sc or hdc). For straps instead of complete armhole openings, leave more of the side seam unworked and crochet straps into place: ch desired length and attach.
7. Optional lining or slip
- Because granny fabric is open, sew a lining from lightweight cotton or mesh. Cut fabric to same shape as panels and hand-sew inside seam allowances.
8. Hem & final touches
- Work 2–3 rounds of sc or a shell border at hem for polish. Add tassels or fringe at hem or across the back for boho flair.
Sizing adjustments
- To increase bust by ~3–4″, add one square to row width. To lengthen by 4–5″, add one more row of squares.
Styling tips
- Wear over a simple slip for evening, or as a cover-up over swimwear for the beach.
2. Crochet Rectangle Mini Beach Dress Pattern

Style: Minimalist tube dress worked from a single rectangle — perfect for beachwear or a breezy summer mini.
Difficulty: Beginner
Materials:
- Lightweight cotton or cotton-blend worsted/DK — 600–900 yds (depending on fullness & length)
- 5.0 mm (H) hook (or as needed)
- Measuring tape, tapestry needle, optional drawstring cord
Construction overview
Make a rectangle whose width equals hip circumference minus ease, seam short ends to form a tube, fold up to create top casing (elastic or drawstring) and optional armhole shaping.
Step-by-step
1. Measure & chain
- Measure bust/hips. For a tube dress that fits around the widest section, choose final width 2–4″ less than the hip circumference if you want fitted, or equal for relaxed.
- Foundation chain length = desired width in stitches. Make a starting chain that sits comfortably across your chest when stretched slightly (measuring chain length physically is easiest).
2. Work rectangle
- Row 1: dc in 4th ch from hook and across (creates nice drape), ch3 turn.
- Row 2+: dc in each st across, ch3 turn, working until rectangle measures desired length from top edge to hem. For mini length measure from underarm or top-of-bust down: 30–34″ for mid-thigh mini depending on height. For beach mini, 28–30″ often works.
3. Seam to tube
- Fold the rectangle so edges meet and seam with whipstitch up the short ends to form a tube. Decide whether seam will be at side or back.
4. Top finishing
Option A — elastic casing: Fold top edge down 1.5″–2″ to inside to make a casing. Leave an opening to thread elastic. Measure elastic around bust or just above bust depending on whether dress is strapless or under-bust. Sew opening closed.
Option B — drawstring: Make a chain long enough for drawstring and thread through casing; tie at front or side.
Option C — straps: Instead of casing, fold down 1″ and sc to create a slight facing. Attach two straps by ch to desired length and sc back along chain. Secure to inside front and back.
5. Hem
- Work 1–2 rounds of sc or reverse sc for a neat finish. For a more playful edge, add picot or shell edging.
6. Optional shaping
- If you want fitted bust: before seaming, decrease few stitches in the top portion by sc2tog spaced across front to create small shaping. Alternatively, add side seams to create darts.
Adjustment tips
- For better fit, try the rectangle on before seaming completely and mark armhole depth by pinching and folding while wearing.
Styling
- Throw on sandals and a belt for daytime. Add a wide-brim hat for a cohesive beach look.
3. Crochet Chic Mini Elegant Dress Pattern
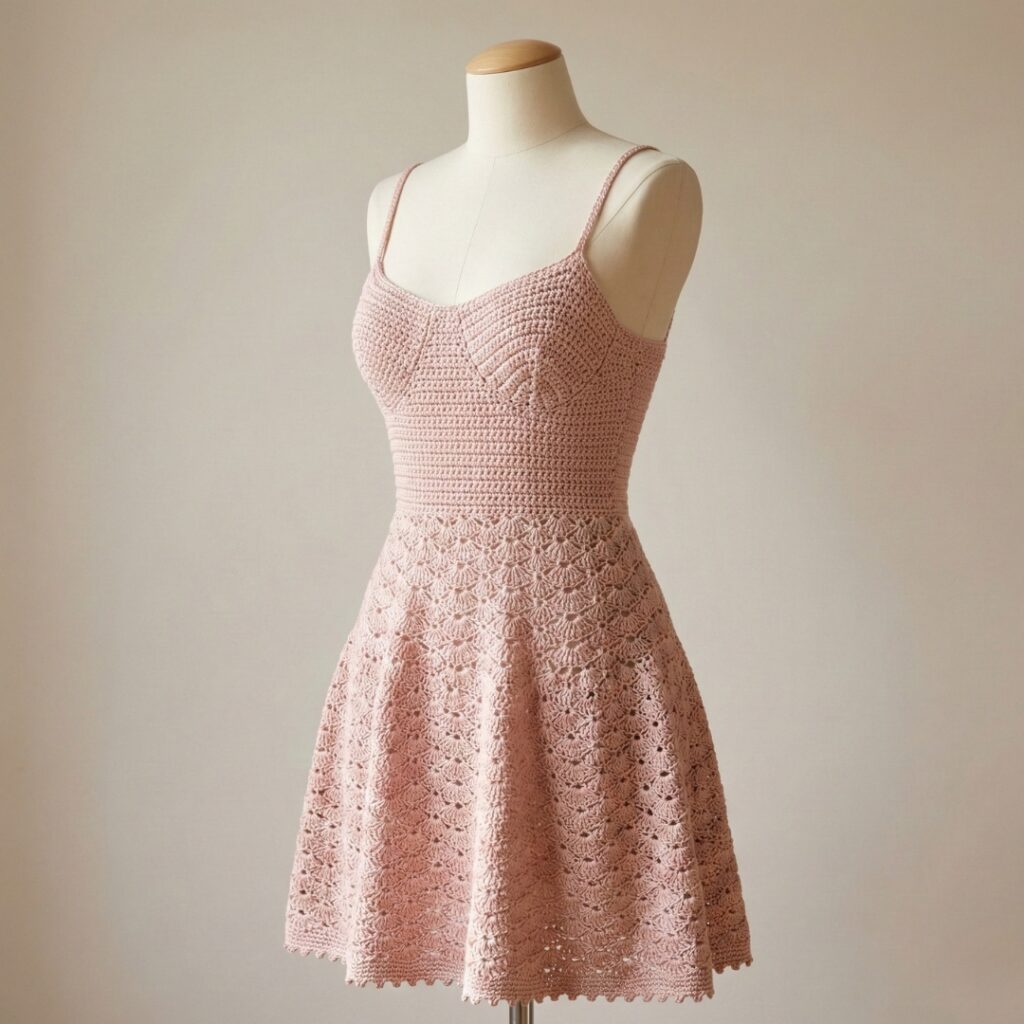
Style: Sleek fitted bodice with delicate straps and a softly flared skirt — ideal for dressy occasions.
Difficulty: Intermediate (shaping & fitted assembly)
Materials:
- Sport or DK yarn with good drape (merino/silk blend recommended) — ~900–1200 yds
- 4.0 mm (G) and 3.5 mm (E) hooks (for tighter bodice)
- Tapestry needle, small elastic, optional invisible zipper for back
Construction overview
Top-down or bottom-up? This pattern uses top-down raglan shaping for a close, smooth bodice, then transitions into a flared skirt worked in rounds with shell stitch for elegance.
Step-by-step
1. Take measurements
- Bust circumference, underbust, waist, desired hem circumference (flared) and length from shoulder to hem.
2. Start the bodice (top-down raglan)
- With smaller hook, ch a number to create the back-neck foundation. Example: ch 40 (adjust for neck width). Join to form ring and work short rows to form shoulder straps and front opening — for simplicity, the following uses a circular yoke construction:
Yoke & raglan
- Make a small circle (magic ring) and work increases in rounds to create a yoke with 4 raglan increase points. Typical raglan increase sequence (US terms): Round 1: ch 3, 2 dc, ch 2, 3 dc in ring, ch 2 repeat to make 4 clusters. Subsequent rounds: increase at raglan corners only by placing (dc, ch2, dc) in corner spaces. Continue until yoke measures across the shoulders and fits. Try on and stop when the yoke width reaches your shoulder-to-shoulder measurement minus a little ease.
3. Separate body & sleeves
- After yoke has reached desired size, place markers at raglan points and work body in rnds (join in the round) while leaving sleeve openings unworked (or work sleeves separately). Seam sleeves later as short straps or 3/4 length depending on style.
4. Bodice shaping
- Work in rounds with smaller hook for snug fit (hdc or dc depending on desired density). Decrease or shape at waist: if you want waist definition, do 2–3 decrease rounds evenly spaced over 1–2 inches (e.g., hdc2tog every X stitches).
5. Transition to skirt
- After bodice length (measure under bust to preferred waist), switch to larger hook for skirt to create drape. Begin shell stitch: skip 2 st, 5 dc in next st, skip 2 st, sc in next repeat around. This creates a flowing shell texture. Alternatively, use V-stitch or (dc, ch1, dc) shells for softer flare.
6. Add flare
- Work increases in the skirt rounds to get desired hem fullness. For a gentle A-line, increase 6–8 stitches every 4–6 rounds by working 2 shells in one stitch or adding extra dc in shell centers.
7. Skirt length
- Continue shell pattern until mini length reached (20–22″ from shoulder for typical mini depending on height). Check length on body.
8. Hem & finishing
- Work 2 rounds of sc for a tidy hem. Optional picot or lace hem: ch3, sl st in 3rd ch from hook to create tiny picots between shells.
9. Straps
- If you want thin straps: crochet a chain equal to desired strap length, sc back along chain to make sturdy strap, attach to inside front and back. Reinforce with a small bar tack of stitches.
10. Closure
- If fitted bodice is snug, add an invisible zipper at back or sew a few small buttons. Alternatively, design with a small keyhole and tie strap.
Sizing adjustments
- Make a toile (test top) with inexpensive yarn to confirm fit. Change stitch count at waist to adjust circumference.
Styling
- Pair with heels and a delicate clutch for evening. Add a slip if skirt stitch is lacy.
4. Crochet Fairy Mini Dress Pattern

Style: Openwork lace, scalloped hem and flutter straps for a fairy-like silhouette — dreamy and perfect for festivals or layered over a slip.
Difficulty: Intermediate (lacy stitches and careful counting)
Materials:
- Fingering or sportweight yarn with drape or a light cotton-linen blend — ~800–1000 yds
- 3.0–3.5 mm hooks depending on yarn
- Tapestry needle, stitch markers, optional lining
Construction overview
Work a lacy panel for the front and back, join at shoulders, create flutter straps, and finish with a scalloped hem.
Step-by-step
1. Decide motif
- A simple lacy repeat: ch 5 (counts as tr + ch2), tr in same st, sk 2, sc in next, ch2, (2 tr, ch2, 2 tr) in next chain space — creates a shell-lattice look.
2. Make front & back panels
- Foundation chain for panel width: ch 56 (adjust to bust/2 plus ease for half-front). Work lace pattern in rows until panel measures from top-of-bust to desired hem. Repeat for back.
3. Join at shoulders
- With RS facing, seam top edges leaving neck opening. For a sweetheart/rounded neckline, shape by decreasing at center over a few rows for front only.
4. Side seams
- Seam sides from hem up to underarm leaving armholes appropriate for your size (5–7″ opening) unless you plan to add flutter sleeves.
5. Flutter straps
- Attach yarn at front shoulder and ch 25–30 (test for comfort), sc back along chain and attach at back shoulder. Repeat for other side. For extra flutter, make two rows and then add picot edge.
6. Scalloped hem
- With RS facing, join yarn at hem. Work a shell border: ch1, sk 2, 5 dc in next st, sk2, sc in next around. This creates a romantic scallop. Fasten off and weave in.
7. Lining
- If fabric is very open, make a simple slip or sew a lining inside.
8. Optional waist tie
- For shape, crochet a thin cord and thread through a row near waist or create tie closures at sides for adjustable cinching.
Tip: Lace looks best blocked — pin panels to dimensions and steam or wet-block to open the stitch and make edges even.
5. Crochet Mini Summer Dress Pattern

Style: Sporty halter top with light mesh skirt — ideal for hot days or layered over swimsuit.
Difficulty: Beginner–intermediate
Materials:
- Cotton or cotton blend DK yarn — ~700–1000 yds
- 4.0–5.0 mm hook (adjust gauge)
- Tapestry needle, small button (optional)
Construction overview
Make halter cup panels, join across back with ties, then pick up stitches for a mesh skirt worked in filet or V-stitch.
Step-by-step
1. Halter cups (make 2)
- Foundation: ch 12. Row 1: dc in 4th ch from hook and across (9 dc). Row 2: ch3, turn, dc in each st, ch1 at end. Continue increasing each RS row by adding a dc at the beginning or end to create a gentle triangle: on the RS rows add (dc, ch1, dc) into the turning chain space to widen. Work until cup measures across at bottom equal to half bust minus ease divided by 2.
2. Join cups
- Place cups side-by-side and join across bottom with sc to create underbust band. Work 2 rounds of hdc in back loop for a snug band. Chain length for ties: ch 150 (or length to go around back and tie).
3. Neck strap
- Chain desired neck length and attach to top center of cups. Make two straps if preferred.
4. Skirt pickup
- With RS facing, join yarn at the underbust band and chain 3. Work V-stitch mesh: dc, ch1, dc in same st, skip 2, dc, ch1, dc repeat around. For a fuller skirt, increase by making 2 V-stitches in one stitch at intervals in the first round. Continue mesh rounds until desired length (mini ~18–22″ from underbust).
5. Hem
- Finish with 2 rounds of sc for weight. For flirty edge add a picot or small shell row.
6. Optional lining
- Make a simple tube slip or shorts as lining for better coverage.
Adjustments
- For more support, add an elastic sewn into the underbust band or crochet a few rounds of tighter stitch (sc) to create support.
Styling
- Great as a beach cover or casual day dress. Pair with sandals and straw accessories.
Finishing Touches for All Dresses
- Weave in ends carefully; use the tail to duplicate stitch into seams or hide inside crochet so they don’t show through lace.
- Block when the fabric benefits from even stitch definition (lace, granny squares) — wet block on a towel and pin to shape.
- Lining: sew a lightweight cotton or rayon slip to reduce transparency. Hand-stitch lining to inner seam allowances.
- Care: check yarn care labels. Most cotton/linens wash gentle cold and lay flat to dry. Wool blends may need hand wash.
- Extras: add a ribbon waist tie, removable straps, pockets, or convertible features to make a pattern multi-seasonal.
Conclusion
There you go — five gorgeous crochet mini dress patterns covering a spectrum of styles: boho granny chic, effortless beach rectangle, elegant fitted mini, ethereal lace fairy dress, and a sporty halter summer mini. Pick the one that matches your yarn stash, skill level, and occasion — and customize color, length, and trim to make it uniquely yours. Crochet dresses are wonderfully forgiving: tweak square counts, row numbers, and stitch choices to tune fit.