Cold-weather accessories deserve to be cute and cosy — and ear muffs are the perfect spot to show off fun stitches, colourwork, and tiny motifs while keeping ears warm. Below you’ll find a full blog-ready post: a helpful introduction (materials, tools, sizing, headband options, safety, and care) followed by five detailed ear muff patterns with materials, sample sizes, stitch notes, clear step-by-step instructions for both ear coverings and headband/attachment methods, assembly, finishing, and styling ideas.
I wrote each pattern so you can make two matching ear covers and attach them to any headband (store-bought, wired base, or crochet-made), or make removable covers that slip over an existing earmuff base. Ready to crochet something warm and delightful? Let’s go.
Quick essentials — yarn, tools, sizing, headband options & safety
Yarn & fiber choices
- Wool / wool blends — warm, springy, and classic for winter ear muffs. Use machine-washable superwash if you want easy care.
- Acrylic / acrylic blends — easy care, great for plush textures and kid-friendly designs.
- Plush / velvet / boucle — super soft, excellent for plush ear covers (careful: may shed or require hand wash).
- Cotton — not as warm but useful if you want a washable, less-itchy option.
Pick yarn based on look and care: wool/wool blend for warmth, acrylic for easy washing, plush for luxury.
Hooks & notions
- Hooks: 3.5–6.5 mm depending on yarn weight. I’ll suggest a hook per pattern.
- Tapestry needle, stitch markers, small amount of fiberfill (for plush inside if desired), felt or fabric for lining, hot glue (optional — use sparingly), small snaps or Velcro (for removable covers), sewing needle + thread for attaching to headband, measuring tape.
- Optional: small metal or plastic ear muff bases (purchased) to make covers removable.
Headband options (pick one)
- Craft headband base (metal/plastic) — buy plain headbands from craft stores; crochet a wrap to cover them (instructions included).
- Wired headband (DIY) — use floral wire or a flexible metal band and crochet a thick wrap around it for structure. Not recommended for small children (wire).
- Existing ear muff base — if you have a store-bought ear muff set, make removable crochet covers that slip over the existing cups. Add snaps/elastic for secure fit.
- Soft felted/ padded headband — crochet a soft tube, stuff lightly, and use as headband — cozy and safe for kids.
Sizing — ear cup basics
- Typical adult ear cup diameter: 3–3.5 inches (7.5–9 cm).
- Teen/small adult: 2.75–3.25 in.
- Child: 2–2.5 in.
You can adjust by changing yarn/hook or by increasing/decreasing rounds. I’ll show a gauge-based method for one pattern so you can scale reliably.
Quick math example (digit-by-digit):
If your gauge swatch shows 4 single crochet (sc) = 1 inch and you want an ear cup diameter of 3.5 inches, you need:
4 × 3.5 = ?
- 4 × 3 = 12
- 4 × 0.5 = 2
- 12 + 2 = 14 stitches per inch around the circumference — but because circles are worked in rounds, you’ll use that gauge to calculate the number of stitches in round increases. (I’ll provide practical round counts below.)
Safety & wearability notes
- For toddlers and very small children avoid small glued beads, loose pom-poms, or anything that can detach. Sew everything securely.
- If using wire in a headband, wrap it well with yarn or fabric and test stability. Avoid wire heads in situations where rough play might bend them out of shape.
- If you plan to wash the ear muffs often, use washable yarn and make covers removable if possible.
Abbreviations (US)
- ch = chain
- sc = single crochet
- hdc = half double crochet
- dc = double crochet
- tr = treble crochet
- sl st = slip stitch
- MR = magic ring (magic loop)
- inc = increase (2 sc in same st)
- dec = decrease (sc2tog)
- BLO / FLO = back loop only / front loop only
- rep = repeat
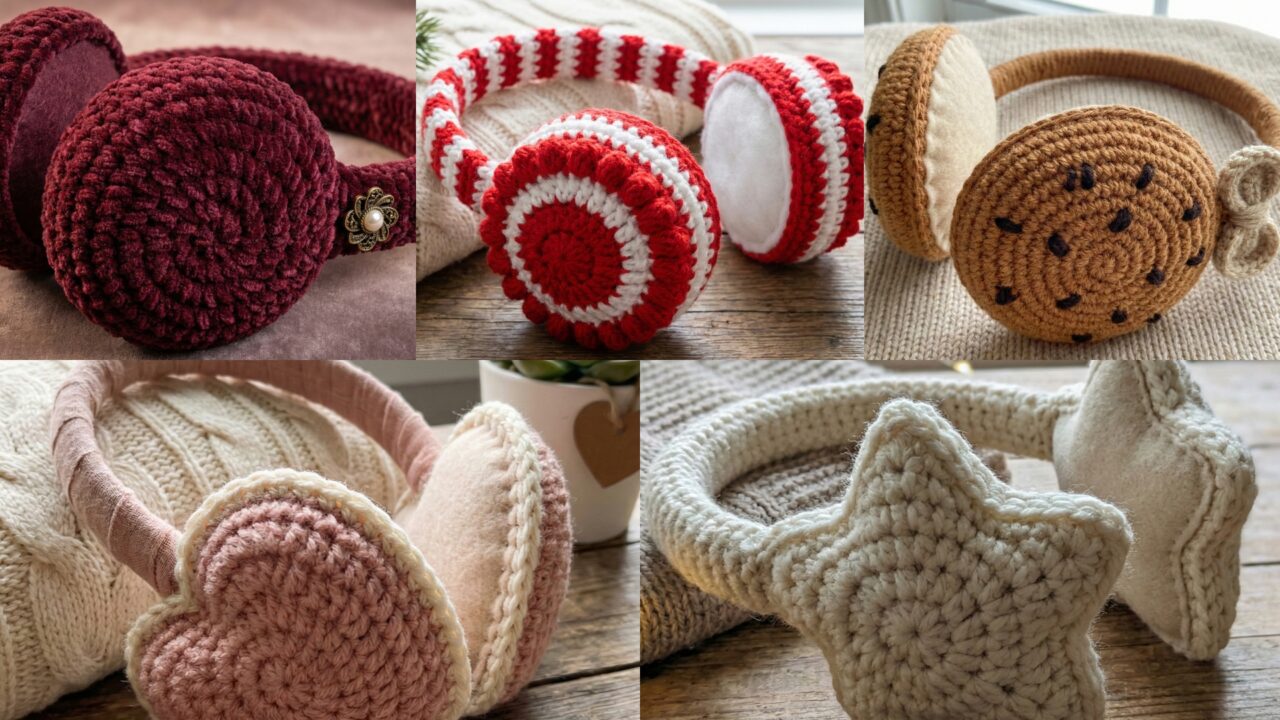
1. Crochet Coquette Chocolate Chip Cookie Ear Muffs Pattern
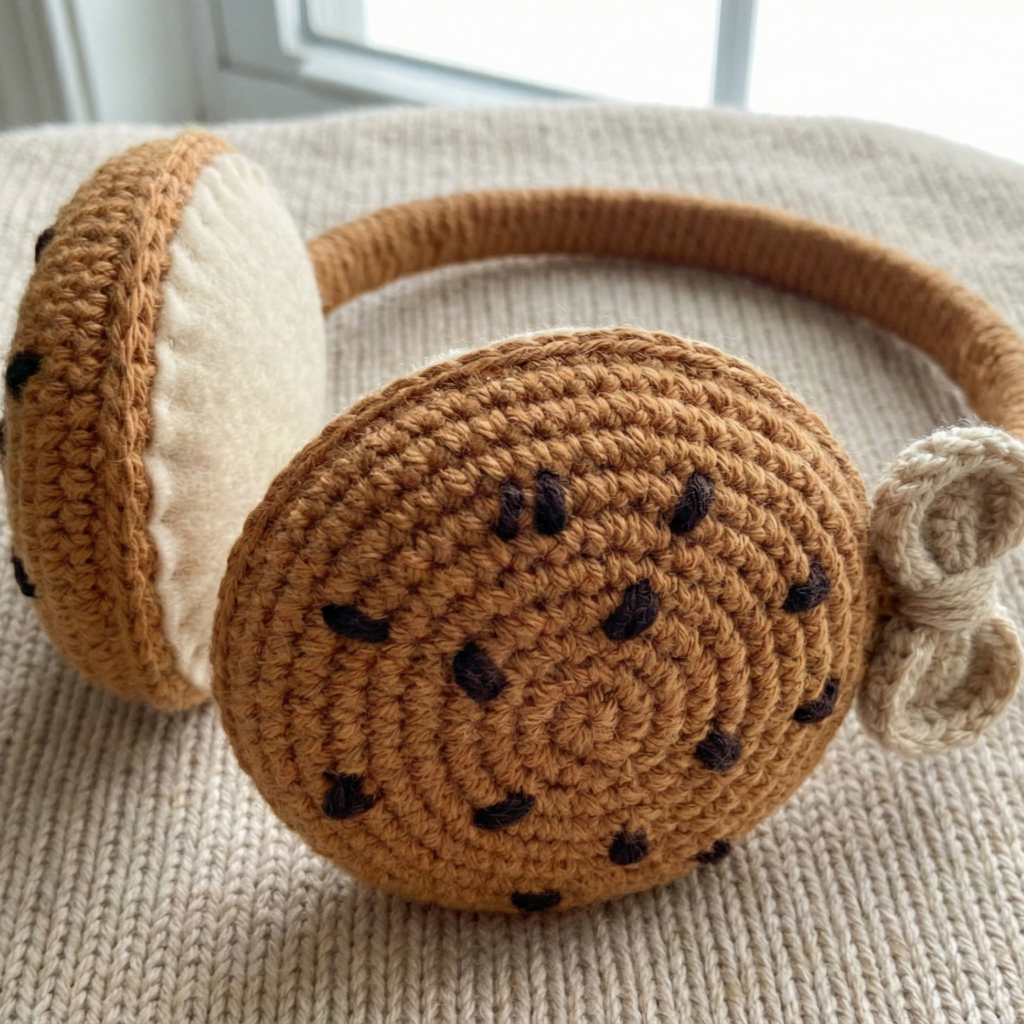
Think warm cookie-brown ear warmers with embroidered “chocolate chips.” This playful oval design sits nicely on a barrette-style headband or over a craft headband base. Works for teens/adults; scale down for kids.
Skill level: confident beginner
Finished sample size (adult): oval ear cover ~3.25 in (8.5 cm) tall × 2.75 in (7 cm) wide; headband wrap ~1 in wide
Materials
- Worsted weight cotton / acrylic blend in cookie brown — ~40–60 yd
- Small amounts of dark brown yarn for chips
- Hook: 4.0 mm (G)
- Tapestry needle, pair of barrette headband bases or metal headband to wrap, felt circles for lining, sewing needle & thread, optional light stuffing for a pillowy interior
Stitch notes
- Work oval shaped piece flat (short rows) or as rounded oval in rounds; here we’ll do flat oval worked in rows for an easy cookie shape.
Step-by-step
A — Make one oval ear piece (make 2)
- Foundation
ch 16 (this chain length yields an oval approx 2.75 in wide with worsted and 4.0 mm hook — adjust if your gauge differs). - Row 1 (base)
sc in 2nd ch from hook and across (15 sc). Turn. - Row 2 (begin rounding one end)
ch1, sc 3, inc, sc 8, inc, sc 2. (That adds 2 stitches to create curve.) Turn.
(Counts: 3 + 2 + 8 + 2 = 15 + 2 = 17 sts this row.) - Rows 3–6 (build height)
ch1, sc across in each st (even rows) until piece measures approx 2 in from starting edge; keep working even rows to build height. - Next round of increases to shape other end
ch1, sc 2, inc, sc 8, inc, sc 3 — this rounds the opposite short edge. Turn. - Mirror back toward opposite end
Continue working even rows until oval reaches desired height (~3.25 in). Then reverse the increases across the last rows to bring the piece back to original 15 sc width: do rows that include decs symmetrical to earlier incs: e.g., sc across and dec near ends (sc2tog) to taper. Finish with a row matching Row 1 to create neat edges. Fasten off leaving long tail. - Make a matching second oval.
B — Optional stuffing & lining
- If you want pillowy ear muffs, cut two felt ovals slightly smaller than crochet piece. Sew one small felt oval onto the inside of one crochet oval, stitch around 3 sides, stuff lightly with fiberfill, then sew the second felt oval inside the other crochet piece and whipstitch crochet pieces together around edges catching felt inside. This creates an inner lining and insulating layer.
C — Embroider chocolate chips
- Use dark brown yarn and a small embroidery needle to stitch random small oblong/teardrop shapes across surface — use satin stitch or short straight stitches (3–5 mm) to make chips look natural. Avoid large or protruding embellishments for kids.
D — Make headband wrap (cover a metal base)
Option 1: Cover a metal headband by crocheting a simple tube that slips over it. Make an i-cord tube: ch 6, sc in 2nd ch from hook and across (5 sc). Work 40–60 rows or until strip length equals headband length. Fold tube and seam long edge to form a snug sleeve. Slide over metal headband and adjust. Trim and secure ends.
Option 2: Sew ovals to a pre-purchased barrette headband by stitching felt backing to metal frame, then sewing crochet outer to felt.
E — Attach ear covers to headband
- Position one oval over each ear position on headband. Sew firmly through felt and headband frame if present. Reinforce with extra stitches. For removable covers (so you can wash) sew a small snap to felt inside the oval and the matching snap to the headband wrap so covers detach.
F — Finishing
- Weave ends, tidy embroidery, test fit.
Styling & variations
- Make matching scrunchie or boot cuff in cookie colors.
- Use plush yarn for a dreamy cookie texture (use darker yarn for chips embroidered with thin yarn).
2. Crochet Vintage Plush Ear Muffs Pattern
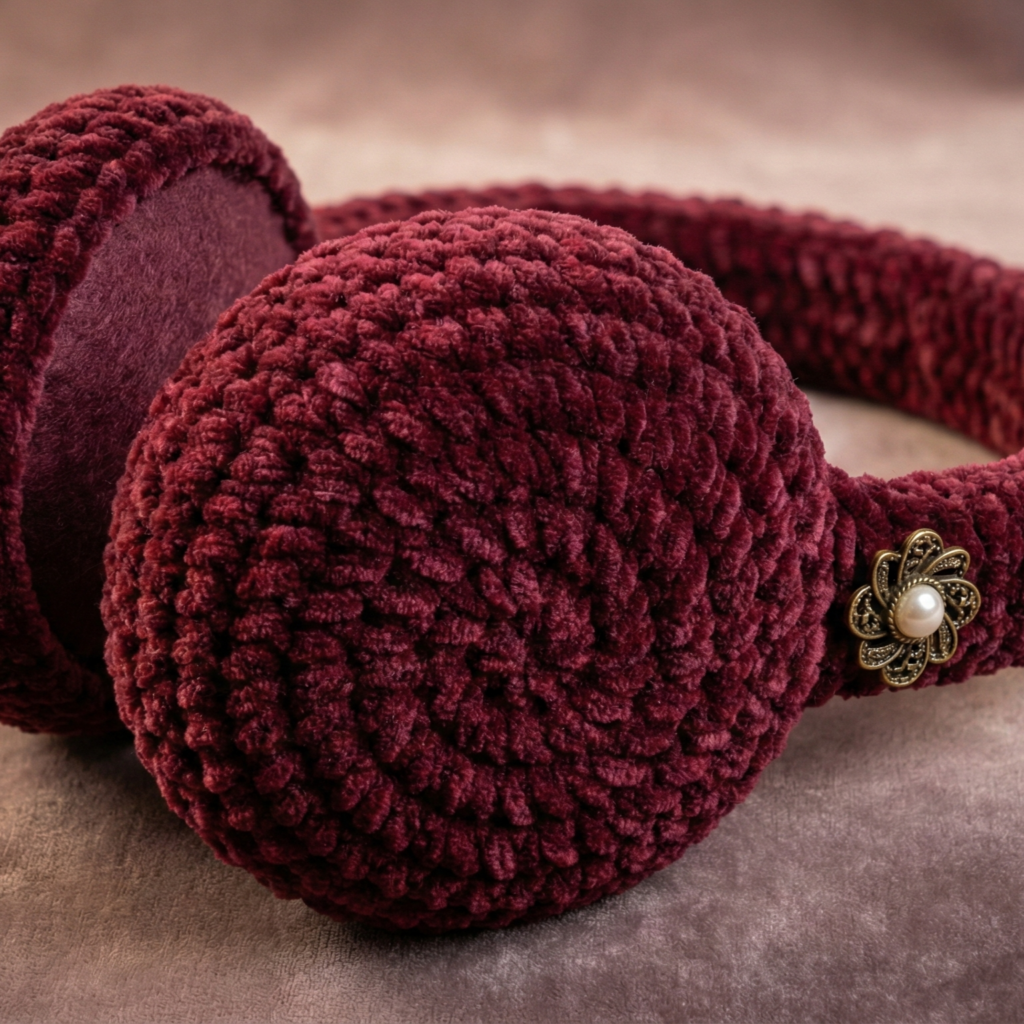
A plush, vintage feminine muff — think luxe faux fur in neutral tones. This pattern produces a soft, dense ear cover with a felted/ plush look. Ideal for formal winter outings.
Skill level: intermediate (texture & lining)
Finished sample size (adult): circular ear cups ~3.5 in diameter; headband wrap ~1.25 in wide
Materials
- Plush / velvet yarn (or bulky chenille) — 100–150 yd total
- Complementary yarn for top band if desired (worsted for band)
- Hook: 6.0–8.0 mm (see yarn label)
- Felt discs, fabric lining (fleece or satin), hot glue (optional), headband base (padded or crocheted), tapestry needle
Stitch notes
- Work tight single crochet rounds to create dense plush fabric. Plush yarn hides stitch definition so keep stitches small and dense.
Step-by-step
A — Make circular cup (make 2)
- R1: MR, 6 sc in ring (6). Pull tight.
- R2: inc around (12).
- R3: sc1, inc around (18).
- R4: sc2, inc around (24).
- R5: sc3, inc around (30). This typically gives a diameter around 3.5 in with bulky plush — check after R5. If you need larger, continue R6 sc4, inc → 36. Stop when disc measures the target diameter.
- R6–R8 (build thickness): Work 2–3 rounds even (sc around) to add a little depth to cup so it feels plush.
- Fasten off leaving long tail for sewing.
B — Add lining & felt backing
- Cut two felt discs (~0.25 in smaller than crochet disc). Sew felt disc to underside of crochet disc. If you want a very smooth interior against ear, stitch a fleece circle inside as the lining. Glue is optional but sewing is preferred for washing.
C — Make headband
- Crochet a wide band to cover a plain headband: chain length equal to headband length (measure across headband along outside), then sc across for 6–8 rows to create a thick band. Fold and seam into a tube then slip over the existing headband, stitching it closed. Plush yarn works beautifully for a luxe look.
D — Attach ear cups
- Position cups where ears fall. Sew felt backing to headband (if headband has holes or metal frame sew through them). For removable option add sew-on snaps: one half on felt of cup, matching half on headband wrap.
E — Finishing
- Brush plush yarn lightly to even pile (use very soft brush), remove any loose fibers. Avoid heat settings in washing; recommend hand wash and lay flat.
Styling & variations
- Add a small vintage brooch or ribbon bow to one side for a retro look.
- Make in champagne, ivory, or deep burgundy for an elegant palette.
3. Crochet Peppermint Ear Muffs Pattern
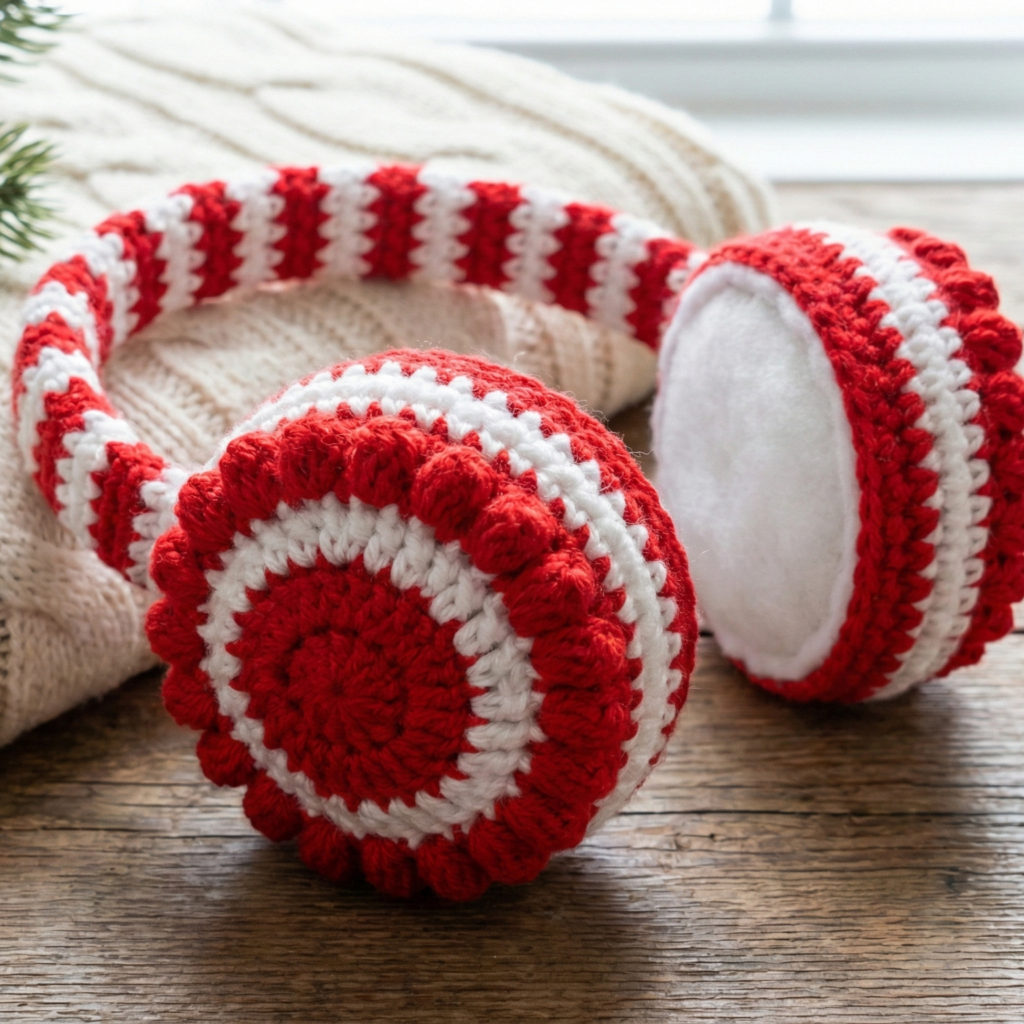
Bright, candy-stripe ear muffs inspired by peppermint candies — fun for holiday outfits. Uses bold red & white stripes and optional bobble edges like sugared rim.
Skill level: confident beginner → intermediate
Finished sample size (adult): circular ear cups ~3 in diameter; headband wrap ~1 in wide
Materials
- Worsted weight yarn in white and peppermint red — ~80–120 yd total
- Hook: 4.0 mm
- Tapestry needle, felt discs, headband base (crocheted sleeve or store bought), small amount of fiberfill for slight padding
Stitch notes
- Work circular ear cups in rounds with color changes each round for stripes. Bobbles add texture.
Step-by-step
A — Make striped ear cup (make 2)
- R1: MR, 6 sc in ring (6). Join. (White)
- R2: inc around (12). Change color to red at end of round.
- R3: sc1, inc around (18). Change to white.
- R4: sc2, inc around (24). Change to red.
- R5: sc around (24) — even round in current color. Change each round to alternate stripes until cup diameter approx 3 in (usually R4–R5 is enough; R6 adds size).
B — Bobble rim
- To create a sugared bobble edge, work one round of bobble stitches into the last round stitches: (bobble stitch, sl st in next) around. Bobble stitch: [yo, insert, pull up loop] × 3, yo and pull through all loops, ch1 to close.
C — Lining & padding
- Add a felt backing and tiny bit of fiberfill if you want a cushy feel — do not overstuff (a thin pad is enough).
D — Headband sleeve & stripe matching
- Crochet a long strip in matching red/white stripes for a seamless look: ch to headband length, sc across in stripes (change color every 2–3 rows). Fold and seam into a tube and slip over headband or stitch to cover. Optionally add narrow elastic at ends to keep sleeve snug.
E — Secure attachment
- Sew ear cups to headband at equal spacing. If you want detachable covers, add small sew-on snaps on felt backing and headband sleeve.
F — Finishing
- Weave ends in carefully, trim any stray fuzz. Avoid small beads for kids.
Styling & variations
- Make matching fingerless gloves or a hat in peppermint stripes for a themed set.
4. Crochet Heart-Shaped Comfy Ear Muffs Pattern
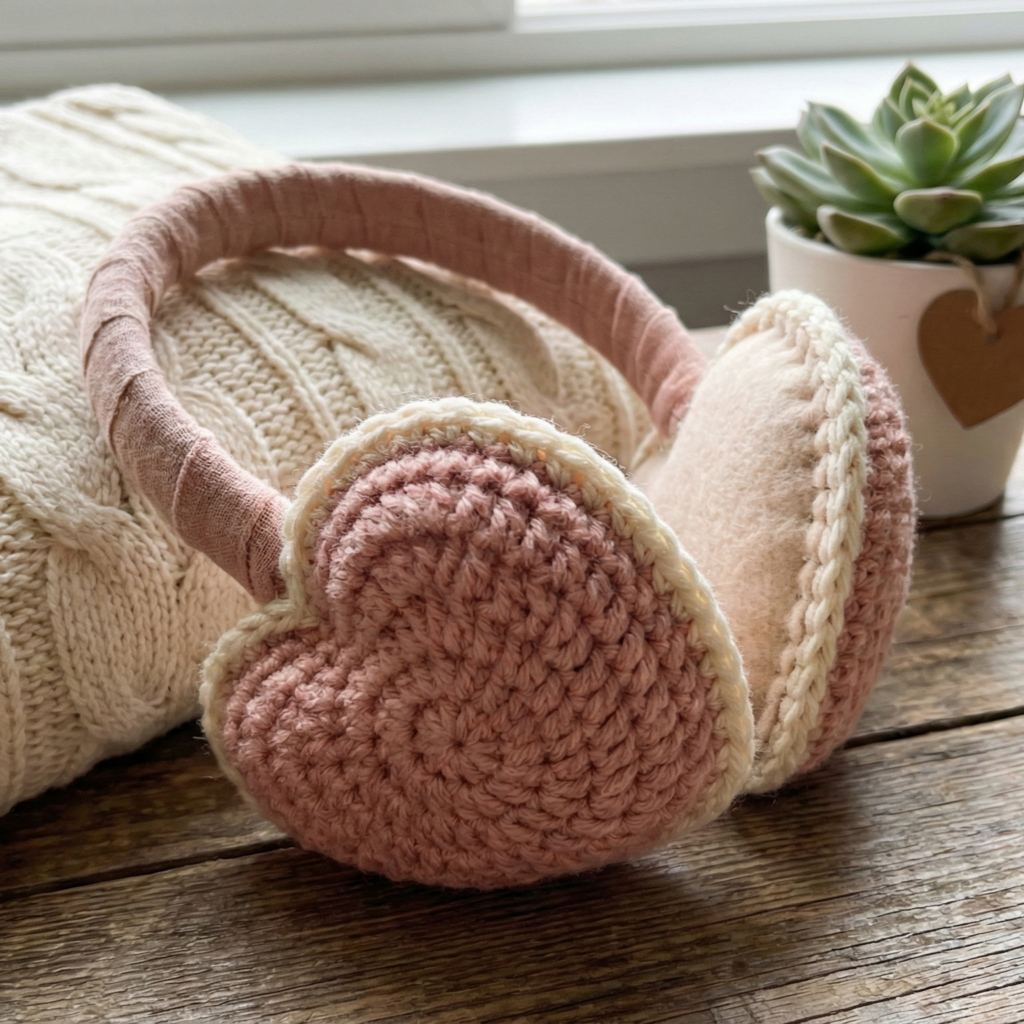
Heart-shaped ear muffs are adorable, great for gifting, and perfect for Valentine’s or anytime you want extra cute. Heart shape requires a slightly different construction than circles—worked flat as hearts and seamed/ lined.
Skill level: intermediate (shaping)
Finished sample size (adult): heart ear covers ~3.25 in wide × 3.25 in tall (across point to top)
Materials
- Worsted weight yarn in blush and accent color (cream) — ~80 yd
- Hook: 4.0 mm
- Felt lining, small amount of fiberfill (optional), headband base, tapestry needle, sewing needle & thread
Stitch notes
- Heart worked flat with increases and decreases; two mirror halves seamed or worked continuous as one flat heart.
Step-by-step
A — Make heart (flat) — make 2
- Foundation
ch 10. Row 1: sc in 2nd ch from hook and across (9 sc). Turn. - Round shaping start (half heart)
Row 2: ch1, sc in next 3 sts, inc in next 2 sts (makes the bottom point widen), sc in last 4 sts. Turn. - Work to top lobes
Continue working rows that increase at the two center stitches every other row to build a triangle shape that becomes half-heart. Example Row 3: ch1, sc across; Row 4: ch1, sc2, inc, sc across, inc, sc to end. Continue until half reaches desired height (~1.5 in). - Mirror to make heart
Make a second identical half and seam them together along the straight edge with mattress stitch to create a heart shape OR work a flat heart by chaining midline and working both sides (but two halves are simpler). - Finish shaping the top lobes
At the top rows work a series of dc clusters into the top center to create rounded lobes: in the center find 2 sts and work 3 dc cluster, ch 2, 3 dc cluster to form the rounded lobes. - Make another heart to match.
B — Lining & optional padding
- Cut felt hearts slightly smaller than crochet hearts. Sew felt to inside and, if desired, sew the two crochet hearts together with a small bit of stuffing to give a plush, comfy ear cup. Leave an opening to insert a matching felt circle and close.
C — Headband & attachment
- Make a padded headband sleeve by crocheting a long tube and stuffing lightly for comfort (ch enough to fit headband length; sc across for 6–8 rows; fold and seam). Slip over headband. Sew hearts to headband sleeve at ear positions.
D — Removable option
- Add small snap halves to felt backs and matching snaps to headband sleeve so heart covers detach for washing.
E — Finishing
- Embroider a small face or tiny flower on one heart for playful personalization (optional). Weave ends.
Styling & variations
- Work hearts in contrasting colors (blush + cream) or make mini hearts for kids.
- Add an embroidered monogram or tiny sparkly yarn thread (not beads) for a subtle shimmer.
5. Crochet Warm Chunky Star Ear Muffs Pattern
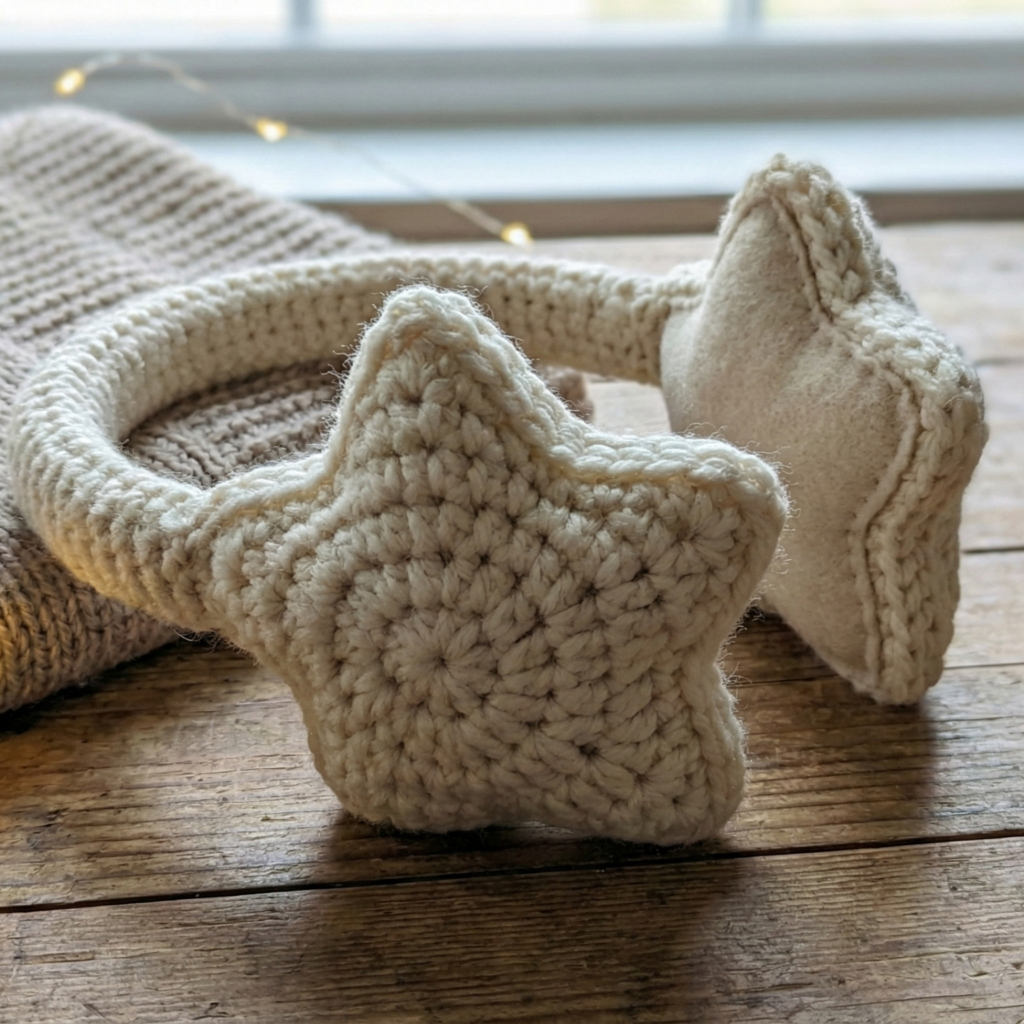
Chunky, sculptural star-shaped ear muffs — fun and fashionable. Stars make a bold statement and are great for winter festivals.
Skill level: intermediate (shaping, star points)
Finished sample size (adult): star ~3.5–4 in tip-to-tip; headband wrap ~1–1.25 in wide
Materials
- Bulky yarn (category 5) — ~100–150 yd total
- Hook: 6.0–8.0 mm depending on yarn
- Felt discs for cozier interior, headband base (soft padded), tapestry needle
Stitch notes
- Each star point is built as a triangular wedge joined to a central circle — easier to make as five small petal/ triangle motifs sewn into star shape.
Step-by-step
A — Make center circle
- MR, ch1, 8 sc in ring (8). Join. This forms the small center of star.
B — Make 5 triangular points (make 5 per ear)
For each point:
- Point foundation
Attach yarn to center, ch 2 and work into a loop to create a triangular wedge: ch2, dc 3 into ring; ch2; turn and work along short side to expand point with increases like: dc across, dec at tip to shape. Or simpler: make a small triangular motif: ch6, sc across, then dec one side each row to make a triangle roughly 1.25–1.75 in tall. Block to shape. - Attach points
Sew 5 points evenly spaced to center circle so they radiate into a star. Use strong stitches through center ring.
C — Add depth
- Make a matching back star and sew them together around the edges leaving a small opening to stuff lightly with polyfill for plushness. Close opening and secure.
D — Backing & headband attachment
- Glue or sew a felt circle inside the back star for neatness. Sew the star to headband sleeve or attach snaps for removable covers. For added stability, sew through the headband frame or stitch to the padded sleeve.
E — Finishing
- Trim stray ends, shape points, and ensure all points are securely sewn.
Styling & variations
- Make metallic-accent stars by using yarn with metallic thread or a contrasting outline.
- Combine star ear muffs with a chunky cowl knitted/crocheted in same yarn.
Assembly tips & final finishing (applies to all patterns)
- Even placement: Measure headband circumference and mark ear positions (usually 2–2.5 in in from center for comfortable fit) before sewing ear cups — try on headband to check fit.
- Removable covers: Add sew-on snaps or small Velcro squares to felt backing and headband sleeve for removable, washable covers. Sew snaps to headband inside cover rather than headband material if it’s thin.
- Lining: Use fleece or satin lining inside each cup for a smooth feel against the ear and added wind protection. Sew lining to felt backing and stitch felt to crochet outer.
- Reinforce joins: For heavy yarns, sew several passes and consider hiding stitches inside felt backing.
- Washing: Make covers removable and hand-wash in cold water, reshape and air dry. Plush yarn may require spot cleaning. For washable setups, use machine-washable yarn and remove covers before washing headband base.
Care, gift ideas & styling
- Care: Removable crochet covers = easy washing. Use gentle detergent, reshape while damp, and air dry. Avoid tumble drying plush yarns.
- Gifting: Present ear muffs with matching mittens, scrunchie, or hat in a small gift box. Add a care card: yarn content + washing instructions.
- Styling: Match ear muffs to outerwear colour, or go bold with contrast (peppermint stripes with neutral coat). For festival looks, use stars or chunky designs; for everyday chic, pick vintage plush or heart styles.
conclusion
You now have five fully detailed ear muff designs — from the whimsical Chocolate Chip Cookie ovals and the luxe Vintage Plush muffs to festive Peppermint stripes, adorable Heart-Shaped covers, and bold Chunky Star muffs. Each pattern includes options for removable covers, various headband attachment methods, lining and reinforcements, and scale adjustments for children or adults.