A crochet bralette top is one of those handmade pieces that feels instantly fun, feminine, and wearable. It is light enough for warm weather, stylish enough for festivals and beach days, and small enough to finish without the pressure of making a full garment. That is part of what makes crochet bralettes such a satisfying project: they let you play with color, shaping, texture, and lace in a way that feels creative but still practical.
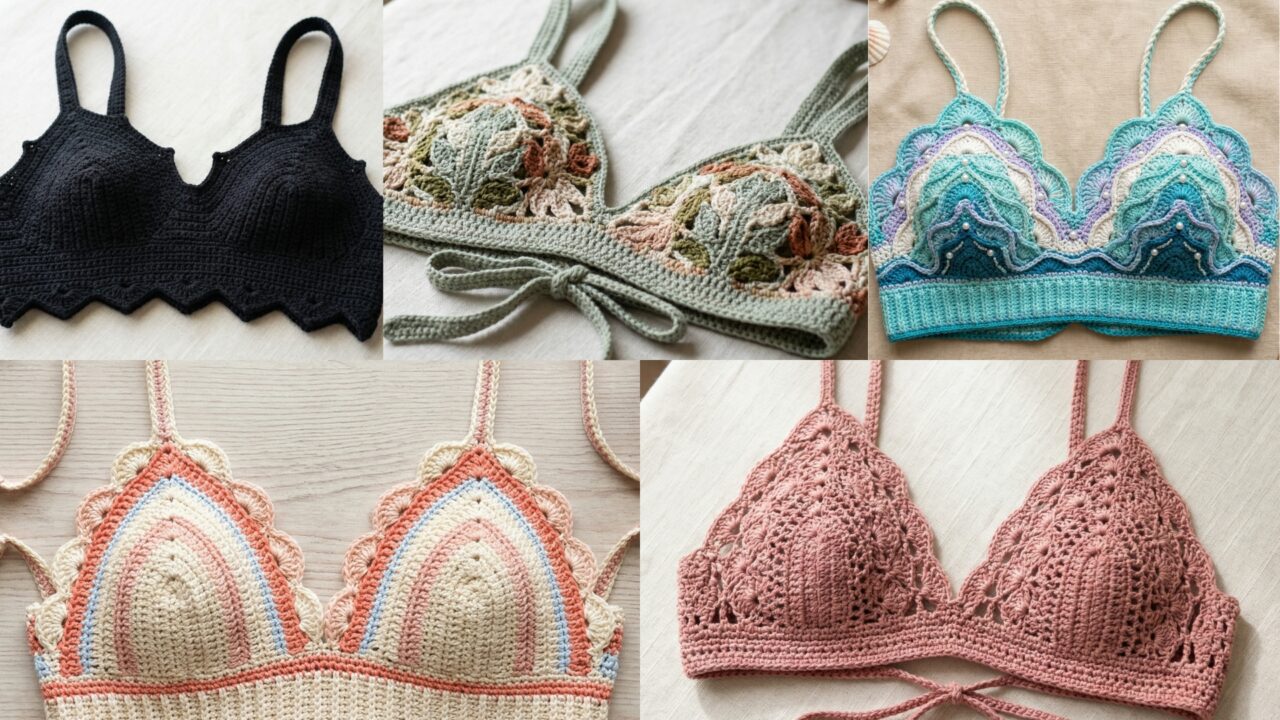
What makes crochet bralette tops so appealing is how much personality you can build into such a small design. A botanical bralette can feel soft and romantic. A bat-inspired bralette adds a bold, playful edge. A dainty lace bralette feels delicate and airy. A scallop bralette brings pretty texture and shape. A mermaid bralette gives you a dreamy, ocean-inspired look that feels perfect for sunny days. Each one has its own mood, but all of them are ideal for warm-weather styling, layering, and making a statement without feeling heavy.
In this post, you will find five stylish crochet bralette top patterns with detailed step-by-step guidance, helpful notes, and practical finishing tips. Each design is written to be easy to follow while still giving you enough detail to create a polished piece that feels comfortable and looks beautiful. Whether you are making one for a festival outfit, a beach cover-up, or your handmade wardrobe, these bralette ideas are a lovely place to begin.
Quick Notes
Project type: Crochet bralette tops
Best for: Festivals, beach days, layering, warm-weather outfits, gifts, and handmade fashion
Skill level: Beginner to intermediate, depending on shaping and stitch detail
Hook size: Usually 2.5 mm to 4.5 mm, depending on yarn weight and fit
Yarn weight: Cotton, cotton blends, DK, or sport weight yarn
Best yarn choice: Cotton or cotton blends for breathability, comfort, and structure
Finished size: Usually fitted, cropped, and adjustable by band and cup size
Time to complete: Several hours to a few days depending on detail
Helpful stitches: Chain, slip stitch, single crochet, half double crochet, double crochet, treble crochet, shell stitch, increases, decreases, picot, lace repeats, color changes, edging
Common Materials
Most crochet bralette tops can be made with the same basic supplies.
- Yarn in your chosen colors
- Crochet hook matched to the yarn
- Yarn needle
- Scissors
- Measuring tape
- Stitch markers
- Optional buttons, ties, or bra pads
- Optional lining or cup inserts for extra coverage
For bralettes, fit and comfort matter just as much as style. Cotton yarn is usually a great choice because it is breathable and holds its shape well. If you want a more delicate or drapey result, you can choose a softer blend, but for support and structure, cotton is often the most reliable option.
1. Crochet Botanical Bralette Pattern
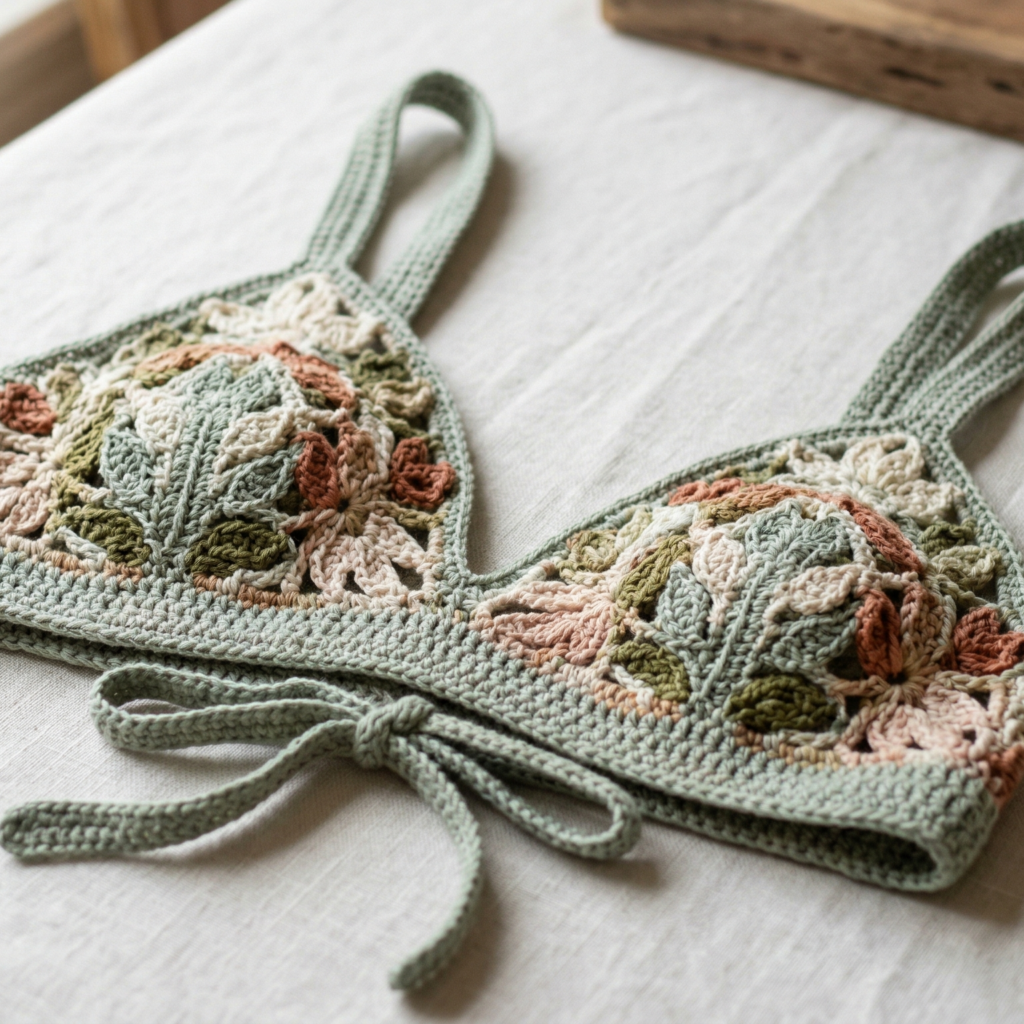
A botanical bralette is soft, romantic, and full of natural charm. It often features leaf-like stitch details, floral-inspired shapes, or a gentle lace texture that gives it a fresh, organic look. This is a beautiful option if you want something feminine and earthy that feels perfect for festivals, garden events, or summer layering.
Quick Notes
Skill level: Beginner to intermediate
Finished size: Fitted cropped bralette
Style: Romantic, natural, airy, feminine
Best colors: Sage, cream, moss, blush, terracotta, soft green tones
Materials
- Cotton yarn in a botanical color palette
- Crochet hook suited to yarn weight
- Yarn needle
- Scissors
- Measuring tape
- Optional ties or adjustable straps
Step-by-Step Guide
Step 1: Measure for fit
Before starting, measure around the bust and underbust area so you know how wide each cup and the band should be. A bralette needs to fit snugly enough to stay in place but not so tightly that it feels uncomfortable. Since this style is often worn in warm weather, comfort is especially important.
Accurate measurements help the botanical shape sit neatly on the body.
Step 2: Choose a cup shape
A botanical bralette usually works well with soft triangle cups or lightly rounded cups. Decide whether you want a fuller shape or a more minimal style. Triangle cups are easier for beginners, while shaped cups can feel more supportive and polished.
The cup shape sets the whole look of the bralette.
Step 3: Crochet the first cup
Start from the center or bottom of the cup and work outward using increases to form the triangle or rounded shape. If you want the botanical look to stand out, use a stitch pattern that creates leaf-like or petal-like texture. Keep the increases even so the cup stays balanced.
The cup should be symmetrical and smooth.
Step 4: Add botanical stitch details
Use lace repeats, shell stitches, or small fan-shaped clusters to create natural-looking texture. These details can resemble petals, leaves, or soft vines depending on how you place them. Keep the texture delicate so the bralette stays lightweight.
The botanical look comes from these gentle decorative elements.
Step 5: Crochet the second cup
Make the second cup the same size and shape as the first. Compare them as you go so they match closely. A balanced pair of cups makes the final bralette look more professional and comfortable to wear.
Symmetry matters a lot in bralette construction.
Step 6: Create the underband
Crochet a band that connects the cups and supports the bust. The band should be snug but stretchy. You can use a firmer stitch here for extra stability. This part is very important because it helps the bralette stay secure during wear.
A solid band adds both support and structure.
Step 7: Add straps and ties
Finish the bralette with shoulder straps and a back tie or adjustable band. Ties make the fit more flexible, which is especially helpful for a festival or beach top. Make the straps long enough for comfort and adjustability.
Step 8: Finish edges neatly
Add a clean border around the top edges, underband, and straps. A simple edging can help the botanical details feel more refined. Weave in all ends securely, then try the bralette on and adjust if needed.
Helpful Tips
This style looks especially beautiful in earthy or muted shades. If you want a more romantic feel, use soft pinks or cream. If you want a more natural botanical mood, sage and moss tones work wonderfully. A subtle leaf-like stitch repeat can make the top feel elegant without becoming too busy.
2. Crochet Bat Inspired Bralette Pattern
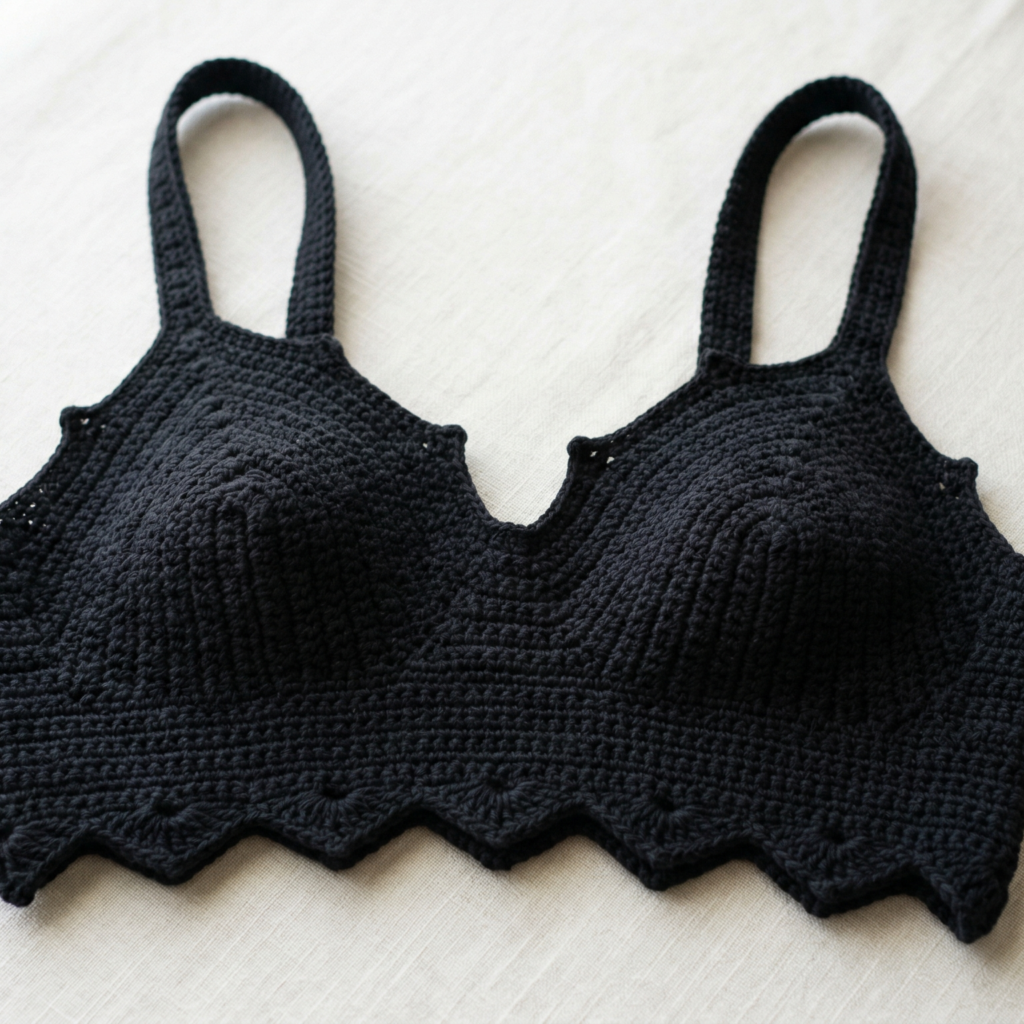
A bat inspired bralette is bold, playful, and perfect for anyone who loves a little edge in their handmade fashion. It can be cute, mysterious, or gothic depending on your color choice and shaping. This style is especially great for festivals, themed outfits, or statement summer looks.
Quick Notes
Skill level: Intermediate
Finished size: Fitted cropped bralette
Style: Bold, edgy, playful, alternative
Best colors: Black, deep plum, red, dark green, charcoal, midnight blue
Materials
- Yarn in a dark or high-contrast color
- Crochet hook suited to the yarn
- Yarn needle
- Scissors
- Measuring tape
- Stitch markers
- Optional ties or decorative edging
Step-by-Step Guide
Step 1: Plan the silhouette
A bat-inspired bralette usually works best when the cups or neckline have pointed or wing-like shaping. Decide whether you want the bat theme to appear in the cup edges, the underband, or the overall silhouette. A subtle design can feel stylish, while a more dramatic shape makes the piece look stronger and more theatrical.
The silhouette is what gives the bralette its character.
Step 2: Measure and map the cups
Take accurate bust measurements so the bralette fits well. Since bat-inspired shapes often use sharper lines or pointed curves, it helps to sketch the cup shape before crocheting. This way, you can plan where the rises and curves should happen.
Planning the shape ahead of time helps keep the design balanced.
Step 3: Crochet the cups
Begin each cup with a firm center and work outward using increases. If you want the bat-inspired effect to show, shape the outer edges with sharper points or curved wing-like lines. Keep the stitches even so the cup still feels wearable and comfortable.
The cups should be decorative but still supportive enough for a bralette.
Step 4: Add a bat-wing neckline or edge detail
This is where the style really becomes recognizable. You can create a pointed neckline, scalloped wing edges, or a sharp decorative border that echoes bat wings. Keep the details neat so the design feels intentional rather than overly bulky.
This decorative edge is the focal point of the pattern.
Step 5: Connect the cups
Join the cups with a central band or small bridge section. This part should feel secure and help the bralette sit comfortably on the chest. If you want a stronger statement, let the bridge be slightly shaped or pointed as well.
The center connection helps tie the whole design together.
Step 6: Crochet the underband and back ties
Work a snug underband and add long ties or adjustable fastenings at the back. For a bralette with more visual edge, narrow ties can help keep the look sleek. Make sure the back closure is secure and comfortable for movement.
Step 7: Finish with sharp, clean edging
Use a neat border to define the bat-inspired shapes. Clean edges are important here because they help the silhouette stand out. Weave in all ends carefully and check that the top fits comfortably.
Helpful Tips
Black yarn is the classic choice for a bat-inspired bralette, but dark plum or midnight blue can feel just as dramatic. If you want a softer version, you can use a muted color with only a subtle pointed edge. This is a great pattern for anyone who likes fashion with personality.
3. Crochet Dainty Lace Bralette Pattern

A dainty lace bralette feels light, elegant, and easy to wear. It is all about delicate stitch work and soft shaping, making it a perfect option if you want something feminine and airy for warm-weather outfits. This style works beautifully under an open shirt, a sheer layer, or as part of a beach-ready look.
Quick Notes
Skill level: Beginner to intermediate
Finished size: Fitted, lightweight bralette
Style: Delicate, airy, romantic, minimal
Best colors: White, ivory, blush, dusty rose, soft blue, pale lavender
Materials
- Light cotton yarn or cotton blend
- Crochet hook suited to the yarn
- Yarn needle
- Scissors
- Measuring tape
- Optional lining or bra cups
Step-by-Step Guide
Step 1: Choose a simple cup base
For a dainty lace bralette, a triangle or lightly rounded cup works beautifully. Keep the base simple so the lace details remain the main visual focus. A cleaner shape will help the pattern feel elegant rather than crowded.
The cup shape should feel soft and flattering.
Step 2: Crochet the foundation rows
Start the cup with a small center and work outward slowly. Keep the stitches neat and slightly open so the lace can breathe. The goal is to create a lightweight base that still has enough structure to support the body.
A soft foundation makes the lace stand out more clearly.
Step 3: Add lace stitch repeats
Work lace-style stitches such as chain spaces, fans, shell stitches, or small open repeats. These details create the dainty feel that gives the bralette its charm. Keep the pattern delicate and regular so the result looks refined.
The lace pattern is the heart of the design.
Step 4: Build the second cup
Make the second cup match the first in size and shape. This is especially important for lace designs because even a small difference can affect the whole look. Compare the cups as you go to keep everything balanced.
Matching cups help the bralette sit properly.
Step 5: Create the underband
Use a slightly firmer stitch pattern for the underband so the bralette feels secure. The band should support the lace cups without overpowering them. A narrow, tidy band often works best for this style.
A clean underband makes the lace feel more delicate.
Step 6: Add thin straps
Thin straps suit this design beautifully because they keep the bralette light and airy. Make the straps long enough to tie or adjust comfortably. You can also make the back ties in a similar delicate style.
Thin straps help maintain the dainty look.
Step 7: Finish with elegant edging
A small picot edge or simple scalloped trim can add a pretty finishing touch. Keep the edging subtle so it enhances the lace without making the piece too heavy. Weave in all ends carefully and shape the cups gently.
Helpful Tips
Dainty lace bralettes are beautiful in pale, romantic colors, but they can also look chic in black or navy for a more evening-ready style. If you want a more wearable everyday version, choose a soft cotton yarn and keep the lace open but not too fragile.
4. Crochet Scallop Bralette Pattern
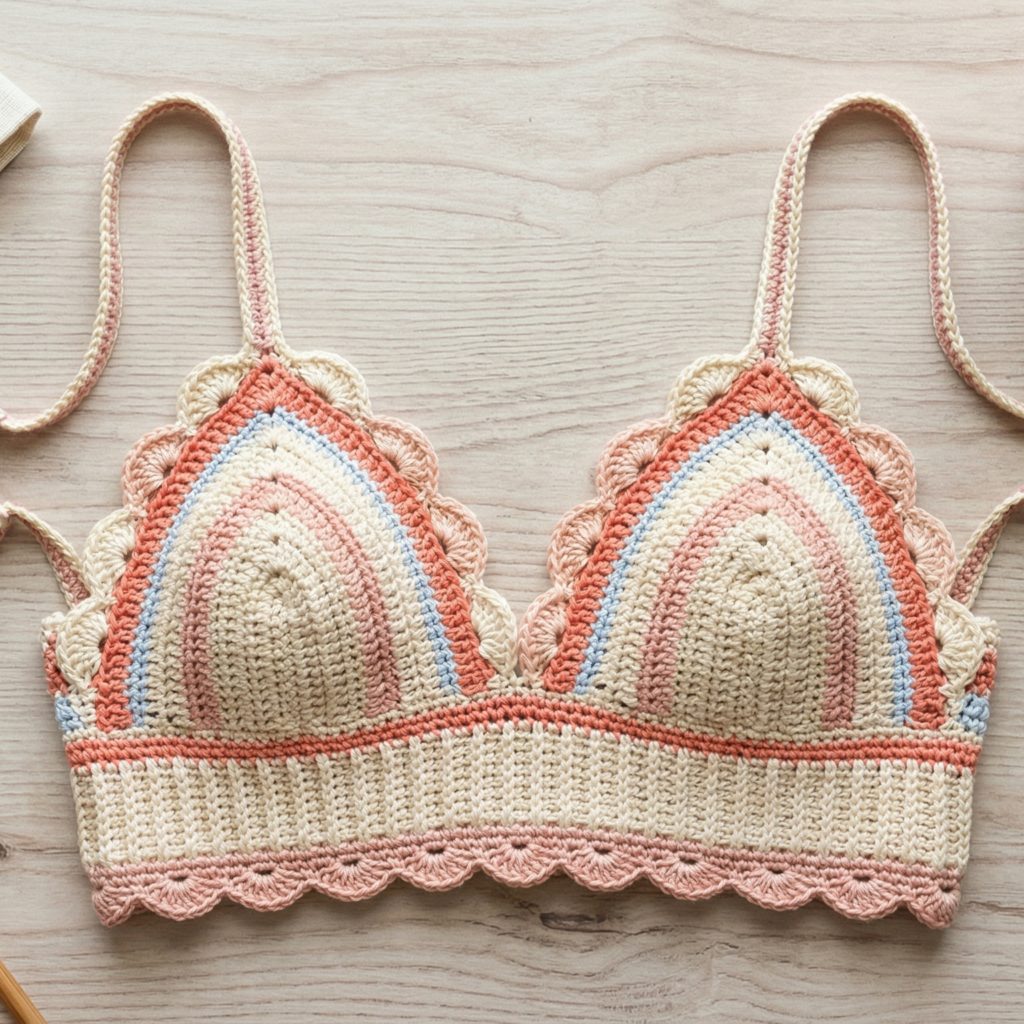
A scallop bralette is cheerful, pretty, and full of texture. Scallop edges naturally create a soft feminine shape, which makes this pattern a lovely choice for festivals, summer layering, and beach outfits. It is a stylish design that feels playful but still polished.
Quick Notes
Skill level: Beginner to intermediate
Finished size: Fitted bralette
Style: Feminine, textured, fun, soft
Best colors: Cream, peach, coral, baby blue, pastel pink, sage, yellow
Materials
- Cotton yarn in your chosen colors
- Crochet hook suited to the yarn
- Yarn needle
- Scissors
- Measuring tape
- Stitch markers
Step-by-Step Guide
Step 1: Measure and sketch the shape
Before you crochet, decide how wide and tall you want the cups to be. Scallop designs look lovely when the overall silhouette is clean and the scallops provide the decorative detail. A sketch can help you decide where to place the scallops most effectively.
A simple shape gives the scallops room to shine.
Step 2: Crochet the base cups
Start with triangle or rounded cups using basic increases. Keep the cups smooth so the scalloped edging later looks neat and even. The cups should feel supportive enough to wear comfortably but not overly stiff.
A balanced base makes the decorative edge more noticeable.
Step 3: Add scallop rows or borders
Once the cup shape is formed, add scallop stitches along the edges or across a decorative section. Shell stitches, fans, or curve-shaped borders can all create the scalloped look. Make sure the scallops are evenly spaced for a polished finish.
The scallops are the signature feature of the bralette.
Step 4: Make the second cup match
Use the same shaping and scallop placement on the second cup. Matching scallops is important because even small differences can become obvious in a symmetrical garment. Take your time and compare the cups regularly.
Symmetry gives the bralette a clean, finished look.
Step 5: Join the cups and add the band
Crochet or sew a small center bridge between the cups, then attach an underband for support. The band should be snug and comfortable, holding the scallop detail in place without pulling too tightly.
The band keeps the top functional as well as decorative.
Step 6: Add straps and ties
Choose straps that suit the softness of the scallop design. Thin straps can keep the look delicate, while slightly wider straps can feel more secure. Back ties are useful if you want the bralette to be adjustable for different outfits or wear styles.
Step 7: Finish and shape
Add a final tidy border if needed, then weave in the ends securely. Shape the scallops gently with your fingers so they sit evenly. If desired, lightly block the bralette so the scallops open up and sit neatly.
Helpful Tips
A scallop bralette looks especially pretty in soft, pastel shades. For a more dreamy beach look, try cream or coral. For a more elegant summer style, choose white or blush. This design works beautifully when the yarn has a clean matte finish.
5. Crochet Mermaid Bralette Pattern
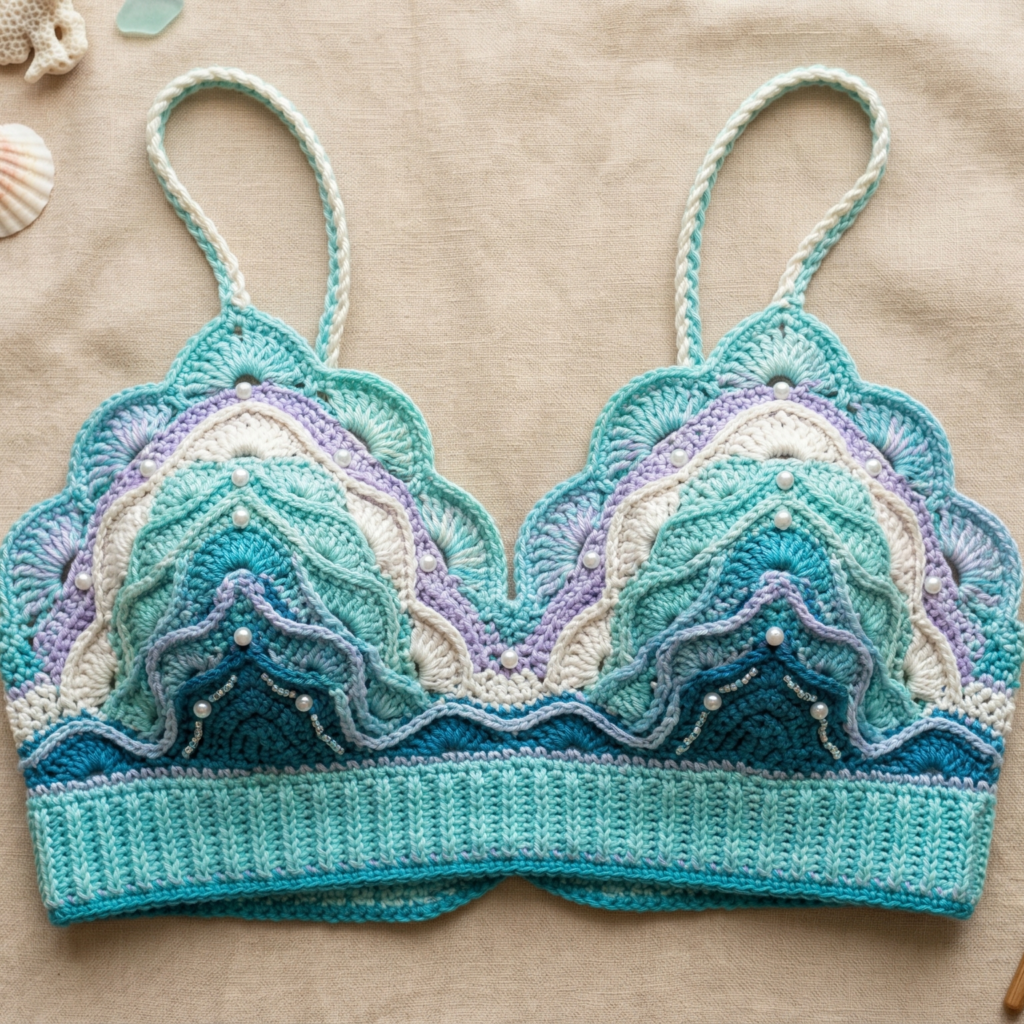
A mermaid bralette is dreamy, whimsical, and full of ocean-inspired beauty. It often uses flowing stitch patterns, shell shapes, and soft color shifts that remind you of seafoam, scales, and waves. This is a wonderful pattern if you want a bold but feminine piece that feels magical for beach days or festival outfits.
Quick Notes
Skill level: Intermediate
Finished size: Fitted bralette
Style: Dreamy, ocean-inspired, whimsical, bold
Best colors: Aqua, teal, seafoam, lavender, pearl, silver, deep blue
Materials
- Cotton or cotton blend yarn in ocean-inspired colors
- Crochet hook suited to the yarn
- Yarn needle
- Scissors
- Measuring tape
- Stitch markers
- Optional beads or shell-inspired accents
Step-by-Step Guide
Step 1: Choose the mermaid color palette
The color choices are what make this style feel magical. Decide whether you want soft seafoam tones, rich ocean blues, or shimmering pastel shades. The palette should feel fluid and watery so the bralette has that underwater-inspired mood.
Color is a big part of the mermaid effect.
Step 2: Shape the cups
Start the cups with simple increases and shape them to fit the bust. You can use triangle cups, rounded cups, or shell-shaped cups depending on how decorative you want the top to be. The cups should provide enough coverage while still feeling light and summery.
A graceful cup shape creates the best base.
Step 3: Add mermaid-like texture
Use shell stitches, layered fans, or scale-like repeats to create the mermaid feel. These stitches can resemble fish scales or wave patterns when worked in the right sequence. Keep the texture balanced so it looks magical rather than too heavy.
The texture is what gives the design its identity.
Step 4: Work the second cup
Make the second cup match the first in size, texture, and detail. With mermaid designs, consistency is important because the flowing texture can be more noticeable than on a plain top. Match the colors and stitch repeat carefully.
Balanced cups make the top feel polished.
Step 5: Add the underband and side structure
Crochet a secure underband and side ties so the top holds its shape. The band should be snug enough to support the decorative cups. If you want a more dramatic look, let the side ties remain thin and delicate.
The band keeps the top wearable and secure.
Step 6: Add straps and optional accents
Finish the top with straps that match the mermaid theme. You can add tiny shell-style details, beads, or subtle color transitions if you want a richer ocean feel. Keep the embellishments secure and lightweight.
A few small accents can make a big difference.
Step 7: Finish and block
Weave in all ends securely, then block the top lightly so the shells or scales settle nicely. This helps the lace or textured pattern look more even and polished.
Helpful Tips
Mermaid bralettes look stunning in color combinations that shift softly from one shade to another. If you want a more subtle version, use pearl, cream, and pale aqua. If you want a stronger fantasy look, choose deeper blues and teals with a bit of shimmer.
Conclusion
Crochet bralette tops are a beautiful way to combine fashion and creativity in one small handmade project. They are fun to make, flattering to wear, and easy to personalize with color, texture, and shape. That makes them especially appealing for warm weather, when you want something light, stylish, and a little more unique than store-bought basics.
These five bralette patterns each bring a different personality. The botanical bralette feels soft and romantic. The bat-inspired bralette adds bold edge. The dainty lace bralette is delicate and airy. The scallop bralette is sweet and textured. The mermaid bralette brings dreamy ocean energy. Together, they show just how versatile crochet can be when you want to create clothing that feels expressive and wearable.
The best part is that a bralette does not need to be complicated to look beautiful. With careful shaping, comfortable yarn, and a thoughtful finish, even a simple top can become a favorite festival piece or beach-day staple. These patterns are a great place to start if you want to make something stylish that feels handmade and special.