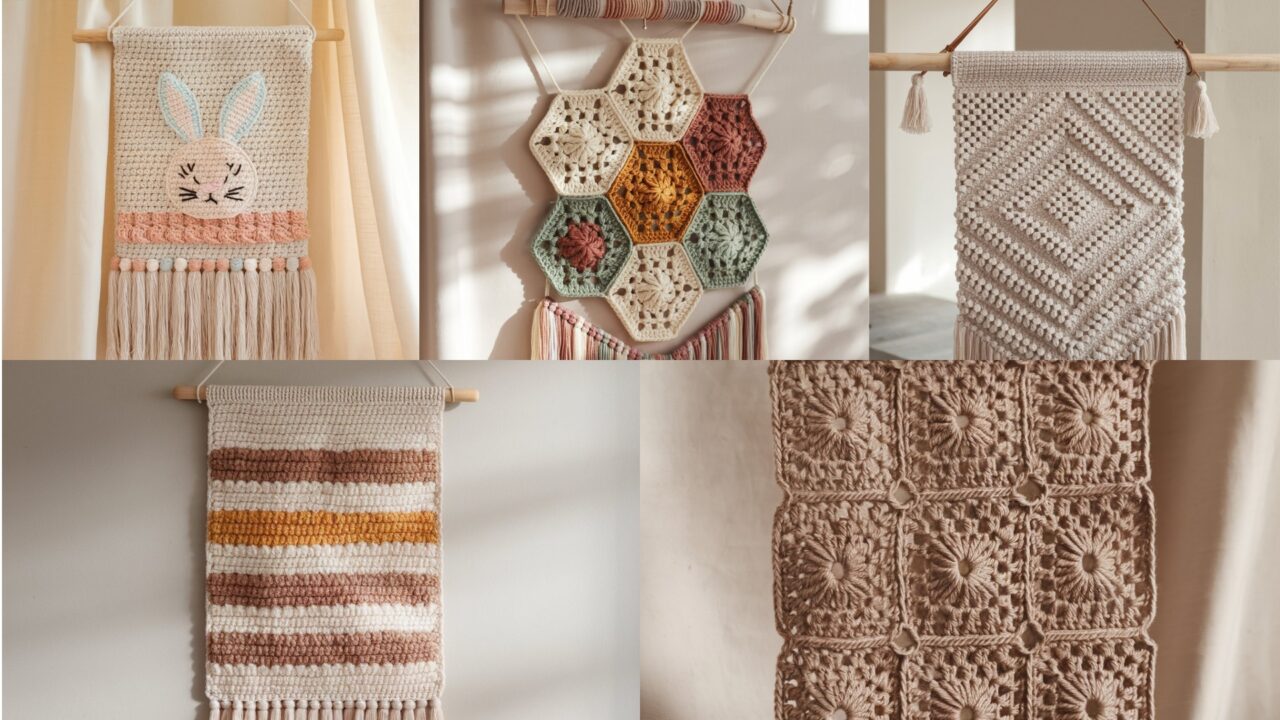
Want to add instant handmade warmth and texture to your walls? Crochet wall hangings are one of the most satisfying home-decor projects: they’re tactile, customizable, and great for using up yarn stash. Whether you prefer modern geometric lines, soft boho fringes, or playful shapes (hello, rabbit!), this post gives you five complete wall-hanging projects with step-by-step instructions, materials, finishing and hanging methods, styling tips, troubleshooting, and variations so you can make pieces that look like they belong in a boutique store.
Each pattern includes:
- Estimated finished size and time
- Skill level and stitches used
- Exact materials and tools
- A very detailed, easy-to-follow step-by-step pattern
- Assembly, finishing and hanging instructions
- Variations and styling tips
Quick notes & abbreviations (read first)
General tips before you begin
- For wall hangings, yarn choice controls drape and structure: cotton or cotton blends give cleaner stitch definition and lighter weight; acrylic/wool blends give more warmth and loft; t-shirt yarn or bulky cotton cord gives structure for sculptural hangings.
- Use a larger hook than the yarn band suggests for open, airy stitches; use the recommended or a smaller hook for dense texture.
- Blocking and finishing are essential — they make the piece look intentional and professional.
- For mounting, natural wooden dowels, driftwood, copper pipes or brass rods all give different looks. Choose hardware to match your decor.
Abbreviations
- ch = chain
- sc = single crochet
- hdc = half double crochet
- dc = double crochet
- tr = treble (triple) crochet
- sl st = slip stitch
- st(s) = stitch(es)
- BLO / FLO = back/front loop only
- rep = repeat
- RS = right side
1. Crochet Box Stitch Wall Hanging Pattern

Finished size: ~14″ wide × 20″ long (including fringe) — easily resized
Time: 3–6 hours (depending on size, fringe amount)
Skill level: Beginner → Intermediate (box stitch technique)
Look & feel: Cozy, modern grid texture — the box stitch gives a chunky quilted look that reads beautifully on a wall with simple fringe.
Materials
- Worsted weight yarn (approx. 350–600 yards depending on size). Two or three colors for stripes (optional).
- Hook: 5.0–6.5 mm (choose based on yarn and desired squish).
- Wooden dowel (14–16″ long) or driftwood; 2 small eyebolts and cord for hanging.
- Tapestry needle, scissors, measuring tape, stitch marker.
Stitches & techniques used
- Chain, single crochet, dc worked into chain spaces in box stitch repeat.
- Box stitch:
box = (dc, ch 2, dc)cluster worked over a row to create little “boxes” when offset with the next row. (I’ll give explicit counts.)
Pattern — panel worked flat
Notes on gauge & sizing: This pattern written for a 14″ wide piece with foundation chain 30 (multiple of 3 + 0). To widen, add 3 chains per extra repeat.
- Foundation row. Ch 30 (or multiple of 3 for width). Row 1: sc in 2nd ch from hook and across (29 sc). Turn. (This gives a sturdy base so box stitch sits even.)
- Row 2 (box row base). Ch 3 (counts as dc), skip next st, work (dc, ch 2, dc) into next st (this is your “box”); repeat from * across, ending with dc in final st. Turn. You should have (dc, ch2, dc) clusters spaced by skipped single crochets — these form the box centers.
- Row 3 (box lid). Ch 1, sc in first st, ch 2, skip ch-2 space below, sc in the top of the next dc — this anchors the boxes. This is a short anchoring row. Turn.
- Row 4 (repeat). Ch 3, work (dc, ch 2, dc) into each sc that corresponds to the box centers across. Turn.
- Alternate. Repeat Rows 3–4 until your panel measures about 14″ tall (or desired height minus fringe). The boxes stack to form a quilted texture.
- Optional color banding. Change color every 4–6 rows for subtle stripes. Carry colors up the side or fasten off and join new color for crisp stripes.
Finishing edges & fringe
- Top row & hanging loop. Work one round of sc around the entire rectangle to tidy edges. On the top edge, make two or three small sl st loops spaced evenly and attach cord for hanging or leave ends to wrap around your dowel. Alternatively, fold the top over the dowel and sew a pocket: fold top edge down about 1″–1.5″, whipstitch through both layers to form a channel for the dowel.
- Fringe (optional). Cut fringe strands twice the desired hanging length (or ½ the cut if folding). Use a lark’s head knot and attach across the bottom edge in the chain row or the sc border. Trim to even length or shape into a V or layered look.
- Block. Pin to dimensions and lightly steam or wet-block to even the boxes.
Hanging & styling
- Suspend the dowel with two pieces of cord to form either centered or off-center hang. Use brass eye hooks and leather cord for a modern look, or macramé cord for boho.
- This textured panel looks great over a nightstand or above a small console.
Troubleshooting & tips
- If the boxes look skewed, check tension: box stitch needs even tension in both dc legs and ch-2. Work slowly first 4 rows to set rhythm.
- For a plusher look, use a slightly larger hook to make boxes puffier.
2. Crochet Tilted Wall Hanging Pattern

Finished size: ~12″ × 18″ (tilt/diagonal orientation)
Time: 3–5 hours
Skill level: Intermediate (working mosaic/tilted panels and color repeats)
Look & feel: Geometric, modern; the motif is worked on a rectangular base but displayed on a diagonal to create movement on the wall.
Materials
- Worsted or aran yarn in 2–4 colors (approx. 300–500 yards total).
- Hook: 5.5–6.5 mm.
- Wooden dowel (one slightly longer than width), leather cord for hanging.
- Tapestry needle, scissors, measuring tape.
Stitches & techniques used
- sc, hdc, dc, mosaic-style color changes (carry floats or intarsia join).
- Basic color chart concept: simple triangles/stripes that form a tilted diamond when hung diagonally.
Pattern overview — panel worked flat (graph-free friendly)
Design idea: Work vertical stripes that, when the rectangle is rotated 45°, read as tilted diamonds/chevrons. I’ll give a stripe technique that builds staggered blocks.
- Foundation chain. Ch 36 (or number for desired width). Row 1: sc in 2nd ch from hook across. Turn.
- Base stripe repeat (6-row motif).
- Row A (color 1): Ch 1, sc across in color 1.
- Row B (color 1): Ch 3 (counts as dc), skip 2 sts, dc in next st repeat to form dotted verticals — this is one row of texture.
- Row C (color 2): Change color; ch 1, sc in color 2 across.
- Row D (color 2): Ch 3, work dc clusters offset by one from Row B so the texture seems to step right.
- Row E (color 3): ch 1 sc across
- Row F (color 3): ch 1 sc across.
- Repeat motif. Repeat these 6 rows, shifting which rows have the textured dc clusters so over many repeats the clusters form diagonal lines. The eye reads this as tilted shapes when you rotate the panel.
- Symmetry. Work until panel is slightly taller than wide for good diagonal visual when rotated 45°. For a strong tilt effect, a square or slightly taller rectangle works best.
Finishing & mounting
- Border. One round of sc around the piece in a neutral color tidies edges and creates a pocket if you want to fold over a dowel. Fold top edge over the dowel and whipstitch to create channel, or sew loops (every 4″) to slip the dowel through.
- Optional tassels. Add 1–3 tassels at bottom corners to anchor the tilt visually.
- Mounting. Hang the dowel horizontally and rotate the panel so the motif sits on the diagonal: the top-left corner will become the topmost point and top-right bottom-most visually.
Styling & tips
- Tilted hangings work brilliantly above low furniture or as a focal point in a gallery wall.
- To keep floats tidy when changing colors, carry yarn along back and trap it with sl st every 6–8 stitches, or work intarsia small bobbins.
3. Crochet Boho Hexagon Wall Hanging Pattern

Finished size: Each hexagon ~6–8″ across; assembled cluster ~18–24″ wide (depending on how many hexes you combine)
Time: 2–6 hours (modular — quick hexes stack fast)
Skill level: Beginner → Intermediate (joining motifs)
Look & feel: Boho, feminine, perfect for cluster galleries — hexagon motifs give a honeycomb structure that’s pleasing and flexible.
Materials
- Bulky or worsted yarn (contrasting colors for centers/borders). Rough estimate 200–500 yards depending how many hexes.
- Hook: 5.0–6.5 mm.
- Wooden dowel or driftwood 24–36″ if making a wider cluster.
- Tapestry needle, scissors, stitch markers.
Stitches & techniques used
- MR, dc clusters, chain spaces to form hex shape, slip-stitch joining or whip stitch for seams.
- Optional bobble or popcorn stitches for textured centers.
Pattern — single hexagon motif
Hexagon worked in rounds: Make as many hexagons as you want to cluster; I’ll describe a 6-round hex sized for 6–8″ with bulky yarn.
- Center (Round 1). MR, ch 3 (counts as dc), work 11 dc into MR. Pull tight and join. (12 dc)
- Round 2 (form sides). Ch 2, 2 dc in next st, ch 1, skip next st — repeat around to form small side points; join.
- Round 3 (shape). Switch color for side definition: Work (2 dc, ch 1, 2 dc) into ch-1 corner spaces to form bigger corner clusters; along straight edges do 2 dc in each straight stitch — this rounds out the hex side lengths.
- Round 4–5 (build). Repeat increases at each corner (2 dc, ch 1, 2 dc) while working 2 dc along edges so the hex grows evenly. Work until each flat side has desired number of dc (3–4 dc per side for small hex; 6–8 dc per side for larger).
- Round 6 (edge). Work a tidy round of sc or picot/loop for decorative edging.
Join and assemble
- Join hexes. Lay hexes in designed layout (a cluster of 5–7 hexes looks lovely). Use whip stitch or mattress stitch through the back loops for a neat seam. For visible, decorative joins, slip-stitch through both pieces using contrasting yarn.
- Backing & fringe. Optional felt backing on each hex makes a more sculptural, stable hanging — glue felt to back and whipstitch yarn over the edge. Add fringe at bottom of cluster for boho flair.
- Mounting. Attach the top hexes to the dowel by sewing over the top edges or using small loops to slip the dowel through. Space hexes evenly to create honeycomb effect.
Variations & styling
- Alternate solid hex colors with open-lace hexes to create negative space.
- For a dramatic look, stitch gold metallic thread into edges.
4. Crochet Grannytastic Wall Hanging Pattern
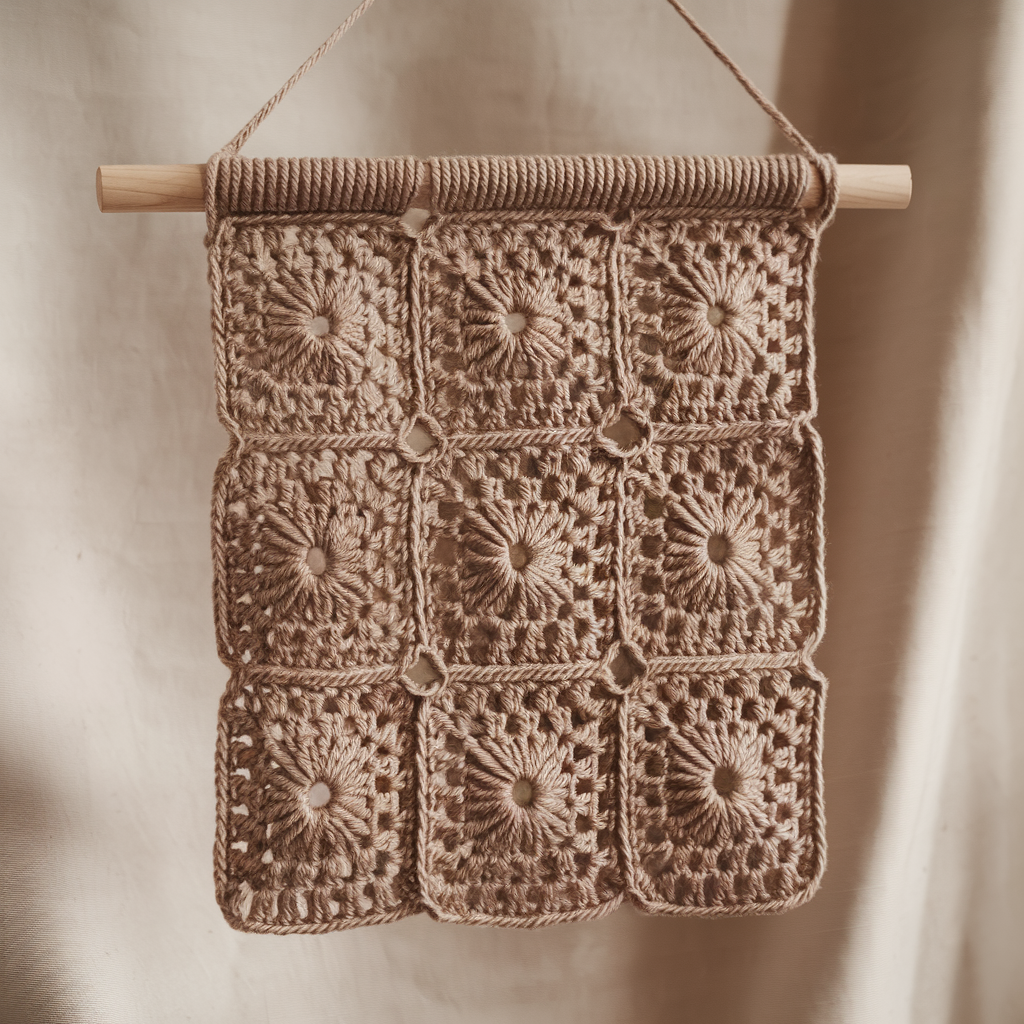
Finished size: ~18″ wide × 24″ long (including fringe) for a 5×5 granny square panel — resize as you like
Time: 4–8 hours (modular granny assembly plus finishing)
Skill level: Beginner → Intermediate (granny squares + assembly)
Look & feel: Classic granny squares reimagined into a modern wall tapestry — bright, graphic, and super customizable.
Materials
- Multiple colors of worsted yarn (approx. 500–900 yards depending on panel size and number of squares).
- Hook: 5.0–6.5 mm.
- Wooden dowel (length according to number of squares), tapestry needle, scissors.
Stitches & techniques used
- Classic granny square clusters: ch, dc cluster (3 dc cluster), ch spaces; join-as-you-go or whip stitch join.
- Fringe, tassel assembly, surface crochet to outline squares.
Pattern — classic granny square (small)
Note: I’ll give a 10-round granny for a roughly 4–5″ square (with bulky yarn). Make as many as needed.
- Start. MR (or ch 4 join), ch 3 (counts as first dc), work (2 dc, ch 2, 3 dc) into ring to form first corner. Ch 1, (3 dc, ch 2, 3 dc) into same ring for second corner and so on — make 4 corners. Join. (This makes the first round of the mini granny.)
- Round 2. Join contrast color into any ch-2 corner, ch 3, 2 dc, ch 2, 3 dc in same corner. Ch 1, (3 dc, ch 2, 3 dc) into next corner — repeat around. Join.
- Round 3–4. Repeat corners and adjust color changes as desired until square is desired size (4–5 rounds for small squares).
- Edging. Work one round of sc around to flatten.
Assembly
- Layout. Lay squares flat in planned pattern. Photograph layout before joining to keep track.
- Join. For visible joins, use join-as-you-go: when making the final round of a square, slip stitch into the adjacent square’s corresponding sts. For invisible joins, use mattress stitch with tapestry needle on back loops.
- Add surface details (optional). Use contrasting yarn and surface slip-stitch to add lines, frames or borders around some squares for graphic interest.
- Fringe & tassels. Add long fringe along bottom edge or tassels at corners. For weight and neat hanging, add a few small wooden beads to bottom tassels.
- Mounting. Sew squares to a long dowel by looping through top stitches or creating a channel on the back (folded top edge) to slip the dowel through.
Styling & tips
- Grannytastic works brilliantly in colorful, eclectic interiors and also looks striking when made monochrome for minimalist spaces.
- This modular approach makes the project addictive — add squares gradually to expand your piece over time.
5. Crochet Rabbit Wall Hanging Pattern
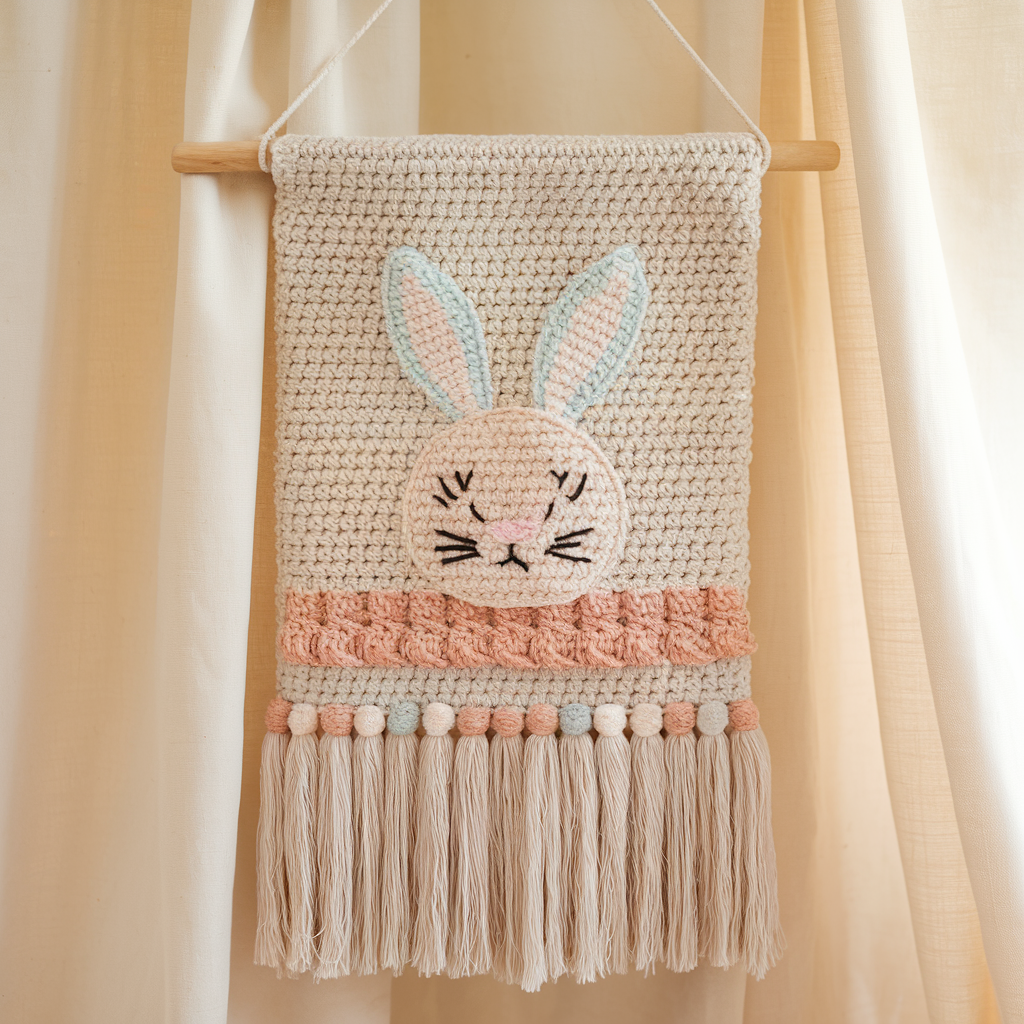
Finished size: ~10–14″ tall (rabbit silhouette) × variable width depending on ears and tail; total hanging with fringe ~18–24″ tall
Time: 3–6 hours
Skill level: Intermediate (shaping, applique, and assembly)
Look & feel: Playful, nursery-friendly, whimsical focal point — soft silhouette with textured belly or pom-pom tail.
Materials
- Worsted yarn in main color (approx. 200–350 yards) and small accent color for belly/inner ear.
- Hook: 5.0–6.0 mm.
- Wooden dowel, small pom-pom maker or yarn for tail, tapestry needle, fiberfill for tiny stuffed tail (optional).
- Stitch markers, scissors.
Stitches & techniques used
- Shaping with increases and decreases (sc, hdc, dc), working in rows and rounds for ears, applique techniques to attach belly, optional surface texture (post stitches for fur).
Pattern — silhouette + belly appliqué
Overview: Work a flat silhouette of the rabbit in one piece (or as two pieces: body + ears) and add an appliqué belly and a pom-pom tail. Then mount on a dowel and add fringe.
Silhouette method (flat, worked from bottom up)
- Body base (Row foundation). Ch 30 (width across the widest point for a mid-size rabbit). Row 1: sc in 2nd ch from hook and across; turn. (29 sc) This is the bottom row where we’ll shape upward.
- Increase for body round. Work a few rows of sc to create base width (3–4 rows). Then start shaping: on the next row, add increases (inc at each end) to create belly curve.
- Build midsection. Continue sc or hdc rows until piece measures about 7″ from base. At this point, begin narrowing for neck: dec at each side (sc2tog) every 2–3 rows until width is ~half.
- Head shaping. Switch to smaller increases/decreases to form the head: increase at center for forehead and shape jaw with targeted sc/dc placement. This is freeform shaping — imagine the head as an oval: add rows that increase then decrease symmetrically to make rounded head.
- Ears (make 2). Ears worked flat: ch 8–10 for narrow ear. Work tapered ear: Row 1: sc in 2nd ch across (7–9 sc). Row 2: sc across, then dec at top edge every other row to create tapered tip. Finish with a neat pointed top and sew to top of head. Leave long tails for secure sewing.
- Belly appliqué. With contrasting pale yarn, make an oval: MR, ch 1, 6 sc in ring, pull tight. Round 2: inc in each st (12 sc). Round 3: sc, inc around to yield ~18 sc — stop when the oval size matches the midsection. Shape the oval by making a short row on one side if needed. Sew applique to center of body.
- Tail (pom-pom or tiny stuffed ball). Make a small pom-pom or a tiny stuffed ball. Sew securely to lower back of rabbit.
Alternate simpler silhouette: Use a printable rabbit silhouette as a guide — apply foundation rows and shape to match the outline. Pin the crocheted piece onto the printed silhouette and adjust by adding or subtracting rows.
Texture & embellishment
- For fur texture, consider surface crochet: work a few rows of post stitches (hdc or dc front post) across the body to create ridges.
- Add embroidered eyes and nose with yarn or embroidery thread (avoid small beads for a child’s decor).
Mounting & finishing
- Neaten edges. Work a sc round around the silhouette to stabilize edges. This makes sewing easier and cleaner.
- Backing & dowel pocket. Option A: Sew a rectangle of felt behind the top third and create a fabric channel to slip the dowel through. Option B: Fold the top edge over the dowel and whipstitch through both layers to secure.
- Fringe border. Add short fringe at the bottom or long hanging tassels to create movement and elongate the piece.
- Hanging hardware. Use sturdy cord or leather to hang your dowel; secure with knots and glue if needed.
Nursery-safe note
- If making for a child’s room, avoid small attached parts that could become choking hazards. Sew everything securely or avoid them entirely.
Finishing touches — blocking, mounting & care
Blocking
- For many wall hangings (box stitch, tilted, hexagon cluster, rabbit), a light wet-block or steam block evens stitches and helps motifs sit flat. Pin to shape, let dry fully.
Stiffening
- For structured pieces, spray lightly with diluted PVA (1 part glue : 3 parts water) or use fabric stiffener. Test on a scrap first.
Backing & mounting
- For clean edges and longevity, back with light felt glued or whipstitched on the back. This hides stitches and secures joins.
- Make a pocket (folded top) for a dowel for a minimal look, or sew looped tabs for a rustic dowel to slide through.
Hanging hardware
- Use sturdy cord, leather, or cotton macramé cord. For heavier hangings use wall anchors or two screws to spread weight.
Styling & where to place each hanging
- Box stitch: Above a reading nook, over a low credenza, or above bedsides. Works with mid-century or Scandinavian rooms.
- Tilted: Use as an accent piece in an office or hallway — great for adding movement.
- Boho hexagon cluster: Looks beautiful above a kid’s bed, entry table, or gallery wall among prints.
- Grannytastic: Ideal for a cozy living room wall, layered with framed photos.
- Rabbit: Nursery focal point, seasonal spring display, or charming gift for a baby shower.
Troubleshooting — common questions
Q: My edges ripple.
A: Pin and block; if ripples remain, adjust hook size or add a sc border to pull the edges flat.
Q: How do I make the piece lighter/heavier?
A: Use t-shirt yarn or cotton cord for more structure/weight; use lightweight cotton/thread for airy hangings.
Q: How to hide color joins?
A: Weave in tails along the stitch path and use small mattress stitch joins on the back. Carry color only a few stitches and knot/secure when long floats would show.
Conclusion
Crochet wall hangings are a deliciously flexible way to introduce texture, color and personality into your home. These five projects — from the quilted charm of the box stitch to the playful rabbit silhouette — span a range of techniques, so you’ll stretch your skills while producing beautiful décor. Start small (a hexagon cluster or single granny square panel) or dive deep with a large grannytastic tapestry — either choice will bring warmth, handmade character, and visual interest to any room.