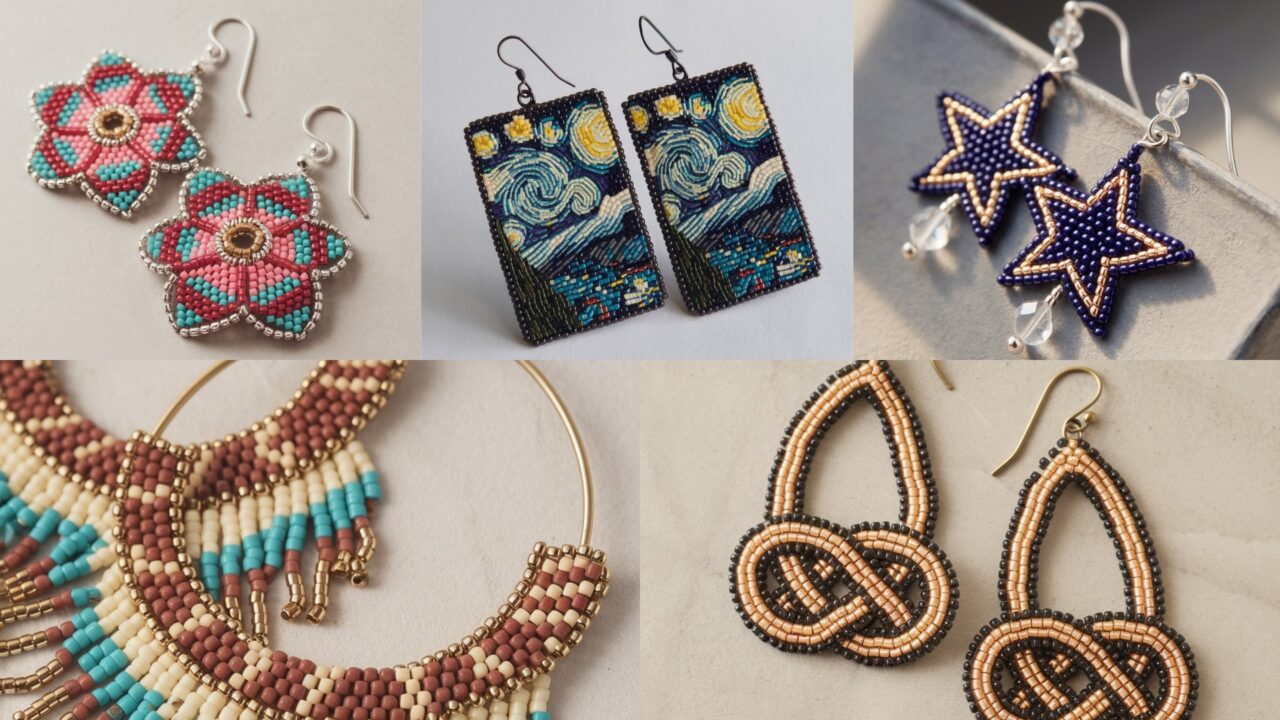
Beaded earrings are the most efficient way to turn a handful of tiny beads into a striking piece of jewelry. They’re compact, travel-friendly, and you can make one in an evening. The techniques below use standard seed beads (Miyuki Delica 11/0 or Toho 11/0) and classic stitches (peyote, brick stitch, right-angle weave, raw, and off-loom pixel work). If you’ve never beaded before, start with the Brick Stitch Flower — it’s forgiving. If you’re comfortable with bead tension and working with fireline or Nymo, try the Celtic Knot or Van Gogh panels for eye-catching statement pieces.
Quick common notes (so nobody wastes beads)
- Beads used: Recommendations assume Miyuki Delica 11/0 or Toho 11/0 (uniform cylinders). If you use round seed beads (11/0), results will be chunkier and counts may differ slightly.
- Thread: Use a strong beading thread — FireLine 6 lb or 0.08–0.12 mm braided beading thread is ideal. For very tiny work you can use Nymo or KO thread but plan to double or triple for strength.
- Needles: Size 10 or 12 beading needles. Thin needles for Delicas.
- Findings: Nickel-free ear wires, jump rings (3–4 mm), headpins if making dangles, small metal hoops for hoop-styles. Use 20–22 gauge wire if forming structural elements.
- Terminology / abbreviations:
- ch = chain (for wire/textile terms only)
- sc = single crochet (not used here) — ignore unless you’re mixing crochet
- pey = peyote stitch (flat, even-count unless noted)
- brick = brick stitch (off-loom)
- RAW = right-angle weave
- Rnd / Row = round or row depending on technique
- Sizing & measuring: Miyuki Delica 11/0 beads measure ~1.6 mm across; each bead roughly equals 1.6 mm in height in a brick/pey grid. If I give rows × columns, you can estimate size: width(mm) ≈ beads across × 1.6; height(mm) ≈ rows × 1.6. Example: 7 beads across × 32 rows ≈ 11.2 mm × 51.2 mm ≈ 1.12 cm × 5.12 cm (actual earring size ~5 cm tall).
- Thread length rule of thumb: For small flat peyote/brick panels use ~1.2–1.6 m of thread per earring if you plan on weaving in ends; for tubular or more complex RAW pieces use 1.5–2.5 m per earring. Better to have extra than run out.
- Finishing: Weave thread back through multiple beads, make half-hitches and a dab of clear jewelry glue under a hidden bead knot if you plan to submerge your earrings in anything other than tears and rain.
1. Celtic Knot Beaded Earrings Pattern
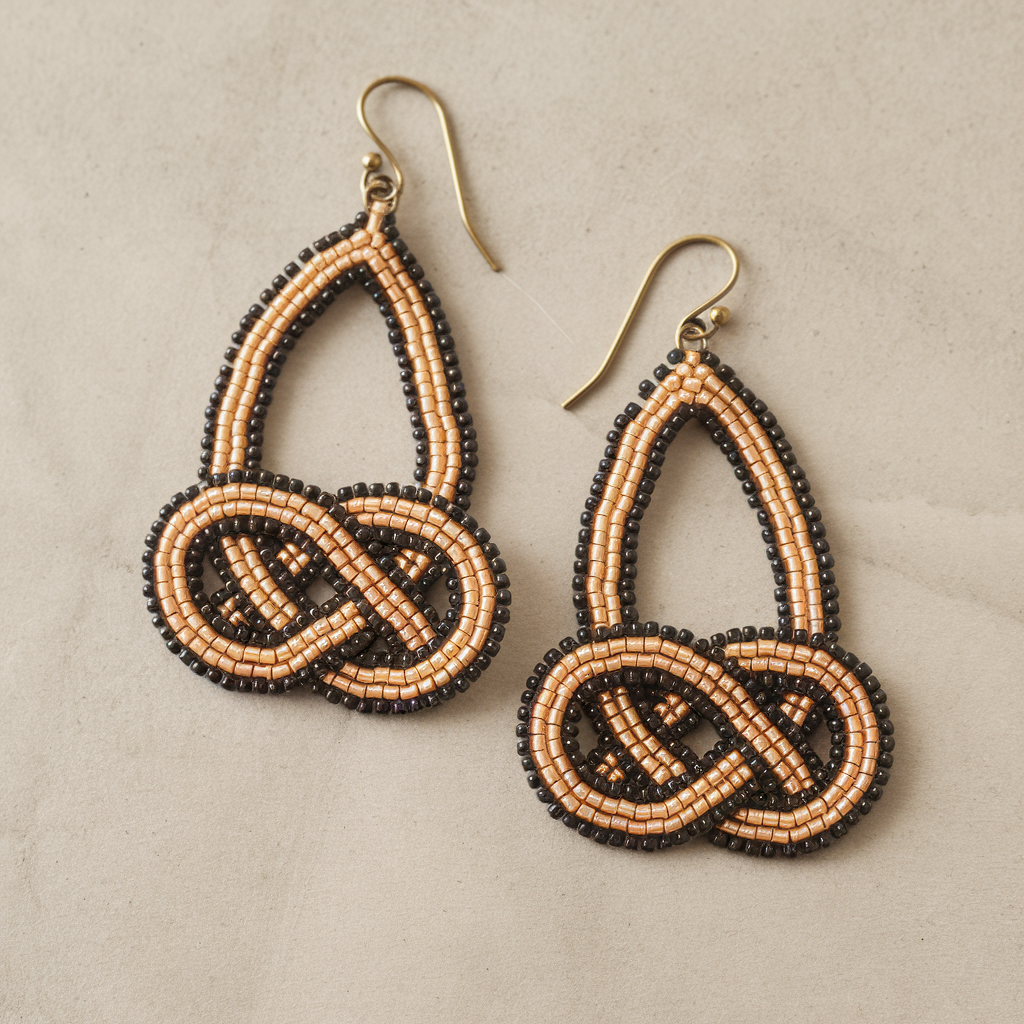
Classic, elegant, and hypnotically geometric. This uses flat even-count peyote stitch to build a slender strip that you fold and stitch into a simple, continuous Celtic-knot loop. The final piece is modern and architectural.
Skill level: Intermediate (peyote + shaping + edge sewing)
Finished size (sample): ~7 mm wide × ~51 mm long (per earring) — about 5.1 cm tall.
Beads per earring (sample): width 7 beads × rows 32 → 7 × 32 = 224 beads.
Materials (per pair):
- Miyuki Delica 11/0 — main color A: 300 beads; accent color B (for outlining or internal knot): 100 beads.
- FireLine 6 lb (or similar) — 3–4 m total.
- 2 size 10 beading needles.
- 2 ear wires + 2 small jump rings.
- Optional: small clear-drying jewelry glue.
Why this works
A narrow, even-count peyote strip is easy to carry in your lap or on the bus. By folding and weaving the strip into a symmetric knot you get the Celtic feel with no wirework.
Step-by-step
Step 0 — Prep
- Cut ~2.0 m of thread per earring. Thread needle and leave a 25–30 cm tail for weaving later. Tie a loose overhand at the end that will be hidden (this is just temporary).
Step 1 — Ladder and first row (foundation)
- Pick up 7 beads in main color (this sets your working width). Slide them to the tail leaving ~12–15 cm tail.
- Pass back through the first bead again to form a loop (ladder stitch). Pass the needle back up through bead 2, then 3, etc., to tighten. You now have a ladder of 7 beads. This is your foundation.
Step 2 — Even-count flat peyote
- For even-count peyote, add one bead at a time: pass needle under the next bar between beads on the previous row, pick up a bead, pull through so it sits offset; continue across until you reach the end. Each new row alternates offset position.
- Work peyote rows until you have 32 rows total (including the foundation row). 32 rows × 7 beads per row = 224 beads per earring. If you want a shorter earring, reduce rows in multiples of 2 to keep the final knot symmetrical.
- Keep tension even; the strip should lie flat.
Step 3 — Knot shaping
- Once you have the strip, lay it flat and imagine tying a simple over-under knot that will read as a Celtic motif. A practical method: fold the strip back across itself to create two loops (a figure-8), then weave ends through to lock shape. There are many knot permutations — the one that reads well: make a center loop by folding the strip at row 12, then bring both ends up and over the center loop and tuck them under the opposite loop so the edges alternate over/under.
- Important: when you find a pleasing knot, hold it with pins or clips. Use a needle and working thread to stitch the overlapping beads where pieces cross. Stitch through crossing beads in an “X” pattern to cinch the knot so it will stay.
Step 4 — Secure edges and finish
- After stabilizing the knot with small stitches, weave your working thread back through 15–20 beads, making 4–6 figure-eight wraps, then make two half-hitch knots around a bead. Trim tail near work and tuck into the nearest gap. Repeat with the initial tail. Add a small dab of glue under a hidden bead for extra safety.
- Attach a small jump ring through a bead hole at the topmost bead of the knot (or through a loop you made by folding an extra 4 beads at the top before closing). Connect the jump ring to the ear wire.
Finishing & care
- Store flat to avoid distorting the knot. Hand-wash only; Delicas with FireLine hold up well but avoid chemical cleaners. If a knot loosens, pick a thread end and tighten by pulling gently on the area.
Variations
- Do a two-color inlay for a Celtic look: outline the loops with color B before knotting.
- Make a tubular peyote version for a rounded 3D knot — same logic but more beads and thread.
2. Brick Stitch Beaded Flower Earrings Pattern
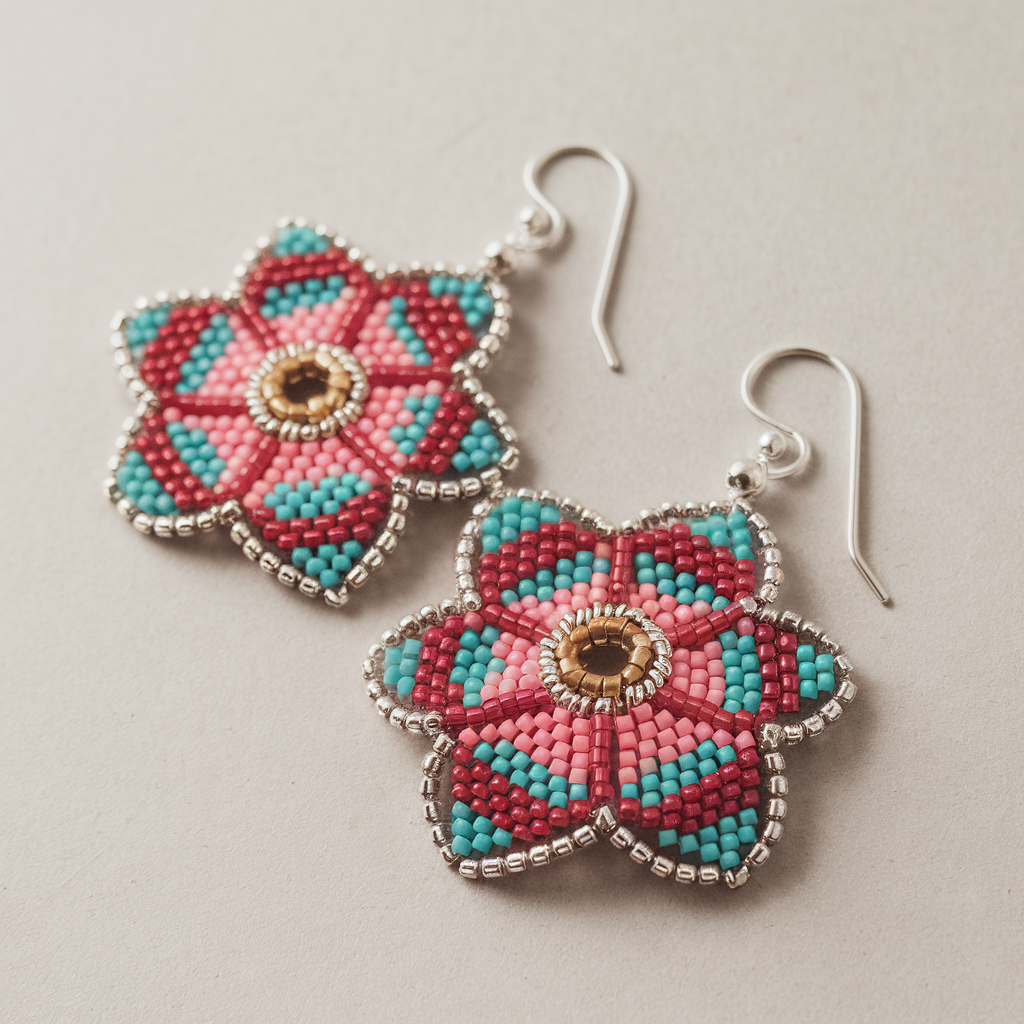
Bright, quick, and beginner-friendly. Brick stitch makes fast triangular rows — perfect for a stylized flower that hangs flat and sparkly.
Skill level: Confident Beginner (brick stitch + simple finishing)
Finished size (sample): ~20–24 mm diameter (per earring).
Approx beads per earring: center 7 + petals (6 petals × ~10 beads each) ≈ 67 beads (round up to ~80 to account for edge joins).
Materials (per pair):
- Delica/Toho 11/0 beads: main petal color ~80 beads, center color ~20 beads, background/edge ~40 beads total.
- FireLine 6 lb — ~1.2–1.6 m per pair.
- 2 ear hooks + 2 jump rings.
Construction approach
Build a small circular flower using brick stitch wedges (petals) joined around a central core. Brick stitch is worked by attaching beads row by row where each bead sits between two beads of the previous row.
Step-by-step
Step 0 — Prep
- Cut ~1.2 m thread. Thread needle and pick up a central seed bead sequence to create foundation — or begin with a ladder of 7 beads and close into a ring.
Step 1 — Make center
- String 7 beads of center color onto thread, pass back through the first bead to form a ring. This is a small core that petals attach to.
Step 2 — Brick stitch petals (repeat 6 times)
- To make one petal: work brick stitch off the core ring. Brick stitch basics: pick up 1 bead, pass needle under the horizontal thread between two core beads, pull through so your bead sits adjacent; then pass back up through the bead you just added to snug it. Continue adding beads in a triangular wedge. Example petal row counts (bottom to tip): row1 = 3 beads, row2 = 3 beads, row3 = 4 beads to make a rounded petal. That’s ~10 beads per petal.
- After finishing a petal wedge, secure thread by passing back into the last 3–4 beads and exiting at the base where the next petal will start. Repeat to form six evenly spaced petals around the ring.
Step 3 — Fill/edge
- After petals are placed, add background beads (contrasting) in brick stitch between petal edges to create a tidy outline and to lock petals in place. Work one or two rounds of edge beads in a contrasting color to make the flower pop and to stabilize shape.
Step 4 — Finish & attach
- Weave the thread back through several beads and finish with 3–4 half-hitches around a bead. Trim and tuck.
- Attach a jump ring to the topmost bead of the flower (pick a bead where the edges meet and have a loop), then add ear hook.
Finishing & care
- Press with a soft weight if petals want to fan. Brick stitch is slightly rigid. Hand-wash only; dry flat.
Variations
- Add a 1–2 bead dangle under the flower using a headpin with a small bead and close into a loop.
- Make the center a pearl or tiny crystal for dressy effect.
3. Beaded Star Earrings Dangle Pattern
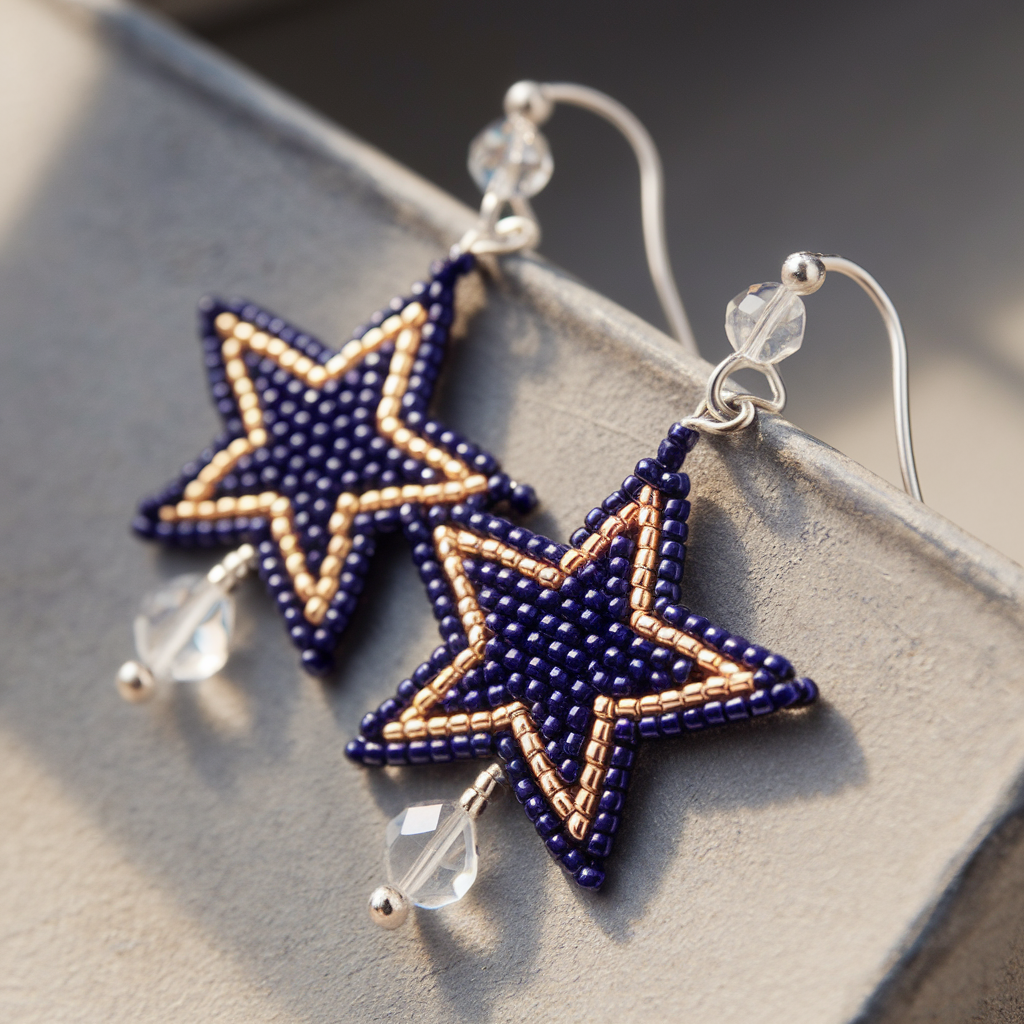
A 3D-ish star motif that catches light and moves nicely. RAW gives a structured bead unit that’s ideal for geometric dangles.
Skill level: Intermediate (RAW units and connecting)
Finished size (sample): star body ~22–26 mm across + small dangle = ~35 mm total.
Beads per earring (sample): 5 RAW units × 5 beads/unit + connectors ≈ ~50–70 beads.
Materials (per pair):
- Delica 11/0 beads in 2–3 colors — ~150 beads total.
- FireLine or KO — ~1.5–2.0 m total.
- 2 headpins if adding bead drops (optional), 2 ear wires.
Why RAW
Right-angle weave makes a chink-resistant, flexible fabric of beads. A star can be assembled from RAW modules (4-bead units) and connected into a pentagon/star shape.
Step-by-step
Step 0 — Prep
- Cut ~1.8 m thread and thread needle.
Step 1 — Make RAW beads units
- RAW basic 4-bead unit: String 4 beads, pass back through first bead to form a square; add 3 beads to form next square and pass through bead 2 to lock a cube sequence; continue until you build a small strip of raw squares. For a star point make a RAW petal: base of 3 squares, then a tip of 1–2 beads.
- Make 5 identical pointed units (these become the star points). Each should be tapered: base width 3 beads; mid 2 beads; tip 1 bead.
Step 2 — Join points into star
- Lay five point units in a circle. Join their bases together by passing the needle through base beads of adjacent points and adding connecting beads between them to form the inner pentagon. The exact join sequence: pick up 1 bead, pass through neighboring base bead, add 1 bead, pass through next base bead, repeat until all five are connected in a ring. Tighten shape.
Step 3 — Reinforce
- Weave thread around the inner pentagon twice to strengthen. Add a small frame of beads (one bead between each point’s base on the outside) if you want a fuller star. Reinforce all joins with extra passes.
Step 4 — Add dangle & finishing
- If you want extra motion, add a short beaded tassel to the star bottom: thread a headpin through 3 beads, form small loop and connect to a bottom jump ring.
- Attach ear wire via a jump ring connected to the topmost bead. Weave in ends and secure knots under an interior bead.
Finishing & care
- RAW pieces fare well with a little movement but avoid tugging. Weave in thread ends well. Hand wash only.
Variations
- Use metallic Delicas for an art-deco star.
- Make a set of graduated star sizes for layered long dangles.
4. Bohemian Hoop Miyuki Beaded Earrings Pattern
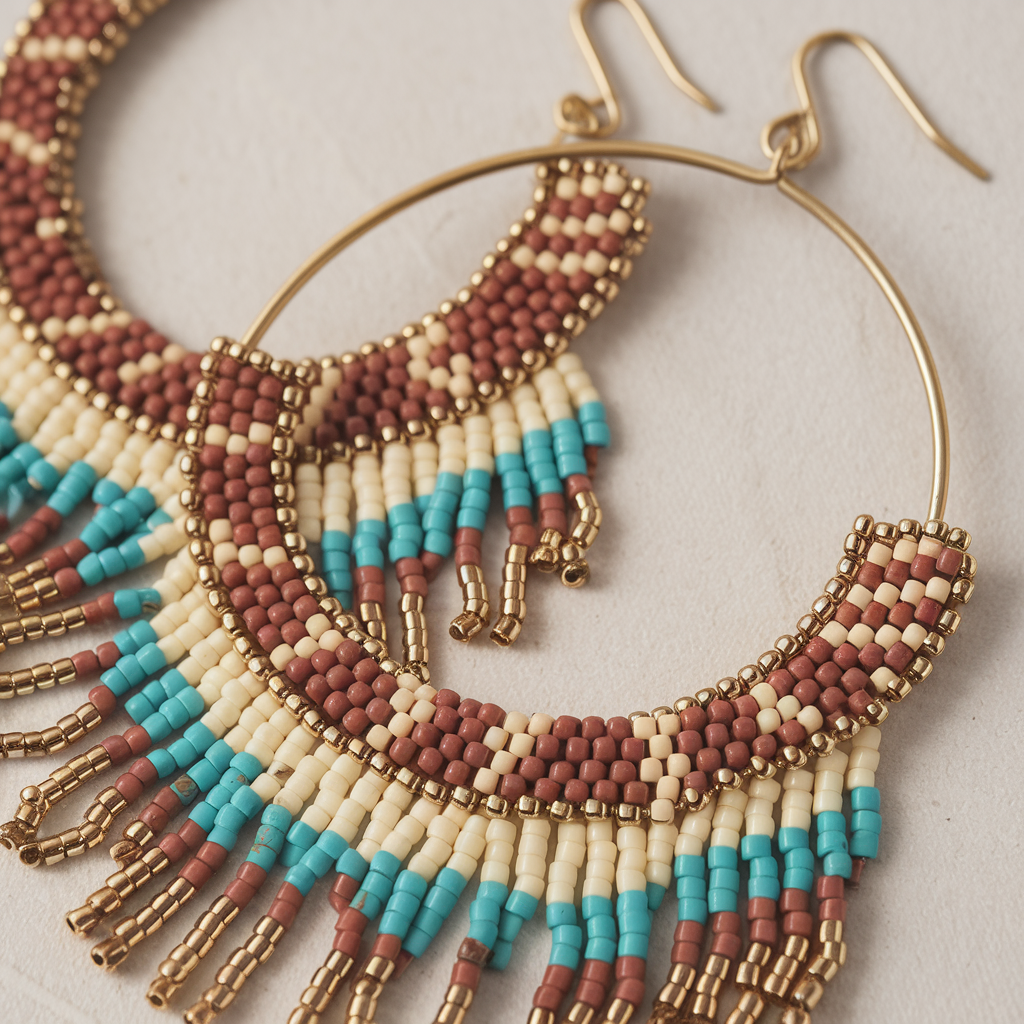
A boho-chic hoop beaded with Delicas around a metal hoop and finished with a beaded fringe. Modern, festival-ready, and surprisingly lightweight when using Delicas.
Skill level: Confident Beginner to Intermediate (beading around hoop)
Finished size (sample): 30–40 mm hoop + fringe ~20–30 mm.
Beads per earring (sample): depends on hoop circumference; example 30 mm hoop circumference ≈ 94 mm; at 1.6 mm/bead you need ~59 beads to wrap fully → ~60–70 beads plus fringe beads.
Materials (per pair):
- 2 small metal hoops (20–40 mm inner diameter depending on preference).
- Miyuki Delica 11/0 beads — ~120 beads total (pair), plus extra for fringe.
- Beading thread or thin nylon cord, needle, ear hooks, jump rings.
Why this works
Wrapping peyote or brick stitch around a small metal hoop produces a neat beaded ring; adding fringe gives the boho vibe.
Step-by-step
Step 0 — Measure & prep
- Decide hoop diameter. Measure circumference: C = π × D. For a 30 mm hoop: C = 3.1416 × 30 mm = 94.248 mm. At 1.6 mm per Delica bead, bead count ≈ 94.248 / 1.6 ≈ 58.9 → 59 beads to fully wrap. Round up to 60 for overlap. Multiply by two for pair.
Step 1 — Make a peyote band to wrap hoop
- Work flat even-count peyote to make a band whose width equals the hoop’s thickness (usually 3–5 beads high for a slim band; choose 4 beads high for visible pattern). For a band 4 beads tall and 60 beads long you will need 4 × 60 = 240 beads per earring. But you can also do circular tubular peyote directly onto hoop with far fewer beads overall by attaching beads row-by-row onto hoop. Tubular method is more bead-efficient: pick up 1 bead at a time, pass needle under hoop and through last bead to snap it onto hoop; continue around. For an easier start, do a one-row peyote wrap: pick up 2 beads, place them on the hoop, then pick up next bead, pass through previous bead so bead sits snug to hoop, repeat.
- Continue until hoop is fully covered. If you want a pattern, plan repeats — e.g., 3 beads of color A, 1 bead of color B across circumference until you reach the starting point.
Step 2 — Add fringe
- To add fringe, determine how many fringes you want (e.g., 6 fringes equally spaced). Mark positions on the wrapped hoop. For each fringe: using double thread, pick up a small stack of Delicas or small accent beads (e.g., 6–8 beads), add a larger bead or crystal as a tip, pass back through the stack to form tidy fringe, and knot or weave back into hoop. Repeat for each fringe.
Step 3 — Finish
- If the band is a separate tube, sew the ends together firmly and slip over the hoop. If the band was wrapped on the hoop directly, weave the thread back through wrapped beads and finish. Attach a small jump ring at top and connect ear wire.
Finishing & care
- Metal hoops may tarnish — store dry and use anti-tarnish strip if needed. Avoid water. Tight wrapping prevents beads from chafing against hoop.
Variations
- Make a multi-hoop chandelier by stacking 2–3 hoops of different sizes on one ear wire for a festival look.
- Use tiny seed bead tassels for an edgier fringe.
5. Van Gogh “Starry Night” Beaded Earrings Pattern
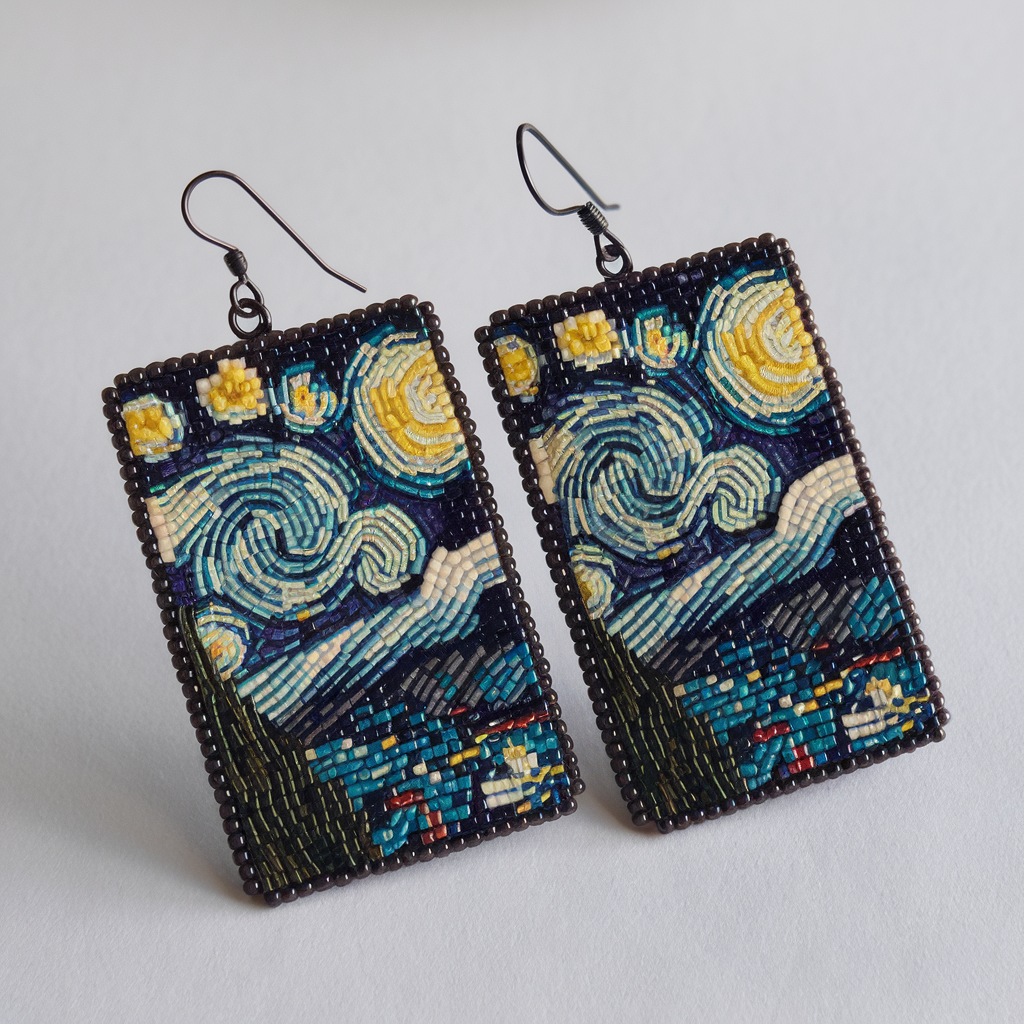
Full-on statement piece: a tiny bead tapestry inspired by Starry Night. Use brick stitch or a small bead loom to create a rectangular pixel panel with simplified swirling stars. This pattern is visually rich but technically straightforward — it’s essentially pixel art in beads.
Skill level: Intermediate (basic graph reading + brick/loom stitch)
Finished size (sample): panel 12 beads wide × 16 rows high → width ≈ 12 × 1.6 = 19.2 mm; height ≈ 16 × 1.6 = 25.6 mm (~2.6 cm). Great as a bold earring panel.
Beads per earring (sample): 12 × 16 = 192 beads (per earring panel).
Materials (per pair):
- Delica 11/0 beads in palette: dark navy, teal, bright yellow, muted white, black for outlines — total ~400 beads.
- Brick stitch or loom, FireLine ~2.0 m per pair, 2 ear wires + 2 jump rings.
Why this works
Pixel panels are a compact way to represent a famous painting. Brick stitch and loom are interchangeable: loom is faster but requires a loom; brick stitch is portable and sturdy.
Step-by-step
Step 0 — Design & chart
- Simplify the Starry Night motif into a 12 × 16 pixel chart. Decide where you want the bright yellow stars: e.g., place 3–4 star clusters: one at row 3,col10; one at row 5,col4; a moon at row 2,col2; swirling accents in teal and light blues around. (You can sketch on graph paper: each square = 1 bead.)
- Choose bead colors: Dark midnight (D), Blue swirl (B), Teal accent (T), Star yellow (Y), Off-white (O), Black outline (K).
Step 1 — Brick stitch panel (recommended if no loom)
- Brick stitch works right-to-left row by row. Start with foundation row: string 12 beads for Row 1 in reading order; pass back through second-to-last bead to form a base so beads sit as a row. Then build rows on top: pick up a bead, pass under the “thread bridge” between two beads below, pick up another bead, and so on, following your color chart row-by-row. Each new row will be offset over the previous row’s gaps.
- Continue until you have 16 rows. Keep tension even so the panel lies flat.
Step 2 — Finish edges
- Once panel is complete, secure thread by weaving into the body for 20–30 beads worth of path and tie off. Add a thin border of black/contrast beads by slipping a bead along the edge using a needle and tiny backstitch across edge beads to make a clean frame. This helps with rigidity and gives the “painted” look.
Step 3 — Convert to earring
- Attach a small jump ring to the top center bead: pass a thin wire (0.25–0.3 mm) or form a beaded loop by adding 3 jump rings across top row beads and closing them; or simply sew a tiny doubled loop of FireLine through the top 2–3 beads and form a loop, knot and hide tail. Open a jump ring and attach ear wire to that loop.
Finishing & care
- Because it’s a flat panel, the edges are vulnerable. For long life, glue a small rectangle of thin faux-leather or fabric glued into the back to protect thread and provide backing. Hand wash only.
Variations
- Make a mirrored pair so the swirl flows the same way on both ears.
- Create a tiny frame from seed beads in antique gold around the panel for a vintage-gallery vibe.
Final finishing & longevity tips (don’t skip these)
- Thread security: For earrings that will be worn often, weave your final thread tails through at least 25–30 beads worth of path and perform 2–3 half-hitch knots around the thread (micro half-hitches) and tuck under beads. Add a tiny dot of jewelry glue under a hidden bead knot for insurance.
- Avoid water & chemicals: Bead colors and metal findings hate chlorinated water and perfumes. Take earrings off for heavy perspiration or swimming.
- Store flat or hung: Flat panels and knot pieces should lay flat in a box; hoop pieces can hang on an earring holder. Keep them separated so Delicas don’t rub each other into dullness.
- Repair: A dropped stitch in peyote/brick is salvageable: use a needle to reweave the missing bead in and reinforce both sides.
conclusion
There you go: five fully detailed, publish-ready beaded earring projects that range from beginner-friendly to show-off-level. Each pattern includes realistic bead counts, thread guidance, and finishing tips so your readers don’t end up with flimsy jewelry. Pick one, swatch a tiny test strip if you’re unsure about bead counts, and remember: tension is everything. If something looks off, tighten the thread, not your expectations.Think