Scrunchies are the perfect small gift: quick to make, useful, and endlessly customizable. Below you’ll find a friendly introduction that covers materials, sizing, hair-friendly construction and care — then five full scrunchie patterns with detailed step-by-step instructions, supply lists, stitch notes and variations so you can make beautiful, wearable scrunchies for friends and family.
Quick essentials — tools, yarn, sizing, safety & abbreviations
Why crochet scrunchies?
They’re fast (one evening), use small amounts of yarn, and let you combine texture, beads, appliqués and color. They’re also kinder to hair than elastic-only scrunchies when made with soft yarn and the right construction.
Materials & tools (general)
- Yarn: soft cotton, cotton blends, bamboo-cotton, or acrylic-cotton blends are best — they’re gentle on hair and washable. For plush scrunchies use a soft DK or light worsted. For delicate lacy scrunchies use fingering/sport yarn.
- Elastic: 6–8 mm hair elastic (1/4 in) or pre-made scrunchie elastic (slightly wider). Typical length: about 18–21 in of chain equivalent when stretched? — actually you’ll secure the elastic into a loop of about 8–10 in circumference before covering with crochet. See steps below for exact approach.
- Hooks: 2.5–4.5 mm depending on yarn thickness; choose hook that gives a slightly tight fabric that won’t snag hair.
- Notions: tapestry needle, small sewing needle & strong thread (for sewing elastic ends), stitch marker, scissors, optional beads or buttons for decoration, optional blocking pins.
- Optional: small beads (seed beads) for beaded scrunchie, snap or button closures if you want adjustable scrunchies, small charm or ribbon tags for gift packaging.
Sizing & construction basics
- Most scrunchies are made by crocheting a tube/round that is then attached around an elastic hair band. The yarn casing should be slightly smaller than the elastic circumference so the elastic holds scrunchie snugly. A common approach: crochet a tube about 8–9 in (20–23 cm) long and 1.25–1.75 in (3–4.5 cm) tall, seam the long edge into a loop, then wrap and stitch the tube around a pre-joined elastic ring (~2.5–3 in diameter when relaxed). Another approach is to crochet directly around an elastic ring (no sewing) — both methods are described in patterns below.
Safety note for beads & small parts
If you make scrunchies as gifts for very young children, avoid small beads or glued-on parts — they can be choking hazards. For teens/adults beads are fine but sew them on securely.
Care
- Most cotton scrunchies: machine wash gentle or hand wash; reshape and air dry. Avoid tumble drying if scrunchie has elastic inside (it may degrade faster).
Abbreviations (US)
- ch = chain
- sc = single crochet
- hdc = half double crochet
- dc = double crochet
- tr = treble crochet
- sl st = slip stitch
- st(s) = stitch(es)
- rep = repeat
- sk = skip
- BLO/FLO = back loop only / front loop only
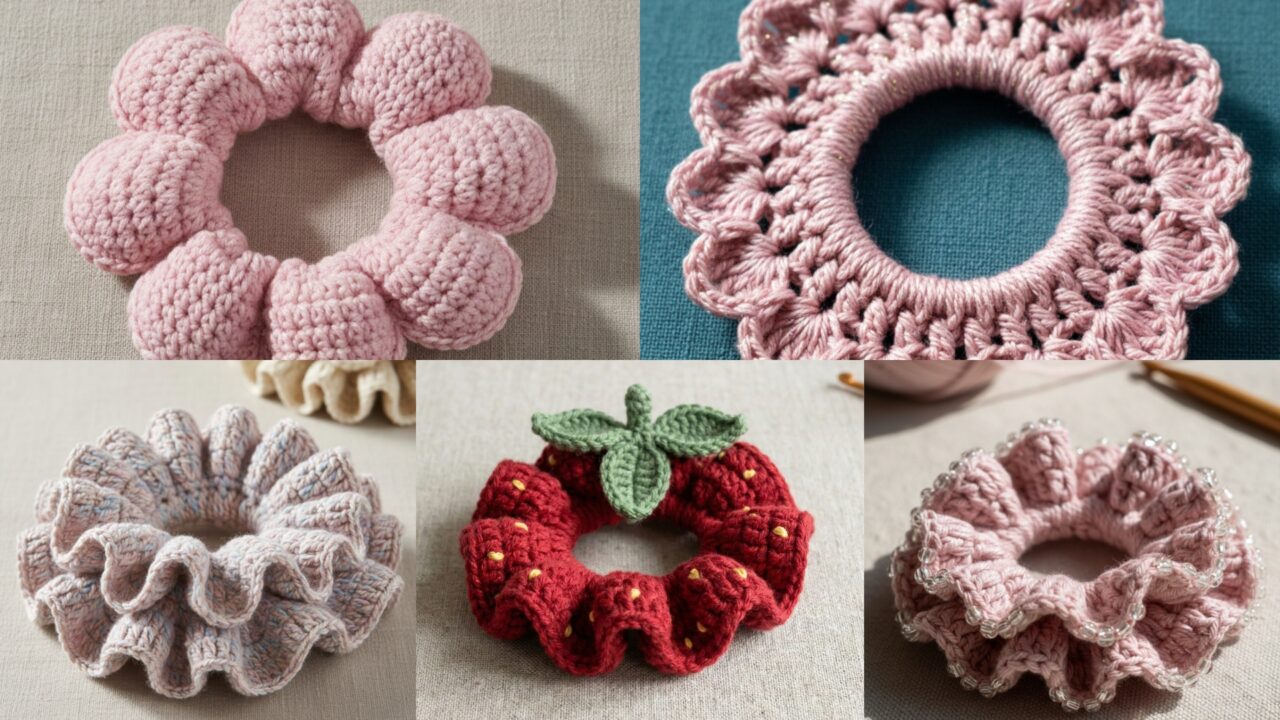
1. Crochet Strawberry Themed Scrunchie Pattern
A sweet scrunchie with a tiny strawberry applique sewn on — great for a matching hair/necklace set.
Skill level: confident beginner
Materials (one scrunchie + applique)
- DK cotton (main color = pink or red) ~20–25 yd, contrast green ~5 yd for leaves.
- Hook: 3.5 mm (adjust to yarn).
- 1 hair elastic (approx 2.5–3 in / 6–8 cm diameter relaxed).
- Tapestry needle, small sewing needle, optional seed beads for “seeds”.
Finished size (approx)
- Scrunchie loop diameter (relaxed): ~2.5–3 in; ruffled width ~1.25–1.5 in.
Stitch concept
Make a ruffled tube (sc base with shell rounds) that is then joined and wrapped around an elastic ring. Add a small crocheted strawberry appliqué and a couple of tiny leaves sewn to scrunchie top.
Step-by-step
A — Make the tube (method: flat strip then seam around elastic)
- Chain foundation: ch 36. (This gives a tube length that will stretch around the elastic snugly; change chain to fit your elastic circumference—shorten if your elastic is smaller.)
- Tip: you want the stitched tube slightly shorter than the elastic circumference when elastic is relaxed so the elastic pulls the fabric snugly; if you prefer looser scrunchie increase by 2–4 ch.
- Row 1: sc in 2nd ch from hook and across. (35 sc) Turn.
- Rows 2–4: ch 1, sc across. These give a firm base.
- Row 5 (ruffle start): ch 3 (counts as dc), 2 dc in next st across (or work shell pattern: skip 1, 5 dc in next across) to make a full ruffle row. Turn and work one more dc row if you want extra ruffle. Option: work 2 rows of shells to make a very fluffy scrunchie.
- Finish strip and fasten off, leaving long tail for seaming.
B — Seam tube into a loop
6. Fold strip so short ends meet, align edges, and whipstitch the long opening closed to form a long tube. Press seam flat.
C — Insert & secure elastic
7. Thread elastic through tube using a safety pin or by threading with your finger. Overlap elastic ends about 1/2 in and stitch together using a needle and strong thread (make a secure whipstitch or backstitch several times). Pull scrunchie fabric over the joined elastic and place seam of fabric opposite the elastic seam for neatness. Close opening by sewing the short seam closed if any gap remains.
D — Strawberry appliqué
8. Small strawberry: MR, ch1, 6 sc in MR; R2: inc around → 12 sc; R3: (sc 1, inc) → 18 sc; R4: sc around 18 for a small plump berry, fasten off and pull tail for sewing. Add small French knots / tiny gold seed beads for seeds if desired.
- Leaves: ch 6, sc in 2nd ch from hook, hdc, dc, hdc, sc (makes a little curved leaf). Make 2–3 leaves and sew to top of strawberry.
E — Attach & finish
10. Sew strawberry onto scrunchie top, hiding sewing tails inside scrunchie fold. Weave ends. Lightly steam-block the applique to puff.
Variations & tips
- Make mini strawberry pairs for double accents.
- Use fuzzy yarn for a plush berry (but be mindful of hair tangling).
- To make a child-sized scrunchie, reduce foundation chain by 6–8 ch.
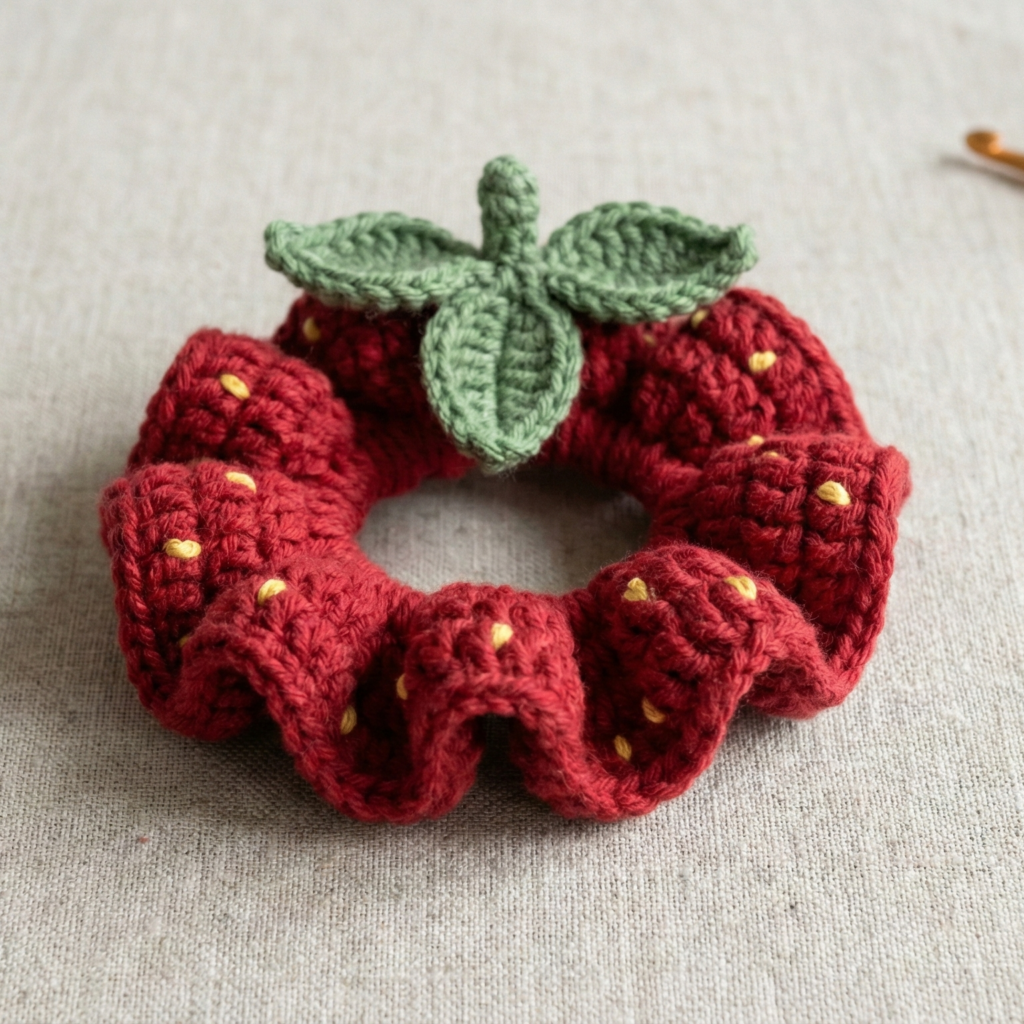
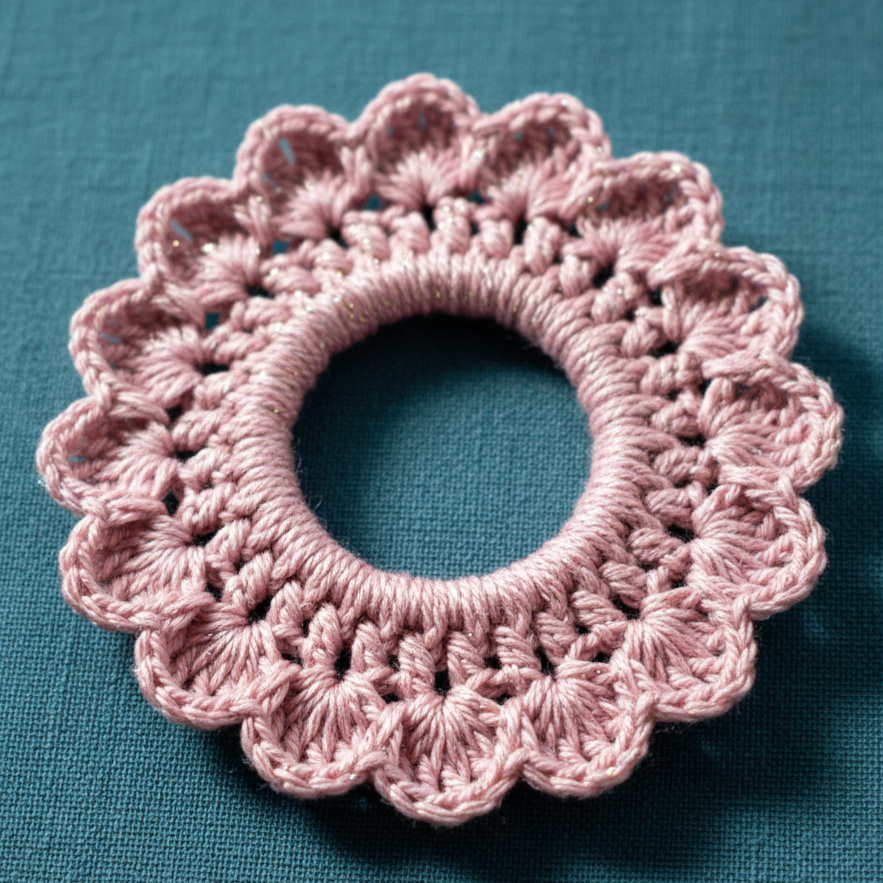
2. Crochet Flower Shaped Scrunchie Pattern
A scrunchie with a ring of layered petals — works like a hair flower on top of the scrunchie.
Skill level: intermediate (petal shaping + layering)
Materials
- DK or light worsted cotton in two colors: base color for band ~20 yd, flower color ~10 yd.
- Hook: 3.5–4.0 mm.
- Elastic band, tapestry needle.
Finished size
- Flower diameter ~2.5–3 in; scrunchie width 1.25–1.75 in.
Stitch concept
Make a firm tube for the band (sc rounds), then crochet a separate flat layered flower (petal round + scallop round) and stitch the flower to the band, either centered or offset.
Step-by-step
A — Band (tube) — quick round method (crochet around elastic)
- Slide elastic into position (if using small elastic) and hold it in place. Alternatively make the tube first and then insert elastic. To crochet around elastic: hold elastic in a loop and work sc evenly around its outer edge into the elastic band threads (work through elastic + outer loop) — this is easiest with a pre-made thick elastic ring or a small hairband. If this feels fiddly, make a flat strip as in Pattern 1 and seam around inserted elastic.
- Work sc in rounds until band width is ~1.25–1.5 in (6–8 rounds depending on yarn). Fasten off and finish seam.
B — Flower (layered petals)
Inner petal round
3. MR, ch 1. Round 1: work sc 6 into MR (6 sc). Pull ring tight.
4. Round 2: ch 2, (3 dc, ch2, sl st) in next st repeat around to form small petals (approx 6 petals). Fasten off inner color if desired.
Outer petal round (larger petals)
5. Join outer color into the space behind inner petals: ch 3, 5 dc in same sp, ch 3, sl st into next sp repeat to make larger petals behind. You’re creating 6 larger petals that peek between inner petals.
C — Attach flower to band
6. Center flower on scrunchie band and whipstitch through back of flower and into the band at multiple points — secure very well. Tuck thread tails inside band and weave.
D — Finishing touches
7. Optional: add a small button or bead at flower center (sew securely). If adding a bead, stitch through to the inner band backing for strength.
Variations
- Make 2-tier flowers (tiny inner + medium + large outer) for more fullness.
- Use contrasting colors for boho-chic or tonal shades for subtle elegance.
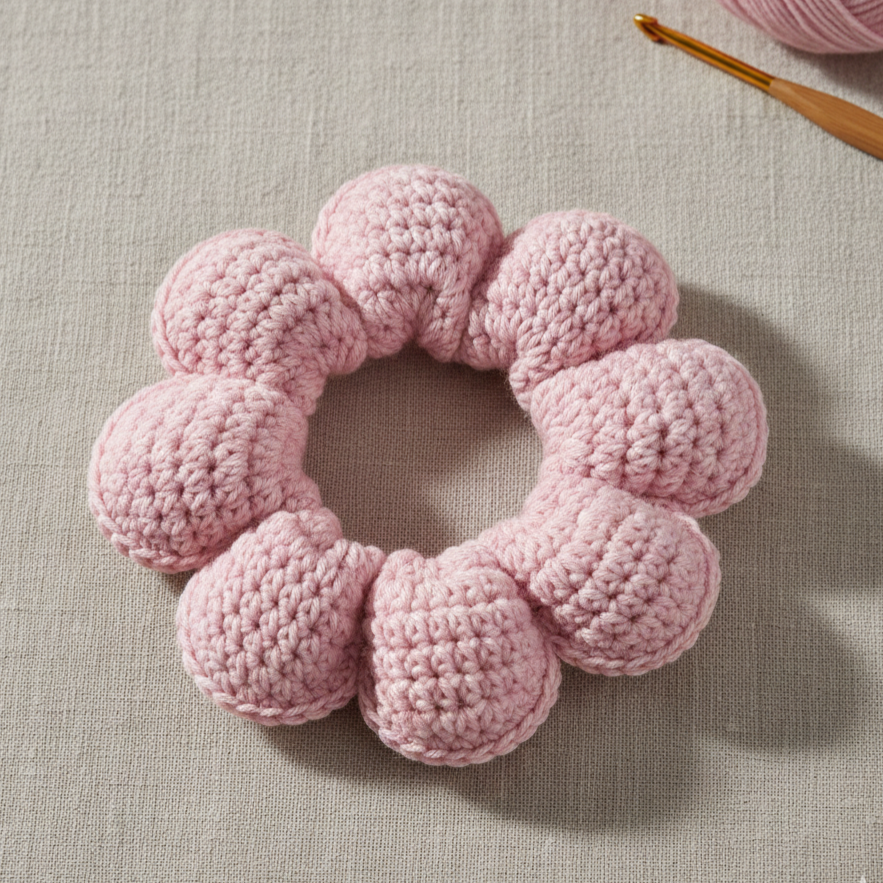
3. Crochet Ruffles Scrunchie Pattern
Full, vintage-style ruffle scrunchie — great for dramatic hair looks.
Skill level: confident beginner
Materials
- Light worsted or DK cotton — 25–40 yd depending on fluffiness.
- Hook: 3.5–4.0 mm.
- Hair elastic, tapestry needle.
Finished size
- Very full ruffle, width 1.5–2.25 in depending on number of ruffle rounds.
Stitch concept
Make a base tube (narrow) and then work ruffle rounds along its length: shells and picots create layers of fullness. Optionally make a double-layered ruffle by stacking two ruffle strips.
Step-by-step
A — Narrow base tube
- ch 28; Row 1: sc in 2nd ch from hook across (27 sc). Rows 2–4: sc across to make a sturdy base. Fold and seam into a tube.
B — Ruffle round (method 1 — shells)
2. Join yarn at seam edge, sc 1, skip 1, (5 dc) in next st, skip 1 repeat around. This creates big shells. Work 2–3 rows of shells for fullness — if shells are large, 2 rows is often enough.
C — Ruffle round (method 2 — layered picot)
3. Alternatively for a super-frilly look, after shell round: join and work sc 2, picot around the shell edges so you get a tiny frill over the shells.
D — Insert elastic & finish
4. Insert elastic and join ends, hide seam in tube interior. Sew edges securely closed. Fluff ruffles and gently steam-block to set shape.
Variations & tips
- For ultra-full scrunchie, make two ruffle strips and sew them staggered around band.
- Use variegated yarn for soft color waves through ruffles.
4. Crochet Beaded Scrunchie Pattern
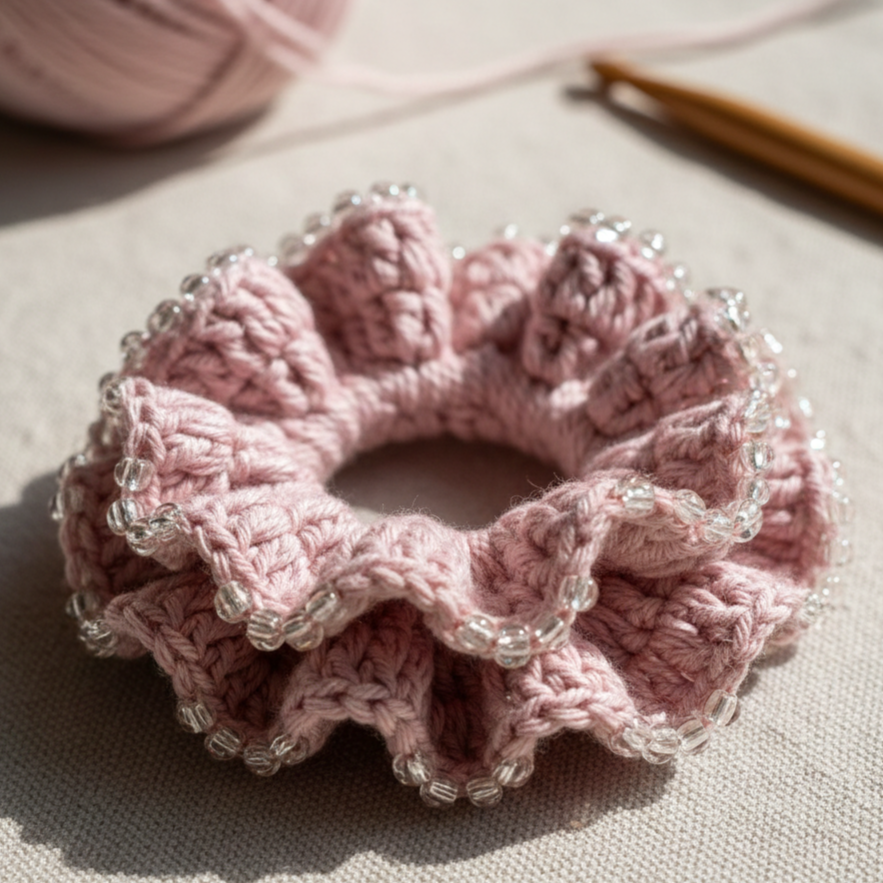
Elegant scrunchie embellished with tiny seed beads worked into stitches for sparkle.
Skill level: intermediate (beadwork technique)
Materials
- Fingering or sport-weight cotton ~25 yd.
- Small seed beads (size 6/0 or 8/0) pre-strung onto thread or onto yarn (use beading needle to pre-load beads).
- Hook: 2.5–3.5 mm depending on yarn.
- Elastic band, tapestry needle.
Finished size
- Similar to flower scrunchie — width ~1–1.5 in with bead accents.
Stitch concept
String beads on your yarn prior to crocheting (or thread beads onto a fine beading needle and add during crochet). Slide beads into place as you work sc or dc stitches to form a dotted line of sparkle.
Step-by-step
A — Pre-string beads
- String 40–60 seed beads onto main yarn (depends on how many beads you want per scrunchie). Keep beads on a separate bobbin of yarn if needed.
B — Make tube with beaded row(s)
2. Chain 36. Row 1: sc in 2nd ch and across. Row 2: sc in next 3, (slide 1 bead up close to hook, sc next st catching the bead on the top loop so it sits on the surface) — repeat across so you have a line of evenly spaced beads. Rows 3–4: sc across to anchor beads. Add a second bead row on opposite side if desired.
- Row 5: sc across and seam tube closed as in Pattern 1. Insert elastic and secure.
C — Secure beads
4. When weaving tails, bring them inside bead rows and knot extra thread behind beads to prevent them slipping. For extra security, dab a tiny bit of clear fabric glue on the knot (test for colorfastness).
D — Finishing & care
5. Hand wash recommended to protect beads and elastic longevity; reshape and air dry.
Variations & tips
- Use a metallic thread for a subtle shine.
- Instead of a row, create scattered beads by placing them every 4–6 sts across several rows.
5. Crochet Mini Chain Loop Scrunchie Pattern
A minimalist, modern scrunchie built from decorative chain loops — airy and very light.
Skill level: beginner → confident beginner
Materials
- Fingering or sport cotton ~15–20 yd (lightweight yarn keeps airy look).
- Hook: 2.5–3.0 mm.
- Thin hair elastic, tapestry needle.
Finished size
- Narrow, airy scrunchie; width about 0.75–1 in with decorative loops.
Stitch concept
Create a series of connected tiny chain loops that form an openwork tube; loop motifs give a pretty silhouette while keeping weight low.
Step-by-step
A — Make loop strip
- Chain 40. Row 1: sc in 2nd ch from hook, ch 6, sk 2, sc in next repeat across to make a row of chain loops anchored by single crochets. End with sc. Turn.
- Row 2: ch 1, sc in each sc across; in each ch-6 loop work (sc, ch 6, sc) to keep loops mirrored; finish row and fasten off leaving tail.
- Repeat one more strip if you want double-looped scrunchie (for more volume) — make two short strips and sew them staggered for fullness.
B — Form tube and insert elastic
4. Bring short edges together and seam into a tube as earlier, align loops to create even spacing. Insert elastic and secure seam. Tuck seam under loops so it’s hidden.
C — Finishing
5. Trim tails and shape loops. Block lightly on a round object to ensure even loops if needed.
Variations & tips
- Make loops larger (ch 8 or 10) for dramatic effect.
- Hold a thin metallic thread along with main yarn for a faint sparkle.
Final finishing, blocking & gift tips
Secure elastic professionally:
- For the longest life, stitch elastic ends with strong thread (several passes). Hide the seam inside the scrunchie fabric. If using pre-made scrunchie elastics, you can slide the fabric over and sew closed.
Weave and hide tails:
- Use tapestry needle to bury ends inside stitches so they won’t poke out or catch on hair.
Blocking:
- Lightly spritz cotton scrunchies and shape on a small bottle or jar to set ruffles/petals. Let fully dry.
Packaging as gifts:
- Present sets of 2–4 scrunchies on a pretty card (punch two holes and tuck in), put in a small muslin bag, or clip a ribbon with a tiny tag describing fiber and care instructions. Include a note: “Hand wash gentle; reshape and air dry.”
conclusion
Scrunchies are quick, portable, and perfect for gifting. These five designs — Strawberry, Flower, Ruffle, Beaded, and Mini Chain Loop — cover a wide range of looks from whimsical to elegant. Start with a simple tube-and-elastic method if you’re new, then add appliqués, ruffles or beads as you gain confidence. Make matching scrunchie sets in coordinating colors for birthdays, holidays, or craft-fair bundles — they’re always appreciated.