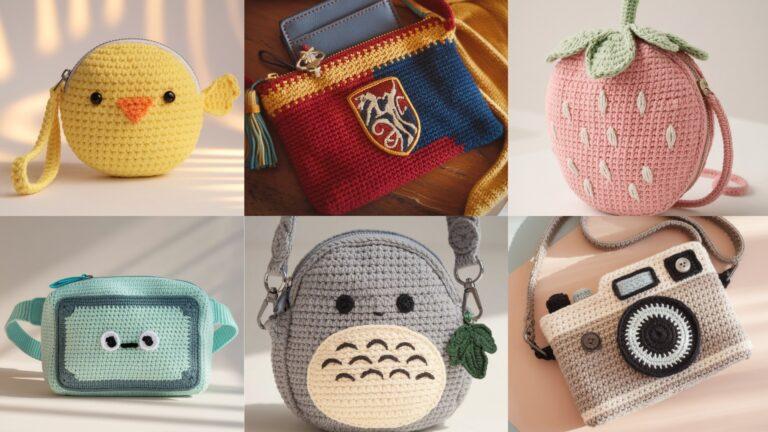
Crochet scrunchies are one of the easiest and most rewarding accessories you can make. They are quick, practical, and endlessly customizable, which makes them a perfect project for beginners and experienced crocheters alike. A handmade scrunchie can add a soft, personal touch to any hairstyle while also being gentle on the hair, especially when you choose smooth yarn and a comfortable elastic base.
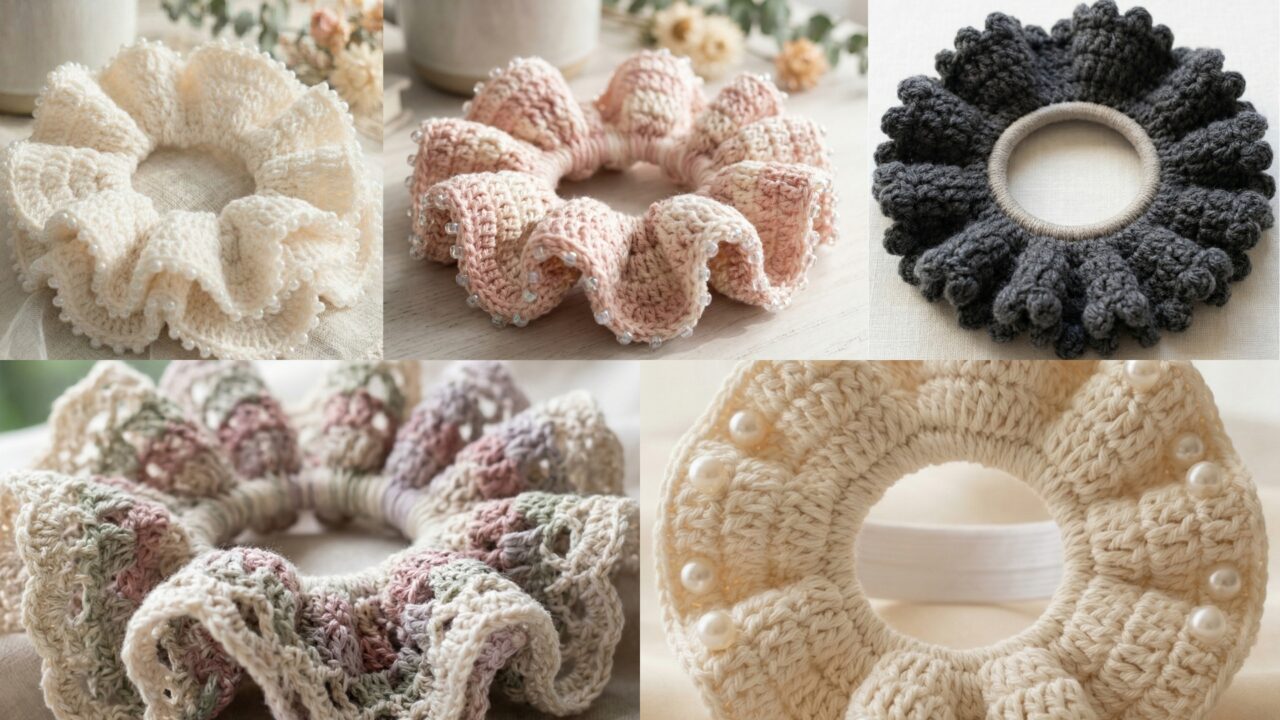
What makes crochet scrunchies so appealing is how much style you can create with such a small project. A simple scrunchie can become elegant with beads, romantic with bridal flowers, delicate with chained picots, timeless with pearls, or dreamy with lacy cottagecore details. Because they are small and fast to make, they are also wonderful for gifts, craft fairs, stash-busting, and trying new stitch ideas without committing to a larger project.
In this post, you will find five soft crochet scrunchie patterns with detailed step-by-step guidance, practical notes, and helpful finishing tips. Each design is written to be easy to follow while still giving you enough detail to make a scrunchie that looks polished, feels comfortable, and suits all hair types. If you want accessories that are pretty, useful, and fun to wear, these scrunchie ideas are a great place to begin.
Quick Notes
Project type: Crochet scrunchies
Best for: Everyday wear, gifts, hair accessories, craft fairs, and stash-busting
Skill level: Beginner to intermediate
Hook size: Usually 2.5 mm to 4.0 mm, depending on yarn weight and desired fullness
Yarn weight: Lightweight cotton, lace, fingering, or soft acrylic yarn
Best yarn choice: Smooth cotton or cotton blends for comfort and durability
Finished size: One-size-fits-most scrunchies, adjustable by elastic size and yarn fullness
Time to complete: About 20 minutes to 1 hour per scrunchie
Helpful stitches: Chain, slip stitch, single crochet, double crochet, picot, shell stitch, chain spaces, decorative joins, bead attachment, flower appliqués
Common Materials
Most crochet scrunchies can be made with the same basic supplies.
- Yarn in your chosen colors
- Crochet hook suited to the yarn
- Strong elastic hair tie or ponytail elastic
- Yarn needle
- Scissors
- Optional beads, pearls, or embellishments
- Optional embroidery thread or small appliqués
For scrunchies, softness and stretch matter more than almost anything else. Choose yarn that feels smooth against the hair and does not snag easily. Cotton or cotton blends are usually excellent because they are breathable and hold their shape well. A strong elastic core is important too, because it gives the scrunchie its grip and makes it suitable for all hair types.
1. Crochet Scrunchie with Beads Pattern
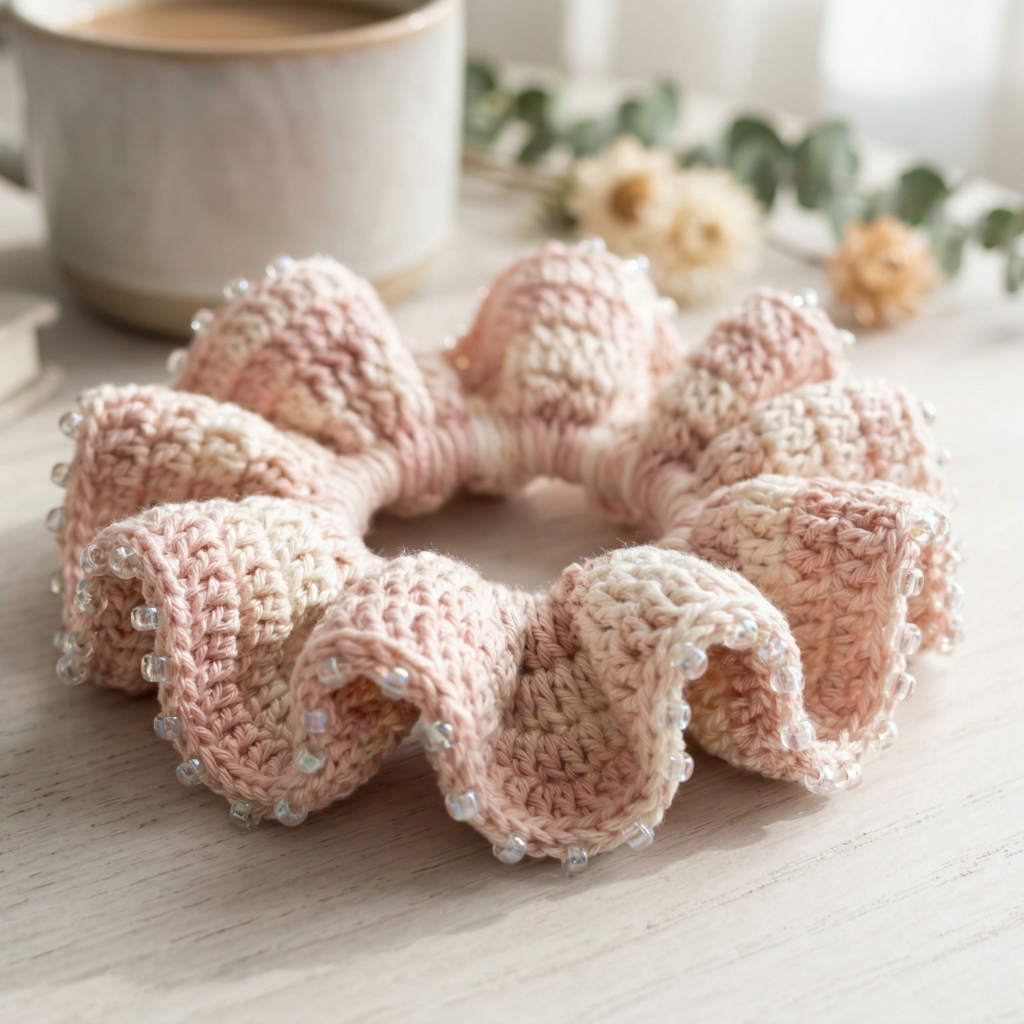
A crochet scrunchie with beads feels elegant, polished, and just a little dressy. The beads add movement and sparkle without making the scrunchie too heavy, which makes it perfect for everyday styling or for dressing up a simple hairstyle. This design works beautifully for anyone who wants a scrunchie that feels a little more special than a plain one.
Step-by-step guide
Step 1: Choose your yarn and beads
Start by selecting a soft yarn and lightweight beads that will not pull on the hair. Small seed beads, pearl-style beads, or tiny glass beads work well. The beads should complement the yarn color rather than overpower it. A smooth yarn will help the beads sit neatly.
The bead choice sets the tone of the whole scrunchie.
Step 2: Secure the elastic base
Take your elastic hair tie and begin crocheting around it. Work a few stitches into the elastic so the yarn stays anchored securely. This is the foundation of the scrunchie, so make sure it feels tight enough to stay in place but not so tight that it becomes stiff.
A secure elastic base is essential for a comfortable scrunchie.
Step 3: Build the first yarn layer
Once the elastic is covered, work rows or rounds of stitches around it to create the scrunchie body. Use a stitch that gives enough fullness, such as double crochet or a small shell repeat. Keep the stitches even so the scrunchie stays soft and balanced.
The body gives the scrunchie its volume.
Step 4: Add beads as you go
Thread beads onto the yarn before crocheting or attach them individually with a needle after the main base is complete. Place them evenly around the scrunchie so they look intentional and decorative. Try not to overcrowd the design, since too many beads can make it heavy.
The beads should feel like accents, not bulk.
Step 5: Keep the scrunchie soft and stretchy
As you add decorative beads, check that the scrunchie still stretches comfortably. You want it to hold hair without feeling rigid. If the beads make the piece too heavy, reduce the number of embellishments or use smaller beads next time.
Step 6: Finish the final round
Once the beads are in place, finish the outer edge with a neat round of stitches. This helps the scrunchie look polished and keeps the shape even. You can make the edge simple or slightly textured depending on the look you want.
Step 7: Weave in all ends carefully
Use a yarn needle to hide all loose ends securely. Because hair accessories get handled often, the ends need to be tucked in well so the scrunchie stays durable. Check the bead placement once more before finishing.
Helpful tips
This scrunchie looks especially beautiful in soft neutrals, blush, cream, or dusty rose. If you want something more elegant, pearl-style beads are lovely. If you want a more modern look, try small metallic or translucent beads. Keep the overall design lightweight so it remains comfortable for all hair types.
2. Crochet Bridal Flower Scrunchie Pattern
A crochet bridal flower scrunchie feels romantic, delicate, and elegant. It is perfect for weddings, special occasions, or anyone who loves soft feminine accessories. The flower detail gives the scrunchie a beautiful dressy feel while still keeping it simple enough to wear comfortably.
Step-by-step guide
Step 1: Pick a bridal color palette
Choose soft colors such as white, ivory, cream, blush, or pale champagne. These shades help the scrunchie feel bridal and timeless. If you want a more modern wedding look, soft dusty rose or pale sage can also work beautifully.
A soft palette helps the flower detail stand out gracefully.
Step 2: Crochet the elastic base
Wrap yarn around the elastic and crochet a secure base layer. The foundation should be neat and snug so the scrunchie can support the flower decoration without slipping. A clean base also helps the flower sit nicely.
A strong base gives the scrunchie stability.
Step 3: Create the scrunchie fullness
Work a full, soft body around the elastic using stitches that create volume. Bridal scrunchies often look lovely when they have a little extra fluff, because it gives them a romantic feel. Keep the texture even so the accessory remains elegant rather than bulky.
The fullness helps the flower look balanced.
Step 4: Crochet the flower motif
Make one or more small flower appliqués separately. Use soft petal stitches or layered rounds to form a gentle floral shape. Keep the flower compact and delicate so it feels bridal and refined rather than oversized.
The flower is the main decorative element.
Step 5: Attach the flower securely
Sew the flower onto one side of the scrunchie or place it slightly off-center for a more elegant look. Make sure it lies flat and is sewn tightly enough to stay secure during use. A centered or slightly angled flower often looks the most polished.
The placement changes the whole mood of the piece.
Step 6: Add subtle finishing details
If desired, add a tiny pearl bead, small sequin, or a little embroidered center to the flower. Keep the embellishments very delicate so the scrunchie retains its soft bridal look. Less is usually more with this design.
Step 7: Check comfort and shape
Before finishing, stretch the scrunchie gently to make sure the flower does not pull or distort. The accessory should still feel easy to wear in any hairstyle. Adjust the decoration if needed so it remains soft and practical.
Helpful tips
This scrunchie is especially lovely for bridesmaids, bridal showers, or elegant gift sets. If you want the flower to feel even more delicate, choose a fine yarn and a small hook so the stitches stay neat. The best bridal scrunchies are soft, light, and beautifully simple.
3. Crochet Chained Picots Scrunchie Pattern
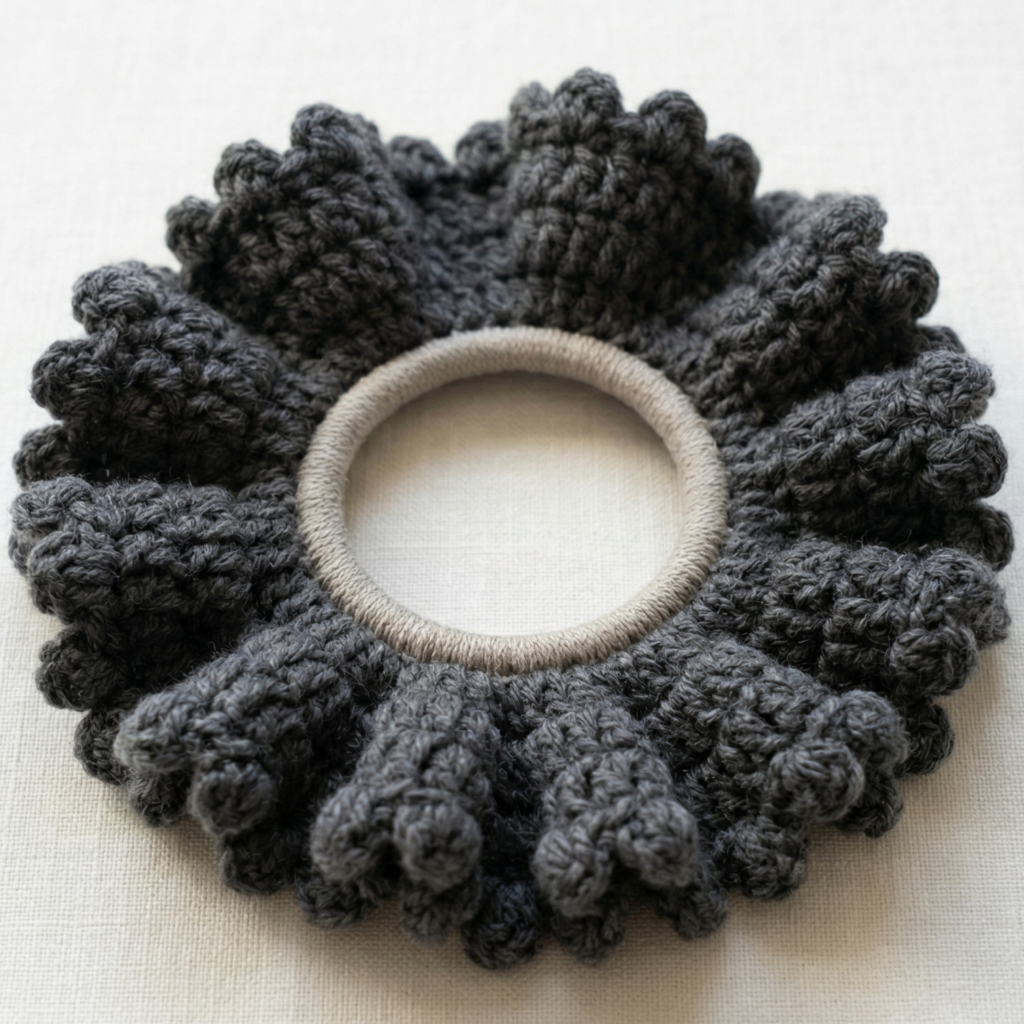
A crochet chained picots scrunchie has a delicate, decorative feel that looks soft and refined. Picots create tiny points or loops that add texture without overwhelming the design. This makes the scrunchie feel dainty while still being practical enough for everyday wear.
Step-by-step guide
Step 1: Start with the elastic core
Take your elastic hair tie and secure the yarn around it. This elastic foundation is what gives the scrunchie its stretch and grip. Make sure the first few stitches are snug enough to hold but not too tight to work around.
The elastic is the base of the scrunchie.
Step 2: Build the first crochet layer
Work a round of stitches around the elastic to cover it completely. Keep the stitches even so the foundation looks tidy. A simple base helps the picot detail stand out later.
A smooth base makes the picots look more defined.
Step 3: Add the picot pattern
Once the base is ready, begin crocheting picots along the outer edge. A picot is usually made by chaining a few stitches and slip stitching back into the same point, creating a tiny pointed loop. Repeat this evenly around the scrunchie for a delicate, decorative finish.
The picots give the scrunchie its signature detail.
Step 4: Keep the spacing even
Make sure the picots are spaced consistently so the scrunchie looks neat and balanced. If the picots are too close together, the edge may become crowded. If they are too far apart, the design may look uneven. Try to keep a steady rhythm.
Even spacing makes the scrunchie feel polished.
Step 5: Add fullness to the body
If you want the scrunchie to feel extra fluffy, work a second round or layer of stitches under the picot edge. This adds volume and helps the picots stand out. The body should remain soft so it can wrap comfortably around hair.
Step 6: Finish the round
When the picot edge is complete, finish the final stitch securely and weave in all ends. Check the edge carefully to make sure the picots sit evenly and do not twist. A neat finish will help the design last longer.
Step 7: Shape the scrunchie gently
Stretch the scrunchie lightly with your fingers so it rounds out nicely. The picot loops should sit upright and visible. If needed, smooth them into shape so the accessory looks even and balanced.
Helpful tips
This scrunchie looks especially beautiful in fine cotton yarn because the picots show up clearly. Soft neutrals, dusty pink, lavender, and cream all work beautifully. It is a lovely choice if you want a scrunchie that feels delicate but not fragile.
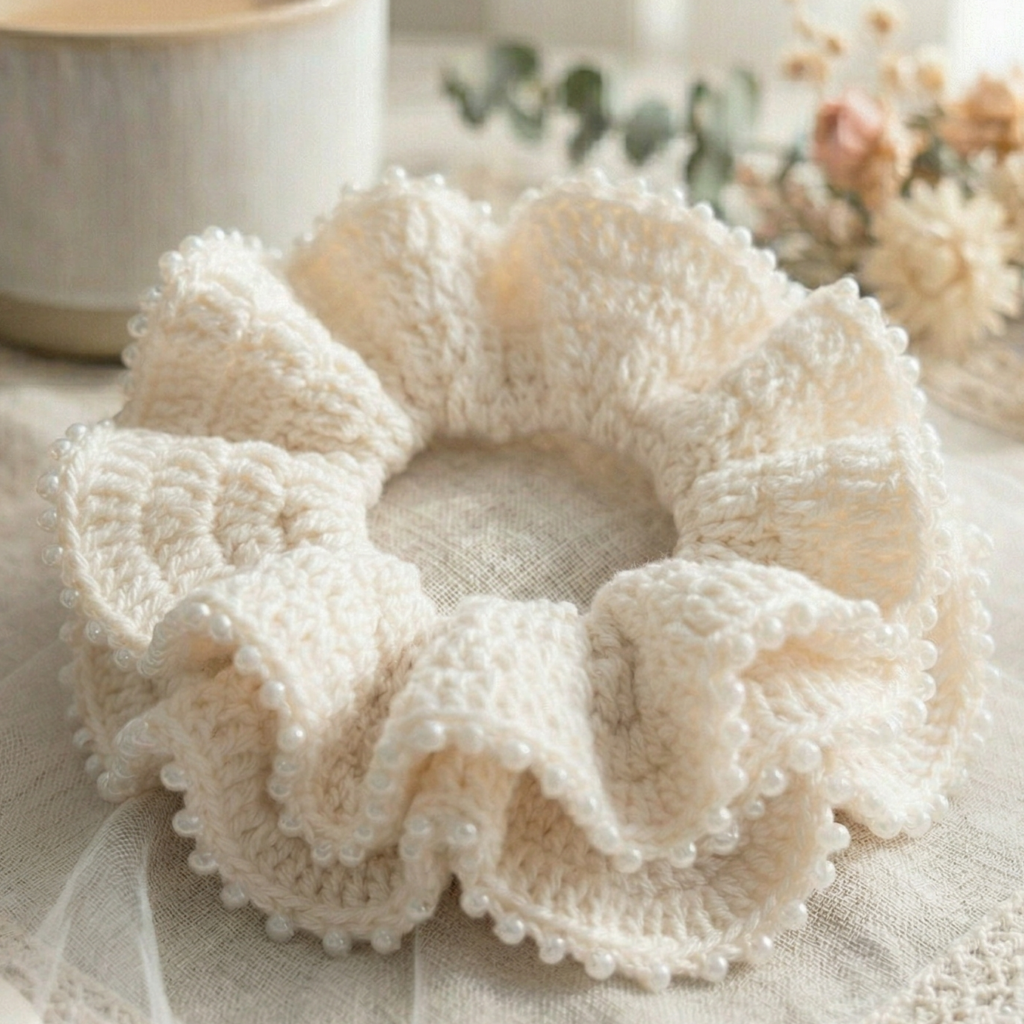
4. Crochet Vintage Pearls Scrunchie Pattern
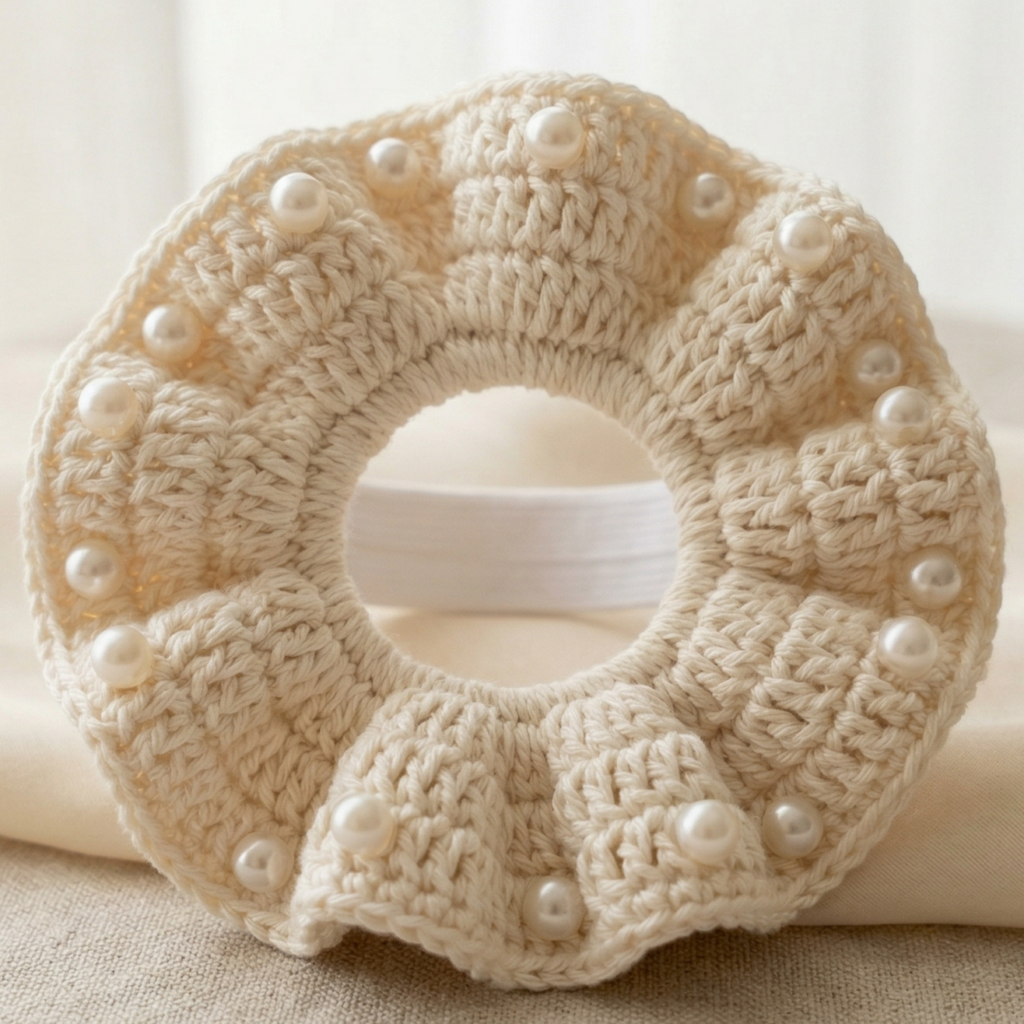
A crochet vintage pearls scrunchie feels classic, feminine, and timeless. Pearls instantly add a vintage-inspired feel, while the crochet base keeps it soft and handmade. This style is perfect if you want something elegant enough for dressing up but still comfortable for everyday use.
Step-by-step guide
Step 1: Choose a soft vintage palette
Pick colors that feel old-fashioned or romantic, such as cream, ivory, pale pink, soft gray, or champagne. These shades pair beautifully with pearls and help the scrunchie feel elegant. The yarn should look soft and refined rather than too bright.
A gentle palette enhances the vintage look.
Step 2: Crochet around the elastic
Begin by covering the elastic hair tie with your yarn. Work carefully so the base feels secure and smooth. The crochet body should be soft enough to sit comfortably in the hair, but full enough to support the pearls.
A tidy base keeps the design balanced.
Step 3: Add fullness to the scrunchie
Use a stitch pattern that creates volume, such as clusters, shells, or repeated rows. Vintage styles often look lovely when the scrunchie feels soft and slightly fluffy. This fullness gives the pearls a beautiful surface to sit on.
The fullness helps the pearls stand out.
Step 4: Attach the pearls
Sew small pearl beads onto the surface of the scrunchie, spacing them evenly or clustering them lightly in sections. Make sure the pearls are securely attached because hair accessories are handled often. Keep the embellishment refined and not too crowded.
The pearls are the classic vintage feature.
Step 5: Check balance and placement
Look at the scrunchie from all sides to make sure the pearls are evenly positioned. If one area feels too crowded, add a few more pearls to balance it or leave it more minimal for a cleaner look. The goal is graceful symmetry.
Step 6: Add a neat edge
Finish the outer edge with a clean round of stitches if needed. This helps the scrunchie feel polished and keeps the pearl detail framed beautifully. A simple edge often works best for a vintage style.
Step 7: Secure all ends and test
Weave in the yarn ends carefully and gently stretch the scrunchie to check that the pearls stay in place. The final piece should feel soft, stylish, and durable enough for real use.
Helpful tips
Vintage pearls look especially lovely with cream yarn, but blush and pale blue can also feel delicate and charming. If you want the design to feel more luxurious, use small pearl accents with a very soft, full scrunchie body. It is a beautiful option for gifts and special occasions.
5. Crochet Cottagecore Lacy Scrunchie Pattern
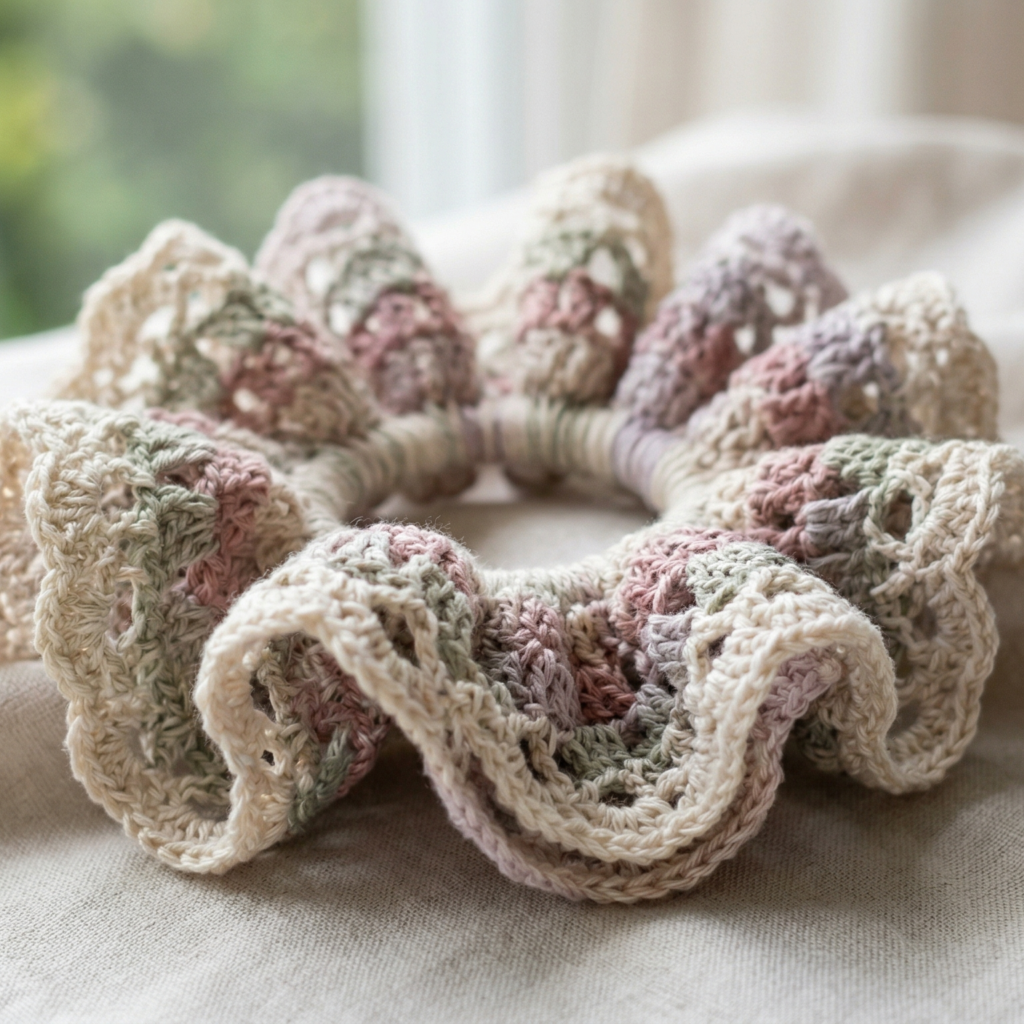
A crochet cottagecore lacy scrunchie feels soft, romantic, and slightly whimsical. The open, airy texture gives it a dreamy handmade look that suits cottagecore style beautifully. It is ideal if you want a scrunchie that feels natural, delicate, and a little nostalgic.
Step-by-step guide
Step 1: Select a cottagecore color palette
Choose soft, nature-inspired colors such as cream, moss, sage, blush, dusty rose, or pale lavender. These shades help the lacy texture feel cozy and gentle. A muted palette usually works best for cottagecore style.
The color palette sets the dreamy mood.
Step 2: Secure the elastic base
Begin by crocheting around the elastic hair tie. Make sure the base is secure and comfortable. The elastic should stay flexible so the scrunchie can work for all hair types, including thick or curly hair.
A secure base is the foundation of the scrunchie.
Step 3: Work the lacy stitch pattern
Use a lace stitch such as chain spaces, open shells, or small fan repeats. Keep the pattern light and airy so it looks delicate without losing shape. The openwork should remain even and balanced around the scrunchie.
The lace is the main visual feature.
Step 4: Add fullness carefully
Lacy scrunchies often look best when they are soft and gently full rather than overly bulky. Add enough rows to create texture, but keep the overall shape light and breathable. This helps the scrunchie feel romantic and natural.
Fullness should feel soft, not heavy.
Step 5: Shape the lace loops
Once the lacy body is complete, gently adjust the loops with your fingers so they sit nicely around the elastic. The open pattern should look soft and evenly distributed. If the loops curl too much, smooth them into place.
Step 6: Finish the edge neatly
Add a simple final round or border if needed. A clean edge can help frame the lacy texture and make the scrunchie feel complete. Keep the finishing subtle so it does not overpower the delicate look.
Step 7: Weave in ends and test the fit
Tuck in all loose ends securely and check the scrunchie on different hair types if possible. It should stretch comfortably and hold hair without snagging. The final result should feel soft, airy, and easy to wear.
Helpful tips
This style looks especially beautiful in natural or muted tones. Cream and sage are lovely choices if you want a soft cottagecore feel. If you want something a little more romantic, dusty rose or lavender can make the lacy pattern feel even more dreamy.
Conclusion
Crochet scrunchies are a wonderful project because they are quick, useful, and easy to personalize. They make everyday hairstyles feel a little more special, and they are soft enough to be comfortable across different hair types. That balance of beauty and practicality is what makes them such a rewarding accessory to make.
These five scrunchie patterns each bring a different mood. The beaded scrunchie feels elegant and polished. The bridal flower scrunchie is romantic and delicate. The chained picots scrunchie is dainty and decorative. The vintage pearls scrunchie feels timeless and refined. The cottagecore lacy scrunchie is dreamy and natural. Together, they show just how much personality you can fit into a small handmade accessory.
A good scrunchie does more than hold hair in place. It can add a soft touch to your outfit, make a thoughtful gift, or become a small project that lets you enjoy the process of making something beautiful and useful. With the right yarn, a comfortable elastic core, and a neat finish, these scrunchies can become favorite everyday accessories that are fun to make and even more fun to wear.