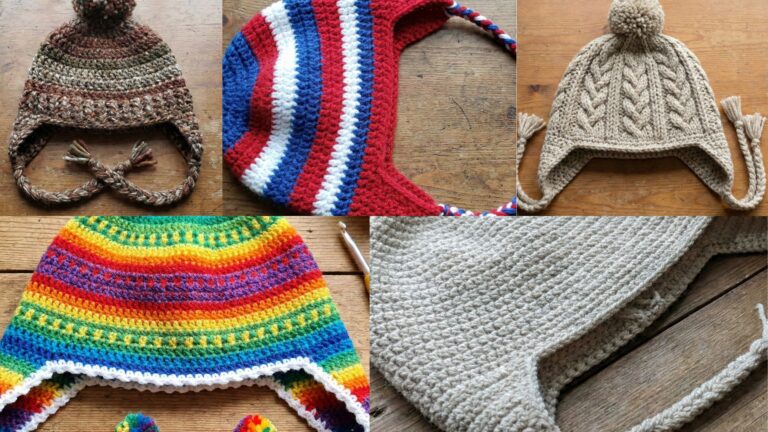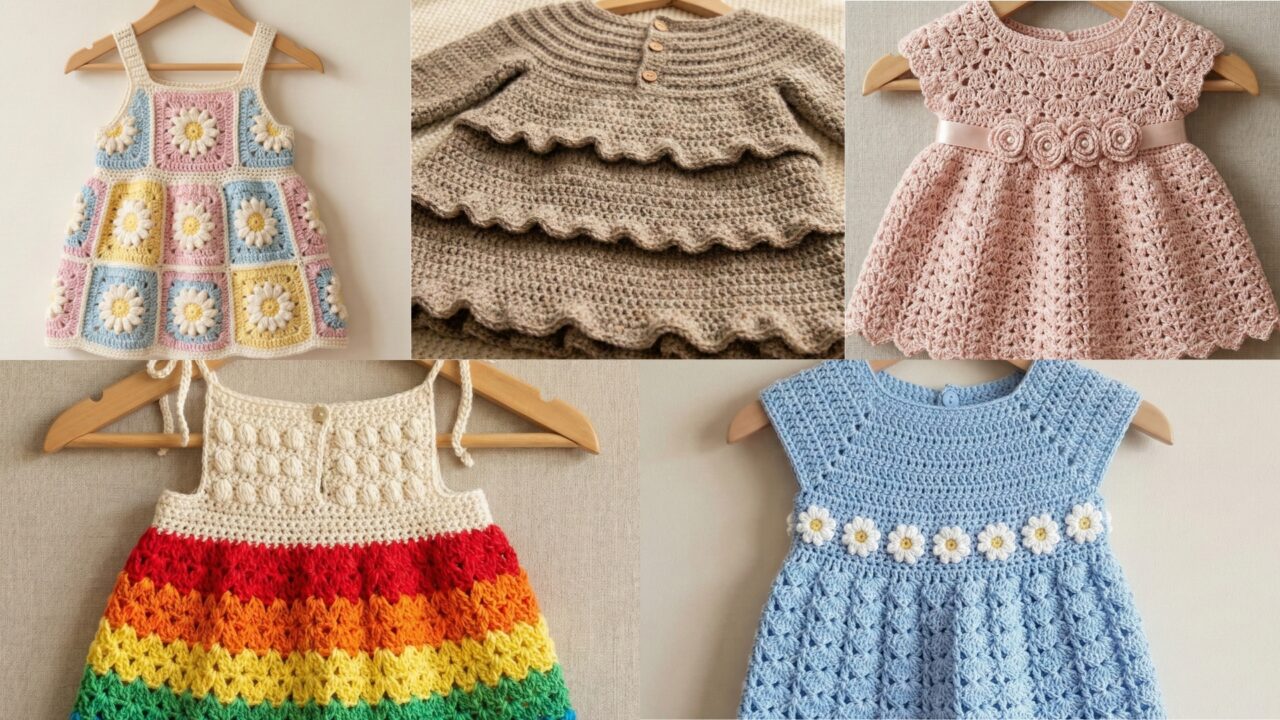
A handmade baby dress is one of the most rewarding small garments to crochet: quick to work, hugely giftable, and endlessly customizable. Below are five full, detailed baby dress patterns with clear materials lists, gauge and sizing guidance, row-by-row construction options, finishing tips, variations, and care notes. Each pattern is written so you can adapt it to common baby sizes (newborn → 24 months) by using the sizing math in the introduction and checking gauge.
Read the Sizing & Gauge primer first — it explains how to convert measurements to stitches and rows so every pattern can be scaled reliably to the baby size you want.
Sizing, gauge & conversion primer (read before you start)
- Decide the finished chest circumference (FC) you want for the dress. Typical finished chest measurements (with light ease) are:
- Newborn / 0–3 months: 16 in
- 3–6 months: 18 in
- 6–12 months: 20 in
- 12–24 months: 22 in
- Make a 4″ × 4″ gauge swatch in the stitch pattern used for the dress, blocked the same way you will finish the garment. Measure stitches per inch (spi) and rows per inch (rpi).
- Convert chest to stitches (foundation)
- Stitches needed = FC × spi.
- Example digit-by-digit: FC = 18 in, spi = 4 sts/in. Multiply: 18 × 4 = (10 × 4) + (8 × 4) = 40 + 32 = 72 stitches.
- If the stitch pattern requires a multiple (for example, multiple of 2, 4, 6), round to the nearest valid multiple. Explain which multiple each pattern needs.
- Length conversion
- Decide finished length (neck → hem). Example lengths:
- Newborn: 12 in, 3–6m: 13 in, 6–12m: 14 in, 12–24m: 15–17 in (choose per style).
- Rows needed = length (in) × rpi. Example: length = 13 in, rpi = 6 rows/in → 13 × 6 = (10 × 6) + (3 × 6) = 60 + 18 = 78 rows.
- Decide finished length (neck → hem). Example lengths:
- Ease and fit
- Baby garments should include light positive ease (0.5–1 in) for comfort and movement. Use the FC numbers above as finished (not body) measurements.
Use this method for each pattern below. Where helpful I include sample gauge and example stitch counts for a medium baby size (3–6 months) so you can begin quickly.
1. Crochet Baby Blue Daisy Dress Pattern
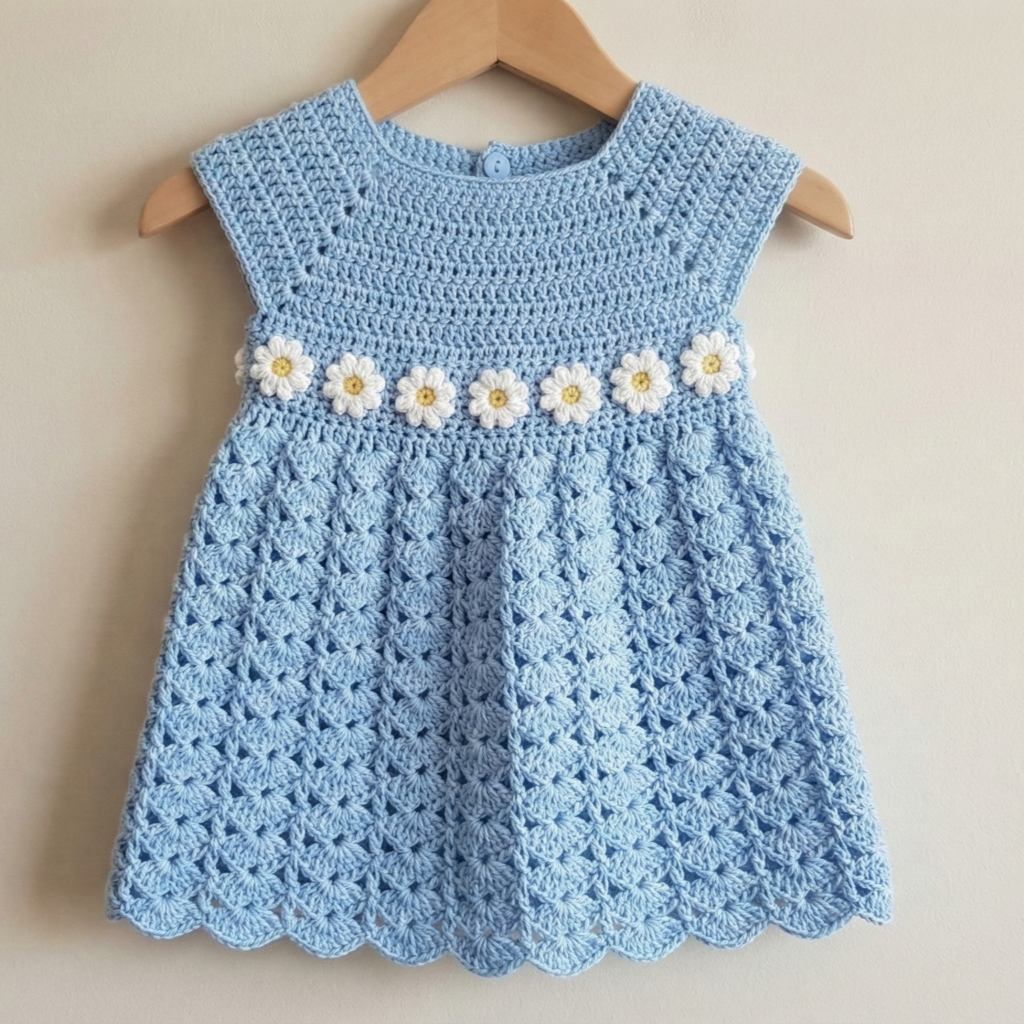
Style & vibe: Sweet A-line sundress with crocheted daisies across the yoke; ideal for spring & summer.
Skill level: Confident beginner — basic shells, granny/daisy motifs, simple shaping.
Suggested yarn & tools
- Soft DK cotton or cotton blend (machine-washable)
- Sample yardage (approx): Newborn 250 yd, 3–6m 300 yd, 6–12m 350 yd, 12–24m 420 yd
- Crochet hooks: 3.5 mm (yoke/details) and 4.5 mm (body) — use smaller hook for tighter fabric at yoke
- Tapestry needle, stitch markers, 2 small buttons for back closure, blocking mats
Sample gauge (shell stitch body): 4 sts × 3 rows = 1″ (spi = 4, rpi = 3) — confirm with swatch.
Construction overview
- Worked top-down: decorative daisy yoke is crocheted first (flat or joined motifs), then body is worked in rounds downward into a gentle A-line. Armhole shaping is created by working yoke in a short-row or raglan-style with small openings, or by creating a back buttoned slit for easy dressing.
Stitch repeats & multiples
- Shell pattern body uses multiple of 4 stitches. Daisy motif: small 5-petal motif worked separately and sewn or join-as-you-go.
Step-by-step (sample 3–6 months — FC 18″, gauge spi 4)
Yoke — daisy band (worked flat, then joined)
- Make small daisies: MR; ch1, 5 dc in ring, sl st × 5 to form 5 petals (or use pattern: MR, ch3, 2 dc, ch3, sl st repeat). Make 7–9 daisies depending on desired yoke width. For 18″ chest you’ll need approximately daisies spaced across front + back; if daisies are 1.5″ each, 18 ÷ 1.5 ≈ 12 daisies total—this example uses spaced decorative daisies plus chain-bridges.
- Alternatively, crochet a yoke row: ch 74 (sample—convert using FC × spi), Row 1: sc across. Row 2: work shell stitches across (shell = 5 dc in same st) to create daisy-like shells across row. Adjust spacing so shells line up with daisies later.
Join yoke into circle
3. Join short ends with slip stitch seam to form yoke ring. Work a round of sc to tidy.
Armhole & yoke shaping
4. Work two rounds of daisy-shell motif in the round to build the yoke height (~1–1.5″). If you prefer buttoned back, leave a central back slit by chaining required stitches (for baby, chain 8–10) and continuing across.
Body — shell A-line (worked in rounds)
5. Convert width to stitches: FC 18″ × spi 4 = 72 stitches. Ensure multiple of 4; 72 ÷ 4 = 18 → good. Foundation round = 72 sc evenly spaced across yoke bottom (pick up loops or join as you go).
6. Round 1: (shell round) skip 1 st, shell (5 dc) in next st, skip 1, sc in next repeat around. This creates a shell band.
7. Round 2: even sc round to stabilize the shell; Round 3–n: repeat shell + sc anchor rounds until skirt length equals desired (convert length to rows using rpi). For 3–6m dress length ~13″ from neck to hem — subtract yoke height (1.5″) = 11.5″ skirt → rows = 11.5 × rpi (example rpi 3) = 34.5 → 35 rounds (counting shell & anchor rounds as individual rounds).
8. For gentle flare, every 6–8 rounds add an increase round: sc in next 8sts, 2 sc in next across to add ~12–15% fullness.
Hem & edging
9. Finish with one round of sc, then a scallop row: sc, skip 1, 5 dc shell in next, skip 1, sc repeat. Fasten off and weave in ends.
Sleeves / straps
10. For sleeveless sundress: create two chain-strap ties at the shoulder or leave armholes open. For short capped sleeves: pick up stitches around armhole and work 4–6 rounds of sc decreasing slightly to shape cap.
Finishing
11. Sew buttons on back flap if used; block gently to even shells. Embroider tiny yellow centers on daisies with a few satin stitches.
Variations
- Make the daisies removable (safety-pin backed) for machine washing.
- Add a matching bloom headband.
Care
- Machine wash cold on gentle; reshape and dry flat.
2. Crochet Daisy Granny Square Baby Sundress Pattern
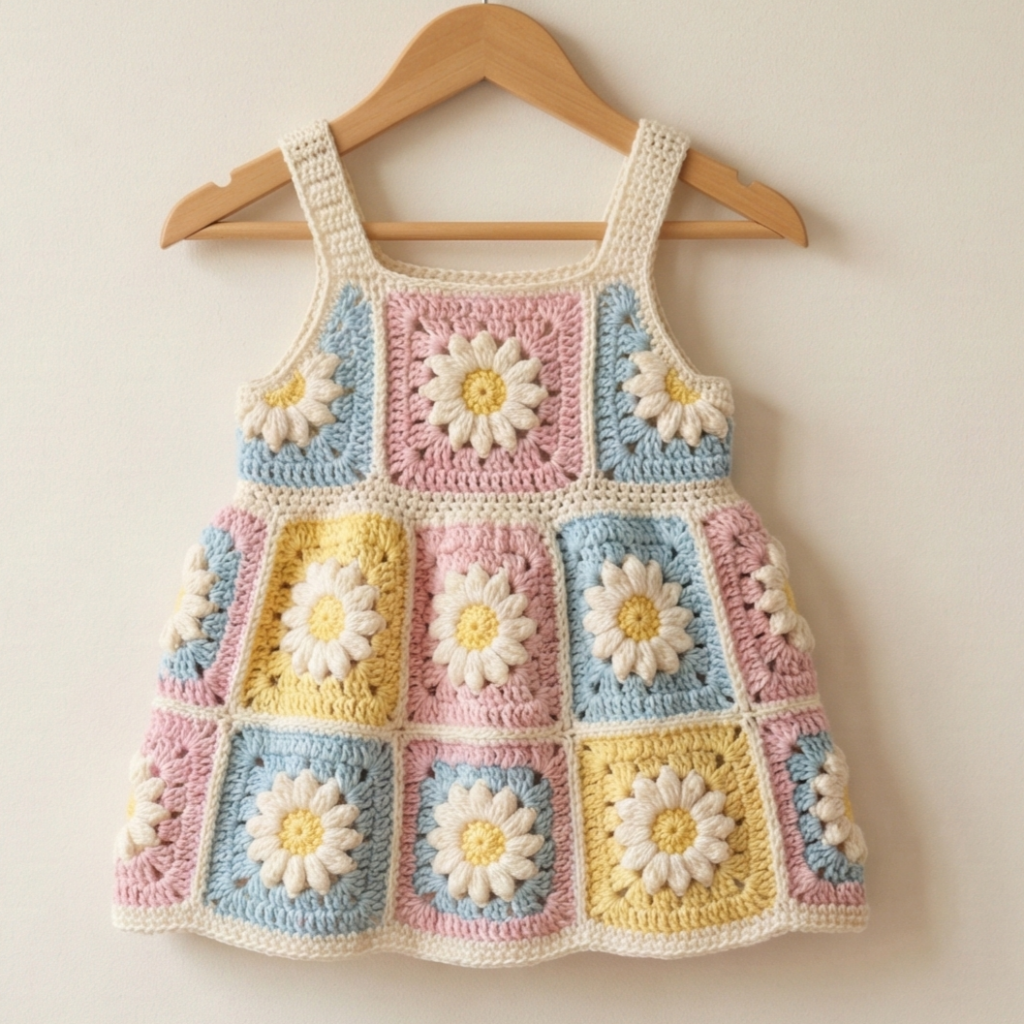
Style & vibe: Playful granny-square skirt and bodice panels—retro-cute and great for using small color scraps.
Skill level: Confident beginner — granny squares and joining.
Materials
- DK or light worsted cotton blend. Approx yarn: NB 250 yd, 3–6m 300–350 yd, 6–12m 400–450 yd, 12–24m 500–600 yd.
- Hooks: 4.0 mm for granny squares; 4.5–5.0 mm for joining and edging.
- Buttons or small hook closure, tapestry needle.
Construction overview
- Make granny squares with daisy centers (small flower in middle of each square), join them into a front panel and back panel (or a continuous wrap), then add a simple A-line skirt attached at the waist. Straps are created from chains or narrow granny rectangles.
Granny square (daisy center) — single square instructions
- Magic ring: ch3 (counts as first dc), 2 dc, ch2, 3 dc, ch2 repeat 3 more times — join to form 4 corner clusters (classic granny). That’s Round 1.
- Round 2: in each corner ch2 space, work (3 dc, ch2, 3 dc). In side spaces work (3 dc) clusters to expand square. Make rounds until square measures ~3.5–4.0″ across (depending on size). Alternate colors for daisy petal and outer round.
How many squares
- For a 3–6m dress: to make a skirt width ~18″ and square size ~3.5″ → 18 ÷ 3.5 ≈ 5.14 → use 5 squares across for width; for length use 3–4 rows for skirt/fullness. Typical arrangement: front panel 5 × 3 squares = 15 squares; back panel same = 15 squares. Use extra squares for straps or decorative pockets.
Joining
2. Lay out squares in the desired pattern; join with whipstitch or join-as-you-go (JAYG) using matching yarn. JAYG allows you to join the last round while crocheting which produces a neat look. After joining front and back panels at shoulders and sides (leaving armholes), attach skirt row to bottom edge of joined bodice by slip-stitching or single crochet seam.
Straps
3. Make two strap panels: either chain straps of length suitable or make two narrow granny strips of 2 squares length, attach to front and back with small buttons so they are adjustable.
Skirt fullness
4. To add fullness quickly, make the skirt as several rows of squares or make a skirt in shell stitches attached to the bottom edge with increases every 4–6 sts for flare.
Edging & finishing
5. Work a tidy single crochet round across neckline and armholes; add a simple picot edge if desired: sc, ch3, sl st to base every 4 sc for dainty scallops.
Variations
- Use tonal neutrals for modern look or rainbow squares for playful kitsch.
- Convert squares into hexagons for softer flow.
Care
- Machine wash cotton blend on gentle, reshape.
3. Crochet Cotton Rainbow Baby Dress Pattern
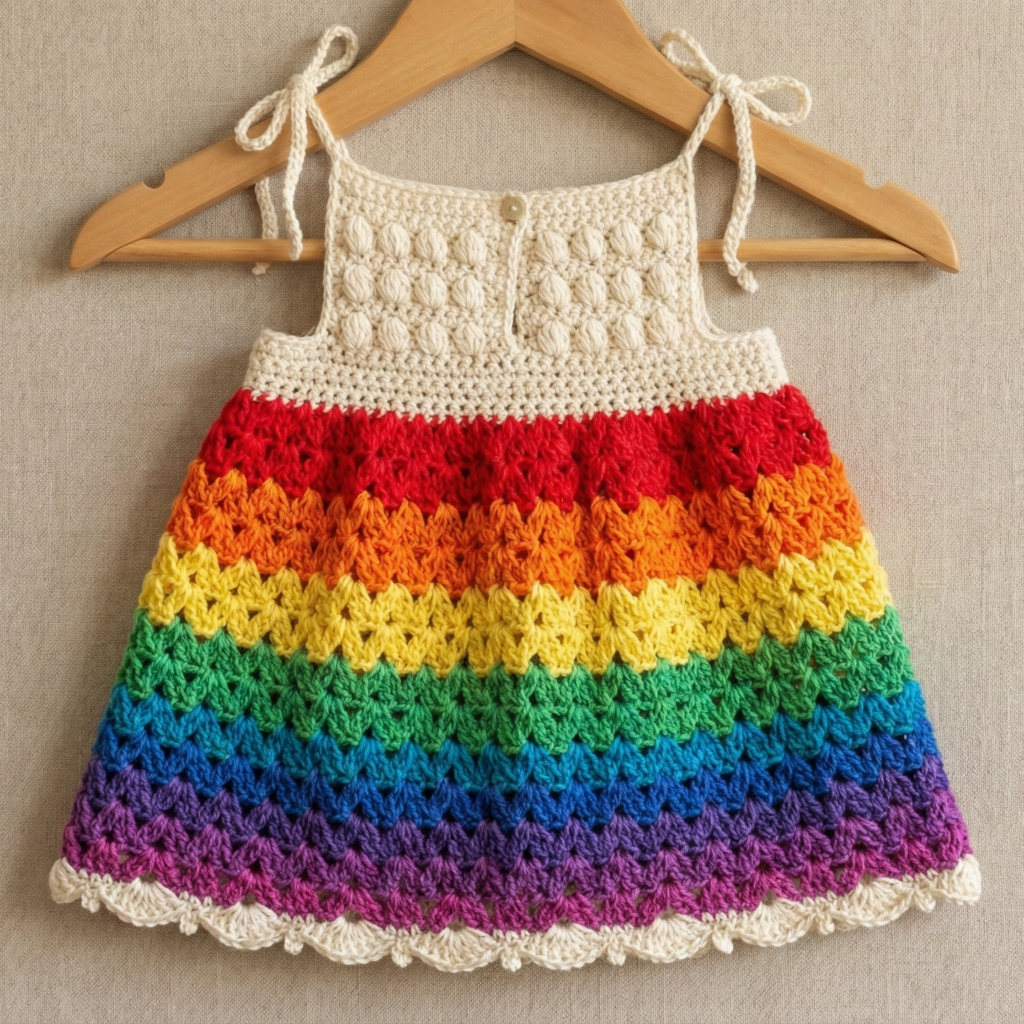
Style & vibe: Lightweight cotton sundress with subtle stripes and airy lace skirt — bright, breathable, perfect for summer.
Skill level: Confident beginner / intermediate (color changes, lace stitch).
Materials
- 100% cotton DK in 4–6 colors or one variegated + solids. Yardage NB 300 yd, 3–6m 350 yd, 6–12m 420 yd, 12–24m 500 yd.
- Hooks: 3.5 mm for yoke, 4.5 mm for skirt (looser lace).
- 2 small buttons if back opening used.
Gauge (lattice/mesh lace): 3.5 sts/in × 4 rows/in (example; adjust to your yarn). Use a 4″ swatch.
Construction overview
- Top-down yoke closed at neck with a short back slit for head; skirt in an open V-stitch mesh for drape. Color changes produce rainbow bands. This design avoids seams by working in continuous rounds or joined rounds.
Step-by-step (sample for 6–12 months FC 20″)
Yoke
- Chain 80 (example—convert FC × spi: FC 20 × spi 4 = 80) and join to ring. Round 1: sc in each ch.
- Round 2–4: Work a simple textured round (hdc or puff anchors) to create yoke base. For a sleeved version add two small sleeve cap rows by marking sides and leaving chain-armhole gaps (chain 6–8 and skip same number of stitches), or simply make sleeveless.
Skirt (V-stitch mesh)
3. Convert to skirt: pick up loops if you worked flat yoke or continue in the round. Work V-stitch round: (dc, ch1, dc) in next st, skip 2 repeat around—this gives airy mesh.
4. Work color bands: change color every 4–6 rounds to create rainbow stripes. Make sure color changes are hidden neatly by completing the last yarn-over with the new color.
5. Add increase rounds: every 6–8 mesh repeats add an increase row to create flare by working V-stitch in ch1 space, then 2 V-stitches in every 3rd ch1 space—subtle increases produce a gentle A-line.
Hem & trims
6. For hem, work a scalloped shell: sc in next 2, 5 dc in next ch1 space, sc next 2 repeat. Add a modest picot at edge for baby-safe finish.
Straps / closures
7. Make simple chain straps or tie straps (chain 30–40 and tie) to keep back-free of hardware for safety. For sleeker look, add buttons and make button loops.
Variations
- Hold two strands of different colors together for blended bands.
- For baby-friendly softness, line the bodice with coordinate cotton fabric slip sewn on the inside.
Care
- Machine-wash cool and dry flat to avoid shrinkage; preshrink cotton yarn by washing a swatch first.
4. Crochet Rose Blush Baby Dress Pattern
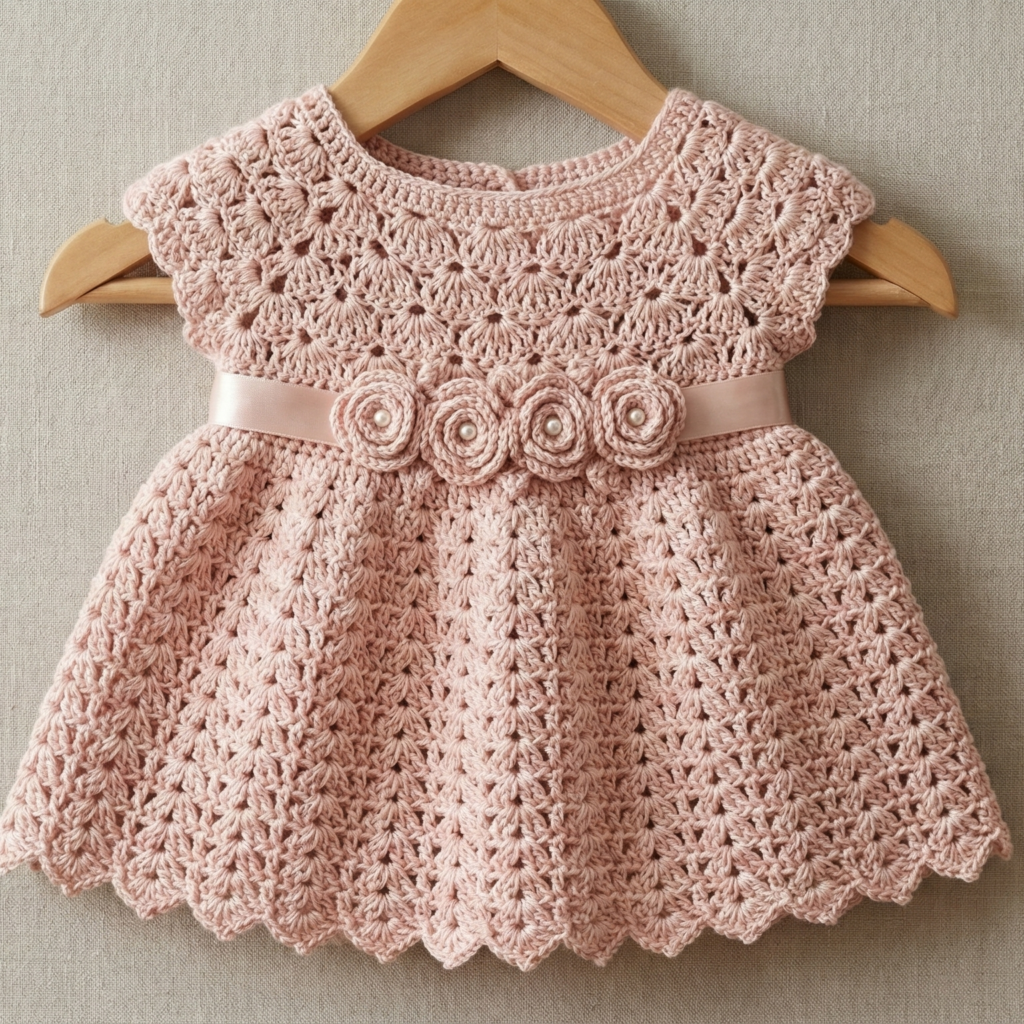
Style & vibe: Elegant rose-motif yoke with textured rosebuds, soft blush palette — perfect for special-occasion dresses.
Skill level: Intermediate — includes short-row shaping, surface embroidery/3D applique roses.
Materials
- Soft blend yarn (cotton/silk blend for sheen or soft acrylic for easy care). Sample yardage NB 280 yd, 3–6m 340 yd, 6–12m 420 yd, 12–24m 500 yd.
- Hooks: 3.5 mm for detail; 4.5 mm for skirt.
- Embroidery needle for rose details, optional pearl beads.
Construction overview
- The yoke is worked flat with 3D mini-rose appliqués crocheted separately (rolled rose or spiral rose) and sewn on. The skirt is worked in a textured lace or cluster stitch for soft movement.
Rose appliqué (small rolled rose)
- Chain 28. Row 1: sc across 27. Row 2: ch3, 3 dc across to form ruffled edge. Fasten off. Roll strip tightly from one end and sew through rolled layers to secure, forming a small rose. Make 3–5 roses for a cluster across front yoke.
Yoke
2. Work flat yoke to fit chest width per sizing conversion using a slight boat-neck shape. Example for 3–6m FC 18″: chain 72 +1, Row 1 sc across, Row 2–4 shell pattern or textured cluster pattern. Attach rose appliqués evenly across front by sewing through base; tack with a few stitches to ensure security.
Skirt (cluster stitch)
3. Join yoke into round and work cluster stitch skirt: round pattern (cluster = [dc3tog] anchored): sc in next 3 sts, cluster in next, sc in next 3 repeat. This creates a slightly bumpy but soft texture.
Shaping & length
4. For extra fullness, after 6–8 rounds of cluster, work an increase round adding 8–12 sc evenly across — insert increases every 6–8 stitches to add flare.
Edging & trim
5. Work a picot or small shell edge to finish; add a narrow satin ribbon threaded through a round near waist as optional decorative sash (secure ends inside seam so not removable by baby).
Finishing & safety
6. Securely sew rose bases to yoke and consider backing them with a small felt disc for security and to prevent catching. Use tone-on-tone thread to minimize contrast stitching.
Care
- Hand wash recommended for blends with silk; acrylic blends OK for gentle machine wash.
5. Crochet Heather Tiered Dress with Frills Pattern

Style & vibe: Cozy tiered dress with frilled tiers — more covered, slightly dressier, great for fall/winter (use soft wool-blend or acrylic).
Skill level: Intermediate — working in tiers, even increases and frill shaping.
Materials
- Soft worsted or aran weight (heathered yarn for depth). Yardage NB 320 yd, 3–6m 380 yd, 6–12m 460 yd, 12–24m 540 yd.
- Hooks: 4.5 mm for structure, 5.5 mm for frills (optional larger hook for flounce).
- Tapestry needle, 2 small buttons if back closure used.
Construction overview
- The dress is worked top-down or bottom-up in three tiers; each tier is slightly wider than the last to create a flouncy, layered effect. Frill rows are added at each tier seam for decorative ruffles.
Top yoke
- Work a simple ribbed yoke in hdc in the round or flat. Decide chest FC and convert to stitches: FC × spi. Example for 6–12m FC 20″ × spi 3.5 = 70 stitches foundation. Work ribbing (hdc in BLO) for 1–1.5″ to create a snug yoke.
Tier construction (3 tiers)
2. Tier 1 (upper skirt): attach yarn and work rounds of dc or v-stitch for a soft drape. Work until desired depth (e.g., 3.5–4″). At the join to the next tier add an increase round: dc in next 2, 2 dc in next repeat for 15–20% extra width.
3. Frill at seam: with a larger hook, work 1–2 rounds of shell: 5 dc in next st, skip 2, sc next around to create a ruffle.
4. Tier 2: repeat pattern with slightly more increases for added width; work same frill at seam. Tier 3: final skirt panel, work to final length.
Length & sizing
5. For 12–24m you may want final hem length ~15–17″. Convert to rows using gauge rpi. Keep tier depths proportional (e.g., tier heights 4″, 5″, 6″ or scale to total desired length).
Sleeve options
6. Add long sleeves by picking up stitches at armhole and working in the round hdc with slight tapers; add a small cuff or mini-frill to match tiers.
Frill finishing
7. Finish hem with 2 rounds of sc then a decorative shell or picot row to match tier frills. Block the frills to open scallops.
Variations
- Make sleeveless sundress version by omitting sleeves and adding ribbon straps.
- Use a contrast color on frills for playful pop.
Care
- For wool-blend follow yarn label—preferably hand wash or delicate machine wash; dry flat to preserve frills.
Final finishing notes & general tips
- Weave in ends securely and hide tails inside stitches for durability.
- Try on as you go: for fitted yokes and sleeve openings it’s helpful to test sizing on a baby board or on the child if possible.
- Blocking: block each dress gently to even stitches and open lace or shell patterns. Use steam or wet-block per yarn instructions.
- Safety: avoid small detachable parts for infants (under 12 months). Instead embroider eyes or appliqués or securely back buttons with fabric.
- Sizing chart (quick reference finished measurements)
- Newborn: chest 16″, length 12″
- 3–6 months: chest 18″, length 13″
- 6–12 months: chest 20″, length 14″
- 12–24 months: chest 22″, length 15–17″
Conclusion
These five baby dress patterns — Baby Blue Daisy, Daisy Granny Square Sundress, Cotton Rainbow Dress, Rose Blush Dress, and Heather Tiered Dress with Frills — cover a wide range of styles and yarn choices, from airy summer cottons to cozy heathered tiers. Use the sizing & gauge primer at the top to adapt any dress to the baby size you need; follow the stitch-by-stitch instructions for each section, try on as you go for the best fit, and finish with careful blocking and secure sewing for a professional, baby-safe garment.