Crochet brooches are tiny projects with a big charm factor. They are quick to make, easy to personalize, and wonderfully giftable, which makes them ideal for anyone who loves small handmade accessories. A brooch can brighten a coat, add personality to a bag, decorate a scarf, or turn a simple outfit into something more special. Best of all, these little pieces are small enough to finish in a short amount of time, but creative enough to feel memorable and unique.
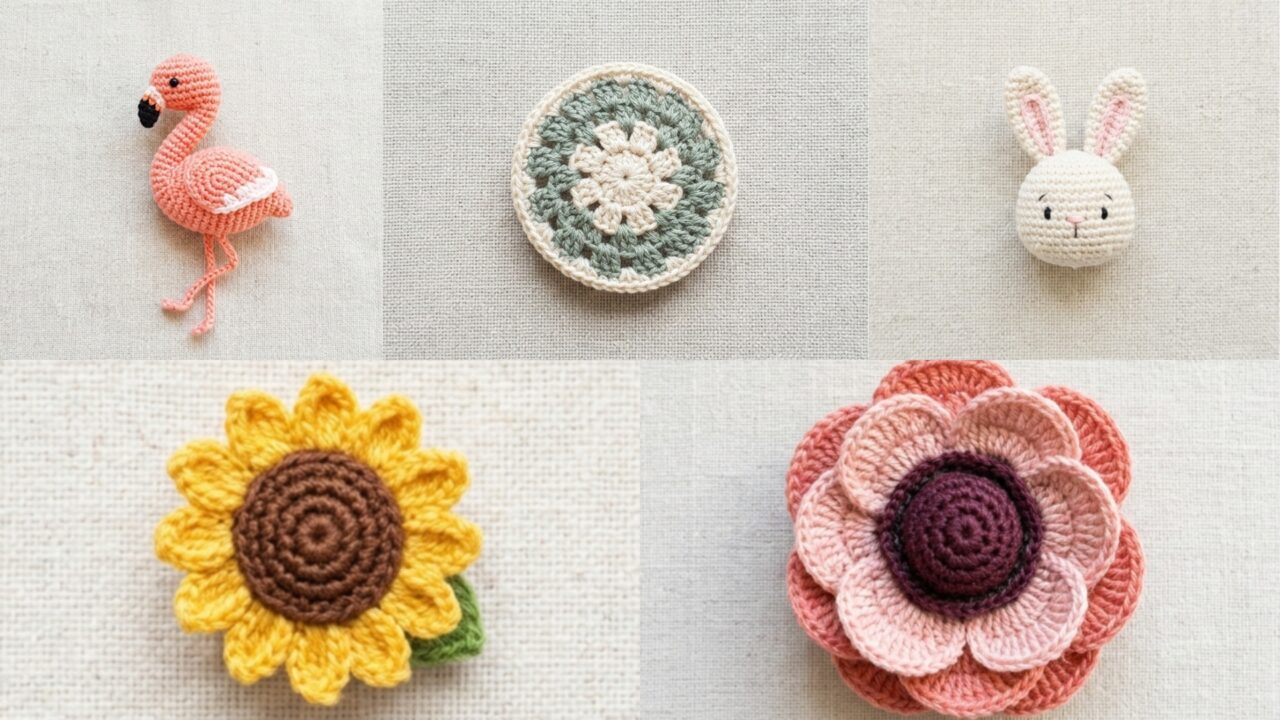
What makes crochet brooches especially fun is the wide range of styles you can create from just a little yarn. A circle granny stitch brooch can feel classic and textured. A flamingo brooch brings playful tropical energy. An Easter bunny brooch adds seasonal sweetness. An anemone brooch feels elegant and floral. A micro sunflower brooch offers a cheerful, miniature touch of brightness. Each design has its own personality, but all of them can be made with simple materials and a bit of attention to detail.
In this post, you will find five small crochet brooch patterns that are perfect for gifts, accessory making, and using up leftover yarn. Each section includes helpful quick notes, common materials, skill level, finished size guidance, and a step-by-step guide to help you create neat, polished brooches that are easy to wear and lovely to give. If you enjoy small crochet projects that are satisfying, creative, and beginner-friendly, these brooch ideas are a perfect place to start.
Quick Notes
Project type: Small crochet brooches and wearable accessories
Best for: Gifts, bags, jackets, scarves, hats, and decorative handmade sets
Skill level: Beginner to intermediate
Hook size: Usually 2.0 mm to 3.5 mm, depending on yarn weight
Yarn weight: Lace, fingering, sport, or lightweight cotton works best
Best yarn choice: Cotton or cotton blend for structure and crisp stitch definition
Finished size: Usually 1 to 3 inches across, depending on the design
Time to complete: About 15 to 60 minutes per brooch
Helpful stitches: Chain, slip stitch, single crochet, half double crochet, double crochet, treble crochet, increase, decrease, magic ring, picot, color change, surface crochet
Common Materials
Most crochet brooches can be made with the same basic supplies.
- Small amounts of yarn in your chosen colors
- Crochet hook suited to the yarn weight
- Yarn needle
- Scissors
- Brooch pin back or safety pin base
- Fabric glue or sewing thread, if needed
- Small piece of felt for backing, optional
- Stitch marker, optional
- Embroidery thread for details, optional
Cotton yarn is often the best choice for brooches because it helps the shapes stay crisp and neat. If you want a more delicate finish, thinner yarn or embroidery floss can also work beautifully. Because these projects are small, even leftover yarn scraps can be enough for several pieces.
1. Crochet Circle Granny Stitch Brooch Pattern
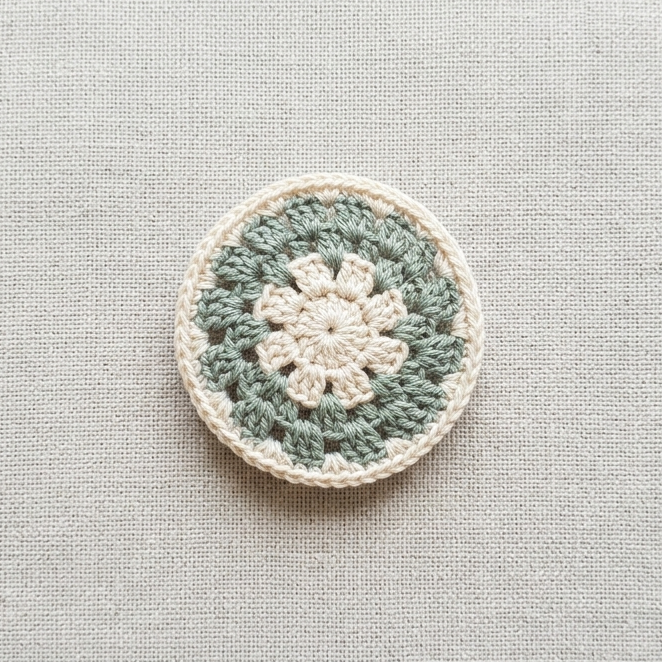
A circle granny stitch brooch is a lovely little accessory that brings a classic crochet look into a compact wearable shape. It has a textured, layered appearance that feels timeless and cozy. Because the design is simple and symmetrical, it works beautifully as a beginner project while still looking polished enough to gift.
Quick Notes
Skill level: Beginner
Finished size: About 1.5 to 2.5 inches across
Style: Classic, textured, colorful, handmade
Best colors: One color for a simple look or two to three colors for a layered effect
Materials
- Fine cotton yarn in one or more colors
- 2.5 mm to 3.0 mm crochet hook
- Yarn needle
- Scissors
- Brooch pin back
- Small felt circle for backing, optional
Step-by-Step Guide
Step 1: Start with a small center
Begin with a magic ring or a tiny chain loop. Work several stitches into the center to form a compact base. Since this brooch is small, the center should stay neat and tight so the circle does not become too loose or uneven.
A firm center helps the whole piece hold its shape better.
Step 2: Build the granny stitch texture
The granny stitch is usually made with clusters of double crochet stitches separated by chain spaces. For a brooch, you will work only a few rounds, keeping the motif small and tidy. The texture should be visible but not too open or floppy.
If you want a more compact brooch, use fewer chain spaces and keep the cluster size small.
Step 3: Change colors if desired
You can keep the brooch in one solid color for a simple elegant look, or switch yarn colors at the start of a new round for a more playful style. Each color change gives the circle a layered look and makes the granny texture stand out more clearly.
A soft gradient or two-tone look works especially well for giftable brooches.
Step 4: Keep the circle flat
As you crochet, check that the circle lays flat. If it starts curling, you may need to adjust your increases. The brooch should feel smooth and balanced, not bulky or wavy.
A flat circle makes the pin sit neatly on clothing.
Step 5: Finish the edge
Once the circle is the right size, add a clean border around the outside. A final round of single crochet or slip stitch edging can help sharpen the shape and give the brooch a polished finish.
A neat edge is especially helpful if you want the brooch to look store-bought and refined.
Step 6: Attach the pin back
Sew a brooch pin back to the back of the piece using strong thread or yarn. For extra stability, add a small felt circle behind the crochet piece before attaching the pin. This helps protect the stitches and makes the brooch wear more comfortably.
Step 7: Check the finish
Make sure the pin sits centered and that no loose ends show on the back. Weave in all yarn tails securely, then shape the front slightly with your fingers so the circle looks smooth and even.
Helpful Tips
This brooch is a great way to use leftover yarn from larger granny projects. You can make matching sets in different colors or create a few circles in the same palette for a coordinated gift bundle. If you want a more elegant version, try muted tones like cream, dusty blue, sage, or soft rose.
2. Crochet Flamingo Brooch Pattern
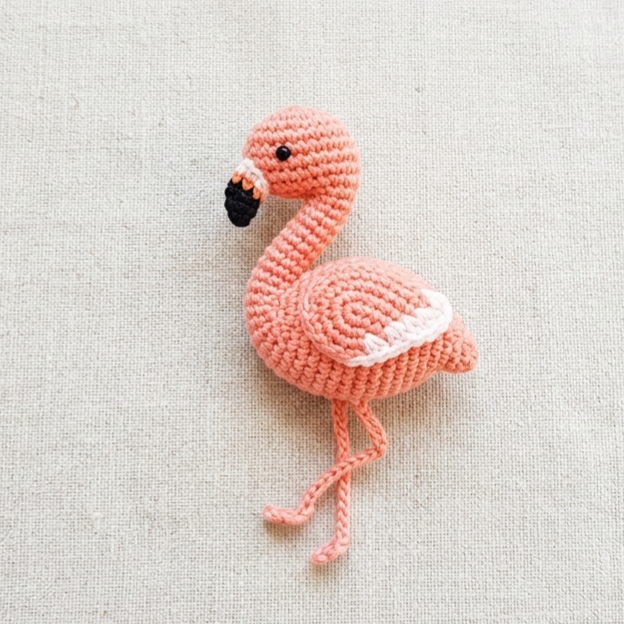
A flamingo brooch is playful, bright, and full of personality. It is the kind of accessory that instantly adds a fun tropical touch to a jacket, tote, or summer scarf. This design may be a little more detailed than a simple circle, but it is still very manageable because the flamingo shape can be simplified into a small stylized silhouette.
Quick Notes
Skill level: Beginner to intermediate
Finished size: About 2 to 3 inches tall
Style: Whimsical, tropical, cute, bold
Best colors: Pink, coral, blush, white, black, and a small amount of orange or yellow
Materials
- Pink yarn for the flamingo body
- Small amount of black yarn for the eye and leg details
- White yarn for wing accents, optional
- 2.5 mm to 3.0 mm crochet hook
- Yarn needle
- Scissors
- Brooch pin back
- Felt backing, optional
Step-by-Step Guide
Step 1: Plan the flamingo silhouette
A brooch version of a flamingo works best when the shape is simplified. Think of it as a small body, a curved neck, a tiny head, and thin legs. You do not need full realism. The most important thing is to make the silhouette clearly readable at a small size.
A stylized shape is usually easier to crochet and looks cleaner.
Step 2: Crochet the body base
Start by making a small oval or teardrop shape for the body. This can be done by working around a small foundation chain or magic ring and increasing at the ends. The body should feel slightly rounded and soft.
Keep the body compact so the brooch remains lightweight.
Step 3: Add the neck and head
The flamingo’s neck is one of its most recognizable features. Crochet a narrow curved strip or chain-based neck piece and attach a small rounded head at the top. The neck should angle gently so the bird looks elegant rather than stiff.
This curved line gives the whole brooch its character.
Step 4: Add the beak and eye
Use a tiny amount of black or darker yarn to embroider a small beak and eye. You can also use embroidery thread for sharper detail. These features should be minimal, because too much detail can overwhelm the small design.
A tiny beak is enough to make the flamingo instantly recognizable.
Step 5: Create the legs
Thin legs can be crocheted as narrow chains or embroidered directly onto the back piece. Keep them simple and graceful. Because brooches are small, the legs should not be too long or bulky, or they may get caught on clothing.
You can make one leg slightly bent to give the bird a lively pose.
Step 6: Add a wing accent
If you want extra detail, crochet a tiny wing or embroider a small white accent onto the body. This gives the flamingo more dimension without making it too complicated.
The goal is a polished but compact decorative piece.
Step 7: Assemble and back it
Sew all parts securely together. Attach the pin back to a felt circle or directly to the finished piece. Make sure the flamingo sits flat enough to wear comfortably.
Check that the neck and legs are firmly secured before using the brooch.
Helpful Tips
This brooch looks especially cute in blush pink with a little white wing detail. If you want a tropical feel, pair it with bright clothing, beach bags, or summer accessories. It also makes a lovely gift for anyone who enjoys quirky handmade pieces.
3. Crochet Easter Bunny Brooch Pattern
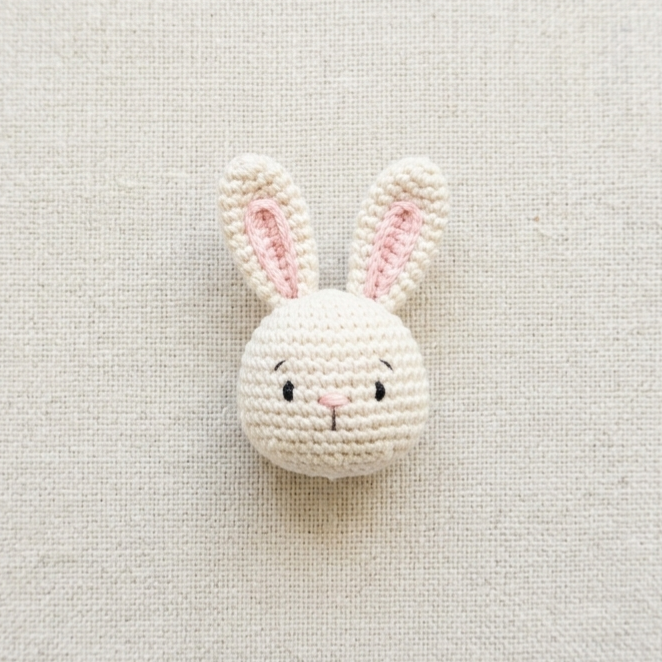
A crochet Easter bunny brooch is sweet, seasonal, and perfect for spring gifting. It brings a soft, charming feel that works beautifully for Easter baskets, holiday outfits, or handmade seasonal accessory sets. The design can be kept very simple so it remains quick to make and easy to wear.
Quick Notes
Skill level: Beginner
Finished size: About 1.5 to 2.5 inches tall
Style: Seasonal, sweet, spring-inspired, playful
Best colors: White, cream, pale pink, gray, beige, or pastel shades
Materials
- Light cotton yarn in bunny color
- Small amount of pink yarn for the nose or inner ears
- Black yarn or embroidery thread for the eyes
- 2.0 mm to 3.0 mm crochet hook
- Yarn needle
- Scissors
- Brooch pin back
- Felt backing, optional
Step-by-Step Guide
Step 1: Make the bunny head
Start with a small circle or oval for the head. Use tight stitches so the shape stays neat. The head should be soft and round, since that helps the bunny look friendly and cute.
A compact head is the best foundation for the rest of the design.
Step 2: Crochet the ears
The ears can be made as two small elongated ovals or tapered pieces. For a bunny brooch, the ears should be upright or gently tilted. Crochet them separately and attach them after shaping. If you want, you can use a second color for the inner ear to give the brooch more personality.
Slightly uneven ears can actually make the bunny look more charming and natural.
Step 3: Add the facial details
Use embroidery thread or thin yarn to stitch tiny eyes, a nose, and a mouth. Keep the face minimal and gentle. A small pink nose with simple dark eyes usually works best. You do not need a full facial expression for the bunny to look sweet.
Tiny details are enough to give the brooch life.
Step 4: Create the body, optional
Some bunny brooches are just head-and-ears designs, while others include a small body. If you want a more complete version, crochet a tiny oval body and attach it beneath the head. For a faster version, you can keep the design to just a head and ears.
Both styles can look lovely depending on the look you want.
Step 5: Add a tail detail, optional
A tiny pom-pom tail or a small crochet puff can be added to the back if you want extra cuteness. Because the brooch is small, keep the tail subtle so it does not add bulk.
This detail is optional, but it can make the bunny feel extra special.
Step 6: Secure the shape
Once all pieces are attached, make sure the ears are firmly sewn and that the face details are evenly placed. Weave in the ends carefully. If the brooch feels soft or flimsy, add a small felt backing for stability.
Step 7: Attach the pin back
Sew or glue the pin back onto the reverse side. Position it so the brooch hangs straight when worn. A felt backing also makes the pin attachment stronger and neater.
Helpful Tips
This pattern is perfect for pastel yarn leftovers. You can make a whole set of bunnies in different spring colors for baskets, gift tags, or holiday packages. The design also works well as a tiny addition to a cardigan, tote, or Easter-themed accessory set.
4. Crochet Anemone Brooch Pattern
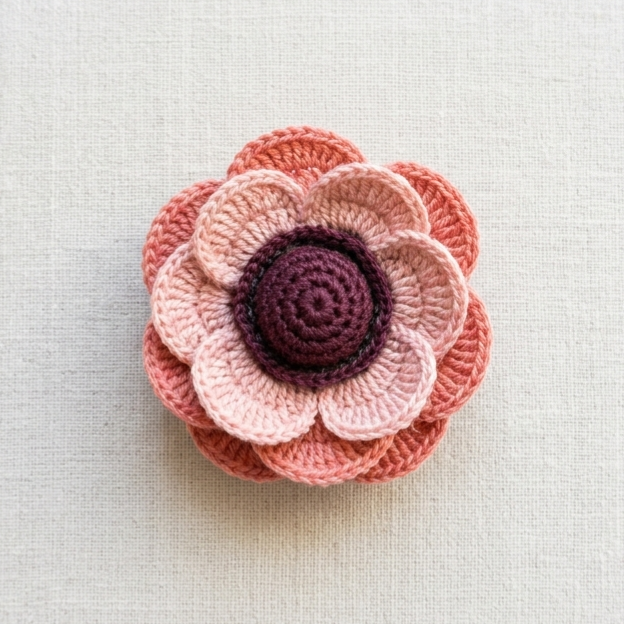
An anemone brooch feels elegant, artistic, and slightly sophisticated. The flower has a soft, layered look that makes it stand out as a wearable floral accessory. Even though it looks detailed, the structure can be simplified into a small central dome with petals around it, which makes the project very achievable.
Quick Notes
Skill level: Intermediate
Finished size: About 2 to 3 inches across
Style: Elegant, floral, textured, refined
Best colors: Purple, plum, coral, burgundy, blush, white, or deep jewel tones
Materials
- Yarn in one or more floral colors
- Small amount of dark yarn for the center
- 2.0 mm to 3.0 mm crochet hook
- Yarn needle
- Scissors
- Brooch pin back
- Felt backing, optional
Step-by-Step Guide
Step 1: Make the flower center
Start with a tight small circle or puffed center. An anemone flower often has a noticeable central dome, so this part should have a little volume. You can use puff stitches or tightly packed stitches to make the center stand out.
The center gives the flower its signature shape.
Step 2: Add the first petal layer
Work a round of petals around the center. Use chain spaces and taller stitches to form soft rounded petals. The petals should curve outward gently rather than sit flat. This gives the flower a more natural appearance.
Keep the petals evenly spaced for a balanced look.
Step 3: Build a fuller flower
If you want a more layered design, add a second round of petals behind or between the first. This creates depth and makes the brooch feel more realistic. For a tiny brooch, you may only need one or two layers.
The flower should feel full but not too bulky.
Step 4: Shape the petals
Once the petals are complete, gently adjust them with your fingers. Some petals can be slightly lifted to create dimension. If the petals curl too much, flatten them carefully while keeping the soft floral structure.
A little shaping goes a long way in a floral brooch.
Step 5: Add a darker center ring, optional
For a more realistic anemone look, add a darker ring around the center or use a contrasting thread to outline the middle. This makes the center pop and gives the flower a more dramatic, botanical effect.
A contrasting center is especially beautiful in jewel-toned versions.
Step 6: Back the brooch
Sew a felt circle behind the flower if needed, then attach the pin back. This helps the brooch stay upright and gives the petals a cleaner finish on the reverse side.
Step 7: Finish and fluff
Weave in all ends carefully and fluff the petals gently so the flower looks soft and lively. Check that the pin is centered and that the flower lies comfortably on clothing.
Helpful Tips
Anemone brooches look especially elegant when made in rich colors like plum, wine, and navy. They are ideal for gifts because they feel more refined than a simple flower motif while still being small and wearable.
5. Crochet Micro Sunflower Brooch Pattern
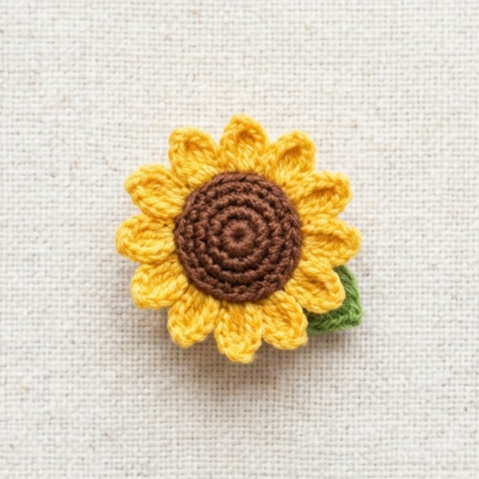
A micro sunflower brooch is tiny, cheerful, and full of warmth. It brings instant brightness to any outfit or accessory without feeling oversized. This is one of the most versatile brooch patterns because it is easy to customize, quick to make, and universally appealing as a gift.
Quick Notes
Skill level: Beginner
Finished size: About 1 to 1.5 inches across
Style: Cheerful, bright, small, versatile
Best colors: Yellow, gold, brown, cream, and green accents
Materials
- Yellow yarn for petals
- Brown yarn for the center
- Green yarn, optional for leaf detail
- 2.0 mm to 3.0 mm crochet hook
- Yarn needle
- Scissors
- Brooch pin back
- Felt backing, optional
Step-by-Step Guide
Step 1: Crochet the center
Start with a small round center in brown yarn. Keep it tight and flat. The center should be slightly raised or at least clearly defined so the sunflower is recognizable at a small size.
A solid center gives the brooch structure and visual focus.
Step 2: Add the petals
Crochet small yellow petals around the center. These can be simple chain-and-stitch petals or short pointed petals, depending on the style you want. Because the brooch is micro-sized, keep the petals short and compact.
Too-long petals can make the flower lose its miniature charm.
Step 3: Check the spacing
Make sure the petals are evenly spaced around the center. Sunflowers look best when the petal ring is neat and balanced. If needed, add a few extra stitches between petals to spread them out more evenly.
Symmetry helps the small flower read clearly.
Step 4: Add a second petal layer, optional
For a fuller look, you can add a second round of slightly offset petals behind the first. This creates a tiny layered sunflower that feels fuller and more detailed. Keep the second layer subtle so the brooch does not become too large.
A second layer can make the flower feel more dimensional.
Step 5: Add a leaf detail, optional
A tiny green leaf can be attached beneath the flower if you want a more botanical finish. This is optional, but it adds charm and makes the sunflower look more complete.
Keep the leaf very small so it does not overpower the flower.
Step 6: Attach the backing
Secure the sunflower to a felt circle if needed, then sew on the pin back. The backing helps the brooch sit flat and protects the stitches from wear.
Step 7: Shape the petals
Gently fluff the petals outward so the sunflower looks bright and lively. Check that the brooch is secure and ready to wear or gift.
Helpful Tips
A micro sunflower brooch is one of the best stash-busting projects because it uses very little yarn. You can make them in a whole range of yellows, from pale butter tones to deep golden shades. These tiny flowers make lovely add-ons for gift wrapping, cards, hats, and bags.
Conclusion
Crochet brooches are proof that small projects can still be full of personality, charm, and style. They are quick enough to make in an afternoon, but thoughtful enough to feel like real handmade gifts. That is what makes them so special. Whether you are creating a simple circle granny stitch brooch, a playful flamingo, a sweet Easter bunny, an elegant anemone, or a tiny sunflower, each design gives you a chance to experiment with color, texture, and shape in a very manageable way.
These five small brooch patterns are ideal for anyone who loves detailed accessories without the time commitment of larger garments. They are also wonderful for using leftover yarn and making meaningful gifts that feel personal and handmade. With a little care in shaping and finishing, even the tiniest brooch can become a standout accessory.
If you are looking for crochet ideas that are beautiful, practical, and giftable, these brooch patterns are a perfect place to start. They remind us that sometimes the smallest handmade pieces carry the most joy.