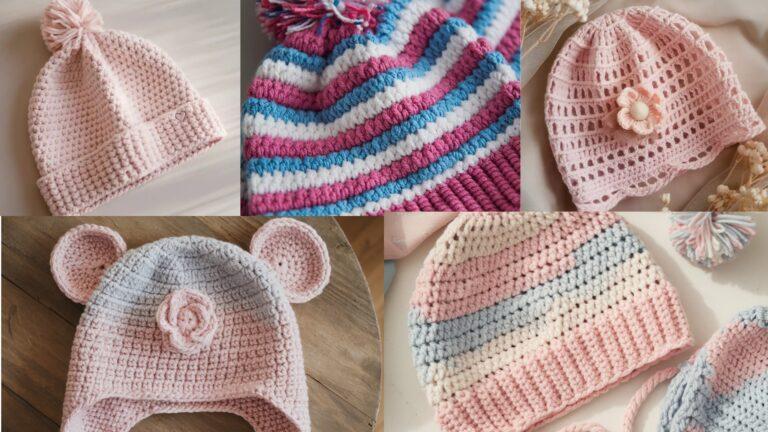
Lightweight, cozy, or decorative — a handmade headband is one of the fastest accessories you can make that instantly upgrades an outfit. Below are five versatile headband patterns: Braided, Cable, Lace, Double Shell Stitch, and Waffle Stitch. Each pattern includes: skill level, finished size + sizing notes, materials, gauge, stitch abbreviations, a very detailed step-by-step pattern (foundation, body repeat, finishing), alternative construction options (buttons, elastic, ties), blocking/finishing tips, and variations so you can personalize every headband for yourself or as gifts.
Quick universal notes for these headbands
- Yarn choice matters. Use soft worsted weight (category 4) for warm, structured headbands; sport/fingering or cotton blends give cooler, more delicate results. For everyday wear choose a soft acrylic/cotton/bamboo blend or merino for cozy winter headbands.
- Sizing: Adult head circumference typically 20–23″ (51–58 cm). These patterns give a standard adult medium fit (≈21–22″ / 53–56 cm). For smaller/larger heads: chain fewer (see each pattern’s size notes). When in doubt, measure the wearer’s head and subtract 0.5–1″ (1.3–2.5 cm) for a snug but not tight fit, or subtract 1.5–2″ (3.8–5 cm) for a very snug fit.
- Seams & closures: You can join headband ends with a flat seam (mattress stitch), a visible seam (sc join), a button + loop, or attach elastic for stretch. Each pattern lists options.
- Gauge is helpful but not critical — headbands are forgiving. If you want a specific width, check the gauge listed and adapt chain numbers.
Abbreviations used across patterns:
- ch = chain
- sc = single crochet
- hdc = half double crochet (US)
- dc = double crochet (US)
- tr = treble crochet (US)
- sl st = slip stitch
- st(s) = stitch(es)
- blo = back loop only
- flo = front loop only
- fp = front post (e.g., fpdc = front post double crochet)
- bp = back post (e.g., bpdc)
- rep = repeat
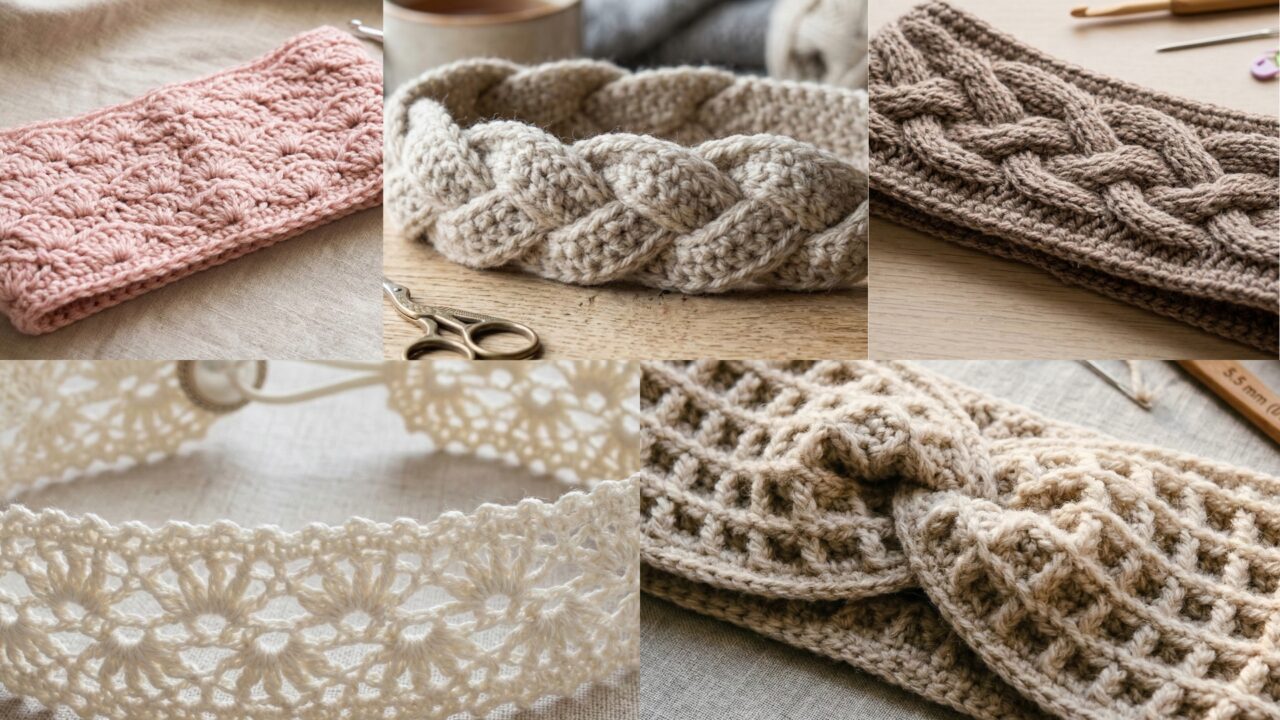
1. Crochet Braided Headband Pattern
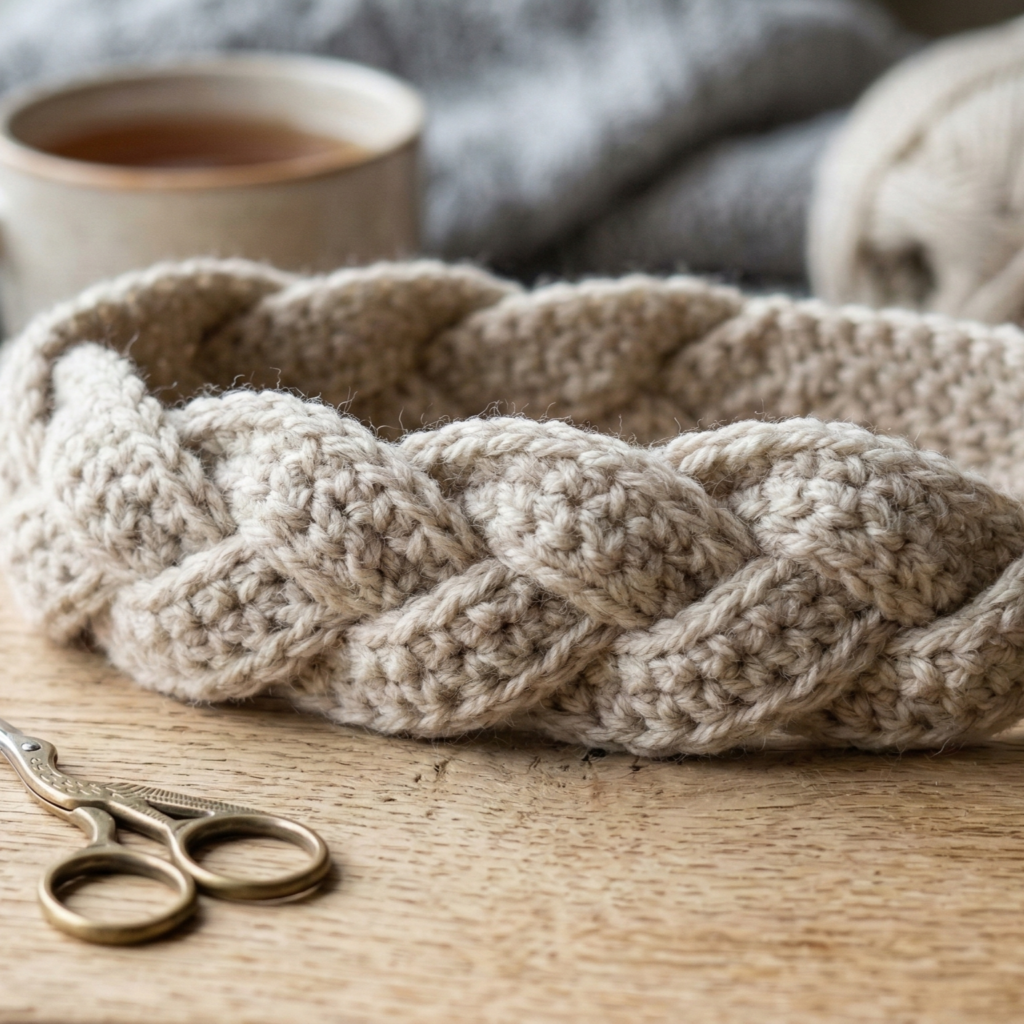
Skill level: Beginner — simple strips + braid (or braided look made in one piece).
Finished size: Adult medium — circumference ~21–22″ (53–56 cm); width ~3″ (7.5 cm) when braided from three narrow strips.
Materials
- Worsted weight yarn (approx 50 g / 100–120 yds). Choose a soft, flexible yarn.
- Hook: 5.0 mm (or size recommended for yarn)
- Tapestry needle, scissors
- Optional: 1 button + small elastic loop, or small piece of 1″ elastic for stretch
Gauge (informal)
- 14 sc × 16 rows ≈ 4″ in sc (use to estimate how many chains for width if you want exact width).
Two construction approaches (both produce a braided result):
A — Three strips braided (classic, beginner-friendly)
This method makes three thin panels and braids them. It’s tidy and gives a real braid feel.
Sizing formula
- Each strip length ≈ (head circumference − seam allowance) / 3. For 21″ circumference and 1″ seam allowance: (21 − 1) / 3 = 6.67″ per strip. But we’ll make strips longer because braiding shortens length. Make each strip length ≈ (circumference − 1″) ÷ 3 × 1.15 (add ~15% for shortening). For simplicity: chain length ~8–8.5″ (20–22 cm) for adult medium per strip, then measure during work.
Make three strips
- Foundation: ch 38 (or ch to reach desired strip length — 38 chains gives ~8.5″ with worsted and 5 mm).
- Row 1: sc in 2nd ch from hook and across. Turn.
- Rows 2–10 (or until strip width ~0.75″): ch1, sc across. Turn.
- Fasten off and weave ends. Make two more identical strips (total 3).
Braid and finish
- Align three strips so right sides are up. Braid them loosely (center over side, side over center, etc.) until near ends.
- Tuck ends together and secure with a short row of slip stitches or whipstitch down the ends using yarn tail to form a neat join. Trim tails and weave them into the underside.
- Join the two ends of braided piece: either stitch them together with mattress stitch (invisible join) onto the underside or overlap 1/2″ and sc through both layers for a visible seam.
Optional closure: button loop
- Instead of joining ends permanently, leave ends unjoined and attach a small 1″ elastic loop to one end and sew a decorative button to the other so the headband is removable.
Tips & variations
- Make wider braid: ply 2 strands for each strip (use two thinner yarns held together for strip making).
- Make braided headband in three colors, or fade across colors for gradient braid.
- For a softer look, steam block lightly.
B — One-piece braided look (no separate strips)
If you prefer single-piece construction that looks braided:
Method (twisted/tuck technique)
- Chain to desired circumference minus 1″ (e.g., ch 60 for adult medium — check gauge). Join to form loop without twisting.
- Row 1: ch1, sc in each chain around. Join with sl st.
- Row 2–8: ch1, sc in blo around (this produces vertical ridges).
- Create 3 vertical panels by marking every third section and folding/tacking to make a braided look: run a length of yarn along top to create 3 channels and gather them by sewing down at intervals so the headband puckers into braided-like ropes. This is a faster technique but less “real” braid.
2. Crochet Cable Headband Pattern
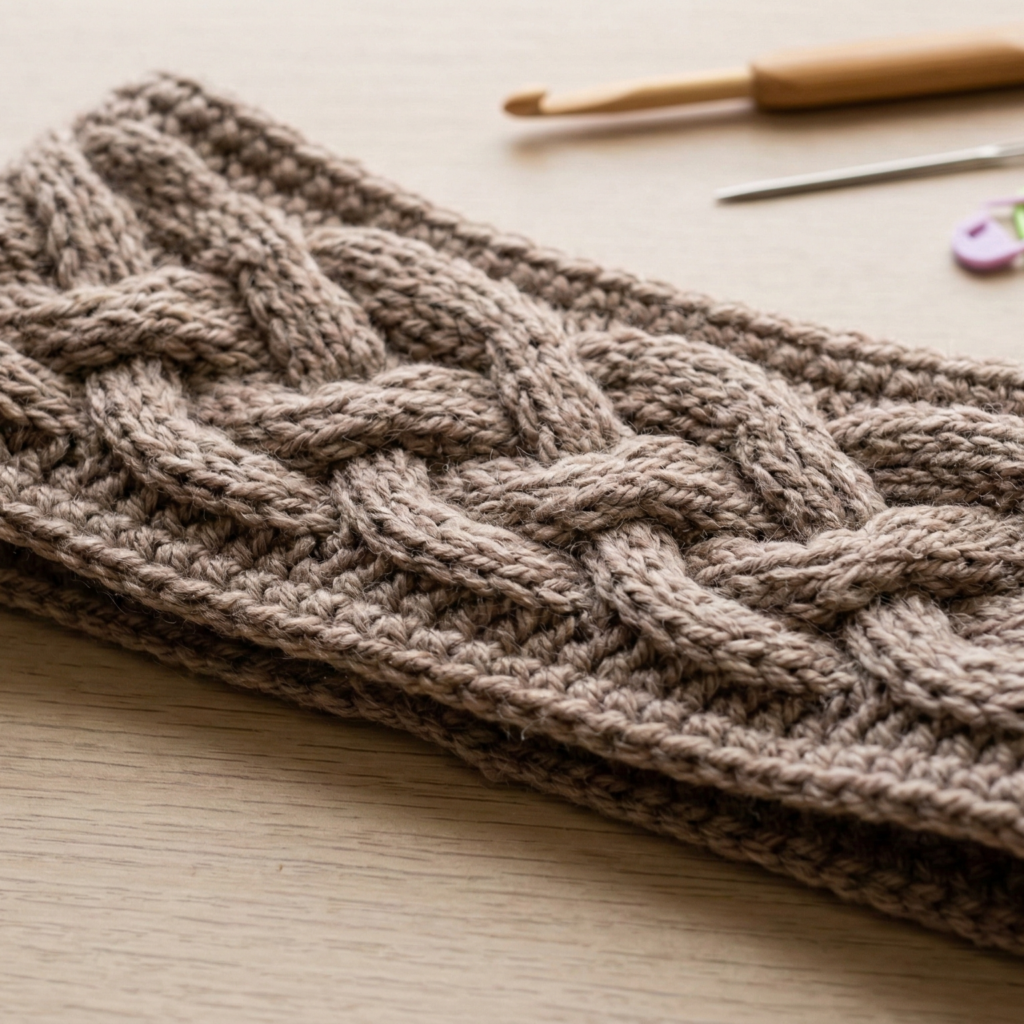
Skill level: Intermediate — working front post/back post stitches (fpdc, bpdc) to create cables.
Finished size: Adult medium circumference ~21–22″ (53–56 cm); width ~3–3.5″ depending on cable repeat.
Materials
- Worsted weight yarn (approx 50–75 g). Bulky yarn gives more pronounced cables.
- Hook: 5.5–6.5 mm for bulky; 5.0 mm for worsted.
- Tapestry needle, stitch markers, scissors.
Gauge (suggested)
- 12 fpdc × 14 rows ≈ 4″ in cable pattern (varies with yarn).
Stitch abbreviations specific to this pattern
- fpdc = front post double crochet
- bpdc = back post double crochet
- dc = double crochet
- sc = single crochet
Pattern concept
Make a rectangular band worked in rows of post stitches forming two 4-stitch cables that cross. Then seam ends to form headband. The crossing creates that classic twist/cable look.
Step-by-step (standard 2-cable band)
Foundation chain (width)
- Chain 32 (this makes a width of ~3–3.5″ in most worsted yarns; increase by 8 chains for wider band). Turn.
Row 1 (base)
- Ch2 (counts as first dc), dc in 3rd ch from hook and across. (You can also sc for a denser base). Turn.
Row 2 (establish post pattern)
- Ch2, dc in first 2 sts, fpdc around next 4 sts, bpdc around next 4 sts — repeat * * across ending with dc in last 2 sts. Turn. (You now have alternating cable columns.)
Row 3–6 (repeat)
- Ch2, dc across maintaining pattern: Where previous row had fpdc, work fpdc in same stitches; where bpdc was, work bpdc. Repeat rows until band height equals desired headband width (~3″ = about 8–9 rows depending on yarn).
Cable cross (to make the cable twist)
We’ll cross the first cable over the second every 6–8 rows for a visible twist.
- To cross left cable over right:
- Work the first two dc, then slip the next 2 fpdc stitches onto a cable needle (or simply hold them on your left hand), work the following 2 fpdc, then work the held 2 fpdc. This technique is simulated with post stitches as follows:
- Row for crossing: Ch2, dc across first 2 sts, fpdc around next 2 sts but insert hook from right to left (i.e., work them in reverse order), then fpdc around following 2 stitches normally. This creates the over/under crossing. If you’re not comfortable with reversing, do this instead:
- Make a short cable crossing row using sc on the wrong side to anchor and then reintroduce fpdc arrangement in the following rows so the cable visually crosses.
Note: Post-stitch cabling can be done in many ways. A clear method is to use a cable needle: remove 2 fpdc stitches to cable needle, work next 2 fpdc on left, then work cable needle stitches — similar to knitting. Use markers to identify cable blocks.
- After making the crossing row, continue repeating the post pattern for another 6–8 rows before crossing again if desired. This gives a repeated braided cable effect.
Final rows & finishing
- When band reaches desired width, work one round of sc around to neaten edges: attach yarn at side and sc evenly. Fasten off and weave in ends.
Join
- Fold band into loop and join ends together with mattress stitch for a flat seam or sc through both edges for a visible join. Alternatively sew a flat fabric backing and slipstitch to hide seam.
Comfort option
- Line the interior with a soft cotton strip or fleece to prevent slippage and keep ears warm without itch.
Tips & variations
- For quick cable effect use a 2×2 rib of fpdc/bpdc without crossings — it still reads as cable-like and is easier.
- Use bulky yarn for dramatic raised cables and minimal rows, or use worsted for subtler cables.
3. Crochet Lace Headband Pattern
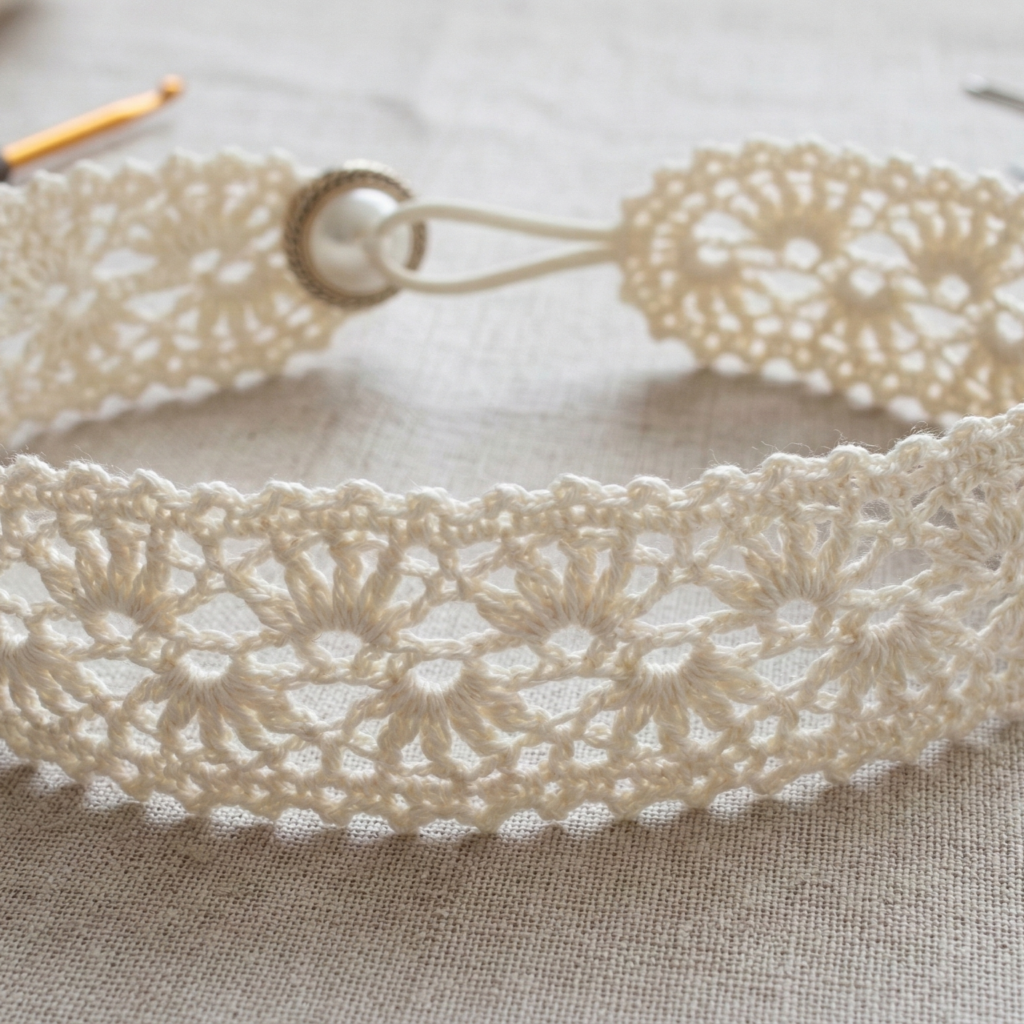
Skill level: Intermediate — lace repeats and edge finishing.
Finished size: Adult medium circumference ≈21–22″; width ~2–2.5″ (for a delicate look) but you can widen by repeating pattern.
Materials
- Sport or fingering weight yarn for gentle lace (or light DK for more structure). ~50–100 yds.
- Hook: 3.0–4.0 mm depending on yarn
- Tapestry needle, blocking pins, scissors.
Gauge
- Lace patterns vary; make a 2″ swatch of the lace repeat to measure how many repeats you need to reach desired width.
Pattern concept
A narrow, airy band using a small shell and chain-lace repeat. Work in rows, join ends, and add a decorative closure (button + loop) so the lace pattern remains unbroken.
Example lace repeat (thin floral lace)
Repeat multiple: 6 + 1 chains for width.
Foundation
- Chain 61 (gives a narrow band ~2.5″ width with fingering; adjust by changing number of repeats). Turn.
Row 1 (setup)
- sc in 2nd ch from hook, ch3, skip 2 ch, sc in next ch across. End with sc in last ch. Turn.
Row 2 (lace shell row)
- Ch3 (counts as dc), {2 dc, ch2, 3 dc} into next ch-3 space (forms shell), ch2, sc into next sc — repeat across, ending with dc in top of starting ch3. Turn.
Row 3 (anchor row)
- Ch1, sc across anchoring each ch-2 space with sc in the ch2 and sc in shell centers as needed. Turn.
Repeat
- Repeat Rows 2–3 until you have about 2″–2.5″ width or desired width. Finish with an anchor row on top.
Option: Continuous loop without seam
- Rather than joining ends by sewing (which may disturb lace), make a small button loop at one end:
- At one short end, chain 10 and sl st back to the base to make an elastic loop. Fasten off and sew small decorative button to other end so the pattern continues uninterrupted when worn.
Edging
- Work a picot edge: join yarn along one long side and sc across, picot every 6 sc for a decorative finish. Block flat.
Lining & comfort
- Lace can be slippery — to prevent slipping out of place, sew a thin strip of elastic into the seam with slight stretch and tack it near the ends, or add a non-slip fabric strip on the inner side.
Variations
- Add a small crocheted flower or bow as an accent sewn to one side.
- Make a wider lace headband by adding repeats across width.
4. Crochet Double Shell Stitch Headband Pattern
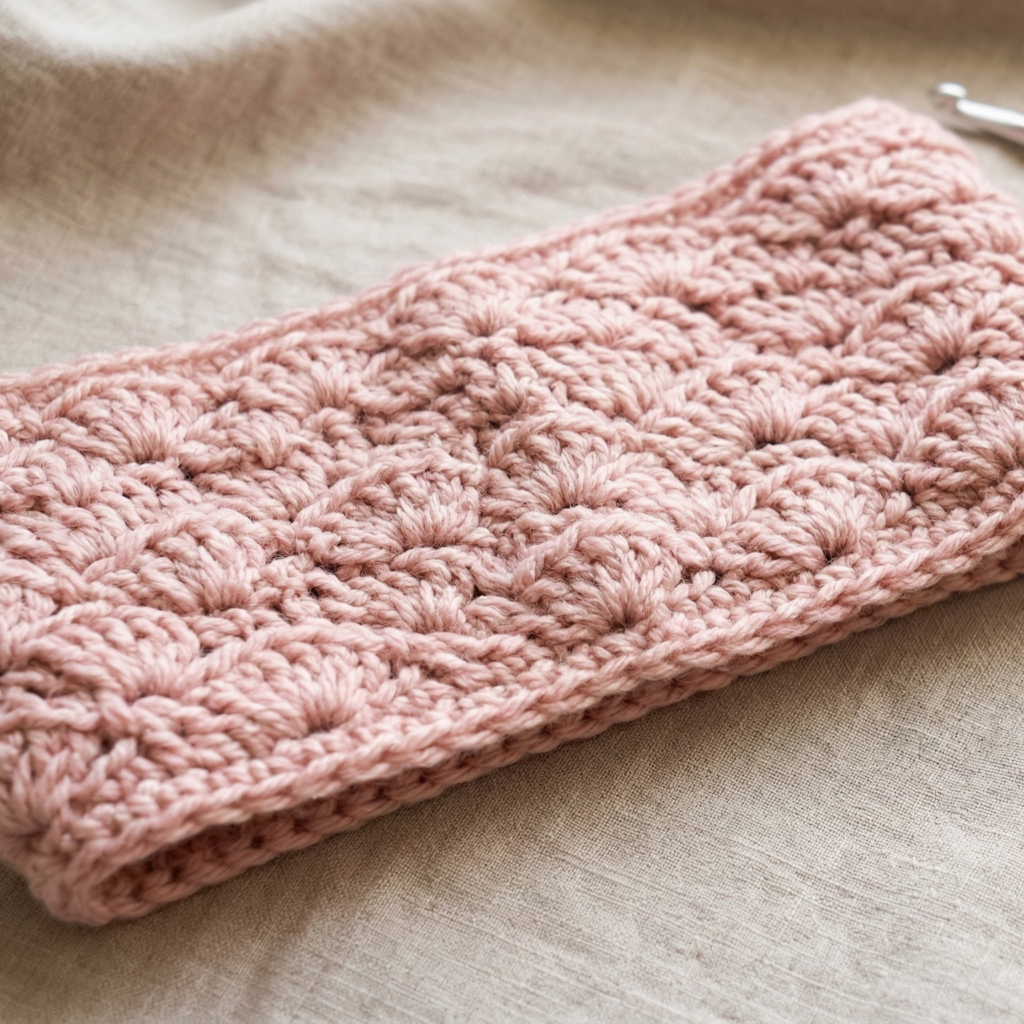
Skill level: Beginner–Intermediate — shell stitches repeated in rows.
Finished size: Adult medium circumference ~21–22″; width ~3–3.5″ (typical double shell height).
Materials
- Worsted weight yarn (soft acrylic/cotton blend) ~75 yds.
- Hook: 5.0 mm
- Tapestry needle, scissors, stitch marker.
Gauge (approx)
- 12–14 dc × 8–10 rows = 4″ in shell pattern.
Pattern concept
Double shell = sets of shells staggered across rows for a textured, feminine headband. Works up quickly and looks detailed without complex stitchwork.
Foundation
- Chain 44 (or any multiple of 6 + 2). For wider headband use more repeats.
Row 1 (base)
- Dc in 4th ch from hook (counts as first dc), skip 2 ch, 5 dc in next ch (shell), skip 2 ch, dc in next ch — repeat across ending with dc in top of turning ch. Turn.
Row 2 (double shell row)
- Ch3, skip 2 dc, shell (5 dc) in middle dc of next shell, skip 2 dc, dc in next dc — basically offset shells to sit between previous shells. Turn.
Row 3–end
- Repeat Row 2 until band height ≈ 3–3.5″ (about 6–8 rows depending on yarn). End after a dc row to make edges tidy.
Border
- Work 1 round of sc around the band to create a firm edging. Work 3 sc in each corner seam area when joining for a smooth circle.
Join
- Fold band into loop and seam with mattress stitch for an invisible join or sc join for decorative ridge. Alternatively, leave open and sew a button + loop.
Variations & finishing
- Make a twisted front: before joining, fold the band in half and twist once, then join ends — creates a turban-knot look at front. Secure twist by sewing a short lining behind twist to hold shape.
- Use a contrasting color for the border to outline shells.
Comfort
- Line the inner side with a thin strip of jersey fabric if you want a non-slip, soft interior.
5. Crochet Waffle Stitch Headband Pattern
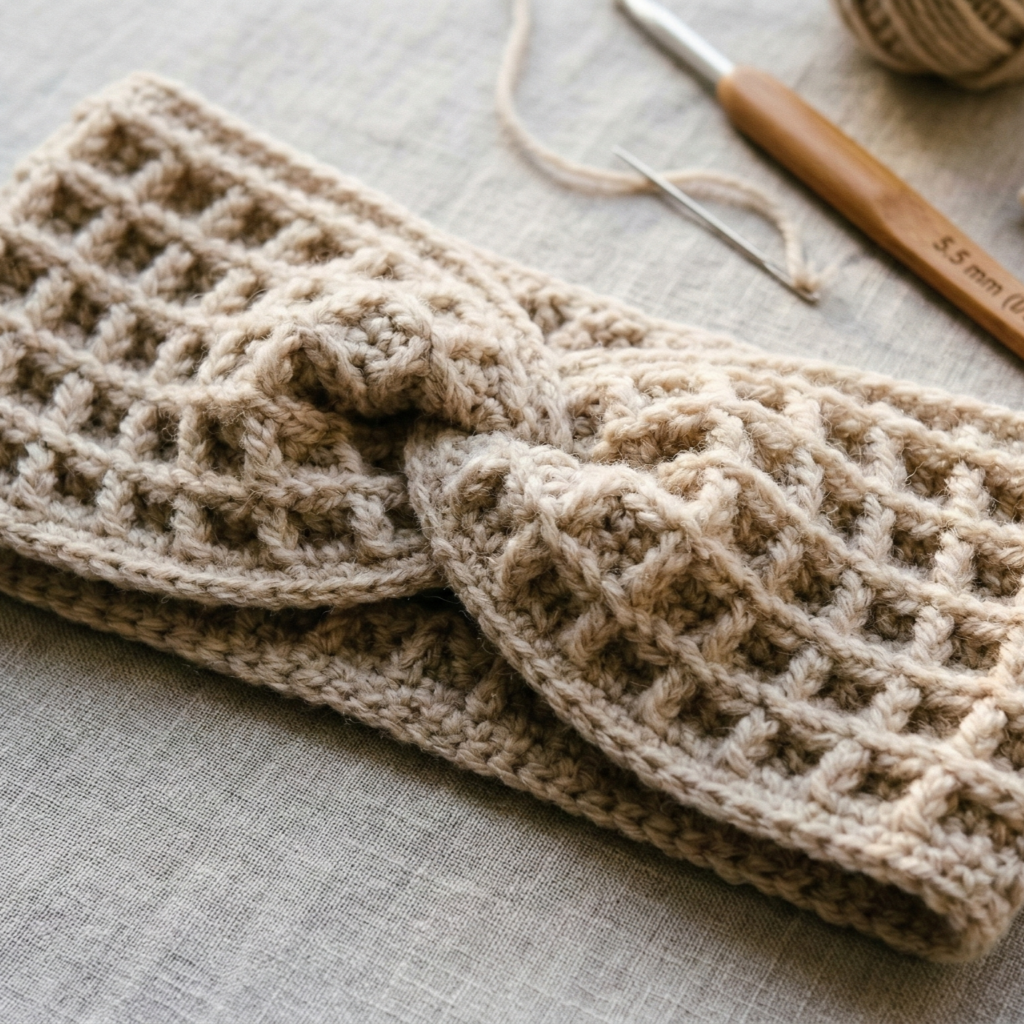
Skill level: Beginner–Intermediate — waffle stitch uses texture (dc and fp/bpdc).
Finished size: Adult medium circumference ~21–22″; width ~3–4″ depending on waffle depth.
Materials
- Worsted weight yarn (100% wool or acrylic/wool blend works great for waffle texture) ~75–100 g.
- Hook: 5.0–6.0 mm
- Tapestry needle, scissors.
Stitch note (waffle stitch)
- Waffle uses fpdc (front post double crochet) around dc from previous rows combined with regular dc to create raised squares.
Pattern (classic waffle headband)
Foundation
- Ch 36 (or any multiple of 3 + 1 for width). Turn.
Row 1 (base)
- Dc in 3rd ch from hook and in each ch across. Turn.
Row 2 (setup)
- Ch2 (counts as first dc). Dc in next stitch. Fpdc around next stitch (the dc below), dc in next 2 sts — rep across ending with dc in top of ch2. Turn.
Row 3
- Ch2, dc in next stitch, fpdc around the dc of previous row (work from front), dc in next 2 — repeat across. The fpdc will build columns that become the waffle squares. Turn.
Repeat
- Repeat Row 3 until headband reaches desired height (for 3–4″ width about 8–10 rows). Finish with a dc row for a neat top edge.
Border & join
- Work 1 round sc around for neater edges. Join ends with mattress stitch or sc seam. Weave in ends.
Variations
- Make a wider waffle headband by increasing foundation chain and working more rows.
- Add a faux knot front: after completing a long band, fold and twist at center then join ends to create a center knot. Sew inside to secure and optionally add a fabric backing to hide seam.
Lining & grip
- Waffle stitch is slightly textured and holds in place well. If you need extra grip, sew a thin silicone strip to inner center.
Blocking, Finishing, and Gift-Ready Presentation
Blocking
- For lace and cable headbands: wet-block lightly and pin to final shape, especially if using natural fibers. For acrylic, steam block carefully (do not press too closely).
- For textured stitches (waffle, cable, double shell): a light steam or finger-pull shaping is usually enough.
Seams & joins
- Invisible join (recommended): mattress stitch or whipstitch through the horizontal bars on the edges gives a flat seam.
- Visible finish: sc join is easier and creates a tidy ridge. If you plan to seam under a knot or twist, a visible sc seam is fine as it will be hidden.
Linings & comfort
- Cut a strip of soft jersey or fleece to the same circumference and stitch it inside if you want a soft, non-slip backing.
- For ear-friendly winter headbands, add a felt or fleece patch behind cable areas to protect ears from draft.
Closures & adjustability
- Button + loop: add a small loop at one end and a decorative button sewn to the other. This is great for adjustable fit and preserving lace aesthetics.
- Elastic: for a one-size-fits-many headband, stitch a short (1–1.5″) piece of elastic inside the join when seaming ends. This adds hidden stretch.
- Tie ends: leave a few inches extra and make ties on each end for adjustable closure.
Care
- Most acrylic and cotton blends: machine wash gentle, reshape, and lay flat to dry.
- Wool/merino: hand wash in cool water and dry flat. Add a care tag if gifting.
Styling tips & variations (quick ideas)
- Add a decorative bow or crocheted flower to one side for a feminine look.
- Make matching sets (headband + wrist warmers) using the same stitch and yarn.
- Use faux fur trim at the interior for a winter luxury headband.
- Color-block: carry two or three colors for modern stripes, or use variegated yarn for instant texture changes.
Conclusion
These five headband patterns combine classic technique and wearable design: braid for casual boho, cables for a cozy knit-look, lace for delicate summer styling, double shell for feminine texture, and waffle for structured warmth. Each pattern can be finished in several ways—flat seam, button/loop, elastic, or faux knot—so you can tailor fit and function to the wearer.