Keychains are perfect small projects: fast to make, endlessly customizable, and great for using scraps. They’re also ideal for gift swaps, zippers, backpacks, and market stalls. Below you’ll find a single, practical introduction (materials, safety notes, abbreviations) and five fully expanded patterns with skill level, exact materials and yardage estimates, finished size, clear round-by-round instructions, assembly and finishing tips, variations, and care. Each pattern is written in US terms and uses continuous rounds unless noted.
Before you start — tools, materials, and safety
Common materials (per keychain unless stated)
- Yarn: DK/light worsted or sport weight for small detail (leftover scraps work great). For plushier shapes you can use worsted.
- Hook: 2.75–3.5 mm (adjust for tightness; smaller hooks make tighter fabric so stuffing doesn’t show).
- Fiberfill stuffing (small amount) or embroidery felt for flat pieces.
- Tapestry needle, small scissors, stitch marker.
- Keychain hardware: small split ring + short lobster clasp or 2–3 cm chain & jump ring.
- Optional: safety eyes (4–6 mm) for adult/decoration only — do not use safety eyes for toys or keychains intended for children under 3 — embroider instead.
- Small beads/buttons for decoration (sew securely; not for toddler items).
- Optional: thin felt circles to back safety eyes or interior seams.
Safety note
- Keychains are not toys. If the keychain may be handled by young children, do not use small parts (beads, safety eyes, buttons). Always securely stitch hardware and embellishments and consider sewing a felt backing over sewn-on parts.
Abbreviations (US)
- MR = magic ring
- ch = chain
- sc = single crochet
- hdc = half double crochet
- dc = double crochet
- inc = increase (2 sc in same st)
- dec = decrease (sc2tog)
- sl st = slip stitch
- st(s) = stitch(es)
- BLO / FLO = back loop only / front loop only
- rep = repeat
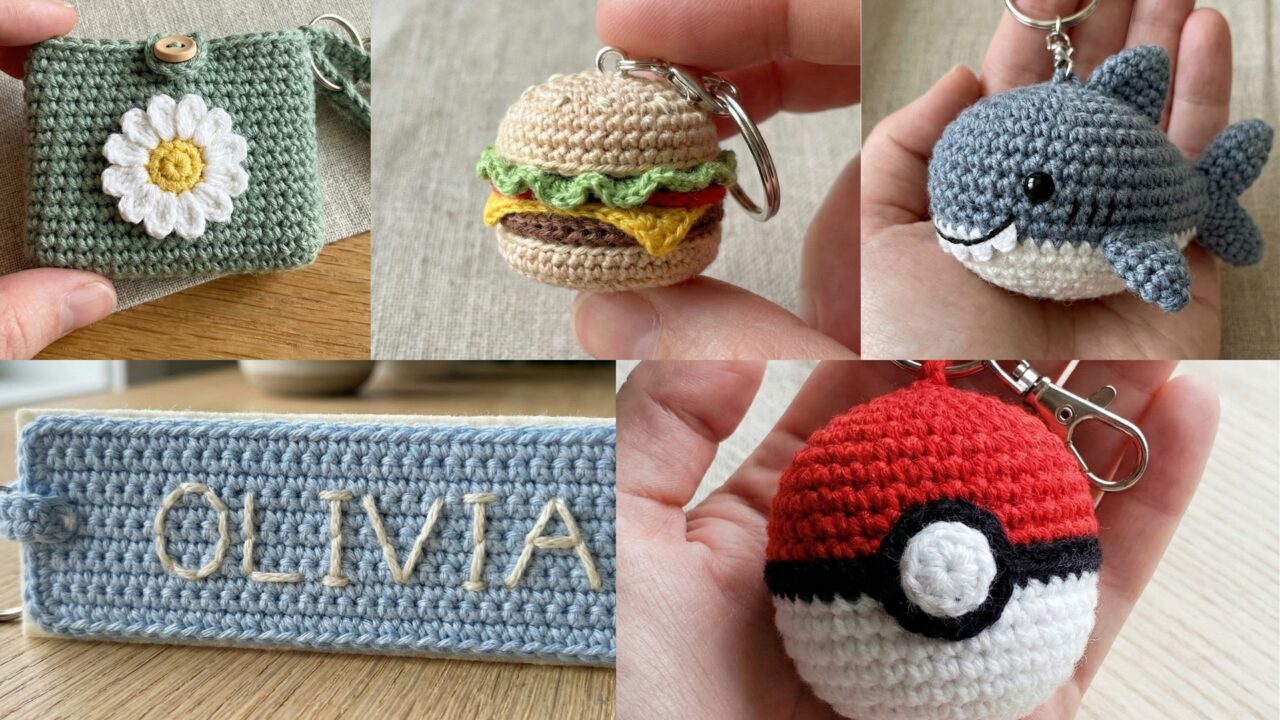
1. Crochet Pokéball Keychain Pattern
Skill level: Beginner–Intermediate (color changes)
Finished size: ~1.75–2.25 in (diameter) depending on yarn/hook.
Materials
- DK / light worsted yarn: White ~10 yd, Red ~10 yd, Black ~5 yd.
- Hook: 3.0 mm.
- Small amount stuffing.
- 6 mm safety eye or embroidered center (recommended for keychains).
- Split ring + short lobster clasp, tapestry needle, stitch marker.
Notes
The Pokéball is worked in three color bands: red top, white bottom, with a narrow black center band and a central “button.” I recommend embroidering the small central circle rather than using a safety eye to keep it child-safe.
Step-by-step (round counts shown; keep continuous rounds and mark round start)
Base and lower half (white)
- MR, R1: 6 sc in MR — (6).
- R2: inc around — (12).
- R3: sc, inc rep around — (18).
- R4: sc x2, inc rep around — (24).
- R5: sc x3, inc rep around — (30).
- R6: sc in each st around — (30).
- R7: sc in each st around — (30).
- R8: sc in next 3, dec* rep around — (24). Start stuffing firmly but not overstuffed.
- R9: (sc x2, dec) rep — (18). Finish stuffing.
- R10: (sc, dec) rep — (12).
- R11: dec around to close to small hole — (6). Fasten off leaving long tail for joining. Do not fully close; we will join with red top.
Top half (red) — worked separately then joined or worked directly
(Option A: join red to open white edge and continue; Option B: make separate hemisphere and sew. Option A is neater.)
- Attach red yarn to remaining open stitches (if you closed, sew seam to re-open). R12: sc in each st around — (12).
- R13: sc, inc rep around — (18).
- R14: sc x2, inc rep around — (24).
- R15: sc x3, inc rep around — (30).
- R16: sc in each st around — (30).
- R17: sc x4, inc rep around — (36) optional if you want a slightly larger round profile — normally stop at 30 for tighter sphere. Stuff top; ensure even stuffing.
Black center band
18. Finish red rounds and switch to black; work 1–2 rounds of sc in black around the middle seam so the black band sits flush across the equator. If you worked top and bottom as one piece, simply change to black for 1–2 rounds at midline.
Button (small circle)
19. With white yarn (or white over black), MR: 6 sc in MR, sl st and leave long tail. Flatten and sew to the black band center front. Alternatively embroider 2 concentric circles for more polish.
Attach keyring
20. Create a small loop: ch 6, sl st to base; weave the tail through loop and cinch; push the loop down and slide the split ring through the loop before tightly sewing the loop to top of Pokéball. Reinforce by sewing through surrounding stitches several times.
Finishing
- Weave in ends. Ensure seams are secure. If you used safety eye for the button (not recommended for kids), back with felt and sew thoroughly.
Variations
- Make Great Ball or Ultra Ball colorways by shifting accent colors and embroidery details.
- Tiny Pokéball charms: use sport yarn and 2.5 mm hook for micro charms.
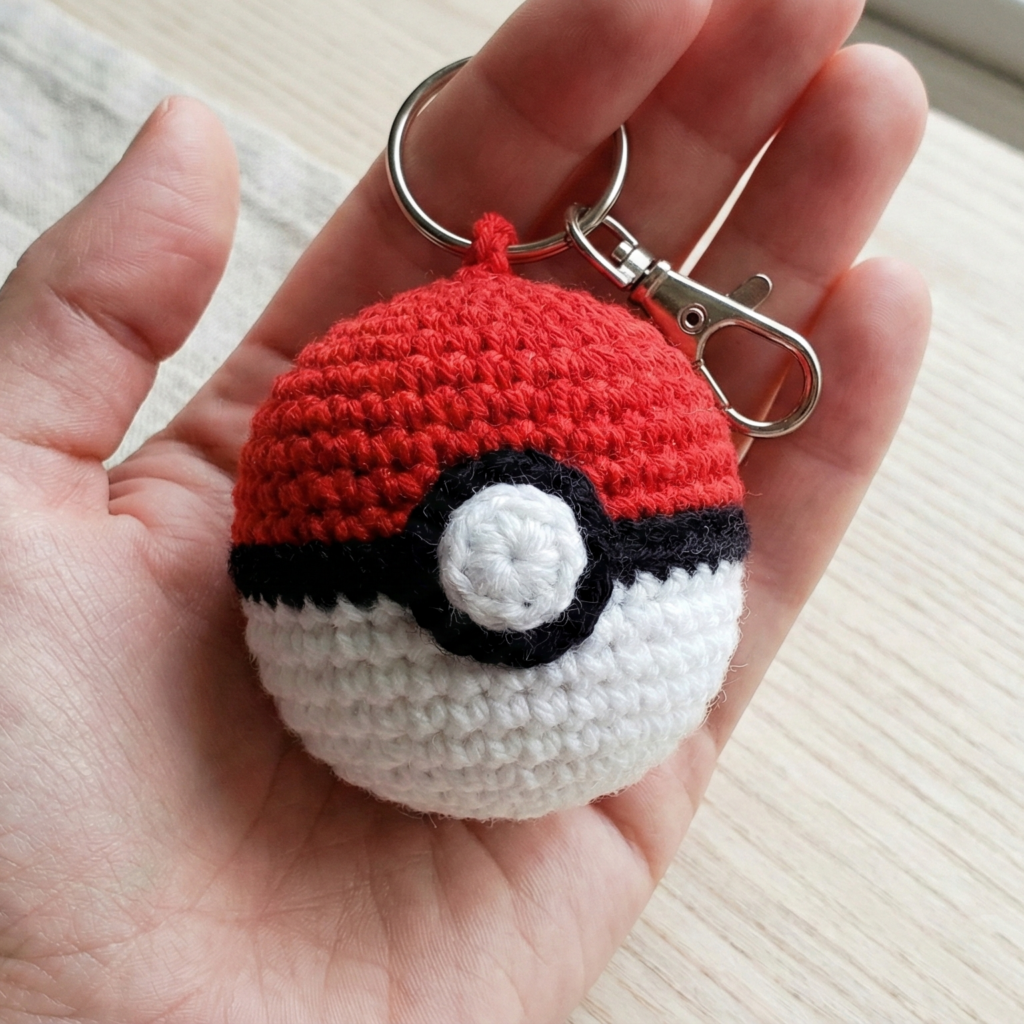
2. Crochet Daisy Mini Bag Keychain Pattern
Skill level: Beginner–Intermediate (motifs and small assembly)
Finished size: Bag ~2.5–3.5 in wide × 2–2.5 in tall (mini bag).
Materials
- DK yarn: Main bag color ~25–35 yd, Daisy petals white ~6–8 yd, Daisy center yellow ~3 yd.
- Hook: 3.25–3.5 mm.
- Small snap or button (optional), small piece of soft lining fabric (optional), split ring + lobster clasp.
- Tapestry needle.
Concept
A tiny pouch with a daisy appliqué on front, functioning as a coin pouch or lip balm holder. The strap will be a short chain loop to attach to a keyring.
Step-by-step
Front & back panels (make 2) — worked flat rectangles or simple granny rectangle
- Chain 18 (adjust to width preference). Row 1: sc in 2nd ch from hook and across (17 sc). Turn.
- Row 2–10: sc across each row for ~10 rows or until panel height ≈ 2–2.5 in (count rows using rpi). For textured look, alternate a row of hdc. Fasten off leaving long tail.
Sides & base (optional for boxier pouch)
3. If you want a flat-bottom mini bag, crochet a narrow strip: join yarn at one short side and sc evenly around the panel edges making a seam strip ~12–14 sts long; continue sc rounds along base for 8–10 rounds; join to create depth. Alternatively simply seam front and back leaving top open.
Daisy applique
4. Petals: MR, ch1, 6 sc in MR (6). Sl st to close. Round 2: ch2, 3 dc in same st, ch2, sl st into next st repeat to make 6 petals. Fasten off, weave tail.
5. Center: small puff or MR 6 sc in yellow; sew into center of flower. Attach flower to front panel with whipstitch using matching yarn, sew through center well.
Closure
6. Add a small snap or a crocheted flap: Attach yarn at top back center, ch 6, sl st to form loop for button; make a small flap on the front top by picking up stitches and working 4–6 sc rows and sewing down sides leaving a buttonhole.
Strap & hardware
7. Make a small strap: ch 20, sc back along chain to create a sturdy strap; fold strap in half and sew ends securely to back top seam leaving a loop for the split ring. Attach lobster clasp to split ring.
Lining (optional)
8. For durability, cut a small piece of fabric to the inner panel size and hand-sew to inside of bag; this helps with coins and small objects.
Finishing
- Weave in ends, trim and tidy edges. Test snap/button closure.
Variations
- Make multiple daisies across the front.
- Use tapestry crochet to create a checkered mini bag.
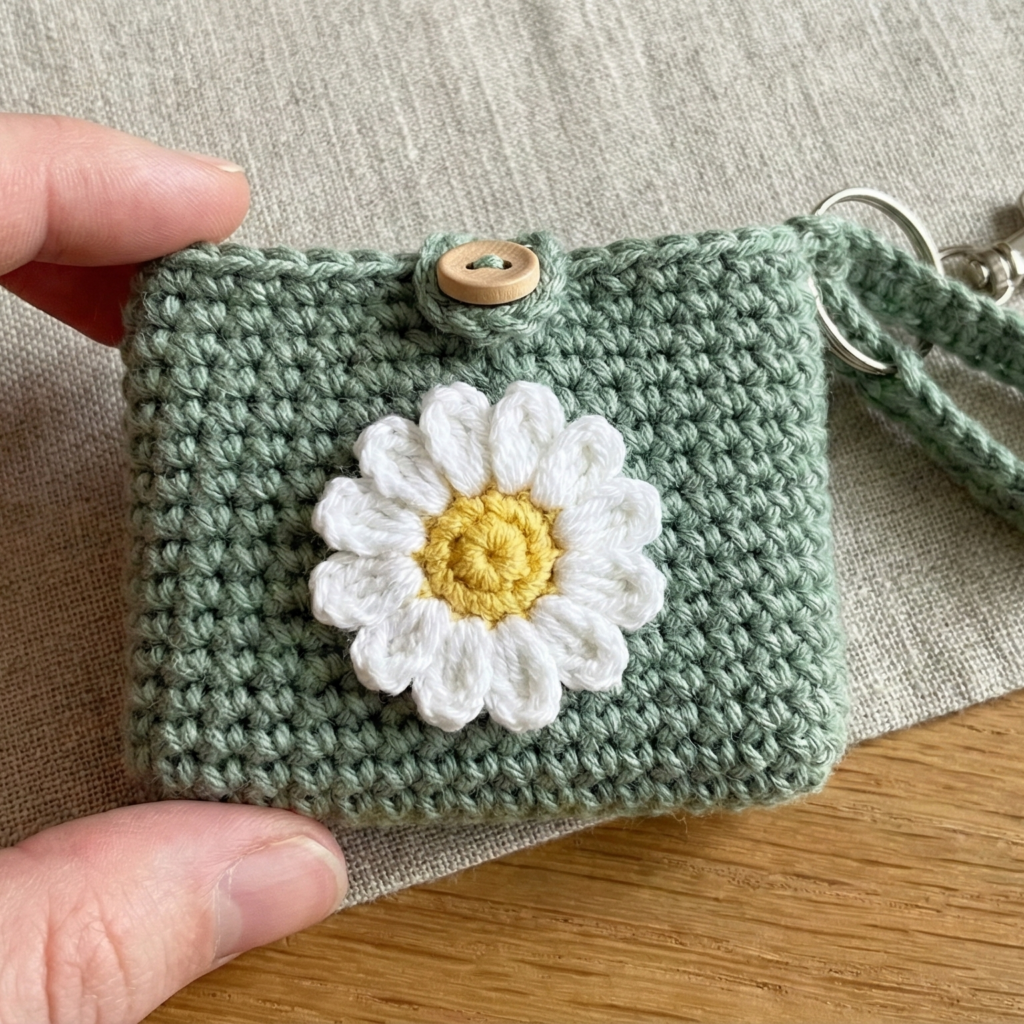
3. Crochet Hamburger Keychain Pattern
Skill level: Intermediate (layering, colorwork)
Finished size: ~2.5–3.5 in across depending on yarn/hook.
Materials
- DK yarn in bun/light tan, darker tan (top/bottom), brown (patty), green (lettuce), red (tomato), yellow (cheese).
- Hook: 3.25–3.5 mm.
- Small amount stuffing for bun layers; felt slices possible for realistic layers.
- Keyring hardware, needle, glue (fabric glue optional).
Concept
The hamburger is made as stacked flat layers—bun top (domed), lettuce/rings as flat frilly rounds, patty as flat circle, cheese as a small square/triangle, bottom bun as flat disc or shallow dome. Layers are stitched together and reinforced.
Step-by-step (make individual layers then assemble)
Top bun (domed hemisphere)
- MR, R1: 6 sc in MR (6).
- R2: inc around → (12).
- R3: sc, inc → (18).
- R4: sc x2, inc → (24).
- R5: sc x3, inc → (30).
- R6–R8: sc around (30) — this creates domed height. Stuff lightly and leave tail for sewing but do not close fully—this becomes the top bun.
Bottom bun (flat disc or shallow dome)
7. MR R1: 6 sc. R2 inc → 12. R3 sc, inc → 18. R4 sc x2, inc → 24. R5 sc around (24). Fasten off leaving tail for sewing or make shallow dome by adding one extra round and small dec rounds.
Patty
8. With brown, MR R1 6 sc; R2 inc → 12; R3 sc, inc → 18; R4 sc even → 18; flatten, fasten off.
Cheese
9. Use yellow: ch 8, sc across ~7 sts for a thin rectangle. Make one or two rows. Or work a small square: ch 5, sc rows 3–4 and fasten off. For melted look, leave one corner longer and make scalloped edges.
Lettuce (frilly)
10. With green, ch 20, row 1 sc across to make a thin strip; Row 2: sc, ch3, sl st across to form ruffles OR work a circular frill: MR, R1: ch3, 12 dc in MR; R2: ch2, 3 dc in next repeat to create edge frills. Make 1–2 frilly rounds.
Tomato (optional slice)
11. Small red circle: MR 6 sc, R2 sc around (6–12) flattened.
Assembly
12. Stack layers in order: bottom bun, patty, cheese (one side tucked under patty for melted effect), lettuce frills, tomato, top bun. Sew layers together around the edge with tight whipstitch; sew through several stitches to secure. Add light stuffing between top bun and patty to keep shape.
Keyring attachment
13. Create a small loop at the top center of top bun: ch 6, join to base with sl st; thread split ring through loop before closing off top seam. Sew loop base strongly through the center top stitches and reinforce through interior.
Finishing details
- Embroider sesame seeds on top bun with cream yarn (stitch single French knots or tiny sl sts).
- Optionally glue a small felt tag with branded charm.
Variations
- Make slider burger: add small velcro inside to insert tiny notes (fun gift).
- Mini burger pair: make two stacked burgers for giant-decorator keychain.
4. Crochet Happy Shark Keychain Pattern

Skill level: Intermediate (small shaping, applique teeth, safety eyes)
Finished size: ~2.5–3.5 in long (nose to tail).
Materials
- DK yarn: shark body (gray/blue) ~25 yd, belly white ~8–10 yd, fin accent color (optional) ~5 yd.
- Hook: 3.0–3.25 mm.
- Small amount stuffing.
- Safety eyes 4–6 mm (not for child-use) or embroidered eyes.
- Keyring hardware, tapestry needle.
Concept
Small amigurumi shark — worked as a single body/hood with side fins, tail, and applique teeth. Use continuous rounds for smooth shaping.
Step-by-step
Head & body (worked in gray)
- MR R1: 6 sc (6).
- R2 inc → 12.
- R3 (sc, inc) → 18.
- R4 (sc x2, inc) → 24.
- R5–R8 sc around (24) — this builds the head. Insert safety eyes between R6–R7 spaced about 6 sts apart (or embroider eyes if safer). Begin light stuffing.
- R9: (sc x3, inc) → 30. R10–R14 sc even (30) — body length. Continue stuffing toward mid-body.
- R15: (sc x3, dec) → 24. R16: (sc x2, dec) → 18. R17: (sc, dec) → 12. Do not close fully; leave opening for tail shaping.
Tail (worked by splitting rounds or closing and sewing)
8. For simple tail, make a flat fin: ch12, sc back across to create long strip, form V by decreasing central stitches for two tails, sew to body tail opening and stuff small amount in base. Or continue by making small tapered tube: MR 6 sc, inc to 12, sc even 3–4 rounds, dec to 6 and close; then attach flat fin by sewing two triangles to the tube.
Fins (make 2 side fins + dorsal fin)
9. Make small triangle fins: ch 6, row 1 sc 5, row 2 sc across decreasing one stitch at tip each row until 1; fasten off leaving tail to sew. For dorsal fin, make slightly larger triangle and sew centered on top.
Belly & teeth applique
10. Belly: With white yarn, ch 8 and sc across for a small oval; sew centered under head/body. Alternatively work MR small oval and sew.
11. Teeth: Using white, tiny single crochet triangles (ch 3, sc 2 in 2nd ch, sc) and make 3–4 small triangles; sew to edge of mouth area, tucking slightly under upper jaw to make a smiling set of teeth. Embroider a curved smile line in black under the teeth for a friendly look.
Assembly & keyring
12. Decide top center and make a small loop (ch 6, sl st to base) and sew down, attaching the split ring before final reinforcement. Ensure loop is anchored through multiple body stitches.
Finishing
- Ensure the area around eyes/teeth is secure. If using safety eyes, back with felt. Weave ends.
Variations
- Make baby shark family with size gradation and different colored bellies.
- Make a magnet version by sewing a small disc magnet into the back (glue and sew through felt backing).
5. Crochet Name Keychain Pattern

Skill level: Beginner (basic shaping, surface embroidery)
Finished size: tags ~1–1.5 in high × width varies by letter.
Materials
- DK or sport yarn in main tag color ~5–10 yd per tag, contrasting color for letters.
- Hook: 2.75–3.5 mm.
- Small felt backing and fabric glue (optional), split ring, embroidery floss for finer letters.
- Tapestry needle.
Concept
Make small flat letter tags (two layers: front shaped letter panel + back layer) or rectangular tags with embroidered initials. These are a great way to personalize gifts.
Option A — Flat letter appliqué tag (worked in the round & seamed)
Step-by-step (simple rectangular tag with letter embroidery)
- Decide dimensions: small rectangle 18 sts × 8 rows (example) for a 1 in tall tag — swatch to confirm.
- Chain foundation: ch 10 (for example), Row 1: sc in 2nd ch from hook and across (9 sc); turn. Row 2–6: sc across (for 8 rows total). Fasten off. Make a second identical rectangle for backing.
- Embroider letter on front rectangle with contrasting yarn or embroidery floss: use backstitch to form clear letters. Example: for name “SAM”, use chain stitch for capitals or satin stitch filling.
- Place front and back wrong sides together and whipstitch around edges leaving a small gap for stuffing if you want a puffy tag; insert a little stuffing then finish stitching. If you prefer flat, sew edges closed flat.
- Add small top loop: at center top, ch 6 and join to seam, or sew a small felt loop to back. Slip split ring through loop and attach lobster clasp.
Option B — Crocheted letter applique (single letter as tag)
- For letter shapes like “A” or “S” it’s easiest to crochet a small rectangle then cut felt letter and embroider or applique felt letter on top to ensure legibility. For clean edges, cut letter from felt and glue/sew into place then stitch rectangle layers around.
Finishing
- Back tags with a small felt circle for durability and to hide knots.
- Seal embroidery with a small dab of Fray Check if needed.
Variations
- Use leather or faux-leather backing for a premium look.
- Add beads or charms to the ring for flair.
Finishing tips (applies to all keychains)
- Use tight tension and a slightly smaller hook than usual so stuffing doesn’t show through.
- Reinforce hardware attachment by sewing through multiple rounds and adding a small felt disc inside to spread the load.
- If keychain will get heavy use, hand-stitch seam areas at least twice and use a backstitch.
- When using safety eyes or beads (non-child use), back them with small felt disks and stitch through the felt and fabric a few times.
- To make pieces machine washable, line interiors with fabric and avoid glued embellishments.
Conclusion
These five keychain patterns — Pokéball, Daisy Mini Bag, Hamburger, Happy Shark, and Name Tag — give you a mix of fast makes and slightly more detailed amigurumi. They’re perfect for using up yarn scraps, practicing small shaping, and creating unique little gifts. Start with the project that fits your skill level and the tools you have: the Pokéball and hamburger are great for small amigurumi practice, the Daisy bag and name tags are excellent for personalized gifts, and the shark is a fun amigurumi-level project with character.