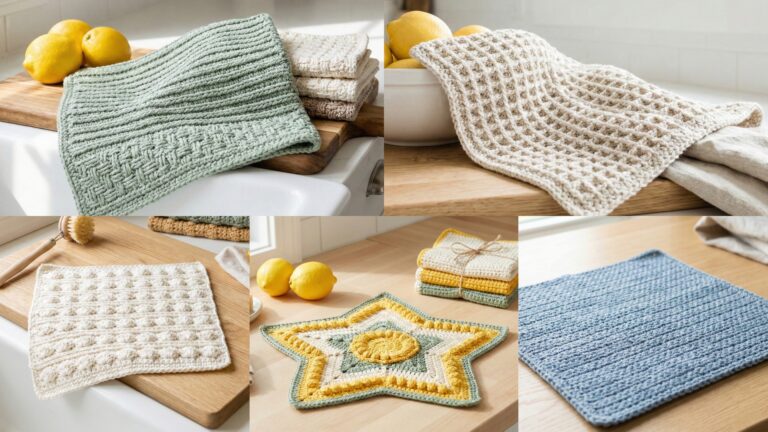
Crochet mug cozies are one of the most satisfying little projects you can make. They are quick, practical, and endlessly cute, which makes them perfect for beginners, stash-busting, handmade gifts, or a cozy afternoon project. Because they are so small, you do not need a huge time commitment, and you can usually finish one in a single sitting. That makes mug cozies especially fun when you want something useful right away but still want the joy of making something by hand.
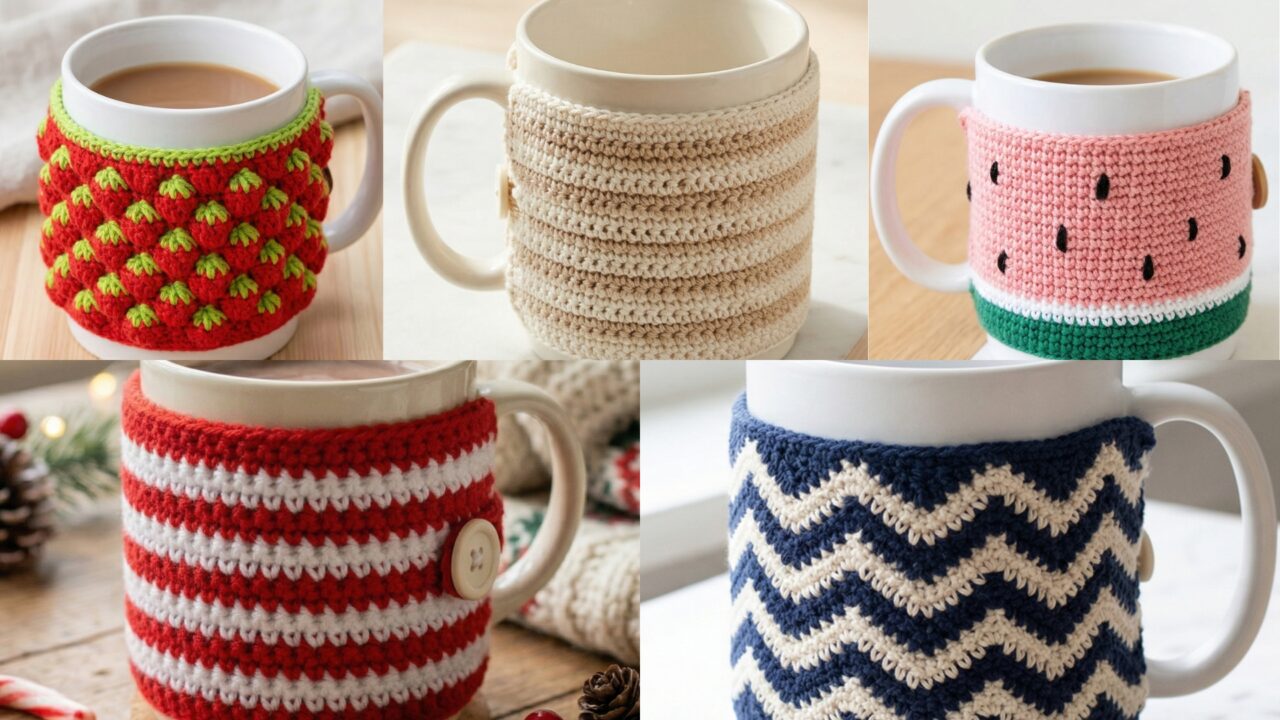
What makes crochet mug cozies so appealing is how much personality you can add to such a tiny project. A strawberry stitch cozy feels sweet and playful. A peppermint cozy brings a festive winter mood. A watermelon-inspired cozy adds cheerful summer charm. A striped cozy is classic and easy to customize. A zigzag cozy gives a bold modern look. Each one is small, simple, and satisfying, but they all make an everyday mug feel a little more special.
In this post, you will find five quick crochet mug cozy patterns with detailed step-by-step guidance and helpful finishing tips. Each pattern is designed to be beginner-friendly and fast to complete, while still giving you enough detail to make the cozy look neat and polished. Whether you are making one for yourself, for a gift, or to sell at a craft fair, these mug cozy ideas are a lovely place to start.
Quick Notes
Project type: Crochet mug cozies
Best for: Gifts, coffee lovers, tea lovers, craft fairs, and stash-busting
Skill level: Beginner to intermediate
Hook size: Usually 2.5 mm to 4.0 mm, depending on yarn weight and firmness needed
Yarn weight: Cotton, cotton blends, DK, or lightweight worsted yarn
Best yarn choice: Cotton yarn for structure, durability, and easy washing
Finished size: Sized to fit standard mugs, adjustable by length and height
Time to complete: One sitting, usually 20 to 60 minutes per cozy
Helpful stitches: Chain, slip stitch, single crochet, half double crochet, double crochet, increase, decrease, color changes, shell stitch, zigzag repeat, simple appliqué
Common Materials
Most mug cozies can be made with the same basic supplies.
- Cotton yarn in your chosen colors
- Crochet hook suited to the yarn
- Yarn needle
- Scissors
- Measuring tape
- A mug to test fit
- Optional button or loop closure
- Optional small decorative appliqués or beads
For mug cozies, fit matters just as much as style. A cozy should wrap snugly around the mug without slipping, but it should also be easy to remove for washing. Cotton yarn is usually the best choice because it is sturdy, washable, and comfortable to handle. A snug stitch pattern will help the cozy stay in place while protecting your hands from heat.
1. Crochet Strawberry Stitch Mug Cozy Pattern
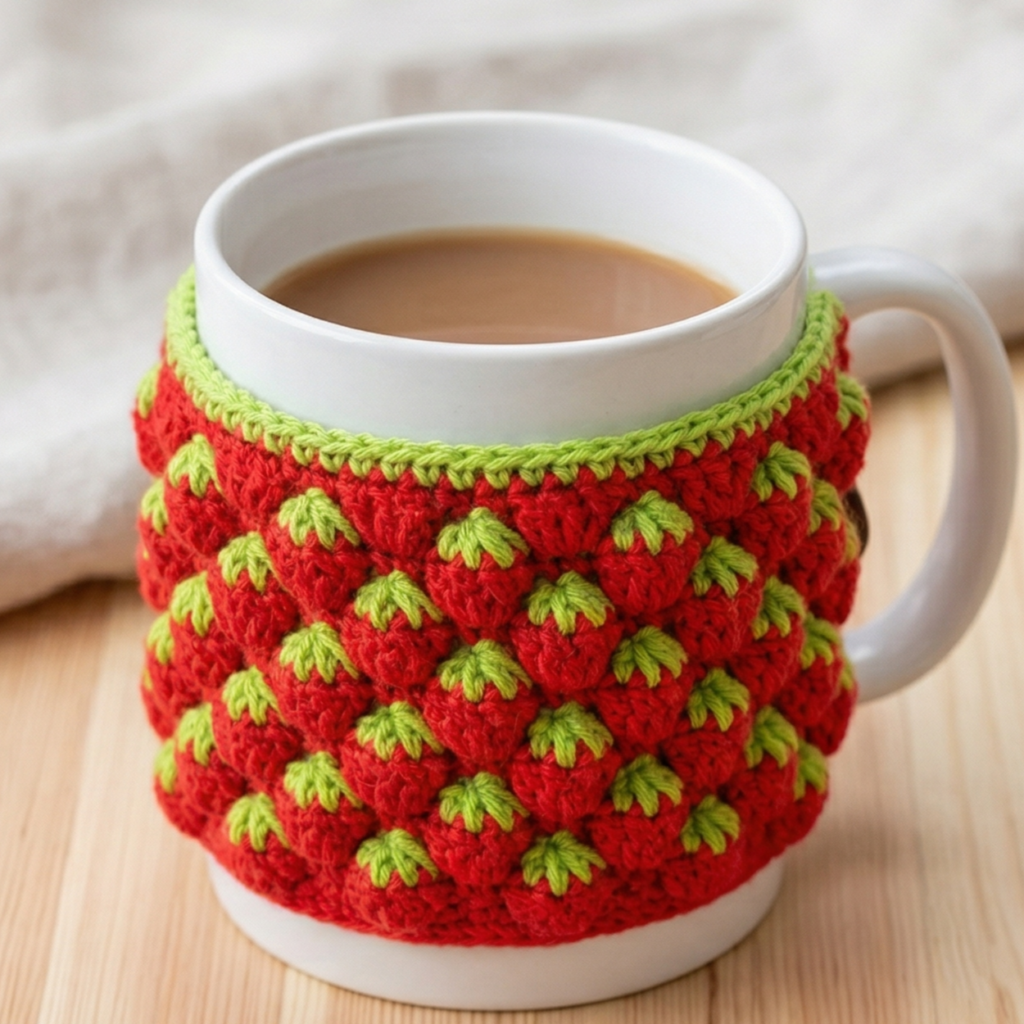
A strawberry stitch mug cozy is sweet, textured, and full of charm. The strawberry stitch gives the fabric a bumpy, berry-like appearance that feels playful and handmade. This is a lovely pattern if you want a cozy that looks cute on a kitchen shelf or makes a cheerful gift for a coffee or tea lover.
Quick Notes
Skill level: Beginner to intermediate
Finished size: Standard mug width, adjustable by strap length
Style: Cute, fruity, textured, playful
Best colors: Red, pink, green, white, cream
Materials
- Cotton yarn in red or pink for the body
- Small amount of green yarn for detail, optional
- Crochet hook suited to your yarn
- Yarn needle
- Scissors
- Button, snap, or tie closure
Step-by-Step Guide
Step 1: Measure your mug
Before starting, wrap a measuring tape around the mug to figure out the circumference. You want the cozy to fit snugly but not feel too tight. Since the fabric will stretch slightly, it is better to make it a little shorter than too loose.
A good fit makes the cozy much more practical.
Step 2: Chain the foundation
Chain a length that will wrap around the mug comfortably. Keep the chain loose enough so it does not pull. This chain will form the base width of the cozy, so make sure it reaches about the right size when laid around the mug.
A flexible foundation helps the cozy sit neatly.
Step 3: Work the strawberry stitch pattern
Begin crocheting the strawberry stitch rows. This stitch creates a textured, slightly raised surface that resembles tiny strawberry seeds or berry texture. Keep the stitch repeat consistent so the cozy looks neat and balanced from one end to the other.
The texture is what gives the cozy its strawberry feel.
Step 4: Add a green top border, optional
If you want the cozy to look even more like a strawberry, add a short green border at one edge to suggest the leafy top. This is optional, but it adds a very cute fruity detail and helps the design feel complete.
Step 5: Continue until the cozy reaches the right height
Work the rows until the cozy is tall enough to cover the mug where you want the insulation. A mug cozy usually does not need to be very tall, so this makes the project quick. Check the fit often so the cozy stays snug.
Step 6: Add the closure
Attach a button, loop, or tie at the back so the cozy can be removed easily. A button closure works well because it makes the cozy adjustable. Make sure the closure is secure and easy to fasten.
Step 7: Finish and shape
Weave in all ends carefully and shape the cozy around the mug to check the fit. If the fabric feels too loose, you can tighten the tension slightly next time or use a smaller hook.
Helpful Tips
This cozy looks especially cute in red or strawberry pink with green accents. If you want a softer look, use blush and cream. It is a great small gift for anyone who loves cheerful handmade kitchen accessories.
2. Crochet Peppermint Mug Cozy Pattern
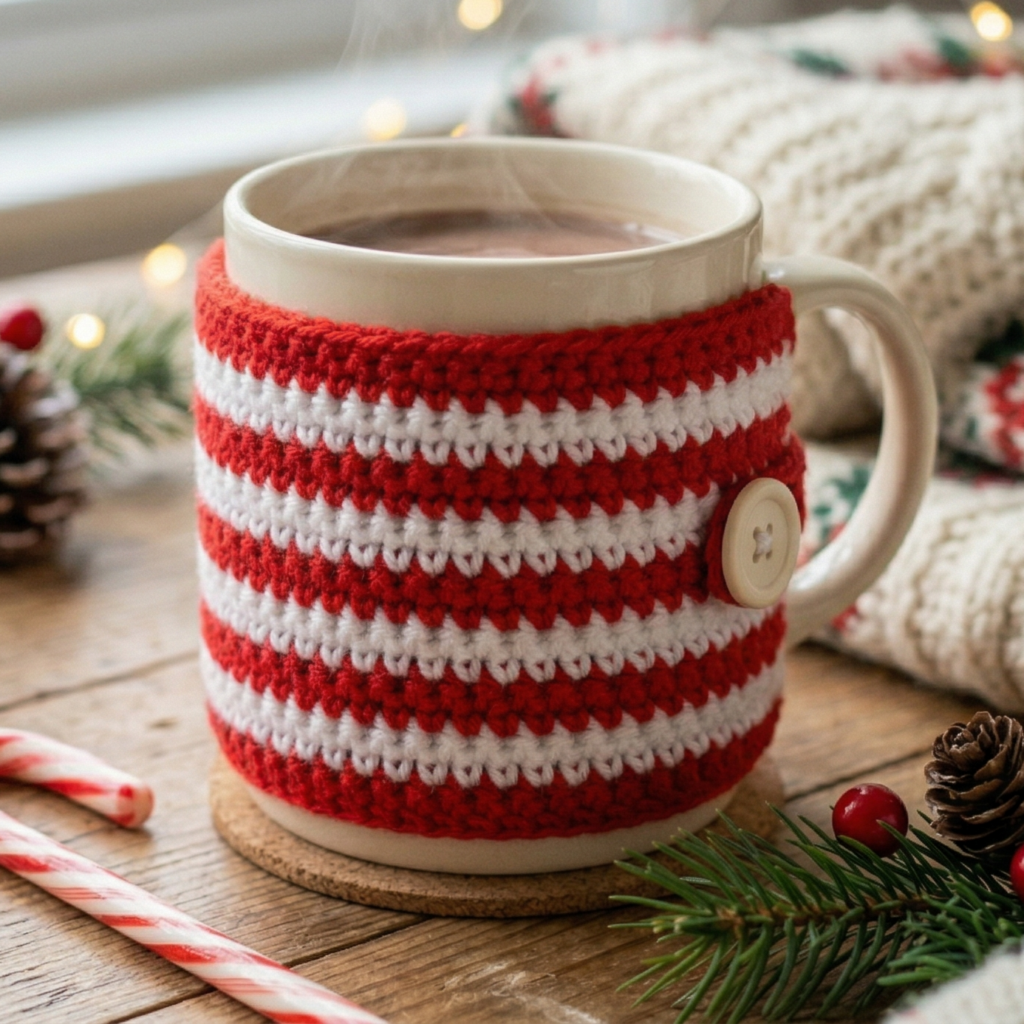
A peppermint mug cozy is perfect for winter and holiday gifting. It has that classic red-and-white candy look that instantly feels festive, cheerful, and seasonal. It is one of those tiny projects that can add a lot of personality to a plain mug.
Quick Notes
Skill level: Beginner
Finished size: Fits standard mug sizes
Style: Festive, wintery, playful, seasonal
Best colors: Red and white, pink and white, green and white
Materials
- Cotton yarn in two colors
- Crochet hook suited to your yarn
- Yarn needle
- Scissors
- Button or loop closure
Step-by-Step Guide
Step 1: Plan the stripe layout
Before starting, decide how wide you want the peppermint stripes to be. The classic look usually uses alternating red and white sections, but you can also try pink and white for a softer candy theme. Planning ahead helps the stripes look clean and evenly spaced.
A thoughtful layout gives the cozy a polished finish.
Step 2: Chain the base length
Start with a chain that matches the mug circumference. The cozy should wrap around the mug securely, so check the length against the mug before continuing. Keep the chain smooth and not too tight.
A good foundation makes the stripes appear even.
Step 3: Work the striped body
Alternate colors row by row to create the peppermint effect. Keep each stripe clean and consistent so the candy-inspired look is clear. You can use single crochet or half double crochet for a firm fabric that helps the stripes stand out.
The stripe pattern is the heart of the design.
Step 4: Keep the fabric flat
As you change colors, make sure the cozy does not curl or twist. A neat edge will help the peppermint stripes stay straight and tidy. If needed, adjust your tension so the rows remain balanced.
Step 5: Repeat until the cozy is tall enough
Continue working the striped pattern until the cozy reaches the desired height. Since the mug cozy is small, you only need a few rows to show off the design.
Step 6: Add the closure
Attach a button or a simple loop closure. A button in white or red works especially well because it fits the peppermint theme. Make sure it is placed so the cozy can open and close easily.
Step 7: Finish the edges
Weave in all ends and smooth the cozy around the mug. The stripes should look clean and cheerful. If you want a more polished finish, add a narrow border in one of the colors.
Helpful Tips
Classic red and white is always a winner, but pink and white can feel sweet and modern. This cozy is especially lovely during the winter season or as a holiday stocking stuffer.
3. Crochet Watermelon Inspired Mug Cozy Pattern
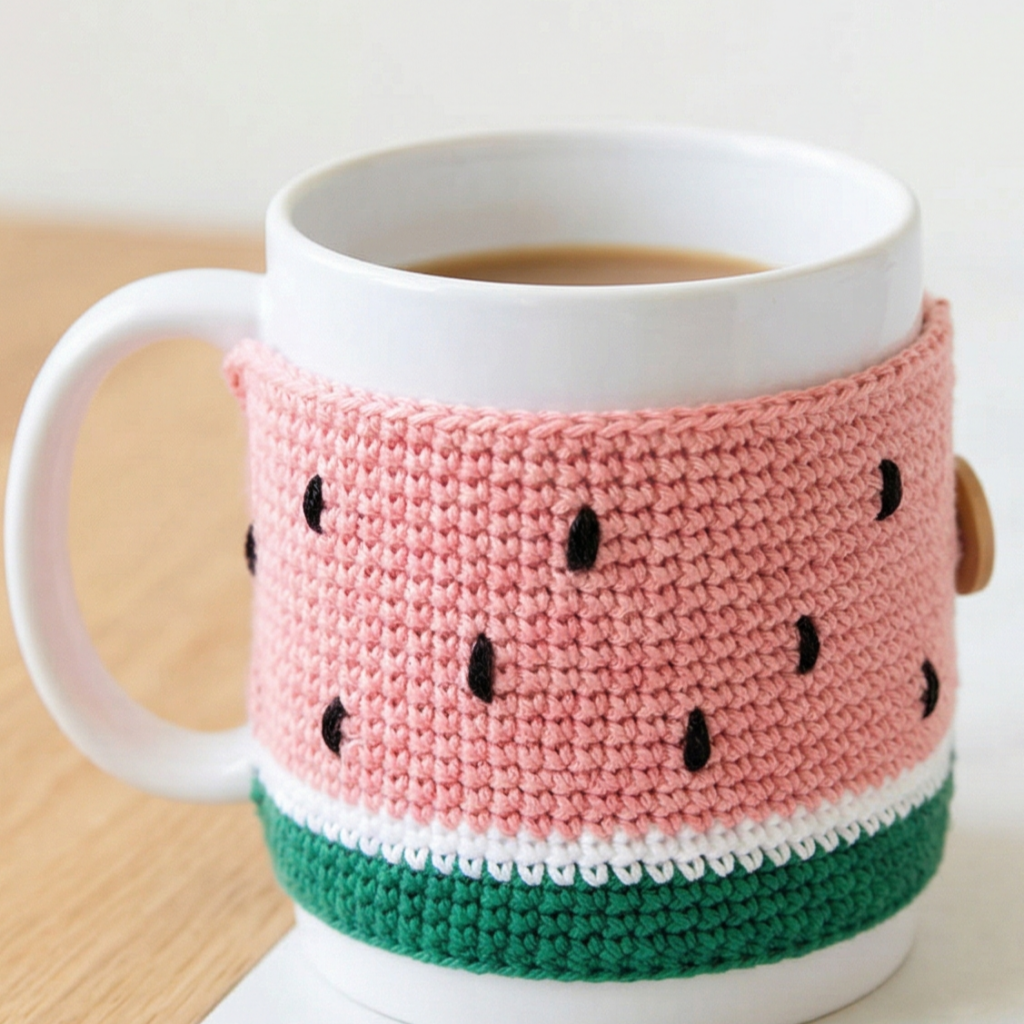
A watermelon-inspired mug cozy is bright, cheerful, and perfect for summer. It brings a fresh, fruity feel to a simple mug and makes a fun seasonal accessory for iced coffee, tea, or travel cups. This is a great pattern if you want something colorful and quick.
Quick Notes
Skill level: Beginner
Finished size: Standard mug width
Style: Summery, fruity, fun, colorful
Best colors: Green, pink, red, white, black
Materials
- Cotton yarn in watermelon colors
- Crochet hook suited to your yarn
- Yarn needle
- Scissors
- Button or loop closure
Step-by-Step Guide
Step 1: Choose the watermelon color bands
The classic watermelon look uses green for the rind, pink or red for the fruit, and tiny black accents for seeds. Decide how much of each color you want to include. A simple two- or three-color layout works beautifully.
A clear color plan makes the design instantly recognizable.
Step 2: Chain the foundation
Start with a chain long enough to wrap around your mug. Check the fit before moving on. The cozy should be snug but not so tight that it becomes hard to put on and take off.
A well-sized base makes the cozy functional.
Step 3: Crochet the rind section
Work a few rows in green yarn to create the outer rind. This sets the watermelon theme and gives the cozy a fresh summer look. Keep the stitches neat so the color band appears clean.
The rind is the first visual clue of the theme.
Step 4: Add the fruit section
Switch to pink or red yarn and work the main body of the cozy. This section should feel bright and playful. Keep your rows even so the fruit part sits smoothly around the mug.
The pink body is what makes it feel like watermelon.
Step 5: Add seed details
Use black yarn or embroidery thread to stitch tiny seed shapes onto the pink section. Keep the seeds sparse and even so they look cute rather than crowded. A few small seeds are enough to make the design clear.
The seeds add a fun finishing touch.
Step 6: Add the closure
Attach a button, snap, or tie closure at the back. Make sure it is secure and easy to fasten. A simple closure works best because it keeps the cozy slim and practical.
Step 7: Finish the edges
Weave in all ends and shape the cozy around the mug. If the edges curl, a small border in green or white can help frame the design and make it look tidy.
Helpful Tips
This pattern is perfect for summer markets or cheerful gifts. If you want a softer version, use pastel pink and mint green. If you want a bold fruity look, use bright red and classic green with black seeds.
4. Crochet Striped Mug Cozy Pattern
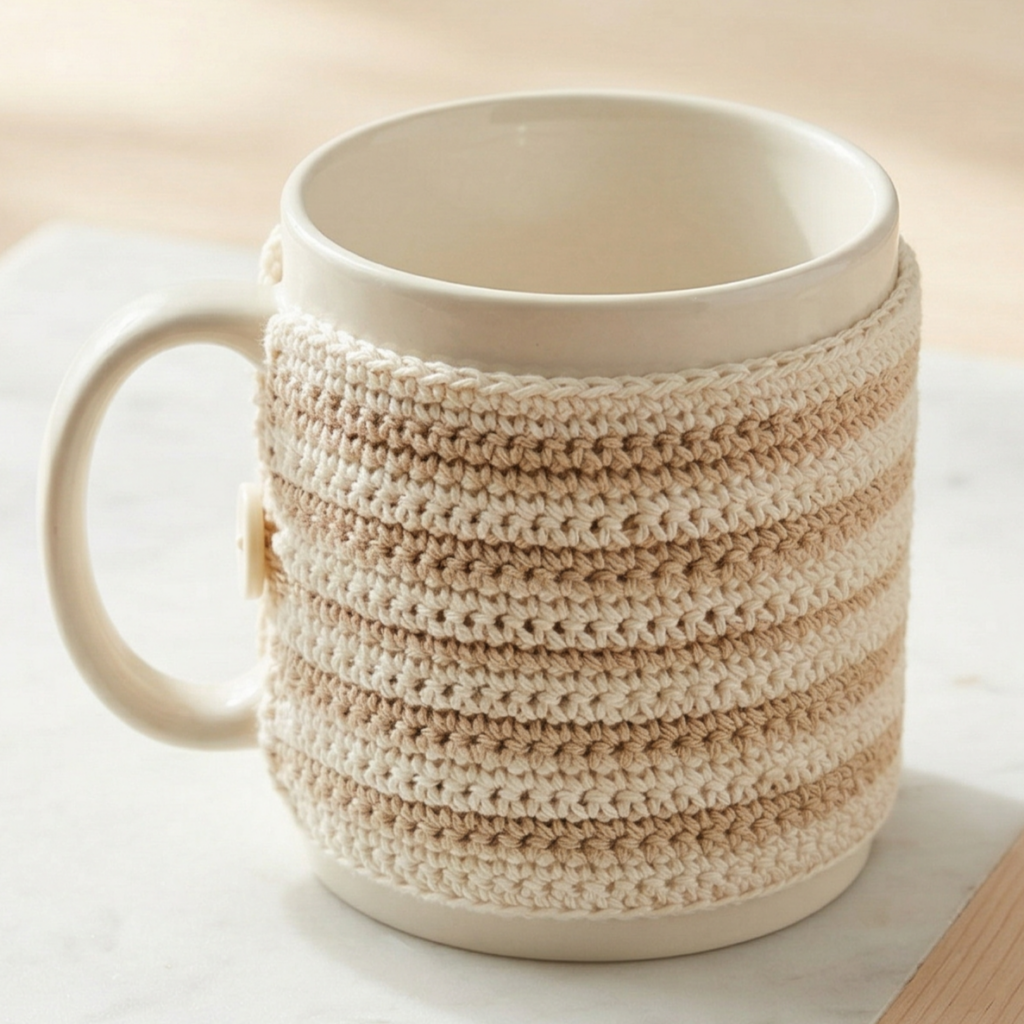
A striped mug cozy is simple, classic, and endlessly customizable. Stripes are one of the easiest ways to make a mug cozy look stylish while still keeping the pattern beginner-friendly. You can make it calm and neutral or bright and cheerful depending on your color choices.
Quick Notes
Skill level: Beginner
Finished size: Standard mug fit
Style: Clean, classic, modern, versatile
Best colors: Any combination, including neutrals, brights, or pastels
Materials
- Cotton yarn in one or more colors
- Crochet hook suited to your yarn
- Yarn needle
- Scissors
- Button or loop closure
Step-by-Step Guide
Step 1: Choose your stripe palette
Decide how many colors you want to use and how wide each stripe should be. Two-color stripes create a clean modern look, while several colors feel playful and fun. A thoughtful palette makes the cozy feel more finished.
The stripe plan shapes the mood of the piece.
Step 2: Chain the base length
Chain enough to wrap around the mug comfortably. Test the length before continuing so the cozy fits properly. Since stripes will be the main design feature, the base should stay even and tidy.
A neat foundation makes the stripes look crisp.
Step 3: Work the first stripe
Begin with your first color and crochet the first section of the cozy. Use a stitch that creates a clean fabric, such as single crochet or half double crochet. Keep your rows even so the stripe appears straight.
The first stripe sets the pattern rhythm.
Step 4: Change colors smoothly
At the end of each stripe section, switch yarn colors carefully. Try to keep the joins neat so the stripes look polished. Consistent color changes make the cozy much more attractive.
Smooth transitions make the design feel intentional.
Step 5: Repeat the stripe pattern
Continue working the color sequence until the cozy reaches the desired height. You can make the stripes thin or thick depending on the look you want. Keep your stitch count consistent from row to row.
Step 6: Add the closure
Finish with a button, loop, or tie at the back. Make sure the closure matches the overall design. A neutral button often works well for striped cozies because it blends in nicely.
Step 7: Finish and check fit
Weave in all ends securely and test the cozy on your mug. If the fabric feels too stretchy, use a firmer stitch or smaller hook next time. The finished cozy should look neat, simple, and cozy.
Helpful Tips
Striped cozies are a great stash-busting project because you can use leftover yarn in fun combinations. They are also the easiest to customize for different seasons, holidays, or personal color preferences.
5. Crochet Zigzag Mug Cozy Pattern
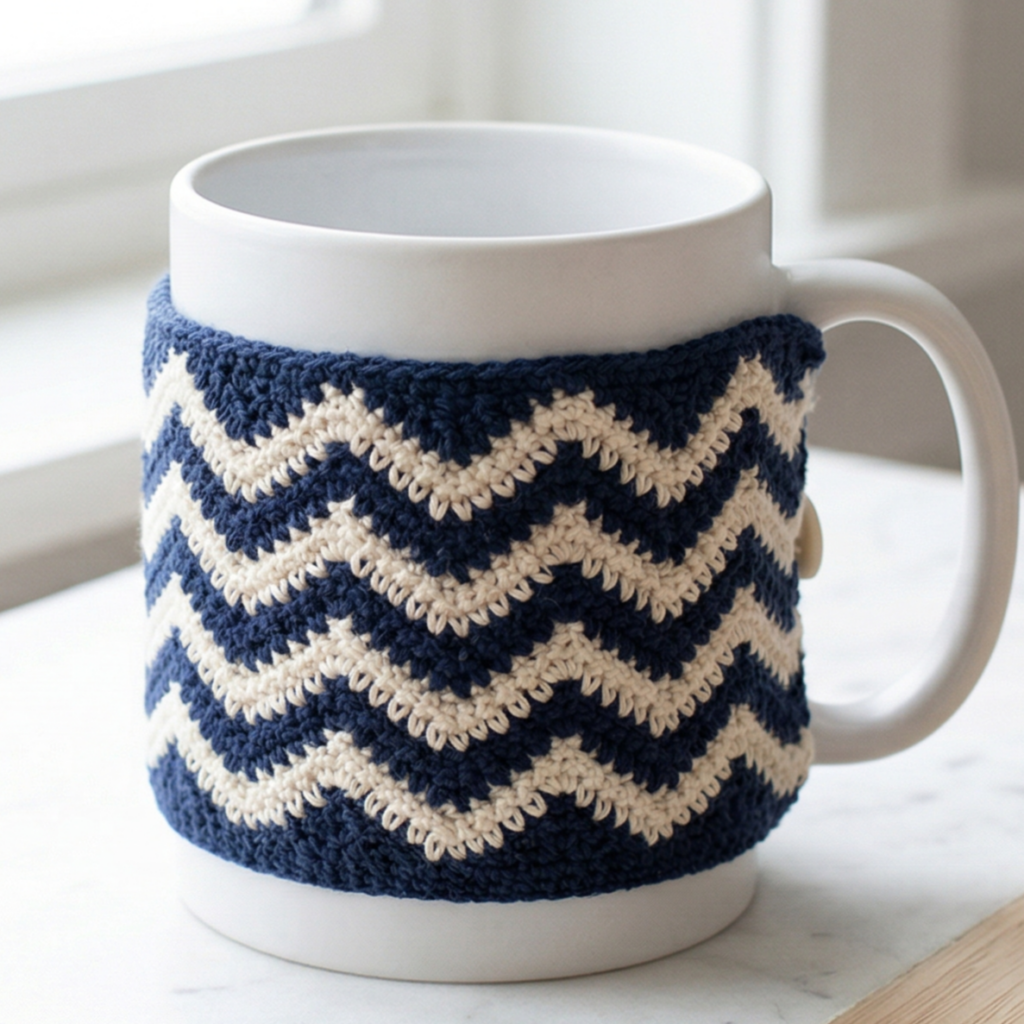
A zigzag mug cozy is bold, modern, and full of visual movement. The zigzag pattern gives the cozy a graphic look that makes even a small mug accessory feel stylish and dynamic. It is a great choice if you want something a little more eye-catching than a plain stripe pattern.
Quick Notes
Skill level: Beginner to intermediate
Finished size: Fits standard mugs
Style: Bold, geometric, modern, playful
Best colors: High-contrast pairs, rainbow shades, neutrals with one accent color
Materials
- Cotton yarn in one or more colors
- Crochet hook suited to your yarn
- Yarn needle
- Scissors
- Button or loop closure
Step-by-Step Guide
Step 1: Plan the zigzag repeat
Before crocheting, decide how wide your zigzag peaks and valleys should be. A narrow zigzag feels subtle, while a wider pattern feels bold and graphic. Planning the repeat ahead of time makes the design easier to follow.
A clear repeat helps the pattern stay balanced.
Step 2: Chain the mug width
Start with a chain that fits around the mug. Check the length against the mug before continuing. Since the zigzag design uses movement in the fabric, the base should stay neat and correctly sized.
A good base helps the zigzag pattern sit properly.
Step 3: Begin the zigzag rows
Work the stitch pattern so the fabric creates peaks and dips across the rows. This may involve increases and decreases or a specific zigzag stitch repeat. Keep your stitch count steady so the zigzags line up evenly.
The peaks and dips are what give the cozy its bold look.
Step 4: Keep the edges straight
Because zigzag patterns can be visually busy, straight edges are important. Make sure the sides of the cozy stay balanced so the pattern remains neat. If the edges curl, adjust your tension or hook size.
Step 5: Repeat until the cozy is tall enough
Continue the zigzag rows until the cozy reaches the right height for your mug. Check the fit as you go so the finished piece stays snug but still easy to remove.
Step 6: Add the closure
Sew on a button, loop, or tie closure. A simple closure works best because the zigzag design is already visually strong. Keep the closure secure and comfortable.
Step 7: Finish the edges
Weave in all ends and smooth the cozy over the mug. A tidy border can help the zigzag pattern feel more polished. If you want, you can add a plain top or bottom edge for contrast.
Helpful Tips
Zigzag cozies look especially good in bold color combinations. If you want a modern graphic effect, try black and white or navy and cream. If you want a more playful version, use rainbow stripes or bright summer shades.
Conclusion
Crochet mug cozies are one of the best quick projects because they are small, useful, and fun to personalize. They make great gifts, sell well at craft fairs, and are perfect for using up leftover yarn in a creative way. Because they are so fast to finish, they give you that satisfying feeling of completing something beautiful without a long time commitment.
These five mug cozy patterns each bring a different style. The strawberry stitch cozy is sweet and textured. The peppermint cozy feels festive and cheerful. The watermelon cozy is bright and summery. The striped cozy is classic and versatile. The zigzag cozy adds bold modern energy. Together, they show how much variety you can create in such a small project.
A handmade mug cozy can make a simple cup of coffee or tea feel more special. It also adds a cozy personal touch to your kitchen, your desk, or a thoughtful gift set. With the right yarn, a neat finish, and a little creativity, these mug cozies can become favorite tiny projects that you make again and again.