Crochet tops are one of the most rewarding handmade fashion projects because they bring together creativity, fit, texture, and personal style in one wearable piece. A crochet top can be soft and romantic, bold and trendy, light and airy for summer, or elegant enough to dress up for a special occasion. That versatility is exactly why crochet tops remain such a favorite among makers who love clothing that feels unique and expressive.
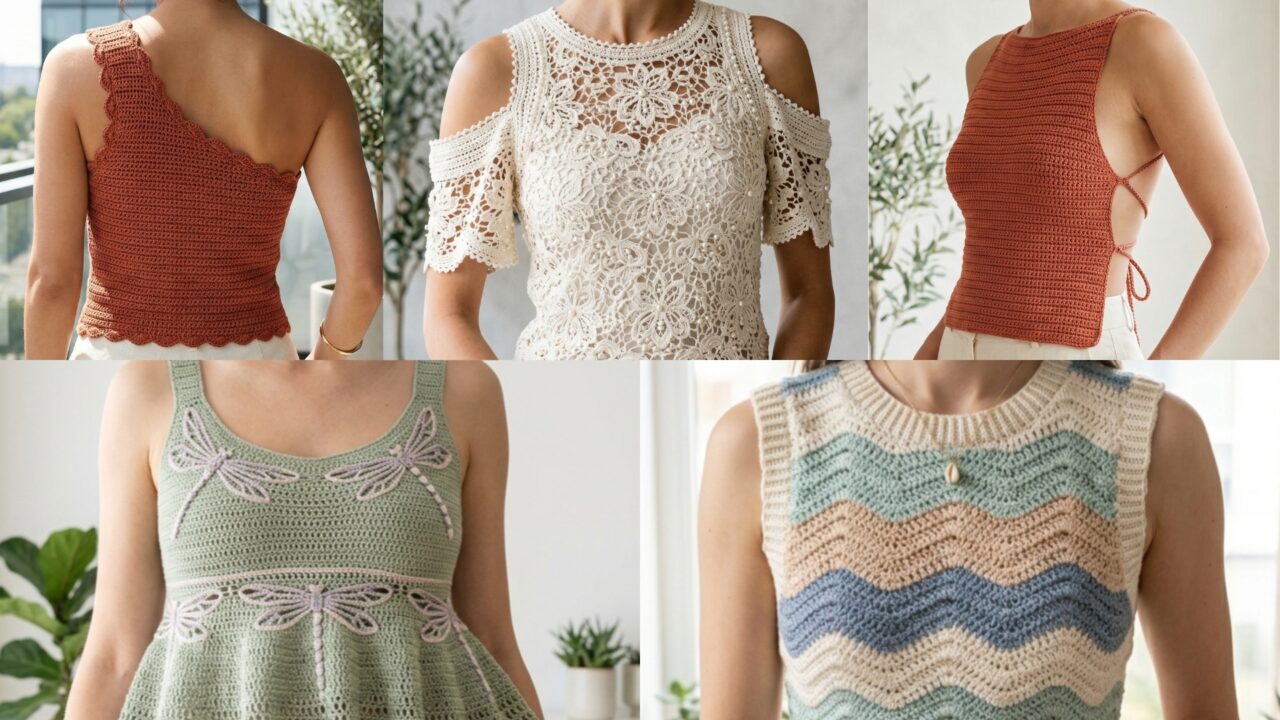
What makes crochet tops especially exciting is how much style you can create with stitch choice alone. A wave pattern can give your top movement and shape. A dragonfly babydoll top can feel playful and airy. A backless summer top can be sleek and bold. A pearl lace cold shoulder top can look delicate and refined. A scallop one shoulder top can bring a feminine, modern edge. Each design has its own mood, but all of them offer a chance to make something beautiful that feels truly handmade.
This post walks through five stylish crochet top ideas with detailed step-by-step guidance, useful notes, and practical tips to help you create polished pieces that are both flattering and wearable. Whether you are making something for yourself, for a gift, or for your handmade shop or blog, these top patterns are designed to inspire and guide you from the first stitch to the final finish.
Quick Notes
Project type: Crochet tops for handmade fashion
Best for: Summer outfits, layering pieces, festival wear, gifts, and wardrobe staples
Skill level: Beginner to intermediate, depending on shaping and stitch detail
Hook size: Usually 2.5 mm to 5 mm, depending on yarn weight and desired drape
Yarn weight: Cotton, cotton blends, DK, sport, or light worsted
Best yarn choice: Cotton or cotton blend for breathability and structure, or soft blends for extra drape
Finished size: Usually fitted, relaxed, or cropped depending on the design
Time to complete: Several hours to a few days depending on size and complexity
Helpful stitches: Chain, slip stitch, single crochet, half double crochet, double crochet, treble crochet, shell stitch, lace stitch, increase, decrease, picot, post stitches, color changes
Common Materials
Most crochet tops can be made with a similar set of supplies.
- Yarn in your chosen colors
- Crochet hook matched to the yarn
- Measuring tape
- Stitch markers
- Yarn needle
- Scissors
- Optional buttons, ties, elastic, or lining
- Optional blocking tools
For tops, yarn choice matters just as much as fit. Cotton and cotton blends are excellent for warm-weather garments because they breathe well and hold their shape. Softer yarns can create more drape, which is beautiful for loose or flowy tops. The best choice depends on the style you want the finished top to have.
1. Crochet Wave Pattern Fitted Top Pattern
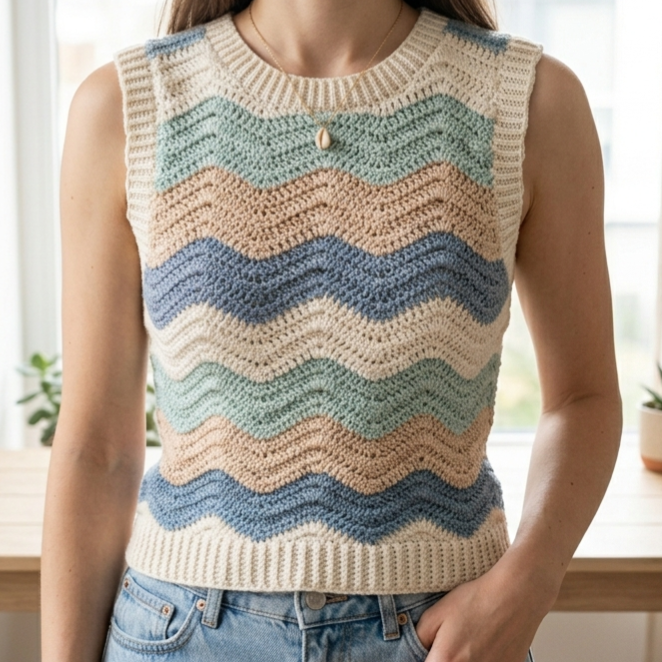
A wave-pattern fitted top is a beautiful blend of texture and shape. The wave stitch gives the fabric movement and visual interest, while the fitted silhouette keeps the top flattering and stylish. This is a great choice if you want something modern, slightly playful, and easy to style with skirts, jeans, or shorts.
Quick Notes
Skill level: Beginner to intermediate
Finished size: Fitted or slightly body-skimming
Style: Textured, modern, flattering, playful
Best colors: Solid colors, ombré yarn, sea-inspired tones, or soft neutrals
Materials
- Cotton or cotton blend yarn
- Crochet hook suited to your yarn
- Stitch markers
- Yarn needle
- Scissors
- Measuring tape
Step-by-Step Guide
Step 1: Decide on the fit
Before you begin, choose whether you want the top to be snug, semi-fitted, or slightly relaxed. A wave stitch top looks especially beautiful when it follows the shape of the body without feeling too tight. A fitted waist and gently shaped bust area usually create the most flattering result.
Take accurate body measurements so the top feels comfortable from the start.
Step 2: Make a gauge swatch
Wave patterns can stretch differently from solid stitch fabric, so a swatch is very important. Work a small sample using the stitch pattern and measure it carefully. This will help you understand how much the top will grow or relax after wearing.
A good gauge swatch saves a lot of fitting trouble later.
Step 3: Create the main body panels or start in the round
You can make this top as separate front and back panels or work it in the round, depending on your preferred construction. Panels make fitting easier for beginners, while in-the-round construction creates a cleaner seamless look.
Start with the lower edge and build upward if you want to shape the waist more precisely.
Step 4: Work the wave stitch pattern
Use a stitch repeat that creates smooth peaks and valleys. Keep the tension even so the waves look balanced across the top. The wave pattern should be visible but not overly stretched, especially if you want the top to keep its shape.
This is the decorative heart of the design, so take your time with it.
Step 5: Shape the neckline and straps
Once the body reaches the desired height, shape the neckline and add straps or sleeves depending on the look you want. Thin straps create a summer feel, while wider straps or small sleeves make the top more versatile. A fitted neckline helps the wave pattern sit neatly across the chest.
Make both sides even so the top feels well balanced.
Step 6: Finish the edges
Add a neat border around the neckline, armholes, and hem. A simple single crochet or slip stitch edging can clean up the shape beautifully. If you want a more decorative finish, a small shell or picot edge can work as well.
A polished edge makes the top look more refined.
Step 7: Block the piece
Blocking helps smooth the wave pattern and improve the fit. Lay the top flat and shape it gently to the measurements you want. This is especially useful if the stitch pattern has any slight curling or unevenness.
Helpful Tips
A wave top looks especially striking in solid or tonal yarn because the stitch texture gets to shine. If you want a beachy feel, choose blue, cream, or sand tones. If you want a trendy everyday top, try black, white, or earthy neutrals.
2. Crochet Dragonfly Babydoll Top Pattern
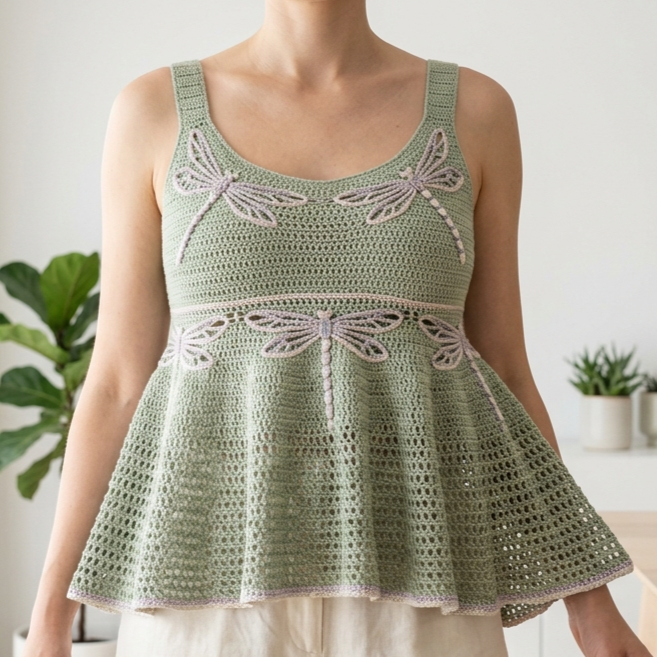
A dragonfly babydoll top is soft, airy, and full of whimsical charm. The babydoll shape gives it a relaxed silhouette, while dragonfly-inspired detailing adds a delicate, almost magical touch. This style is especially lovely for spring and summer, and it works beautifully in light yarns with graceful drape.
Quick Notes
Skill level: Beginner to intermediate
Finished size: Loose and flowy with a fitted or gently shaped bust
Style: Feminine, airy, whimsical, romantic
Best colors: Lavender, sage, sky blue, cream, blush, or pastel combinations
Materials
- Lightweight cotton, cotton blend, or soft DK yarn
- Crochet hook suited to your yarn
- Yarn needle
- Scissors
- Stitch markers
- Measuring tape
Step-by-Step Guide
Step 1: Plan the babydoll silhouette
A babydoll top usually has a fitted bust area and a looser, flowing lower section. Decide how high you want the empire seam to sit. This seam is important because it creates the gentle flare that defines the babydoll look.
The fit should feel soft, comfortable, and easy to move in.
Step 2: Begin with the upper bodice
Start with the bust or upper bodice section. You can work this as a fitted cup shape or as a straightforward panel if you prefer a simpler construction. Keep the stitches neat so the upper part supports the looser lower section well.
This part should hold the top in place without feeling restrictive.
Step 3: Shape the empire line
Once the bodice is complete, create the empire seam where the skirt portion begins. This can be done with a stitch change, a decorative row, or a subtle increase line. The seam should sit just under the bust for the classic babydoll effect.
This line defines the silhouette, so it should be clear and balanced.
Step 4: Add the flared lower section
Work the lower part of the top with gentle increases so it flares out softly. The fabric should fall in a relaxed way without looking stiff. The flare gives the top its airy movement and makes it feel flattering on many body types.
A soft drape is the key to this style.
Step 5: Add dragonfly-inspired details
Dragonfly details can be added in several ways. You might use a lace motif, surface crochet accents, tiny wing-like motifs, or a decorative central motif across the bodice. Keep the design delicate and graceful so it feels like an elegant theme rather than a costume piece.
A subtle dragonfly detail is often more beautiful than an overly literal one.
Step 6: Finish straps or sleeves
Choose simple straps, flutter sleeves, or short cap sleeves depending on the look you want. Narrow straps make the top feel summery, while small sleeves add softness and coverage. Keep the shaping symmetrical so the top hangs evenly.
Step 7: Add edge finishing and block
Finish the neckline, hem, and armholes with clean edging. Then block the top so the flare relaxes naturally and the lace or detail work opens up nicely.
Helpful Tips
This top looks especially beautiful in pastel yarns or faded natural tones. If you want an even softer romantic feel, pair it with a subtle lace border or tiny decorative buttons. It is the kind of top that feels lovely with skirts, linen pants, or layered over a fitted dress.
3. Crochet Backless Summer Top Pattern
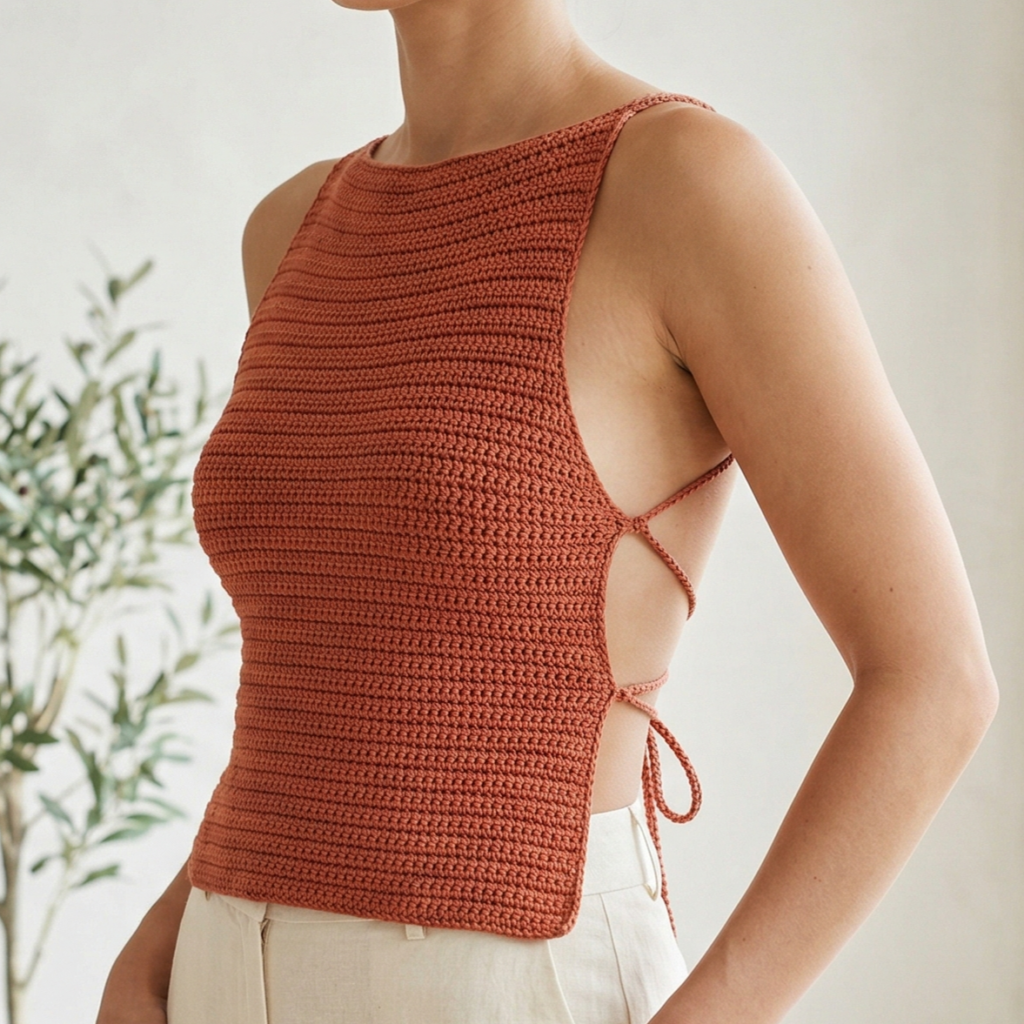
A backless summer top is bold, breezy, and perfect for warm weather. It feels light and fashionable while still giving you the joy of making something handmade and stylish. This design is great for festivals, vacations, and casual summer outfits when you want something that feels airy and eye-catching.
Quick Notes
Skill level: Intermediate
Finished size: Fitted or lightly fitted with open back
Style: Bold, modern, breathable, summer-ready
Best colors: White, black, terracotta, bright colors, or soft beach tones
Materials
- Cotton or cotton blend yarn
- Crochet hook suited to your yarn
- Yarn needle
- Scissors
- Stitch markers
- Measuring tape
- Optional ties, buttons, or elastic
Step-by-Step Guide
Step 1: Choose the support structure
Because the back is open, the top needs a secure front and shoulder structure. Decide whether you want a halter-style neckline, thin straps, or a crossed-back look. The front should provide enough coverage and support for comfortable wear.
This is the foundation of the top’s fit.
Step 2: Make the front panel
Begin by crocheting the front section in the shape you want. A simple rectangle, shaped bust panel, or slightly fitted bodice can all work depending on your comfort level. Make sure the front is snug enough to stay in place without slipping.
The front should balance the openness of the back.
Step 3: Add shaping if needed
If you want a more flattering fit, add darts, increases, or decreases near the bust and waist. A backless top often looks best when the front is carefully fitted, since the open back naturally makes the design feel more dramatic.
Small shaping changes can make a big difference.
Step 4: Create the straps or neckline ties
The straps are what hold the top in place, so make them secure and comfortable. You can use thin straps for a delicate look or wider straps for more support. Some backless tops also use tie closures around the neck or back for adjustability.
Make sure the strap placement feels balanced and wearable.
Step 5: Build the open back
The back can be left open completely or partially open with strap details. You may use crisscross ties, a low band, or a simple open frame. The goal is to keep the style breezy while still making sure the top stays secure.
A clean open back gives the design its main visual impact.
Step 6: Finish all edges neatly
Because this style exposes more skin, neat edges are especially important. Add smooth finishing around the neckline, armholes, and back opening so the top feels polished and comfortable against the body.
Step 7: Check fit and comfort
Try the top on and move around in it. Make sure the straps stay in place and the back opening sits the way you want it to. Adjust the ties or band if necessary before finishing off completely.
Helpful Tips
This style looks amazing in light yarns with good drape. If you want a more elegant version, choose a solid neutral color. If you want a playful summer look, use bright or tropical tones. This is the kind of top that pairs beautifully with high-waisted bottoms.
4. Crochet Pearl Lace Cold Shoulder Top Pattern
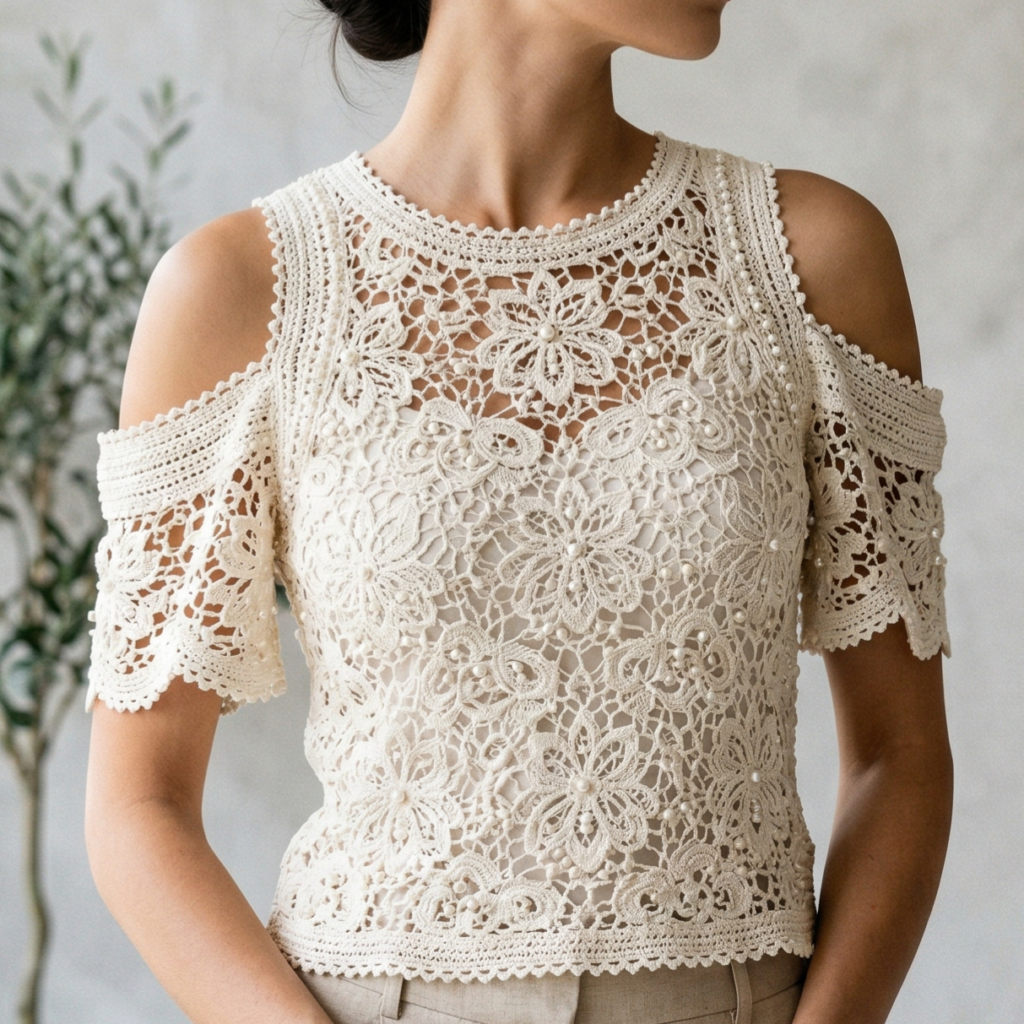
A pearl lace cold shoulder top feels delicate, elegant, and a little romantic. The cold shoulder shape gives it a trendy silhouette, while pearl-like lace details add charm and refinement. This design is perfect if you want a feminine crochet top that feels dressy enough for special occasions but still wearable for everyday styling.
Quick Notes
Skill level: Intermediate
Finished size: Slightly fitted or semi-relaxed
Style: Elegant, romantic, lace-inspired, polished
Best colors: Ivory, cream, blush, pearl gray, or soft jewel tones
Materials
- Fine cotton, lace-weight, or sport yarn
- Small crochet hook suited to yarn weight
- Yarn needle
- Scissors
- Stitch markers
- Measuring tape
- Optional small beads or pearl accents
Step-by-Step Guide
Step 1: Design the cold shoulder layout
A cold shoulder top has cutouts at the shoulders while still providing some coverage across the chest and sleeves. Decide how open you want the shoulders to be. A smaller cutout creates a more subtle look, while a larger opening feels more fashion-forward.
The shoulder shape should be flattering and secure.
Step 2: Create the bodice
Start with the upper bodice or chest section. You can work this in lace stitch, mesh lace, or a delicate shell-based stitch. The fabric should feel feminine and light, with enough structure to support the shoulder cutouts.
The bodice is where the lacework gets to shine.
Step 3: Shape the shoulder openings
When you reach the shoulder area, separate the fabric so the cutouts appear on both sides. Keep both sides symmetrical. The openings should sit comfortably and not pull awkwardly when worn.
This shaping is what gives the top its standout style.
Step 4: Add sleeve or drape sections
Cold shoulder tops often have short sleeves or soft draped sections around the upper arm. Crochet these gently so they frame the shoulders without covering the cutouts. The sleeves should feel decorative and airy rather than heavy.
The balance between exposed shoulder and soft sleeve is key.
Step 5: Work the pearl lace detail
You can create a pearl lace effect in a few different ways. One option is to use a lace pattern with small puff-like or bobble-like stitches that resemble tiny pearls. Another option is to sew on tiny pearl beads after the top is finished. Keep the detail subtle so the top retains its elegant feel.
A little sparkle or texture goes a long way.
Step 6: Add edging and finish
Use a neat border around the neckline, sleeves, and hem. A scalloped or picot edge can work beautifully here. Finish the top carefully so the lace pattern looks clean and the silhouette remains refined.
Step 7: Block gently
Blocking is especially useful for lace tops because it opens up the pattern and helps the cutouts and edges sit smoothly. Shape the top to your preferred fit and let it dry flat.
Helpful Tips
This top looks particularly beautiful in soft neutral tones, but jewel tones can also make the lace look rich and dramatic. If you want it to feel more elegant, keep the beadwork subtle. If you want a more romantic look, use pearl-like accents sparingly along the neckline or sleeves.
5. Crochet Scallop One Shoulder Top Pattern
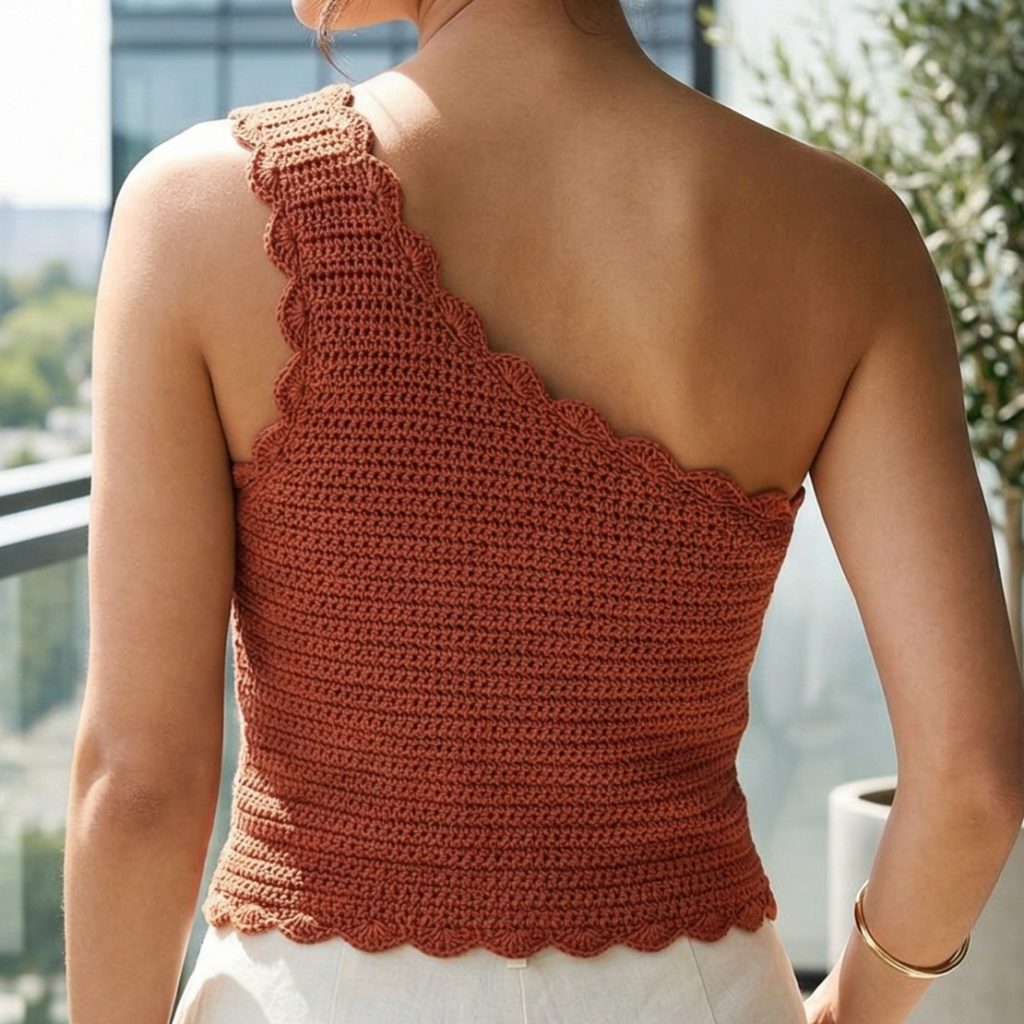
A scallop one shoulder top is stylish, modern, and feminine all at once. The one-shoulder shape gives the top a contemporary edge, while scallop details soften the overall look and make it feel romantic. It is a great piece if you want something that feels unique and fashionable without being overly complicated.
Quick Notes
Skill level: Intermediate
Finished size: Fitted or softly shaped
Style: Trendy, elegant, asymmetrical, feminine
Best colors: Black, white, blush, soft blue, cream, or bold statement shades
Materials
- Yarn with smooth stitch definition
- Crochet hook suited to the yarn
- Yarn needle
- Scissors
- Stitch markers
- Measuring tape
Step-by-Step Guide
Step 1: Plan the asymmetrical shape
A one shoulder top depends on clean asymmetry. Decide which shoulder will be covered and how the neckline will slope across the chest. The design should feel balanced even though it is intentionally uneven.
The neckline shape is the main visual feature here.
Step 2: Crochet the main body
Start with the main body panel or body section. You can work it from the bottom up or from the top down depending on your comfort level. Keep the fit close enough to stay secure, especially since one shoulder will remain uncovered.
The body should support the neckline without slipping.
Step 3: Shape the single shoulder strap or upper section
Crochet the shoulder section so it covers only one side. This might be a wide strap, a partial sleeve, or a band that extends across one shoulder and upper back. Keep the shaping neat so the top sits comfortably.
This step gives the top its signature silhouette.
Step 4: Add scallop edging
Scallop edging can be worked around the neckline, hem, or shoulder line. This detail softens the asymmetry and gives the top a pretty, finished look. Keep the scallops even and consistent so they read clearly.
The scallops add a feminine and decorative touch.
Step 5: Check the fit
Because the top is asymmetrical, fit matters a lot. Try it on and make sure it stays in place without shifting too much. You may need to slightly adjust the shoulder width or neckline depth for the best result.
A well-fitted one shoulder top should feel secure and comfortable.
Step 6: Finish the hem and edges
Add a clean border along the hem and around any open edges. This helps the top look polished and prevents curling. A tidy finish is especially important on asymmetrical garments.
Step 7: Block carefully
Light blocking helps the top settle into its final shape and makes the scallop detail more visible. Shape the neckline gently so the one-shoulder line looks smooth and intentional.
Helpful Tips
This top looks striking in a solid color because the asymmetry and scallop edge become the main focus. For a more romantic look, try soft pastels. For a more dramatic fashion feel, choose black, deep red, or rich green.
Conclusion
Crochet tops are one of the best ways to turn yarn into fashion that feels truly personal. They can be simple or detailed, fitted or flowing, subtle or statement-making. That flexibility is what makes them so enjoyable to design and wear. With the right yarn, a thoughtful fit, and careful finishing, even a basic top can become a standout piece in your handmade wardrobe.
These five crochet top ideas offer a range of styles for different moods and seasons. Whether you love the texture of a wave pattern fitted top, the airy charm of a dragonfly babydoll top, the confidence of a backless summer top, the elegance of a pearl lace cold shoulder top, or the chic shape of a scallop one shoulder top, each design gives you a chance to create something beautiful and wearable.
Handmade fashion works best when it feels like it belongs to you, and that is exactly what these patterns are meant to do. They are creative, versatile, and easy to adapt to your own style. With patience, good materials, and a little attention to detail, you can make crochet tops that look polished, feel comfortable, and elevate any outfit.