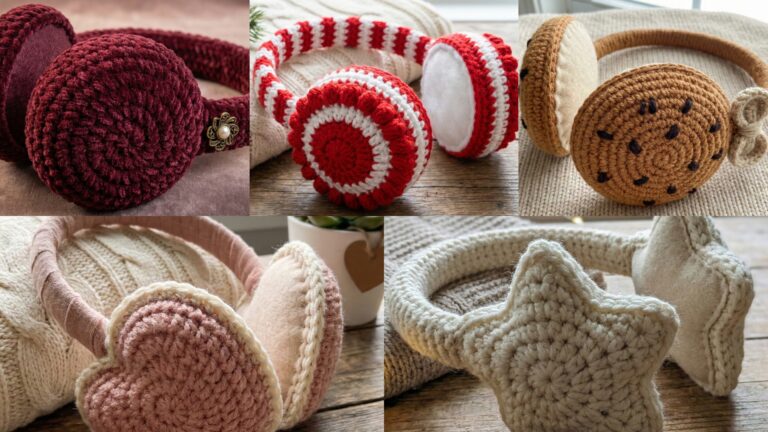
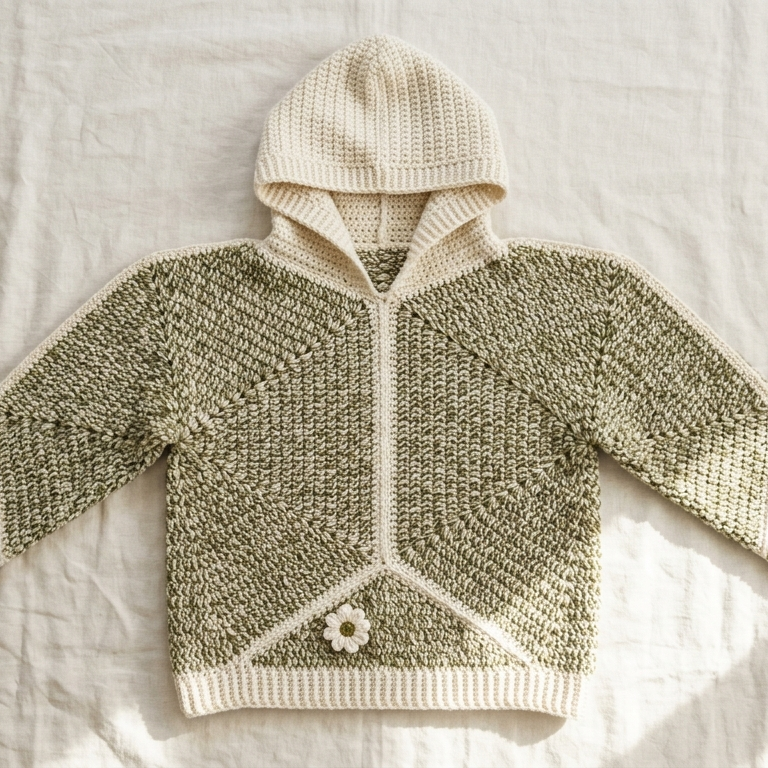
A crochet hoodie is one of those pieces that feels like a perfect mix of comfort, creativity, and everyday wearability. It is cozy enough to throw on during chilly mornings, stylish enough to layer into an outfit, and handmade enough to feel truly special. Unlike many other crochet garments, hoodies have a relaxed, lived-in look that makes them easy to wear again and again. They can be oversized and casual, fitted and polished, textured and rustic, or modern and graphic depending on the yarn, stitch pattern, and shaping you choose.
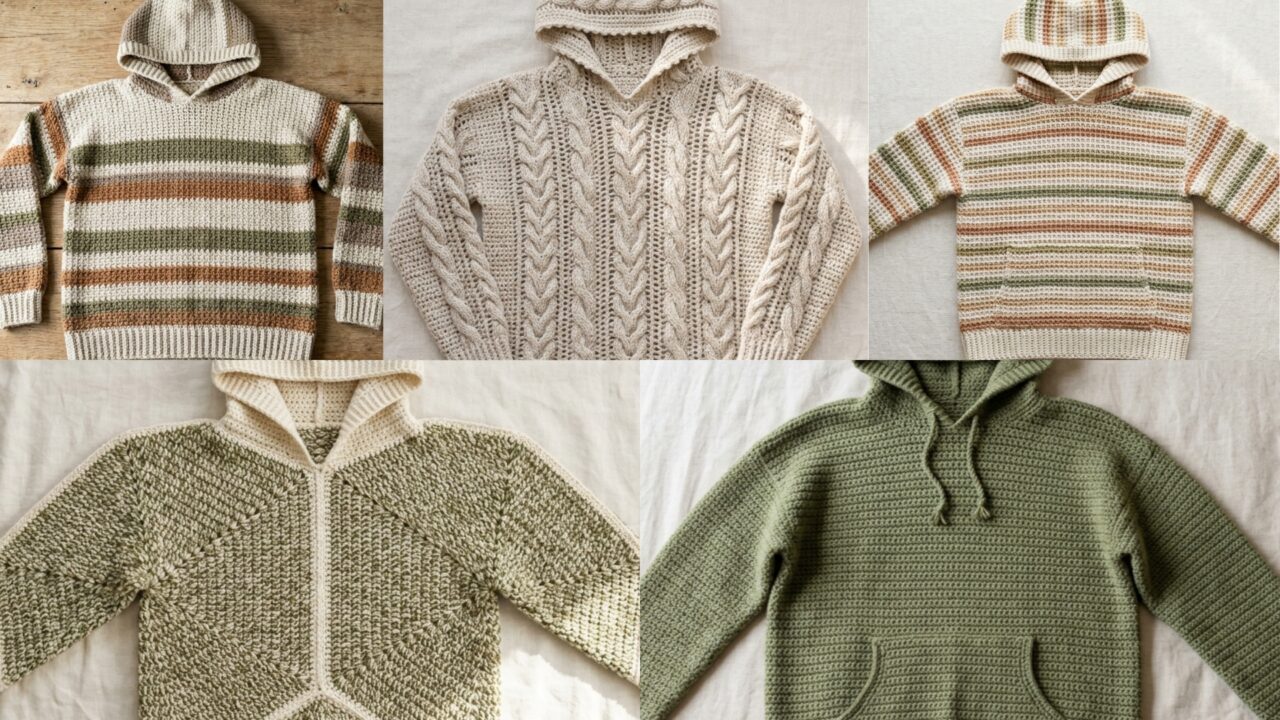
What makes crochet hoodies especially appealing is how versatile they are. A Hawthorn hoodie can feel soft and earthy. An outlaw hoodie brings a bold, slightly edgy energy. A hexagon pullover hoodie uses clever construction for a fun, geometric fit. An open cable knit hoodie adds rich texture and depth. A waffle knit striped pullover hoodie feels cozy, classic, and visually interesting. Each one has its own mood, but all of them can become wardrobe staples that feel both practical and personal.
In this post, you will find five must-try crochet hoodie ideas with detailed step-by-step guidance, helpful notes, and practical finishing tips. Each design is written to be easy to follow while still giving you enough detail to create a hoodie that looks polished, feels comfortable, and fits beautifully. Whether you are making your first hoodie or adding another handmade layer to your wardrobe, these patterns are a great place to start.
Quick Notes
Project type: Crochet hoodies
Best for: Everyday wear, layering, gifts, fall and winter outfits, handmade wardrobes
Skill level: Beginner to intermediate, depending on shaping and texture
Hook size: Usually 4.0 mm to 6.5 mm, depending on yarn weight and desired drape
Yarn weight: DK, worsted, or light bulky yarn
Best yarn choice: Soft wool blends, acrylic blends, or cotton blends with good drape and warmth
Finished size: Usually relaxed fit or oversized fit, but customizable
Time to complete: Several days to a few weeks depending on size and stitch detail
Helpful stitches: Chain, slip stitch, single crochet, half double crochet, double crochet, front post stitches, back post stitches, increases, decreases, join-as-you-go, seaming, ribbing, texture stitches
Common Materials
Most crochet hoodies use a similar set of supplies.
- Yarn in your chosen colors
- Crochet hook matched to the yarn
- Yarn needle
- Scissors
- Measuring tape
- Stitch markers
- Optional zipper, buttons, or drawstring cord
- Optional blocking tools
- Optional lining if you want extra structure
For hoodies, yarn choice matters a lot. A yarn that is too stiff may make the garment uncomfortable, while a yarn that is too soft may lose shape quickly. A balanced yarn with warmth, softness, and some structure usually works best. If you want a garment you can wear often, choose a yarn that feels good against the skin and holds up to regular use.
1. Crochet Hawthorn Hoodie Pattern
A Hawthorn hoodie feels soft, calm, and naturally stylish. The name gives it a slightly earthy and rustic mood, which makes it ideal if you want a hoodie that feels cozy without being too heavy or overly sporty. This style often works beautifully with textured stitches, subtle shaping, and a relaxed fit that makes it easy to wear every day.
Step-by-Step Guide
Step 1: Decide on the fit
Before you start, decide whether you want the hoodie to be oversized, relaxed, or slightly fitted. A Hawthorn hoodie usually looks beautiful with a soft, easy silhouette. Take your bust, shoulder, sleeve, and length measurements so you can plan the size carefully.
A good fit makes the hoodie comfortable and wearable.
Step 2: Choose a soft stitch pattern
Pick a stitch that gives the hoodie some visual interest without making it too bulky. Half double crochet, moss stitch, or a gentle textured repeat can all work nicely. The texture should feel natural and understated, like the softness of a sweater you will want to reach for often.
The texture should support the cozy mood of the hoodie.
Step 3: Start the body panels or top-down section
You can make the Hawthorn hoodie with separate front and back panels or work it top-down in one piece. If you are a beginner, simple panels may feel easier to manage. Work the body until it reaches the length you want before shaping the armholes or sleeves.
The body is the base of the hoodie’s silhouette.
Step 4: Shape the shoulders and armholes
If using panels, shape the shoulders and armholes gradually so the hoodie sits well across the upper body. If working top-down, separate the sleeves at the right point and continue with the body. Keep the shaping even so the hoodie does not pull or feel tight.
Comfort matters especially in a relaxed hoodie.
Step 5: Crochet the sleeves
Work the sleeves in the same stitch pattern as the body or use a slightly simpler stitch if you want the texture to stay concentrated on the torso. The sleeves should feel roomy but not overly wide, and the cuffs should taper gently for a comfortable finish.
A balanced sleeve shape keeps the hoodie practical.
Step 6: Add the hood
The hood is one of the most important parts of the design. Crochet it as a separate piece or directly from the neckline. Make sure it is deep enough to wear comfortably and shaped so it rests naturally behind the neck and head. A slightly rounded hood often looks soft and flattering.
A good hood gives the hoodie its signature look.
Step 7: Finish the edges and add details
Add ribbing around the cuffs, hem, and hood edge if desired. You can also add a drawstring for a more classic hoodie look. Weave in all ends carefully and block lightly if needed so the stitches settle nicely.
Helpful Tips
The Hawthorn hoodie looks especially lovely in earthy neutrals, soft greens, warm browns, or muted cream tones. If you want a more refined everyday sweater-hoodie, keep the details minimal and let the texture and shape do the work.
2. Crochet The Outlaw Hoodie Pattern
The Outlaw hoodie has a bolder, more edgy feel. It is the kind of piece that can be styled with jeans, boots, or layered outfits for a confident look. Even though it sounds dramatic, it can still be soft and wearable if you choose the right yarn and keep the fit comfortable.
Step-by-Step Guide
Step 1: Choose a stronger silhouette
The Outlaw hoodie usually looks best with a slightly structured shape. Decide whether you want it to be oversized with a bold drape or closer-fitting with sharper lines. A more defined shape helps the style feel intentional and fashion-forward.
The silhouette sets the tone of the hoodie.
Step 2: Select a stitch with character
A textured stitch, stripe pattern, or rib-like stitch can give the hoodie its strong personality. You want something with presence, not something too delicate. Post stitches or a denser texture work well because they add visual weight and make the hoodie feel more substantial.
The texture should feel bold and confident.
Step 3: Build the body
Start with the front and back panels or a top-down base. Keep the stitch count consistent so the fabric stays even. If you want a more rugged feel, use darker colors or high-contrast stripes. The body should feel sturdy and stylish at the same time.
A strong body structure helps the hoodie feel polished.
Step 4: Shape the sleeves and cuffs
Outlaw-style sleeves can be slightly looser or more dramatic, but they still need to move comfortably. Work the sleeves in the same texture or use a simpler stitch for balance. Add cuffs that pull in gently so the sleeve shape stays clean.
The sleeve shape helps define the mood of the garment.
Step 5: Crochet a roomy hood
Make the hood deep and slightly rounded so it feels practical and comfortable. A hood that is too small can distort the neckline, so take care to make it generous enough for everyday wear. If desired, add a contrast edge for a bolder look.
The hood should feel strong but easy to wear.
Step 6: Add details
This is where you can really lean into the outlaw feel. You might use contrast stitching, a drawstring, or dark ribbing at the cuffs and hem. Keep the details intentional so the hoodie feels stylish rather than costume-like.
Small details can make the whole design feel finished.
Step 7: Finish carefully
Weave in ends securely and block lightly if needed. If you want a more structured look, give the edges extra attention so they stay crisp. The final piece should feel bold but comfortable.
Helpful Tips
The Outlaw hoodie looks great in black, charcoal, deep olive, burgundy, or dark denim shades. If you want it to feel less intense, use a soft neutral with bold contrast edging. This is a perfect hoodie if you like a slightly edgier everyday style.
3. Crochet Hexagon Pullover Hoodie Pattern
A hexagon pullover hoodie is a clever and satisfying project because the construction itself becomes part of the charm. Hexagon sweaters and pullovers are loved for their easy shaping and beautiful geometric feel, and turning that style into a hoodie creates something modern, interesting, and surprisingly practical.
Step-by-Step Guide
Step 1: Learn the hexagon shape
The hoodie starts with two large hexagon sections, each becoming one side of the garment. If you have never made a hexagon garment before, work a small practice swatch to understand how the shaping behaves. The corners and increases create the structure that will later become the sleeves and body.
The hexagon is the foundation of the whole pullover.
Step 2: Crochet the first hexagon
Work your first hexagon in rounds, increasing at the corners evenly. Keep the fabric flat and balanced so the shape grows cleanly. The size of the hexagon determines how loose or fitted the hoodie will be, so measure as you go.
The hexagon should be large enough to become a wearable section.
Step 3: Crochet the second hexagon
Make a second matching hexagon the same size. Matching the two pieces is important because they will form the sweater body and sleeves when joined. Keep your stitch tension consistent so both pieces fit together neatly.
Symmetry helps the construction work properly.
Step 4: Join the hexagons
Fold each hexagon in the correct direction so the sides create the sleeves and body. Seam the back and underarm sections together. This is the part that transforms the flat shapes into a wearable pullover. The join should be neat and secure.
This step is what creates the garment structure.
Step 5: Shape the sleeves and body
Once the hexagons are joined, you will see the sleeves and body form naturally. Adjust the underarm seam if needed to improve comfort. If you want a more fitted hem or cuff, add ribbing or tighter rows at the bottom and wrist openings.
The shape becomes visible here.
Step 6: Add the hood
Crochet the hood separately or directly from the neckline. Since the pullover is already built from geometric shapes, a simple hood can balance the design beautifully. Make sure it sits comfortably and does not pull on the neckline.
A well-shaped hood keeps the pullover cozy.
Step 7: Finish the edges
Add ribbing or a clean border around the cuffs, hem, and hood opening if desired. This helps the garment feel finished and wearable. Weave in all ends carefully and block if needed to help the shape relax.
Helpful Tips
A hexagon pullover hoodie looks especially great in solid colors because the construction is the focal point. If you want to highlight the geometry, use a bold stitch texture or subtle color blocking. This is a fun hoodie if you enjoy clever construction and modern handmade fashion.
4. Crochet Open Cable Knit Hoodie Pattern
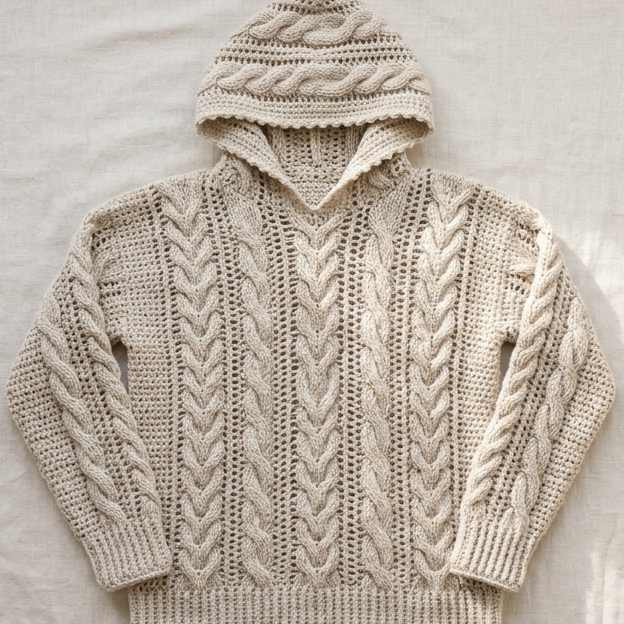
An open cable knit hoodie combines texture and lightness in a very beautiful way. The cable effect gives it a rich, elegant look, while the open structure keeps it from feeling too heavy. This is a great choice if you want a hoodie that feels a little dressier and more visually interesting.
Step-by-Step Guide
Step 1: Choose the cable layout
Before you begin, decide where the cables will appear. They can run vertically down the front, across the sleeves, or around the body panels. A thoughtful placement helps the texture feel balanced. Because cables already add a lot of visual detail, you do not need them everywhere.
The cable layout shapes the personality of the hoodie.
Step 2: Practice the cable stitch
If you are new to cable crochet, practice a small swatch first. Cables often use front post and back post stitches or crossed stitch techniques. Getting comfortable with the stitch repeat will make the actual garment much easier.
A swatch helps you understand the texture and spacing.
Step 3: Start the body panels
Work the front and back panels in the chosen cable pattern. Keep the stitches even and the cable rows consistent. The open parts of the design should feel breathable while the cables add definition and structure.
The body should show off the texture cleanly.
Step 4: Shape the shoulders and armholes
As with any hoodie, the shoulders and armholes need to fit well. Shape them gradually so the cable pattern continues smoothly. Avoid making the garment too tight, since the texture already creates some firmness.
Comfort should stay in balance with texture.
Step 5: Crochet the sleeves
Continue the cable pattern on the sleeves if you want a fully textured look, or simplify the sleeves if you want the body to remain the main focus. Ribbed cuffs work especially well here because they complement the cable texture.
The sleeves can either echo or support the body pattern.
Step 6: Add the hood
Crochet a hood that balances the dense texture of the cables. A simple hood often works best so the cable work remains the star of the design. Make it deep enough to wear comfortably and shape it so it lies smoothly at the neckline.
The hood should feel soft against the stronger texture.
Step 7: Finish the hoodie
Add ribbing or a clean edge at the hem, cuffs, and hood opening. Block gently if needed so the cables open and settle into shape. Weave in all ends carefully for a polished result.
Helpful Tips
This hoodie looks beautiful in cream, oatmeal, soft gray, or muted jewel tones. If you want a more luxurious feel, choose a yarn with excellent stitch definition. Open cable designs are especially pretty for transitional weather and layered outfits.
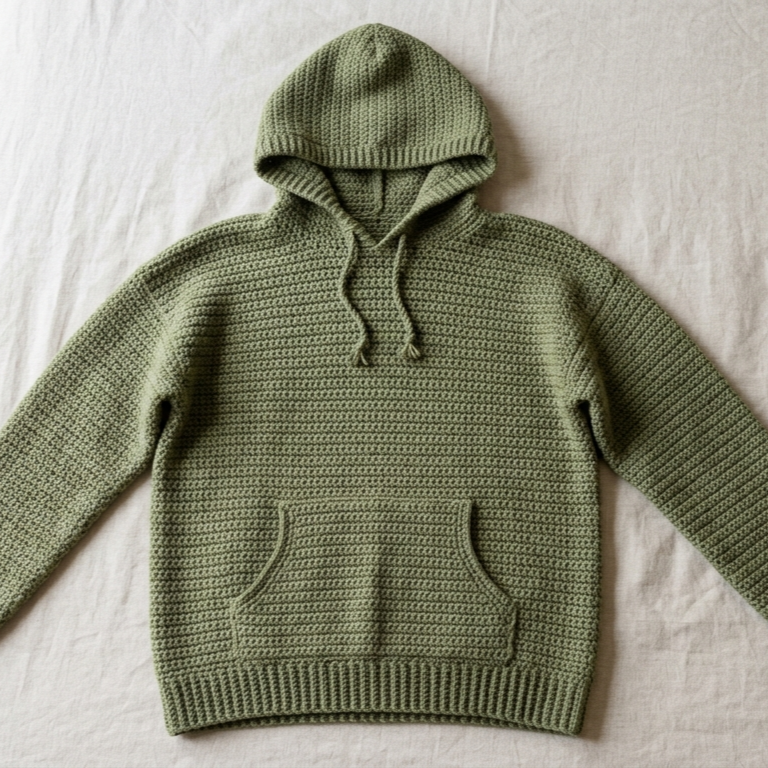
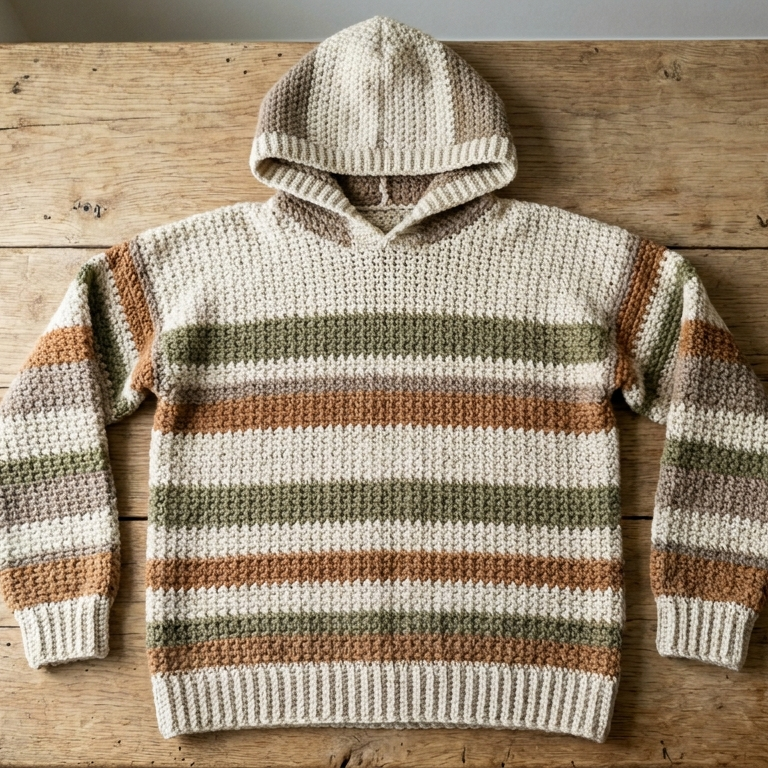
5. Crochet Waffle Knit Striped Pullover Hoodie Pattern
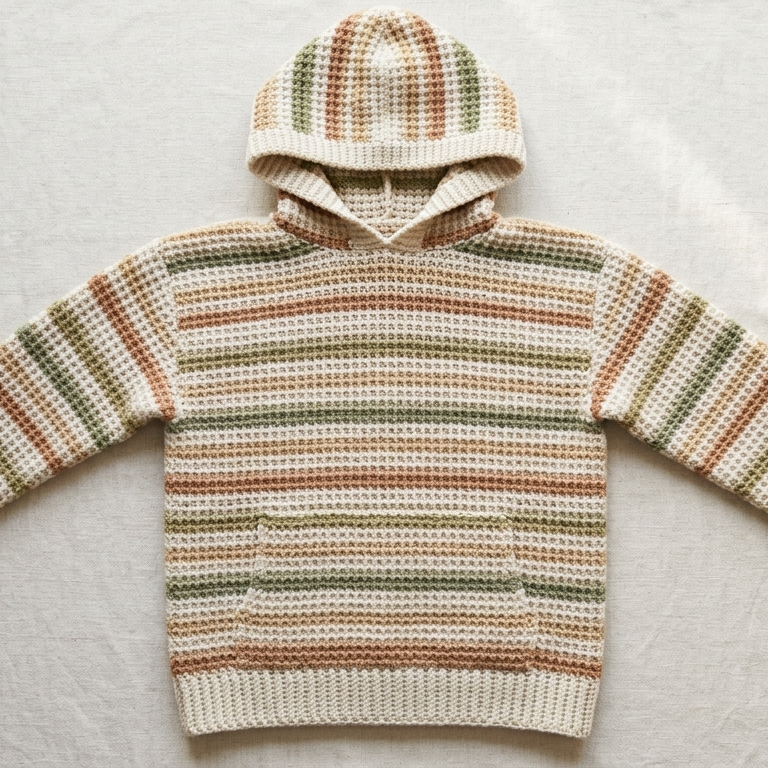
A waffle knit striped pullover hoodie is cozy, textured, and visually dynamic. The waffle stitch gives the hoodie warmth and depth, while the stripes make it feel modern and fun. This is a wonderful option if you want a hoodie that feels casual but still looks stylish and intentional.
Step-by-Step Guide
Step 1: Plan the stripe sequence
Choose the colors and stripe widths before you begin. You can use wide stripes for a bold look or thin stripes for a more subtle effect. A planned sequence will help the hoodie look more balanced and put together.
The stripe layout sets the visual rhythm.
Step 2: Swatch the waffle stitch
Before starting the full hoodie, make a small swatch in waffle stitch to check gauge and texture. Waffle stitch creates a thick, cushioned fabric, so it is important to see how it behaves with your yarn. This also helps you avoid fit issues later.
A swatch helps with both texture and sizing.
Step 3: Crochet the body panels
Work the front and back panels in waffle stitch and switch colors according to your stripe plan. Keep the stitch tension consistent so the stripes stay neat and the fabric does not become too tight. The waffle texture will create a soft, substantial feel.
The body is where the texture really shines.
Step 4: Shape the neckline and armholes
If you are making separate panels, shape the neckline and armholes carefully so the hoodie sits comfortably. Waffle stitch can feel dense, so make sure the openings are not too small. If working top-down, separate the sleeves at the proper point and continue the body from there.
Comfort is especially important with thicker fabric.
Step 5: Crochet the sleeves
Make the sleeves in matching stripes or keep them in a simpler layout depending on the look you want. Waffle stitch sleeves can feel very cozy, but they should not be too bulky. Add cuffs to help keep the sleeve shape neat.
Step 6: Add the hood
A hoodie with waffle texture looks great with a simple hood. Crochet the hood deep enough to sit comfortably and make sure it does not pull the neckline. If you want extra detail, add a striped edge to match the body.
A balanced hood keeps the design practical.
Step 7: Finish the ribbing
Add ribbing to the cuffs, hem, and hood opening if desired. Ribbing gives the hoodie a clean finish and helps contrast the chunky waffle texture. Weave in all ends carefully and block lightly if needed.
Helpful Tips
This hoodie looks especially good in earthy stripe combinations, soft neutrals, or vintage-inspired color pairings. Because waffle stitch is naturally thick and cozy, it is ideal for colder seasons and relaxed everyday wear.
Conclusion
Crochet hoodies are some of the most satisfying garments to make because they blend comfort, style, and handmade personality in one wearable piece. They can feel cozy and casual, structured and modern, or textured and fashion-forward depending on the pattern you choose. That flexibility is one of the reasons hoodies are such a rewarding crochet project.
These five hoodie patterns each offer something different. The Hawthorn hoodie feels calm and earthy. The Outlaw hoodie brings bold character. The hexagon pullover hoodie uses clever geometric construction. The open cable knit hoodie adds rich texture and elegance. The waffle knit striped pullover hoodie gives you cozy warmth with visual interest. Together, they show how versatile crochet can be when you want to create something wearable and stylish.
A handmade hoodie is more than just a garment. It is a piece you can wear often, style in many ways, and feel proud of because you made it yourself. With the right yarn, careful shaping, and thoughtful finishing, these hoodie patterns can become favorites in any handmade wardrobe.