

Small, portable, and endlessly customizable, crochet bracelets are the perfect weekend project: quick to make, friendly to travel with, and ideal for using up scraps or trying a new stitch. Whether you want something romantic for a wedding, playful for daily wear, beaded and luxe, or textured and modern, this collection of five bracelet patterns gives you a variety of techniques — lacework, colorwork, beads, chevrons, and appliqué butterflies — so you can mix-and-match styles to suit your wardrobe or gift list.
Each pattern below is written in US crochet terms and includes:
- Skill level & estimated time
- Materials and suggested alternatives
- Gauge and finished measurements (with how to adjust for wrist size)
- Detailed step-by-step instructions (foundation → body → closure)
- Finishing, variations, and troubleshooting tips
- Care instructions
Make a small swatch first if precise fit matters (especially for beaded cuffs or lace), but most bracelets are forgiving — slight size differences are fine because closures can be adjusted. Let’s dive in.
Abbreviations (US)
- CH — chain
- SL ST — slip stitch
- SC — single crochet
- HDC — half double crochet
- DC — double crochet
- TR — treble crochet
- BLO — back loop only
- FLO — front loop only
- ST(S) — stitch(es)
- INC — increase (2 sts in same st)
- DEC — decrease
- RS — right side, WS — wrong side
- rep — repeat
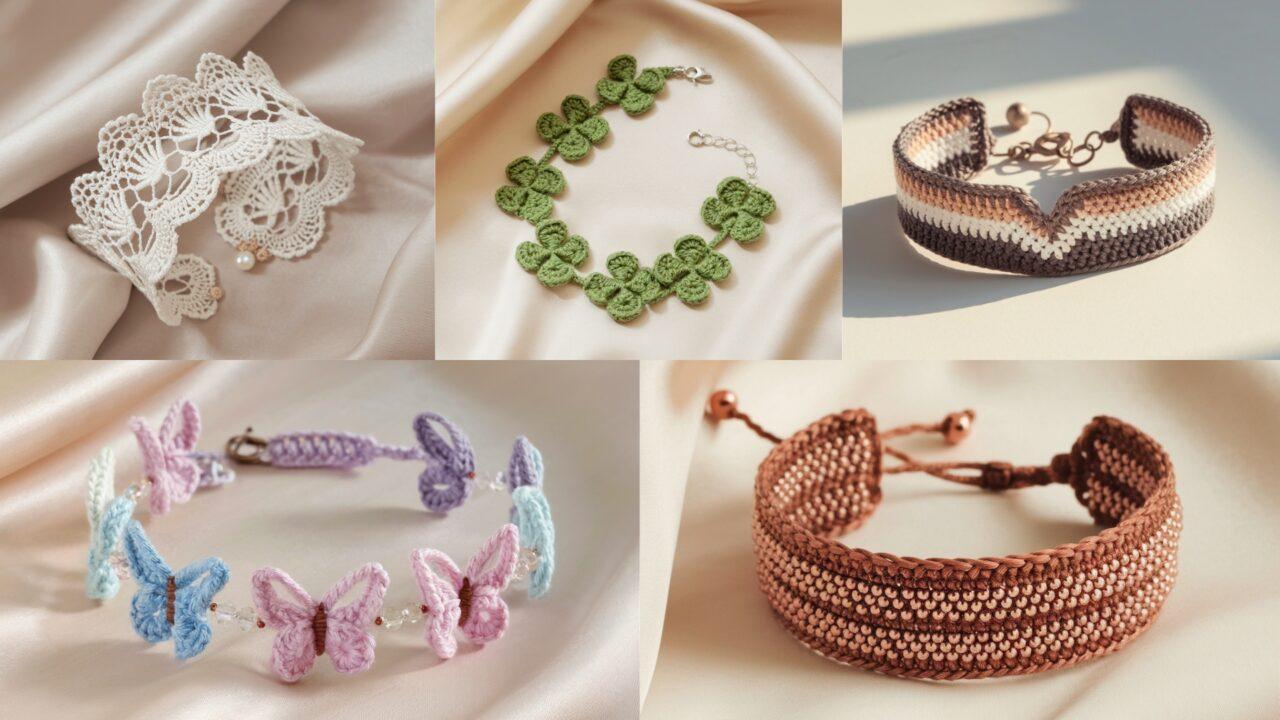
1. Crochet Wedding Lace Cuff Bracelet Pattern
Skill level: Confident beginner → Intermediate
Estimated time: 1.5–3 hours
Style: Romantic, lacy cuff suitable for weddings, bridesmaids, or elegant daytime wear. Works beautifully in white, ivory, blush, or metallic thread.
Materials
- Size 10 crochet cotton thread (or fine lace-weight yarn) — 10–20 g
- Steel crochet hook 1.75–2.5 mm (choose hook that creates neat lace)
- Small snap or button + loop, or lobster clasp + jump rings for closure
- Tapestry needle, scissors, blocking pins, small piece of lightweight interfacing (optional)
Alternatives:
- For a chunkier cuff, use fingering-weight yarn + 2.75–3.5 mm hook; the pattern becomes more substantial.
Finished size (approx.)
- Standard adult cuff circumference: 6.5–7 in (16.5–18 cm) unstretched.
- Height: 1–1.5 in (2.5–4 cm) depending on rounds.
- To fit small/medium/large wrists: measure wrist circumference and subtract 0.25–0.5 in for a snug fit when using cotton thread; subtract 0.5–1 in for stretchier yarns.
Gauge (optional but helpful)
- 10 DC × 8 rows = 1 in in this lace (highly dependent on thread/hook). Swatch to match look rather than exact gauge.
Notes before you begin
- This cuff is worked flat as a narrow rectangular panel, then edged and joined. You’ll create a picot/shell lace motif that repeats along the length.
- The pattern below is written for a Medium bracelet length; I include notes for adjusting width/length.
Stitch pattern (motif overview)
- Lace motif: small shell clusters separated by chain arches, creating a decorative, airy fabric.
Instructions — Step-by-step (Medium)
1. Foundation chain
- Measure desired cuff circumference (example 7 in). Make a foundation chain that when laid flat and worked yields that length: for fine thread using this motif, chain 56 (multiple of 8 + 0) — this produces ~6.8–7 in depending on tension. If in doubt, chain slightly longer and test.
2. Row 1 — Setup row
- CH 1, SC in 2nd CH from hook and in each CH across. (This creates a base for the lace.) Turn.
3. Row 2 — Establish lace spacing
- CH 3 (counts as DC), skip next st, 5 DC in next st (shell), skip next st, CH 3, SL ST in next st — repeat across to end, ending with DC in last st if needed to square off. Turn.
4. Row 3 — Anchor row
- CH 1, SC into each DC and SL ST of previous row to stabilize, placing SC in shell centers and in arch spaces. Turn.
5. Row 4 — Shell row (repeat)
- CH 3, skip next st, 5 DC in next st, skip next st, CH 3, SL ST in next st — repeat across. (This aligns shells above shells.) Turn.
6. Rows 5–n — Repeat
- Repeat Rows 3–4 until cuff reaches desired height (typically 3–4 shell rows gives a cuff ~1–1.5 in tall). End on an anchor row (Row 3 type) for easier edging.
7. Edging (top & bottom)
- With RS facing, join thread at one corner and work SC evenly across the short edge; then SC around the long edge. In corners, work 3 SC to keep edges square. Repeat on other short edge.
- Decorative picot edge (optional): SC, CH 3, SL ST in same SC every 3–4 sts along both long edges to produce a delicate picot scallop.
8. Finishing & closure
- Block the panel flat to open the lace — pin into shape and spritz/dampen as appropriate for your fiber.
- Fold the cuff into a loop matching wrist circumference. Overlap ends slightly and sew the short ends together (mattress stitch or whipstitch from WS) or leave a 1/2 in overlap for a button/snap closure.
- Attach snap or sew on a feminine small button on top edge; crochet a tiny loop on the opposite end: CH 6, SL ST back to base to make a secure loop, test fit.
Variations & embellishments
- Sew tiny seed beads into shell centers before blocking (use beading thread and needle) for subtle sparkle.
- Edge with metallic thread for a wedding look.
- Create a double-layer cuff by making two panels and joining them offset for a fuller look.
Troubleshooting
- If the lace looks too dense: increase hook size by 0.25–0.5 mm.
- If hole spaces are too large: reduce hook size or decrease CH 3 arches to CH 2.
Care
- Hand wash cold for delicate thread, reshape and lay flat to dry. For machine-washable yarns, use a gentle cycle in a mesh bag.
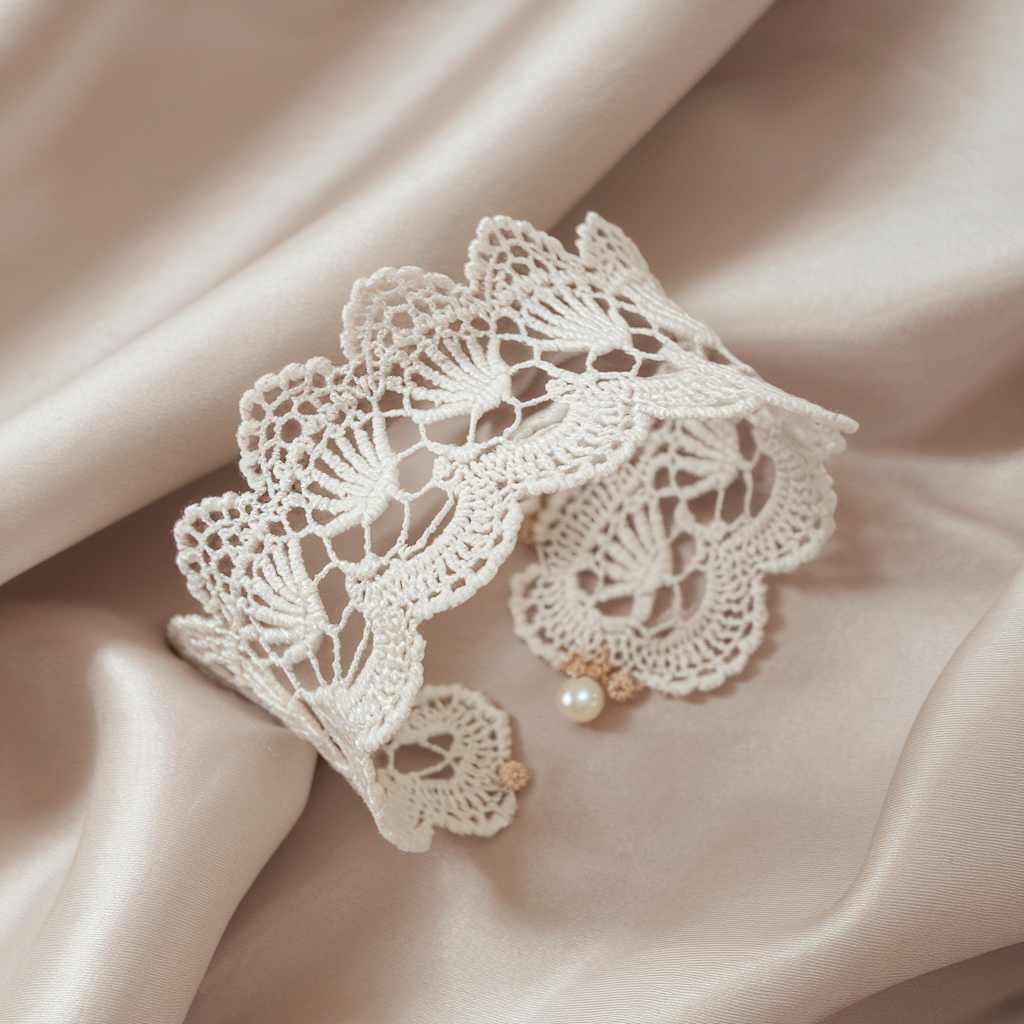
2. Crochet Clover Bracelet Pattern
Skill level: Beginner → Confident beginner
Estimated time: 1–2 hours
Style: Playful, shamrock/clover motifs linked by delicate chains — perfect for spring, St. Patrick’s Day, or a nature-inspired gift.
Materials
- Sport-weight cotton or mercerized cotton yarn — small amounts of green (main) and contrast if desired
- 2.5–3.5 mm crochet hook (depending on yarn)
- Small lobster clasp & jump ring OR elastic jewelry cord (for stretch version)
- Yarn needle, scissors, optional small green seed beads
Finished size
- Bracelet circumference: adjustable 6–8 in (make loop length or add clasp).
- Each clover motif: approx 0.75–1 in across (size depends on yarn/hook).
Notes
- Two construction options: (A) crocheted chain with motifs attached, closed with clasp; (B) motifs strung on elastic cord for a flexible bracelet. Below we show clasped version.
Clover motif (single four-leaf clover) — make 6–8 motifs
Clover — Step-by-step
- Make a magic ring. CH 1. Round 1: SC, CH 3 repeat 4 times into ring to form 4 chain-arch points; SL ST to first SC. Pull ring closed. (4 SC / 4 ch-3 loops)
- Round 2 (petals): In each CH-3 loop work (SC, HDC, 3 DC, HDC, SC) — this creates a petal. Repeat for 4 loops. Fasten off leaving long tail for sewing/attaching. Block lightly to shape petals.
Bracelet chain & assembly
- Chain enough to make desired bracelet base length minus motif widths. Example: chain 30 for small base loop. Join with SL ST to form a small chain circle (or leave as a straight strand to attach to clasp ends).
- Lay out clovers evenly along chain; sew each clover through its base onto the chain using yarn needle and tail. Add a tiny bead at clover center if desired (pick a green seed bead and stitch into center).
- Attach jump ring & lobster clasp to ends, or finish with a crocheted loop + button.
Elastic variation
- Instead of chain + clasp, thread elastic jewelry cord through small holes you create by making a tiny chain loop on the back of each clover (CH 4, SL ST to form loop). String motifs onto the elastic before securing ends with surgeon’s knot and a dab of jewelry glue.
Variations & tips
- Make a longer version for anklet use by adding more motifs or larger clovers.
- Use a variegated green for a subtle tone shift in petals.
Care
- Machine wash gentle in mesh bag if using cotton; air dry.
3. Crochet Ombre Chevron Bracelet Pattern
Skill level: Confident beginner → Intermediate (color changes)
Estimated time: 1–2 hours
Style: Graphic chevron strip, worked narrow and finished with metal findings. Ombre gradient yarn or three colors creates a modern boho bracelet.
Materials
- Fingering or sport-weight yarn in ombre/gradient cake or three coordinated colors
- 2.5–3.5 mm crochet hook
- Small jewelry bar/clasp set (fold-over tube ends or fabric ends with glue) OR sew-on snap/button
- Tapestry needle, scissors, optional stiffener/interfacing if you want a rigid cuff
Finished size
- Width: 0.5–1 in depending on stitch height and number of rows.
- Circumference: adjustable; sample uses 6.75 in finished circumference for medium.
Notes before you start
- This bracelet is worked as a narrow chevron strip (flat) then joined into a loop and finished with ends tucked into tube findings or sewn together and covered with a small decorative button flap.
Stitch pattern (chevron basics)
- Chevron is made by increases and decreases (V-shape): DC in next 3, DC2TOG, CH 1, INC, DC in next 3 — pattern repeat across width.
Instructions — Step-by-step
1. Foundation chain & first row
- Chain 24 (multiple of pattern repeat for narrow chevron; adjust to desired width). Optional: chain fewer for narrower bracelet, more for wider cuff.
- Row 1: DC in 4th CH from hook and across (counts as DC). Turn.
2. Establishing chevron repeat
- Row 2 (chevron shaping): CH 3, DC in next 2 sts, DC2TOG (decrease to make valley), CH 1, 2 DC in next st (increase to make peak), DC in next 3 — repeat to end, ending symmetrical. Turn.
- Row 3+: Continue repeating Row 2 until strip length equals desired bracelet circumference (e.g., 6.5–7 in before finishing). Use ombre yarn so color shifts naturally across length; for clean color changes, fasten off and join new color at the start of a row.
3. Edge finishing
- Make one round of SC around the entire chevron strip for a neat edge; in corners or on peaks insert 2–3 SC to soften points. Fasten off.
4. Assembly & closures
Option A — Sew ends & cover seam: Overlap ends slightly and sew with tapestry needle. For a polished finish, wrap overlap with a short piece of leather or fabric and glue/hand-sew it in place.
Option B — Jewelry tube ends: Tuck each raw end into a metal tube finding and crimp or glue per product instructions. Attach lobster clasp and jump ring.
Variations & tips
- Add a thin row of metallic thread on peaks for subtle sparkle.
- For a softer bracelet, block the strip lightly; for a firmer, stiffer cuff, use fusible interfacing sewn inside before finishing.
Care
- Hand wash and reshape; if interfaced, follow interfacing care.
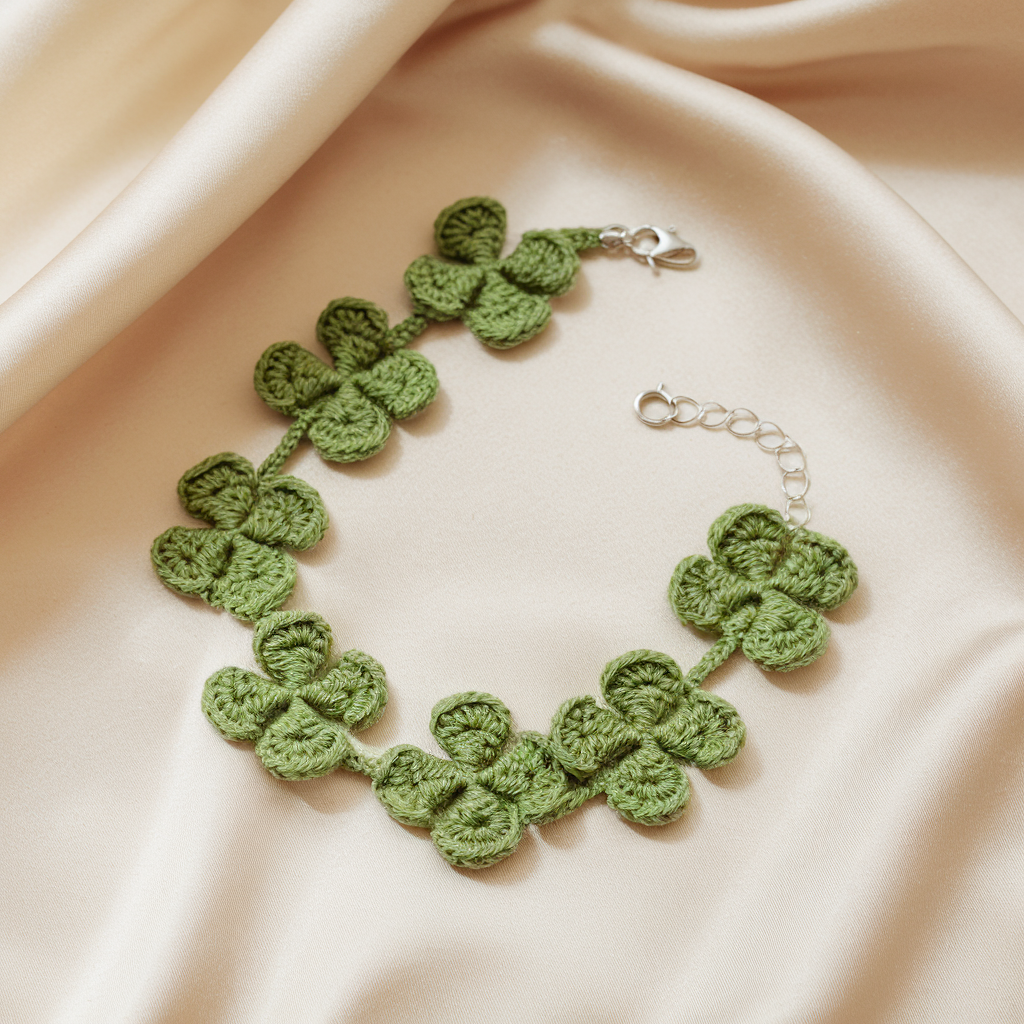
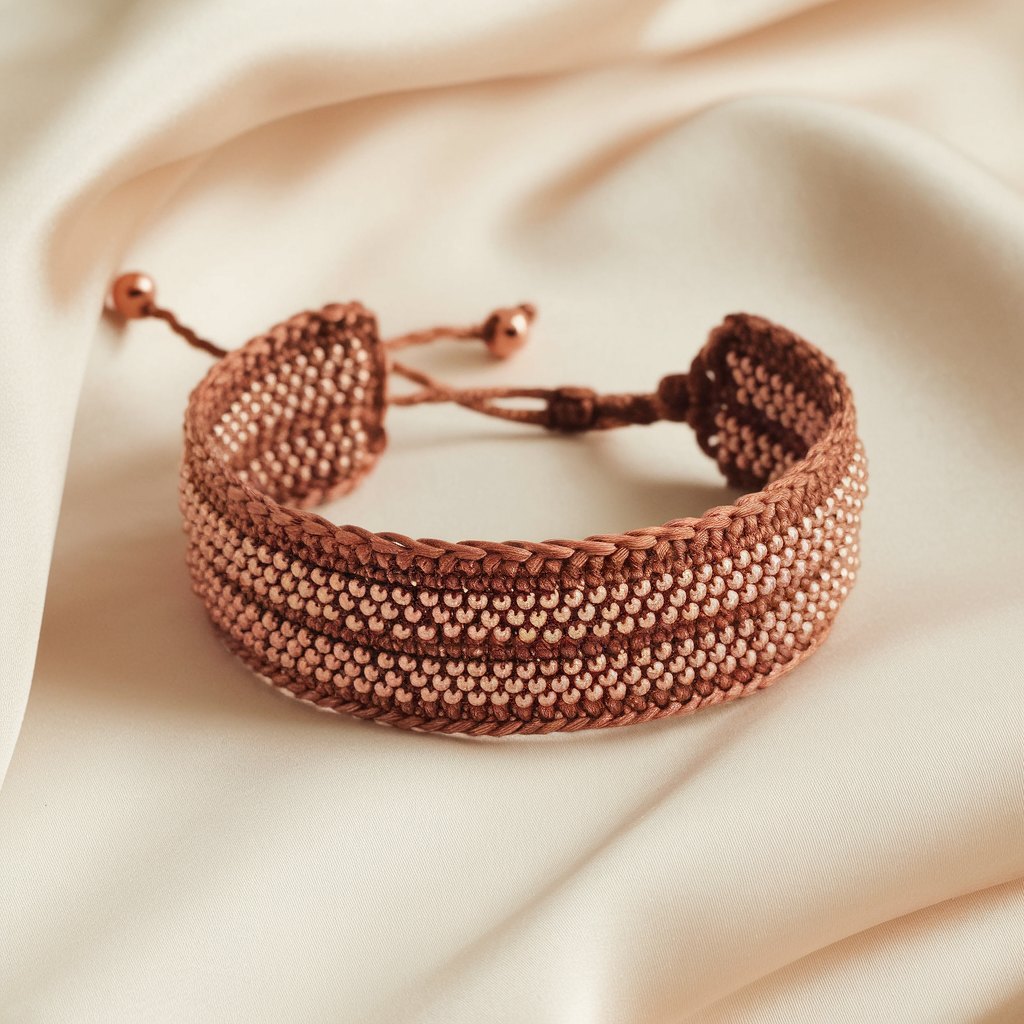
4. Crochet Sienna Beaded Bracelet Pattern
Skill level: Intermediate (beading + crochet)
Estimated time: 2–3 hours
Style: Elegant beaded bracelet inspired by terracotta/sienna tones — use glass seed beads and metallic accents for a luxe hand-crafted cuff.
Materials
- DK or fingering cotton/silk blend yarn in warm sienna/terracotta — small amount (~10–20 g)
- 1.75–2.5 mm crochet hook (size chosen to carry beads snugly)
- Approximately 80–120 small glass seed beads (size 6/0 or 8/0), metallic spacer beads optional
- Beading needle + beading thread (or pre-string beads onto yarn/thread before crocheting)
- Small clasp (toggle or lobster) + jump rings
- Tapestry needle, scissors
Two beading methods (choose one)
- Pre-string method (recommended): String beads onto yarn before beginning; slide beads into place as you work.
- Post-attach method: Crochet and sew beads on later (works but takes longer and beads may sit less flush).
Finished size
- Width: narrow cuff (~0.5–0.75 in) or wider band depending on stitch repeat; sample uses narrow.
- Circumference: adjustable to wrist; sample uses 7 in finished.
Stitch concept
- Single crochet strip with beads worked into every other stitch to create a linear beaded row, or multiple bead rows for denser coverage.
Instructions — Step-by-step (pre-string method)
1. Prepare beads
- Pre-string about 1.5× the number of beads you think you’ll use (easier than running out mid-row). Use a fine beading needle or a thin wire to slide beads onto yarn.
2. Foundation chain
- CH 22 (for a narrow band; change count for wider). This provides a base of about 1 in width after working several rows.
3. Row 1 — base
- SC in 2nd ch from hook and across. Turn.
4. Row 2 — beaded row
- To work a bead into a stitch: slide the next bead up close to the hook, CH 1 (optional anchor), insert hook into next st, pull up loop, yarn over and pull through, slide bead over and finish SC — the bead sits against the stitch.
- Pattern example: [bead + SC], SC; repeat across — bead on every other stitch for dotted effect. Turn.
5. Rows 3–n
- Repeat Row 2 for 6–10 rows until band reaches desired height (or until beads are used). For a denser beaded field, place beads in every stitch.
6. Edge finishing
- SC around entire rectangle for neat finish. When you reach bead rows, work SC behind beads, securing them in place.
7. Blocking & stiffening (optional)
- For a cuff that holds shape, block and then apply a lightweight fabric stiffener to the wrong side (test on scrap). Alternatively stitch a thin leather strip to the inside.
8. Attach closure
- Overlap ends and sew a jump ring and toggle clasp; or attach thin end findings and a lobster clasp.
Styling & variation
- Mix matte and metallic beads for texture.
- Add a tiny charm at seam for personalization.
Troubleshooting
- If beads bunch: reduce bead frequency or use a slightly larger hook for smoother bead sliding.
- Beads not sliding onto yarn: string onto a separate beading thread and then sew beads on during stitching (post-attach method).
Care
- Hand wash recommended; beads and metallic spacers can be sensitive.
5. Crochet Butterfly Beaded Bracelet Pattern
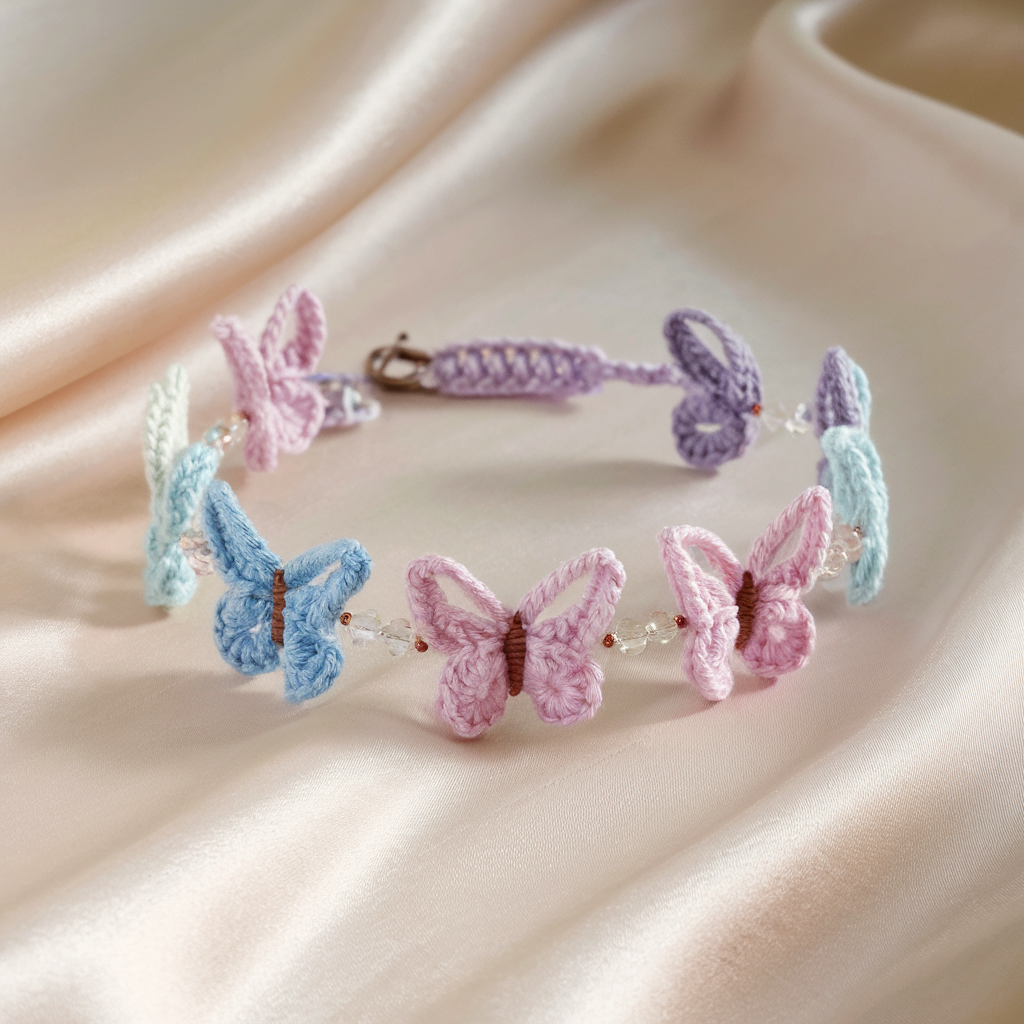
Skill level: Intermediate (appliqué + beading)
Estimated time: 2–4 hours
Style: Youthful, decorative bracelet with small crocheted butterflies embellished with beads — great for gifts, festival wear, or children’s accessories (ensure embellishments are secured or embroidered instead of glued for safety).
Materials
- Fingering or sport yarn in two colors (butterfly & band)
- 2.5–3.5 mm crochet hook
- Small seed beads (optional)
- Elastic jewelry cord (for stretch version) or clasp + jump ring
- Yarn needle, scissors
Finished size
- Butterfly approx 0.75–1 in across; bracelet circumference adjustable 6–8 in.
Butterfly motif — make 6–8
Butterfly motif — Step-by-step
- Magic ring, CH 1. Round 1: (SC, CH 4) repeat 4 times into ring, SL ST to first SC — this gives 4 loops. Pull ring closed.
- Rnd 2 (petal wings): In first CH-4 loop work (SC, HDC, 3 DC, HDC, SC) for a wing. Repeat in each of the 4 loops to make 4 wing lobes (two top/smaller, two bottom/larger depending on your chain counts). Fasten off leaving tail.
- Body: With contrast color, CH 6 and SL ST back to form a small band; wrap around center of wings and stitch securely, creating the butterfly body. You can add a few tiny beads to center with beading thread.
Bracelet band (stringing)
Option A — Elastic stringing (quick)
- Cut elastic cord to 1 in less than wrist measurement, thread beads and butterflies (string through their back loops or through a small loop sewn to butterfly back) and tie ends in a secure surgeon knot. Add drop of jewelry glue to knot. Trim tails.
Option B — Crocheted chain band with motifs sewn on
- CH 60 (or number to approximate wrist circumference). Join to form a ring or leave as strip to add flexible closure.
- SC around one or two rounds to create tube-like band for stability.
- Evenly space butterflies and sew them onto the band using yarn tails and needle.
Decorative touches
- Add antennae with black embroidery floss: two short stitched lines with a tiny bead at each tip.
- String seed beads onto antennae before knotting for sparkle.
Safety note
- For young children, avoid loose beads; sew beads on tightly or use embroidered dots for eyes.
Care
- Hand wash and reshape; store flat to avoid crushing butterflies.
Conclusion
These five crochet bracelet patterns give you a range of styles and skills to try this weekend — from bridal-ready lace to playful clovers, graphic ombré chevrons, luxe beaded cuffs, and whimsical butterflies. Each design is adaptable: swap fibers, tweak widths, change closures, or add beads and charms to make each bracelet uniquely yours. Small projects like these are perfect for experimenting with new techniques (mosaic lace, beading, post stitches) without a huge time commitment, and they make delightful handmade gifts.
Greeting can I make printed copies of the patterns please
Thanks for sharing. I read many of your blog posts, cool, your blog is very good. https://accounts.binance.com/lv/register?ref=SMUBFN5I
Thank you for your sharing. I am worried that I lack creative ideas. It is your article that makes me full of hope. Thank you. But, I have a question, can you help me?
I don’t think the title of your article matches the content lol. Just kidding, mainly because I had some doubts after reading the article. https://accounts.binance.com/el/register-person?ref=DB40ITMB
Can you be more specific about the content of your article? After reading it, I still have some doubts. Hope you can help me.
Can you be more specific about the content of your article? After reading it, I still have some doubts. Hope you can help me.
Can you be more specific about the content of your article? After reading it, I still have some doubts. Hope you can help me.
Can you be more specific about the content of your article? After reading it, I still have some doubts. Hope you can help me.
Your point of view caught my eye and was very interesting. Thanks. I have a question for you.
Thanks for sharing. I read many of your blog posts, cool, your blog is very good.
Your article helped me a lot, is there any more related content? Thanks!
I don’t think the title of your article matches the content lol. Just kidding, mainly because I had some doubts after reading the article. https://www.binance.info/register?ref=IHJUI7TF
Your point of view caught my eye and was very interesting. Thanks. I have a question for you.
Your point of view caught my eye and was very interesting. Thanks. I have a question for you.