A crochet beanie is one of the most satisfying accessories you can make because it is practical, stylish, and endlessly customizable. It is the kind of project that feels fun to crochet and even better to wear. Whether you prefer a classic cold-weather staple, a textured statement piece, or a colorful hat that adds personality to a simple outfit, a beanie can do all of that with just a few yarn choices and stitch changes.
What makes crochet beanies so appealing is their versatility. A cable beanie can feel rich and polished. A textured mini bean stitch beanie can look soft and modern. A two-tone beanie can bring contrast and style. A wavy beanie can feel playful and eye-catching. A country rib beanie can give you that cozy handmade look that never goes out of style. Each one has a different mood, but all of them are useful, wearable, and rewarding to make.
In this post, you will find five crochet beanie ideas with clear, step-by-step guidance, helpful notes, and practical finishing tips. Each design is written to be easy to follow while still detailed enough to help you create a polished, comfortable hat. If you love handmade accessories that combine warmth and style, these beanie patterns are a great place to start.
Quick Notes
Project type: Crochet beanie hats
Best for: Everyday wear, gifts, winter outfits, handmade accessories, and wardrobe staples
Skill level: Beginner to intermediate, depending on stitch texture and shaping
Hook size: Usually 4.0 mm to 6.0 mm, depending on yarn weight and fit
Yarn weight: DK, worsted, or light bulky yarn
Best yarn choice: Soft acrylic, wool blends, cotton blends, or merino blends
Finished size: Usually one-size-fits-most, with stretch for comfort
Time to complete: A few hours to one day depending on detail and size
Helpful stitches: Chain, slip stitch, single crochet, half double crochet, double crochet, front post stitch, back post stitch, increase, decrease, bean stitch, color change, ribbing
Common Materials
Most crochet beanies use the same basic supplies.
- Yarn in your chosen colors
- Crochet hook matched to the yarn
- Stitch marker
- Yarn needle
- Scissors
- Measuring tape
- Optional pom-pom
- Optional blocking tools
For beanies, yarn choice matters a lot. A yarn that is too stiff may make the hat uncomfortable, while a yarn that is too soft may lose shape quickly. A balanced yarn with some structure and softness usually works best for wearable hats.
1. Crochet Cable Beanie Hat Pattern
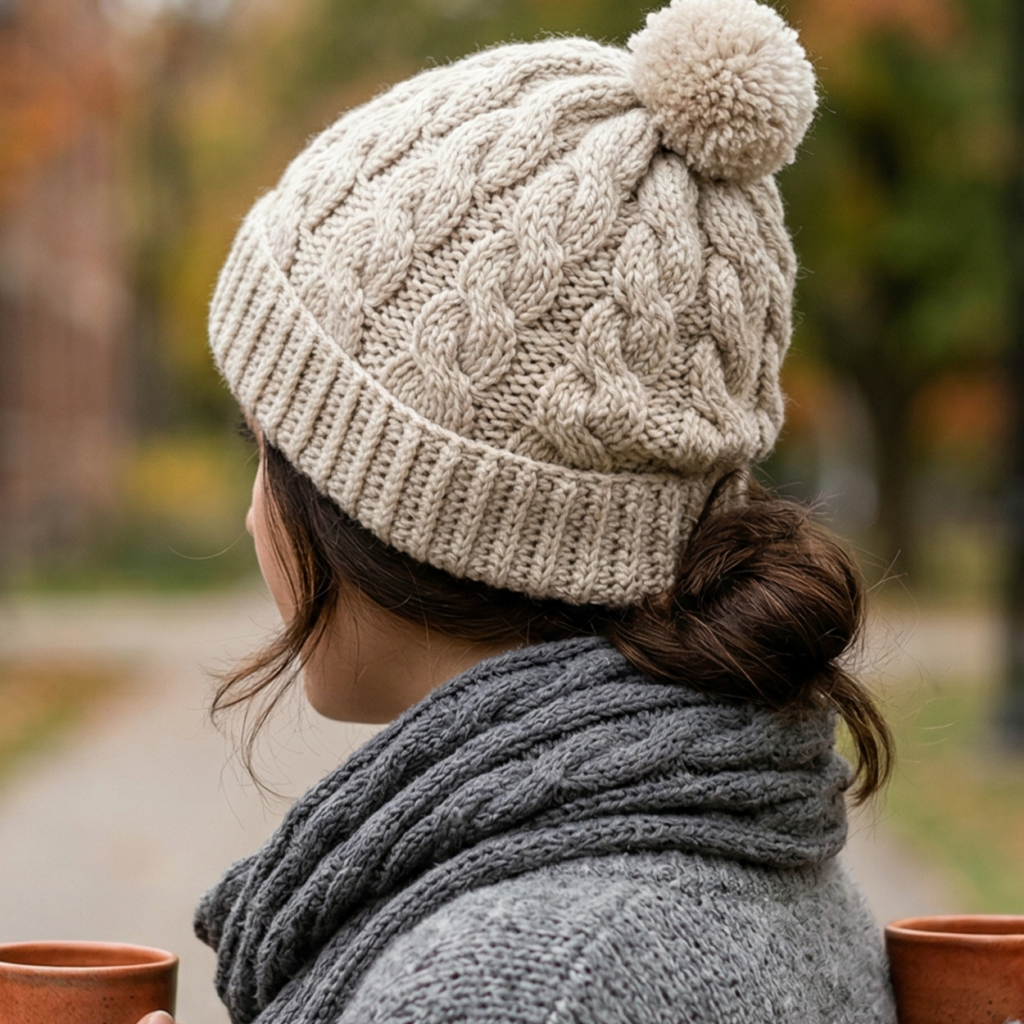
A cable beanie is a beautiful way to bring texture and elegance into a winter accessory. It has that classic handmade look that feels a little more refined than a plain hat, while still being cozy and practical. Cable stitches create raised braided lines that make the beanie feel rich and detailed.
Quick Notes
Skill level: Intermediate
Finished size: Usually medium adult size with stretch
Style: Cozy, polished, textured, classic
Best colors: Cream, oatmeal, gray, navy, forest green, burgundy
Materials
- Medium-weight yarn
- Crochet hook suited to the yarn
- Stitch marker
- Yarn needle
- Scissors
- Measuring tape
Step-by-Step Guide
Step 1: Start with the crown
Begin by crocheting a flat circular crown. This is the top of the beanie and determines the overall fit. Work increases evenly in the round so the circle stays flat and smooth.
The crown should be wide enough to fit the top of the head comfortably before the sides begin.
Step 2: Transition into the cable section
Once the crown reaches the right width, stop increasing and begin the cable texture. Cable stitches usually involve front post and back post stitches that cross over each other to create raised twist-like shapes. This section gives the beanie its signature look.
Take your time here because the cables are the most noticeable part of the hat.
Step 3: Keep the cable pattern consistent
Work the cable repeat around the beanie, making sure each twist lines up evenly. A consistent pattern makes the hat look polished and professional. The rows should be snug but not too tight, since cables naturally add density to the fabric.
If the stitch tension is too tight, the hat may lose comfort and stretch.
Step 4: Add the body of the beanie
Continue the cable pattern until the hat reaches the desired depth. This is the section that covers the sides of the head, so make sure it has enough length to fit comfortably over the ears if you want extra warmth.
The beanie should feel structured but not stiff.
Step 5: Work the ribbed band
At the bottom edge, add a ribbed band or a tighter stitch section. Ribbing helps the beanie stay in place and gives the finish a neat, professional look. You can use front post and back post stitches for a stretchy rib effect.
A secure band makes the beanie more comfortable to wear.
Step 6: Shape and finish
Weave in all ends carefully. If needed, block the beanie lightly to help the cables settle into shape. Add a pom-pom if you want a more playful winter look, or leave it plain for a cleaner finish.
Helpful Tips
Cable beanies look especially beautiful in solid colors because the texture becomes the main feature. If you want a luxe feel, choose a yarn with a soft wool blend. If you want a more casual look, try a neutral tone with a simple cuff.
2. Crochet Textured Mini Bean Stitch Beanie Hat Pattern
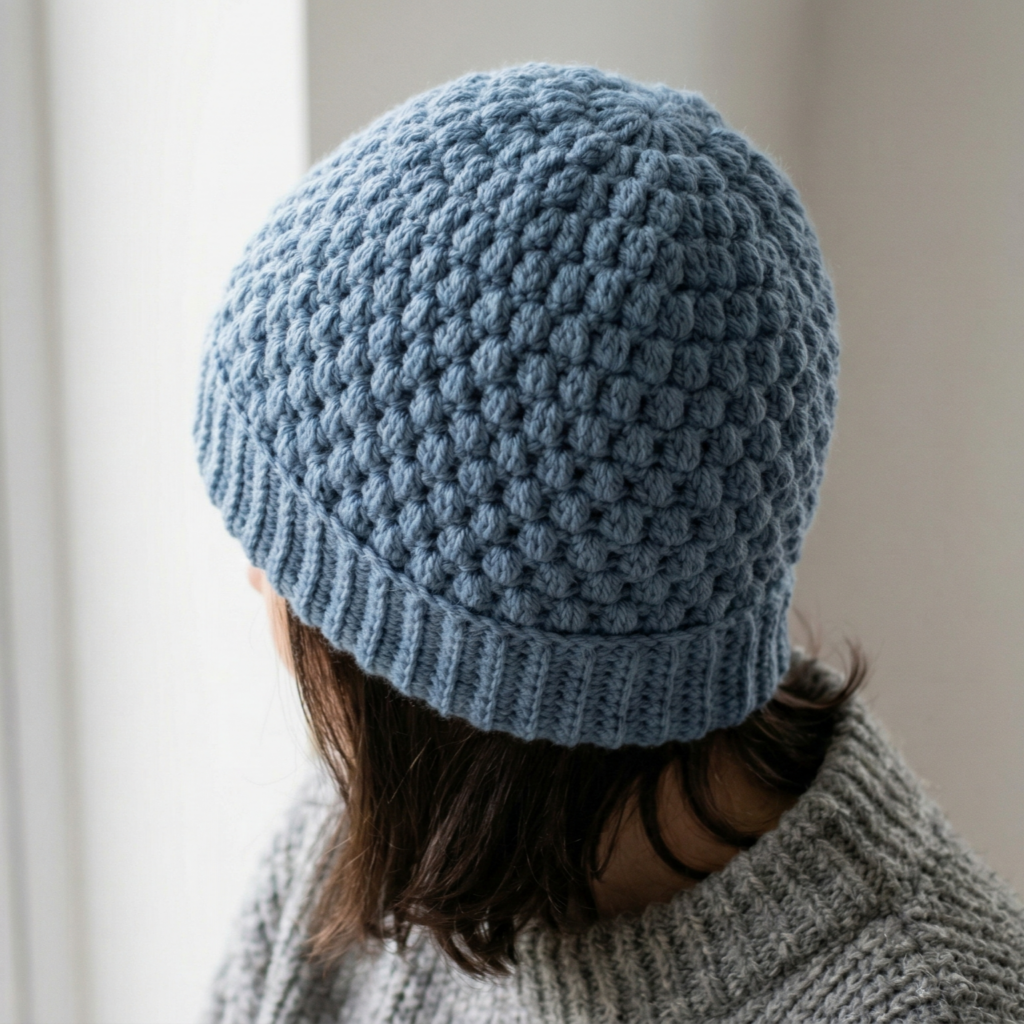
A mini bean stitch beanie is soft, modern, and packed with texture. The bean stitch creates a bumpy, cozy surface that looks a little plush without being too bulky. This makes it a wonderful option if you want a beanie that feels interesting but still easy to wear with everyday outfits.
Quick Notes
Skill level: Beginner to intermediate
Finished size: Standard adult beanie with soft stretch
Style: Textured, cozy, modern, subtle
Best colors: Soft neutrals, earthy shades, muted pastels, charcoal, rust
Materials
- Worsteds or DK yarn
- Crochet hook suited to your yarn
- Stitch marker
- Yarn needle
- Scissors
- Measuring tape
Step-by-Step Guide
Step 1: Make the crown
Start with a flat round crown using simple increases. This forms the top of the beanie and should sit comfortably before the texture begins. Keep the circle even so the hat does not flare oddly.
A smooth crown gives the beanie a balanced shape.
Step 2: Practice the mini bean stitch
The mini bean stitch is created by drawing up loops and closing them in a way that creates a small puff-like texture. Before starting the full beanie, make a small swatch so you understand how the stitch behaves and how much space it uses.
This helps you keep the fabric even from the start.
Step 3: Work the textured body
Once the crown is complete, continue in the mini bean stitch pattern around the beanie. The texture will give the hat a soft, raised surface that feels cozy and visually appealing. Keep the stitch count consistent from row to row.
The texture should be full but not too heavy.
Step 4: Maintain fit and stretch
Because textured stitches can make fabric denser, make sure the beanie still has enough stretch. If the hat feels too tight, use a slightly larger hook or loosen your tension a little. The goal is a comfy beanie that holds shape without feeling stiff.
Comfort is just as important as texture.
Step 5: Add the lower band
Finish the beanie with a tighter band or ribbed edge to help it sit nicely on the head. A narrow band makes the texture stand out while giving the hat a clean finished shape.
Step 6: Finish neatly
Weave in the yarn ends and lightly shape the beanie with your hands. If the texture feels uneven, a gentle steam block can help settle the stitches.
Helpful Tips
This style works very well in solid colors because the texture becomes the star. A muted tone like sage, mocha, or dusty blue can make the mini bean stitch look even more elegant. This is a great everyday beanie if you want something subtle but not plain.
3. Crochet Two Tone Beanie Hat Pattern
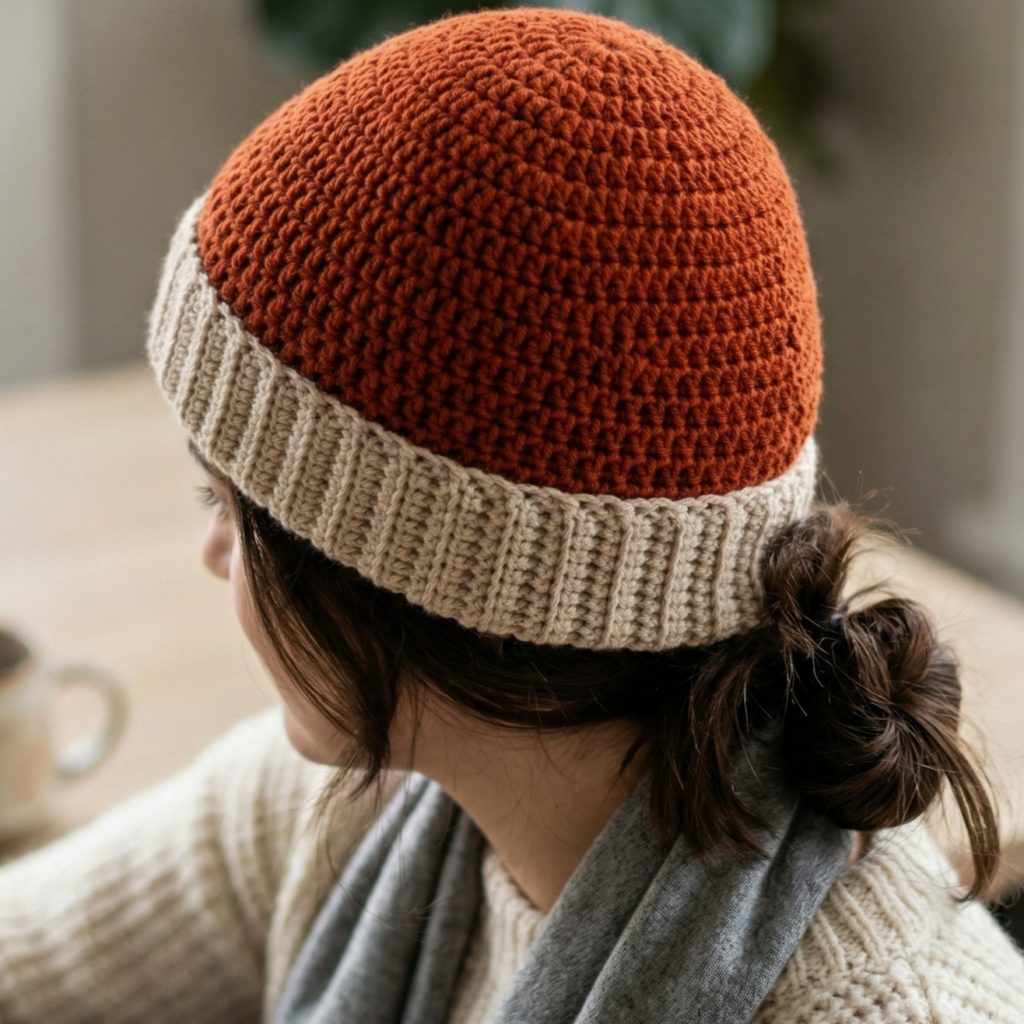
A two-tone beanie is simple, stylish, and full of visual impact. The color contrast adds personality without requiring complicated stitch work. This makes it a great project if you want a modern hat that looks intentional and fashionable.
Quick Notes
Skill level: Beginner
Finished size: One-size-fits-most with flexible fit
Style: Modern, bold, casual, stylish
Best colors: Black and cream, rust and beige, navy and gray, pink and white, green and cream
Materials
- Two yarn colors
- Crochet hook matched to the yarn
- Stitch marker
- Yarn needle
- Scissors
- Measuring tape
Step-by-Step Guide
Step 1: Choose your color placement
Decide where you want the color change to happen. You can split the beanie into a bottom band and top crown, create wide color blocks, or alternate colors in sections. The placement of the color change changes the whole look of the hat.
A clean color plan will make the beanie feel polished.
Step 2: Crochet the crown
Start with the main color and work the crown in the round. Keep the crown simple so the color contrast can stand out later. If you want the beanie to feel modern, use a neat stitch with even tension.
The crown is the base that holds the design together.
Step 3: Add the second color
Once the crown is complete, switch to the second color. Make the transition clean by fastening off or carrying the yarn neatly if your method allows. A neat color change makes the hat look much more professional.
This is the point where the two-tone effect becomes visible.
Step 4: Work the body of the beanie
Continue crocheting in the second color for the main body or alternate back and forth depending on your design plan. Keep the stitch pattern consistent so the color contrast stays the main decorative element.
Simple stitches often work best for this style because they let the colors shine.
Step 5: Finish the band or cuff
You can use the first color again for a cuff, or keep the band the same color as the body for a cleaner finish. A ribbed band helps the hat fit snugly and adds a classic touch.
The band should feel secure and comfortable.
Step 6: Check the transitions
Inspect the color joins and weave in ends carefully. If the color change line feels uneven, gently adjust it with your fingers or block the hat lightly.
Helpful Tips
Two-tone beanies are especially versatile because they can feel sporty, chic, or cozy depending on color choice. For a bold look, use high contrast. For a softer, more subtle style, choose shades from the same color family. This is also a great project for using yarn leftovers in a stylish way.
4. Crochet Wavy Beanie Hat Pattern
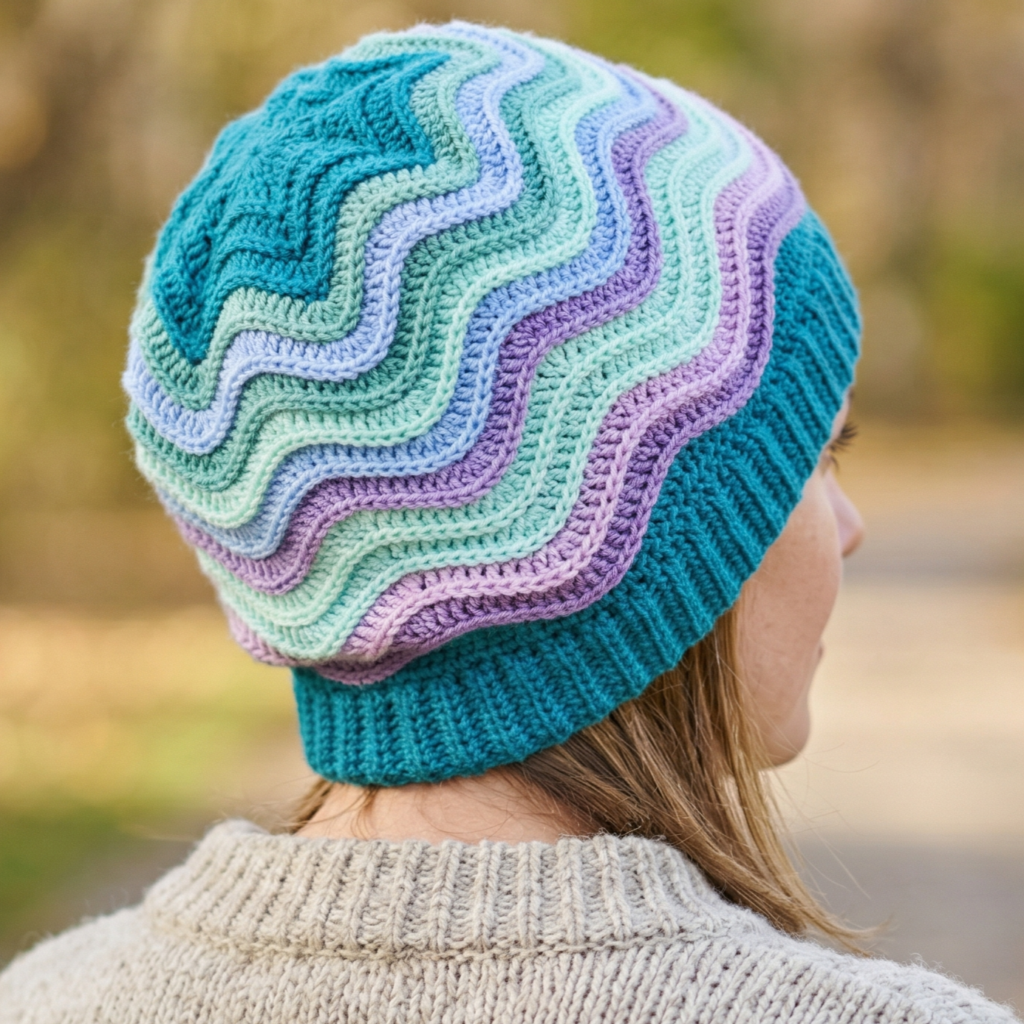
A wavy beanie is playful, creative, and visually fun. The wave pattern adds movement to the surface and gives the hat a light, stylish personality. This design works beautifully if you want something that feels less traditional and more fashion-forward.
Quick Notes
Skill level: Beginner to intermediate
Finished size: Standard adult beanie with stretch and shape
Style: Playful, modern, colorful, eye-catching
Best colors: Ocean tones, rainbow shades, soft pastels, or bold contrast colors
Materials
- Yarn in one or more colors
- Crochet hook suited to yarn
- Stitch marker
- Yarn needle
- Scissors
- Measuring tape
Step-by-Step Guide
Step 1: Plan the wave rhythm
Decide how wide and dramatic you want the waves to be. You can use color changes, stitch placement, or a combination of both to create the wavy effect. A strong visual rhythm makes the beanie much more appealing.
The wave design should feel balanced from top to bottom.
Step 2: Begin the crown
Start with a circular crown using smooth increases. Keep the shape flat and even so the waves appear clean once the pattern begins. The crown should provide the structure for the rest of the hat.
A stable crown is the key to a good fit.
Step 3: Start the wave stitch section
Begin working the wave pattern around the beanie. This may involve increases and decreases arranged in peaks and dips, or a repeating stitch pattern that naturally forms waves. The waves should be visible but still wearable.
Keep the tension steady so the fabric does not warp.
Step 4: Continue the body
Work the wave pattern down the sides of the beanie. If you are using color changes, keep the sequence consistent so the waves flow visually around the hat. This is what gives the design its lively look.
The body should still fit comfortably over the head.
Step 5: Finish with a band
Add a snug band at the bottom to help the beanie stay in place. A ribbed or firm single crochet band can work well here. It gives the hat a tidy finish and balances the decorative upper section.
Step 6: Shape and smooth
After finishing, gently shape the beanie with your hands. If necessary, block it lightly so the wave lines settle into a neat curve.
Helpful Tips
Wavy beanies are beautiful in color combinations that shift naturally, like blue and teal, cream and tan, or pastel rainbow tones. This is a great style for people who love accessories that feel fun and artistic but still practical.
5. Crochet Country Rib Beanie Hat Pattern
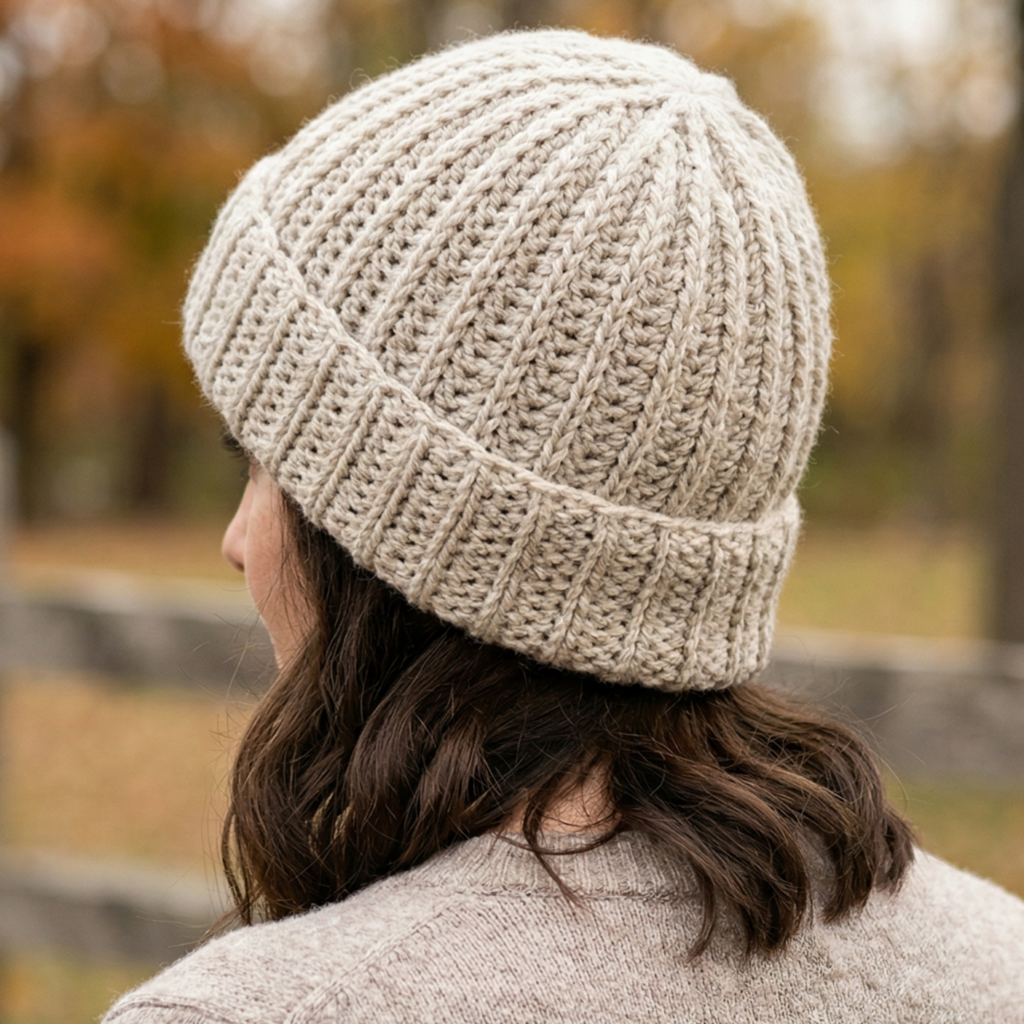
A country rib beanie is cozy, relaxed, and timeless. It has that classic handmade feel that never goes out of style. The ribbing adds stretch and texture, making it one of the most comfortable and wearable beanie patterns you can make.
Quick Notes
Skill level: Beginner
Finished size: Flexible and snug with lots of stretch
Style: Cozy, rustic, classic, everyday
Best colors: Oatmeal, beige, cream, brown, olive, rust, denim blue
Materials
- Soft medium-weight yarn
- Crochet hook suited to your yarn
- Stitch marker
- Yarn needle
- Scissors
- Measuring tape
Step-by-Step Guide
Step 1: Decide on the rib direction
You can make the ribbing run vertically or horizontally depending on how you want the hat to look. Vertical ribbing creates a very classic beanie shape, while horizontal ribbing gives a cozy, wrap-like effect.
The rib direction influences the overall style of the hat.
Step 2: Create the ribbed fabric
Use front post and back post stitches or another ribbing technique to create a stretchy, textured fabric. Keep the rows even and consistent so the ribbing looks neat and feels flexible.
This texture gives the beanie its country-style charm.
Step 3: Form the body of the hat
Continue the ribbing until the piece is large enough to form the beanie. Depending on your method, you may work a rectangle and seam it into a tube, or crochet in the round if your ribbing technique allows it.
The body should stretch comfortably around the head.
Step 4: Shape the crown or top
If you are working a rectangle, seam the sides and gather the top securely to close the crown. If you are working in the round, decrease evenly at the top to close the hat neatly. Make sure the crown does not pucker too sharply.
A smooth top helps the hat feel more polished.
Step 5: Add a folded cuff
One of the best features of a country rib beanie is the folded brim. A double cuff can make the hat feel extra warm and stylish. It also adds a classic handmade look that is both practical and attractive.
The cuff should sit comfortably above the ears.
Step 6: Finish and shape
Weave in all ends and gently shape the beanie by hand. If needed, lightly block it so the ribbing relaxes and the hat sits nicely.
Helpful Tips
Country rib beanies look especially good in earthy or natural shades. They are perfect for casual outfits, outdoor wear, and gift-making because they feel classic and warm without being overly trendy. If you want an even cozier look, add a soft pom-pom on top.
Conclusion
Crochet beanies are one of the most rewarding accessories to make because they are practical, stylish, and endlessly customizable. They can be simple or detailed, subtle or bold, classic or playful, which means there is truly a beanie style for every wardrobe. That is what makes them such a great project for both beginners and experienced crocheters.
These five beanie patterns each bring something different to the table. A cable beanie feels polished and rich. A mini bean stitch beanie feels textured and modern. A two-tone beanie creates instant visual interest. A wavy beanie adds playful movement. A country rib beanie gives you that cozy, timeless look that never feels out of place. Each one can become a go-to accessory depending on the yarn, color, and fit you choose.
A well-made beanie can do more than keep you warm. It can finish an outfit, show off your style, and give you the satisfaction of wearing something you made yourself. With careful shaping, thoughtful yarn choice, and neat finishing, even a simple crochet beanie can become a favorite piece in your wardrobe.