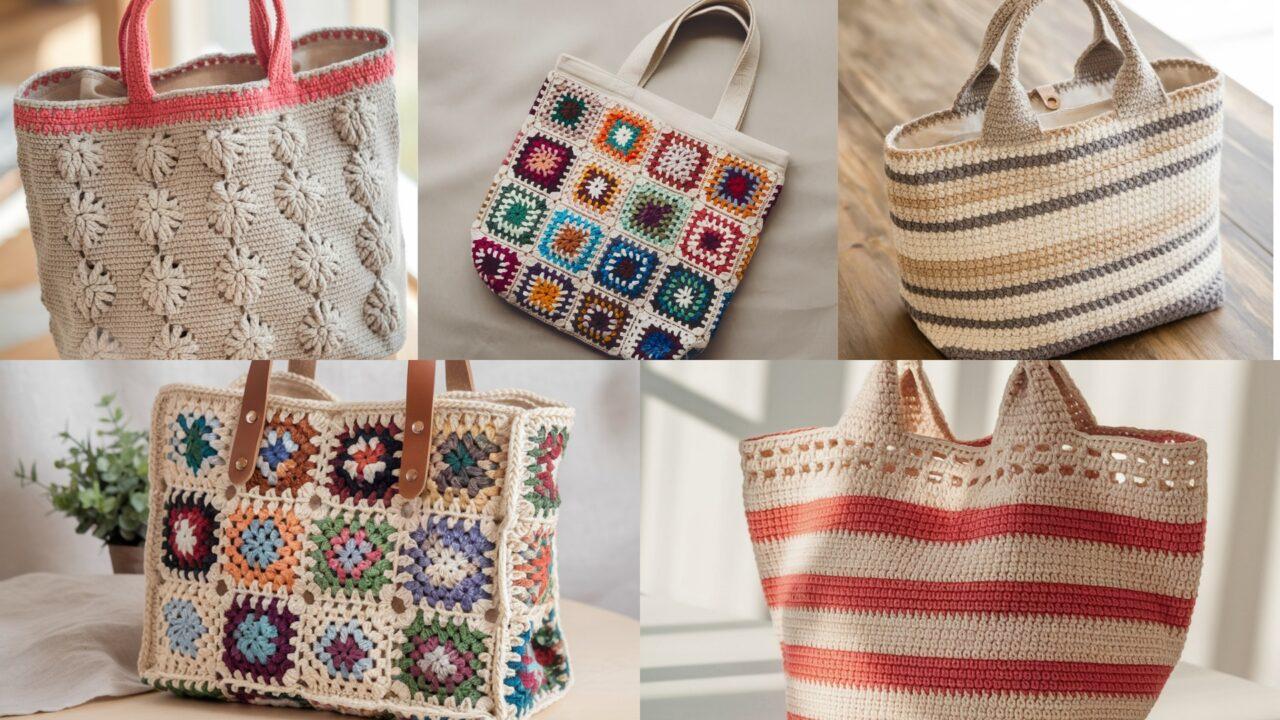
A sturdy, stylish tote bag is one of the most satisfying crochet projects — practical, quick to make, and endlessly customizable. Whether you want a breezy market bag for summer produce, a durable everyday tote to carry your laptop and notebooks, or a retro statement bag to match seasonal outfits, there’s a pattern here for you.
1. Summer Retro Tote Bag Crochet Pattern
Skill Level
Easy–Intermediate — single crochet fabric, color changes, simple seaming.
Finished Size
- Medium (default): 14″ W × 12″ H × 4″ D (35 × 30 × 10 cm)
- Small / Large: scale foundation chain ±4 sts per 1″ width; add/subtract rows for depth/height.
Materials
- 100% cotton worsted weight (or cotton/linen blend) — approx 600–900 yards depending on size and stripes
- 4.0 mm hook (drop to 3.5 mm for denser fabric)
- Tapestry needle, scissors, stitch markers
- Optional: cotton canvas for lining, zipper or magnetic snap, interfacing, plastic canvas base
Assembly (step-by-step)
A. Make rectangular base (Medium example)
- Chain 38. Row 1: sc in 2nd ch from hook and across → 37 sc. Turn.
- Rows 2–8: ch 1, sc across (7 rows total) until base depth ≈ 4″. Fasten off.
B. Join base and work body in rounds 3. With RS facing, join yarn to a short edge or pick up stitches evenly along the base edge. Join into a round with sl st. Place a stitch marker at round start. 4. Round 1: sc evenly around, place 3 sc in each corner to avoid puckering. Count and note total stitches around. 5. Rounds 2–8: sc in Color A to build a sturdy foundation.
C. Add stripes & body height 6. Change colors on final yarn-over of a round for clean joins. Sample stripe layout: Color B for 4 rounds, Color C for 6 rounds, Color A for 8 rounds — repeat. Continue until bag height ≈ 11–12″. 7. Optional subtle A-line flare: once at desired mid-height, do one increase round: sc in next 10 sts, 2 sc in next st — repeat around.
D. Top band & handles 8. Work 2 rounds of hdc (use one hook size smaller) to form a neat top band. 9. Handles, Option 1 (crocheted straps): make 2 straps — ch 60 (adjust for shoulder length), sc in 2nd ch and across forming strap width 1–1.5″ (4–6 rows). Sew ends 2″ in from side seams; reinforce with canvas patches sewn inside lining. 10. Handles, Option 2 (integrated chains): On a round, sc to handle start, ch 34, skip same number of stitches, sc across. On next round sc across chains to form finished handle.
E. Lining & closure (optional) 11. Cut lining fabric to interior dims (allow seam allowance). Add interfacing for structure. Sew lining pockets first. If adding zipper, sew zipper to lining top before inserting and hand-stitch lining to bag top edge to hide seams. 12. Insert optional base support (plastic canvas or covered fabric) to stiffen bottom.
Tips & Variations
- For a true retro palette, choose two bold colors plus a neutral. Variegated yarn also works for softer bands.
- If the bag sags, add a plain sc stabilization round every 6–8 rounds or use a smaller hook.
- Add an openwork row near the top for summer ventilation or a scalloped edge for vintage charm.
Care
- Machine wash cold on gentle for cotton; reshape and air dry. If the lining has interfacing, spot clean or hand wash and reshape.
2. Sea Shells Market Tote Bag Crochet Pattern
Skill Level
Intermediate — shell/puff/cluster stitches and a firm joining round recommended.
Finished Size
- Medium (default): 15″ W × 14″ H × 5″ D (38 × 35 × 12 cm)
- Scale up/down by adding shell repeats around or lengthwise.
Materials
- Sturdy cotton worsted weight, 800–1000 yards
- 5.0 mm hook (drop to 4.5 mm for denser fabric)
- Tapestry needle, scissors
- Optional: plastic canvas or stiff base insert, cotton canvas lining
Assembly (step-by-step)
A. Base (rectangle or oval)
- Chain 40 (rectangle method). Row 1: sc in 2nd ch and across → 39 sc.
- Rows 2–10: ch 1, sc across until base depth ≈ 5″. For oval, ch 18 and increase at ends on rounds.
B. Join & begin body in rounds 3. Join short edges to create a loop or pick up sts along base and sl st join. Round 1: sc around base, placing 3 sc in each corner. Note total stitches.
C. Shell stitch body 4. Shell pattern (example): sc in next st, skip 2, (5 dc) in next st, skip 2 — repeat around, using sc anchor stitches between shells. 5. Work an anchor round of sc or dc after each shell round to stabilize the motif. Repeat shell + anchor rounds until bag height ≈ 12″. 6. To reduce stretch, add a full sc stabilization round every 6–8 rounds.
D. Top finishing & handles 7. Work 2–3 rounds of hdc for the top band. For handles: crochet two wide straps (ch 70, sc back and forth 6–8 rows) and sew with reinforced canvas patches, or create integrated chain handles as described in Pattern 1.
E. Lining & base support 8. Make a canvas lining with pocket; insert a covered plastic canvas base if desired.
Tips & Variations
- Use neutral shells with a bright handle for contrast.
- For an airy market bag, increase hook by 1 mm, but test to ensure small items won’t slip through.
Care
- Remove any rigid base before washing. Machine wash gentle and lay flat to dry.
3. Crochet Cotton Granny Tote Bag Pattern
Skill Level
Easy–Intermediate — granny squares plus joining and lining.
Finished Size
- Medium (default): approx 14–15″ W × 12″ H (with 3×4 medium squares)
- Vary by square size and number of squares.
Materials
- 100% cotton worsted/DK (scrap-friendly): ~700–1000 yards total depending on layout
- 4.0–4.5 mm hook
- Cotton canvas for lining, sewing thread, tapestry needle
Assembly (step-by-step)
A. Make granny squares
- Make 12 medium granny squares (approx 6″ each): Round 1 magic ring, ch 3, 2 dc, ch 2, 3 dc, ch 2 × 3; Round 2: corners (3 dc, ch 2, 3 dc) in each corner; add an outer dc round to reach target size.
B. Block & layout 2. Wet-block all squares to exact size for neat seams. Lay out in 3 (width) × 4 (height) configuration.
C. Join squares 3. Join squares with whip stitch for invisible seams or sc through both loops for a defined raised join. Work in rows: join squares into strips, then join strips together.
D. Form bag & base 4. Fold joined rectangle and seam sides and bottom with sturdy joining stitch (whip stitch or invisible mattress stitch). Optionally add a base panel in sc for a reinforced bottom.
E. Top edge & handles 5. Work 2–3 rounds of sc around top edge. Crochet two strap panels (ch 60–80, sc across 6–8 rows) and sew onto top edge 2″ in from side seams with reinforced stitching.
F. Lining 6. Cut canvas lining to interior dims + seam allowance. Add pockets then hand-stitch lining into bag, hiding top edge seam.
Tips & Variations
- Use contrasting join color to modernize the granny grid.
- For an airy beach bag, use larger squares and skip lining; for daily carry add full canvas lining and interfacing.
Care
- Machine wash gentle for cotton; remove lining if possible and lay flat to dry.
4. Easy Crochet Tote Bag Pattern
Skill Level
Beginner — single crochet rounds, minimal shaping.
Finished Size
- Medium (default): 15″ W × 14″ H × 5″ D
Materials
- Worsted cotton yarn — approx 800–1000 yards
- 4.5 mm hook
- Tapestry needle, scissors
Assembly (step-by-step)
A. Base & join
- Chain 40. Row 1: sc in 2nd ch and across → 39 sc. Rows 2–10: sc across to depth ≈ 5″.
- Join ends to work in continuous rounds. Round 1: sc evenly around base with 3 sc in corners.
B. Body 3. sc in each st around until bag height ≈ 12″ from base. Maintain even tension.
C. Top & handles 4. Work 2 rounds hdc for top band. For handles: either crochet straps and sew on, or create integrated handle gaps on a round (ch desired length and skip stitches, then sc across chains next round).
D. Lining & closure 5. Add simple canvas lining and attach with ladder stitch; add magnetic snap for closure.
Tips & Variations
- Vary width or make a long, narrow market variant. Use color-block stripes for personality.
Care
- Machine wash gentle and reshape; cotton may stiffen slightly after washing — reblock if needed.
5. Crochet Granny Square Tote Bag Pattern (Mixed Micro-Grannies)
Skill Level
Intermediate — lots of small motifs, blocking and careful joining required.
Finished Size
- Medium (default): approx 13–14″ W × 13″ H depending on motif sizes and layout
Materials
- DK/worsted cotton in multiple colors; many small motifs use scraps (approx 700–1000 yd total)
- 3.5–4.5 mm hook, tapestry needle
- Cotton canvas for lining and reinforcement
Assembly (step-by-step)
A. Make micro-granny motifs
- Make many micro-grannies (2–3″ each): magic ring, ch 3, 2 dc, ch 2 × 4 corners, join; add 1–2 rounds to reach desired motif size.
B. Block & layout 2. Wet-block motifs to consistent size. Lay out into rectangle (e.g., 5 across × 8 down = 40 motifs).
C. Join & form bag 3. Join motifs using slip-stitch join or whip-stitch into strips, then join strips into a rectangle. Fold and seam sides and bottom. Add a sc base panel if you prefer a boxed bottom.
D. Top & handles 4. Add 2–3 rounds sc around top. Attach straps (crocheted straps or leather straps sewed through lining) and reinforce with canvas patches.
E. Lining 5. Cut and sew canvas lining, add pockets, and hand-sew lining inside bag to hide seams.
Tips & Variations
- Use a uniform outer round color for all motifs for easier joining and a clean grid effect.
- Try hexagon motifs for a beehive look.
Care
- Machine wash gentle if yarn is colorfast; avoid hot water. Remove lining if possible before machine washing.
Conclusion
This collection of five tote patterns balances style with real-world function: breathable options for summer markets, textured shells for a statement carry-all, classic granny constructions for colorful scrap-busting, simple dense totes for everyday hauling, and playful micro-granny mosaics for a creative finish. The success of each bag depends on three practical choices: **choose the right yarn for the job (sturdiness vs. drape), make the fabric firm enough for the