

If you want high-impact home décor without buying expensive pillows, crochet covers are the fastest way in. They’re portable, forgiving, and let you swap looks seasonally. Below you’ll find five modern pillow patterns — each with a clear skill level, full materials list, exact step-by-step construction, finishing and styling tips, plus troubleshooting and care. I’m not sugarcoating: some bits take patience (seams, neat edges), but every pattern is doable if you follow the steps and count carefully. Let’s make useful, attractive cushions you’ll actually keep on the sofa.
1. Crochet Sweet Bolster Pillow Pattern
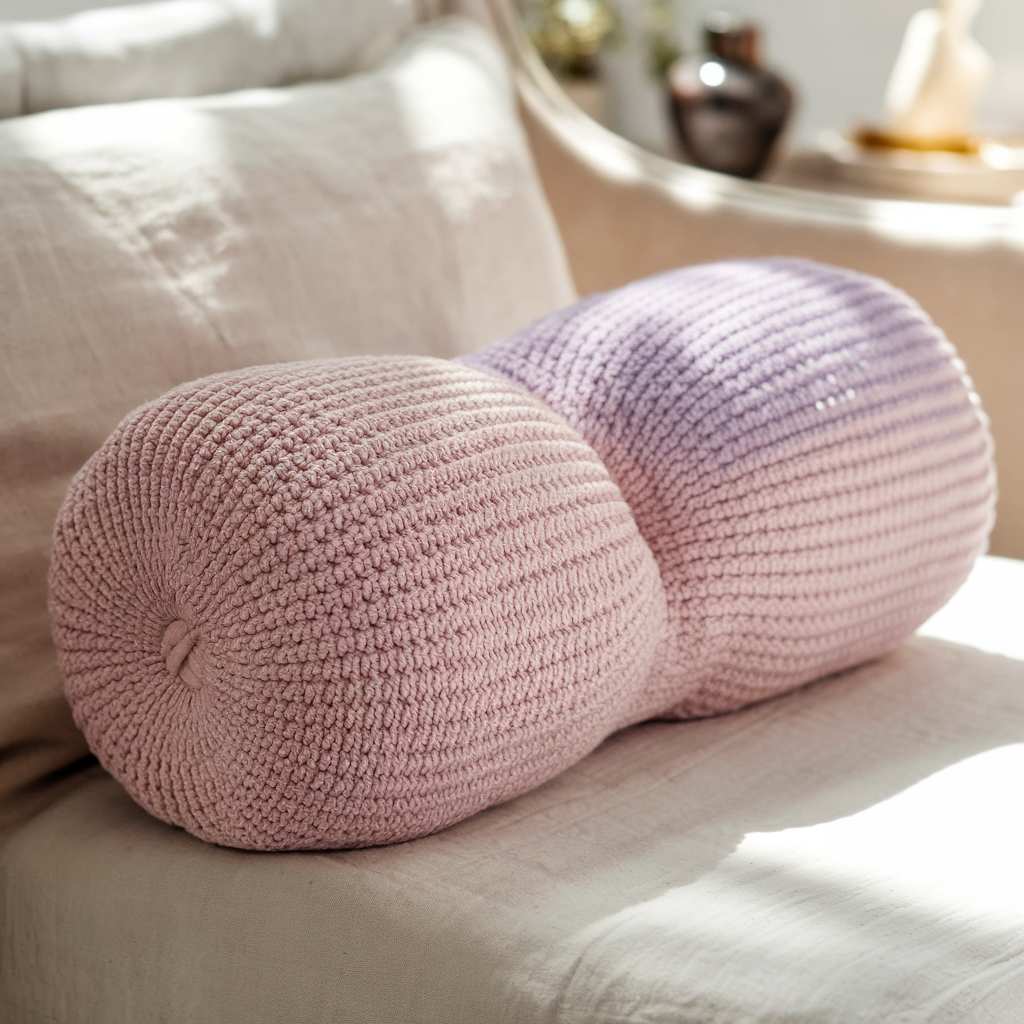
Overview: A streamlined bolster (tube) cushion cover for a modern bed or bench. Simple construction, subtle texture, and neat ends make this a quick win.
Skill level: Confident Beginner — comfortable with basic stitches (sc, hdc, dc), working in rounds and seaming.
Finished size: Fits a standard 12″ × 5″ bolster insert; adjust stitch count to fit other sizes.
Materials
- DK weight yarn, approx. 400–500 yds (acrylic, cotton, or cotton blend). Choose yarn that blocks lightly for smooth finish.
- 3.5–4.0 mm hook (use hook that gives you fabric with good drape but no big gaps)
- Tapestry needle, stitch marker
- 12″ × 5″ bolster insert or polyfill + core
- Optional: zipper or button/loop if you want removable cover
Abbreviations
- ch — chain
- sc — single crochet
- hdc — half double crochet
- dc — double crochet
- st(s) — stitch(es)
- sl st — slip stitch
- BLO — back loop only
- inc — increase (2 sc in same st)
Gauge (approx.)
16 sc × 18 rows = 4″ in sc (adjust hook if needed).
Notes
- This pattern is worked in the round for the tube body then flat for end circles (joined). If you prefer, make two flat rectangles and seam long edges.
- Measure your insert; you want the cover about ¾” smaller in circumference for a snug look.
Step-by-step instructions
Body (worked in the round)
- Measure the circumference of your insert: for a 12″ × 5″ insert, aim for ~34–36 sts in your round (this will vary by gauge). Determine a multiple that matches gauge. Example: if gauge gives 4″ = 16 sc and you need 34″ circumference → 34 ÷ 0.25 = 136 sts — this is an exaggerated calculation; instead use gauge to find stitches per inch then multiply. (Practical approach: make a 4″ swatch, count sc per inch, multiply by circumference.)
- Ch enough to join without twisting to reach desired circumference (or make a foundation sc round): join with sl st into first ch. Place marker.
- R1–R??: sc (or alternating sc/hdc rows for texture) around, working in continuous rounds or join & ch1 each round — your choice. Work until tube length equals insert length minus ~1″ (for end seaming). For a 12″ insert, work to 11–11.25″.
- Tip: If using continuous rounds, move stitch marker every 10 rounds to keep track.
- For a textured look: alternate 2 rounds sc, 2 rounds BLO hdc to create subtle ribbing.
End circles (make 2)
- Make a magic ring or ch 4 join to form ring.
- R1: 6 sc in ring — 6 sts.
- R2: inc around (12 sts).
- R3: sc, inc around (18 sts).
- Continue increasing evenly until circle diameter ≈ 5″ (to match the tube circumference; you may need 6–8 increase rounds depending on yarn/hook). Keep stitches even — increase placement determines flatness.
- Make two identical circles.
Assembly
- Place one circle at one end of the tube, right sides together. Whipstitch or mattress stitch around, leaving center gap large enough to insert bolster. Turn right side out.
- Insert the bolster: either slip in insert fully or stuff polyfill. If using dried lavender/scent, place in a small inner pouch before inserting.
- Attach second circle and seam closed. If you want a removable cover, instead seam only three sides, insert, and finish with zipper or button closure technique:
- Option: Instead of fully seaming, crochet a row of button-loop holes before final seam and add buttons on one half for removable cover.
Finishing
- Weave in ends. Steam-block lightly (careful with synthetic yarn).
- For tufted look: before final seam, thread tapestry needle with contrasting yarn and pull through center, tie to form shallow gathering.
Variations
- Add stripes by changing color every 6–8 rounds.
- Make ends in contrasting color or textured shell stitch.
- Use worsted yarn + larger hook for a chunkier bolster.
Troubleshooting
- If circle puckers: your increases are too close — add an extra sc between increases.
- If tube is too loose: decrease hook size one step or add an extra round of sc.
Care
- Machine wash gentle for acrylic/cotton blends; air-dry flat to preserve shape. Follow yarn label.
2. Crochet Bohemian Pillow Pattern
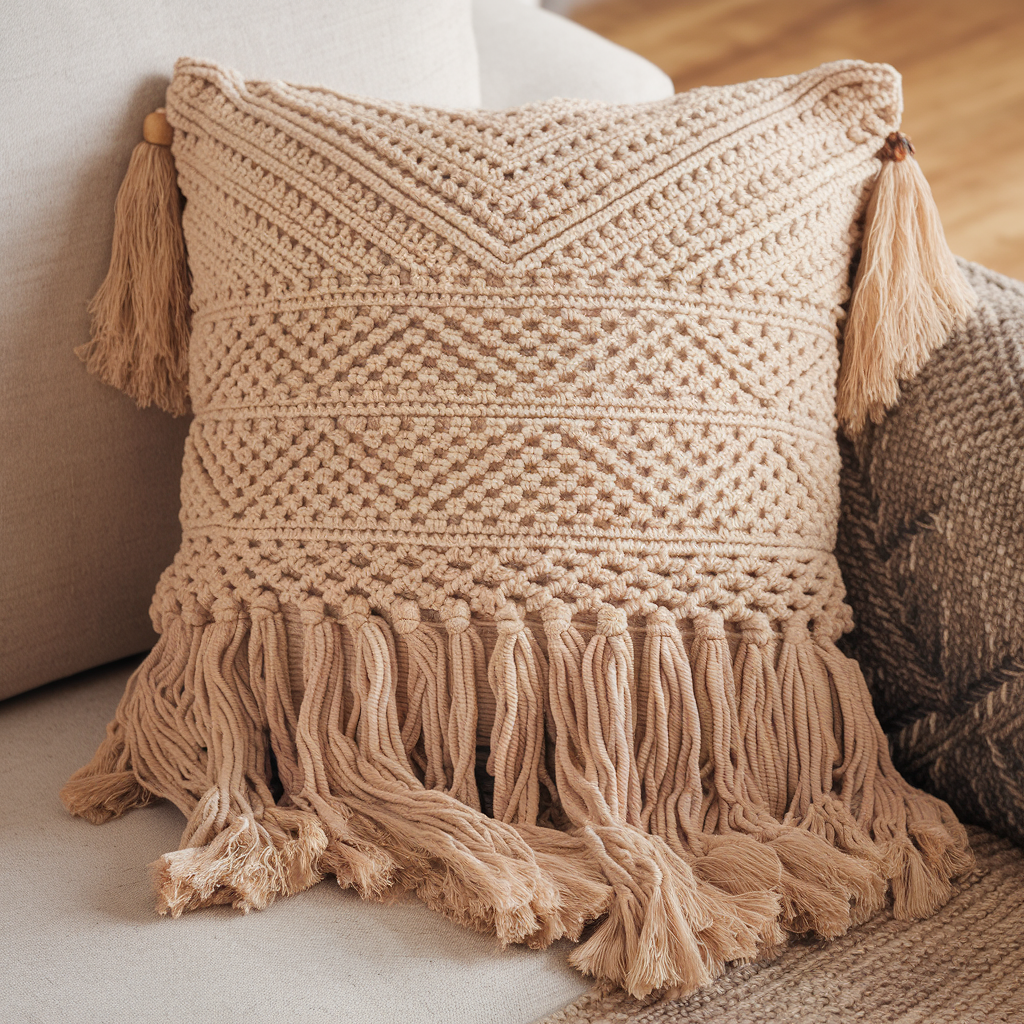
Overview: A cozy 18″ square pillow cover with boho texture—macramé-inspired fringe, openwork panels, and a central textured motif. Statement piece for sofas and floor seating.
Skill level: Intermediate — comfortable with filet/openwork, post stitches, fringe finishing.
Finished size: 18″ × 18″ pillow cover (fits 18″ insert).
Materials
- DK or aran weight yarn, approx. 500–700 yds (cotton-blend gives good drape).
- 4.0 mm hook (or size for gauge)
- Tapestry needle, stitch markers
- 18″ pillow insert
- Scissors, comb for fringe
Abbreviations
- ch, sc, hdc, dc, tr — treble (or tr in your region), sl st
- fpdc — front post double crochet
- bpdc — back post double crochet
- ch-sp — chain space
Gauge
14 dc × 10 rows = 4″ (varies by stitch; swatch recommended).
Design Notes
- Constructed as two panels (front with motif + fringe, back plain or envelope), then seamed.
- The front features three horizontal bands: textured center (post stitches), openwork band (lacier), and solid bands.
Step-by-step instructions
Front Panel (18″ wide)
- Foundation: ch enough to reach 18″ width using gauge. Example: if gauge is 4 dc = 1.5″, calculate dc per inch. Practical method: make a reference swatch and count stitches per inch, then multiply by 18.
- Row 1: dc across (turn).
- Row 2–6 (Bottom solid band): ch 3 (counts as dc), dc across. Repeat until 1.5″–2″ tall.
- Openwork band (lace): Row A: ch 3, dc in next st, ch1, skip 1 across to create airy mesh — repeat for desired height (1″–1.5″).
- Center textured band (focal): use fpdc/bpdc pattern to create raised diamond or chevron texture:
- Example textured repeat (over multiples of 6 sts): Row 1: fpdc around next 2 sts, bpdc around next 2 sts, repeat to end. Alternate rows to create ribbed chevrons. Work 3–4″ tall.
- Repeat openwork and top solid band to mirror bottom.
Back Panel
- Option A (Envelope): Make two panels: one 12″ tall and another 6″ tall (overlap) so they form an envelope. Alternatively add buttons or zipper.
- Option B (Full back): Make full 18″ square and close with zipper or hidden closure.
Fringe & Embellishments
- Cut multiple 8″ lengths of yarn, fold in half, and pull through edge stitches along the top/bottom or the sides to create boho fringe.
- Comb fringe gently to fluff, trim to even length.
Assembly
- Place front and back right sides together. Single crochet or slip stitch around 3 sides leaving one side for insert or use mattress stitch for neat seam.
- Insert pillow. Close final side with invisible seam or join with decorative buttons.
Finishing touches
- Add wooden beads to some fringe strands for boho detail.
- For extra depth, embroider small accents with contrasting yarn.
Troubleshooting
- If your panel keeps curling: add a few rows of sc around edges as a border to stabilize.
- Fringe too heavy: reduce length or number of strands.
Care
- Cotton blends: machine wash gentle, dry flat; avoid hot dryers to prevent shrinkage.
3. Crochet Granny’s Diamond Cushion Pillow Pattern
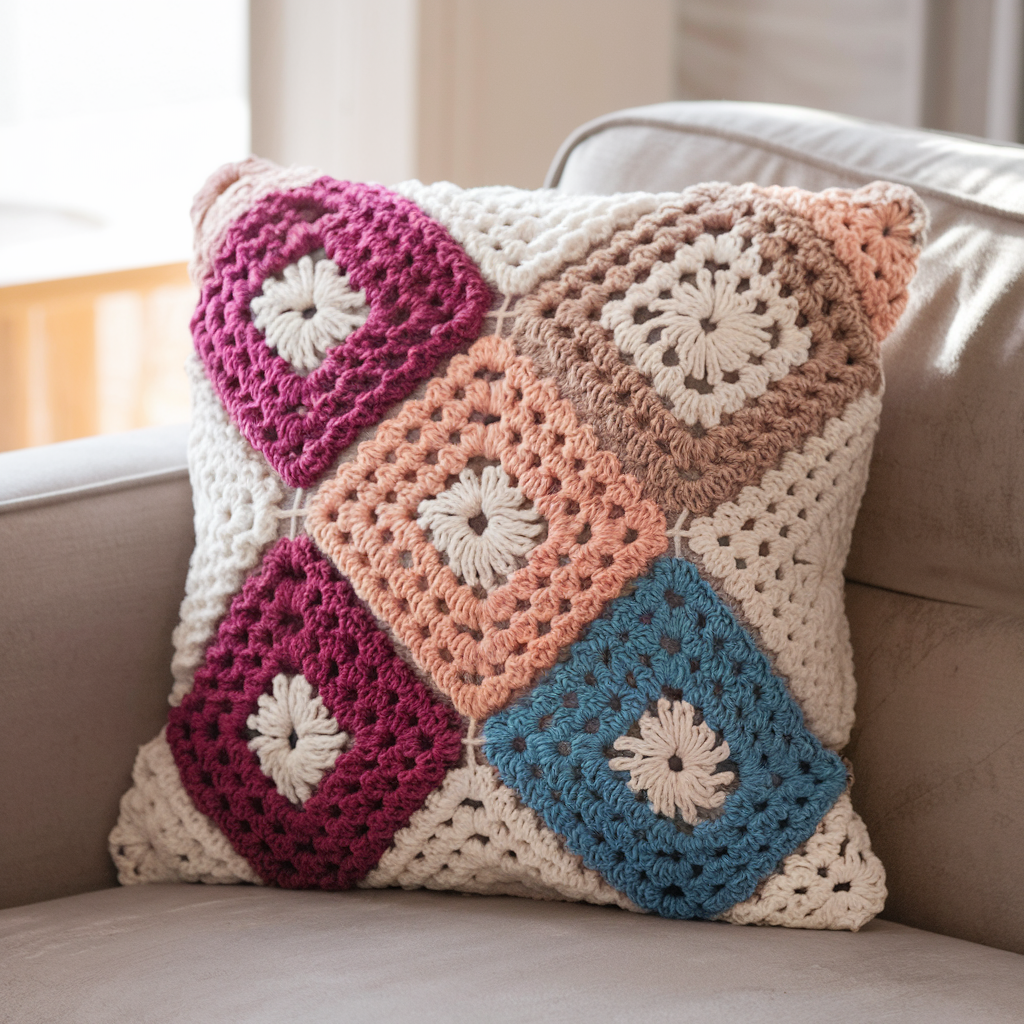
Overview: A modern twist on the classic granny motif — diamond-shaped granny squares joined to make a bold cushion cover. Perfect for color play and textures.
Skill level: Confident Beginner / Intermediate — basic cluster/granny stitches and joining methods.
Finished size: 16″ × 16″ cushion (made from 4 large diamond motifs arranged in a square), or scale up/down by changing motif size.
Materials
- DK yarn in 3–5 colors, 350–500 yds total.
- 4.0 mm hook (or hook to match yarn/gauge)
- Tapestry needle, blocking mat (recommended)
- 16″ pillow insert
Abbreviations
- ch, sl st, dc cluster (granny: usually 3 dc cluster), st(s), sp (space)
Motif notes
- Diamond motif is just a square granny worked into a diamond orientation by turning the square 45° when placing. We’ll work “diamond granny” from center out.
Step-by-step instructions
Large Diamond Granny (make 4)
- Foundation: Begin with a magic ring or ch 4 joined.
- Round 1: ch 3 (counts as dc), 2 dc in ring, ch 2, 3 dc in ring, ch 2 repeat twice more, join with sl st to top of ch3. (You have 4 clusters separated by ch-2 corners.)
- Round 2: In each ch-2 corner: (3 dc, ch 2, 3 dc). Between corners on sides: ch 1, 3 dc clusters (depending on width) — essentially you’re creating clusters that expand each side. Work until motif measures approx. 8″ from point to point (to create large diamond).
- Increase rounds evenly: each round adds clusters along the sides; keep corners as (3 dc, ch2, 3 dc).
- Change colors every 2–3 rounds for stripes of color. Fasten off and weave in ends.
Blocking (important)
- Block each motif to the same dimensions so joins are clean — pin to shape and spritz, let dry.
Join motifs
- Arrange four diamonds with points meeting at center to form square. Use whipstitch or mattress stitch to join right sides together. For a decorative join, use join-as-you-go method: when working final round of last motif, join into adjacent motif with sl sts and create a neat seam.
- Add an outer border: sc or crab stitch around outside edges to square up the whole piece and stabilize.
Back panel
- Make a full 16″ square back in dc or granny rows, or make a simple plain panel and add a zipper or envelope closure.
Assembly
- With right sides together, seam three sides with slip stitch or mattress stitch, insert pillow, and close final side.
- For removable cover, add a zipper before final seaming: install zipper along one side then seam remaining sides.
Styling & color tips
- Choose a dominant color + 2 contrasting accent colors. For modern look, pick one neutral (cream/gray) plus one saturated color and a muted tone.
- Use tonal shifts in the rounds for subtle ombré diamond.
Troubleshooting
- Diamonds not matching at seams: block motifs and count rounds — ensure each motif has same number of rounds.
- Gaps at center: make sure tension is consistent; use join-as-you-go for tighter center.
Care
- Wash gently; block again after washing if needed to maintain motif geometry.
4. Crochet Modern Granny Square Pillow Pattern
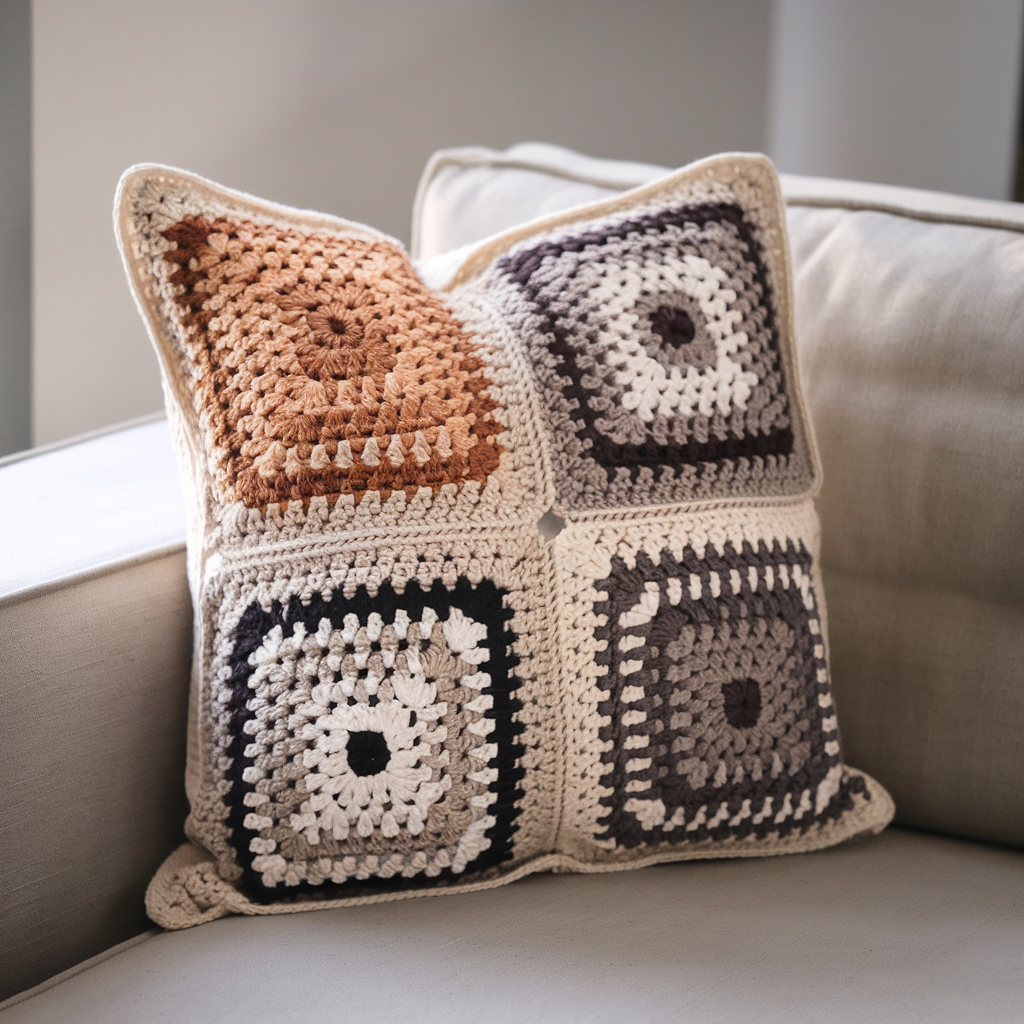
Overview: Classic granny square assembled into a modern, minimalist cushion—works in any size. This version uses large granny squares with contemporary color blocking and a sleek border.
Skill level: Confident Beginner — granny squares and standard finishing.
Finished size: 20″ × 20″ pillow (4 large granny squares, each ~10″).
Materials
- DK or worsted yarn depending on desired texture, 600–800 yds.
- 4.0–5.0 mm hook (match yarn)
- 20″ insert, tapestry needle, optional zipper
Abbreviations
- ch, sl st, dc cluster (3 dc cluster with ch1 between clusters)
Notes
- Large granny squares reduce join seams and speed assembly.
- Border can be modern (clean sc edging) or decorative (shell stitch).
Step-by-step instructions
Large Granny Square (make 4)
- Start with magic ring.
- Round 1: ch 3, (2 dc, ch1) × 3, 3 dc into ring, ch1, join. (4 clusters with ch1 corners)
- Round 2: In each ch1 corner, (3 dc, ch1, 3 dc); between corners, ch1, 3 dc cluster into ch1 space from previous round. Repeat to desired size — for 10″ squares, you may need 6–8 rounds depending on hook/yarn.
- Color changes: choose large blocks of color—2–3 rounds per color for modern stripes.
Joining
- Use visible join for modern look: slip-stitch join with contrasting yarn to create a gridline effect.
- Place squares right sides together and sl st through both loops along join (or join as you go).
- Add a border: once four squares joined into a big square, work 1–2 rounds of sc to even edges, then 2–3 rounds of hdc or extended stitches for plush feel.
Back panel & closure
- Make back panel plain in dc/hdc or make two panels for envelope closure (overlap 4–6″).
- For zipper: seam three sides, insert zipper, finish last side.
Finishing
- Weave ends into the border so they’re hidden but secure.
- Consider subtle tufting: thread through center and knot on inside with short tail.
Styling
- For a modern look: use 1 neutral + 1 pop color, or a monochrome tonal palette.
- For farmhouse/modern-mix: use natural yarns plus a burnt-orange or teal accent.
Troubleshooting
- Uneven square sizes: block and add rounds to smaller ones to match.
- Bulky joins: use thinner yarn for joins or use mattress stitch for flatter seam.
Care
- Follow yarn instructions; avoid hot dryer when using natural fibers.
5. Crochet Christmas Snowflake Pillow Pattern

Overview: A seasonal 16″ square pillow featuring a raised snowflake motif in the center built with post stitches and layered applique. Festive but refined — works year after year.
Skill level: Intermediate — post stitches, motif applique, clean finishing.
Finished size: 16″ square.
Materials
- DK or aran yarn in white (snowflake) and background color (navy, grey, or deep green), ~400 yds total.
- 4.0 mm hook (or matching yarn)
- Tapestry needle, blocking pins
- 16″ pillow insert
Abbreviations
- ch, sl st, sc, hdc, dc, fpdc, bpdc, tr
- FLO — front loop only (optional for texture)
Design notes
- Work base square in solid color; make appliqué snowflake separately and sew on for a raised look.
- Snowflake can also be worked as post-stitch raised motif directly on the square if you prefer.
Step-by-step instructions
Base Square (16″)
- Ch enough for 16″ width; or make a granny/square of desired size. Example: ch 42 (adjust by gauge).
- R1: dc across. R2–R??: dc for about 8–9″ to make a square. Add sc border 1 round for neat edge.
Snowflake Appliqué
- Make a center ring: magic ring or ch 6 join.
- Round 1: ch 3 (counts as dc), dc, ch2, dc repeat 6 times total for 6 points — join.
- Round 2: In each ch2 corner: (ch3, tr, ch3) to extend point; add picots as decorative tips if desired: (dc, ch3, sl st in last ch).
- Round 3 (arms/detail): Attach white yarn at base of each point and work chains and single dc clusters to form branch details. Use fpdc/bpdc behind to raise some branches for shadowed depth.
- Block snowflake flat so points are crisp.
Attach appliqué to base
- Position snowflake centrally on the square. Pin in place.
- Use small whipstitches with white yarn to sew around interior points; keep stitches invisible on top.
- Optional: add a small button or metallic bead at center for sparkle.
Alternative: Raised Post Stitch Snowflake
- On base square, mark center. Work post stitches (fpdc) radiating out to form arms, building height by stacking fpdc rounds, and fill center with dc clusters. This method creates integrated texture.
Back & Assembly
- Make back panel as envelope or full panel with zipper.
- Place front and back right sides together; seam leaving opening or insert zipper.
- Insert pillow insert and close.
Finishing & Embellishments
- Add metallic thread sparingly for shimmer (use with care — can snag).
- For a subtle holiday look, edge with a row of crab stitch in white.
Troubleshooting
- Snowflake edges curl: block thoroughly and use a few stabilizing stitches at points.
- Appliqué puckers: use small, even stitches and avoid pulling too tight.
Care
- Hand wash recommended for embellished cushions; air dry flat.
Conclusion
Pick the pattern that matches your skill and the room you’re changing. Before you start a full cover: swatch, measure, and block. Those three actions cut your rework in half.
Quick checklist to finish any pillow well:
- Choose yarn and hook, then make a 4″ swatch and count stitches/rows per inch.
- Adjust stitch count so the finished cover has about 5–10% negative ease (slightly smaller than the insert) for a tidy, plump look.
- Block motifs/panels to consistent size before joining — don’t skip this.
- Join seams with a flat method (mattress stitch or join-as-you-go) for neat edges.
- Add your closure (envelope, zipper, buttons) before final seaming if you want a removable cover.
- Finish: weave ends, steam-block lightly if yarn allows, then insert and fluff.
- Care: follow yarn label; hand-wash embellished pieces, machine-wash plain cotton on gentle, air-dry flat.
Bottom line: accuracy (gauge + blocking) and neat finishing matter more than fussy stitches. Do those well and even a simple granny square will look designer on your sofa.


адгезия шпаклёвки
https://adgezia-shpaklevok.ru
гидрофобные добавки
https://vlago-stoykaya-shtukaturka.ru
самовыравнивающиеся смеси
https://teplypol-smesi.ru
теплоизоляция Технониколь
https://energiya-tehnonikol.ru
мобильная версия сайта
http://www.razrabotkaiseo.ru/
Hypertrade
https://cashflowix.com/publications/ai-powered-invoice-processing-revolution-machine-learning-algorithms-transforming-accounts-payable-automation.html
crypto swap aggregator
https://collfinancing.com/publications/blockchain-and-tokenization-in-structured-finance-the-future-of-real-world-asset-securitization.html
ht.xyz
http://www.google.rs/url?q=https://facebook-trends.com/blog/facebook-marketplace-business-strategy-from-setup-to-sales-success.html
hyperliquid trading platform
https://google.co.in/url?q=http://fintechreform.com/publications/shadow-banking-and-non-bank-financial-intermediation-systemic-risks-and-the-imperative-for-comprehensive-reform.html
hyperliquid trading
[url=https://gaming-horse.com/blog/cloud-gaming-the-complete-guide-to-the-future-of-gaming-industry.html]https://gaming-horse.com/blog/cloud-gaming-the-complete-guide-to-the-future-of-gaming-industry.html/[/url]
ht.xyz
https://fintechreform.com/publications/shadow-banking-and-non-bank-financial-intermediation-systemic-risks-and-the-imperative-for-comprehensive-reform.html
ht.xyz
https://home-pinterest.com/blog/pinterest-affiliate-marketing-the-ultimate-monetization-guide-for-content-creators.html
ht.xyz
https://anolink.com/?link=http://insta-limit.com/news/instagram-analytics-mastery-building-data-driven-marketing-dashboards.html
hyperliquid aggregator
https://www.google.mn/url?q=https://link-edin.com/blog/the-psychology-behind-linkedin-algorithm-understanding-user-behavior-for-maximum-organic-reach.html
decentralized trading platform
http://google.com.vc/url?q=http://myfinrights.com/publications/buy-now-pay-later-bnpl-hidden-risks-of-installment-services-and-how-to-protect-your-financial-interests.html
decentralized trading platform
https://net-surfingzone.com/blog/quantum-computing-and-internet-security-preparing-for-the-new-era-of-cryptography.html
swap hyperliquid
http://jump.5ch.net/?http://snap-chat-it.com/blog/snapchat-monetization-the-complete-guide-to-earning-money-as-a-content-creator.html
ht.xyz
https://tech-intell.com/blog/the-philosophy-of-ai-consciousness-can-machines-achieve-sentience-and-what-it-means-for-humanity.html
ht.xyz
https://techfluxpro.com/publications/synthetic-biology-engineering-life-for-industrial-innovation-and-sustainable-future.html
ht.xyz
https://www.teen-social.com/blog/tiktok-creator-economy-complete-revenue-generation-guide-for-content-creators.html
ht.xyz
[url=https://twitter-old.com/blog/x-threads-mastery-advanced-strategies-for-maximum-engagement.html]https://twitter-old.com/blog/x-threads-mastery-advanced-strategies-for-maximum-engagement.html[/url]
ht.xyz
https://vertechsys.com/publications/artificial-intelligence-integration-in-manufacturing-processes-from-theory-to-practical-implementation.html
SEO продвижение сайтов
https://seo-top777.ru
SEO продвижение сайтов
https://google.tl/url?q=http://komandor-club.ru
SEO продвижение сайтов
https://google.sk/url?q=http://ldsp-vrn.ru
SEO продвижение сайтов
https://megamebel812.ru
SEO агентство Москва
[url=https://pharmcatalog.ru]https://pharmcatalog.ru[/url]
SEO агентство Москва
https://google.sh/url?q=http://prodvizhenie-sait.ru
SEO агентство Москва
https://prodvizhenie-saitov-24.ru
SEO агентство Москва
http://www.google.cf/url?q=https://seo-audit-sait.ru
SEO агентство Москва
https://seo-business.ru
SEO продвижение сайтов
http://www.southernclimate.org/?URL=seo-dreams.ru
SEO продвижение сайтов
[url=https://seo-head.ru]http://www.seo-head.ru/[/url]
SEO агентство Москва
https://seo-more.ru
SEO продвижение сайтов
http://www.a-31.de/url?q=http://seo-privat.ru
SEO продвижение сайтов
https://www.seo-top-site.ru/
SEO агентство Москва
https://seo-top.msk.ru
SEO продвижение сайтов
https://seosait-24.ru
SEO агентство Москва
https://seotop-google.ru/
SEO продвижение сайтов
http://www.seymoursimon.com/?URL=seotop-site.ru
SEO продвижение сайтов
https://www.google.mn/url?q=https://sozdanie-website.ru
SEO агентство Москва
[url=http://google.com.ar/url?q=https://продвижение-сайтов-нижний-новгород.рф]https://google.co.zw/url?q=http://продвижение-сайтов-нижний-новгород.рф[/url]
SEO продвижение сайтов
https://раскрутка-сайтов-краснодар.рф
SEO агентство Москва
https://www.rosbooks.ru/go?http://продвижение-сайта-красноярск.рф
SEO агентство Москва
https://www.продвижение-сайта-екб.рф/
SEO продвижение сайтов
http://www.продвижение-сайта-пермь.рф
SEO агентство Москва
[url=https://продвижение-сайтов-ярославль.рф]http://продвижение-сайтов-ярославль.рф/[/url]
SEO продвижение сайтов
https://google.as/url?q=http://продвижение-сайтов-новосибирск.рф
SEO продвижение сайтов
http://www.hellotw.com/gate/big5/продвижение-сайтов-новокузнецк.рф
SEO агентство Москва
http://google.com.kw/url?q=http://продвижение-сайтов-сургут.рф
шины Goodyear купить
http://google.to/url?q=http://goodyear-tyres.ru
шины Goodyear Москва
https://sc.hkexnews.hk/TuniS/goodyeartyres.ru
интернет-магазин шин Yokohama-tyres
https://yokohamatyres.ru
шины Yokohama доставка Россия
https://yokohama-tyres.ru/
шины Continental купить
https://continentaltyres.ru
шины Continental Москва
https://continental-tyres.ru
шины Hankook купить
http://www.hankooktyres.ru
интернет-магазин шин Hankook
http://www.hankook-tyres.ru
шины Toyo купить
[url=https://tyres-toyo.ru]https://tyres-toyo.ru[/url]
интернет-магазин шин
http://www.шины-для-вас-мск.рф
интернет-магазин шин
https://шины-для-вас.рф/
шины купить
http://www.gde-daewoo.ru
интернет-магазин шин
https://sv-margo.ru
интернет-магазин шин
[url=https://teron.online/go/?http://sv-margo.ru]http://google.sc/url?q=http://sv-margo.ru%5B/url%5D
шины купить
http://hr.bjx.com.cn/go.aspx?u=otdelkaidizain.ru
интернет-магазин шин
https://an0nym.xyz/?http://lee-1c.ru
шины купить
https://rrrus.ru
интернет-магазин шин
https://maulanet.ru
шины купить
http://www.shiny-m.ru/
шины купить
https://ug-online.ru
интернет-магазин шин
https://poligrin.ru
жк нова
[url=https://blog-igry.ru]https://blog-igry.ru[/url]
жк нова
http://www.jsfiles.ru/
жилой комплекс остров
https://kinoinemcu.ru
жилой комплекс остров
https://spain-vng.ru/
жилой комплекс символ
[url=https://vng-ispaniya.ru]http://www.vng-ispaniya.ru/[/url]
жк символ
http://vnzh-ispaniya.ru
исправление кифоза у взрослых
https://kifoz-operaciya.ru
витамины для суставов
http://www.sustavy-pitanie.ru
prp инъекции суставы отзывы
https://www.google.hr/url?q=https://prp-sustavy.ru
нейростимуляция позвоночника
http://www.muppetsauderghem.be/?URL=neiro-modulyaciya-boli.ru
нейростимуляция позвоночника
https://neiro-modulyaciya-boli.ru
анализы на артрит
https://rannii-artrit.ru
мрт позвоночника
[url=https://mrt-kt-pozvonochnik.ru]http://mrt-kt-pozvonochnik.ru/[/url]
реабилитация после операции на кисти
https://www.kontraktura-ruki.ru/
как сидеть за компьютером правильно
https://osanka-kompyuter.ru/
восстановление хрящевой ткани
http://regeneraciya-hryasha.ru
https://pohodka-endoprotez.ru/
[url=https://pohodka-endoprotez.ru]http://pohodka-endoprotez.ru/[/url]
артроскопическая хирургия
https://www.triathlon.org/?URL=artroskopiya-travmy.ru
физиотерапия при артрозе
http://www.fizioterapiya-artroz.ru
упражнения для стоп детей
https://www.stopa-detei.ru/
современные методы лечения некроза бедра
https://nekroz-bedra.ru
терапия некроза головки бедра
http://find.games.free.fr/visit.php/ves-i-spina.ru
лишний вес суставы
https://google.us/url?q=http://vrozhdennye-patologii.ru
современные методы лечения ревматоидного артрита
http://www.revmatoidnyi-artrit.ru
шпаклёвка
http://www.adgezia-shpaklevok.ru/
фасадные декоративные покрытия
https://vlago-stoykaya-shtukaturka.ru
энергоэффективные материалы
http://energiya-tehnonikol.ru/
звукопоглощающие материалы
https://zvukoizolyaciya-bazalt.ru
поведенческие факторы
http://www.google.az/url?q=http://clickolov.ru
seo продвижение
https://pro-seo.expert
seo продвижение в сша
https://moscow-rockets.com/seo-prodvizhenie-sajtov-v-usa
ремонт в офисе
https://construct-msk.ru/remont_ofisov
сколько стоит застеклить балкон в самаре
http://google.as/url?q=http://vitrum-balkon.ru
hypertrade crypto
https://ht.xyz
сколько стоит тонна авиационного керосина
https://nafta.ru/catalog/kerosin_ts/aviatsionnyy_kerosin_ts_1
манипуляторы в аренду в москве
https://super-manipulyator.ru
whitecirclegroup.com
https://www.www.whitecirclegroup.com/
комплексное маркетинговое агентство
http://www.google.hr/url?q=https://dp-promotion.ru
перевозка лежачих больных
http://www.perewozka-bolnyh.ru
диспорт для лица цена
http://google.by/url?q=http://marilav.ru/botulotoksini/botulinoterapiya-lica-inekcii-botulotoksina/inekcii-disport
бетон москва купить
https://google.co.bw/url?q=http://ksg-beton.ru
hypertrade crypto
https://www.hyperliquidpremiums.com
hypertrade dex
https://distribution-hyperliquid.com
hyperliquid swap
https://hyperliquidtoken.net
swap hyperevm
https://weburg.net/redirect?url=hyperliquidfinance.net
hyper trading
https://hyperliquidt.xyz
hyperliquid arbitrage finder
http://www.hyperliquidi.com
hyperliquid
https://www.hyperliquidlabs.net/
hyperevm dex
https://google.gm/url?q=http://hyperliquids.top
trading on hyperliquid
[url=https://hyperliquids.top]https://hyperliquids.top[/url]
открытие бизнеса в оаэ
http://www.whitesquarepartners.com/ru/services/corporate-services/corporate-setup
создание холдингов оаэ
https://www.whitesquarepartners.com/ru/services/corporate-services/establishment/holding-setup
личные фонды оаэ
http://www.whitesquarepartners.com/ru/services/corporate-services/establishment/foundation-setup/
учреждение семейных офисов оаэ
http://google.com.np/url?q=http://whitesquarepartners.com/ru/services/corporate-services/establishment/family-office-setup
открыть счет в банке оаэ
https://google.je/url?q=http://whitesquarepartners.com/ru/services/corporate-services/bank-brokerage-accounts/bank-accounts
золотая виза оаэ
https://whitesquarepartners.com/ru/services/corporate-services/residency-visas/golden-visa
виза инвестора в оаэ
https://whitesquarepartners.com/ru/services/corporate-services/residency-visas/investor-visa
налоговое консультирование оаэ
https://whitesquarepartners.com/ru/services/corporate-services/tax-advisory-accounting/tax-advisory
бухгалтерский учет в оаэ
[url=https://cse.google.vg/url?q=http://whitesquarepartners.com/ru/services/corporate-services/tax-advisory-accounting/accounting]https://leffingeleuren.be/?URL=whitesquarepartners.com/ru/services/corporate-services/tax-advisory-accounting/accounting[/url]
корпоративные услуги в оаэ
http://maps.google.ge/url?q=https://whitesquarepartners.com/ru/services/corporate-services/corporate-administration
легализация документов в оаэ
https://whitesquarepartners.com/ru/services/corporate-services/legalization-consular-support/legalization
консульское сопровождение оаэ
https://whitesquarepartners.com/ru/services/corporate-services/legalization-consular-support/consular-support
открыть брокерский счет в оаэ
http://whitesquarepartners.com/ru/services/corporate-services/bank-brokerage-accounts/brokerage-accounts/
рабочая виза в оаэ
http://maps.google.lt/url?q=http://whitesquarepartners.com/ru/services/corporate-services/residency-visas/employee-visa
поддержка по трудовым вопросам оаэ
http://zanostroy.ru/go?url=http://whitesquarepartners.com/ru/services/corporate-services/labor-matters-support
трудовые соглашения оаэ
http://google.com.qa/url?q=https://whitesquarepartners.com/ru/services/corporate-services/labor-matters-support/employment-agreements
соглашения об управлении оаэ
https://whitesquarepartners.com/ru/services/corporate-services/labor-matters-support/management-agreements
опционные планы в оаэ
https://whitesquarepartners.com/ru/services/corporate-services/labor-matters-support/share-option-plans
business accounts uae
https://www.groei.nl/?URL=http://www.whitecirclegroup.com/bank-accounts
uae golden visa
http://www.iqpark.be/?URL=www.whitecirclegroup.com/golden-visa
tax consultant uae
https://www.whitecirclegroup.com/tax-advisory
accounting services in uae
https://www.whitecirclegroup.com/accounting
setting up a company in dubai
http://pagecs.net/www.whitecirclegroup.com/company-setup
investor visa uae
http://www.www.whitecirclegroup.com/investor-visa/
consular support uae
https://google.ca/url?q=http://www.whitecirclegroup.com/consular-support
corporate setup uae
https://www.www.whitecirclegroup.com/corporate-setup
holding company in uae
http://www.www.whitecirclegroup.com/holding-setup
fund setup uae
https://www.www.whitecirclegroup.com/fund-setup/
family office setup uae
https://www.www.whitecirclegroup.com/family-office-setup
document legalization uae
https://www.whitecirclegroup.com/legalization
poa dubai
https://ssylki.info/?who=www.whitecirclegroup.com/powers-of-attorney
uae will for expats
http://www.whitecirclegroup.com/wills
brokerage account uae
[url=https://www.whitecirclegroup.com/brokerage-accounts]http://www.www.whitecirclegroup.com/brokerage-accounts/[/url]
uae work visa
https://www.whitecirclegroup.com/employee-visa
купить дайсон в москве оригинал fen-dn-kupit-11.ru .
стайлер дайсон для волос с насадками цена официальный сайт купит… fen-dn-kupit-11.ru .
ростов купить стайлер дайсон fen-dn-kupit-11.ru .
dyson фен оригинал fen-dn-kupit-11.ru .
купить дайсон фен в москве у официального дилера stajler-dsn.ru .
dyson фен оригинал dn-fen-kupit.ru .
стайлер дайсон для волос купить официальный сайт с насадками цен… стайлер дайсон для волос купить официальный сайт с насадками цен… .
фен купить dyson оригинал fen-dn-kupit-13.ru .
пылесос дайсон напольный купить pylesos-dn-1.ru .
стайлер дайсон для волос купить официальный сайт с насадками цен… стайлер дайсон для волос купить официальный сайт с насадками цен… .
купить дайсон стайлер для волос официальный сайт цена с насадкам… stajler-dsn.ru .
дайсон купить стайлер официальный сайт dn-fen-kupit.ru .
dyson пылесос detect absolute pylesos-dn-1.ru .
дайсон купить стайлер официальный сайт fen-dn-kupit-13.ru .
цена дайсон стайлер для волос с насадками официальный сайт купит… цена дайсон стайлер для волос с насадками официальный сайт купит… .
дайсон фен купить в москве дайсон фен купить в москве .
купить оригинальный пылесос дайсон pylesos-dn-2.ru .
пылесос dyson вертикальный купить [url=https://pylesos-dn-kupit-1.ru/]pylesos-dn-kupit-1.ru[/url] .
dyson v12 пылесос pylesos-dn-kupit.ru .
пылесос dyson sv47 pylesos-dsn.ru .
пылесос dyson sv47 pylesos-dn-kupit-2.ru .
купить дайсон в москве оригинал stajler-dsn.ru .
фен купить дайсон фен купить дайсон .
пылесос дайсон беспроводной вертикальный купить в москве pylesos-dn-1.ru .
дайсон фен купить официальный дайсон фен купить официальный .
купить дайсон стайлер с насадками официальный сайт для волос цен… fen-dn-kupit-12.ru .
фен дайсон оригинал купить официальный stajler-dsn-1.ru .
вертикальные пылесосы дайсон купить в москве pylesos-dn-2.ru .
купить пылесос дайсон мощный купить пылесос дайсон мощный .
купить пылесос дайсон v15 detect absolute pylesos-dn-kupit-1.ru .
купить пылесос дайсон новосибирск pylesos-dn-kupit.ru .
купить пылесос dyson v15 москва pylesos-dn-kupit-2.ru .
дайсон стайлер для волос цена официальный сайт купить с насадкам… stajler-dsn.ru .
дайсон стайлер для волос цена с насадками купить официальный сай… dn-fen-kupit.ru .
дайсон пылесос оригинал pylesos-dn-1.ru .
dyson фен оригинал fen-dn-kupit-13.ru .
стайлер дайсон для волос цена с насадками официальный сайт купит… fen-dn-kupit-12.ru .
пылесос dyson submarine pylesos-dsn.ru .
фен дайсон оригинал купить официальный stajler-dsn-1.ru .
пылесос дайсон оригинал купить pylesos-dn-2.ru .
пылесос dyson sv47 pylesos-dn-kupit-1.ru .
ростов купить пылесос дайсон pylesos-dn-kupit.ru .
дайсон пылесос купить в москве оригинал pylesos-dsn-1.ru .
купить пылесос дайсон беспроводной v15 купить пылесос дайсон беспроводной v15 .
купить пылесос дайсон новосибирск pylesos-dn-kupit-2.ru .
пылесос дайсон купить в уфе pylesos-dn-kupit-1.ru .
пылесос дайсон купить в воронеже пылесос дайсон купить в воронеже .
пылесосы dyson официальный пылесосы dyson официальный .
пылесос dyson detect купить pylesos-dn-kupit.ru .
пылесос дайсон купить москва официальный [url=https://pylesos-dn-2.ru/]pylesos-dn-2.ru[/url] .
дайсон пылесос купить в москве оригинал [url=https://dn-pylesos-kupit.ru/]dn-pylesos-kupit.ru[/url] .
купить пылесос dyson v15 москва pylesos-dn-kupit-2.ru .
пылесос дайсон купить в уфе пылесос дайсон купить в уфе .
пылесос дайсон беспроводной последняя модель купить dn-pylesos-kupit.ru .
пылесос дайсон беспроводной купить в москве цена pylesos-dsn-1.ru .
пылесос dyson submarine dn-pylesos-kupit.ru .
пылесос дайсон купить последняя модель dn-pylesos-kupit-1.ru .
где купить выпрямитель дайсон vypryamitel-dn.ru .
dyson фен выпрямитель купить vypryamitel-dn-1.ru .
выпрямитель для волос дайсон москва выпрямитель для волос дайсон москва .
купить пылесос дайсон мощный купить пылесос дайсон мощный .
выпрямитель дайсон airstrait купить выпрямитель дайсон airstrait купить .
купить выпрямитель волос dyson vypryamitel-dn.ru .
купить кейс для выпрямителя дайсон vypryamitel-dn-3.ru .
пылесос дайсон купить в уфе пылесос дайсон купить в уфе .
выпрямитель дайсон отзывы выпрямитель дайсон отзывы .
дайсон выпрямитель купить минск vypryamitel-dn-1.ru .
купить пылесос дайсон в калининграде купить пылесос дайсон в калининграде .
дайсон выпрямитель купить минск vypryamitel-dn-3.ru .
выпрямитель для волос дайсон купить vypryamitel-dn.ru .
оригинал dyson пылесос купить dn-pylesos-kupit-1.ru .
выпрямитель дайсон цена выпрямитель дайсон цена .
выпрямитель dyson hs07 vypryamitel-dn-1.ru .
dyson пылесос v15 absolute dyson пылесос v15 absolute .
фен выпрямитель дайсон airstrait фен выпрямитель дайсон airstrait .
пылесосы для дома дайсон купить dn-pylesos-kupit-1.ru .
выпрямитель дайсон купить в ростове vypryamitel-dn.ru .
dyson выпрямитель dyson выпрямитель .
купить выпрямитель dyson оптом vypryamitel-dn-1.ru .
пылесос дайсон absolute купить пылесос дайсон absolute купить .
купить выпрямитель дайсон оригинал dsn-vypryamitel-1.ru .
дайсон выпрямитель купить воронеж dsn-vypryamitel.ru .
Игра Авиатор https://www.aviator-plus.ru .
выпрямитель дайсон airstrait ht01 dsn-vypryamitel-2.ru .
выпрямитель dyson москва выпрямитель dyson москва .
dyson выпрямитель купить в москве [url=https://dsn-vypryamitel-4.ru/]dyson выпрямитель купить в москве[/url] .
купить фен выпрямитель дайсон vypryamitel-dn-kupit.ru .
выпрямитель dyson corrale выпрямитель dyson corrale .
выпрямитель дайсон ht01 купить выпрямитель дайсон ht01 купить .
купить выпрямитель волос дайсон в москве dsn-vypryamitel-1.ru .
dyson выпрямитель для волос airstrait dsn-vypryamitel-2.ru .
выпрямитель волос dyson ht01 dsn-vypryamitel.ru .
купить фен выпрямитель дайсон оригинал vypryamitel-dn-kupit.ru .
dyson выпрямитель для волос купить в симферополе dsn-vypryamitel-3.ru .
выпрямитель дайсон airstrait [url=https://dsn-vypryamitel-4.ru/]выпрямитель дайсон airstrait[/url] .
выпрямитель дайсон airstrait vypryamitel-dn-kupit-1.ru .
выпрямитель dyson купить [url=https://vypryamitel-dn-kupit-2.ru/]выпрямитель dyson купить[/url] .
dyson фен выпрямитель купить dyson фен выпрямитель купить .
выпрямитель дайсон airstrait dsn-vypryamitel-2.ru .
выпрямитель dyson цена выпрямитель dyson цена .
выпрямитель dyson москва dsn-vypryamitel.ru .
dyson фен выпрямитель купить vypryamitel-dn-kupit.ru .
выпрямитель dyson купить выпрямитель dyson купить .
выпрямитель дайсон купить в екатеринбурге выпрямитель дайсон купить в екатеринбурге .
фен выпрямитель дайсон где купить vypryamitel-dn-kupit-1.ru .
dyson выпрямитель для волос купить в симферополе dsn-vypryamitel-4.ru .
какой выпрямитель дайсон купить какой выпрямитель дайсон купить .
купить дайсон выпрямитель донецк dsn-vypryamitel-2.ru .
выпрямитель dyson airstrait pink dsn-vypryamitel-1.ru .
dyson выпрямитель купить спб dsn-vypryamitel.ru .
фен выпрямитель дайсон купить в тц багратионовская vypryamitel-dn-kupit.ru .
выпрямитель для волос дайсон купить выпрямитель для волос дайсон купить .
какой выпрямитель дайсон купить dsn-vypryamitel-3.ru .
дайсон фен выпрямитель для волос купить оригинал vypryamitel-dn-kupit-1.ru .
выпрямитель дайсон купить выпрямитель дайсон купить .
фен выпрямитель дайсон airstrait купить фен выпрямитель дайсон airstrait купить .
выпрямитель дайсон купить в москве оригинал vypryamitel-dn-kupit-2.ru .
какой выпрямитель дайсон купить vypryamitel-dn-kupit-3.ru .
дайсон фен выпрямитель для волос vypryamitel-dsn-kupit.ru .
выпрямитель дайсон купить выпрямитель дайсон купить .
дайсон выпрямитель купить краснодар vypryamitel-dsn-kupit-1.ru .
выпрямитель dyson corrale купить выпрямитель dyson corrale купить .
выпрямитель dyson corrale выпрямитель dyson corrale .
выпрямитель dyson airstrait ht01 vypryamitel-dsn-kupit.ru .
выпрямитель dyson airstrait выпрямитель dyson airstrait .
выпрямитель dyson ht01 купить vypryamitel-dsn-kupit-2.ru .
выпрямитель дайсон airstrait ht01 выпрямитель дайсон airstrait ht01 .
фен выпрямитель дайсон airstrait купить [url=https://vypryamitel-dsn-kupit-1.ru/]vypryamitel-dsn-kupit-1.ru[/url] .
какой выпрямитель дайсон купить какой выпрямитель дайсон купить .
купить выпрямитель дайсон оригинал vypryamitel-dsn-kupit.ru .
выпрямитель dyson corrale купить выпрямитель dyson corrale купить .
дайсон фен выпрямитель для волос дайсон фен выпрямитель для волос .
выпрямитель для волос dyson airstrait купить выпрямитель для волос dyson airstrait купить .
выпрямитель dyson airstrait ht01 vypryamitel-dsn-kupit-1.ru .
выпрямитель dyson купить выпрямитель dyson купить .
выпрямитель dyson airstrait ht01 vypryamitel-dsn-kupit.ru .
фен выпрямитель дайсон оригинал vypryamitel-dsn-kupit-2.ru .
выпрямитель дайсон airstrait ht01 выпрямитель дайсон airstrait ht01 .
dyson airstraight dyson airstraight .
выпрямитель волос dyson airstrait ht01 купить vypryamitel-dsn-kupit-1.ru .
выпрямитель для волос дайсон москва выпрямитель для волос дайсон москва .
услуги по перепланировке квартир pereplanirovka-kvartir3.ru .
перепланировка в москве pereplanirovka-kvartir4.ru .
узаконивание перепланировки узаконивание перепланировки .
проект на перепланировку квартиры заказать proekt-pereplanirovki-kvartiry20.ru .
купить выпрямитель дайсон пенза в наличии vypryamitel-dsn-kupit-4.ru .
перепланировка квартиры стоимость skolko-stoit-uzakonit-pereplanirovku-6.ru .
услуги по согласованию перепланировки pereplanirovka-kvartir4.ru .
согласование перепланировки pereplanirovka-kvartir3.ru .
помощь в согласовании перепланировки квартиры pereplanirovka-kvartir5.ru .
проект перепланировки квартиры москва [url=https://proekt-pereplanirovki-kvartiry20.ru/]проект перепланировки квартиры москва[/url] .
ломоносовская школа онлайн shkola-onlajn11.ru .
lbs это shkola-onlajn12.ru .
онлайн школа ломоносов онлайн школа ломоносов .
дайсон выпрямитель купить минск дайсон выпрямитель купить минск .
ломоносовская школа онлайн ломоносовская школа онлайн .
заказать сео анализ сайта пушка seo-kejsy7.ru .
ломоносов скул shkola-onlajn13.ru .
официальный сайт melbet официальный сайт melbet .
melbet ru melbet ru .
сколько стоит узаконить перепланировку в квартире skolko-stoit-uzakonit-pereplanirovku-6.ru .
согласование перепланировки квартиры москва pereplanirovka-kvartir4.ru .
перепланировка квартиры согласование pereplanirovka-kvartir3.ru .
проект перепланировки и переустройства квартиры proekt-pereplanirovki-kvartiry20.ru .
перепланировка квартиры согласование перепланировка квартиры согласование .
домашняя школа интернет урок вход shkola-onlajn11.ru .
московская школа онлайн обучение shkola-onlajn14.ru .
школы дистанционного обучения shkola-onlajn12.ru .
онлайн-школа для детей бесплатно [url=https://shkola-onlajn15.ru/]shkola-onlajn15.ru[/url] .
мелбет ставки на спорт скачать на андроид мелбет ставки на спорт скачать на андроид .
стайлер дайсон выпрямитель стайлер дайсон выпрямитель .
кп по продвижению сайта кп по продвижению сайта .
официальный сайт бк мелбет официальный сайт бк мелбет .
сколько стоит оформить перепланировку квартиры skolko-stoit-uzakonit-pereplanirovku-6.ru .
онлайн обучение для детей онлайн обучение для детей .
перепланировка квартир перепланировка квартир .
где согласовать перепланировку pereplanirovka-kvartir3.ru .
сделать проект перепланировки квартиры в москве proekt-pereplanirovki-kvartiry20.ru .
где согласовать перепланировку pereplanirovka-kvartir5.ru .
lomonosov school shkola-onlajn11.ru .
ломоносов скул ломоносов скул .
лбс это shkola-onlajn12.ru .
онлайн-школа для детей бесплатно [url=https://shkola-onlajn15.ru/]shkola-onlajn15.ru[/url] .
ставки на спорт мелбет отзывы ставки на спорт мелбет отзывы .
мелбет регистрация официальный сайт мелбет регистрация официальный сайт .
узаконить перепланировку квартиры стоимость skolko-stoit-uzakonit-pereplanirovku-6.ru .
выпрямитель dyson купить выпрямитель dyson купить .
гибридная структура сайта гибридная структура сайта .
дистанционное обучение 10-11 класс shkola-onlajn13.ru .
школа онлайн для детей shkola-onlajn14.ru .
обучение стриминг shkola-onlajn11.ru .
lbs что это lbs что это .
лбс это лбс это .
online betting [url=http://studio-pulse.ru]online betting[/url] .
сколько стоит согласование перепланировки сколько стоит согласование перепланировки .
мелбет games официальный сайт мелбет games официальный сайт .
закупка ссылок в гугл заказать услугу агентство seo-kejsy7.ru .
закрытые школы в россии закрытые школы в россии .
online sports betting site online sports betting site .
букмекерская контора melbet [url=www.rusfusion.ru/]букмекерская контора melbet[/url] .
melbet sports melbet sports .
betting sport online betting sport online .
курсовая заказ купить kupit-kursovuyu-44.ru .
написать курсовую на заказ kupit-kursovuyu-42.ru .
купить задание для студентов kupit-kursovuyu-45.ru .
написать курсовую на заказ написать курсовую на заказ .
стоимость написания курсовой работы на заказ kupit-kursovuyu-47.ru .
betting on sports online betting on sports online .
курсовая работа купить курсовая работа купить .
заказ курсовых работ kupit-kursovuyu-48.ru .
заказать качественную курсовую kupit-kursovuyu-49.ru .
написание курсовых работ на заказ цена kupit-kursovuyu-50.ru .
продвижение сайтов во франции [url=https://prodvizhenie-sajtov-v-moskve111.ru/]prodvizhenie-sajtov-v-moskve111.ru[/url] .
оптимизация сайта франция prodvizhenie-sajtov13.ru .
поисковое seo в москве prodvizhenie-sajtov11.ru .
заказать студенческую работу заказать студенческую работу .
помощь курсовые помощь курсовые .
курсовые работы заказать kupit-kursovuyu-42.ru .
сайт для заказа курсовых работ kupit-kursovuyu-47.ru .
заказать курсовую срочно заказать курсовую срочно .
продвижение сайта продвижение сайта .
заказать дипломную работу в москве заказать дипломную работу в москве .
продвижения сайта в google [url=https://prodvizhenie-sajtov13.ru/]prodvizhenie-sajtov13.ru[/url] .
продвижение сайта франция prodvizhenie-sajtov11.ru .
студенческие работы на заказ студенческие работы на заказ .
заказать курсовую [url=https://kupit-kursovuyu-48.ru/]заказать курсовую[/url] .
купить курсовая работа kupit-kursovuyu-43.ru .
melbet букмекерская контора melbet букмекерская контора .
заказать курсовую работу качественно заказать курсовую работу качественно .
курсовая заказать недорого kupit-kursovuyu-45.ru .
выполнение курсовых kupit-kursovuyu-47.ru .
помощь студентам и школьникам kupit-kursovuyu-42.ru .
выполнение учебных работ kupit-kursovuyu-50.ru .
сделать аудит сайта цена prodvizhenie-sajtov-v-moskve111.ru .
заказать курсовую срочно заказать курсовую срочно .
поисковое продвижение сайта в интернете москва поисковое продвижение сайта в интернете москва .
поисковое продвижение сайта в интернете москва prodvizhenie-sajtov13.ru .
курсовой проект цена kupit-kursovuyu-49.ru .
помощь студентам контрольные kupit-kursovuyu-48.ru .
заказать курсовую работу заказать курсовую работу .
мелбет онлайн ставки на спорт мелбет онлайн ставки на спорт .
заказать курсовую срочно заказать курсовую срочно .
написание курсовой работы на заказ цена kupit-kursovuyu-47.ru .
помощь студентам контрольные помощь студентам контрольные .
заказать курсовую срочно заказать курсовую срочно .
выполнение учебных работ kupit-kursovuyu-42.ru .
seo агентство prodvizhenie-sajtov-v-moskve111.ru .
курсовые купить курсовые купить .
выполнение курсовых работ выполнение курсовых работ .
комплексное продвижение сайтов москва комплексное продвижение сайтов москва .
продвижение сайтов prodvizhenie-sajtov13.ru .
выполнение учебных работ [url=https://kupit-kursovuyu-48.ru/]kupit-kursovuyu-48.ru[/url] .
написание курсовой на заказ цена kupit-kursovuyu-43.ru .
online betting melbet online betting melbet .
помощь студентам курсовые kupit-kursovuyu-41.ru .
seo продвижение и раскрутка сайта seo продвижение и раскрутка сайта .
курсовой проект цена kupit-kursovuyu-41.ru .
поисковое продвижение москва профессиональное продвижение сайтов prodvizhenie-sajtov-v-moskve113.ru .
интернет раскрутка интернет раскрутка .
поисковое seo в москве prodvizhenie-sajtov-v-moskve214.ru .
интернет продвижение москва prodvizhenie-sajtov-v-moskve213.ru .
раскрутка сайта франция prodvizhenie-sajtov-v-moskve215.ru .
seo агентство prodvizhenie-sajtov-v-moskve223.ru .
интернет агентство продвижение сайтов сео prodvizhenie-sajtov-v-moskve216.ru .
заказать анализ сайта заказать анализ сайта .
internetagentur seo prodvizhenie-sajtov-v-moskve224.ru .
заказать продвижение сайта в москве заказать продвижение сайта в москве .
поисковое seo в москве поисковое seo в москве .
раскрутка и продвижение сайта раскрутка и продвижение сайта .
продвижение сайтов в москве продвижение сайтов в москве .
помощь студентам курсовые kupit-kursovuyu-41.ru .
seo агентство seo агентство .
1win promo kod az http://www.1win5762.help
1win az basketbol mərcləri https://1win5762.help/
net seo prodvizhenie-sajtov-v-moskve225.ru .
интернет продвижение москва prodvizhenie-sajtov-v-moskve223.ru .
интернет продвижение москва prodvizhenie-sajtov-v-moskve214.ru .
глубокий комлексный аудит сайта prodvizhenie-sajtov-v-moskve117.ru .
seo partner prodvizhenie-sajtov-v-moskve213.ru .
усиление ссылок переходами prodvizhenie-sajtov-v-moskve215.ru .
seo network prodvizhenie-sajtov-v-moskve224.ru .
продвижение сайта [url=https://prodvizhenie-sajtov-v-moskve216.ru/]продвижение сайта[/url] .
сео агентство сео агентство .
поисковое seo в москве поисковое seo в москве .
продвижение сайтов продвижение сайтов .
сколько стоит сделать курсовую работу на заказ kupit-kursovuyu-41.ru .
раскрутка и продвижение сайта раскрутка и продвижение сайта .
продвижения сайта в google продвижения сайта в google .
интернет раскрутка prodvizhenie-sajtov-v-moskve225.ru .
компании занимающиеся продвижением сайтов prodvizhenie-sajtov-v-moskve223.ru .
оптимизация и продвижение сайтов москва prodvizhenie-sajtov-v-moskve214.ru .
усиление ссылок переходами prodvizhenie-sajtov-v-moskve216.ru .
сео агентство сео агентство .
оптимизация и продвижение сайтов москва оптимизация и продвижение сайтов москва .
продвижение сайтов интернет магазины в москве prodvizhenie-sajtov-v-moskve213.ru .
сео агентство prodvizhenie-sajtov-v-moskve224.ru .
компании занимающиеся продвижением сайтов компании занимающиеся продвижением сайтов .
раскрутка и продвижение сайта раскрутка и продвижение сайта .
net seo prodvizhenie-sajtov-v-moskve115.ru .
заказать анализ сайта заказать анализ сайта .
seo partner program prodvizhenie-sajtov-v-moskve216.ru .
продвижение сайтов интернет магазины в москве prodvizhenie-sajtov-v-moskve214.ru .
компании занимающиеся продвижением сайтов компании занимающиеся продвижением сайтов .
internet seo prodvizhenie-sajtov-v-moskve223.ru .
интернет продвижение москва prodvizhenie-sajtov-v-moskve215.ru .
профессиональное продвижение сайтов prodvizhenie-sajtov-v-moskve213.ru .
усиление ссылок переходами усиление ссылок переходами .
заказать продвижение сайта в москве заказать продвижение сайта в москве .
seo partner seo partner .
комплексное продвижение сайтов москва комплексное продвижение сайтов москва .
оптимизация сайта франция цена prodvizhenie-sajtov-v-moskve115.ru .
seo продвижение и раскрутка сайта seo продвижение и раскрутка сайта .
1win aviator az https://1win5762.help/
1win az müsbət rəylər 1win az müsbət rəylər
интернет раскрутка интернет раскрутка .
seo partners prodvizhenie-sajtov-v-moskve231.ru .
поисковое продвижение сайта в интернете москва поисковое продвижение сайта в интернете москва .
поисковое seo в москве поисковое seo в москве .
интернет продвижение москва интернет продвижение москва .
seo аудит веб сайта prodvizhenie-sajtov-v-moskve235.ru .
internetagentur seo [url=https://prodvizhenie-sajtov-v-moskve232.ru/]internetagentur seo[/url] .
аудит продвижения сайта аудит продвижения сайта .
комплексное продвижение сайтов москва prodvizhenie-sajtov-v-moskve234.ru .
продвижение сайтов интернет магазины в москве продвижение сайтов интернет магазины в москве .
Эффективное продвижение требует анализа. Мы используем Яндекс.Метрику и Google Analytics для отслеживания трафика из Гродно seo гродно, поведения пользователей и конверсий. На основе данных корректируем стратегию, делая ее максимально результативной.