

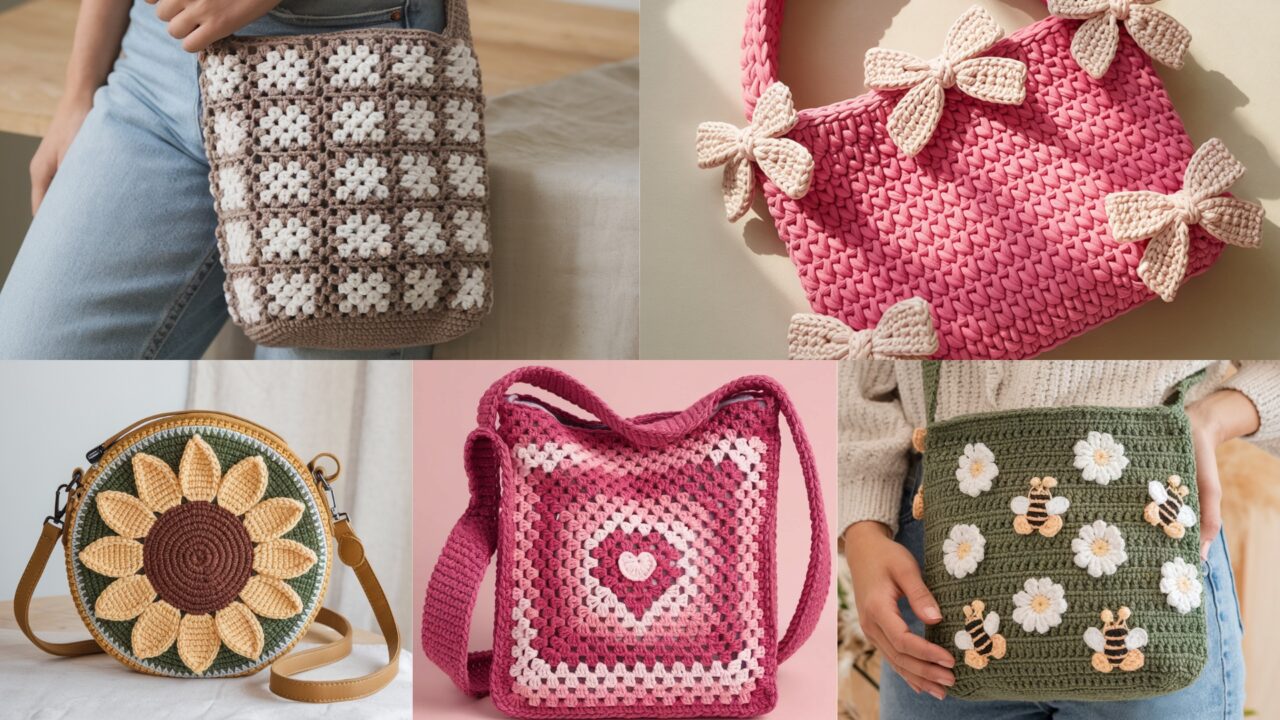
A well-made crochet bag is more than an accessory — it’s functional art. The right bag combines structure, texture, and hardware in a way that elevates an outfit while being useful every day. This collection presents five modern bag concepts you can actually make: a bow-accent shoulder bag, a heart-granny tote, a daisy-and-bee aesthetic bag, a sunflower crossbody, and a classic granny-stitch shoulder bag. Each pattern below includes a clear overview, skill level, recommended materials and tools, finished dimensions and gauge guidance, a step-by-step construction method (with measurements you can adapt), instructions for handles/closures/lining, finishing and care notes, troubleshooting tips, and variation ideas — everything a maker needs to build a publishable blog post or printable pattern.
Read the general notes below before you start — they’ll save you time when adapting yarn or sizing.
General notes (read this once)
- Terms: US crochet terms used (ch, sc, hdc, dc, tr, sl st, st(s), inc, dec, FLO/BLO = front/back loop only, RS/WS).
- Gauge & swatching: Always make a 4 in × 4 in (10 × 10 cm) swatch in the main stitch of the bag — especially important for structured bags. Use your swatch to calculate how many foundation chains or repeats you need for the desired width.
- Yarn choice: For stable bags choose cotton, cotton-blend, or a sturdy recycled cotton/cord yarn (e.g., t-shirt yarn) — these hold shape and tolerate weight. For softer, fashionable bags (slouchy crossbody or boho), choose an acrylic-cotton blend or light worsted.
- Hook choice: Use a hook that gives a firm fabric for structured bags (often 1–2 sizes smaller than yarn label suggests), and a slightly larger hook for slouchy styles.
- Reinforcement & hardware: Consider interfacing, ribbon, or lining for structure; rivets, magnetic snaps, zippers, and metal or leather straps elevate both function and aesthetics.
- Construction approaches: I give both seamed-panel and seamless (in-the-round) options where useful. Seamless produces a cleaner interior; seamed panels can be faster for some stitch patterns.
- Sizing: All finished sizes are sample dimensions; adapt with your gauge and repeat math. I’ll show how to calculate and adjust where needed.
1. Crochet Bow Coquette Shoulder Bag Pattern
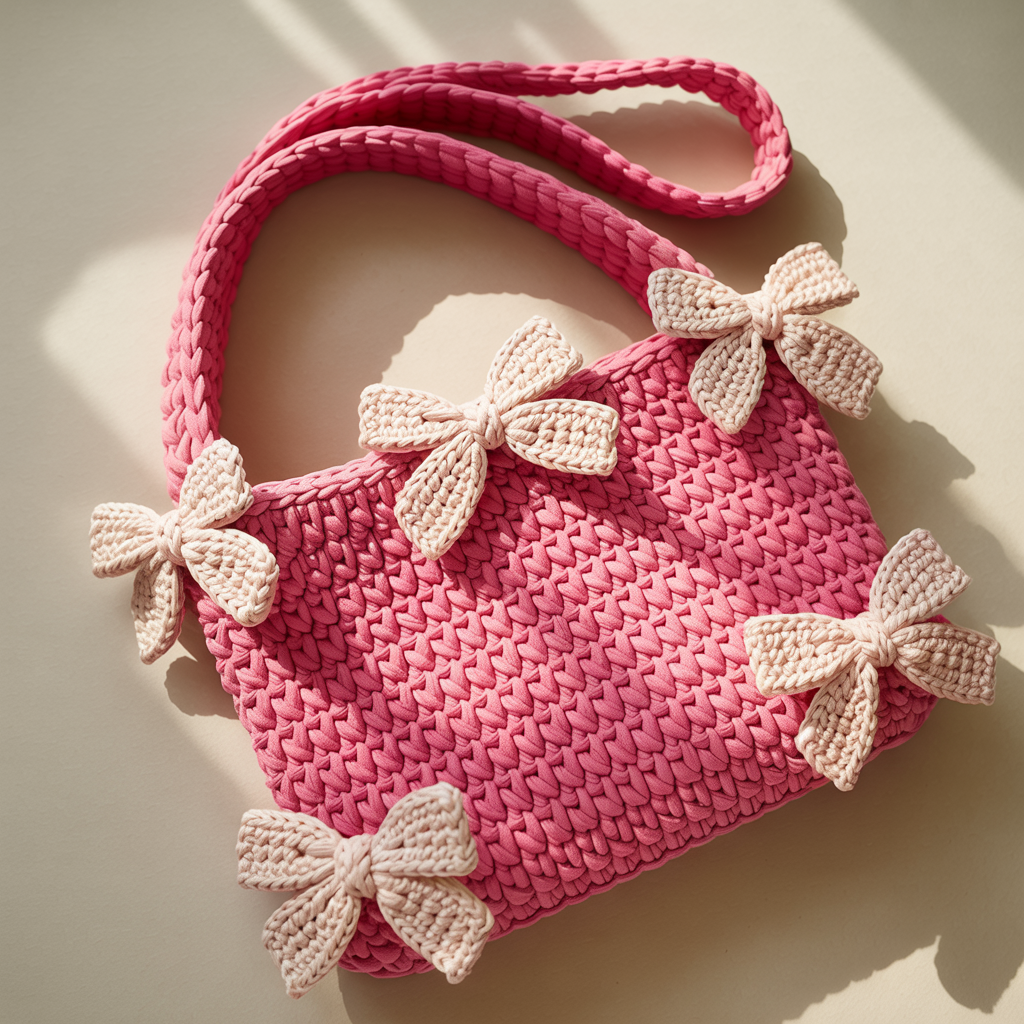
Overview
A refined shoulder bag with a large decorative bow (integrated or detachable) — chic and feminine. Structured body with a soft bow overlay makes it versatile: go minimalist in neutral cotton or playful with color and texture.
Skill level
Confident beginner → Intermediate (working firm fabric and attaching hardware)
Finished dimensions (sample)
- Body: 11 in wide × 8.5 in tall × 3 in deep
- Strap drop: 10–12 in for shoulder carry (adjustable)
Materials & tools (sample)
- Worsted cotton or cotton-blend yarn, 400–500 yds (body + bow)
- Hook: 4.0 mm for a firm fabric (adjust per gauge)
- Lining fabric ~0.25 yd, fusible interfacing (medium)
- Magnetic snap or small zipper, small button (optional)
- 1 leather or crocheted strap (20–24 in long) or strap hardware (D-rings, lobster clasps)
- Tapestry needle, sewing needle, thread, scissors, pins
Gauge (example)
- 18 sc × 22 rows = 4 in (in single crochet). Make swatch.
Construction — step-by-step
A. Calculate starting stitches
- Measure desired width (11 in) and multiply by stitches-per-inch from your swatch (SPI). Example: SPI = 4.5 sc/in → 11 × 4.5 = 49.5 → round to 48 or 50 (keep pattern multiple if required). For sc, any even number is fine.
B. Base & sides (bottom-up box) — structured approach
- Base: Work a flat rectangle for the bag base using sc in rows. Chain foundation to match base width (e.g., 48 ch + 1). Row 1: sc across. Continue until base depth = 3 in (measure by rows using your swatch; if row gauge = 5 rows/in, 15 rows ≈ 3 in).
- Turn base to sides: To create a boxed bottom, work short side panels onto the ends of your base rectangle (work sc across the short side stitches to build height) OR seam panels later. Easier: work continuous rounds around base (sc in ends of rows) to create a tube. If you worked base in rows, seam the short edges to make a rectangle and then work sc in rounds up the sides.
C. Body
- Once base height matches 3 in, join to work in the round (if not already). Work sc in rounds to build the body to 6 in tall from base (for total 8.5 in including base). Keep tension even; place stitch markers at the join. If you want textural detail, insert 2 rounds of hdc or a woven FPdc/BPdc rib band about 1–2 in from the top.
D. Top edge & strap anchors
- To prepare for strap hardware, decide strap type:
- Option 1 (sewn leather strap): Attach D-rings to the top sides using reinforced crocheted tabs: pick up 6–8 stitches at side seam, work a short strap tab (sc rows 1.25 in), fold and sew through D-ring; secure with whipstitch to bag body and topstitch through lining.
- Option 2 (crocheted strap): Create a strap by making a long strap in sc or 3-rail strap: ch to length (20–24 in total when doubled), sc back to create width and strength, then attach ends to side tabs as above.
- Finish top: 2 rounds of sc in BLO to create a neat foldable rim. Add a final decorative round: crab stitch or reverse sc for polished finish.
E. Bow — two options
- Detachable bow (recommended):
- Make a rectangle: ch 36; Row 1: sc in 2nd ch and across; Rows 2–6: sc across. Rectangle size roughly 9.5 in × 2.5 in.
- Fold rectangle in half lengthwise and seam short edges to create tube; flatten and pinch center. Wrap a 2 in long narrow band (ch 12; sc back) around the center and sew ends on underside. Attach to bag using a snap or stitched-on button if you want the option to remove it.
- Integrated bow (sewn firmly): Make same rectangle, sew permanently centered on front of bag, stitch through both bow base and bag body.
F. Lining & hardware
- Cut lining fabric from a template of bag interior plus ½ in seam allowance. Fuse interfacing to lining for sturdiness and sew lining with a top hem left open.
- Insert lining into bag and hand-sew the top edge to the inside of the brim with ladder stitch for invisible join. Sew through the interfacing-backed strap anchors for extra strength.
- Install magnetic snap on the lining top edges (follow snap manufacturer instructions) or sew a small zipper into top for closure.
Finishing & care
- Weave in ends along wrong side; block lightly if needed (cotton may be stretched slightly). Machine-washable if yarn and hardware allow; for leather straps hand-clean only.
Variations & styling
- Make a mini clutch version by skipping strap and shortening height; add inner zip and wrist strap.
- For a textured look, replace sc body with a herringbone or waffle stitch, while using a smaller hook at base for structure.
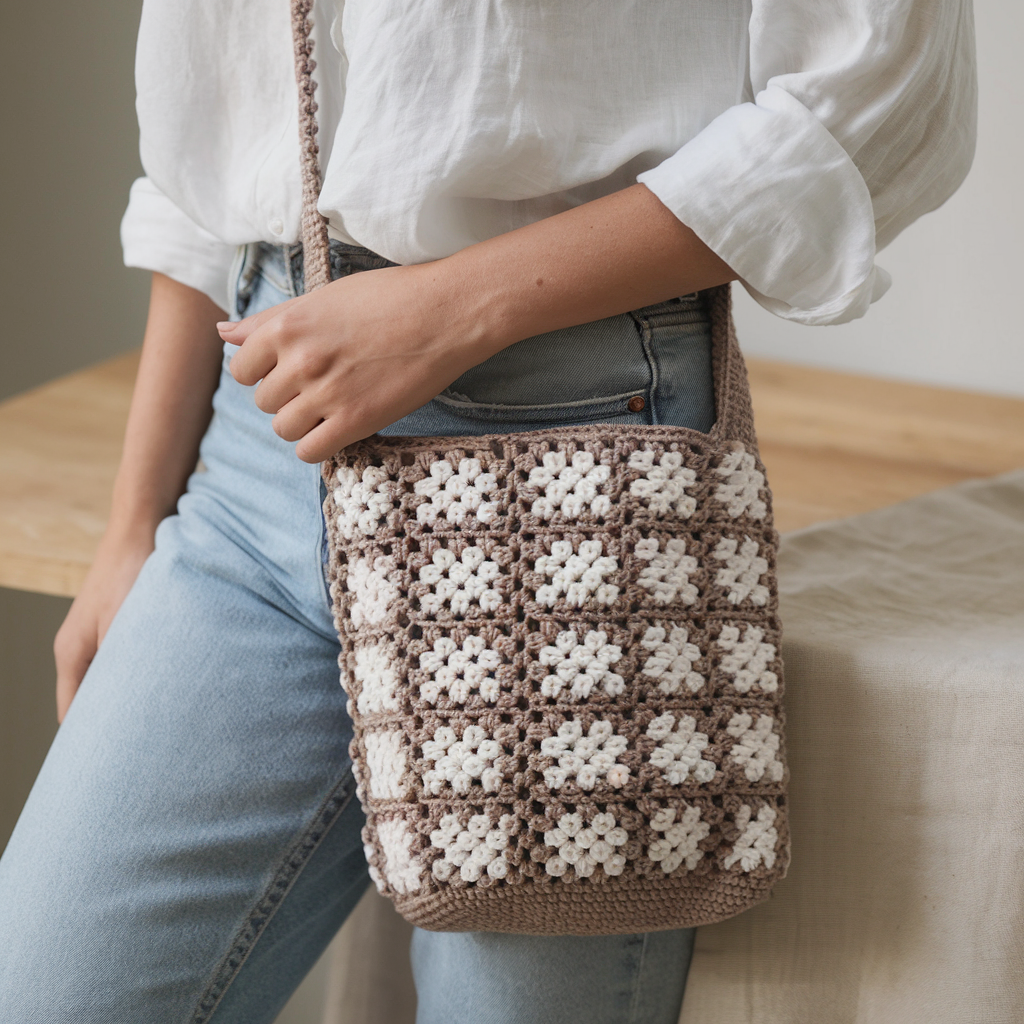
2. Crochet Heart Granny Square Bag Pattern
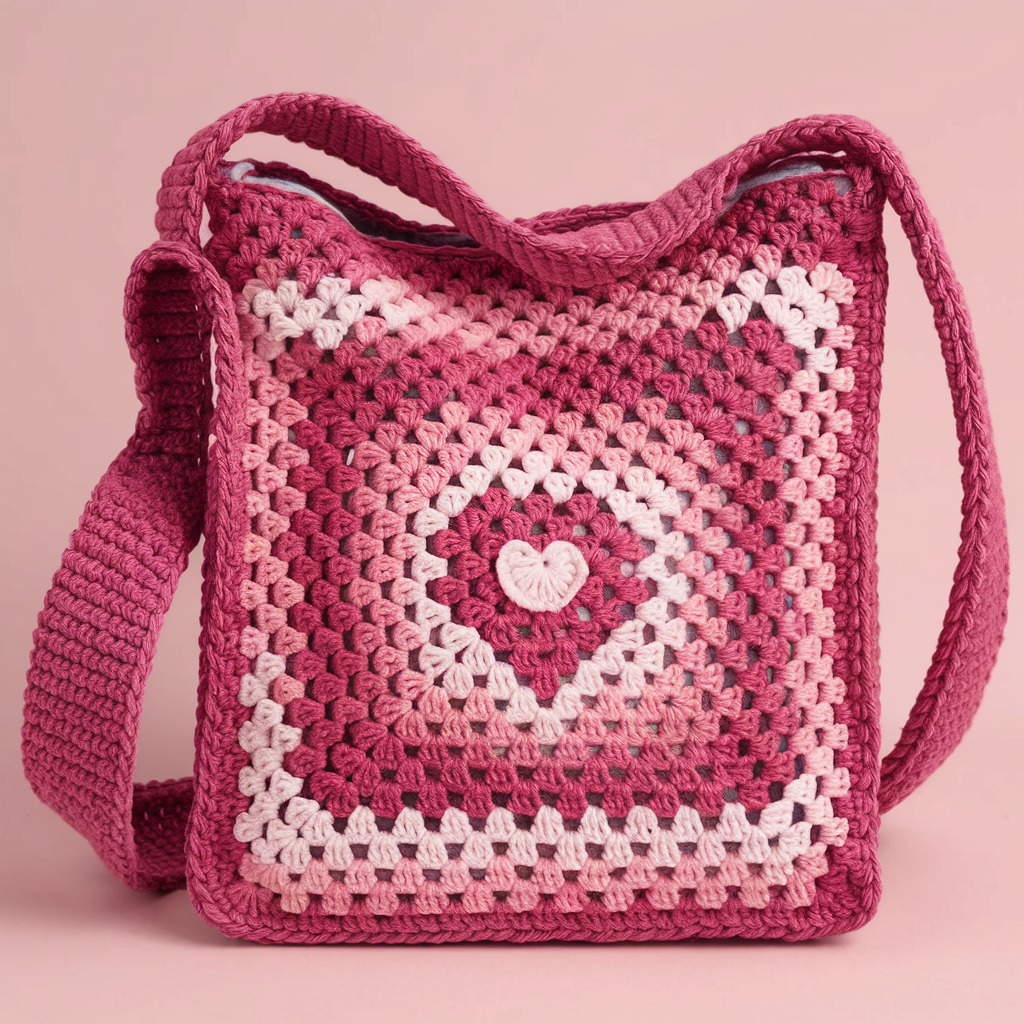
Overview
A playful granny-square bag with heart-motif centers — the iconic granny square updated with heart centers and modern colorblocking. Works as a roomy tote or crossbody when lined and reinforced.
Skill level
Confident beginner (granny-square assembly and joining techniques)
Finished dimensions (sample)
- Tote: 14 in wide × 13 in tall × 3 in deep (using 4 × 4 granny layout)
Materials & tools
- Worsted cotton in 3–4 colors (contrast for heart center + background): ~700 yds total
- Hook: 4.0 mm for firm squares
- Lining fabric 0.5 yd, interfacing, small zipper or magnetic snap
- Optional leather handles or crocheted handles, rivets for reinforcement
Gauge & motif sizing
- Each granny square blocked target ~3.5 in. Make a sample square and block to measure; adjust hook or rounds to achieve motif size.
Construction — step-by-step
A. Heart Granny Square (make 16 if using 4×4 layout)
- Heart center (small motif) — worked in 3 rounds:
- MR, ch1; R1: 6 sc in MR; join.
- R2: Join heart color: ch 3 (counts as dc), (2 dc in next st, ch 2, sl st), repeat to create small lobes — or use a mini heart pattern of your choice that fits inside a 3–4 in motif.
- Granny rounds (surround heart): Use classic granny cluster method: in each corner space work (3 dc, ch 2, 3 dc); in side spaces work 3 dc. Work 2–3 rounds until each square measures your target size. Fasten off and weave tails.
B. Block squares
- Wet-block all squares to exact dimensions; blocking makes joining neater and squares uniform.
C. Layout & assembly
- Arrange squares in 4 × 4 grid (or 3 × 4 for smaller bag). Ensure repeating color placement is balanced.
- Join squares with join-as-you-go (JAYG) for clean joins or whipstitch/mattress stitch from the wrong side. For a flat seam use mattress stitch to hide join.
- After joining front and back panels, create a base: make a strip of squares long enough to form the side+bottom (e.g., 4 squares long for full depth) or crochet a solid rectangle for the base and sew to bottom edge.
D. Handles & hardware
- Add handles: either sew leather handles to top with rivets through interfaced lining, or make thick crocheted handles:
- Make handles by chaining desired length (for shoulder: 50–60 ch depending on gauge), sc across in back loops to make a sturdy band, make two, fold and sew ends onto inside top edge with reinforcement stitches and felt/interfacing backing.
- Add magnetic snap or zip closure per preference.
E. Lining
- Cut lining to bag interior shape plus seam allowances. Add small internal pockets if desired.
- Sew lining panels, press, and insert into bag. Hand-stitch lining top edge to inner rim to hide seam and secure handles through fabric.
Finishing & variations
- Use heart centers in different color combos for playful effect; make a monochrome version for modern minimalism.
- For a more durable bag, perform a second row of sc around seams on the outside to create a continuous frame.
Troubleshooting
- If squares differ in size after blocking, re-block or add a thin sc band around each motif to unify sizes before joining.
- For bulky joins, flatten seams and trim excess tails; consider slip-stitch join for lower bulk.
3. Crochet Daisy and Bee Motifs Aesthetic Bag Pattern
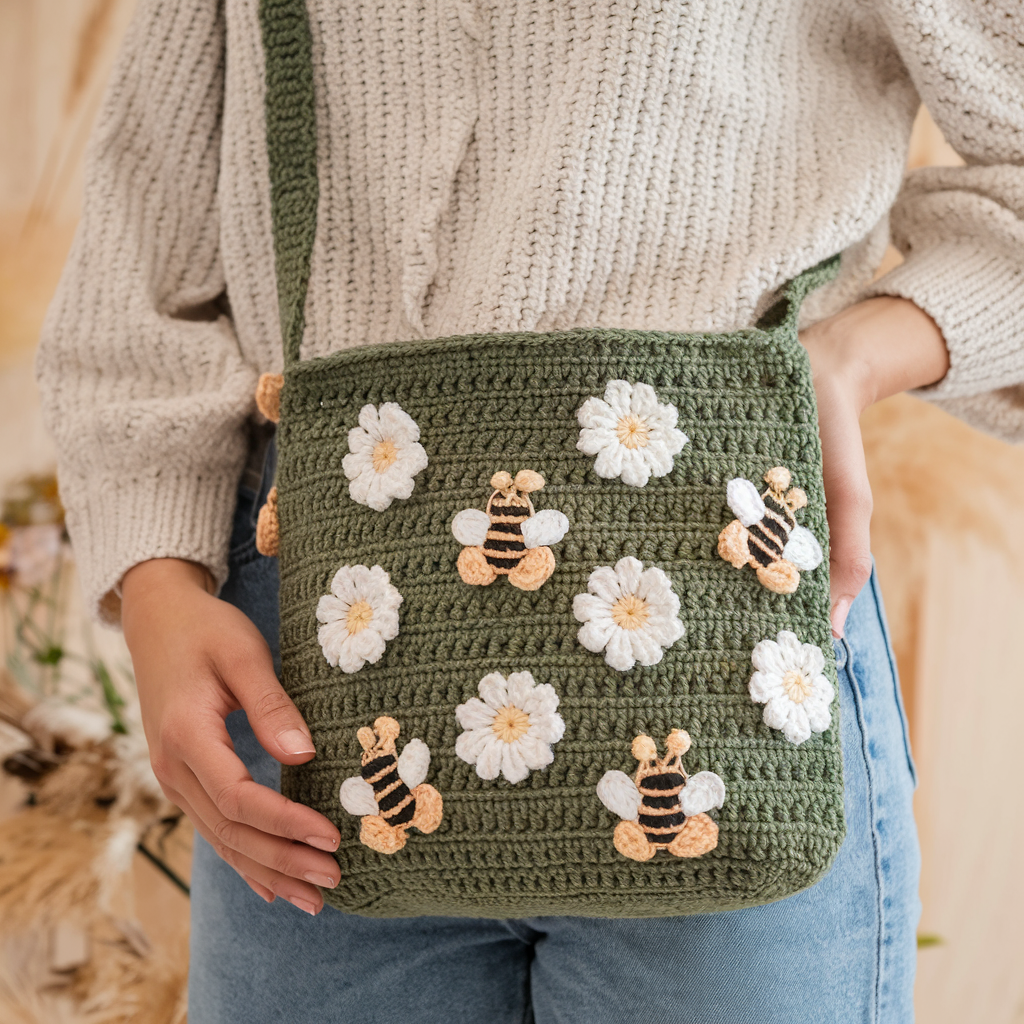
Overview
A whimsical, cottagecore-style bag covered with daisy motifs and tiny embroidered bees — perfect as a statement crossbody or market bag. The motifs are appliquéd to a sturdy base panel and lined for durability.
Skill level
Intermediate — motif making, appliqué, and embroidery details
Finished dimensions (sample)
- Crossbody: 12 in wide × 9 in tall × 2.5 in deep; long strap ~42–48 in
Materials & tools
- Worsted cotton yarn in white (daisy), yellow (centers), neutral (bag body), and a small amount black or warm brown for bees
- Hook 3.5–4.5 mm depending on motif size and bag firmness
- Lining, interfacing, long adjustable strap (crocheted or leather), magnetic snap or zipper
- Embroidery needle and small amount of embroidery floss for bee details
Construction — step-by-step
A. Base panel
- Work a firm rectangle for front and back panels in sc (or waffle stitch for texture). For sample 12 in width at SPI (e.g., 4.5 st/in), chain 54 ch + 1; sc rows until panel height = 9 in. Make two panels.
- Make base/bottom rectangle (12 in × 2.5 in).
B. Daisy motifs (make 10–15 depending on layout)
- Small daisy (~1.25–1.5 in):
- MR, ch 1; 6 sc in MR; join. (Center)
- Join petal color: ch 3, sl st into next st repeat 6 times to make loops.
- Work (sc, hdc, dc, hdc, sc) around each loop to form petals. Fasten off and block slightly.
- Larger daisies: add an extra petal round or increase initial sc rounds.
C. Bee motifs (tiny embroidered bees)
- Make tiny oval base: MR; 6 sc; sl st. Use black/brown embroidery floss to add tiny stripes and two French-knot eyes. Sew bees onto panel rather than crocheting them so they remain flat.
D. Layout & appliqué
- Arrange daisies and bees across front panel visually: clustered corner group and a scattered top-right group works well.
- Sew daisies onto the panel by stitching through the center (multiple passes to secure), attach bees with small stitches. For longevity, add a small felt disc behind each motif (glue or sew) to distribute stress.
E. Assembly of bag
- Join front, back, and base panels by whipstitching or slip-stitch join for a clean exterior seam. Reinforce corners with extra stitching.
- Add strap anchors: crochet strap tabs and insert D-rings; or sew a leather strap via rivets through an interfaced liner.
F. Lining & closure
- Line the bag, add an inner zip pocket and stitch lining to top edge. Attach magnetic snap on lining per manufacturer instructions for neat finish.
Finishing & styling
- For a lighter, summer look use pastel yarn or linen-blend yarn.
- For seasonal variation, make tiny embroidered ladybugs or leaves instead of bees.
Troubleshooting
- If daisies flap loose, secure more center stitches and use a glue-dot through felt before sewing for extra stability (test glue on small scrap).
- If panel puckers from applique, block panel after each sewn motif and loosen stitches around the motif if necessary.
4. Crochet Sunflower Crossbody Bag Pattern
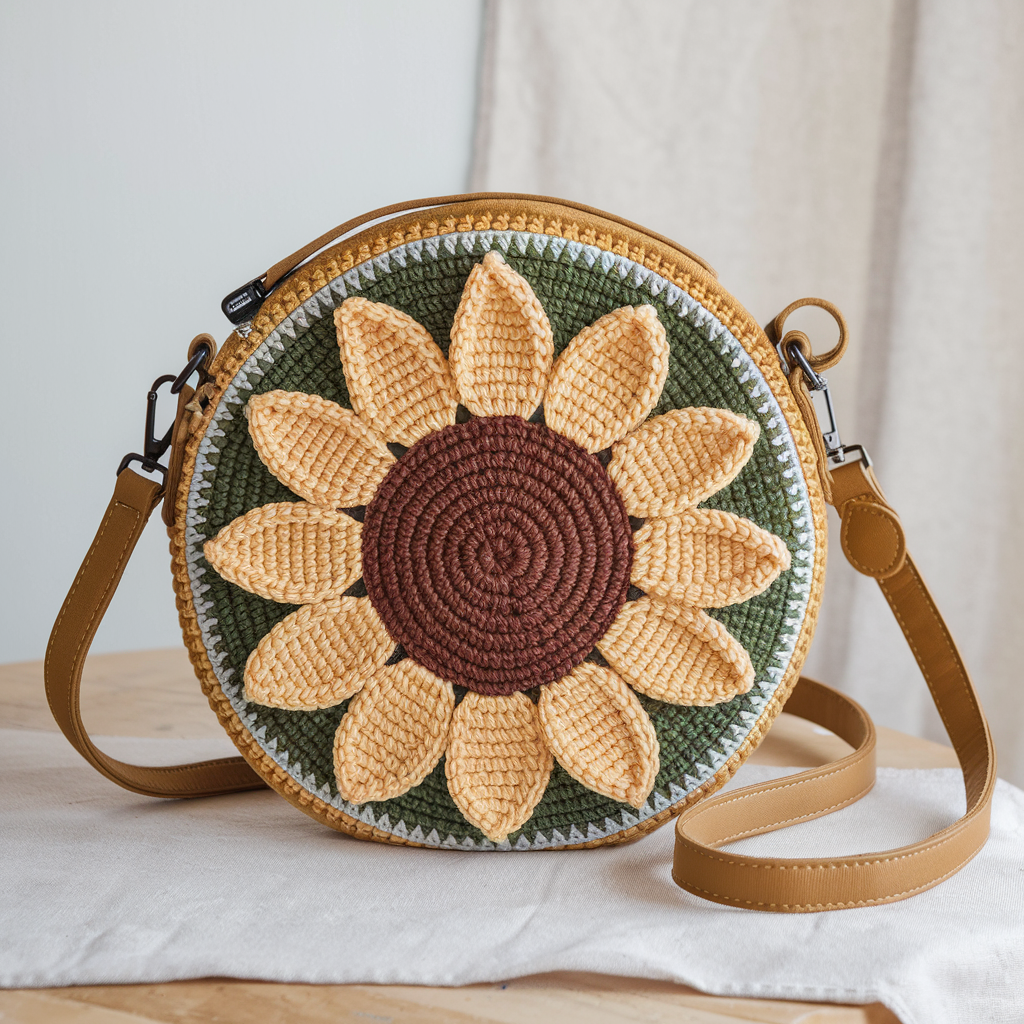
Overview
A cheerful crossbody featuring a large sunflower motif — bold center disk and layered petals — mounted on a compact round or rectangular bag. Great for festivals, markets, or adding a pop of color.
Skill level
Intermediate (large motif work + structured round bag construction)
Finished dimensions (sample)
- Round sunflower bag: 9–10 in diameter × 2.5 in depth; strap drop 22–26 in (crossbody)
Materials & tools
- Worsted cotton in sunflower yellow, brown, and green; ~450–550 yds total
- Hook: 3.5–4.5 mm (tighter for motif definition)
- Small zipper or magnetic snap, lining fabric, optional leather strap or adjustable crossbody strap hardware
Construction — step-by-step
A. Sunflower motif
- Center disk (brown):
- MR; R1: 12 sc in MR; join.
- R2: inc in each st → 24 sc.
- R3: sc 1, inc repeat → 36 sc (adjust radius to about 3 in).
- Petal rounds (yellow):
- Attach yellow yarn in a loop space around disk edge or work into sts depending on look. Work petal modules: ch 3, sl st to create loop spacing around for N petals (e.g., 14–18 petals depending on size).
- Into each loop work a petal: (sc, hdc, dc, tr, dc, hdc, sc) — longer center tr makes the petal point. Fasten off and shape petals with blocking.
B. Bag body (round box)
- Back panel & base: Work a round base in sc using standard increase circle method until base diameter ≈ 9–10 in. Continue in rounds without increases to build depth (2.5 in).
- Front panel application: Sew the sunflower motif onto a front panel made the same size (or integrate motif as front round by crocheting petals directly onto front round).
- Join front & back with side band: Crochet a long strip in sc equal to the circumference of your circle (measure and chain accordingly), then seam front and back to the side band using whipstitch or slip-stitch join for a tidy edge.
C. Strap & hardware
- Add strap tabs at opposite sides of top edge; attach adjustable crossbody strap or make a crocheted strap with inner cotton tape for strength. Use rivets or reinforced sewing to secure metal hardware.
D. Lining & closure
- Sew lining discs (two) and a tube for the side band; insert into bag and baste top edge. Attach a zipper around top or install magnetic snap through lining.
Finishing
- Lightly steam-block petals for open sunflower look. For extra definition, use a small amount of starch on petals for temporary body (wash out later).
Variations
- Make a half-sun design cropping the motif into a rectangle for a larger tote.
- Replace sunflower with other large floral motifs (peony or daisy) using the same construction.
5. Crochet Granny Stitch Shoulder Bag Pattern
Overview
A modern, roomy shoulder bag built in the granny-stitch style but scaled for a contemporary silhouette — think large granny clusters, long strap, and a deep interior that holds daily essentials. This is the most versatile bag in the set: make it compact or oversized.
Skill level
Confident beginner (granny clusters and assembly)
Finished dimensions (sample)
- 13 in wide × 11 in tall × 4 in deep (medium shoulder bag)
Materials & tools
- Worsted cotton or cotton-blend, ~800 yds (depends on size)
- Hook: 4.5 mm (for classic granny cluster definition)
- Lining fabric 0.5 yd with interfacing, magnetic snap or zipper, strap hardware optional
Construction — step-by-step
A. Granny panel construction
- Granny cluster motif: Traditional 3-dc cluster (3 dc, ch 1) per cluster into chain-2 corners. Start with a small granny ring and work outward to create a square or rectangle motif. Block to size.
- Panel approach: Make two large panels (front and back) by joining granny squares as you go or by working continuous granny rounds to reach target dimensions (e.g., 13 in × 11 in).
- Continuous granny rounds: start center MR, make 4-corner foundation, then continue rounds until panel reaches desired size.
- Side + base strip: Crochet a strip of granny or sc rounds matching the width (13 in) and desired depth (4 in) that will be seamed to base and sides.
B. Joining
- Seam front, base, and back panels together with mattress stitch or sc seam. For less bulk use whipstitch on wrong side and then work 1 round sc around bag exterior to tidy seams.
C. Strap
- For shoulder carry, make a wide strap in sc (4 rows wide) and long enough for shoulder drop (~10–12 in). Make two and attach to sides with reinforced stitching and interfacing inside lining.
D. Lining
- Because granny clusters are open, fully line the bag with sturdy backing fabric. Topstitch lining into bag with ladder stitch for clean interior. Add internal pockets for phone/keys.
E. Closure & finishing
- Add a magnetic snap anchored through lining and through a small leather or crocheted reinforcement patch, or install zipper at top.
- Optionally add a decorative sc trim around top edge or a shell round.
Variations
- Make the granny clusters in variegated yarn for boho vibe; use high-contrast single colors for a graphic look.
- For a beach bag use bulkier yarn and skip lining; add a bottom insert for extra stability.
Final finishing, care, and packaging tips
- Reinforce stress points: Wherever a strap meets the bag, sew through both canvas and lining with several passes and add a small interfacing or leather patch to spread load.
- Lining improves durability and gives you a professional finish. Use medium-weight interfacing for structured bags.
- Hardware installation: Follow rivet/strap hardware manufacturer instructions; always test with load before gifting or selling.
- Care: Cotton bags are generally machine-washable on gentle, but remove leather straps or wipe clean. If the bag is lined or has interfacing, hand-wash and reshape to dry flat.
- Photographing for a blog: Showcase construction steps: blocked motifs, layout, join close-ups, hardware attachment, lining insertion, and finished worn shots (shoulder/crossbody detail). Include size references (phone, keys) for scale.
Conclusion
These five modern crochet bag patterns cover a broad spectrum of wearable handcrafted fashion — from the polished Bow Coquette shoulder bag to the playful Heart Granny tote, the whimsical Daisy & Bee aesthetic bag, the bold Sunflower crossbody, and the classic Granny Stitch shoulder bag. Each design is written to be adaptable: alter yarn weight and hook to change structure; add lining and hardware for practical durability; and personalize finishes (buttons, tassels, leather straps) to match your brand or aesthetic.


xn88 slot Mỗi tựa game giải trí tại danh mục đều do nhà phát hành đình đám hàng đầu thế giới liên kết với sân chơi đem đến. Điều này giúp đảm bảo mọi trò chơi đều thiết kế, cập nhật tính năng mới mẻ mỗi ngày giúp đáp ứng tất cả nhu cầu săn thưởng của anh em. Ngoài việc có cơ hội trải nghiệm tính năng mới mẻ thì anh em còn được khám phá tỷ lệ trả thưởng siêu cao cùng với quy trình thanh toán minh bạch, rõ ràng và an toàn tuyệt đối.
2qzw7s
Ngoài ra, giao diện của slot365 rtp cũng được thiết kế phù hợp với nhiều loại thiết bị, bao gồm cả điện thoại di động. Điều này giúp người chơi có thể dễ dàng truy cập và tham gia vào các trò chơi ở bất cứ đâu và bất cứ lúc nào.