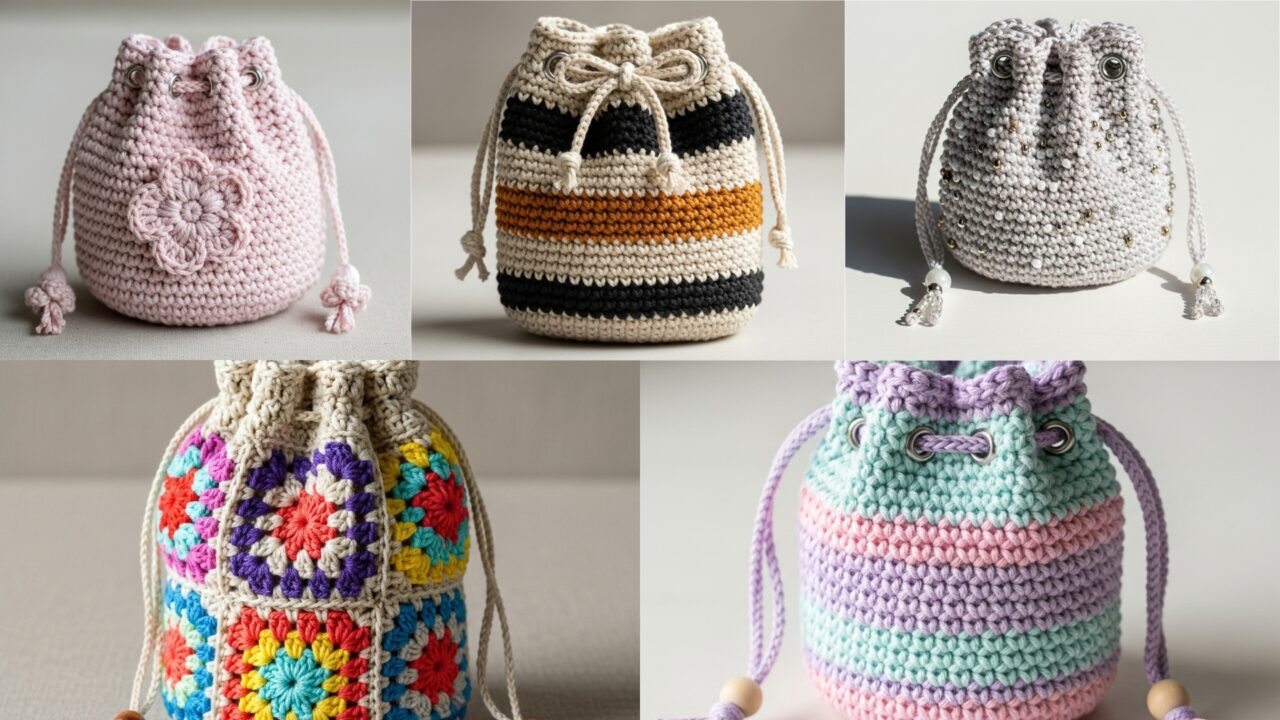
Small drawstring pouches are perfect for gifting jewelry, keeping trinkets organized, or selling as cute market items. Below you’ll find an introduction that applies to all five patterns, then five full, very detailed pattern sections (skill level, materials & yardage, sample gauge and finished size, exact step-by-step instructions, variations, lining/finishing, and care). All patterns use US crochet terms.
If you’re short on time: each pattern includes a clear, copy-pasteable “Quick Build” box giving the minimum steps to make one sample pouch fast (about 30–60 minutes for an experienced crocheter). Otherwise read the full sections for tips, variations, and professional finishing.
Quick common notes (applies to every pouch)
Abbreviations (US): MR = magic ring, ch = chain, sc = single crochet, hdc = half double crochet, dc = double crochet, tr = treble, sl st = slip stitch, inc = increase (2 sc in same st), dec = single crochet 2 together (sc2tog), BLO/FLO = back/front loop only, sk = skip, sp = space, st(s) = stitch(es), rep = repeat.
Yarn & hook recommendations (small pouch):
- For a sturdy, non-slouchy pouch: 100% cotton DK or sport (weight 2–3) or worsted cotton (weight 4) for a slightly chunkier pouch.
- For delicate, dressy pouches: size 10 crochet thread (very fine) or fingering-weight yarn.
- Typical hooks: 3.0–4.5 mm depending on yarn. I give example hooks per pattern.
Finished size reference (sample pouches below):
- Small jewelry pouch ≈ 3″ diameter × 3.5–4″ tall (fits a ring, a few earrings, or a small necklace).
- You can scale up/down by changing yarn/hook or by adding/subtracting increase rounds for base / working more rounds for taller sides.
How I build these pouches (common structure):
- Work a circular base (magic ring + increase rounds) to desired diameter.
- Work even rounds (no increases) for the pouch wall until desired height.
- Add a drawstring casing (one of: eyelet row, corded casing, or a row of looped chains) or work the cord directly through stitch posts.
- Make a drawstring (crocheted cord, i-cord, woven ribbon, chain, or beaded cord) and thread through casing. Optionally line the pouch with fabric for structure and protection.
Sizing quick math:
- Make a small test swatch: e.g., 10 sc = 2″ (5 sc/inch). If you want a 3″ diameter pouch → circumference ≈ 3.14×3 = 9.4″ → 9.4 × 5 sc/in = ~47 sc around. Most circular bases are worked in rounds that yield even counts (24, 30, 36, 42, 48, etc.). Choose the nearest even increase round (e.g., 48 sc → base that yields about 3″ diameter).
Safety & care:
- If the pouch will hold delicate jewelry, add a cotton or felt lining to protect metal from abrasion.
- Wash cotton pouches gently by hand and lay flat to dry. Avoid tumble-drying unless yarn label allows; thread and some novelty yarns may shrink or fuzz.
1. Crochet Whimsy Mini Drawstring Pouch Pattern
A playful, slightly textured mini pouch with a decorative scalloped edge and optional tassel.
Skill level: Confident beginner (circular increases, scallops, chain casing)
Materials (sample pouch ≈ 3″ × 3.5″)
- Cotton DK or sport yarn — ~25–40 yds.
- Hook: 3.5 mm (or size to match gauge).
- Small tapestry needle, stitch marker, small wooden bead or tassel for ends (optional).
- Optional: fabric scrap for lining.
Gauge (example): 16 sc = 4″ (4 sc/in). Using that, a 3″ diameter base requires ~48 sc around (3″ circumference ≈ 9.4″, 9.4 × 4 ≈ 38; choose 40–48 depending on your swatch; pattern uses 48 for a round base around 3″).
Full Step-By-Step (Whimsy Mini)
Base (magic ring increases)
- MR; R1: ch1, 6 sc in MR; sl st to first sc. (6)
- R2: ch1, inc in each st around (2 sc in each st). (12)
- R3: ch1, sc in next st, inc in next st rep around. (18)
- R4: ch1, sc in next 2, inc in next rep around. (24)
- R5: ch1, sc in next 3, inc in next rep around. (30)
- R6: ch1, sc in next 4, inc in next rep around. (36)
- R7: ch1, sc in next 5, inc in next rep around. (42)
- R8: ch1, sc in next 6, inc in next rep around. (48) — stop when base diameter matches desired measurement. (If you prefer a slightly smaller base, stop at 42.)
Wall (even rounds)
9. R9–R? (work even): ch1, sc in each st around (in BLO for a subtle ridge if you like). Repeat until the tube height reaches ~2.75–3.0″ (for an overall pouch height 3.5–4″ after scallop and cord). Example: if rpi = 4 rows/inch, work about 11 rows.
Eyelet row (drawstring casing)
10. R(n+1): ch1, sc in next 2, ch2, sk 2 rep around (or adapt spacing to your stitch count so eyelets are evenly spaced). If using 48 sts: sc2, ch2, sk2 × 8 = 48 positions — adjust repeat to fit. End with sl st; do 1 plain sc round on top to stabilize.
Scalloped top (decorative)
11. R(next): sc in each sc around to first ch-space, in each ch-2 space work (5 dc) for scallop, sc in next sc; rep OR simpler: sc, ch3, sl st in base st for tiny picot loops. Fasten off.
Make a drawstring
12. Chain 60 (or make an i-cord / 3-strand braided cord) — length depends on how long you want the tails (for a small pouch chain 40–60). Optionally string tiny beads onto cord before finishing and add a wooden bead as a stopper. Thread cord through eyelets and knot/tassel ends.
(Optional) Tassel
13. Make a tiny tassel and attach to each cord end for a whimsical finish.
Lining (optional but recommended for jewelry)
14. Cut a fabric rectangle slightly smaller than the interior of the pouch; fold and hand sew into interior using small whipstitches through the top rim so it sits neatly. A lining prevents metal snagging and shapes the pouch.
Quick Build — Whimsy Mini
- MR → inc rounds until 42–48 sts (base) → sc rounds until 3″ tall → eyelet row (sc2, ch2, sk2 repeat) → 1 sc round → scallop edge → crochet or chain cord, thread through eyelets → optional lining/tassels.
Variations & Notes
- Make the scallop larger (7 dc) for a rufflier rim.
- Use two-tone yarn and work the scallop in contrast color.
- To make it stiffer, line with interfaced cotton or use a second strand held double when crocheting.
Care: Hand wash cool, reshape and dry flat. Cotton is durable; avoid bleach.
2. Crochet Lotsa Beads Drawstring Pouch Pattern

A sparkly pouch that incorporates seed beads into the body for glam—perfect for tiny gemstone sets or special jewelry.
Skill level: Intermediate (pre-stringing beads and crocheting with beads)
Materials (sample pouch ≈ 3″ × 3.5″)
- Mercerized cotton or beading thread (size 10 or fingering cotton) — ~25–40 yds.
- Small seed beads (size 8/0–11/0) — 40–70 beads depending on bead spacing.
- Hook: 2.0–3.0 mm (small hook for bead thread) or matching to thread.
- Beading needle (or pre-string beads directly onto yarn) and tapestry needle.
Technique note: Pre-string beads onto your yarn before crocheting. Slide beads up as needed and incorporate them into stitches so they sit on the right side of the work (standard bead crochet technique).
Full Step-By-Step (Lotsa Beads)
Prepping beads
- String 40–70 seed beads onto yarn before starting and slide them down out of the way.
Base (worked plain — no beads)
2. MR; R1: ch1, 6 sc in MR. R2: inc each st to 12. R3: sc, inc → 18. Continue increase rounds until base is ~3″ diameter (see base sequence in Whimsy mini — for beaded work you might prefer 36 sts base for a slightly smaller circumference so beads appear close together).
Wall with beads (bead on every Xth sc)
3. Work 1–2 plain sc rounds to set base. Then begin bead round: decide bead spacing — e.g., one bead every 3–4 sc. Example pattern (with 36 sts): sc 2, slide 1 bead up, sc into next st (with bead on front) — this will make the bead sit on the exterior. Repeat around. For 48 sts you can do sc 3, bead sc etc. Make sure beads are spaced evenly by working counts that divide stitch count.
How to put a bead into a sc: Before inserting hook into target stitch, slide bead near hook, insert hook into stitch, pull up loop, yarn over and pull through while holding bead near loop so the bead rests against the stitch — many crocheters prefer to bring bead over hook and complete the stitch so the bead sits on the outer face.
Continue body
4. After a bead round, work 1–2 sc rounds to lock beads. Repeat bead rounds interspersed with plain rounds until desired height.
Eyelet casing
5. Work an eyelet round: sc 3, ch2, sk2 (or fit to stitch count) ensuring a sufficient number of openings. Lock with a plain sc round.
Cord (beaded)
6. Make a chain cord and slide beads onto the cord while chaining (if using larger beads) or make a crocheted chain with beads inserted at intervals. Another option: make an i-cord or a fine crochet tube and add beads as you go.
Finishing
7. Make small bead tassels for cord ends or knot several small beads onto end threads for sparkle. Add lining if storing delicate stones.
Quick Build — Lotsa Beads
- Pre-string beads → MR increases to desired base → work alternating bead rows and plain sc rows → eyelet row → chain or tube cord threaded with beads → finish with bead tassels → optional lining.
Variations & Notes
- Use larger accent beads (glass or gemstone) for focal points — make spacing wider.
- For luxury pouches, use silk or rayon-blend thread and a tiny hook for a compact, lustrous finish.
Care: Because beads can scratch, line pouch. Hand wash gently and dry flat; avoid long soak for sewn beadwork.
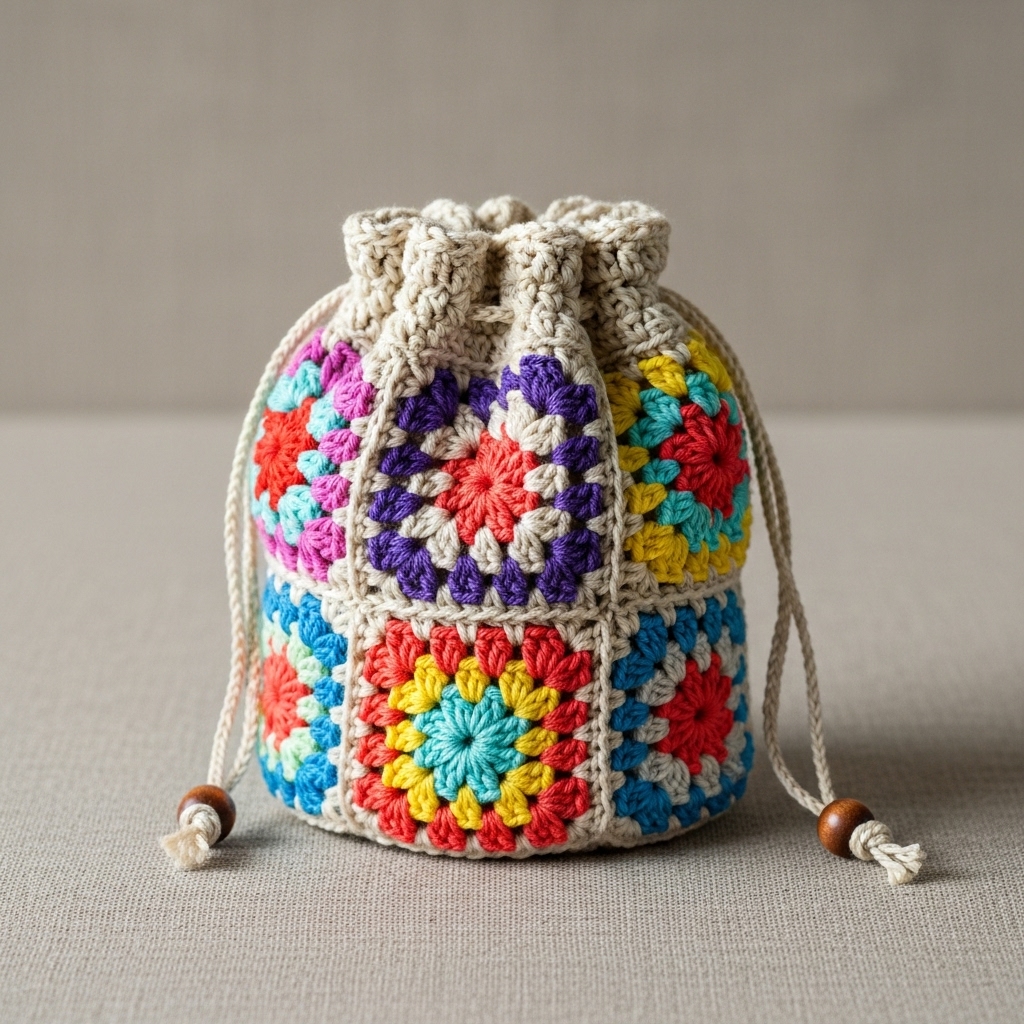
3. Crochet Flower Drawstring Pouch Pattern

A romantic pouch where the wall is made from small floral motifs joined as you go — beautiful when petals overlap and create texture.
Skill level: Intermediate (motif join-as-you-go, on-the-fly shaping)
Materials
- DK cotton or fingering-weight yarn (for finer petals) — ~40–60 yds.
- Hook: 3.0–3.5 mm.
- Tapestry needle, blocking pins, small piece of felt for interior if desired.
Finished size (approx): 3″ diameter × 4″ tall depending on number of motif rows.
Full Step-By-Step (Flower Pouch)
Petal motif (flat five-petal flower, approx 1.25–1.5″ across)
- MR; Round 1: ch1, 8 sc in MR; sl st to join. (8)
- Round 2 (petal loops): ch4, sl st into next sc repeat 8 times → 8 loops (for smaller look do ch3 loops and 8 loops).
- Round 3 (petal shaping): In each loop work (sc, hdc, dc, hdc, sc) then sl st to join. Fasten off leaving tail for sewing. Block gently to shape petals.
Make a strip or tube of motifs
4. Decide layout: to make a circular tube you’ll need to join motifs in rings (e.g., 8 motifs around each row). A 3″ diameter base may be approximated by joining 8 motifs in round 1, then adding successive rows above, staggering joins to fill gaps. Example construction: make 8 motifs, join them with slip-stitch or whipstitch edge to edge in a ring (RS out). For join-as-you-go: on final round of each new motif, sl st into corresponding loop of adjacent motif instead of sl st to form a seam.
Build height
5. Continue adding motif rows, joining each new ring to the top row below. Use 3–4 motif rows to create a height of ~3–4″.
Top casing
6. After final motif row, work one round of sc around the top edge of motifs to create a secure rim. Then work an eyelet round: sc2, ch2, sk2 around (modify per stitch count) or simply create small loop spaces by chaining and skipping. Work a final sc round to stabilize.
Cord
7. Make a pretty cord — e.g., a 3-strand plait flat braid from leftover yarn or a chained cord with small flower charms attached. Thread through eyelets and knot. Add tassel or tiny bloom to cord ends.
Lining & interior
8. Because motifs leave tiny seams inside, hand-sew a cotton lining cylinder and tack it to the top inside rim with small whipstitches.
Quick Build — Flower Pouch
- Crochet 8–12 flower motifs → join into a circular base ring → add 2–3 rings to build height → sc round and eyelet row for casing → cord and lining.
Variations & Notes
- Make larger petals and fewer motifs for a bold floral shell.
- Use two tonal shades for petals and centers.
Care: Hand wash and reshape. Lined pouches handle gentle machine wash better.
4. Crochet Granny Stitch Drawstring Pouch Pattern
A stash-busting, quick pouch using classic granny clusters. This is ideal for makers who love colorful squares and a relaxed, boho look.
Skill level: Confident beginner (granny clusters, joining rounds)
Materials
- Worst ed cotton (worsted weight) or leftover scrap yarns — ~30–50 yds.
- Hook: 4.0–5.0 mm.
- Tapestry needle.
Finished size: A 3–3.5″ pouch can be made from a 4×4 granny square folded and seamed; for a cylindrical granny tube make rounds of granny clusters.
Two construction options — Square → box pouch OR Round granny tube
A — Granny Square Box Pouch (fastest)
- Make one large granny square (classic 3-dc corner clusters) to desired size. For a small pouch, a square about 6–7″ per side folded yields a small box pouch. Basic granny (3 rounds) in worsted will be ~6–7″. If smaller, use a smaller hook/yarn.
- Block square to exact dimension.
- Fold square into a pouch shape: fold sides up so two opposite sides become front/back and the other two become sides. Seam bottom and one side with whipstitch leaving top open, or seam three sides leaving a top opening.
- Add a simple drawstring casing: pick up stitches across top edges and work 1–2 rounds of sc to create a neat rim with small loops. Or before top edge closing, leave chain loops along the top row for threading.
- Make a braided cord and thread through loops. Fasten ends with wooden bead.
B — Granny Tube (worked in the round)
- Ch 4, join to form ring. Round 1: ch3, 2 dc, ch2, 3 dc in ring (first corner); ch1, rep to make 4 corners → complete small square. For tube, keep building rounds and stop when width across flat square reaches desired circumference when folded; then seam to make a tube shape as with option A. Alternatively shape a round tube by working circular granny (making small, even increases) until base diameter is desired; then work granny cluster rounds with no increases to create the tube wall.
Quick Build — Granny Stitch Pouch
- Make a granny square large enough to fold → block and fold → seam sides → sc rim or make loop holes → crochet or braid drawstring → optional lining.
Variations & Notes
- Make each cluster in a different color for playful scrapbusting.
- Add a small granny flap that buttons over the drawstring for extra security.
Care: Machine-washable depending on yarn; block flat to reshape.
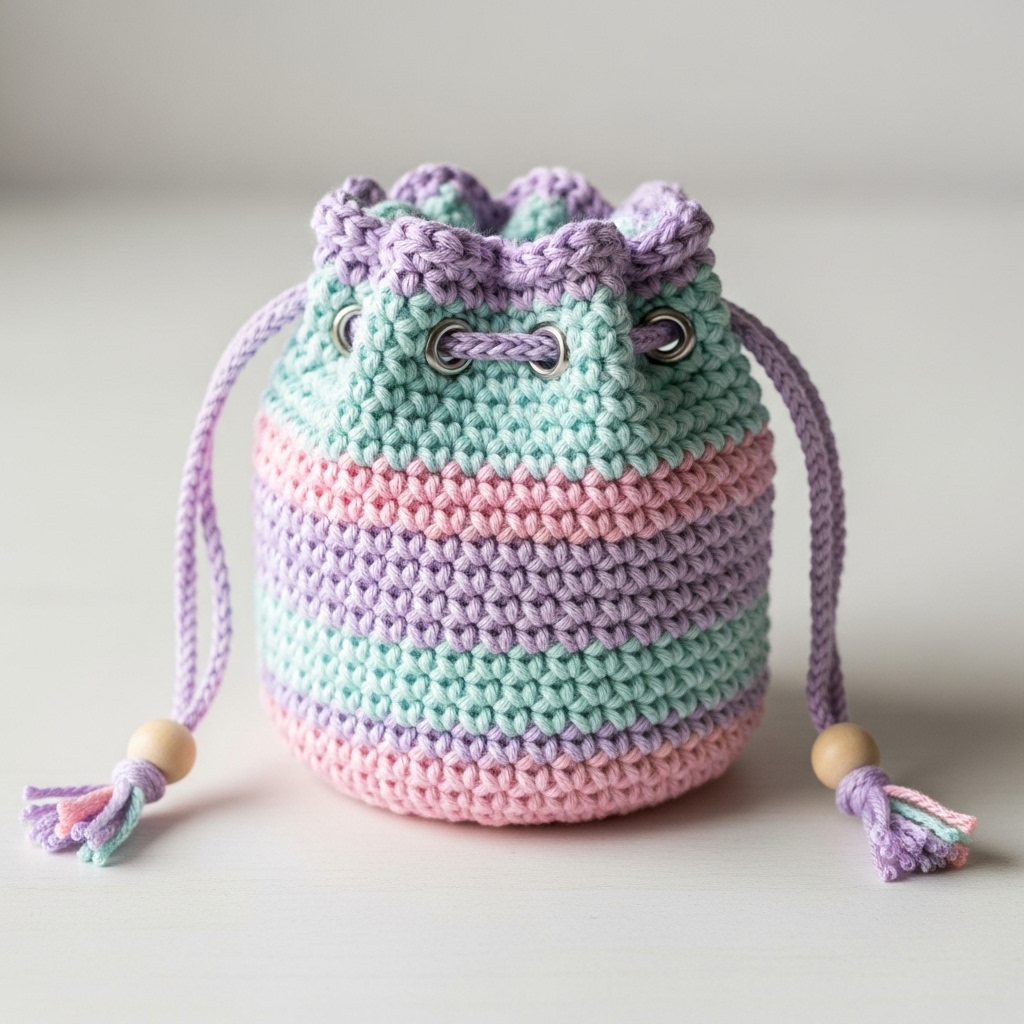
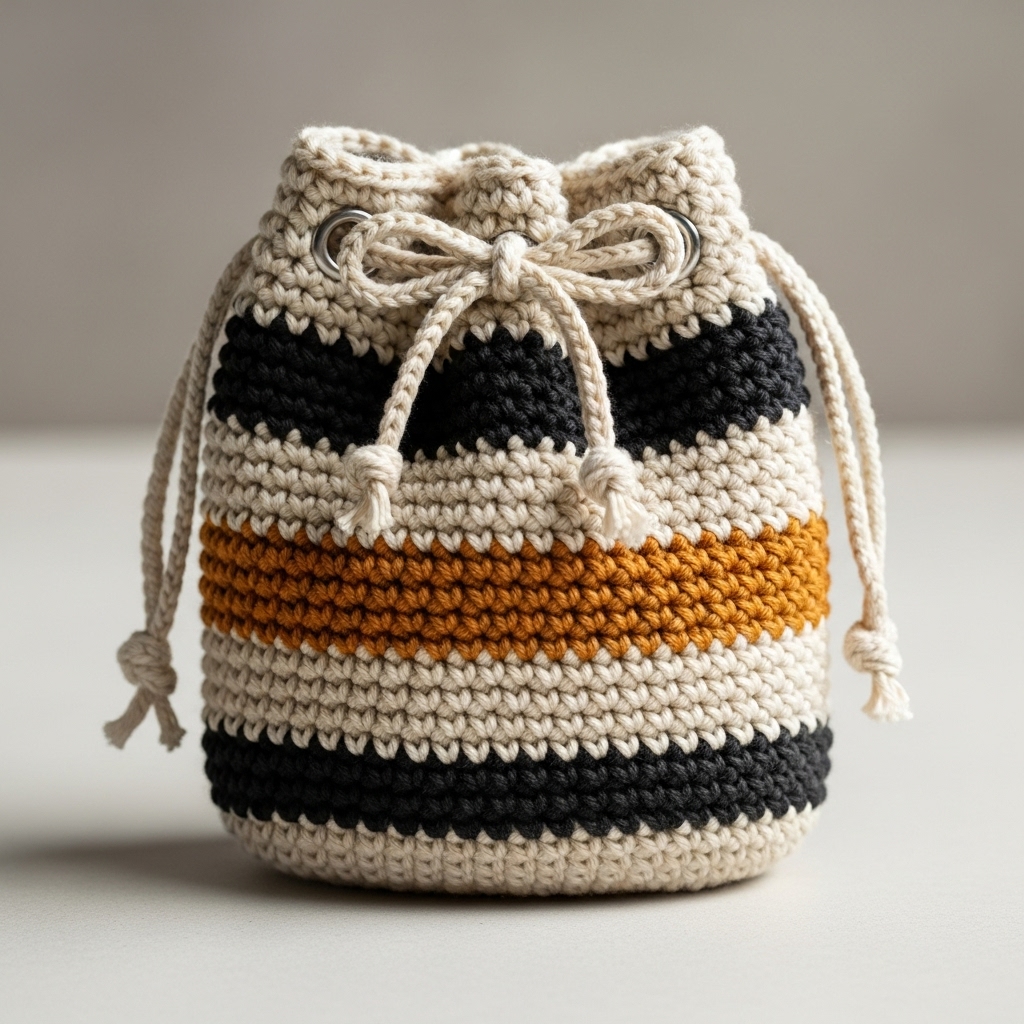
5. Crochet Striped Pouch Drawstring Pattern
A clean, modern pouch that uses horizontal stripes and a sturdy casing — great for gender-neutral gifting.
Skill level: Confident beginner (color changes and neat finishing)
Materials
- Worsted cotton in two or more colors — ~30–50 yds.
- Hook: 4.0–4.5 mm.
- Tapestry needle, optional toggles.
Finished size (sample): 3″×4″ with stripes every 3–4 rows.
Full Step-By-Step (Striped Pouch)
Base
- MR; R1: 6 sc in MR. R2: inc each → 12. R3: sc, inc → 18. R4: sc2, inc → 24. R5: sc3, inc → 30. R6: sc4, inc → 36 (or stop at 36–42 for desired diameter). Switch to color B at the end of a round if you want the first stripe starting at the base.
Walls with stripes
2. Work even sc rounds, changing colors every 3–4 rounds. To change color cleanly: finish the last sc of the round up to the final yarn-over, yarn over with new color and pull through to complete stitch — this joins the new color at the start of next round without a visible knot. Carry unused colors up the inside by weaving them or cutting and rejoining each stripe (cutting gives cleaner inside for lining).
Height & casing
3. Work until tube is ~3″ high. For the casing, work one round of sc, ch2, sk2 for eyelets spaced evenly. After that, work one plain sc round to stabilize.
Top finish
4. Add one round of slip stitch in contrast color for a tidy rim. Optional: make a small folded cuff by working 6–8 more sc rounds and folding inside, sewing down to hide the raw edge; this creates a clean interior casing and bit more stability.
Cord & toggles
5. Make a crocheted cord (chain or i-cord). For a modern look thread a leather cord through the eyelets and add a metal toggle to cinch.
Lining
6. Because stripes and carrying color inside can be unsightly, add a simple cotton lining: cut a rectangle matching pouch interior size plus ½” seam allowance, hem top, and sew into place with hidden running stitches around the inside rim.
Quick Build — Striped Pouch
- Magic ring increases to 36–42 sts base → alternate stripes (3–4 rounds per color) until ~3″ tall → eyelet round → cord through eyelets → tidy rim and lining.
Variations & Notes
- Use tonal gradients for elegant transitions or high-contrast brights for playful pouches.
- Stitch choices: replace plain sc with hdc for a taller, softer wall that uses fewer rounds.
Care: Machine wash on gentle (if cotton) or hand wash; reshape while damp.
Final finishing tips (all patterns)
- Weave ends carefully: Use a tapestry needle and weave tails through 6–8 sts on wrong side for secure finish.
- Lining advice: For jewelry pouches, a lining is highly recommended. Use lightweight cotton or felt. Stitch lining slightly smaller than interior to keep it snug. Sew lining to top rim with small, even stitches.
- Drawstring security: Knot cord ends and secure with a bead or small tassel. If using ribbon, finish ends with a dab of clear glue or a small stitch to avoid fraying.
- Branding/labels: If you sell these, stitch a small woven or leather label to the inside seam for a professional touch.
- Packaging: For gift sets, place LED mini tealights, a tiny polishing cloth, or a jewelry card inside the pouch.
Conclusion
These five patterns — Whimsy Mini, Lotsa Beads, Flower, Granny Stitch, and Striped Pouch — give you a complete micro-collection for jewelry and small trinkets: from playful and textured to elegant and beaded. Each pattern is intentionally flexible so you can scale size, swap yarn weights, and personalize colors, closures, cord styles, and linings.