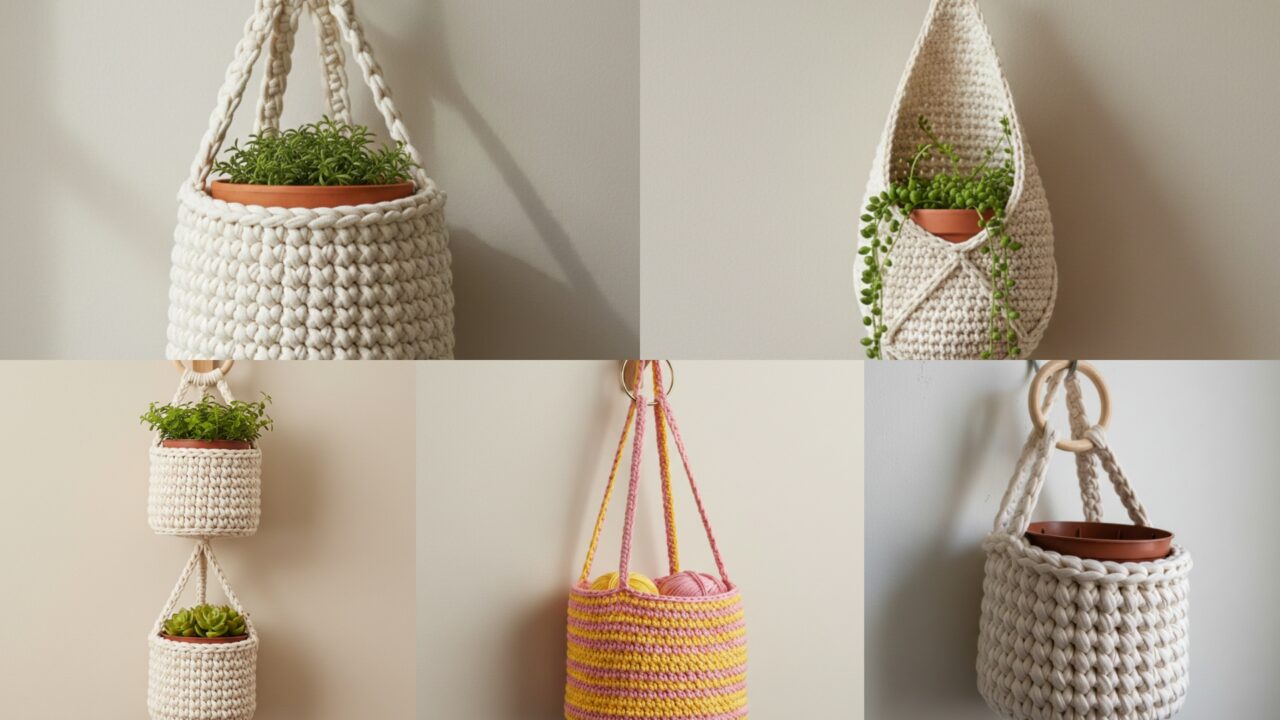
Hanging baskets are one of the fastest ways to add personality and greenery to a room, balcony, or porch. They’re practical, stylish, and—best of all—excellent small-to-medium crochet projects. Below you’ll find a friendly introduction (materials, sizing, safety and how to calculate your stitch count), then five fully detailed hanging-basket patterns with step-by-step construction, finishing, and styling ideas: Sweet Stripes, Teardrop, No-Sew, Double, and Chunky. Each pattern includes materials, example finished sizes, construction notes, and clear numbered steps so you can follow along and adapt the baskets to your pots.
Quick intro — tools, materials, sizing, safety & stitch math
Why hanging crochet baskets?
They transform vertical space, save floor real estate, and let you coordinate plants with decor. Crochet fabric is flexible, so you can make fitted baskets for specific pots or stretchy slings that fit multiple pot sizes.
Common materials
- Yarn: For structure and durability pick cotton, cotton-blends, or t-shirt/rope (bulky) yarn. Cotton handles moisture, is reasonably stiff, and launders well. T-shirt yarn or rope gives a super-sturdy basket. Avoid very soft, fuzzy yarns for load-bearing parts.
- Hooks: Use the hook recommended for your yarn; typical: 4.5–8.0 mm depending on yarn thickness. For t-shirt yarn you may use 8–12 mm.
- Notions: tapestry needle, scissors, stitch markers, measuring tape, (optional) small piece of plastic canvas or cardboard for a base insert, metal ring or wooden hoop for hanger, fabric liner or small nursery pot, optional cotton webbing or macramé ring for extra hanging strength.
- Optional hardware: metal or wooden ring (for a neat hanger top), key ring, D-rings, small carabiner for easy hanging.
Sizing basics
- Measure the pot diameter (top)
Dand pot heightH. Decide whether the basket will hold a nursery pot (so drain holes are fine) or the pot+plant. For a snug fit, make the basket mouth roughly equal toD(or 0.25–0.5 in smaller so elastic/stretch holds it), and height ~H + 0.5–1 inso pot sits secure. - To calculate foundation stitches, swatch the stitch for stitches per inch (spi). Example: if your stitch gives 4 sc = 1 in, and your pot top diameter is 8 in, circumference
C = π × D ≈ 3.1416 × 8 ≈ 25.13 in. Multiply:spi × circumference = 4 × 25.13 ≈ 100.5→ round to 100 or 102 depending on stitch multiple required by pattern. When in doubt round down for a snug fit (fabric will stretch).
Load & safety
- Filled plant + water can be heavy. For heavy plants use sturdy yarn (cotton, rope) and reinforcing (webbing, metal ring) at hanger points.
- Line baskets with a plastic nursery pot or waterproof liner — don’t put wet soil directly against cotton if you want the basket to last longer.
- Secure knots and test weight before hanging over delicate surfaces.
Construction overview (common elements)
- Base — flat circle (magic ring + increases) or a crocheted/inserted disc.
- Sides — worked up in the round (sc/hdc/waffle/tight stitches) until desired height.
- Rim — reinforced with extra rounds, folded casing for a rim, or sewn-in wooden ring.
- Hanger — straps made by crocheting straps/cords or using macramé cords; attach to rim or through reinforced holes.
- Finish — optional liner, block to shape, test with pot before final hanging.
1. Crochet Sweet Stripes Hanging Basket Pattern
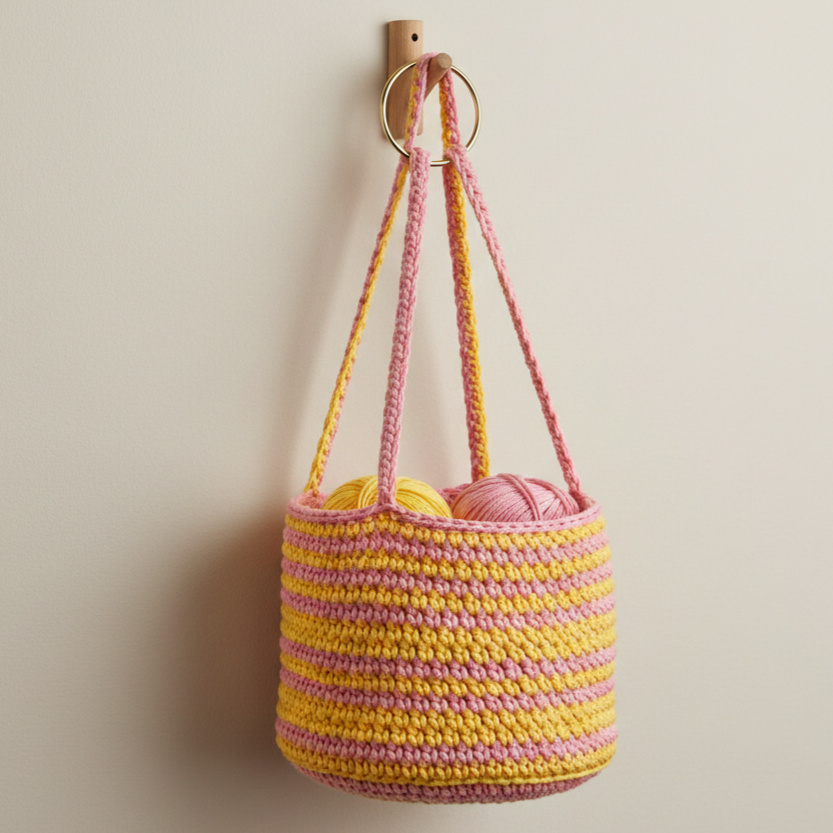
Playful stripes and neat construction — great for bright yarn and mid-weight cotton.
Skill level: confident beginner
Materials (sample basket)
- Worsted cotton (2 contrasting colors A & B), ~250–350 yd total.
- Hook: 5.5 mm for worsted cotton to get a slightly flexible but sturdy fabric.
- Tapestry needle, stitch markers, optional metal ring for hanger.
- Finished example: holds a 6–8 in nursery pot; base ≈ 8.5 in diameter, height ≈ 8 in.
Stitch choices
- Base: sc for dense flat base.
- Sides: sc or hdc for a tidy texture. Stripes made by switching colors every few rounds.
Step-by-step
A. Swatch & compute
- Make a small 4 in swatch in sc in the round, blocked. Count stitches per inch (spi). Example: 4 sc = 1 in. For 8.5 in diameter pot: circumference ≈ π×8.5 ≈ 26.7 in. Stitches needed ≈ 26.7 × 4 = 106.8 → use 106 or 108 (choose multiple suitable to stripe repeat; 108 is divisible by 6).
B. Base (flat circle)
- MR, ch1. R1: 8 sc into MR. (8)
- R2: 2 sc in each st around → 16 sc.
- R3: sc 1, inc around → 24 sc.
- R4: sc 2, inc → 32 sc.
- Continue rounds increasing by one more sc between increases each round until the total stitch count in the round equals your target circumference (here ~108 sc). Check diameter periodically by measuring flat across. When base reaches desired diameter, stop increasing. Example: may stop at round where count=108.
C. Sides (stripes)
- Join color A, work sc in back loop only (BLO) for 2 rounds to create a neat base-turn. Then continue even rounds in sc (not BLO) around until wall height ≈
H - 1 in. For a sample 8 in height pot, work sides to ~7 in to allow rim finish. - Stripe pattern: switch to color B for 2–4 rounds, then A for 2–4 rounds, repeat until height reached. Weave ends as you go or carry color inside for short floats.
D. Rim & reinforcement
- Work 3 rounds of sc in a sturdy color; on last round, slip-stitch through front loop only to create a little ridge that prevents stretching. Optionally fold a single round inward and seam to create a double-thick rim casing.
- If you want a metal ring, work tight sc around the ring and slide ring inside seam, then sc another round to encase ring.
E. Hanger straps
Option 1 — Crochet straps:
- Decide 3 attachment points (120° apart) or 4 points. For 3 straps: mark points equally spaced on rim.
- At mark, ch desired strap length × spi (ex: for 12 in hanger, chain 30 with hook 5.5 mm if your chains per inch ~2.5). Work back along chain with sc or hdc to make thick strap; join with sl st at rim. Repeat for other straps and braid or gather straps at top into a loop or metal ring.
Option 2 — Macramé/rope: use cotton cord, knot to rim with lark’s head and combine cords to a hang loop.
F. Lining & finishing
- Place nursery pot inside and test fit. If wobble, add a circular felt base inside or small piece of plastic canvas for stiffening.
- Tidy ends and trim. Hang and test with pot full of soil (wet) to ensure safety.
Styling notes
- Use bright paired colors for a modern kitchen or pastel stripes for nursery.
- Thin stripes (2 rounds each) give a candy-striped look; wider stripes are more graphic.
2. Crochet Teardrop Hanging Basket Pattern
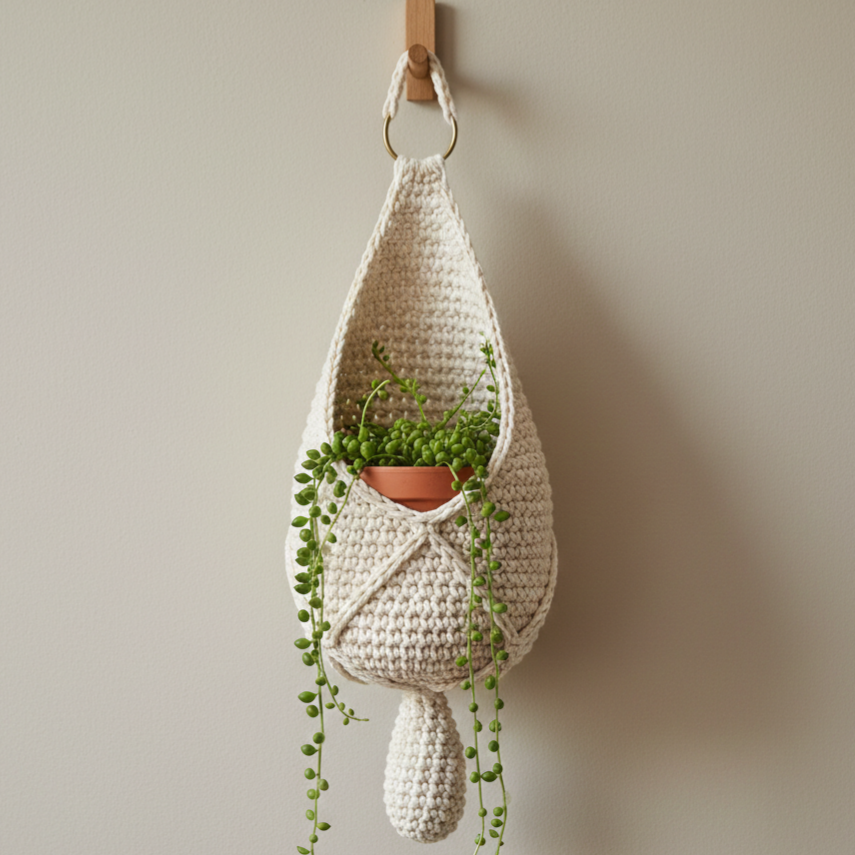
A sculptural teardrop silhouette — elegant for trailing plants.
Skill level: intermediate (shaping + tapered sides)
Materials (sample)
- Worsted cotton or cotton-blend ~300–400 yd.
- Hook: 5.5 mm.
- Tapestry needle, stitch markers, optional small hoop for top.
- Finished example: teardrop length ≈ 14–18 in (top loop → bottom), widest diameter ≈ 8 in.
Shape concept
- The basket is worked as a flat oval or circle base, then the sides are increased and then decreased to create a tapered teardrop. The top gathers to a narrow neck and transitions to a long hanging loop.
Step-by-step
A. Base (flat circle)
- MR, 8 sc. Increase rounds as in pattern 1 until base diameter ~6–8 in (depending on desired widest point location). Stop early—this shape will expand and then taper.
B. Side expansion to widest point
- Work even rounds (sc) for several rounds to get vertical wall. Then begin a subtle increase phase: every 6th stitch inc around to add flare until you reach the widest circumference. Example: increase rounds 3–4 times spaced by 4–6 even rounds.
C. Teardrop tapering
- After widest round, gradually decrease over several rounds to taper into a neck that is about 2–3 in diameter. Decrease scheme: do a round with sc 8, dec repeat, then a round even, then sc 7, dec, etc., spacing decreases evenly; place stitch markers to keep even decreases.
D. Neck & hanging cord
- When neck is narrow (≈ 12–16 sc), work 6–10 rounds to form a sturdy neck. For a neat hanger, either:
- (a) Make a long crocheted cord directly from neck: ch to desired hang length, sc back and secure to neck with button loop or attach to small wooden ring at top.
- (b) Create long braided cord from 3 crochet i-cords or chains, attach securely to neck with tight stitching.
- Optionally insert a wooden or metal ring inside top to keep opening stable (stitch ring into last round).
E. Reinforcement & lining
- For heavy trailing plants place a nursery pot inside rather than potting soil directly into basket. For neat look, sew a removable fabric liner.
F. Finishing
- Block the teardrop lightly to even shape (pin the base and neck to desired contour). Test hanging weight.
Styling
- Works beautifully with string-of-pearls, pothos, or ivy. Make a pair: one short, one long for layered look.
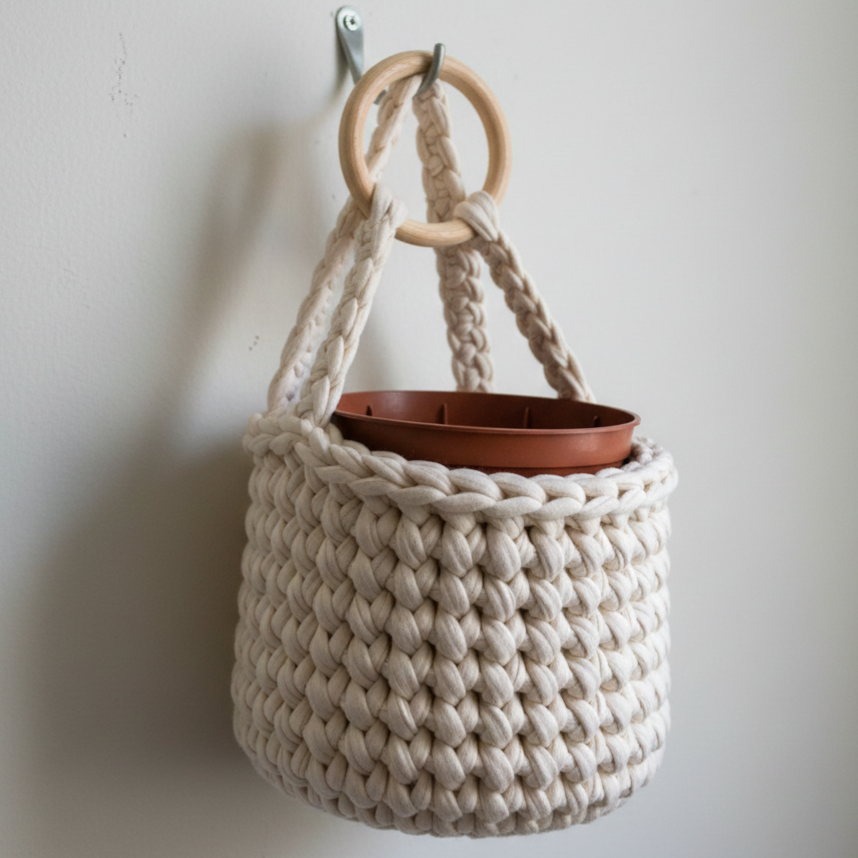
3. Crochet No-Sew Hanging Basket Pattern
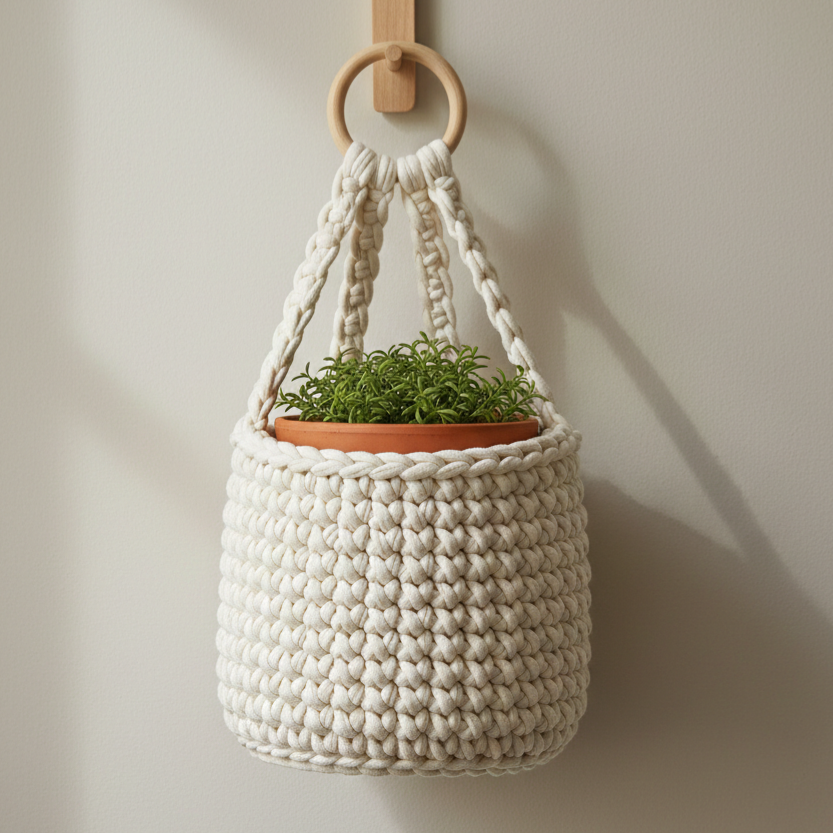
A single-piece, no-sewing method — quick assembly and clean finish.
Skill level: confident beginner → intermediate
Materials (sample)
- Cotton or t-shirt yarn ~300–450 yd (t-shirt yarn gives great body).
- Hook: 8.0–10.0 mm for t-shirt yarn; use 5.5–6.5 mm for worsted cotton.
- Tapestry needle (for weaving ends only), optional wooden ring.
- Finished example: for 6–8 in nursery pot; base ≈ 8 in dia; height ≈ 9 in.
No-sew idea
- Work base + sides + rim + straps in continuous rounds, using slip-stitch joins and folding techniques so no sewing is required (only weaving ends).
Step-by-step
A. Base (flat circle)
- MR, 8 sc (sc with a large hook/t-shirt yarn is dense). Rounds: increase uniformly until base equals target diameter (e.g., 8 in). Use careful measuring. For t-shirt yarn and 8 mm hook you’ll hit diameter in fewer rounds.
B. Side (single-piece)
- Once base diameter reached, work even rounds of hdc or sc (choose hdc if you want slightly more flexible). Work in continuous rounds (no joining) for a smooth seam. Keep a stitch marker for round start. Work to desired height minus rim height.
C. Reset & make rim fold (no sewing)
- On last round of side, fold the top edge inward (toward inside) and insert hook into a back loop only of the st from the round below and then into the corresponding loops on the folded side, and sl st around to join and create a folded casing—this locks fold without sewing. Pull tight to hide raw edge.
D. Hanger straps (built-in)
- On rim, work idential strap sections by chain loops integrated into last sc round: sc 6, ch 30, sl st back into same st to form loop — repeat at 3 or 4 points. Then secure loops by working a round of sc around chains to make them thick and sturdy (i.e., sc along chain back to rim). This is still no-sew because you tucked and sc’d everything in place.
E. Weave ends & finish
- Weave in loose tails into the folded rim. Because you used continuous rounds and folded the rim, there’s no seam to sew. Test hanger strength.
F. Lining & plant care
- Use a plastic nursery pot inside — easy to remove for watering. No-sew basket looks especially neat in jute or natural t-shirt yarn.
Tips
- T-shirt yarn gives an industrial-chic look and is forgiving for no-sew methods.
- If chains seem weak, work sc along the chain to thicken before finishing.
4. Crochet Double Hanging Basket Pattern
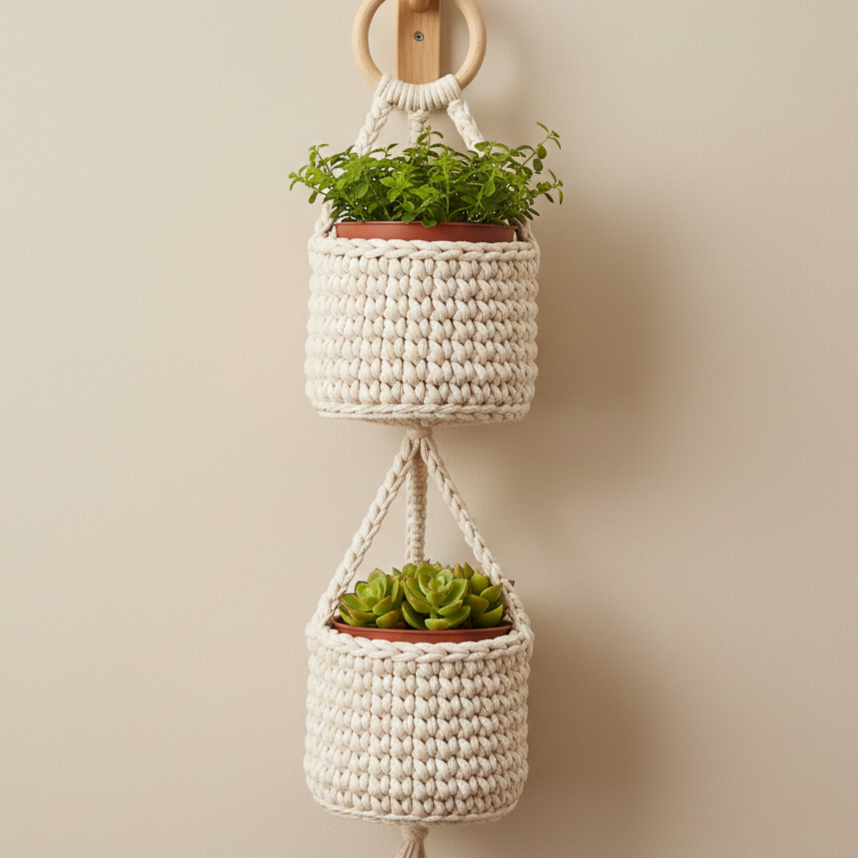
Two baskets on one hanger — perfect for herbs (one above another), or two small succulents on display.
Skill level: intermediate (multi-part assembly + weight distribution)
Materials (sample)
- Worsted cotton or t-shirt yarn ~400–600 yd (depends on two baskets size).
- Hooks: 5.5 mm (worsted) or 8–10 mm (t-shirt).
- Metal ring or wooden hoop for joining hanger, tapestry needle.
- Finished example: two small baskets ~5–6 in dia each, stacked vertically with 8–10 in between.
Design concept
- Two small basket pouches attached to a central hanger—top pouch nearer ring, bottom pouch suspended by cords. Weight distribution is key; use strong hanger ring and secure knots.
Step-by-step
A. Make two baskets (identical but small)
- Follow the Sweet Stripes base & side procedure but stop when base diameter ≈ 5–6 in. Work side height ~4–6 in depending on pot height. Reinforce rim with extra sc rounds.
B. Hanger ring & top basket attachment
- Slip-stitch or sc tightly around wooden/metal ring to create a neat rim. Attach the top basket directly surrounding the ring by working a joining round: align basket rim under ring and sc through ring and basket rim loops to secure. This creates a stable attachment.
C. Bottom basket suspension
- From the underside of ring, create 3 (or 4) strong cords (crochet i-cord or 3-chain braid) of equal length. Secure each cord to ring with overhand knot or lark’s head, gather cords under ring into a small knot and then attach to the top edge of the bottom basket by sewing or lashing with yarn.
- Adjust spacing so bottom basket hangs centrally under ring, leaving about 8–10 in of space between baskets. Use 3 cords for tripod stability or 4 for square stability.
D. Reinforcement
- For extra strength at bottom basket join points, tie a small piece of cotton webbing inside and stitch through; this prevents rim stretching under weight.
E. Lining & test
- Test with empty pots first, then add pots with soil and water to ensure that the hanger holds safely.
Styling
- Use matching colors for a cohesive look, or different colors for each basket to create an herb-labeled duo (e.g., green for basil top, sage for lower).
5. Crochet Chunky Hanging Basket Pattern
Quick, highly structured basket using bulky yarn — modern, minimal, and incredibly fast.
Skill level: confident beginner
Materials (sample)
- Bulky t-shirt yarn or chunky cotton rope — ~250–450 yd depending on size.
- Hook: 10–12 mm or jumbo depending on yarn.
- Sturdy wooden ring for hanger recommended; tapestry needle.
- Finished example: base ≈ 9–10 in diameter, height ≈ 8–10 in.
Why chunky?
Chunky baskets stand up on their own, need fewer rounds to make big baskets, and have a contemporary look. The structure is excellent for holding nursery pots and is great for rapid makes.
Step-by-step
A. Base
- MR, ch1, 8 sc with chunky yarn (will make large stitches). Rounds: increase each round as normal until base diameter ≈ 9 in. Use fewer rounds due to thickness.
B. Sides
- Work even rounds in sc or hdc for 8–10 rounds for a stout wall. Because the yarn is heavy, avoid too many loose stitches—work firm tension.
C. Rim & ring
- Fold rim and work a tight round of sc to create a double-thick rim. Insert wooden ring inside fold if using one; sc around to cover the ring.
D. Hanger
- For a chunky statement, make three fat straps: ch to desired length (e.g., 16–20 in), sc back to thicken. Attach to rim evenly and braid or gather straps at top into a strong loop tied to ring. Alternatively, use leather webbing as hanger for contrast.
E. Finish & test
- Weave in ends and set shape. Chunky baskets rarely need extra stiffeners. Place lined nursery pot inside before watering.
Styling
- Great in natural hues (cream, stone, slate) for minimal decor. Use bright colors for boho look.
Final finishing, care & safety reminders
- Always test with weight. Fill pot with soil and small amount of water to test basket and hanger strength before fully mounting over furniture or heavy areas.
- Use liners. For longevity, put a nursery pot inside the crocheted basket or sew a removable fabric liner so soil and moisture don’t rot the yarn.
- Reinforce hang points. If you expect frequent watering, reinforce strap attachment with extra stitches, webbing, or ring.
- Cleaning. Cotton baskets can be hand-washed; t-shirt yarn may be machine-washed on gentle but always check yarn care instructions. Remove liner/pot before washing.
- Plant safety. Don’t hang heavy pots above people or fragile surfaces. Keep hanging baskets away from high-traffic zones if water drips could cause slipping.
Conclusion
Hanging baskets are a beautiful, functional way to bring plants into every room. These five patterns—Sweet Stripes, Teardrop, No-Sew, Double, and Chunky—cover a wide range of styles and materials so you can choose quick decorative makes, sculptural statement pieces, or sturdy utility baskets. Start with your pot measurements, make a small swatch to calculate stitch count, and pick a yarn that suits the look and strength you need. With a little planning (and a finished test-hang), you’ll have a handmade hanging feature ready to brighten a wall, corner, or balcony.