


Tiny, handmade hair clips are fast, addictive, and perfect little gifts — inexpensive to make, quick to personalize, and delightful to receive. This post gives you five finished, ready-to-use crochet hair-clip patterns with everything you need: materials, skill level, finished size, exact step-by-step stitch instructions, assembly (how to attach to clips), finishing tips, kid-safe notes, and variations so you can make sets for birthdays, stocking stuffers, or a craft market.
I wrote each pattern to be approachable for confident beginners and comfortable for intermediate crocheters. Most clips take 10–40 minutes each, and use very small amounts of yarn — great for stash-busting.
Quick common notes (read first)
- Abbreviations: ch = chain • sl st = slip stitch • sc = single crochet • hdc = half double crochet • dc = double crochet • tr = treble (UK tr) • st(s) = stitch(es) • MR = magic ring.
- Hooks: the patterns use small hooks (2.5–4.0 mm) because smaller hooks make firmer motifs that hold shape on the clip. Adjust hook and yarn to get tighter fabric if you need a more stable embellishment.
- Clips: common clip types are alligator clips (flat or lined), snap/clips (French barrettes), or metal hairpins. For small motifs, 4–6 cm alligator clips or small snap clips work best. Use hot glue and stitches to secure.
- Safety: for toddlers, avoid glued-on beads or small parts; sew everything securely and prefer embroidered eyes rather than beads.
- Finishes: you’ll weave in ends and optionally stiffen (light starch or diluted PVA) if you want a crisp shape.
why crochet hair clips make perfect handmade gifts
Handmade hair clips are the smallest packages of delight. They’re quick to make when you need gifts fast, they’re easily personalized (color, size, embellishment), and they let your recipient wear something you made. Each of the five designs below teaches a useful motif: lacy daisy for delicate looks, rose for romantic classics, watermelon for playful summer vibes, doughnut for cute novelty, and an oval bear for whimsical kids’ accessories. Make a set in coordinated hues and tie them up in a little box — instant heartfelt present.
1. Crochet Daisy Lacy Hair Clip Pattern

Look: delicate open-lace daisy with a tiny center — light and feminine.
Skill level: Beginner → Intermediate
Time: 15–25 minutes
Finished size: ~2–2.5″ (5–6 cm) diameter (using DK yarn + 3.5 mm hook)
Materials: small amount DK or fingering cotton in white (petals) & yellow (center), 3.5 mm hook, 4–6 cm alligator or snap clip, tapestry needle, small dab of glue (optional).
Stitches & idea
- MR center, short chain loops for lacy petals, single crochet round to create firm base for clip attachment.
Step-by-step
Center (yellow)
- MR, ch 1, work 8 sc into the ring. Pull tight and join with sl st to first sc. (8 sc)
- Fasten off yellow leaving a 6–8 cm tail for sewing and switch to white for petals.
Petal foundation (loop round)
3. Join white in any base stitch. Ch 5, sl st into next sc — repeat around until you have 8 ch-5 loops (one per center sc). Join and fasten off if desired.
Petal formation (lacy petals)
4. Rejoin white in a loop, sl st to nearest ch-5 loop base, ch 1, work into each loop: (sc, hdc, dc, hdc, sc) — this makes a small lacy petal. Repeat for each loop. Join. (8 petals)
Secure base & tidy
5. With white, work 1 round sc around the back/bottom edge of the petals where they meet the center (insert hook under the petal bases and work sc). This flattens the motif into a neat disc. Fasten off and weave tails to back.
Assembly
6. Prepare your clip: if using an alligator clip with teeth, optionally glue a small felt backing (covering the top flat area) for comfort and to hide stitches. Position daisy so the center sits slightly off-center toward the wider end of the clip (so petals show when clipped in hair). Sew through the motif into the clip loop or felt backing with several passes. Add a small dab of hot glue for extra hold (not necessary if sewn strongly).
Variation ideas
- Make smaller daisies with ch-3 loops for petite clips.
- Use variegated yarn for petals for subtle color shifts.
- Sew two daisies together slightly offset for fuller look.
2. Crochet Rose Flower Hair Clip Pattern

Look: classic rolled/spiral rose — romantic, elegant.
Skill level: Beginner (basic shaping)
Time: 20–40 minutes (rolling + sewing takes a bit)
Finished size: ~2–3″ (5–7 cm) diameter depending on chain length
Materials: small amount worsted or DK in rose color, 4.0 mm hook, 4–6 cm alligator/snap clip, tapestry needle, optional felt circle, hot glue.
Stitches & idea
- Make a long strip of shells or dc row, roll into a rose spiral, stitch base, attach to backing.
Step-by-step
Petal strip
- Ch 30 (for a medium rose). Adjust chain length for bigger/smaller rose (longer = bigger rose).
- Row 1: dc in 4th ch from hook and across (so you have tall stitches). Do not turn — leave the strip. You may add a 2nd row of dc if you want fuller petals (dc across; then fasten off).
Form rose spiral
3. Lay the strip with right side up. Starting at one narrow end, roll the strip tightly while keeping the rolled center snug. As you roll, occasionally tack the rolled layers together with a few small whip-stitches through the base (use the long tail or a separate yarn needle). Continue rolling until the whole strip is coiled into a rose.
Secure base
4. Make a small circle backing: MR, ch 1, 6 sc into MR; pull tight and join — fasten off leaving tail. Place the rolled rose on this felt/crochet circle and stitch around base through several layers to secure firmly.
Attach to clip
5. For durability, stitch the felt/circle to the clip with multiple passes and knot securely. Add hot glue between backing and clip for extra hold. If clip has teeth, place rose with petals toward the open end so it sits nicely when worn.
Variation ideas
- Use a strip of shell stitches (sc, ch 3, 3 dc) for rufflier petals.
- Make two roses and stitch them together for fuller corsage clip.
3. Crochet Watermelon Hair Clip Pattern
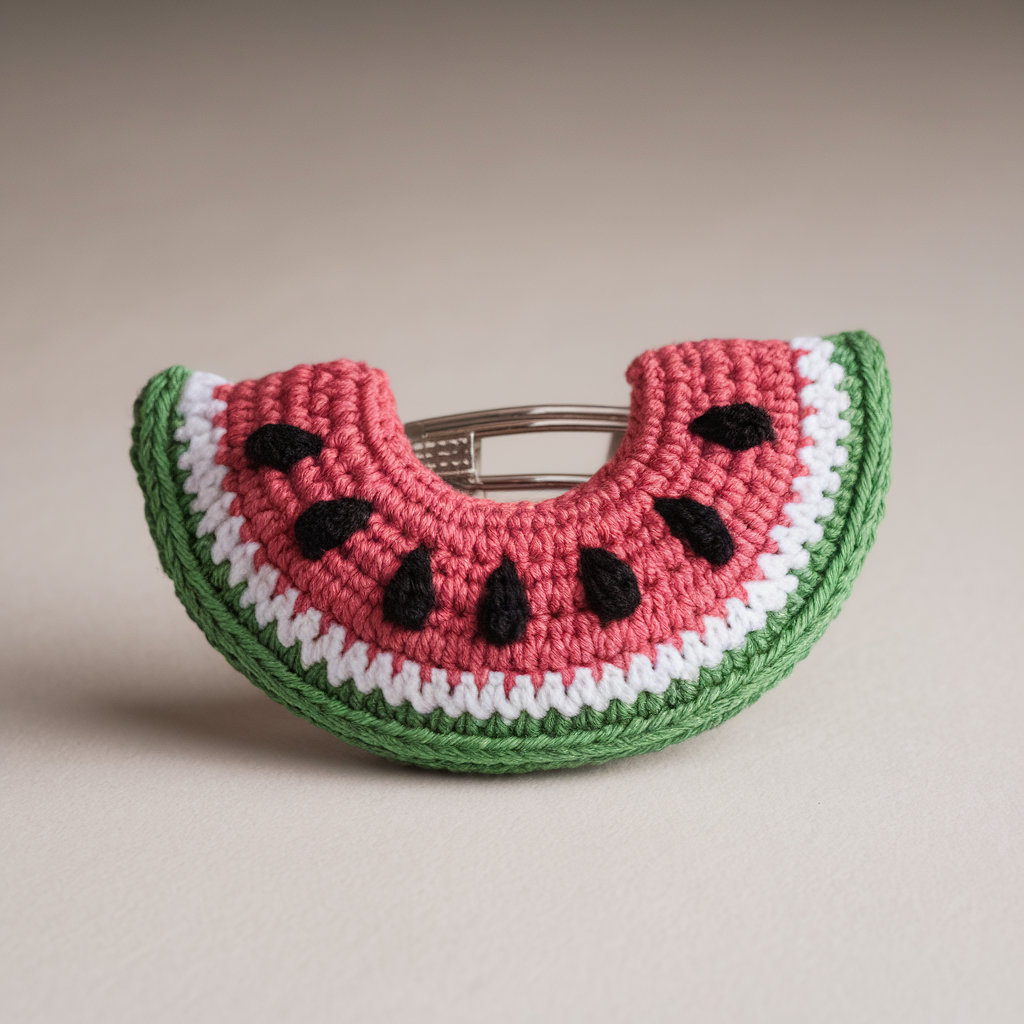
Look: bright semicircle watermelon slice — playful, seasonal favorite.
Skill level: Beginner → Intermediate (color changes)
Time: 20–30 minutes
Finished size: ~2.5″ (6–7 cm) wide across arc (using DK & 3.5 mm hook)
Materials: small amounts of pink/seed red, white, and dark green; black embroidery thread or tiny beads for seeds (recommend embroidered seeds for safety), 3.5 mm hook, clip, tapestry needle.
Stitches & idea
- Work a half-circle (semi-circle) in increasing dc rows; change colors for rind and pith; add embroidered seeds.
Step-by-step
Semi-circle flesh (pink)
- MR, ch 2, work 10 dc into MR, pull tight and join to form a small circle. (10 dc)
- R2: ch 2, 2 dc in each dc around — (20 dc). Join.
- R3: ch 2, [dc, 2 dc in next] repeat around — (30 dc). Join. Continue one more increase round if you want larger slice (pattern: increase evenly to maintain semi-circle).
Make semi-circle flat
4. To make a half-slice rather than full circle, fold the circle in half and sew across the back center to flatten into a semi-circle OR work half of a round by stopping at halfway before joining. Simpler method: after making a circle, fold and tack bottom seam to flatten into a slice shape.
Add pith & rind
5. Join white yarn to inner curved edge (where the cut would be) and work 1 round sc around the inner curve to define pith. Join dark green to outer edge and sc one round for rind; optionally work a final round with hdc for thickness.
Seeds (embroidery)
6. Use black embroidery thread to stitch 5–8 small seed dashes evenly over the pink flesh (short satin stitches or straight stitches). If making for small children, embroider firmly and avoid loose threads.
Assembly
7. Place watermelon slice over the clip (flat side over top of clip), sew through backing and clip or glue/felt+glue. Make sure the clip can still open/close without glue blocking the spring.
Variations
- Make tiny watermelon halves as barrettes (shorter chain/rounds).
- Add a tiny leaf off the rind for decoration.
4. Crochet Handmade Doughnut Hair Clip Pattern

Look: cute round doughnut with icing and sprinkles — fun for kids or novelty gifting.
Skill level: Beginner
Time: 20–30 minutes
Finished size: ~1.8–2.5″ (4.5–6 cm) diameter (depending on yarn/hook)
Materials: small amounts tan/beige (dough), pink/white/any color for icing, contrasting yarn for embroidered sprinkles, 3.5–4.0 mm hook, small stuffing (polyfill) optional for plush look, clip, needle, glue.
Stitches & idea
- Make a small stuffed ring (amigurumi-style) or flat appliqué ring; add icing on top.
Step-by-step — plush doughnut (3D)
Doughnut ring (base)
- MR, ch 1, work 8 sc into ring. Pull tight and join (8 sc).
- R2: inc in each st around (16 sc).
- R3: sc, inc around (24 sc). Continue increasing evenly to desired outer diameter (e.g., next round sc x2, inc to 32 sc). Fasten off with long tail.
Make two rounds and join
4. Make two identical discs (front and back) or make one wide ring by working additional rounds then creating inner hole by decreasing strategically. Easiest: make two discs and seam with sc, stuffing lightly before closing.
Icing (flat applique)
5. With icing color, ch a chain long enough to arc across one disc’s top (or make a slightly smaller circle and scallop edge). A simple method: join icing color to top surface and work sc, ch 3, skip a stitch in an undulating line to mimic drips; or make a semicircle shaped icing piece and stitch to top of doughnut. See variations for mini instructions.
Sprinkles (embroidery)
6. Use small contrasting yarn or embroidery thread to stitch short sprinkles over icing (tiny straight stitches). If risk of little parts, embroider securely.
Assembly
7. If using two discs: place them wrong sides together, insert a few mm of stuffing so doughnut has a gentle puff (not overstuffed), then sc through both discs around to seam them, leaving small opening to stuff, then finish seam. Sew icing piece to top. Securely stitch the motif to clip via felt backing or multiple strong stitches; add a dab of hot glue for durability.
Variation — flat felt-backed doughnut
- Make a single flat round, cut out center hole, stitch icing on top and glue to a felt circle that is sewn to clip. Faster and sturdier.
5. Crochet Oval Bear Hair Clip Pattern

Look: adorable bear face in an oval motif — whimsical and perfect for baby/toddler-safe clips.
Skill level: Beginner → Intermediate (simple shaping + embroidery)
Time: 25–45 minutes
Finished size: ~2–2.5″ (5–6 cm) tall (including ears)
Materials: small amount worsted/DK in bear color (beige/brown), small white/pink for cheeks/inner ear, 3.5–4.0 mm hook, tapestry needle, safety considerations: embroidered eyes for babies (do not use beads for children under 3), clip, felt backing.
Stitches & idea
- Work oval face using increases/decreases; make small ear appliqués; embroider muzzle and eyes.
Step-by-step
Face — oval foundation
- Ch 10. Row 1: sc in 2nd ch from hook and across 9 sc; turn. (9 sc)
- Row 2: ch 1, sc in first 3 sts, inc (2 sc in next st), sc across until last 4 sts, inc in next st, sc in final 3 sts. Turn. (adds 2 sts)
- Repeat Row 2 for 3–4 rows until piece becomes an oval of desired height (~6–8 rows total). Then mirror decreases: work rows with sc across until the region of increase, dec to taper top slightly if you want a rounded chin.
Or — amigurumi oval worked in rounds
Alternative faster method: MR, 6 sc into ring; R2 inc (12), R3 sc, inc (18), R4–7 sc around to make height; next round dec at two points opposite to shape into an oval. This requires counting but gives tidy oval.
Ears (make 2)
4. MR, 6 sc into ring; R2 sc, inc around (9 sc). Fasten off leaving tail for sewing. Fold and sew base for triangular ear shape.
Muzzle (small circle)
5. MR, ch 1, 6 sc into ring; close and sew to lower center of face. Embroider small nose and mouth with black or dark brown thread.
Eyes & cheeks
6. Use small French knots or stitched tiny ovals for eyes (do not use safety eyes for baby clips). Add pale pink embroidered circles for cheeks (tiny satin stitch). Keep thread ends short and secure.
Assembly
7. Position ears at top corners and sew through face to secure. Sew or glue small felt backing behind face to hide stitches and create a neat surface for attaching to clip. Sew felt to clip with a few passes, then add a little hot glue if desired.
Safety & finishing for kids
- For toddler/baby gifts, avoid beads and glued parts; stitch everything firmly and use felt-backed sewing to attach to clip. Test tug strength before gifting.
Variation ideas
- Change face shape to bunny by making longer ears.
- Add tiny bow or scarf below chin for personalization.
Final tips for making, attaching & gifting
Secure attachment is everything
- Sew through motif and clip multiple times — glue alone is not sufficient for heavy wear. Use a small felt circle between motif and clip as a neat and sturdy anchor. Stitch several times through felt + metal clip teeth if possible.
Make sets
- Coordinating colorways (3–4 clips) look like a cohesive gift: e.g., pastel daisy, rose, watermelon, and doughnut in complementary shades. Tie with ribbon and add a tiny care card.
Finishing touches
- Weave ends neatly. Trim fuzz but leave a clean halo if using mohair.
- For boutique look, package in small kraft boxes with tissue and a handwritten tag.
Care instructions to include with gift
- Hand wash gently and air-dry. Avoid soaking clip metal to prevent rust. Remove motif from clip for cleaning if possible.
Conclusion
These five crochet hair-clip patterns are designed to give you quick wins and beautiful gift-ready results. You learned a little lace (daisy), shaping and spirals (rose), color-blocked slices (watermelon), novelty applique and plush work (doughnut), and character-building embroidery (bear). Make a set, personalize colors for the recipient, and package them simply — every handmade clip is a tiny wearable reminder that someone thought to make something special just for them.


Недропользование — это направление деятельности, связанный с разработкой подземных богатств.
Оно включает поиск полезных ископаемых и их промышленное освоение.
Данная сфера регулируется нормативными актами, направленными на сохранение природного баланса.
Ответственное ведение работ в недропользовании способствует экономическому росту.
оэрн
Философия гедонизма — это мировоззренческий подход, которое ставит удовольствие в центр человеческой жизни.
Согласно этому взгляду, поиск радости считается естественной целью существования.
Гедонизм не всегда подразумевает чрезмерность.
Во многих трактовках он связан с умеренностью и контроль желаний.
https://telegra.ph/Tom-Ford-12-25
Актуальная интерпретация часто акцентирует внимание на качестве жизни.
При этом важную роль играет гармония между удовольствиями и реальными возможностями.
Эта философия может способствовать личному развитию.
В итоге, гедонизм рассматривается как философская перспектива, а не как безусловное потакание желаниям.
Система iQOS представляет собой современным устройством для нагревания табака.
В отличие от классических способов, устройство работает без горения.
Такой подход помогает снизить образование дыма.
Система выделяется современным внешним видом.
https://terea777.shop/lukhovitsy/product/delia-gold/
Удобство использования делает устройство популярным выбором для многих пользователей.
Также iQOS предлагает контролируемый процесс.
Выбор вариантов позволяет подобрать подходящий формат.
В итоге, система iQOS заняла свое место на рынке среди взрослых пользователей.
нейросеть для учебы нейросеть для учебы .
нейросеть для студентов онлайн нейросеть для студентов онлайн .
нейросеть для учебы nejroset-dlya-ucheby-7.ru .
нейросеть для школьников и студентов nejroset-dlya-ucheby-6.ru .
нейросеть студент бот нейросеть студент бот .
ии для учебы студентов ии для учебы студентов .
перепланировка москва pereplanirovka-kvartir9.ru .
ии для студентов ии для студентов .
нейросеть реферат онлайн нейросеть реферат онлайн .
нейросеть для студентов нейросеть для студентов .
нейросеть для учебы нейросеть для учебы .
нейросеть для студентов нейросеть для студентов .
нейросеть для студентов нейросеть для студентов .
чат нейросеть для учебы nejroset-dlya-ucheby-5.ru .
перепланировка услуги перепланировка услуги .
нейросеть реферат нейросеть реферат .
нейросеть генерации текстов для студентов нейросеть генерации текстов для студентов .
умная нейросеть для учебы nejroset-dlya-ucheby-7.ru .
ии для студентов nejroset-dlya-ucheby-6.ru .
сделать реферат сделать реферат .
нейросеть студент бот нейросеть студент бот .
согласование перепланировки под ключ согласование перепланировки под ключ .
сайт для рефератов nejroset-dlya-ucheby-5.ru .
нейросеть для студентов нейросеть для студентов .
нейросети для студентов нейросети для студентов .
нейросеть для школьников и студентов нейросеть для школьников и студентов .
нейросеть текст для учебы нейросеть текст для учебы .
перепланировка квартиры в москве pereplanirovka-kvartir9.ru .
нейросеть для школьников и студентов nejroset-dlya-ucheby-5.ru .
нейросети для студентов нейросети для студентов .
ии для учебы студентов nejroset-dlya-ucheby-7.ru .
умная нейросеть для учебы nejroset-dlya-ucheby-8.ru .
ии для студентов ии для студентов .
перепланировка квартиры согласование pereplanirovka-kvartir9.ru .
нейросеть для студентов нейросеть для студентов .
лучшая нейросеть для учебы nejroset-dlya-ucheby-7.ru .
перепланировка москва pereplanirovka-kvartir9.ru .
сделать реферат сделать реферат .
чат нейросеть для учебы nejroset-dlya-ucheby-8.ru .
сделать проект перепланировки квартиры в москве proekt-pereplanirovki-kvartiry22.ru .
стоимость перепланировки квартиры стоимость перепланировки квартиры .
нейросеть текст для учебы nejroset-dlya-ucheby-5.ru .
внедрение 1с москва внедрение 1с москва .
сделать реферат nejroset-dlya-ucheby-6.ru .
ии для учебы студентов ии для учебы студентов .
сколько стоит согласовать перепланировку skolko-stoit-uzakonit-pereplanirovku-8.ru .
бк мелбет официальный сайт бк мелбет официальный сайт .
проект перепланировки квартиры проект перепланировки квартиры .
скачать официальный сайт мелбет скачать официальный сайт мелбет .
услуга внедрение 1с 1s-vnedrenie.ru .
нейросеть для студентов онлайн нейросеть для студентов онлайн .
ии для студентов nejroset-dlya-ucheby-6.ru .
нейросеть онлайн для учебы nejroset-dlya-ucheby-3.ru .
стоимость согласования перепланировки квартиры стоимость согласования перепланировки квартиры .
мелбет мелбет .
мелбет рабочее зеркало мелбет рабочее зеркало .
заказать проект перепланировки квартиры proekt-pereplanirovki-kvartiry22.ru .
внедрение 1с производство 1s-vnedrenie.ru .
реферат через нейросеть реферат через нейросеть .
нейросеть пишет реферат нейросеть пишет реферат .
сколько стоит перепланировка квартиры в москве skolko-stoit-uzakonit-pereplanirovku-8.ru .
melbet скачать официальный сайт melbet скачать официальный сайт .
проект перепланировки квартиры в москве проект перепланировки квартиры в москве .
мелбет играть http://melbet-ru.it.com/ .
внедрение 1c внедрение 1c .
приложение melbet android приложение melbet android .
сколько стоит оформить перепланировку квартиры skolko-stoit-uzakonit-pereplanirovku-8.ru .
мелбет скачать официальный сайт мелбет скачать официальный сайт .
проект перепланировки москва проект перепланировки москва .
букмекерская компания мелбет букмекерская компания мелбет .
внедрение 1с решений 1s-vnedrenie.ru .
скачать мелбет казино на андроид скачать мелбет казино на андроид .
бк мелбет скачать мобильную версию бк мелбет скачать мобильную версию .
узаконить перепланировку цена skolko-stoit-uzakonit-pereplanirovku-8.ru .
заказать проект перепланировки квартиры proekt-pereplanirovki-kvartiry22.ru .
ставки на спорт мелбет ставки на спорт мелбет .
внедрение 1с внедрение 1с .
скачать melbet на айфон скачать melbet на айфон .
мелбет букмекерская контора скачать мелбет букмекерская контора скачать .
букмекерская контора мелбет сайт букмекерская контора мелбет сайт .
мелбет скачать ios мелбет скачать ios .
скачать бк мелбет на айфон скачать бк мелбет на айфон .
скачать мелбет зеркало на андроид скачать мелбет зеркало на андроид .
мелбет регистрация мелбет регистрация .
мелбет скачать официальный сайт мелбет скачать официальный сайт .
мелбет скачать мелбет скачать .
промокод мелбет при регистрации промокод мелбет при регистрации .
мелбет казино скачать мелбет казино скачать .
мелбет казино скачать на андроид мелбет казино скачать на андроид .
государственная аккредитация онлайн школы государственная аккредитация онлайн школы .
запоминаемость рекламы reklamnyj-kreativ9.ru .
бесплатный период upster reklamnyj-kreativ8.ru .
водопонизительная скважина vodoponizhenie-msk.ru .
вакуумное водопонижение вакуумное водопонижение .
проектирование водопонижения xn—77-eddkgagrc5cdhbap.xn--p1ai .
рейтинг по аккредитации best-schools-online.ru .
машинное обучение креативы reklamnyj-kreativ9.ru .
иглофильтровое водопонижение иглофильтровое водопонижение .
водопонижение скважинами водопонижение скважинами .
карточки товаров wildberries карточки товаров wildberries .
водопонижение иглофильтрами москва водопонижение иглофильтрами москва .
водопонижение иглофильтрами водопонижение иглофильтрами .
водопонижение строительное xn—77-eddkgagrc5cdhbap.xn--p1ai .
рейтинг аккредитованных школ рейтинг аккредитованных школ .
melbet фрибет киргизия http://www.melbet09342.help
рекламный креатив рекламный креатив .
понижение уровня грунтовых вод понижение уровня грунтовых вод .
понижение уровня грунтовых вод понижение уровня грунтовых вод .
откачка грунтовых вод vodoponizhenie-msk.ru .
водопонизительная скважина vodoponizhenie-moskva.ru .
запоминаемость слогана реклама reklamnyj-kreativ8.ru .
онлайн формат занятий best-schools-online.ru .
водопонижение строительных котлованов водопонижение строительных котлованов .
сервис анализа креативов сервис анализа креативов .
скважинное водопонижение xn—77-eddkgagrc5cdhbap.xn--p1ai .
водопонижение строительное водопонижение строительное .
глубинное водопонижение глубинное водопонижение .
плинко mostbet плинко mostbet
водопонижение иглофильтрами москва vodoponizhenie-msk.ru .
устройство водопонижения устройство водопонижения .
сравнение онлайн-школ сравнение онлайн-школ .
анализ наружной рекламы анализ наружной рекламы .
1win официальный сайт https://www.1win50742.help
вакуумное водопонижение иглофильтрами vodoponizhenie-iglofiltrami-moskva.ru .
улучшение hero карточки улучшение hero карточки .
проектирование водопонижения проектирование водопонижения .
бурение скважин для водопонижения xn—77-eddkgagrc5cdhbap.xn--p1ai .
проект на водопонижение vse-o-vodoponizhenii.ru .
дистанционное образование дистанционное образование .
бурение скважин обратной промывкой vodoponizhenie-msk.ru .
точность прогноза креативов 95% reklamnyj-kreativ8.ru .
запоминаемость слогана реклама reklamnyj-kreativ9.ru .
водопонижение строительное водопонижение строительное .
водопонижение скважинами водопонижение скважинами .
водопонижение иглофильтрами москва vodoponizhenie-msk.ru .
проект водопонижения проект водопонижения .
1win лимит депозита 1win лимит депозита
мостбет вход ошибка https://mostbet61527.help/
водопонижение строительных котлованов водопонижение строительных котлованов .
вакуумное водопонижение иглофильтрами вакуумное водопонижение иглофильтрами .
бурение скважин для водопонижения vodoponizhenie-iglofiltrami-moskva.ru .
1win оптимабанк пополнение https://1win50742.help
водопонижение строительных котлованов водопонижение строительных котлованов .
согласование перепланировки в москве согласование перепланировки в москве .
проект на водопонижение xn—77-eddkgagrc5cdhbap.xn--p1ai .
top sms activate services github.com/SMS-Activate-Service .
sms activate sms activate .
best sms activate service http://www.linkedin.com/pulse/top-5-sms-activate-services-ultimate-guide-virtual-phone-mike-davis-gnhre/ .
карточки товаров wildberries карточки товаров wildberries .
1win комиссия visa http://www.1win50742.help
sms activation github.com/SMS-Activate-Alternatives .
водопонижение грунтовых вод vodoponizhenie-iglofiltrami-moskva.ru .
вакуумное водопонижение вакуумное водопонижение .
согласование перепланировки квартиры москва согласование перепланировки квартиры москва .
1win Кыргызстан жүктөп алуу 1win50742.help
sms activate website sms activate website .
иглофильтровое водопонижение xn—77-eddkgagrc5cdhbap.xn--p1ai .
sms activate login sms activate login .
sms activate sms activate .
melbet киргизия скачать melbet09342.help
водопонижение строительных котлованов водопонижение строительных котлованов .
sms activation github.com/SMS-Activate-Alternatives .
услуги по перепланировке квартир услуги по перепланировке квартир .
top sms activate services github.com/SMS-Activate-Login .
best sms activate service github.com/SMS-Activate-Service .
top sms activate services http://www.linkedin.com/pulse/top-5-sms-activate-services-ultimate-guide-virtual-phone-mike-davis-gnhre/ .
top sms activate services github.com/SMS-Activate-Login .
согласование перепланировки москва согласование перепланировки москва .
sms activator github.com/SMS-Activate-Alternatives .
smsactivate smsactivate .
sms activate website sms activate website .
mostbet казино вход https://www.mostbet61527.help
sms activate sms activate .
мелбет зеркало http://www.melbet09342.help
услуги по согласованию перепланировки услуги по согласованию перепланировки .
sms activate sms activate .
top sms activate alternatives top sms activate alternatives .
как получить бонус мостбет http://mostbet61527.help
мелбет без паспорта регистрация https://www.melbet09342.help
smsactivate smsactivate .
melbet как пополнить элсом melbet как пополнить элсом
top sms activate services github.com/SMS-Activate-Service .
sms activator github.com/SMS-Activate-Alternatives .
узаконивание перепланировки квартиры sostav.ru/blogs/286398/77663 .
мостбет не приходит код мостбет не приходит код
sms activate alternatives sms activate alternatives .
best virtual number service github.com/SMS-Activate-Alternatives .
мелбет чат киргизия https://melbet09342.help
sms activate website sms activate website .
mostbet скачать apk бесплатно mostbet скачать apk бесплатно
проект перепланировки квартиры москва проект перепланировки квартиры москва .
Ita? down caiu.site .
Лучшие онлайн казино Лучшие онлайн казино .
Лучшие онлайн казино Лучшие онлайн казино .
заказать кухню с доставкой zakazat-kuhnyu-3.ru .
заказать кухню по индивидуальному заказу zakazat-kuhnyu-2.ru .
заказать кухню с установкой zakazat-kuhnyu-1.ru .
проектная организация для перепланировки квартиры teletype.in/@jorik11/proekt-dlya-pereplanirovki .
YouTube down caiu.site .
Рейтинг 10 лучших онлайн казино Рейтинг 10 лучших онлайн казино .
Топ 10 казино онлайн Топ 10 казино онлайн .
1win curs valutar https://1win5805.help
заказать кухню по размерам заказать кухню по размерам .
заказать кухню в интернете заказать кухню в интернете .
1 win az http://1win5763.help/
кухни в спб на заказ kuhni-spb-41.ru .
заказать кухню каталог заказать кухню каталог .
мостбет отыгрыш бонуса мостбет отыгрыш бонуса
проект перепланировки и переустройства квартиры проект перепланировки и переустройства квартиры .
перепланировка квартиры согласование sites.google.com/view/dokument-dlya-pereplan/главная-страница .
Казино в тг с бонусами Казино в тг с бонусами .
99 down caiu.site .
Казино флагман Казино флагман .
заказать кухню сайт zakazat-kuhnyu-1.ru .
купить заказать кухню купить заказать кухню .
заказать кухню по индивидуальному проекту zakazat-kuhnyu-2.ru .
1win android quraşdırma 1win android quraşdırma
услуги печати https://exchange.prx.org/series/60539 .
перепланировка квартиры проектные организации teletype.in/@jorik11/proekt-dlya-pereplanirovki .
Онлайн казино в телеграм Онлайн казино в телеграм .
кухня на заказ спб от производителя недорого kuhni-spb-41.ru .
согласование переоборудования квартиры sites.google.com/view/dokument-dlya-pereplan/главная-страница .
заказать кухню каталог заказать кухню каталог .
Instagram down Instagram down .
Топ казино онлайн Топ казино онлайн .
заказать кухню под ключ zakazat-kuhnyu-3.ru .
заказать кухню заказать кухню .
заказать кухню по своим размерам zakazat-kuhnyu-1.ru .
печатные услуги http://maraforum.iboards.ru/viewtopic.php?f=10&t=9428 .
проект перепланировки квартиры для согласования [url=https://teletype.in/@jorik11/proekt-dlya-pereplanirovki/]проект перепланировки квартиры для согласования[/url] .
1win link Republica Moldova https://1win5805.help/
Онлайн казино играть Онлайн казино играть .
Claro caiu Claro caiu .
Топ казино онлайн Топ казино онлайн .
большая кухня на заказ kuhni-spb-41.ru .
перепланировка помещения sites.google.com/view/dokument-dlya-pereplan/главная-страница .
заказать кухню по индивидуальному проекту заказать кухню по индивидуальному проекту .
мостбет зеркало для ios https://www.mostbet52718.help
1win mobil ilova yuklab olish https://1win5767.help/
заказать кухню цены zakazat-kuhnyu-3.ru .
mostbet приложение http://mostbet52718.help
mostbet ios Кыргызстан http://mostbet52718.help
cum retrag cu Neteller de la 1win cum retrag cu Neteller de la 1win
заказать кухню в рассрочку zakazat-kuhnyu-2.ru .
печатная компания https://bresdel.com/blogs/1432784/%D0%A2%D0%9E%D0%9F-%D0%B2%D0%BE%D0%BF%D1%80%D0%BE%D1%81%D0%BE%D0%B2-%D0%BA%D0%BE%D1%82%D0%BE%D1%80%D1%8B%D0%B5-%D0%BD%D1%83%D0%B6%D0%BD%D0%BE-%D0%B7%D0%B0%D0%B4%D0%B0%D1%82%D1%8C-%D0%BC%D0%B5%D0%BD%D0%B5%D0%B4%D0%B6%D0%B5%D1%80%D1%83-%D1%82%D0%B8%D0%BF%D0%BE%D0%B3%D1%80%D0%B0%D1%84%D0%B8%D0%B8-%D0%BF%D0%B5%D1%80%D0%B5%D0%B4-%D0%BF%D0%B5%D1%87%D0%B0%D1%82%D1%8C%D1%8E .
проект перепланировки квартиры проект перепланировки квартиры .
Казино вулкан Казино вулкан .
downdetector brasil caiu.site .
Казино в тг с бонусами Казино в тг с бонусами .
1win pagina oficiala https://www.1win5805.help
заказать кухню с замером zakazat-kuhnyu-1.ru .
согласование перепланировки под ключ согласование перепланировки под ключ .
кухни спб на заказ кухни спб на заказ .
заказать кухню под заказ заказать кухню под заказ .
1win Oʻzbekistonda kazino 1win Oʻzbekistonda kazino
полиграфические материалы https://scrapbox.io/toppost/Как_отличить_типографию_полного_цикла_от_посредника%3F .
1win istoric tranzactii 1win5805.help
1win crash strategie 1win crash strategie
согласование перепланировки квартиры москва согласование перепланировки квартиры москва .
мебель для кухни спб от производителя kuhni-spb-41.ru .
купить заказать кухню купить заказать кухню .
1win crash turniri 1win crash turniri
заказ полиграфии https://scrapbox.io/toppost/Как_заполнить_конверт_по_ГОСТу_и_почему_это_важно_для_ЗАГСов_и_судов .
заказать кухню цены zakazat-kuhnyu-1.ru .
1win shaxsiy kabinet depozit https://1win5767.help/
внедрение erp цена внедрение erp цена .
1win crash qaydaları https://1win5763.help/
полиграфические услуги в Москве http://diafan.rusheat.ru/forum/gde-zakazat-kachestvennuyu-upakovku-dlya-nebolshog/ .
1win Oʻzbekistonda tikish 1win Oʻzbekistonda tikish
производство кухонь в спб на заказ kuhni-spb-41.ru .
заказать кухню по размерам zakazat-kuhnyu-1.ru .
1с внедрение erp http://1s-erp-vnedrenie.ru .
mostbet apk с официального сайта https://mostbet52718.help/
заказать кухню по индивидуальному проекту заказать кухню по индивидуальному проекту .
заказать кухню через интернет заказать кухню через интернет .
узаконивание перепланировки sites.google.com/view/dokument-dlya-pereplan/главная-страница .
1win Payme orqali to‘lash 1win Payme orqali to‘lash
кухня по индивидуальному заказу спб кухня по индивидуальному заказу спб .
современные кухни на заказ в спб современные кухни на заказ в спб .
купить кухню на заказ в спб kuhni-spb-42.ru .
заказать кухню цены заказать кухню цены .
lucky jet 1win como jugar lucky jet 1win como jugar
внедрение 1с ерп внедрение 1с ерп .
кухни на заказ в санкт-петербурге kuhni-spb-43.ru .
кухня по индивидуальному проекту kuhni-spb-44.ru .
мебель для кухни спб от производителя kuhni-spb-42.ru .
мостбет скачать приложение с официального сайта https://mostbet52718.help/
1win rəsmi ios https://1win5763.help/
внедрение ерп системы 1с http://www.1s-erp-vnedrenie.ru/ .
купить кухню на заказ спб kuhni-spb-44.ru .
заказ кухни заказ кухни .
заказать кухню в спб от производителя kuhni-spb-42.ru .
сколько стоит свадебное платье магазин свадебных платьев каталог
внедрение erp цена 1с внедрение erp цена 1с .
Нужны столбики? столбики ограждения с лентой купить столбики для складов, парковок и общественных пространств. Прочные материалы, устойчивое основание и удобство перемещения обеспечивают безопасность и порядок.
Looking for a yacht? romantic yacht cruise Cyprus for unforgettable sea adventures. Charter luxury yachts, catamarans, or motorboats with or without crew. Explore crystal-clear waters, secluded bays, and iconic coastal locations in first-class comfort onboard.
купить кабель 16 магазин электрики в минске
кухни под заказ спб кухни под заказ спб .
кухни на заказ санкт петербург от производителя кухни на заказ санкт петербург от производителя .
1win plinko 1win5767.help
купить кухню на заказ спб kuhni-spb-42.ru .
1win aplicación 1win aplicación
внедрение 1с erp внедрение 1с erp .
купить кухню на заказ в спб kuhni-spb-44.ru .
кухня по индивидуальному проекту kuhni-spb-43.ru .
заказать кухню в спб от производителя kuhni-spb-42.ru .
1win bono por descargar app http://1win5771.help/
мелбет beeline kg http://melbet41263.help
1win-mx http://1win5771.help
кухни в спб на заказ кухни в спб на заказ .
кухни на заказ производство спб кухни на заказ производство спб .
мелбет регистрация киргизия без проблем http://www.melbet41263.help
кухня глория kuhni-spb-42.ru .
descargar aplicación de 1win https://www.1win5771.help
1win apk casino méxico descargar http://1win5771.help
melbet карта пополнение melbet карта пополнение
нарколог на дом в ростове на дону нарколог на дом в ростове на дону .
сколько стоит нарколог на дом в ростове narkolog-na-dom-v-rostove-1.ru .
мелбет идентификация мелбет идентификация
pin-up retiro mínimo Chile https://pinup37056.help/
частный нарколог на дом в ростове narkolog-na-dom-v-rostove.ru .
1вин ios http://1win19643.help/
наркологическая служба на дом ростов-на-дону narkolog-na-dom-v-rostove-1.ru .
врач нарколог на дом в ростове narkolog-na-dom-v-rostove.ru .
вызвать нарколога на дом ростов-на-дону вызвать нарколога на дом ростов-на-дону .
мелбет app скачать https://www.melbet41263.help
врач нарколог на дом в ростове narkolog-na-dom-v-rostove-1.ru .
нарколог на дом в ростове нарколог на дом в ростове .
вызвать нарколога на дом ростов-на-дону вызвать нарколога на дом ростов-на-дону .
наркологическая помощь на дому ростов narkolog-na-dom-v-rostove-1.ru .
наркологическая служба на дом ростов-на-дону narkolog-na-dom-v-rostove.ru .
pin up descargar https://pinup37056.help/
1вин mines 1вин mines
pin-up bank köçürməsi çıxarış http://pinup09715.help
врач нарколог на дом в ростове врач нарколог на дом в ростове .
1вин бонус 1вин бонус
круглосуточный нарколог на дом в ростове narkolog-na-dom-v-rostove.ru .
iniciar sesión pin up http://pinup37056.help
1win ELSOM https://1win19643.help/
наркологическая служба на дом ростов-на-дону narkolog-na-dom-v-rostove-1.ru .
платный нарколог на дом в ростове платный нарколог на дом в ростове .
нарколог на дом без постановки на учет ростов нарколог на дом без постановки на учет ростов .
вывод из запоя на дому в ростове на дону вывод из запоя на дому в ростове на дону .
вывод из запоя дома в ростове vyvod-iz-zapoya-v-rostove-1.ru .
cómo usar el bono de pin-up https://pinup37056.help
вывод из запоя на дому в ростове-на-дону вывод из запоя на дому в ростове-на-дону .
вывод из запоя на дому в ростове вывод из запоя на дому в ростове .
проект и монтаж газового пожаротушения montazh-gazovogo-pozharotusheniya.ru .
вывод из запоя в ростове цена vyvod-iz-zapoya-v-rostove-2.ru .
вызов нарколога на дом в ростове вызов нарколога на дом в ростове .
pin-up keçid linki https://pinup09715.help/
нарколог на дом ростов круглосуточно нарколог на дом ростов круглосуточно .
bono pin-up https://www.pinup37056.help
pin-up tragamonedas http://pinup37056.help
вывод из запоя на дому в ростове-на-дону вывод из запоя на дому в ростове-на-дону .
нарколог на дом срочно ростов-на-дону нарколог на дом срочно ростов-на-дону .
нарколог на дом ростов отзывы narkolog-na-dom-v-rostove-3.ru .
1win Бишкек 1win Бишкек
нарколог вывод из запоя на дому в ростове vyvod-iz-zapoya-v-rostove-4.ru .
вывод из запоя на дому в ростове-на-дону vyvod-iz-zapoya-v-rostove-1.ru .
вывод из запоя на дому нарколог в ростове вывод из запоя на дому нарколог в ростове .
монтаж газового пожаротушения под ключ montazh-gazovogo-pozharotusheniya.ru .
психиатр нарколог на дом в ростове психиатр нарколог на дом в ростове .
анонимный вывод из запоя в ростове vyvod-iz-zapoya-v-rostove-2.ru .
mostbet giriş təlimatı mostbet giriş təlimatı
пинап apk пинап apk
нарколог вывод из запоя в ростове нарколог вывод из запоя в ростове .
платный нарколог на дом в ростове платный нарколог на дом в ростове .
нарколог на дом ростов круглосуточно нарколог на дом ростов круглосуточно .
вывод из запоя в ростове на дону вывод из запоя в ростове на дону .
вывод из запоя в ростове вывод из запоя в ростове .
стоимость монтажа газового пожаротушения montazh-gazovogo-pozharotusheniya.ru .
вывод из запоя на дому в ростове вывод из запоя на дому в ростове .
нарколог на дом в ростове нарколог на дом в ростове .
mostbet kazino giriş mostbet kazino giriş
1win установка на android http://1win19643.help/
вывод из запоя в ростове на дону вывод из запоя в ростове на дону .
клиника в ростове вывод из запоя клиника в ростове вывод из запоя .
психиатр нарколог на дом в ростове психиатр нарколог на дом в ростове .
pin-up populyar slotlar pinup09715.help
нарколог на дом в ростове на дону нарколог на дом в ростове на дону .
вывод из запоя на дому в ростове-на-дону вывод из запоя на дому в ростове-на-дону .
лицензия на монтаж газового пожаротушения montazh-gazovogo-pozharotusheniya.ru .
нарколог вывод из запоя в ростове нарколог вывод из запоя в ростове .
вывод из запоя в стационаре в ростове-на-дону vyvod-iz-zapoya-v-rostove-1.ru .
pin-up server problemi Azərbaycan https://pinup09715.help
вывод из запоя клиника в ростове вывод из запоя клиника в ростове .
вывод из запоя в стационаре в ростове на дону вывод из запоя в стационаре в ростове на дону .
нарколог на дом ростов круглосуточно нарколог на дом ростов круглосуточно .
вывод из запоя в ростове на дону вывод из запоя в ростове на дону .
нарколог на дом ночью ростов-на-дону narkolog-na-dom-v-rostove-3.ru .
монтаж газового пожаротушения для склада montazh-gazovogo-pozharotusheniya.ru .
нарколог вывод из запоя на дому в ростове нарколог вывод из запоя на дому в ростове .
наркологическая клиника в ростове вывод из запоя vyvod-iz-zapoya-v-rostove-1.ru .
клиника в ростове вывод из запоя клиника в ростове вывод из запоя .
нарколог на дом ночью ростов-на-дону нарколог на дом ночью ростов-на-дону .
вывод из запоя дома в ростове vyvod-iz-zapoya-v-rostove-4.ru .
вывод из запоя в ростове вывод из запоя в ростове .
наркологическая помощь на дому ростов наркологическая помощь на дому ростов .
mostbet program loialitate http://www.mostbet96150.help
установка автоматического газового пожаротушения montazh-gazovogo-pozharotusheniya.ru .
вывод из запоя в стационаре в ростове на дону вывод из запоя в стационаре в ростове на дону .
анонимный вывод из запоя в ростове vyvod-iz-zapoya-v-rostove-1.ru .
круглосуточный вывод из запоя в ростове круглосуточный вывод из запоя в ростове .
производство наклеек pechat-nakleek-v-moskve.ru .
mostbet plinko donur https://www.mostbet13670.help
pin-up canlı kazino rulet pin-up canlı kazino rulet
типография печать наклеек типография печать наклеек .
mostbet azərbaycan yükləmə https://mostbet13670.help
mostbet Tiraspol mostbet Tiraspol
1win промо код 1win91276.help
стикеры наклейки на заказ pechat-nakleek-v-moskve.ru .
mostbet suport in romana https://www.mostbet96150.help
descarca mostbet apk descarca mostbet apk
печать стикеров печать стикеров .
mostbet turnee sloturi http://www.mostbet96150.help
mostbet conditii bonus https://mostbet96150.help
mostbet bonusdan uduş çıxarmaq mostbet13670.help
1win сколько идет вывод http://www.1win91276.help
1вин Бишкек https://1win91276.help/
1вин промокод 1вин промокод
печать наклеек москва печать наклеек москва .
1win Ош кирүү 1win Ош кирүү
мостбет Токмок http://mostbet39081.help
печать наклеек цена pechat-nakleek-v-moskve.ru .
монтаж газового пожаротушения под ключ монтаж газового пожаротушения под ключ .
монтаж системы газового пожаротушения спб montazh-gazovogo-pozharotusheniya-2.ru .
продвижение сайта продвижение сайта .
заказать газовое пожаротушение заказать газовое пожаротушение .
melbet бк скачать melbet бк скачать
1 вин промокод http://1win91276.help
слоты мостбет слоты мостбет
melbet статистика https://www.melbet54187.help
стоимость монтажа газового пожаротушения montazh-gazovogo-pozharotusheniya-2.ru .
монтаж газового пожаротушения для банка montazh-gazovogo-pozharotusheniya-1.ru .
раскрутка сайта франция цена prodvizhenie-sajtov-v-moskve9.ru .
монтаж газового пожаротушения для банка монтаж газового пожаротушения для банка .
грузчики недорого грузчики цена
услуги грузчиков грузчики услуги
газоблок d500 цена куба газоблока
мостбет как пополнить Visa http://mostbet39081.help/
melbet plinko как играть melbet plinko как играть
seo partners seo partners .
монтаж газового пожаротушения москва монтаж газового пожаротушения москва .
заказать газовое пожаротушение montazh-gazovogo-pozharotusheniya-1.ru .
раскрутка сайта франция цена prodvizhenie-sajtov-v-moskve9.ru .
Google Salaries https://salarydatahub.uk by Role (US & UK) – Real Pay Ranges, Levels, and Total Compensation
кран шаровой под приварку кран под приварку
установка газового пожаротушения цена установка газового пожаротушения цена .
поисковое продвижение москва профессиональное продвижение сайтов prodvizhenie-sajtov-v-moskve10.ru .
мелбет купон http://melbet76815.help/
плинко мостбет http://www.mostbet39081.help
монтаж газового пожаротушения для банка montazh-gazovogo-pozharotusheniya-2.ru .
установка газового пожаротушения установка газового пожаротушения .
аудит продвижения сайта prodvizhenie-sajtov-v-moskve9.ru .
Learn more here: check out here
melbet скачать на телефон http://www.melbet76815.help
мостбет коэффициенты футбол Кыргызстан мостбет коэффициенты футбол Кыргызстан
поисковое продвижение сайта в интернете москва prodvizhenie-sajtov-v-moskve10.ru .
melbet вывод киргизия melbet вывод киргизия
установка системы пожаротушения установка системы пожаротушения .
продвижение в google продвижение в google .
переносные ограждения столбика мобильные стойки ограждения купить
купить кабель метрами купить кабель минск
melbet вывод odengi кыргызстан https://www.melbet76815.help
магазин платья свадебные купить https://svadebnye-platya-msk.ru
melbet ошибка регистрации https://www.melbet76815.help
мелбет как получить бонус http://melbet30926.help
установка газового пожаротушения установка газового пожаротушения .
оптимизация сайта франция prodvizhenie-sajtov-v-moskve10.ru .
мелбет играть онлайн melbet54187.help
интернет продвижение москва интернет продвижение москва .
mostbet установка apk http://mostbet39081.help/
как сделать депозит melbet как сделать депозит melbet
мелбет киргизия онлайн казино http://melbet30926.help
мелбет фрибет киргизия http://www.melbet30926.help
melbet plinko играть http://melbet30926.help/
интернет продвижение москва prodvizhenie-sajtov-v-moskve9.ru .
расчет газового пожаротушения расчет газового пожаротушения .
монтаж газового пожаротушения для музея монтаж газового пожаротушения для музея .
melbet приложение киргизия https://melbet51923.help
Looking for a casino? https://pinupturkiye.org is a licensed online casino with a wide selection of slots, live dealer games, and sports betting. New players can take advantage of a welcome bonus and regular promotions; deposits and withdrawals are available through popular methods. The site supports responsible gaming and offers customer support in multiple languages. Pinup Casino is suitable for players who prefer a user-friendly interface and a wide range of entertainment options.
аудит продвижения сайта prodvizhenie-sajtov-v-moskve9.ru .
стоимость монтажа газового пожаротушения montazh-gazovogo-pozharotusheniya-1.ru .
melbet бк скачать http://melbet30926.help
как создать аккаунт melbet https://melbet54187.help/
оптимизация сайта франция prodvizhenie-sajtov-v-moskve9.ru .
цена монтажа системы газового пожаротушения цена монтажа системы газового пожаротушения .
melbet куда вводить промокод https://melbet30926.help/
melbet plinko киргизия http://www.melbet51923.help
монтаж газового пожаротушения москва монтаж газового пожаротушения москва .
mostbet зеркало Киргизия mostbet зеркало Киргизия
мелбет слоты киргизия melbet51923.help
поисковое продвижение москва профессиональное продвижение сайтов prodvizhenie-sajtov-v-moskve9.ru .
как скачать мелбет на android melbet51923.help
установка газового пожаротушения для промышленного объекта установка газового пожаротушения для промышленного объекта .
стоїть ремонт квартири ключ ремонт квартир недорого
мостбет поддержка whatsapp мостбет поддержка whatsapp
мелбет казино регистрация https://melbet51923.help
melbet support кыргызстан https://melbet51923.help/
mostbet casino slots https://www.mostbet76914.help
mostbet apk с официального сайта mostbet85961.help
mostbet обновить приложение mostbet76914.help
мостбет ставки на футбол Кыргызстан http://mostbet85961.help/
mostbet забыли пароль mostbet85961.help
частный seo оптимизатор prodvizhenie-sajtov-v-moskve9.ru .
закупка ссылок в гугл заказать услугу агентство закупка ссылок в гугл заказать услугу агентство .
melbet элсом киргизия http://www.melbet93640.help
установка автоматического газового пожаротушения montazh-gazovogo-pozharotusheniya-3.ru .
технического аудита сайта prodvizhenie-sajtov-v-moskve9.ru .
мелбет кзс зеркало http://melbet28175.help/
продвижение наркологии seo-kejsy13.ru .
Онлайн-журнал https://tga-info.ru со статьями обо всём: от технологий и финансов до психологии, бизнеса и лайфхаков. Читайте полезные материалы, обзоры, аналитические статьи и практические рекомендации для работы, обучения и повседневной жизни.
Строительный портал https://nesmetnoe.ru с полезными статьями о строительстве домов, ремонте квартир, выборе материалов и современных технологиях. Советы специалистов, инструкции, обзоры инструментов, идеи для интерьера и практические решения для частного и коммерческого строительства.
Онлайн-блог https://lifeoflove.ru о семейной жизни, психологии любви и гармоничных отношениях. Читайте статьи о доверии, понимании, воспитании детей, романтике и совместном досуге. Полезные советы и вдохновение для счастливой семейной жизни.
Интернет-журнал https://greendachnik.ru о садоводстве, огороде и ландшафтном дизайне. Полезные статьи о выращивании овощей, фруктов и цветов, уходе за растениями, планировании участка и создании красивого сада. Советы садоводов, идеи оформления и практические рекомендации.
Новости IT https://hardexpert.net и компьютерного мира: новинки технологий, программное обеспечение, гаджеты, компьютерные комплектующие и цифровые сервисы. Обзоры, аналитика, обновления программ и последние события в мире технологий.
установка газового пожаротушения под ключ установка газового пожаротушения под ключ .
как сделать ставку в mostbet https://mostbet76914.help
mostbet скачать на ios Киргизия https://mostbet85961.help
Автомобильный портал https://hyundai-sto.ru со статьями обо всем, что связано с машинами. Новости автопрома, обзоры автомобилей, советы по выбору, ремонту и обслуживанию, сравнения моделей, технологии и полезная информация для водителей и автолюбителей.
Женский сайт https://allsekrets.ru о красоте, моде, здоровье и отношениях. Полезные статьи о стиле, уходе за собой, психологии, семейной жизни и саморазвитии. Советы, идеи и вдохновение для современной женщины, которая хочет выглядеть красиво и чувствовать гармонию.
Женский портал https://idealnaya-ya.ru о красоте, моде, здоровье и гармоничной жизни. Читайте статьи о стиле, отношениях, психологии, воспитании детей, саморазвитии и уходе за собой. Полезные советы, вдохновение и идеи для счастливой жизни.
Все о стройке https://dobdom.ru и ремонте: полезные статьи о строительстве домов, ремонте квартир, отделке помещений и выборе материалов. Советы специалистов, инструкции, идеи для интерьера и практические рекомендации по строительству и благоустройству жилья.
Портал о стройке https://profsmeta3dn.ru и ремонте: строительство домов, ремонт квартир, отделка помещений и современные строительные технологии. Полезные советы мастеров, обзоры материалов и инструмента, инструкции и идеи для ремонта и благоустройства жилья.
seo продвижение магазин наушников seo-kejsy13.ru .
mostbet скачать на iphone mostbet скачать на iphone
melbet минимальный депозит https://www.melbet93640.help
монтаж автоматической системы газового пожаротушения монтаж автоматической системы газового пожаротушения .
игра aviator melbet melbet28175.help
современные seo кейсы seo-kejsy13.ru .
мелбет рабочее зеркало киргизия https://www.melbet93640.help
melbet aviator стратегия melbet28175.help
melbet usdt https://melbet28175.help/
melbet лимиты melbet лимиты
mostbet официальный сайт вход https://www.mostbet15247.help
мостбет условия отыгрыша мостбет условия отыгрыша
Found a bride? plan a surprise proposal in Barcelona romantic scenarios, beautiful locations, photo shoots, decor, and surprises for the perfect declaration of love. Make your engagement in Barcelona an unforgettable moment in your story.
успешные seo кейсы санкт петербург успешные seo кейсы санкт петербург .
Проблемы с застройщиком? выплата по неустойке дду помощь юриста по долевому строительству, расчет неустойки, подготовка претензии и подача иска в суд. Защитим права дольщиков и поможем получить компенсацию.
Нужен юрист? арбитражный адвокат москва представительство в арбитражном суде, защита интересов бизнеса, взыскание задолженности, споры по договорам и сопровождение судебных процессов для компаний и предпринимателей.
Ищешь кран? краны под приварку для трубопроводов различного назначения. Надежная запорная арматура для систем водоснабжения, отопления, газа и промышленных магистралей. Высокая герметичность, долговечность и устойчивость к нагрузкам.
парфюмерия и косметика https://elicebeauty.com/parfyumeriya/filter/_m302/
мелбет скачать мелбет скачать
melbet пополнение через карту melbet пополнение через карту
мелбет депозит мелбет депозит
мостбет aviator на деньги http://mostbet15247.help
мостбет отыгрыш бонуса http://mostbet96810.help
заказать сео анализ сайта пушка заказать сео анализ сайта пушка .
мостбет верификация http://mostbet76914.help/
мостбет app https://www.mostbet96810.help
mostbet экспресс ставка https://www.mostbet15247.help
мелбет сайт на русском melbet28175.help
1win хуруҷ бо TJS 1win хуруҷ бо TJS
мостбет Баткен http://mostbet15247.help/
мостбет баскетбол ставки мостбет баскетбол ставки
1win pariuri pe meciuri azi 1win pariuri pe meciuri azi
расчет газового пожаротушения расчет газового пожаротушения .
mostbet промокод Киргизия http://www.mostbet96810.help
мостбет восстановление аккаунта http://mostbet15247.help/
1вин Тоҷикистон воридшавӣ https://1win83254.help
mostbet слоты 2026 http://www.mostbet49271.help
мостбет скачать приложение на android http://www.mostbet49271.help
1win apk зеркашӣ http://1win83254.help
1win confirmare cont https://www.1win83062.help
1вин футбол шартгузорӣ https://www.1win83254.help
cum retrag cu Payeer de la 1win http://1win83062.help/
mostbet зеркало сегодня mostbet15247.help
mostbet официальный сайт в Кыргызстане http://mostbet96810.help/
1win cum fac transfer bancar 1win83062.help
1win valorant шартгузорӣ 1win valorant шартгузорӣ
1win crash игра http://www.1win32786.help
1win nu merge 1win83062.help
1win conectare cu facebook 1win conectare cu facebook
мостбет ставки на футбол Кыргызстан мостбет ставки на футбол Кыргызстан
1win скачать на android http://1win32786.help
1win вывод на карту сколько идет https://www.1win32786.help
lucky jet 1вин 1win32786.help
1win тамошои бозӣ 1win тамошои бозӣ
mostbet обновить apk сегодня https://mostbet49271.help/
1вин Узбекистан скачать http://www.1win36247.help
crash 1вин crash 1вин
1win MasterCard вывод 1win MasterCard вывод
mostbet восстановить пароль https://mostbet58041.help/
1win скачать 2026 1win скачать 2026
1вин официальный сайт 1вин официальный сайт
1вин зеркало http://www.1win32786.help
mostbet_kg http://www.mostbet49271.help
мостбет aviator на деньги http://mostbet49271.help
как вывести средства с 1win на карту как вывести средства с 1win на карту
1win регистрация через номер http://www.1win68017.help
1вин mines http://1win36247.help
1win сайт недоступен http://1win68017.help/
mostbet регистрация за 1 минуту https://www.mostbet58041.help
1win depunere Neteller https://www.1win38174.help
1вин скачать http://1win36247.help
1вин как скачать http://1win68017.help/
mostbet промокод https://mostbet58041.help
mostbet aviator играть https://mostbet58041.help/
мостбет тотал mostbet90753.help
1win retragere MDL https://www.1win38174.help
мостбет ЮMoney пополнение http://mostbet58041.help
mostbet как пройти верификацию mostbet58041.help
mostbet регистрация по номеру mostbet регистрация по номеру
1win личный кабинет бонусы 1win60925.help
1win conectare https://1win38174.help/
1win_uz https://1win36247.help
1win официальный 1win официальный
1win пополнение не проходит http://1win82361.help/
1win сколько выводят на о деньги 1win20819.help
1win cashback 1win cashback
1win miza minima http://1win38174.help/
1вин игровые автоматы 1вин игровые автоматы
1win acces fara blocare http://1win38174.help/
1win mBank вывод 1win60925.help
1вин скачать на ios 1вин скачать на ios
1win слоты на реальные деньги http://1win15478.help
mostbet задержка вывода mostbet90753.help
1 вин промокод 1 вин промокод
1вин скачать http://1win82361.help
мостбет ставки регистрация http://mostbet90753.help
1win crash http://1win82361.help/
1win retragere Mastercard 1win retragere Mastercard
1win бонус новичкам 1win бонус новичкам
1win приветственный бонус 1win приветственный бонус
1win crash http://1win82361.help
melbet kz настройки уведомлений melbet kz настройки уведомлений
melbet comision 0 https://melbet42310.help/
1win Ош 1win Ош
1вин способы оплаты http://1win15478.help
Информационный портал https://tga-info.ru обо всем: статьи о технологиях, здоровье, образе жизни, финансах, путешествиях и саморазвитии. Полезные советы, интересные факты и актуальные материалы для тех, кто хочет узнавать новое каждый день.
Портал о строительстве https://nesmetnoe.ru и ремонте: технологии возведения домов, отделка помещений, выбор строительных материалов и инструмента. Полезные статьи, инструкции, советы специалистов и идеи для обустройства жилья.
Онлайн-журнал https://lifeoflove.ru для женщин о красоте, моде, здоровье и отношениях. Полезные советы по уходу за собой, статьи о психологии, семье, стиле и саморазвитии. Идеи для вдохновения, гармонии и счастливой жизни.
melbet problema site melbet42310.help
melbet yumoney вывод melbet yumoney вывод
1вин вход Киргизия https://1win15478.help
Сайт новостей https://hardexpert.net компьютерного мира: технологии, программное обеспечение, компьютерное железо и гаджеты. Свежие новости IT, обзоры устройств, аналитика и полезные материалы о современных цифровых технологиях.
Все про автомобили https://hyundai-sto.ru новости автопрома, обзоры новых моделей, технические характеристики, советы по выбору машины и обслуживанию. Полезные статьи о ремонте, эксплуатации, тюнинге и современных технологиях автомобильной индустрии.
1вин коэффициенты 1вин коэффициенты
мостбет регистрация бонус Киргизия mostbet90753.help
Информационный журнал https://greendachnik.ru для садоводов и дачников. Статьи о саде, огороде и ландшафтном дизайне, советы по посадке и уходу за растениями, идеи оформления участка и рекомендации по созданию уютного сада.
Женский портал https://idealnaya-ya.ru о красоте, здоровье, отношениях и стиле. Полезные советы для женщин, идеи для ухода за собой, моды, семьи и гармоничной жизни.
Все женские секреты https://allsekrets.ru сайт о красоте, здоровье, отношениях и стиле жизни. Полезные советы по уходу за собой, психологии, моде, семье и саморазвитию. Идеи для вдохновения, гармонии и счастливой жизни современной женщины.
mostbet фриспины за регистрацию https://mostbet90753.help
Сайт о строительстве https://profsmeta3dn.ru и ремонте: полезные советы по строительству домов, ремонту квартир и отделке помещений. Обзоры строительных материалов, инструкции по работам и рекомендации специалистов для обустройства дома.
Все о стройке https://dobdom.ru и ремонте — полезные статьи о строительстве домов, ремонте квартир, отделке помещений и выборе материалов. Практические советы мастеров, инструкции по строительным работам и идеи для обустройства дома.
Доставка пиццы https://kosmopizza.ru в саратове, закажи по номеру 71-55-55
Мы выполняем работы https://kartremont.ru “от и до”: демонтаж, черновые и чистовые работы, установку сантехники, электрики, отделку стен, пола, потолка, кондиционеров, вентиляции, мебели и клининг.
melbet vpn necesar melbet vpn necesar
1win бесплатные вращения 1win бесплатные вращения
melbet обход блокировки melbet обход блокировки
1win документы для верификации 1win20819.help
A website with unblocked games for free online play. Popular browser games, arcades, platformers, racing games, and puzzles are available with no downloads or restrictions on any device.
Услуги по настройке https://sysadmin.guru и администрированию серверов и компьютеров. Установка систем, настройка сетей, обслуживание серверной инфраструктуры, защита данных и техническая поддержка. Помогаем обеспечить стабильную работу IT-систем.
jocuri casino melbet jocuri casino melbet
melbet пополнение https://www.melbet60432.help
1win турнир слоты http://www.1win20819.help
pinup registratsiya muammo pinup registratsiya muammo
melbet pariuri pe cornere melbet pariuri pe cornere
melbet сменить номер телефона http://www.melbet60432.help
mines 1вин http://1win20819.help/
pinup slots https://pinup14278.help
mostbet зеркало 2026 https://mostbet45087.help
A platform for searching https://grand-screen.com and comparing mobile apps. Explore features, reviews, ratings, and user feedback. The Android and iOS app catalog helps you find the best services for work, communication, and entertainment.
Свежие новости свежие новости с оперативными новостями из России и мира. Политика, экономика, технологии, общество, культура и другие важные темы. Актуальная информация, аналитика и комментарии экспертов.
Портал о строительстве https://sdhhbsteel.com и промышленности: новости отрасли, технологии, оборудование, строительные материалы и производственные решения. Полезная информация, аналитика и обзоры для специалистов и компаний.
Обзоры дрелей https://drel-interskol.ru и электроинструмента для дома и профессиональной работы. Сравнение моделей, характеристики, преимущества и недостатки популярных дрелей. Полезные советы по выбору инструмента для ремонта, строительства и бытовых задач.
1win промо код http://www.1win20819.help
мостбет бонус не начислили мостбет бонус не начислили
mostbet azərbaycan register http://mostbet2012.help
Сертификация товаров http://www.certif-test.ru представляет собой официальный процесс подтверждения соответствия продукции установленным стандартам качества, безопасности и экологичности. В основе этого понятия лежит проверка изделий независимыми органами на предмет соблюдения нормативов, таких как ГОСТ, ISO или отраслевые требования. Что такое сертификация товаров? Это не просто формальность, а комплекс мер, включающих лабораторные тесты, аудит производства и выдачу сертификата, который служит доказательством надежности продукта. Без сертификации многие товары не допускаются на рынок, особенно в сферах пищевой промышленности, электроники и медицинских изделий, где риски для здоровья потребителей особенно высоки.
Сертификация товаров http://www.vnii-certification.ru это процесс официального подтверждения соответствия продукции установленным стандартам качества, безопасности и экологичности. В современном мире, где потребители все чаще обращают внимание на надежность и происхождение товаров, сертификация играет ключевую роль в обеспечении доверия на рынке. Она помогает производителям и поставщикам демонстрировать, что их продукция соответствует нормам, а также защищает интересы покупателей. Существуют различные типы сертификации товаров, которые можно разделить на обязательную и добровольную, каждая из которых имеет свои особенности и цели. В этой статье мы разберем, что такое сертификация товаров и почему она важна для бизнеса и потребителей.
Только лучшие материалы: https://sterligov.com/modelnyy_dom/platya/sarafan-siniy/
pin-up android pinup14278.help
1win минимальная сумма вывода карта https://1win20819.help
descarca melbet gratis descarca melbet gratis
mostbet kartdan depozit vaxtı mostbet kartdan depozit vaxtı
melbet http://melbet60432.help
pin-up koeffitsientlar pinup14278.help
мостбет версия для ios http://www.mostbet45087.help
pin up Oʻzbekistonda depozit http://pinup14278.help
мостбет кэшбэк условия https://mostbet20748.help/
mostbet cod promoțional Republica Moldova https://mostbet63218.help
Нужен кондиционер? установка кондиционера в Москве мы устанавливаем все марки и модели кондиционеров, сплит-системы, мультисплит-системы, кассетные, канальные и напольно-потолочные. Также предоставляем сопутствующие услуги автовышки или альпиниста, оказываем гарантийное и сервисное обслуживание.
aviator игра мостбет aviator игра мостбет
мостбет слоты бонус https://mostbet20748.help/
mostbet результаты live http://mostbet20748.help/
мостбет баскетбол ставки http://www.mostbet45087.help
1win восстановление аккаунта http://www.1win20819.help
mostbet pariuri multiple http://mostbet63218.help/
mostbet официальный сайт Бишкек https://www.mostbet45087.help
мостбет двухфакторная защита http://mostbet45087.help
кольцо с камнями цены помолвочное кольцо женское
Current weather in Podgorica in September, today and in the coming days. Accurate forecast of temperature, precipitation, wind, and humidity. Find out what the weather is like in Podgorica now, the weekly forecast for the month, and weather trends in Montenegro’s capital.
Если вам интересен провайдер провайдер PG Soft и вы хотите разбираться в его играх не “вслепую”, а с пониманием механик – загляните в наш Telegram. Мы регулярно выкладываем подборки слотов PG Soft, рассказываем, чем отличаются популярные тайтлы, на что смотреть по волатильности/бонускам, какие фичи встречаются чаще всего и где реально можно поймать самые сочные раунды. Формат простой: короткие обзоры, заметки по обновлениям и идеи, что стоит попробовать в первую очередь.
мостбет регистрация Киргизия mostbet20748.help
pin up apk https://pinup14278.help/
mostbet deschidere cont mostbet63218.help
Если вы ищете лучшие казино по отзывам игроков, смотрите не только на общий рейтинг, но и на повторяющиеся детали: как быстро выводят, какие платежки реально проходят, насколько вменяемая поддержка, и нет ли массовых жалоб на блокировки или резкие ограничения. Мы как раз отслеживаем такие моменты и публикуем свежие подборки и обновления в Telegram – чтобы можно было быстро понять, где сейчас стабильно и честно. Ссылка на канал: https://t.me/s/rating_casino_russia/23
mostbet canlı bahis mostbet2012.help
mostbet uzbekistan https://mostbet28461.help
crash мостбет mostbet20748.help
1вин логин https://www.1win17043.help
mostbet tətbiq bonusu https://mostbet2012.help/
mostbet confirmare email mostbet confirmare email
mostbet joc mines mostbet joc mines
mostbet depozit komissiya http://www.mostbet28461.help
слоты 1win слоты 1win
mostbet скачать бесплатно https://mostbet17403.help
mostbet crash qoidalari https://mostbet28461.help
1win вывод через мегапей инструкция 1win вывод через мегапей инструкция
mostbet crash oyun mostbet crash oyun
сколько стоит курсовая работа по юриспруденции kupit-kursovuyu-82.ru .
курсовая работа недорого kupit-kursovuyu-81.ru .
mostbet slot qaydaları mostbet slot qaydaları
mostbet aviator bot mostbet aviator bot
1win пополнение DemirBank 1win пополнение DemirBank
mostbet Causeni http://mostbet63218.help/
курсовые работы заказать курсовые работы заказать .
заказать курсовую заказать курсовую .
mostbet bonus ishlatish https://mostbet28461.help/
мостбет верификация аккаунта https://www.mostbet17403.help
mostbet депозит не пришел http://mostbet57193.help/
1вин краш https://1win17043.help/
mostbet mines strategiya mostbet mines strategiya
1вин crash 1вин crash
заказать курсовую заказать курсовую .
мостбет зеркало для Кыргызстана https://mostbet17403.help/
выполнение курсовых работ выполнение курсовых работ .
mostbet бонусы казино mostbet17403.help
мостбет создать аккаунт http://www.mostbet57193.help
мостбет букмекер http://mostbet60172.help
срочно курсовая работа kupit-kursovuyu-82.ru .
заказать практическую работу недорого цены kupit-kursovuyu-81.ru .
мостбет как пополнить с карты https://www.mostbet17403.help
мостбет ios Кыргызстан http://www.mostbet17403.help
Профессиональный лечение запоя капельницами детоксикация организма, помощь при алкогольной интоксикации и восстановление самочувствия пациента. Специалист приезжает на дом и оказывает профессиональную помощь.
1win демо crash https://1win54038.help/
mostbet смотреть матчи mostbet смотреть матчи
мостбет лимиты вывода http://www.mostbet60172.help
mostbet ilovada depozit mostbet28461.help
курсовые под заказ курсовые под заказ .
mostbet apk download uz mostbet apk download uz
1win пополнение без комиссии элсом http://1win17043.help
mostbet ishlaydigan sayt mostbet ishlaydigan sayt
mostbet sariq kartochka stavka https://mostbet84629.help/
мостбет apk скачать на android https://mostbet57193.help
1win безопасность https://www.1win54038.help
купить задание для студентов kupit-kursovuyu-82.ru .
mostbet apk скачать на android mostbet apk скачать на android
mostbet kupon hisoblash http://mostbet84629.help
1win казино 1win54038.help
как скачать mostbet на iphone mostbet94063.help
помощь курсовые kupit-kursovuyu-81.ru .
1 вин промокод http://1win54038.help/
1win apk o‘rnatish http://1win5754.help
mostbet kazino hisob http://mostbet84629.help
Качественное SEO https://outreachseo.ru продвижение сайта для бизнеса. Наши специалисты предлагают эффективные решения для роста позиций в поисковых системах. Подробнее об услугах и стратегиях можно узнать на сайте
мостбет click mostbet https://mostbet60172.help/
мостбет почта поддержки мостбет почта поддержки
курсовые работы заказать kupit-kursovuyu-81.ru .
mostbet электронный кошелек http://mostbet57193.help
как вывести деньги с мостбет как вывести деньги с мостбет
mostbet lucky jet https://mostbet94063.help
1win авиатор на реальные деньги 1win авиатор на реальные деньги
1win lucky jet https://www.1win5754.help
mostbet app for ios http://mostbet53160.help
mostbet mines mobilon https://mostbet2023.help/
mostbet промокод https://mostbet94063.help/
1win iosga qanday yuklab olish 1win iosga qanday yuklab olish
mostbet вход с Кыргызстана http://www.mostbet94063.help
1win slotlar qanday o‘ynash 1win slotlar qanday o‘ynash
mostbet казино бонус за депозит http://mostbet60172.help/
мостбет slots мостбет slots
mostbet bonus code today http://mostbet53160.help/
mostbet magyar weboldal mostbet magyar weboldal
1win blokdan chiqish https://1win5754.help
1win sloturi populare 1win62509.help
melbet aviator играть https://melbet47086.help/
mostbet live cash out https://mostbet53160.help
mostbet befizetés azonnal mostbet2023.help
мелбет зеркало кыргызстан http://melbet47086.help/
mostbet first deposit bonus code http://mostbet53160.help
как скачать mostbet на iphone mostbet94063.help
mostbet lucky jet http://mostbet2023.help
1win plinko Republica Moldova https://1win62509.help
melbet элсом вывод http://melbet47086.help
1win comision depunere http://1win62509.help
mostbet new slots mostbet53160.help
мостбет купон http://mostbet82043.help
1win jocuri crash 1win jocuri crash
mostbet bónusz kifizethető http://mostbet2023.help
melbet способы оплаты киргизия melbet способы оплаты киргизия
1win mercado pago https://1win5772.help/
Любишь азарт? pin up casino online предлагает разнообразные игровые автоматы, настольные игры и интересные бонусные программы. Платформа создана для комфортной игры и предлагает широкий выбор развлечений.
мелбет документы для верификации https://melbet47086.help/
Онлайн казино https://wordpressinside.ru с большим выбором слотов, настольных игр и бонусных предложений. Платформа предлагает удобный интерфейс, популярные игровые автоматы и различные способы оплаты.
Лучшее казино https://россиягоржусь.рф платформа для онлайн игр с большим выбором слотов и настольных развлечений. Бонусные предложения и удобный интерфейс делают игру комфортной.
1win stare server http://www.1win5758.help
mostbet новый официальный сайт http://mostbet82043.help
1win intrare pe site http://www.1win62509.help
Большой выбор автоматов https://ekolip.ru настольных развлечений и бонусных предложений делает игру более разнообразной. Пин Ап казино предлагает пользователям популярные слоты и удобную игровую платформу.
Нужен банный веник? купить дубовый веник натуральные банные веники помогают улучшить эффект парения и создать особую атмосферу в бане. У нас можно купить веник для бани из березы, дуба или эвкалипта.
Разнообразные игровые автоматы пин ап скачать настольные развлечения доступны на популярной игровой платформе. Пин Ап казино предлагает большой каталог слотов и удобный интерфейс для пользователей.
visit this bazaar page – I opened the site for the first time and found the content informative.
Нужен банный веник? купить эвкалиптовый веник натуральные банные веники помогают улучшить эффект парения и создать особую атмосферу в бане. У нас можно купить веник для бани из березы, дуба или эвкалипта.
Противопожарные двери https://zavod-dverimontazh.moscow от производителя с профессиональной установкой в Москве. Изготовление по ГОСТ, сертифицированные конструкции с высокой огнестойкостью. Металлические противопожарные двери для офисов, складов, жилых и коммерческих зданий. Доставка, монтаж, гарантия качества и выгодные цены.
1win jocuri noi http://www.1win5758.help
мостбет официальный сайт вход https://mostbet82043.help
1win autentificare cu email http://1win62509.help
mostbet free spins no deposit http://mostbet53160.help
mostbet promó kód nem működik mostbet2023.help
мелбет не открывается https://melbet47086.help
cómo jugar crash en 1win 1win5772.help
mostbet мобильная версия mostbet мобильная версия
мостбет пополнение с карты https://mostbet82043.help
1win contacto méxico http://1win5772.help/
1win mirror actual https://1win5758.help
lucky jet o‘yini pin-up http://pinup76809.help
Новостной портал https://newsn.ru — свежие новости России и мира, политика, экономика, общество, технологии и культура. Оперативные публикации, аналитические материалы и главные события дня. Узнавайте важные новости первыми и следите за развитием событий онлайн.
Все о строительстве https://dipris-studio.ru и дизайне загородного дома: современные проекты, идеи планировки, выбор материалов, этапы строительства и оформление интерьера. Полезные советы по строительству коттеджей, ремонту и благоустройству участка. Практические рекомендации для владельцев домов и тех, кто только планирует строительство.
Портал про здоровье https://vekneboley.ru с полезными статьями о профилактике заболеваний, правильном питании, иммунитете и здоровом образе жизни. Рекомендации специалистов, советы по поддержанию здоровья, физической активности и улучшению самочувствия каждый день.
Портал новостей https://hand-store.ru о высоких технологиях и IT-индустрии. Последние события в мире программирования, искусственного интеллекта, стартапов, гаджетов и цифровых технологий. Читайте обзоры, аналитические материалы и важные новости технологического рынка.
Все о строительстве https://sportdon.ru и ремонтах: рекомендации по выбору материалов, технологиям строительства, отделке помещений и дизайну интерьера. Полезные статьи для тех, кто строит дом, делает ремонт квартиры или планирует обновление интерьера.
1win link nou https://1win62509.help
1win login rapid https://www.1win5758.help
Портал о бытовой https://expert-byt.ru технике и ее эксплуатации. Полезные статьи о выборе техники для дома, правильном использовании, уходе и продлении срока службы устройств. Советы по ремонту, обслуживанию и эффективному использованию бытовой техники в повседневной жизни.
Читайте свежие новости https://иваново37.рф России на новостном портале. Главные события дня, политика, экономика, общество, технологии и культура. Оперативные публикации, аналитика и важная информация о событиях в стране и мире.
Свежие мировые https://novostizn.ru новости и интересные события со всех уголков планеты. Политика, экономика, технологии, культура, наука и общественная жизнь. Актуальные новости, аналитика и необычные факты о событиях, которые обсуждает весь мир.
Мировые новости https://dikb.ru и интересные события каждый день. Самые важные события политики, экономики, технологий, науки и культуры. Свежие публикации, аналитика и необычные факты о происходящем в разных странах мира.
Все о смартфонах https://topse.ru мобильных телефонах и гаджетах Sony. Новости, обзоры новых моделей Xperia, характеристики устройств, сравнение смартфонов и полезные советы по выбору техники. Узнайте о новинках Sony, технологиях камер, производительности и возможностях мобильных устройств.
pin up rasmiy link pin up rasmiy link
Live streams https://selcuksport.com.az of football matches and sports TV shows online. Football news, schedules, results, and analysis. Follow your favorite teams, watch highlights, and stay up-to-date on the latest news from the world of football.
Playmods APK http://www.playmods.com.az/ is a convenient app for downloading modified games and apps on Android. It offers a large catalog of popular games, fast mod updates, additional features, and a simple interface for easy searching and installation.
Противопожарные двери https://zavod-dverimontazh.moscow в Москве от производителя. Надежные металлические двери с высокой огнестойкостью для жилых и коммерческих помещений. Сертификация, соответствие нормам пожарной безопасности, быстрая доставка и установка противопожарных дверей под ключ.
Общаешься в максе? мессенджер max удобный способ найти интересные каналы в мессенджере. Новости, технологии, бизнес, развлечения и другие категории. Просматривайте популярные каналы, открывайте новые источники информации и подписывайтесь.
Читать далее: https://l-parfum.ru/catalog/les-contes/
мостбет ставка экспресс http://www.mostbet82043.help
1win tarjeta de crédito 1win tarjeta de crédito
Консультация семейного юриста поможет быстро разобраться в сложных жизненных ситуациях: развод, раздел имущества, алименты, споры о детях и брачные договоры. Перейдя по запросу юрист по делам семьи – специалист объяснит ваши права, оценит перспективы дела и предложит оптимальный план действий. Получите профессиональную юридическую помощь и ответы на все вопросы по семейному праву.
mostbet obejście blokady mirror mostbet2003.help
Бесплатная консультация юриста — это возможность получить профессиональную правовую помощь без оплаты. Перейдя по запросу юридическая консультация бесплатно онлайн круглосуточно вы получите поддержку специалиста, который выслушает вашу ситуацию, оценит риски и подскажет возможные варианты решения: от подготовки документов до защиты интересов в суде. Такая консультация помогает понять свои права, избежать ошибок и выбрать правильную стратегию действий.
Строительный портал https://apis-togo.org с полезными статьями о строительстве домов, ремонте квартир и выборе строительных материалов. Советы специалистов, современные технологии строительства, идеи дизайна интерьера и практические рекомендации для ремонта и обустройства жилья.
Строительный журнал https://eeu-a.kiev.ua о строительстве, ремонте и дизайне. Полезные статьи о строительных технологиях, выборе материалов, отделке помещений и обустройстве дома. Практические советы для тех, кто строит дом или делает ремонт.
Все о строительстве https://elektrod.com.ua и ремонте на строительном портале. Советы по выбору строительных материалов, технологиям строительства, отделке помещений и дизайну интерьера. Полезные рекомендации для владельцев домов, квартир и загородной недвижимости.
Строительный портал https://furbero.com с полезной информацией о строительстве домов, ремонте квартир и отделке помещений. Советы по выбору материалов, современные технологии строительства и идеи дизайна интерьера для комфортного жилья.
Полезные статьи https://novostroi.in.ua о строительстве и ремонте на строительном портале. Технологии строительства, выбор материалов, отделка помещений и дизайн интерьера. Практические рекомендации для строительства дома и ремонта квартиры.
pin-up apk 2026 https://www.pinup76809.help
1win change password 1win change password
pin-up mines o‘ynash pin-up mines o‘ynash
mines 1win cómo jugar https://1win5772.help/
cum depun cu Visa pe 1win cum depun cu Visa pe 1win
1win cuenta verificada http://1win5772.help/
Автомобильный портал https://autoiceny.com.ua для автолюбителей. Свежие новости автоиндустрии, обзоры автомобилей, тест-драйвы, рекомендации по эксплуатации и обслуживанию машин. Полезная информация о современных автомобилях и автомобильных технологиях.
Портал про автомобили https://carexpert.com.ua новости автоиндустрии, обзоры новых моделей, тест-драйвы и советы по эксплуатации машин. Полезные статьи для автолюбителей о выборе автомобиля, ремонте, обслуживании и современных автомобильных технологиях.
Все об автомобилях https://eurasiamobilechallenge.com на автомобильном портале. Новости автоиндустрии, обзоры машин, тест-драйвы, советы по ремонту и обслуживанию автомобилей. Узнайте о новых моделях авто, технологиях и событиях автомобильного рынка.
Автомобильный портал https://mallex.info с новостями автоиндустрии, обзорами автомобилей, тест-драйвами и полезными советами для водителей. Узнайте о новых моделях машин, технологиях автопроизводителей, обслуживании авто и последних событиях автомобильного рынка.
Портал о строительстве https://proektsam.kyiv.ua и ремонте домов и квартир. Полезные статьи о строительных технологиях, выборе материалов, отделке помещений и дизайне интерьера. Советы специалистов и практические рекомендации для обустройства жилья.
1win pariuri Republica Moldova 1win pariuri Republica Moldova
1win pentru ios 18 1win62509.help
revolut mostbet revolut mostbet
pinup app ishlamayapti https://pinup23185.help
pin-up promoskodni qanday kiritish pin-up promoskodni qanday kiritish
descargar aplicación de 1win descargar aplicación de 1win
como descargar 1win https://1win5772.help/
1win free spins Moldova http://1win5758.help
Женский сайт https://entertainment.com.ua с полезными статьями о красоте, здоровье, моде, отношениях и саморазвитии. Советы по уходу за собой, идеи стиля, рецепты, психология и вдохновение для современной женщины. Читайте интересные материалы и находите полезные советы для повседневной жизни.
1win official website 1win official website
Информационный женский https://gorod-lubvi.com.ua портал о красоте, здоровье, моде, семье и отношениях. Полезные советы, идеи стиля, рецепты, психология и рекомендации для современной женщины. Узнайте, как заботиться о себе и создавать гармонию в жизни.
Женский портал https://happytime.in.ua с полезными статьями о моде, красоте, здоровье, отношениях и семье. Советы по уходу за собой, рецепты, идеи стиля и вдохновение для женщин. Все самое интересное и полезное для современной женщины.
Сайт для женщин https://leif.com.ua с полезными советами о красоте, здоровье, моде и отношениях. Статьи о саморазвитии, семье, стиле жизни и уходе за собой. Узнайте секреты женской красоты и гармонии.
Все для женщин https://novaya.com.ua на одном сайте: мода, красота, здоровье, отношения и семья. Полезные советы по уходу за собой, идеи стиля, рецепты и вдохновляющие статьи для современной женщины.
explore zen bazaar hub – Just visited, looks like a well-curated marketplace with interesting finds.
lavender market online – I checked out the page and everything appeared properly organized.
pinup aviator demo pinup aviator demo
pinup koeffitsiyentlar pinup23185.help
Женский сайт https://martime.com.ua о красоте, здоровье, моде и стиле жизни. Советы по уходу за собой, психология отношений, рецепты и полезные рекомендации для современной женщины. Читайте интересные статьи и вдохновляйтесь.
Женский портал https://olive.kiev.ua о моде, красоте и здоровье. Полезные советы, рецепты, психология отношений и идеи стиля. Читайте интересные статьи и находите вдохновение для повседневной жизни.
Все о строительстве https://sevgr.org.ua домов, ремонте квартир и благоустройстве жилья на строительном портале. Полезные статьи, рекомендации специалистов, современные технологии строительства и практические советы по выбору строительных материалов и отделке помещений.
Сайт для женщин https://tiamo.rv.ua с полезными статьями о красоте, здоровье, моде, семье и отношениях. Рекомендации по уходу за собой, идеи стиля, рецепты и советы для гармоничной жизни.
Olive Brook Vendor Hub – Browsed through the site today and the pages loaded smoothly.
mostbet bonus za kupon http://www.mostbet2003.help
ремонт ванны санузла под ключ сколько ремонт ванной комнаты
1win mirror MD https://1win5758.help/
1win sports withdrawal Uganda https://1win5742.help
actualizare 1win app actualizare 1win app
collective vendor portal – Looked around earlier and the pages load smoothly with easy navigation.
В каталоге представлены проверенные провайдеры и актуальные игровые новинки.
Pinco Casino
Платформа постоянно развивается и совершенствуется.
bay bazaar shop – Smooth pages and simple layout make exploring the marketplace enjoyable.
pin-up ga qanday depozit qilish https://pinup23185.help
visit walnut crest vendors – The site design feels tidy, and everything loads without delays.
open hazel harbor vendors – Came across this site by chance and the listings seem worth a quick look.
mostbet link do pobrania https://www.mostbet2003.help
pinup slots pinup23185.help
1win slot app http://1win5742.help
мостбет plinko стратегия http://mostbet34518.help
mostbet wyniki tenis https://www.mostbet2003.help
explore berry bazaar – Layout is easy to navigate, with a friendly and pleasant marketplace vibe.
check out wave vendor – Pages respond quickly and the layout is clean and simple to use.
1win site Moldova http://www.1win62509.help
1win site down Uganda https://www.1win5742.help
aviator 1win Moldova 1win5758.help
discover echobrook items – Pages load quickly, and browsing categories felt smooth.
1win qeydiyyat et Azərbaycan https://1win5764.help/
1win suport bonus https://1win5758.help
pin-up aviator o‘yini pin-up aviator o‘yini
shop brightbrook finds – Smooth navigation and clear layout make exploring sections enjoyable.
мостбет чат онлайн мостбет чат онлайн
browse acorn marketplace listings – The structure feels organized and navigating through products was easy.
pin up android ilova http://pinup23185.help/
explore this bazaar – Came across the website and the layout is clean and helpful.
valebrookvendorhub – Just checked this site earlier and navigation felt smooth.
Хотите, чтобы ваш профиль или группа в Одноклассниках росли быстрее? Перейдя по запросу накрутка просмотров и подписчиков в одноклассники вы сможете увеличить количество подписчиков и активность на странице. Чем больше подписчиков — тем выше доверие и интерес к вашему аккаунту. Начните развивать свою страницу уже сегодня!
мостбет обновление android мостбет обновление android
crownstoneemporium – Emprorium marketplace here seems organized and friendly to explore.
sporturi virtuale melbet https://www.melbet75891.help
mostbet oficjalna domena mostbet oficjalna domena
browse this hub – Came across this marketplace today, and it appears active and easy to navigate.
this emporium website – I checked the page today and found the information simple yet informative.
1win Visa çıxarış http://1win5764.help
1win aviator demo http://1win5742.help/
Свежие новости https://actualnews.kyiv.ua Украины и мира на информационном новостном сайте. Политика, экономика, общество, технологии, культура и происшествия. Оперативные публикации, аналитика и комментарии экспертов. Узнавайте главные события дня и следите за развитием новостей.
Сайт новостей https://antifa-action.org.ua Украины и мира с актуальными событиями политики, экономики, общества и технологий. Читайте свежие новости, аналитические материалы и комментарии экспертов. Все главные события Украины и международной повестки.
Актуальные новости https://kiev-online.com.ua Украины и мира на новостном портале. Политика, экономика, общество, технологии и культура. Свежие события, аналитика и важные новости дня.
Читайте последние https://kiev-pravda.kiev.ua новости Украины и мира на новостном сайте. Политика, экономика, общество, технологии, культура и происшествия. Оперативные обновления и аналитические материалы.
Информационный сайт https://mediashare.com.ua новостей Украины и мира. Свежие события политики, экономики, общества и технологий. Главные новости дня, аналитика и комментарии экспертов.
sistem pariuri melbet http://melbet75891.help/
mostbet slots https://mostbet34518.help/
1win Ethereum Azərbaycan 1win5764.help
daisystone marketplace – Well-organized pages and smooth transitions made browsing enjoyable.
Портал для женщин https://fotky.com.ua с интересными статьями о моде, красоте, здоровье, семье и отношениях. Полезные советы, рецепты, психология отношений и идеи стиля.
Сайт о гипертонии https://gipertoniya.net и повышенном артериальном давлении. Полезные статьи о причинах гипертонии, симптомах, профилактике и современных методах лечения. Советы врачей, рекомендации по питанию, образу жизни и контролю артериального давления.
Строительный сайт https://ko-online.com.ua с полезными статьями о строительстве домов, ремонте квартир и выборе строительных материалов. Современные технологии строительства, советы специалистов, идеи дизайна интерьера и практические рекомендации для ремонта и обустройства жилья.
Медицинский портал https://lpl.org.ua с полезными статьями о здоровье, профилактике заболеваний и современных методах лечения. Советы врачей, рекомендации по правильному питанию, укреплению иммунитета и здоровому образу жизни.
Сайт о финансах https://manorsgroup.com.ua и недвижимости с полезными статьями о инвестициях, покупке и продаже недвижимости, ипотеке и управлении личными финансами. Аналитика рынка, советы экспертов и актуальные новости для тех, кто интересуется финансовыми решениями и недвижимостью.
mostbet live линия mostbet live линия
1win yüklə Azərbaycan apk http://1win5764.help
mostbet sənəd qəbul olunmadı http://mostbet85214.help/
Все о строительстве https://mia.km.ua и ремонте на одном сайте. Полезные советы по выбору строительных материалов, технологиям строительства, отделке помещений и дизайну интерьера. Практические рекомендации для тех, кто строит дом или делает ремонт.
Онлайн журнал https://mts-agro.com.ua о садоводстве и дизайне участка. Советы по выращиванию растений, уходу за садом, ландшафтному дизайну и обустройству дачного участка. Идеи для сада, рекомендации по посадке цветов, деревьев и созданию красивого и уютного пространства.
Новостной портал https://sevsovet.com.ua с актуальными новостями Украины и мира. Политика, экономика, общество, технологии и культура. Оперативные новости и аналитические материалы.
Женский портал https://socvirus.com.ua о моде, красоте и здоровье. Полезные советы по уходу за собой, психология отношений, идеи стиля и рекомендации по здоровому образу жизни.
shop chestnutharbor finds – The marketplace layout is organized, and browsing feels smooth and easy.
Фитнес-портал https://sportinvent.com.ua о тренировках, здоровом образе жизни и правильном питании. Программы тренировок, советы тренеров, упражнения для дома и зала, рекомендации по похудению и набору мышечной массы. Узнайте, как улучшить физическую форму и поддерживать здоровье.
Хотите быстро развить канал на Rutube? Накрутка подписчиков Rutube поможет увеличить аудиторию, повысить доверие к каналу и ускорить продвижение видео. Перейдя по запросу накрутка просмотров rutube вы получите живых подписчиков, плавное добавление и безопасные методы продвижения. Отличное решение для новых и развивающихся каналов, которым важно быстрее набрать активность и привлечь больше просмотров. Начните рост канала уже сегодня.
visit autumn stone – The emporium’s layout is tidy and pleasantly simple to browse.
1win telefon nömrəsi ilə qeydiyyat 1win telefon nömrəsi ilə qeydiyyat
1win limitlər 1win limitlər
discover driftorchard items – Fast-loading outlet site, layout clear and browsing enjoyable.
melbet ios скачать приложение http://melbet39518.help/
shop cloud cove online – Pages load nicely, and the boutique design feels refined and user-friendly.
jasperstoneemporium – Interesting emporium style shop, products seem nicely displayed.
browse juniper vendors – Went through the platform quickly and found the product listings tidy.
outletlane – Products stand out nicely, navigating pages is smooth.
Статьи о маркетинге https://reklamspilka.org.ua PR и рекламе для бизнеса и специалистов. Практические рекомендации по продвижению брендов, управлению репутацией, контент-стратегии, рекламе в интернете и эффективным коммуникациям с клиентами.
Мастерская креативных идей https://rusproekt.org изготовление авторской мебели и текстиля, создание уникального декора и фитодизайна. Отделочные работы в стиле кантри и прованс, оформление интерьеров и индивидуальные дизайнерские решения для дома, кафе и загородных пространств.
Сайт новостей https://vestionline.com.ua Украины и мира с ежедневными обновлениями. Политика, экономика, общество, технологии и культура. Узнавайте последние события и следите за новостями.
Женский интернет-портал https://ledis.top о красоте, здоровье, моде и стиле жизни. Советы по уходу за собой, психология отношений, рецепты и полезные статьи для современной женщины.
Свежие новости https://zoobonus.com.ua Украины и мира в одном месте. Политика, экономика, общество, технологии, культура и происшествия. Актуальные события и аналитические материалы.
melbet md casino https://melbet75891.help/
shop pebblepine online – I noticed the listings are organized quite well.
melbet kz пополнение visa Казахстан https://www.melbet39518.help
mostbet промокод где взять mostbet34518.help
browse pebblestone – Looked around briefly and the products seem well presented.
latest 1win mirror latest 1win mirror
explore outlet treasures – Browsing items is comfortable and the layout is well-structured.
see pineharbor items – The marketplace feels smooth and straightforward.
melbet actualizare apk melbet actualizare apk
market hub – Well-structured pages, exploring items feels intuitive.
mostbet stránka nefunguje http://mostbet2017.help
coveemporiumfinds – Products are clearly arranged, navigation feels fast and intuitive.
melbet время вывода http://www.melbet39518.help
grovehub – Pages are clean and organized, exploring the catalog is fast.
mostbet saytga kirish mirror https://mostbet02894.help
1win valid promo code http://1win5524.ru/
mostbet kryptoměny výběr mostbet2017.help
lanternstonebazaar – Interesting bazaar concept, enjoyed looking through a few products.
мелбет казино слоты https://melbet39518.help
мелбет бонус за регистрацию https://melbet06374.help
Спортивный журнал https://beachsoccer.com.ua о мире спорта. Новости спортивных событий, обзоры матчей, аналитика соревнований и интервью со спортсменами. Читайте актуальные статьи о футболе, хоккее, теннисе, боксе и других популярных видах спорта.
Журнал о строительстве https://bms-soft.com.ua и ремонте для дома и квартиры. Полезные статьи о строительных технологиях, отделке помещений, выборе материалов и ремонте. Советы специалистов, идеи для интерьера и практические рекомендации.
Чайный портал https://etea.com.ua для любителей чая. Статьи о разных сортах чая, традициях чаепития, способах заваривания и пользе чая для здоровья. Узнайте больше о культуре чая, популярных напитках и интересных фактах о чае.
Портал о здоровье глаз https://eyecenter.com.ua и зрении человека. Советы по профилактике заболеваний глаз, улучшению зрения, правильной работе за компьютером и уходу за глазами. Полезные статьи о здоровье глаз и современных методах коррекции зрения.
Портал о технологиях https://helikon.com.ua и инновациях: новости IT, обзоры гаджетов, смартфонов и компьютеров. Статьи о цифровых сервисах, искусственном интеллекте и технологических трендах.
boutiquelane – Products stand out nicely, browsing feels smooth.
1win new slots https://1win5524.ru/
mostbet mines o‘ynash https://mostbet02894.help/
melbet jocuri casino http://www.melbet75891.help
plinko мелбет plinko мелбет
melbet apk instalare https://melbet75891.help/
mines mostbet tipy mines mostbet tipy
mostbet depozit olmadan oynamaq http://mostbet85214.help
emporiumhub – Clean layout with products easy to locate.
Накрутка подписчиков Rutube поможет быстро увеличить аудиторию канала и повысить доверие к контенту. Живые подписчики создают активность, улучшают видимость роликов и привлекают новых зрителей. Перейдя по запросу накрутить подписчики рутуб Кворк вы получите быстрый старт канала, безопасные методы продвижения и стабильный рост аудитории без отписок. Отличное решение для тех, кто хочет быстрее развить канал на Rutube.
shopping market link – I like the fun look of the site, browsing around was convenient.
stonefindsplus – Clear layout and organized catalog make navigation smooth.
Мужской портал https://hooligans.org.ua о стиле жизни, здоровье, карьере и саморазвитии. Статьи о спорте, отношениях, финансах, технологиях и мужских интересах. Полезные советы, лайфхаки и вдохновение для современных мужчин.
Женский портал https://psilocybe-larvae.com о красоте, здоровье, отношениях и саморазвитии. Полезные советы для женщин, идеи для дома и семьи, мода, психология, рецепты, лайфхаки и вдохновение на каждый день. Читайте статьи, находите полезную информацию и улучшайте свою жизнь.
Информационный автожурнал https://real-voice.info о мире автомобилей. Новости автопрома, обзоры новых моделей, тест-драйвы, сравнения машин, советы по эксплуатации и обслуживанию. Полезные материалы для автолюбителей, владельцев авто и тех, кто выбирает автомобиль.
rent a car montenegro herceg novi https://www.montenegro-car-rental-hire.com
нужен биг бэг? https://big-bag-mkr.ru: прочные биг-бэги для стройматериалов, зерна, гранулята и других сыпучих продуктов. Производство под заказ и со склада, консультация, расчет, доставка по РФ.
mostbet gündəlik bonus http://mostbet85214.help/
mostbet mobil saytdan istifadə http://www.mostbet85214.help
brookbazaar – Pages are tidy and well-structured, finding items is easy.
mostbet mirror uz mostbet02894.help
Мы собрали https://kinogo-film.my для вас не просто фильмы и сериалы, а целые миры. От классики, которая трогает душу, до свежих блокбастеров. Здесь есть место для вечернего романтического кино под пледиком, для боевика, который вы ждали весь год. Онлайн-кинотеатр Киного — это место, где вы сами решаете, какой будет ваш киносеанс.
1win crash roulette http://www.1win5524.ru
mostbet hokej mostbet hokej
orchardhub – Pages are tidy, exploring the catalog is fast and simple.
browse this emporium – The shop responds quickly and exploring the categories is easy.
Justin TV Azerbaijan justin tv main page: live match watch, football, big matches, basketball, UFC and game schedule sections.
Lamine Yamal https://www.lamine-yamal.com.az Barcelona career, statistics, age, where he is from and basic biographical facts. Lamine Yamal profile on one page.
Продажа квартир https://nedvizhkavspb.ru в Санкт-Петербурге. Большой выбор недвижимости на первичном и вторичном рынке: студии, однокомнатные, двухкомнатные и просторные квартиры в разных районах города. Актуальные предложения, удобный поиск и помощь в покупке жилья.
Продажа квартир https://kvartira778.ru в Санкт-Петербурге от собственников и агентств недвижимости. Актуальные объявления о продаже квартир в новостройках и на вторичном рынке.
мостбет mines коэффициенты http://www.mostbet4151.ru
1win app lag http://1win5524.ru/
mostbet výsledky hokej mostbet výsledky hokej
1win canlı söhbət http://1win34861.help
mostbet hesabım oğurlanıb http://www.mostbet85214.help
mostbet crash statistika https://www.mostbet02894.help
мелбет турнир https://melbet06374.help
мостбет promo code mostbet4151.ru
melbet kz поддержка whatsapp http://melbet39518.help/
Продвигайте свой аккаунт быстрее с помощью накрутки подписчиков в TikTok. Перейдя по запросу накрутка живых подписчиков тик ток Кворк вы сможете увеличить количество фолловеров, повысить доверие к профилю и привлечь больше просмотров и лайков. Быстрая и безопасная накрутка поможет вашему контенту попасть в рекомендации и ускорить рост аккаунта. Подходит для блогеров, брендов и бизнеса, которые хотят развиваться в TikTok и получать больше охватов.
mostbet ordinator https://mostbet02894.help
Wild Orchard shop platform – Discovered this site today while looking through different vendor markets.
lucky jet melbet http://www.melbet06374.help
1win lucky jet ios http://1win34861.help/
take a look at Bayridge Vendor Studio – Just browsing and found this platform, looks like a lively vendor hub.
melbet odengi melbet odengi
mostbet azn http://mostbet85214.help/
MakerBench – Layout is simple, navigation feels effortless.
ребенка болит зуб лечение лечение зубов детям под наркозом
jasper vendor space – Clean interface and pages respond quickly and clearly.
1win ruletka strategiya http://www.1win34861.help
melbet crash играть melbet crash играть
how to bet on 1win https://1win5524.ru
melbet как играть в aviator https://www.melbet06374.help
mostbet online casino cz https://mostbet2017.help
discover pebble crate deals – The platform layout makes exploring listings feel natural.
1win VIP status 1win VIP status
BoxedBazaar – Clear presentation of vendors, makes me want to explore more.
mostbet вход Киргизия https://www.mostbet4151.ru
Woodstone shop hub – Browsing new marketplaces and this one looks interesting.
mostbet live koeffitsient https://mostbet02894.help/
VendorSphere – Clean and professional, makes checking out items easy.
1win KYC necə etmək olar 1win KYC necə etmək olar
Brimstone vendor store – Creative marketplace platform, browsing through it was fun.
plumbrook vendor directory – The layout keeps everything clearly arranged.
mostbet скачать бесплатно mostbet скачать бесплатно
CurioVault – Relaxing interface, makes checking out vendors effortless.
Zen Cove shop – The shop has a soothing, minimalist aesthetic with a modern touch.
melbet ошибка пополнения melbet ошибка пополнения
Бесплатная консультация семейного юриста — это возможность быстро разобраться в сложной ситуации и понять свои права. Перейдя по запросу семейный адвокат бесплатно юрист поможет вам по вопросам развода, алиментов, раздела имущества, опеки над детьми и другим семейным спорам. Разъясним перспективы дела и подскажем оптимальное решение. Получите профессиональную помощь без оплаты и лишних обязательств.
mostbet balans nol bo‘ldi mostbet balans nol bo‘ldi
melbet visa пополнение https://melbet81573.help/
1win müraciət 1win34861.help
Alpine vendor network – The name implies a community-driven shop.
vavada waluta PLN http://vavada56378.help/
mostbet пополнение банковской картой Кыргызстан mostbet пополнение банковской картой Кыргызстан
mostbet линия ставок mostbet линия ставок
explore Amberstone vendors – Happened to find this site and it looks quite appealing.
ремонт ванной спб ремонт ванной в хрущевке
melbet бонус на депозит http://www.melbet81573.help
TheVendorVault – Clear interface, all the vendor categories are easy to explore.
Бесплатная консультация юриста по расторжению брака поможет разобраться в ваших правах и возможностях при разводе. Специалист объяснит порядок развода через суд или ЗАГС, подскажет, как решаются вопросы раздела имущества, алиментов и проживания детей. Перейдя по запросу адвокат по семейным делам по разводу в Москве вы получите профессиональные рекомендации и ответы на все вопросы, чтобы пройти процедуру развода максимально спокойно и с защитой ваших интересов.
1win ky login https://1win76138.help
мелбет коэффициенты киргизия https://melbet81573.help
1win promokod kiritish Oʻzbekiston 1win promokod kiritish Oʻzbekiston
mostbet лимиты пополнения mostbet27541.help
vavada wsparcie po polsku vavada wsparcie po polsku
aurorabrookvendorhub – Came across this vendor hub while browsing for new shops.
mostbet karta orqali yechish mostbet karta orqali yechish
vavada app download http://vavada56378.help/
vavada witryna http://www.vavada56378.help
sweet bonanza promociones de bienvenida https://sweet-bonanza18364.help
Aurora online vendor hub – Exploring multiple-vendor platforms always catches my attention.
delete 1win account delete 1win account
open this vendor site – Just noticed this site today and the content seems fairly good.
1win_uz 1win5768.help
mostbet промокод mostbet промокод
sweet bonanza crash apk http://sweet-bonanza18364.help/
1win complaint email 1win76138.help
mostbet apk yangilash http://mostbet24618.help/
vavada logowanie vavada logowanie
1win slotlar demo 1win slotlar demo
мостбет вход с Кыргызстана mostbet27541.help
mostbet kod bilan kirish http://mostbet24618.help
melbet элкарт пополнение melbet81573.help
1win ky download 1win ky download
quick vendor site – Browsed for a bit, layout looks tidy and user-friendly.
1win aviator o‘yin https://www.1win5768.help
melbet казино вход http://www.melbet36290.help
mostbet пополнить счет Кыргызстан mostbet пополнить счет Кыргызстан
vavada strona zablokowana co robić https://vavada56378.help/
1win alternative address 1win alternative address
Need a multimedia system? equipment for lecture halls We integrate multimedia systems for home and business. We install and configure audio and video systems, manage content, and integrate equipment into a single system. Modern solutions for comfortable and efficient use of technology.
1win sport tikish http://www.1win5768.help
mostbet https://mostbet24618.help/
mostbet быстрый вход https://www.mostbet27541.help
mostbet pul yechish qancha vaqt http://mostbet24618.help
melbet megacom https://melbet36290.help/
como registrarse en sweet bonanza http://www.sweet-bonanza18364.help
Юридическая консультация по разделу имущества поможет защитить ваши права и избежать ошибок при разводе или спорах между собственниками. Переходите по запросу юридическая консультация по разделу квартиры – юрист оценит ситуацию, разъяснит перспективы дела, подскажет, как правильно оформить документы и выстроить стратегию. Вы получите чёткий план действий и поддержку на каждом этапе — от переговоров до суда.
see this vendor site – Looked briefly, content appears clear and well organized.
Все подробности по ссылке: https://spainslov.ru/site/word/word/%D0%9E%D0%A0%D0%95%D0%A5
Хочешь казино бонус? новые бездепозитные бонусы 2026 всегда актуальные бонусы в онлайн казино. Получайте бонусы без вложений, фриспины и подарки за регистрацию. Актуальные предложения, честные условия отыгрыша и список проверенных казино с бонусами без депозита.
sweet bonanza metodo de pago mercado pago sweet bonanza metodo de pago mercado pago
melbet статистика http://melbet36290.help
vendor resource page – Opened the page for a minute, layout is tidy and content seems clear.
how to play mines on 1win https://www.1win76138.help
Лучшие казино https://rating-casino-russia.ru: актуальный список онлайн казино с высоким рейтингом, быстрым выводом средств и выгодными бонусами. Обзор лицензий, игр и платежных методов поможет выбрать надежное казино для комфортной игры.
Халява казино бездепы казино: фриспины за регистрацию, бонусы без пополнения и акции для новых игроков. Сравнивайте условия отыгрыша, выбирайте проверенные онлайн казино и начинайте играть бесплатно с возможностью вывода выигрыша.
Лучшие фриспины 2026 бездепозитные бонусы: бесплатные вращения в онлайн казино без вложений. Подборка проверенных сайтов, бонусы за регистрацию, честные условия отыгрыша и возможность вывода выигрыша без риска для игроков.
1win bonusni yechib olish shartlari https://1win5768.help/
Официальный сайт покерок скачать: регистрация, вход, бонусы и игра в онлайн покер. Обзор возможностей, турниров, кеш-столов и мобильного приложения. Узнайте, как начать играть и выводить деньги на проверенной платформе.
click to explore listings – Everything is clearly arranged, which simplifies browsing.
mostbet безопасность аккаунта https://mostbet27541.help/
helpful vendor page – Opened briefly, navigation feels simple and information is clear.
мелбет демо слоты https://melbet36290.help
Online tool vin decoder breaks down VIN into readable format showing year model and engine type.
This resource vin report helps verify vehicle condition and reveals hidden damage or title problems.
Book your next private jet charter flights private jet charter flight with instant confirmation and transparent pricing.
Transparent pricing https://rentprivatejetfly.com/ helps you understand exactly how much a private jet costs per flight.
Нужен дизайн участка? ландшафтный дизайн Москва проектирование и благоустройство участка с учетом рельефа, растений и стиля. Создаем красивые и функциональные решения для частных домов и дач, подбираем материалы и обеспечиваем качественную реализацию проекта.
plinko майнс игра http://www.plinko61038.help
мелбет lucky jet бо бонус мелбет lucky jet бо бонус
Бесплатная консультация юриста по взысканию алиментов — первый шаг к защите ваших прав и интересов ребёнка. Переходите по запросу цена консультации юриста по алиментам и получите разбор именно вашей ситуации, узнайте порядок действий, какие нужно собрать документы и оценку перспектив дела. Поддержка на каждом этапе — от обращения в суд до фактического получения алиментых выплат. Запишитесь уже сегодня!
melbet скачать на андроид киргизия melbet скачать на андроид киргизия
start browsing vendors – The interface is clean and logical, helping users locate products quickly.
Брендирование сувениров https://4youcreation.kz в Алматы по современным технологиям. Специалисты предлагают лазерную гравировку, УФ-печать и термоперенос на ткани, стекло, металл и пластик. Организуют доставку по всему Казахстану.
Компания FarbWood https://farbwood.by предлагает пиломатериалы из сибирской лиственницы для частного и коммерческого строительства в Минске и по всей территории Минска. Мы работаем только с лиственницей сибирской, сосна и ель используются как дополнение к основному ассортименту древесины.
Нужна накрутка соц сетей? накрутка телеграм увеличение подписчиков, лайков и просмотров для продвижения аккаунтов. Быстрый старт, безопасные методы и живая активность помогут развить профиль и повысить вовлеченность в популярных социальных платформах.
The best porn generator ai nude image generator your fantasies remain strictly between you and the neural network. Instant, high-quality generation, extensive scenario and character customization.
Все подробности по ссылке: https://g0r0d.en.cx/Guestbook/Messages.aspx?page=1&fmode=gb&topic=363715&anchor#7947410
cómo usar el bono de sweet bonanza https://sweet-bonanza18364.help/
sweet bonanza cómo registrarse desde México https://sweet-bonanza18364.help
plinko пополнение kaspi без комиссии plinko пополнение kaspi без комиссии
чӣ тавр аз mostbet пул баровардан чӣ тавр аз mostbet пул баровардан
плинко вывод mastercard Казахстан http://plinko61038.help/
ideasflowwithintent.click – A smart approach inspires focused implementation of ideas each day.
melbet промоакции melbet промоакции
sweet bonanza виведення на рахунок банку sweet-bonanza54072.help
plinko пополнение с карты Казахстан plinko61038.help
melbet российский рубль http://www.melbet41682.help
site oficial 1win Republica Moldova http://www.1win5808.help
Modern platform buy cheap discord accounts caters to solo buyers and agencies who need reliable accounts at scale with volume pricing and priority restocking. A loyalty program with cashback on every order makes repeated purchases more cost-effective for teams with regular sourcing requirements. The combination of product quality, transparent specs, and responsive support creates a reliable foundation for scaling ad operations.
Professional service verified bm buy specializes in accounts optimized for paid campaigns with proper warming history and platform trust markers. Aged profiles with natural activity patterns consistently outperform fresh registrations in ad delivery quality and checkpoint avoidance rates. Access the full catalog today and discover why top-performing affiliates and agencies choose this platform for their account needs.
Leading store gmail account online gives media buyers access to aged, warmed, and verified profiles sorted by geo, trust level, and ad readiness. Detailed usage guides help buyers understand the differences between softreg, selfreg, farmed, and reinstated account types before purchasing. Invest in verified account infrastructure and redirect the time saved from troubleshooting into actual campaign optimization work.
Experienced supplier get google ads account verified offers complete asset packages including login credentials, recovery access, 2FA codes, cookies, and user-agent data. Step-by-step documentation accompanies every order, covering login procedure, security setup, and recommended first actions after access. Experienced buyers return for the consistency — same quality standards, same fast delivery, same professional support every time.
Premium marketplace instagram reels best practices hook first 3 seconds 2026 features an extensive inventory updated daily across all major geos including USA, Europe, and Asia-Pacific regions. Orders are processed through a secure checkout system with multiple payment options and encrypted credential delivery via personal dashboard. Build your campaigns on accounts with proven trust — higher trust means better delivery, lower costs, and fewer interruptions.
plinko вывод без верификации http://plinko61038.help/
sweet bonanza скільки йде виведення sweet bonanza скільки йде виведення
Specialized store hotmail login focuses exclusively on accounts proven to perform in paid advertising with real spend history and trust indicators. Each listing comes with complete access data including email, password, cookies, token, and user-agent string for seamless campaign setup. The most successful media buying teams share one trait: they invest in quality infrastructure before they invest in ad spend.
Trusted platform protonmail discount offers premium accounts with verified quality, complete credentials, and instant automated delivery. A loyalty program with cashback on every order makes repeated purchases more cost-effective for teams with regular sourcing requirements. Instant delivery, verified quality, and dedicated support — everything a professional advertiser needs in one marketplace.
Expert-level shop reddit account karma buy combines automated delivery with manual verification to ensure every account meets strict quality benchmarks. The knowledge base includes working guides for account warming, ad launch protocols, and reinstatement check procedures for reference. Invest in verified account infrastructure and redirect the time saved from troubleshooting into actual campaign optimization work.
Top-rated dealer yahoo has been serving the media buying community since 2020 with consistent product quality and responsive customer support. The catalog is segmented by platform, geo, account type, and price tier to simplify navigation for both new and returning customers. Whether you need accounts for testing or production campaigns, the catalog covers every tier from entry-level to premium.
Trusted platform youtube monetization account offers premium accounts with verified quality, complete credentials, and instant automated delivery. The knowledge base includes working guides for account warming, ad launch protocols, and reinstatement check procedures for reference. Access the full catalog today and discover why top-performing affiliates and agencies choose this platform for their account needs.
mostbet барои samsung http://mostbet95163.help/
use this page – Pricing details are well-organized, allowing quick comprehension of costs.
последнее зеркало мелбет melbet41682.help
melbet казино сабти ном http://www.melbet20856.help
1win official mirror http://1win5523.ru
see available items – The selection is well-organized, so finding products is fast and effortless.
site 1win http://1win5808.help/
mostbet Кӯлоб https://mostbet95163.help
mostbet Mastercard депозит http://mostbet95163.help
світ бонанза завантажити ios http://sweet-bonanza54072.help/
check shaping process – Action gradually builds a steady and reliable forward path.
1win deposit match bonus http://www.1win5523.ru
melbet mines сигналы https://melbet41682.help/
1win retragere Payeer Moldova http://www.1win5808.help
melbet гирифтани пул ба ҳамён https://melbet20856.help/
see clear ideas – Structuring ideas well reduces friction during implementation.
плинко быстрый депозит http://plinko61038.help
this website – Provides easy access to library collections and online tools for everyone.
sweet bonanza реєстрація за номером sweet bonanza реєстрація за номером
Юридическая помощь по защите прав ребенка — это поддержка в самых важных ситуациях: от споров о месте проживания и алиментах до защиты от насилия и нарушения прав в школе. Переходите по запросу юрист по правам детей в школе и квалифицированный юрист поможет отстоять интересы ребенка, подготовить документы и представить ваши интересы в суде, обеспечив безопасность и справедливость.
чӣ тавр дар mostbet aviator бозӣ кардан http://www.mostbet95163.help
правила казино melbet http://www.melbet41682.help
мелбет насб http://www.melbet20856.help
sweet bonanza вивести на visa http://www.sweet-bonanza54072.help
1win mines Moldova 1win mines Moldova
visit this guide – Clear menus and structured content make exploring voter resources simple.
melbet поддержка по выплатам http://melbet41682.help/
мостбет регистрация сегодня мостбет регистрация сегодня
1win transmisiuni live https://www.1win5808.help
useful guide – Proper direction eliminates confusion and accelerates team progress.
melbet сабти ном melbet20856.help
melbet live шартгузорӣ Тоҷикистон http://melbet20856.help
nostalgiahub – Enjoyable throwback vibe, content is clear and readable.
мостбет бонуси 2026 http://www.mostbet95163.help
интерьер дизайн квартир дизайн студия спб
дизайн интерьеров спб https://dizayna-interera-spb.ru
motovibe – Engaging layout, navigating pages feels effortless.
mostbet в Кыргызстане http://www.mostbet78063.help
how to use 1win bonus http://1win5523.ru
світ бонанза депозит visa світ бонанза депозит visa
mostbet казино 2026 mostbet казино 2026
1win apk latest https://1win5523.ru/
melbet блэкджек https://www.melbet41682.help
1win statistici http://1win5808.help/
mostbet KG сайт mostbet78063.help
1win profil ayarları 1win profil ayarları
softspace – Friendly design and approachable text, enjoyable experience.
mostbet бонус без депозита правда https://mostbet78063.help
organizerpro – Helps plan activities clearly, very intuitive design.
1win rəsmi sayt Azərbaycan dili [url=https://www.1win82430.help]https://www.1win82430.help[/url]
1win lucky jet 1win lucky jet
change password 1win http://1win5523.ru/
nohostation – Clean and simple interface, makes exploring effortless.
instant cam access – The platform feels responsive, with smooth transitions between sections.
мостбет изменить пароль http://mostbet21480.help/
1win login Azərbaycan http://www.1win82430.help
explore driftbrook bargains – Fast-loading pages and neat layout make exploring enjoyable.
win guide – Short and focused layout with practical information for quick reading.
trend insights – Well-structured pages with concise and easy-to-follow content.
conceptconnect – Straightforward layout, details are easy to understand.
1win app 2026 https://1win5765.help
санкт петербург дизайнер интерьера дизайн проект студии спб
дизайн проекты дома дизайн коттеджа под ключ
дизайнеры спб дизайнер внутренних помещений
melbet настройки аккаунта melbet72043.help
мостбет кэшбэк казино мостбет кэшбэк казино
vendor hub – Even a short visit provided helpful insights and interesting content.
1win rəsmi app haradan http://www.1win82430.help
мелбет как пополнить мбанк melbet42089.help
mostbet Oʻzbekiston download mostbet Oʻzbekiston download
1win bonus və cashback 1win bonus və cashback
pinup shartlar https://www.pinup69053.help
quietreads – Content is easy to absorb, feels peaceful and uncluttered.
мелбет kassa24 вывод melbet72043.help
Тензоприбор предлагает калибровочные гири для весов нужного класса точности и номинальной массы для калибровки весов.
В нашей компании можно купить поверочные гири классов точности E1, E2, F1, F2, M1, M2.
Чем выше класс точности, тем меньше будет разница между номинальным и действительным значениями массы калибровочной гири.
rasecworld – Structured layout, content feels credible and accessible.
мелбет mines стратегия http://melbet42089.help
mostbet express stavka https://mostbet37150.help
pin up Oʻzbekiston rasmiy sayt https://pinup69053.help/
дизайны загородных домов коттеджный дизайнер
The best porn generator generate hentai ai your fantasies remain strictly between you and the neural network. Instant, high-quality generation, extensive scenario and character customization. Available 24/7. For adults.
Все подробности: https://www.instapaper.com/p/17177535
1win karta yechib olish https://1win5765.help
melbet ios app скачать https://www.melbet42089.help
mostbet kirish havolasi https://mostbet37150.help
1win yangi domen 1win yangi domen
crash 1win https://www.1win5765.help
pin-up ishchi link http://pinup69053.help/
mostbet поддержка 2026 https://www.mostbet21480.help
1win depozit 1win82430.help
quick access – Clearly defined concepts guide projects toward successful outcomes.
quick access – It gives a reliable impression and is worth revisiting.
melbet ошибка регистрации https://melbet42089.help/
mostbet bonus ishlatish https://mostbet37150.help/
melbet kz код подтверждения melbet72043.help
pin-up bank karta http://pinup69053.help/
cottongroveexchange.shop – The interface is clean, and navigation is simple to follow.
melbet депозит http://melbet42089.help
Pebble Vendor Hub – Browsed through today and the site is organized in a straightforward way.
read this page – Structured thinking keeps projects on track and progressing smoothly.
start browsing – Quick-loading content and a tidy layout make browsing enjoyable.
browse here – Clear design helps users find content quickly and efficiently.
mostbet служба поддержки mostbet служба поддержки
1win bitcoin yechish https://www.1win5765.help
mostbet rasmiy ilova mostbet37150.help
mostbet смотреть матчи mostbet смотреть матчи
pin-up ios app store bormi http://pinup69053.help
melbet kz турниры https://melbet72043.help/
mostbet бонусы казино mostbet бонусы казино
Top rated resource https://bestguitarreview.com reviews guitars by category including classical hollow body and 12 string.
Find your perfect best headphone brands headphones with detailed comparisons of noise cancelling and audiophile models.
Best resource bestmicrophoneguide compares hundreds of microphones by sound quality build and recording purpose.
Узнать больше здесь: http://newsrosprom.ru/zakazat-vysokopoligonalnuyu-model-dlya-agr-kak-vsyo-ustroeno.html
this website – Momentum increases when direction is focused, preventing wasted effort.
click to visit store – Overall, browsing feels smooth and well-structured.
Юридическая консультация по лишению родительских прав поможет оценить ситуацию, определить основания и выстроить грамотную стратегию защиты или подачи иска. Переходите по запросу адвокат по правам родителей – специалист разъяснит порядок действий и подготовит документы. Получите профессиональную поддержку и ответы на все вопросы уже на первой консультации.
Go to site – Pages respond fast and overall browsing is pleasant.
start here – Properly planned growth avoids setbacks and maximizes results over time.
мостбет как пополнить через терминал https://mostbet83507.help
Советы автомехаников https://proavtomaster.com полезные рекомендации по ремонту и обслуживанию автомобиля. Узнайте, как продлить срок службы двигателя, подвески и электрооборудования, избежать частых поломок и сэкономить на ремонте благодаря практическим советам специалистов.
Профессиональный автосервис https://km-motors.org кузовной ремонт, покраска авто, ремонт двигателя и подвески. Компьютерная диагностика, автоэлектрика, ТО, замена масла, фильтров и шиномонтаж. Работаем быстро, качественно и по стандартам производителей.
Компания «Заборыч» https://заборыч.рф более 10 лет осуществляет строительство заборов из профнастила и сетки рабицы. Мы производим заборы для частных лиц и производственных объектов. За это время мы построили десятки объектов, от простых ограждений до сложных ландшафтных комплексов. Наши клиенты остаются довольны качеством работ и сроками реализации проектов.
порно худые порно старые шлюхи
view more info – Fast-loading pages and a clean layout make browsing simple.
1win mines http://1win5765.help
Профессиональная помощь детям https://neuropsy-centr.ru с нарушениями речи и развития. Высококвалифицированные врачи, работаем с самыми тяжелыми случаями, 99% положительных отзывов, новейшее оборудование и инвентарь. Государственная лицензия: Л035-01298-77/01604531 от 09.12.24
Платная частная клиника https://mypsyhealth.ru/services/drug-treatment-hospital психиатрии, неврологии и наркологии — анонимное лечение и консультации специалистов. Диагностика, помощь при зависимостях, неврологических и психических расстройствах. Конфиденциальность, опытные врачи и комфортные условия.
модульный дом с участком технология строительства модульных домов
Ежедневный обзор: https://avon-forum.ru/cgi-bin/ikonboard.cgi?act=st&f=3&t=2044
mostbet [url=mostbet21480.help]mostbet21480.help[/url]
mostbet ставки Кыргызстан http://mostbet21480.help/
visit the site – Reducing mental clutter makes progress smoother and more natural.
мелбет kg официальный сайт https://melbet42089.help
mostbet plinko коэффициенты mostbet83507.help
Скоро лето и жара кондиционер для дома купить с установкой широкий выбор сплит-систем для квартиры, дома и офиса. Поможем подобрать модель по площади, бюджету и характеристикам. Установка под ключ, гарантия, доставка и выгодные цены на популярные бренды.
Top web design https://webdesignfirmshub.com companies worldwide: a selection of the best studios for website and interface creation. Learn about case studies, design approaches, UX/UI solutions, and innovations to help you choose a reliable contractor for your digital projects.
Top branding agencies https://topbrandagencies.com worldwide: the best studios for brand development, corporate identity, and positioning. Portfolio reviews, strategies, and case studies will help you choose a reliable agency for business development and brand enhancement.
Top UX/UI design https://uiuxagencies.com agencies: the best companies creating user-friendly interfaces and digital products. Explore case studies, methodologies, and approaches to UX/UI to choose a reliable contractor for your website or app.
go explore – Everything loads quickly and the site layout is engaging.
mostbet birinchi depozit bonus http://mostbet37150.help
мелбет регистрация через email http://melbet72043.help/
pinup parolni tiklash pinup parolni tiklash
мелбет слоты на деньги https://www.melbet72043.help
1win ба ҳисоб даромадан https://www.1win91403.help
check it out here – The site is well-organized and responds quickly.
A non-profit organization https://linkimpact.org dedicated to supporting multicultural families, environmental protection, volunteerism, and language and cultural exchange.
Дубликаты номеров https://avtostrahovka36.ru в Воронеже — изготовление и восстановление регистрационных знаков по ГОСТ. Срочно за 1 день, качественные материалы, соответствие требованиям и выгодные цены. Оформление быстро и без очередей.
Практик о заборах https://sinta-kedr.ru/ честный разбор материалов, установки и стоимости. Узнайте плюсы и минусы разных видов заборов, частые ошибки и реальные сроки службы. Полезные рекомендации перед покупкой и монтажом ограждений.
An astrology portal http://www.burcler.com.az/ with daily horoscopes, natal charts, and forecasts. Online consultations, zodiac sign compatibility, and personalized recommendations will help you better understand yourself and make important decisions.
Windcrest Hub – Clear interface with smooth page transitions.
<ahref="//focusactivatesprogress.click/](https://focusactivatesprogress.click/)” />find out more – Proper attention amplifies results and prevents progress from stalling.
Quick visit – Honestly, much better than expected, runs really smoothly.
open and browse – Pages are clear, and moving through the site feels effortless.
мостбет минимальная ставка http://www.mostbet83507.help
browse this site – Pages respond quickly, and the layout makes content easy to access.
чӣ тавр аз 1win хуруҷ кардан http://1win91403.help/
visit this link – Pages are structured neatly and the layout feels comfortable to navigate.
mostbet Баткен https://mostbet83507.help
Check platform – Smooth navigation and no problems while exploring the site.
explore this page – The structure is clean and moving through the site is effortless.
mostbet slots http://mostbet2009.help
echo aisle homepage – First impression shows the layout is neat and easy to navigate.
1win depositar 1win depositar
1win шикоят https://www.1win91403.help
check acorn brook – Browsing feels natural, and reading is comfortable.
Дубликаты номеров https://avtostrahovka36.ru в Воронеже — изготовление и восстановление регистрационных знаков по ГОСТ. Срочно за 1 день, качественные материалы, соответствие требованиям и выгодные цены. Оформление быстро и без очередей.
this online shop – Spending a minute browsing and the structure seems pretty straightforward.
Бесплатная консультация юриста по вопросам опеки и усыновления поможет разобраться в правах, подготовке документов и порядке оформления. Переходите по запросу юрист по попечительству над ребенком – специалист подскажет, как действовать в вашей ситуации, оценит риски и предложит оптимальное решение. Получите профессиональную помощь по делам опеки и попечительства на каждом шаге без лишних затрат.
1win app no instala 1win app no instala
Практик о заборах https://sinta-kedr.ru/ честный разбор материалов, установки и стоимости. Узнайте плюсы и минусы разных видов заборов, частые ошибки и реальные сроки службы. Полезные рекомендации перед покупкой и монтажом ограждений.
Все новостройки https://tut-novostroyki.ru от застройщиков в Новосибирске — актуальный каталог квартир в новых ЖК. Цены, планировки, сроки сдачи и акции. Подберите квартиру напрямую от застройщика без комиссии с удобным поиском и проверенной информацией.
Дизайнерское бюро https://vseremontytut.ru проектирование интерьера и ремонт под ключ. Разработка дизайн-проекта, 3D-визуализация, подбор материалов и полная реализация. Создаем стильные и функциональные пространства с гарантией качества и соблюдением сроков.
Шпаклевка стен https://shpaklevka-sten.ru и потолков в Москве — выравнивание поверхностей под покраску и обои. Качественные материалы, опытные мастера и соблюдение технологий. Выполняем работы быстро, аккуратно и с гарантией результата по доступной цене.
боргирии 1win барои ios боргирии 1win барои ios
alpinestoneemporium – Pretty smooth experience, content layout makes reading easy today.
most bet alternative link http://www.mostbet07493.help
Vendor Corner – Well-structured layout, finding information is easy.
amberbrooktrading – Just came across this page and the overall layout looks clean and orderly.
mostbet пополнение банковской картой Кыргызстан http://mostbet83507.help/
online shop portal – Browsing casually and the content appears well arranged.
1win авиатор коэффициент 1win авиатор коэффициент
registration bonus mostbet registration bonus mostbet
Calm Vault Portal – Pages are well-organized, easy to navigate through.
1win MasterCard https://www.1win03748.help
мостбет приложение Киргизия http://mostbet42395.help/
Механизированная шпаклевка https://shpaklevka-msk.ru современный способ выравнивания стен и потолков. Ровное нанесение, высокая скорость работ и экономия материалов. Подготовка под финишную отделку с гарантией качества и соблюдением технологий.
Бытовая химия в Казани https://bytovayalavka.ru широкий ассортимент средств для уборки, стирки и ухода за домом. Оригинальная продукция, выгодные цены и быстрая доставка. Подберите качественные моющие средства для чистоты и комфорта вашего дома.
Calculate your horoscope ulduz-fali online. Horoscopes, love compatibility, daily horoscopes and astrological interpretations by date of birth on one site.
Dream Interpretations 2026 https://yuxu-yozmalari.com.az learn the meaning of your dreams with AI artificial intelligence. Dream interpretation from A to Z, folk belief interpretation, psychological approach. Free online dream interpretation.
mostbet play http://mostbet07493.help/
mostbet logare rapidă mostbet logare rapidă
Workshop Vendor Space – Sections are well-laid-out, content is easy to scan.
Check this page – Smooth interface with well-organized sections makes browsing easy.
Жіночий сайт https://zhinka.in.ua поради про красу, здоров’я, стосунки та стиль життя. Читайте корисні статті, лайфхаки, рецепти догляду та натхнення для сучасних жінок. Все про жіночу гармонію, саморозвиток і комфорт у повсякденному житті.
Сайт міста Вінниця https://faine-misto.vinnica.ua новини, події, довідник компаній і корисна інформація для жителів та гостей. Актуальні новини, афіша, транспорт, послуги і все про життя міста в одному зручному онлайн-порталі.
An online numerology https://numerologiya.com.az profile analyzes your destiny, talents, and finances. Accurate calculations, number interpretation, and personalized recommendations will help you better understand yourself and choose the right direction in life.
Сайт міста Одеса https://faine-misto.od.ua новини, події, афіша, довідник компаній та корисна інформація. Дізнавайтесь актуальні новини, знаходьте послуги, заклади і маршрути. Все про життя Одеси для мешканців і гостей міста в одному місці.
Marketplace Hub – Pages flow naturally, browsing is simple.
mostbet plinko casino http://mostbet07493.help
mostbet cont suspendat https://mostbet2009.help
mostbet pending withdrawal mostbet pending withdrawal
мостбет игровые автоматы https://www.mostbet42395.help
1win idman oyunları 1win idman oyunları
mostbet transfer bancar Moldova http://mostbet2009.help
crash en 1win http://1win19458.help
Workshop Vendor Space – Clear sections, content is simple to access.
Сайт міста Житомир https://faine-misto.zt.ua новини, події, афіша та довідник компаній. Актуальна інформація про життя міста, транспорт, послуги і заклади. Усе необхідне для мешканців і гостей Житомира в одному зручному онлайн-порталі.
Автомобільний портал https://avtogid.in.ua новини авто, огляди, тести та поради водіям. Дізнавайтесь про нові моделі, технології, ремонт і обслуговування. Все про автомобілі в одному місці для власників і автолюбителів.
Сайт міста Львів https://faine-misto.lviv.ua новини, події, афіша та довідник компаній. Актуальна інформація про життя міста, транспорт, послуги і заклади. Усе необхідне для мешканців і туристів Львова в одному зручному онлайн-порталі.
Блог Києва https://infosite.kyiv.ua події, новини, цікаві місця та корисні поради для мешканців і гостей столиці. Дізнавайтесь про актуальні заходи, життя міста, розваги та сервіси. Все найцікавіше про Київ в одному зручному онлайн-блозі.
mostbet condiții bonus mostbet condiții bonus
mostbet portal mostbet2009.help
Go to homepage – Clean menus and an intuitive layout make browsing effortless.
мелбет экспресс ставки http://melbet84062.help
Сайт Полтави https://u-misti.poltava.ua новини, події, афіша та довідник компаній міста. Актуальна інформація про життя, транспорт, послуги і заклади. Усе необхідне для мешканців і гостей Полтави в одному зручному онлайн-порталі.
У місті Одеса https://u-misti.odesa.ua актуальні новини, події, афіша та корисна інформація для мешканців і гостей. Дізнавайтесь про життя міста, транспорт, заклади і послуги. Все найважливіше про Одесу в одному зручному онлайн-порталі.
Житомир онлайн https://u-misti.zhitomir.ua міський портал з новинами, афішею та довідником. Дізнавайтесь про події, транспорт, бізнес і послуги. Усе для комфортного життя та відпочинку в Житомирі в одному місці.
Хмельницький онлайн https://u-misti.khmelnytskyi.ua міський портал з новинами, афішею та довідником. Дізнавайтесь про події, транспорт, бізнес і послуги. Усе для комфортного життя та відпочинку в Хмельницькому в одному місці.
1win cashout 1win cashout
1win app última versión https://1win19458.help/
мостбет логин mostbet42395.help
1win rəsmi saytı 1win rəsmi saytı
storefront link here – Quick glance today and the page seems easy to read.
how to create mostbet account mostbet07493.help
storefront link here – Stopped by for a moment and the design seems clear.
Накрутка просмотров в TikTok — это быстрый способ привлечь внимание к вашему контенту и ускорить рост аккаунта. Переходите по запросу как накрутить просмотры в тиктоке и величьте показатели популярности, повысьте доверие аудитории и попадите в рекомендации. Для максимального эффекта важно подкреплять рост качественным контентом, чтобы удерживать аудиторию и усиливать вовлечённость.
У місті Львів https://u-misti.lviv.ua актуальні новини, події, афіша та корисна інформація для мешканців і гостей. Дізнавайтесь про життя міста, транспорт, заклади і послуги. Все найважливіше про Львів в одному зручному онлайн-порталі.
Київ онлайн https://u-misti.kyiv.ua міський портал з новинами, афішею та довідником. Дізнавайтесь про події, транспорт, бізнес і послуги. Усе для комфортного життя та відпочинку в Києві в одному місці.
Міський сайт Дніпра https://u-misti.dp.ua новини, події, оголошення і довідник організацій. Зручний пошук послуг, закладів і маршрутів. Будьте в курсі життя міста та знаходьте потрібну інформацію швидко.
У місті Вінниця https://u-misti.vinnica.ua новини, афіша заходів, довідник закладів і корисні сервіси. Дізнавайтесь про події, відкривайте нові місця і плануйте свій час у Вінниці легко та зручно.
fernridgevendorhub.shop – Easy to explore and the site feels clean and well organized.
browse platform – Content is organized nicely, navigation is intuitive.
Сайт Чернівців https://u-misti.chernivtsi.ua новини, події, афіша та довідник компаній міста. Актуальна інформація про життя, транспорт, послуги і заклади. Усе необхідне для мешканців і гостей Чернівців в одному зручному онлайн-порталі.
Міський сайт Черкас https://u-misti.cherkasy.ua новини, події, оголошення і довідник організацій. Зручний пошук послуг, закладів і маршрутів. Будьте в курсі життя міста та знаходьте потрібну інформацію швидко.
Где можно познакомиться https://datenow.ru в России в 2026 году? Приложения для знакомств стали главным инструментом для миллионов. Но важно выбрать те, где реально можно найти человека для отношений. Не просто лайки, а искренний интерес. Разбираем, какие сервисы работают в этом году. Честно. Без рекламы. Только для тех, кто ищет всерьёз.
мостбет правила бонуса https://mostbet42395.help
Наша лучшая подборка: https://stroy-63.ru
1win AZN bonus 1win AZN bonus
mostbet трансляции mostbet38195.help
mostbet как пополнить MasterCard mostbet как пополнить MasterCard
1win как сделать депозит 1win как сделать депозит
1win depozit gecikir 1win depozit gecikir
1win juego responsable 1win juego responsable
1win torneo aviator https://1win19458.help
melbet комиссия на вывод https://www.melbet84062.help
мелбет пополнение https://www.melbet84062.help
1win Кыргызстан http://1win63197.help
мелбет apk киргизия скачать melbet84062.help
Услуга накрутки просмотров на канал YouTube поможет быстро увеличить активность под вашими видео и привлечь внимание аудитории. Переходите по запросу как набрать просмотры на ютубе. Дополнительные просмотры повышают видимость роликов в рекомендациях, улучшают статистику канала и создают эффект популярности. Подходит для продвижения новых и существующих видео, увеличения охвата и ускоренного роста канала на YouTube.
1win комиссия при выводе 1win комиссия при выводе
mostbet вход ошибка http://www.mostbet42395.help
Текущие рекомендации: https://sobranie-novostroy.ru
1win cashback çıxarış http://1win57196.help
1win lucky jet demo https://www.1win03748.help
Новое в категории: https://remontparketspb.su
crash pinup crash pinup
melbet изменить номер телефона melbet84062.help
Open link – Smooth performance and clear structure make exploring easy.
1 вин 1 вин
Последние обновления: https://sochibuilders.ru
1win mirror necə tapmaq olar http://1win57196.help/
pin-up Uzcard depozit pin-up Uzcard depozit
1win зарегистрироваться https://1win63197.help
дизайн интерьера 3d квартиры дизайн квартиры
мостбет ставки на футбол Кыргызстан http://mostbet38195.help
melbet вход https://melbet84062.help/
1win yeni bonuslar https://1win57196.help
мелбет live ставки киргизия http://www.melbet27438.help
pin up kirish muammo https://pinup35741.help/
студия дизайнов интерьеров дизайн студия интерьеров спб
мостбет aviator Кыргызстан мостбет aviator Кыргызстан
melbet сайт не работает https://melbet27438.help
1win futbol live http://1win57196.help
Продвигайте свой канал в Яндекс Дзен быстрее: увеличьте число подписчиков и создайте эффект популярности. Переходите по запросу настоящие подписчики в дзен. Накрутка поможет привлечь внимание новой аудитории, повысить доверие к каналу и ускорить рост. Подходит для новых и развивающихся блогов, чтобы быстрее выйти в рекомендации и усилить продвижение контента.
pinup bepul tikish https://www.pinup35741.help
mostbet как пополнить MasterCard https://mostbet38195.help/
1win play market https://1win57196.help
спб дизайн интерьера студия дизайна интерьера в спб
1win фрибет за регистрацию http://1win63197.help/
pin-up roʻyxatdan oʻtish Oʻzbekiston pinup35741.help
mostbet kifizetés menete https://www.mostbet2021.help
1вин купон https://1win41825.help/
crash игра mostbet crash игра mostbet
mostbet plinko стратегия mostbet38195.help
mostbet belépési probléma https://www.mostbet2021.help
1win Кыргызстан расмий сайт http://www.1win41825.help
melbet депозит мбанк https://www.melbet27438.help
1win mərc ləğv https://1win57196.help/
pin up uz https://www.pinup35741.help
mostbet minimum befizetés mostbet minimum befizetés
mostbet yenidən cəhd et http://www.mostbet31847.help
Продвигайте свой канал быстрее с услугой накрутки подписчиков в YouTube. Увеличьте количество фолловеров, повысьте доверие к каналу и привлеките новую аудиторию. Переходите по запросу самые дешевые подписчики на ютубе Кворк. Быстрый старт для блогеров, брендов и экспертов. Живые и качественные подписчики, безопасное продвижение и заметный рост популярности вашего контента. Начните развивать канал уже сегодня!
авиатор мелбет авиатор мелбет
1win ссылка на apk 1win41825.help
mostbet aviator online mostbet2019.help
mostbet reload bónusz http://mostbet2021.help/
1win mines игра https://1win41825.help
mostbet android hivatalos app mostbet android hivatalos app
ТОП лучших МФО https://mfo-finance.github.io проверенные компании с высоким уровнем одобрения займов. Актуальные предложения, прозрачные условия, быстрые выплаты и онлайн оформление. Сравнивайте и выбирайте надежные МФО для получения денег.
Are you into rafting? http://www.tara-montenegro-rafting.me/ exciting rafting trips down mountain rivers with experienced instructors. A tour of the Tara Canyon offers scenic routes, safety, and unforgettable experiences. Book a rafting tour and discover an active holiday.
1win slots 1win slots
мелбет megafon kg мелбет megafon kg
mostbet kupon kodu səhvdir https://www.mostbet31847.help
мелбет вход киргизия без vpn http://melbet27438.help
mostbet lucky jet necə oynanır mostbet lucky jet necə oynanır
mostbet qeydiyyat olmadan giriş olurmu https://mostbet31847.help/
dental problems? https://www.dental-tourism-montenegro.com high-quality dental treatment abroad at affordable prices. Implants, veneers, prosthetics, and treatments with a guarantee. We select a clinic, organize your trip, and provide patient support throughout the entire process.
Zahnprobleme? https://www.zahntourismus-in-montenegro.com zahnbehandlung im Ausland mit bis zu 70 % Ersparnis. Implantate, Zahnersatz, asthetische Zahnheilkunde und Diagnostik in modernen Kliniken. Wir unterstutzen Sie bei der Wahl des Landes und der Klinik und organisieren Ihre Reise von A bis Z.
Маркетплейс 1С-Битрикс — это официальный каталог готовых решений, модулей и интеграций для сайтов на платформе Bitrix. Переходите по запросу каталог модулей Битрикс и вы найдете расширения для интернет-магазинов, CRM, SEO, аналитики, платежных систем и автоматизации бизнеса. Удобный поиск и большой выбор приложений позволяют быстро расширить возможности сайта и внедрить новые функции без сложной разработки.
Студия дизайна https://dill-design.ru интерьера в Санкт-Петербурге. Реализовываем проекты в г. Санкт-Петербург и г. Москва. Более 100 довольных заказчиков доверили нам создание своего интерьера. От разработки дизайн проекта до его качественной реализации. Авторский надзор на всех этапах реализации. Комплектация в подарок. Закажите расчет дизайн-проекта
mostbet aplikacja oficjalna mostbet2005.help
Обзор путешествий https://tfast.ru и экскурсий. Ваш персональный гид в мире путешествий. Мы собираем самые живые обзоры, проверенные маршруты и уникальные экскурсии — от известных достопримечательностей до скрытых мест, о которых знают только местные. Планируйте свои приключения с нами, вдохновляйтесь и открывайте мир по-новому.
mostbet élő fogadás cashout https://www.mostbet2021.help
значок металлический с логотипом заказ значков из металла со своим дизайном москва
mostbet crash uduş taktikası mostbet31847.help
металлические значки изготовление металлических значков на заказ москва
металлические значки найк изготовление значков из металла москва
металлические значки найк https://izgotovlenie-znachkov-moskva.ru/
mostbet mastercard cz mostbet mastercard cz
mostbet free bet bez depozytu http://www.mostbet2005.help
1win возврат ставки http://www.1win41825.help
melbet inscriere melbet inscriere
mostbet oyun donur mostbet oyun donur
mostbet mobil internetda ishlaydimi http://www.mostbet73618.help
Browse now – Clear menus and responsive pages make exploring effortless.
mostbet telegram kanal mostbet telegram kanal
mostbet lucky jet výhra https://www.mostbet2019.help
melbet depunere cu perfect money melbet depunere cu perfect money
mostbet lucky jet donur https://www.mostbet31847.help
mostbet şifrə dəyişmək https://mostbet2013.help
Explore here – Pages load quickly, and content is logically arranged for simple navigation.
mostbet smazat účet https://www.mostbet2019.help
mostbet mines minimal stavka mostbet mines minimal stavka
mostbet missiyalar https://mostbet2013.help
Платформа 1C-Bitrix — это комплекс программных продуктов для создания сайтов, интернет-магазинов и корпоративных порталов. Переходите по запросу купить программное обеспечение Битрикс. Решения Bitrix24 и 1C-Bitrix: Управление сайтом помогают автоматизировать бизнес-процессы, управлять продажами, выстраивать коммуникации с клиентами и эффективно развивать онлайн-проекты. Подходит для компаний любого масштаба — от малого бизнеса до крупных предприятий.
mostbet rəsmi veb sayt mostbet rəsmi veb sayt
melbet pariuri pe volei http://www.melbet63048.help
mostbet Oʻzbekiston aviator http://mostbet73618.help
mostbet live sázky fotbal mostbet live sázky fotbal
mostbet vklad google pay mostbet2019.help
mostbet weryfikacja a wypłata https://mostbet2005.help/
melbet MDL https://www.melbet63048.help
See details – Organized sections and fast-loading content make browsing natural.
1win autentificare cu email https://1win71038.help
mostbet jak zaktualizować aplikację mostbet jak zaktualizować aplikację
mostbet verifikatsiyasiz yechish mostbet verifikatsiyasiz yechish
mines melbet melbet63048.help
mostbet demo slotlar mostbet73618.help
значок металлический купить https://znaknazakaz.ru/
blackjack 1win http://1win71038.help/
значок металлический купить металлические значки москва быстро
1win retragere Mastercard https://1win71038.help/
мостбет сменить email http://mostbet05638.help
crash mostbet wypłata http://mostbet2005.help
mostbet zamrożenie konta http://mostbet2005.help
паркет после циклевки циклевка паркета в спб
mostbet push bildiriş https://mostbet2013.help
melbet stream live http://melbet63048.help
casa de pariuri 1win 1win71038.help
mostbet aviator signal http://mostbet73618.help/
Explore here – Smooth interface with tidy sections makes finding information effortless.
mostbet скачать приложение с официального сайта http://mostbet05638.help
1win conectare cu facebook 1win conectare cu facebook
мостбет crash стратегия https://www.mostbet05638.help
Бесплатная юридическая консультация поможет разобраться в сложной ситуации и понять, какие действия предпринять дальше. Переходите по запросу городская консультация юриста бесплатно по телефону и вы сможете задать вопрос юристу онлайн и получить разъяснение по гражданским, семейным, трудовым, жилищным и другим правовым вопросам. Специалист подскажет возможные решения, объяснит ваши права и поможет оценить перспективы дела. Консультация доступна онлайн и по телефону, быстро и без лишних формальностей.
мостбет игровые автоматы http://mostbet05638.help/
1win site oglinda https://1win71038.help
mostbet мобильное казино https://www.mostbet05638.help
мелбет support кыргызстан мелбет support кыргызстан
Старый паркет? шлифовка паркета полов профессиональное восстановление деревянного пола без пыли и лишних затрат. Удаляем царапины, потемнения и старое покрытие, возвращаем гладкость и естественный цвет. Используем современное оборудование, выполняем циклевку, шлифовку и лакировку паркета под ключ с гарантией качества и точным соблюдением сроков.
Старый паркет? https://shlifovka-parketa.ru профессиональное восстановление деревянного пола без пыли и лишних затрат. Удаляем царапины, потемнения и старое покрытие, возвращаем гладкость и естественный цвет. Используем современное оборудование, выполняем циклевку, шлифовку и лакировку паркета под ключ с гарантией качества и точным соблюдением сроков.
Ищете надежные лицензии для 1С-Битрикс? Мы предлагаем легальные решения для всех типов проектов: интернет-магазинов, корпоративных сайтов и порталов. Переходите по запросу лицензия Битрикс магазин. Быстрая активация, официальная поддержка и выгодные условия – обеспечьте своему веб-проекту стабильную работу и защиту с надежным ПО уже сегодня!
Лицензия «Битрикс: Управление сайтом – Старт» — оптимальное решение для создания небольшого сайта, лендинга или корпоративной страницы. Переходите по запросу редакция 1C Битрикс Старт. Редакция включает базовые инструменты для управления контентом, готовые модули, защиту сайта и удобную административную панель. Подходит для быстрого запуска проекта на CMS 1C-Битрикс с возможностью дальнейшего масштабирования и перехода на более функциональные редакции.
What we recommend now: https://intan321.net/xnxx-free-porno-video-clips-hd-porno-pipe-mature-sex-video-clips/
Current recommendations: https://ecombie.com/2026/03/17/20-finest-bitcoin-crypto-casinos-gaming-sites-united-states-of-america-2026-better-selections/
Today’s Most Important: https://www.myminifactory.com/users/xxxbptv
Лицензия «Битрикс: Управление сайтом – Старт» — оптимальное решение для создания небольшого сайта, лендинга или корпоративной страницы. Переходите по запросу Битрикс Старт описание. Редакция включает базовые инструменты для управления контентом, готовые модули, защиту сайта и удобную административную панель. Подходит для быстрого запуска проекта на CMS 1C-Битрикс с возможностью дальнейшего масштабирования и перехода на более функциональные редакции.
Things Worth Watching: http://www.energysolutions.co.th/womanexercisinginfitness-center-porn-video-clips/
Details on the page: https://alvoradapflege.de/finest-casinos-on-the-internet-the-real-deal-money-2026-2/
mostbet crash на деньги mostbet crash на деньги
Today’s Focus: https://www.aram-ent.co.il/i-20-migliori-bisca-online-paypal-2025/
PUPIL OF FATE MOTORS https://auto.ae/pupiloffatemotors автосалон премиум авто в Дубае. Продажа роскошных автомобилей, эксклюзивные модели и индивидуальный подбор. Помогаем выбрать, оформить и доставить авто с гарантией качества и высоким уровнем сервиса.
Эко-бытовая химия http://reporter63.ru/content/view/784903/himiya-dlya-uborki-sekrety-effektivnosti-i-bezopasnosti в Санкт-Петербурге — средства для уборки без вредных компонентов. Эффективная очистка, безопасность для здоровья и окружающей среды. Широкий ассортимент и доставка по городу.
Расширенная статья здесь: https://linkparfum.ru/articles/bandit-chyernaya-zhemchuzhina-aromatov-robert-piguet.html
Modern earth fault indicator monitor the condition of electrical networks and protect equipment. They offer rapid fault detection, high accuracy, and reliability for industrial applications.
Битрикс: Управление сайтом Малый Бизнес — функциональная редакция CMS для создания интернет-магазинов и коммерческих проектов. Переходите по запросу Bitrix Малый Бизнес скачать. Система включает каталог товаров, корзину, онлайн-оплаты, маркетинговые инструменты и интеграцию с 1С. Решение подходит для компаний, которым нужен надежный и масштабируемый сайт с возможностью расширения функционала через модули и интеграции.
Посмотреть на сайте: нужна циклевка паркета
Только лучшие материалы: услуги шлифовка паркета
Только лучшее здесь: шлифовка паркета цена
Самое полезное для вас: сколько стоит циклевка паркета
Hi, do have a e-newsletter? In the event you don’t definately should get on that piece…this web site is pure gold!
Продвижение сообщества или страницы во ВКонтакте с помощью привлечения подписчиков. Услуга помогает быстро увеличить аудиторию, повысить активность и доверие к группе или профилю. Переходите по запросу подписчики в вк. Возможна накрутка живых и заинтересованных пользователей, что улучшает видимость сообщества, помогает быстрее развивать бренд, проекты и продажи. Подходит для групп, пабликов и личных страниц.
Нужны подписчики в Telegram? Поможем быстро увеличить аудиторию вашего канала или группы. Переходите по запросу живые подписчики в телеграмм канал. Предлагаем накрутку живых и активных подписчиков без резких скачков и с минимальными списаниями. Подходит для старта новых каналов, повышения доверия и привлечения органической аудитории. Безопасное продвижение, гибкие объемы заказа и быстрый запуск. Увеличьте популярность вашего Telegram-канала уже сегодня.
mostbet правила вывода https://www.mostbet2029.help
mostbet Angren https://mostbet16734.help
mostbet yechish qoidalari https://mostbet16082.help
мелбет odengi https://www.melbet08561.help
мостбет рамзи SMS http://mostbet07482.help
мелбет не приходит sms мелбет не приходит sms
wheatcovegoodsdistrict – Very simple and clean site, everything loads quickly and navigation is smooth.
KettleSavingsHub – Smooth interface with content organized for easy access.
mostbet пополнить счет 2026 mostbet пополнить счет 2026
1win зеркашӣ бе хато http://1win14536.help
mostbet android telefon uchun mostbet android telefon uchun
mostbet live kazino Oʻzbekiston https://mostbet16082.help
мостбет чати дастгирӣ мостбет чати дастгирӣ
мелбет бк регистрация мелбет бк регистрация
access the store – Had a fast look, pages are clear and navigation is effortless.
mostbet mostbet
1win рейкбек 1win рейкбек
мостбет вход с Кыргызстана http://mostbet2029.help/
mostbet барои ios боргирӣ mostbet барои ios боргирӣ
1win sms not received 1win sms not received
mostbet lotereya http://www.mostbet16734.help
мелбет элкарт вывод http://melbet08561.help/
visit trader collective – Everything is arranged logically, making it simple to find items.
browse wheatcove – Layout is neat, pages load fast, and navigation feels effortless.
mostbet app store mostbet mostbet app store mostbet
mostbet фрибет http://mostbet07482.help
aviator игра mostbet https://mostbet2029.help/
1вин кэшбэк 1win14536.help
1win free slots https://1win5530.ru/
enter here – Pages are organized clearly, giving a seamless browsing experience.
melbet казино бонус киргизия http://www.melbet18207.help
Самые актуальный новости новостной сайт — свежие события, аналитика и репортажи. Политика, экономика, технологии и общество. Будьте в курсе последних новостей и ключевых событий каждый день.
mostbet 404 xato https://mostbet16734.help/
мелбет mines играть https://www.melbet08561.help
Handmade Marketplace – Items arrived quickly, perfectly packaged, and exactly as described.
mostbet ishchi mirror uz https://mostbet16082.help
mostbet казино вход mostbet2029.help
1win uz 1win bukmeker http://1win5530.ru/
1win регистрация онлайн 1win регистрация онлайн
mostbet download барои android https://mostbet07482.help
check hub offerings – Moving between sections is simple, and the design feels natural.
shop online now – Layout is tidy, pages are fast, and navigation is intuitive.
Zen Craft Studio – Browsing was intuitive, found products easily, and shopping felt simple.
visit shop page – Pages are clear, structured, and browsing feels comfortable.
mostbet demo o‘yin mostbet demo o‘yin
creative artisan hub – Everything is easy to access, clear and well-arranged.
melbet элсом пополнение melbet элсом пополнение
check it out here – Pages are well arranged, making it easy to find what you need.
melbet apk скачать киргизия melbet apk скачать киргизия
browse products here – Navigation is simple and the site feels user-friendly.
browse wheatcove – Layout is neat, pages load fast, and navigation feels effortless.
>visit commerce hub – Everything is well-organized, so content is easy to access.
view this shop – Layout is organized, pages respond fast, and information is easy to locate.
online trading hub – It’s easy to get around thanks to the well-planned menu layout.
lucky jet melbet http://melbet18207.help
discover more – Browsing is easy, pages are responsive, and interface feels natural.
Local Artisan Marketplace – Quality exceeded expectations, delivery was quick, and support was helpful.
mostbet скачать сегодня mostbet скачать сегодня
access page – Took a peek, content is well organized and navigation is effortless.
shop link – The website feels fast and content is well-organized
1win register 1win14536.help
1win exclusive promo code http://1win5530.ru
промокод melbet http://melbet18207.help/
mostbet oyinlar http://mostbet16082.help/
мостбет версияи нав боргирӣ мостбет версияи нав боргирӣ
visit platform – Took a short browse, pages are neat and browsing is comfortable.
explore goods here – The platform feels organized, and I can quickly find useful details.
мелбет фрибет киргизия мелбет фрибет киргизия
mostbet Nukus https://mostbet16734.help
enter shop page – Pages are neatly laid out, making it simple to explore products.
IvoryDealsHub – Pages respond fast and the site structure is clear.
Kent Casino kentcasino ru com официальный сайт, регистрация и бонусы. Онлайн казино с быстрым выводом средств, слотами и играми от топ провайдеров. Получите фриспины и играйте на реальные деньги безопасно.
Специалисты компании выполнят изготовление этикеток любого формата и сложности: тканых жаккардовых, деревянных, металлических, кожаных и проч.
Чтобы хлопковы бирки для одежды не утратили своего первоначального вида и были износостойкими, мы используем только качественные материалы.
open marketplace – It felt reliable from start to finish, with smooth loading times.
a href=”https://gingerwoodcommercehub.shop/” />view hub listings – Content is easy to access, and pages load fast.
retail exploration hub – Just discovered it, looks like a nice platform to return to.
explore glade harbor – The layout is tidy and pages load quickly for smooth browsing.
future solutions – Simple layout and smooth navigation make understanding straightforward.
view vendor site – A simple interface made it convenient to look around.
see handmade marketplace – The platform has a nice rhythm, and exploring is simple.
мелбет зеркало без блокировки https://melbet18207.help/
Bead Bazaar – The site is straightforward and the structure is logical.
visit trading studio – Everything is organized logically, so content is simple to locate.
Creative Lemon House – Pleasant first impression, navigation is smooth and logical.
main shop link – Information is accurate and visually easy to follow.
VendorBay – Logical page structure, clear sections, and intuitive navigation throughout.
JasperQuickBuy – Well-structured content and smooth navigation make the site enjoyable.
enter shop page – Layout is clear and organized, making exploration enjoyable.
product hub link – The layout is tidy, and moving through items feels effortless.
amberharbortradecollective – Looks organized and user friendly, enjoyed browsing through pages here.
плинко apk жүктеу плинко apk жүктеу
Shimmer Shop – Well-laid-out pages make it easy to browse categories.
aviator 1win aviator 1win
see this website – Initial experience was good, with no issues encountered.
дивитися хороше кіно дивитися фільми онлайн безкоштовно без реєстрації
plinko apk http://plinko50862.help/
artisanal goods hub – The clean look and easy navigation stand out right away.
CraftHarbor – Layout is well-organized, browsing through content is effortless.
always learn – Clean interface with well-presented information that’s easy to navigate.
mines sweet bonanza mines sweet bonanza
Artisan Honey – Well-laid-out pages make exploring products effortless.
ArtisanStone – Intuitive navigation, exploring categories is quick and easy.
LinensAndMore – Easy-to-use interface and organized content make shopping enjoyable.
HandmadeCove – Clean and logical design, navigating through pages is effortless.
see product hub – Everything loads quickly, and the layout feels comfortable to use.
plinko не работает https://www.plinko50862.help
1win селфи для верификации https://www.1win40729.help
CraftedCorner – Well-structured content and clean menus, very user-friendly.
sweet bonanza méxico https://www.sweet-bonanza72501.help
click to see craft offerings – Layout is neat, making it straightforward to explore content.
plinko слоты онлайн plinko слоты онлайн
retail organization space – The design is orderly, making it easy to find what you need.
1win верификация http://www.1win40729.help
RetailCoveHub – Well-laid-out pages, navigating content is easy.
gift selection – Simple and clean interface with easy-to-follow product arrangements.
плинко вывод usdt плинко вывод usdt
Icicle Isle Crafts – The site looks promising; I’ll explore it further when I have time.
artisan makers platform – Everything is straightforward and simple to browse.
sweet bonanza bonos México sweet bonanza bonos México
Нужна бесплатная юридическая консультация? Переходите по запросу бесплатная юридическая консультация круглосуточно по телефону в Питере и получите помощь опытного юриста по любым правовым вопросам: семейные споры, долги, недвижимость, трудовые конфликты, защита прав потребителей и многое другое. Задайте вопрос онлайн или по телефону и получите подробный разбор вашей ситуации и рекомендации по дальнейшим действиям. Консультация проводится бесплатно и конфиденциально.
MapleCorner – Well-organized design and easy to move between sections.
FernHarborStudio – Easy-to-read layout, all content is well-presented and clear.
Bead Haven – Smooth layout with intuitive navigation makes exploring effortless.
pin-up rasmiy manzil 2026 pinup52914.help
MapleTrade – Simple and logical interface, making product discovery easy.
1win подтвердить аккаунт 1win40729.help
FernVendorHub – Well-laid-out pages, navigating products is simple.
best choice hub – Clear and simple layout makes browsing decisions effortless.
HarborFindsOnline – Navigation is straightforward, and content is clear and accessible.
1win Кыргызстан жүктөп алуу https://www.1win85163.help
melbet пополнение элкарт melbet пополнение элкарт
sweet bonanza seguridad app http://sweet-bonanza72501.help/
sweet bonanza активувати купон sweet-bonanza06538.help
mostbet noua adresă http://mostbet21067.help
1win лимит на элсом https://1win40729.help
browse vendor catalog – Content is easy to follow with a clean and structured design.
реабилитация наркоманов реабилитация наркоманов .
check retail collections – Simple interface and tidy sections make browsing stress-free.
sweet bonanza aviator game México sweet bonanza aviator game México
vendor hub link – Clear design and easy navigation, a pleasant browsing experience.
explore retail collections – Fast-loading pages and simple navigation stand out.
plinko приложение https://www.plinko50862.help
Ridge Artisan Shop – Navigation is smooth, content is well structured and clear.
browse artisan hub – Smooth interface with well-structured sections makes navigating easy.
RetailLane – Fast-loading sections with intuitive layout make browsing simple.
melbet aviator скачать https://melbet76521.help
1вин мегапей вывод http://www.1win85163.help
світ бонанза бонус україна http://www.sweet-bonanza06538.help
shop handmade traders – Easy-to-follow structure, navigation feels smooth and natural.
mostbet contul meu mostbet contul meu
pin-up aviator tikish https://www.pinup52914.help
see Dune Meadow listings – Content is clear and navigation feels very straightforward.
vendor connections hub – Organized layout, browsing is simple and comfortable.
tap to view – The site is structured well, helping you locate products without confusion.
access marketplace offerings – The layout is logical, so you can find what you need quickly.
online retail studio – Navigation is intuitive, layout is minimal and functional.
CraftedCove – Fast-loading sections and logical design simplify finding what you need.
click to explore boutique – Easy-to-read content and simple navigation make exploring enjoyable.
melbet приложение http://www.melbet76521.help
1win официальный сайт вход http://1win85163.help
shop online – Pleasant design, products are clear, and navigating feels natural.
upland goods hub – Clean design with fast-loading pages makes shopping effortless.
sweet bonanza другий депозит бонус https://sweet-bonanza06538.help/
mostbet cod promotional Moldova mostbet21067.help
check out artisan hub – Everything is clear and user-friendly, making browsing simple.
silk meadow crafts – Very smooth browsing, pages are clean and easy to explore.
visit River Harbor hub – Layout is simple, content is clear, and navigating feels easy.
pin-up ilova rasmiy pinup52914.help
VendorCove – Organized menus and simple layout provide a pleasant experience.
1win поддержка на русском https://1win40729.help
community rise – Smooth navigation with inspiring and approachable content throughout.
see handmade creations – The platform is inviting, with unique artisan products to explore.
sweet bonanza mi cuenta https://www.sweet-bonanza72501.help
check vendor listings – Clear structure and neat layout, everything is simple to access.
ArtisanCove – Clear navigation and tidy interface make exploring fast and simple.
check this link – Sections are clean and clear, making it simple to find what you’re looking for.
explore Echo Harbor crafts – Pages load nicely and it’s easy to find what I need.
мелбет вывести деньги без верификации мелбет вывести деньги без верификации
1win вывести баланс на о деньги http://1win85163.help/
handmade craft marketplace – Simple structure, makes finding items effortless.
plinko ставки sweet bonanza https://sweet-bonanza06538.help
mostbet descarcare 2026 https://www.mostbet21067.help
VendorFloraVault – Efficient layout, browsing items is effortless.
наркологический центр наркологический центр .
enter artisan marketplace – Tidy layout and intuitive navigation made exploring effortless.
1win регистрация без паспорта 1win регистрация без паспорта
мелбет чат кыргызстан https://melbet76521.help
explore this site – It has an honest charm, encouraging visitors to spend time browsing.
sweet bonanza вхід з комп’ютера sweet bonanza вхід з комп’ютера
mostbet autentificare esuata mostbet autentificare esuata
explore Rose Harbor crafts – Navigation is smooth and sections are neatly arranged, very pleasant.
HarborMintStudio – Logical layout, fast pages, and smooth browsing overall.
open vendor marketplace – The site is clean and finding items is straightforward.
check Daisy Cove marketplace – The platform is appealing, I’ll probably return later.
ForestArtisanVault – Pleasant navigation, the site feels responsive.
artisan marketplace link – Easy-to-read content and fast page loads make exploring enjoyable.
shop craft collections – Clean design and simple layout enhance the overall browsing experience.
browse creative crafts – Layout feels organized, navigation is intuitive and fast.
сервис скачивания с ютуба skachat-video-s-youtube-1.ru .
discover page – Easy navigation, content is clearly presented and accessible.
pin-up free bet shartlari https://www.pinup52914.help
tealcovetail marketplace – Nice structure and clean pages, browsing is enjoyable.
browse handmade marketplace – Neat design and clear sections make exploring simple.
shop artisan collections – Clear interface and tidy layout make exploring smooth.
explore the hub – Content is presented cleanly, making browsing enjoyable.
see product range – Simple navigation paired with a clean layout makes shopping smooth.
rain boutique hub – Fast-loading pages and easy-to-read listings create a pleasant experience.
explore creative collective – Clean and minimal interface, browsing feels effortless.
click teal harbor crafts – Clean interface, fast pages, and effortless browsing.
1win пополнить баланс элсом 1win пополнить баланс элсом
melbet сроки верификации http://melbet76521.help/
sweet bonanza lucky jet бонус sweet bonanza lucky jet бонус
marketplace homepage – Clean visuals and organized layout make browsing intuitive.
mostbet apk Moldova http://mostbet21067.help/
click for craft items – Easy-to-follow design, everything is presented neatly.
explore more – Well-structured layout and clear content allow smooth movement through the site.
лечение наркомании лечение наркомании .
artisan trading link – Clear sections and fast-loading pages make browsing comfortable.
explore handmade goods – Unique items and a pleasant browsing experience make it worth visiting.
start exploring here – It feels intuitive, with content that’s easy to reach.
click to visit – Navigation is straightforward, and content is easy to access.
скачать видео youtube по ссылке скачать видео youtube по ссылке .
access now – Everything works smoothly, site is simple yet practical to use.
visit creative artisan hub – Pages load quickly and structure is user-friendly.
visit marketplace now – The layout is clear and makes browsing feel effortless.
view available collections – Everything is laid out logically and easy to access.
1win manat bonus http://1win60278.help
mostbet maksimal yechish http://mostbet59402.help
learn more here – Clear structure and neat sections allow smooth exploration.
explore timbertrail craft vendors – Layout feels natural, browsing is quick and clear.
visit artisan shop – Straightforward layout that makes exploring hassle-free.
visit this platform – Feels special and different in a way that’s very appealing.
Zen Harbor Market – Browsing was enjoyable, with a thoughtful mix of products that stand out.
marketplace homepage – Pages are organized logically, making it easy to navigate quickly.
browse now – Fast-loading pages with a neat, professional design.
open website – Everything is arranged neatly, allowing for effortless browsing.
mostbet фора mostbet фора
скачать видео с ютуба на телефоне skachat-video-s-youtube-1.ru .
sage harbor retail – Nicely arranged layout with clear visuals that help navigation feel effortless.
windharboroutpost.shop – Very smooth browsing, clean layout and everything works perfectly
see full collection – Everything is logically arranged, making content simple to follow.
open this link – Pages are well-organized, allowing effortless navigation.
open this page – Pages are easy to scan and the structure feels intuitive.
tap this link – Clean interface and intuitive navigation make it user-friendly.
explore timbertrail hall – Smooth interface and content is easy to follow.
mostbet login mostbet59402.help
visit boutique portal – Well-structured site with clean design, easy to follow content.
view latest arrivals – A smooth and relaxed setup that makes browsing enjoyable.
Нужна бесплатная юридическая консультация? Переходите по запросу вопрос адвокату бесплатно онлайн без регистрации в России в Балашихе и получите помощь опытного юриста по любым правовым вопросам: семейные споры, долги, недвижимость, трудовые конфликты, защита прав потребителей и многое другое. Задайте вопрос онлайн или по телефону и получите подробный разбор вашей ситуации и рекомендации по дальнейшим действиям. Консультация проводится бесплатно и конфиденциально.
open this shop – The interface is intuitive and easy to navigate
check this site – Found the layout useful, everything is explained clearly.
mostbet мобильная версия http://mostbet70269.help/
Velvet Coast Collective – Light layout, makes exploring stress-free
visit this page – Navigation feels logical, with content organized in expected spots.
artisan goods link – Everything feels accessible, navigation is smooth and simple.
online market link – Everything feels polished, and moving between sections is simple.
капельница от запоя капельница от запоя .
загрузчик видео с ютуба загрузчик видео с ютуба .
mostbet android app mostbet59402.help
1win aviator balans https://1win60278.help/
official vault page – Clear structure and quick page loads improve the browsing experience.
explore store – Everything flows well and the interface is user-friendly
HandmadeSpot – Clear design, moving between pages is intuitive.
learn more – Clean layout that makes browsing the site smooth.
click to enter – Simple design and intuitive structure make it effortless to navigate.
mostbet зеркало для android https://mostbet70269.help
discover collections here – Sections are clearly defined, making it easy to explore.
мелбет казино киргизия мелбет казино киргизия
view catalog – Pleasant interface, easy to move through items with clear displays.
explore this store – Layout is well-structured, making the browsing experience pleasant.
opalwillowboutiquehall – The site is neatly arranged, making everything simple to understand.
see details – Fast-loading content and a visually clear interface.
1win tək mərc https://1win60278.help/
mostbet natijalar https://mostbet59402.help/
access boutique – User-friendly design with well-laid-out content for easy browsing.
explore this store – Bright visuals and smooth navigation make it pleasant to browse.
night coast hub – The layout is tidy and moving through sections is effortless.
discover more – Straightforward interface that feels stable and easy to navigate.
1win киргизче кирүү https://1win09451.help/
melbet tournois casino https://melbet81256.help/
ComfyHomeLinens – Simple menus and responsive pages create a pleasant experience.
mostbet apk Киргизия http://mostbet32854.help
загрузчик видео с ютуба загрузчик видео с ютуба .
explore upland collections – Simple navigation and organized layout make online shopping easy.
open website – Clear layout with intuitive navigation helps users find content quickly.
browse products – Well-arranged content that makes navigation smooth
StudioBazaar – Very readable interface, exploring the catalog is easy.
check page – The site feels orderly and easy to move through.
mostbet номер телефона поддержки https://mostbet70269.help
mostbet apk virus yo‘qmi mostbet apk virus yo‘qmi
1win yükləmə problemi 1win60278.help
TextileTreasures – Pages respond quickly and the content is easy to read.
see trading items – The design is straightforward and makes content accessible.
visit this store – Navigation is simple and the content is presented in a clean way.
discover more – Layout is neat and thoughtful, making scrolling through content simple.
enter site – Logical flow, pages are structured clearly.
browse products now – The platform looks solid, and the items are easy to view.
StoneCraftCorner – Very clear structure, exploring categories is convenient.
see this marketplace – Everything is clearly structured and browsing feels smooth
мостбет Талас мостбет Талас
CozyHomeTextiles – Pages load quickly, browsing feels natural and effortless.
click to open – From the start, it feels like a strong and reliable site.
melbet ios problème connexion https://melbet81256.help/
1win ставки 1win ставки
browse upland marketplace – Clear categories and fast-loading pages make exploring effortless.
скачать видео ютуба скачать видео ютуба .
mostbet Visa mostbet Visa
check the store – Layout is clean and pages load quickly for a pleasant experience.
visit platform – Modern look, easy to move through all sections
check page – Layout is simple but effective, makes exploring pleasant.
StudioMarketHub – Clear layout, moving around the site is stress-free.
скачать видео ютуб на пк скачать видео ютуб на пк .
go to this link – Layout is neat and moving through sections is intuitive
ArtisanHome – Neat pages, easy to navigate and find relevant details.
глазные капли Ястреб yastreb-kapli.ru .
Handmade Marketplace – Very easy to navigate, everything is clearly displayed, and browsing is enjoyable.
мелбет зеркало бишкек https://melbet30946.help/
browse vendor vault – The site is organized well, making it easy to find information.
click here now – Tidy layout with logical flow ensures easy movement between pages.
view vendor products – Categories are arranged in a way that feels logical and user-friendly.
реабилитационный центр от алкоголизма vyvod-iz-zapoya-na-domu-ekaterinburg.ru .
shop link – Very clear layout and effortless browsing experience
visit page – Simple, clear layout makes exploring the site fast and easy.
HomeTextilesMaple – Very clean and logical design, navigation is simple and fast.
реабилитация алкоголиков реабилитация алкоголиков .
Rustic Charm Crafts – Selection was impressive, checkout simple, and the process went smoothly.
реабилитационный центр для наркозависимых vyvod-iz-zapoya-na-domu-nizhnij-novgorod.ru .
1вин официальный 1win09451.help
нарколог на дом нарколог на дом .
реабилитационный центр для наркозависимых vyvod-iz-zapoya-na-domu-nizhnij-novgorod-1.ru .
melbet cash back http://melbet81256.help
мостбет платежные методы https://www.mostbet32854.help
вывод из запоя в стационаре kapelnica-ot-zapoya-nizhnij-novgorod-1.ru .
капельница от похмелья vyvod-iz-zapoya-na-domu-ekaterinburg-2.ru .
наркологическая помощь наркологическая помощь .
browse now – Neatly structured content with quick page loads enhances usability.
check page – Well-organized pages make everything easy to find.
check out products – The pages are tidy and easy to read.
tap to view – Simple and clean layout helps information be absorbed quickly.
EmberTradingPost – Sections are organized well, making browsing straightforward
shop link – Nice layout that makes exploring content easy
Rose Cove Marketplace – Smooth interface and well-structured pages enhance usability
browse upland goods – Navigation is straightforward, making it simple to find what you need.
мелбет crash как играть мелбет crash как играть
ShopCove – Clean structure, moving through pages is convenient.
скачать видео с ютуба скачать видео с ютуба .
1win bonus hesablanması http://1win60278.help/
mostbet mobil mostbet59402.help
dawnforestgoodsatelier – Clean layout and everything is simple to understand.
1win casino live Moldova 1win casino live Moldova
shop link – Easy to navigate, interface is modern and responsive
start browsing – The design is inviting, making it easy to experiment with concepts
мелбет официальный сайт бишкек http://melbet30946.help
StoneShopOnline – Layout is clean and readable, making shopping fast
granite orchard access – Content is presented in a clean way, making navigation smooth
Нужна бесплатная юридическая консультация? Переходите по запросу помощь адвоката в Подмосковье и получите помощь опытного юриста по любым правовым вопросам: семейные споры, долги, недвижимость, трудовые конфликты, защита прав потребителей и многое другое. Задайте вопрос онлайн или по телефону и получите подробный разбор вашей ситуации и рекомендации по дальнейшим действиям. Консультация проводится бесплатно и конфиденциально.
mostbet кэшбэк mostbet кэшбэк
melbet règlement des gains https://melbet81256.help/
1вин обход блокировки 1вин обход блокировки
view marketplace – Easy navigation makes the whole browsing experience pleasant.
check out listings – Pages are organized logically, so finding information is easy.
мостбет белый экран мостбет белый экран
скачат видео ютуб скачат видео ютуб .
AmberUrbanStore – Everything feels logically arranged, navigation is smooth
see more here – Neat interface with clear organization and quick page response.
granite stone homepage – Everything is intuitive and the site loads quickly without clutter
visit homepage – Content is clearly arranged, navigation feels smooth.
mostbet вход в личный кабинет https://www.mostbet32854.help
melbet support côte divoire http://www.melbet81256.help
MakerHarborStudio – Easy-to-read design, browsing sections feels natural.
check out this shop – Boutique-style presentation adds a touch of elegance to browsing.
Orchard Commerce Hub – Interface feels tidy and browsing is fast
1win instalare apk https://www.1win59213.help
visit boutique hall – Layout is tidy and browsing through sections is easy.
наркологический центр наркологический центр .
загрузчик видео с ютуба загрузчик видео с ютуба .
OrchardSilkStore – Everything is organized clearly, browsing is effortless
visit this site – Easy to navigate and the information is very helpful
go to this store – Well-structured pages and intuitive menus make navigation seamless.
купить капли ястреб yastreb-kapli.ru .
visit harborstone collective – A clean design makes navigation feel easy and natural
наркологическая помощь наркологическая помощь .
лечение наркомании vyvod-iz-zapoya-na-domu-nizhnij-novgorod-1.ru .
наркологическая помощь наркологическая помощь .
Silk Studio Hub – Layout is clean and navigation is smooth
check this site – Looks well-organized, definitely worth a closer look.
look through offerings – Sections are easy to scan, so finding items is fast.
enter this shop – It has a tidy layout that makes browsing simple
вывод из запоя в стационаре вывод из запоя в стационаре .
наркологический центр наркологический центр .
реабилитация алкоголиков kapelnica-ot-zapoya-nizhnij-novgorod-1.ru .
click to open – Easy-to-follow content and a simple layout make browsing pleasant.
капельница от похмелья vyvod-iz-zapoya-na-domu-ekaterinburg-1.ru .
explore this shop – Layout is tidy, and finding information feels intuitive.
1win promotii 1win promotii
Pebble Studio Online – Layout feels organized and effortless to browse
melbet aviator на деньги https://melbet30946.help/
open the marketplace – The interface is clean, making it easy to move between sections.
discover more – The layout looks organized and gives a solid first impression
explore this store – Navigation feels natural and content is easy to find