Garlands are the easiest way to decorate: they’re lightweight, portable, re-usable, and let your handmade touch transform any room or party. Below are five complete, blog-ready crochet garland projects you can make from scraps or dedicate a cozy weekend to: String of Hearts, Scrap-Buster Holiday Light Garland, Strawberry Garland, Wisteria Garland, and Aesthetic Leaf Garland.
Each pattern includes a warm intro, materials & tools, sizing and spacing math, full step-by-step instructions (motif + assembly), finishing tips, safety notes (important for lighted garlands), variations and styling ideas. I kept the instructions clear and adaptable so they work for beginners through confident makers.
Quick notes before you start (materials, sizing, safety)
Yarn & hook
- For garlands you’ll want yarn that holds shape: cotton, cotton-blend, or DK acrylic. Cotton holds stitch definition and blocks nicely; acrylic is light, colorful, and machine-washable.
- Typical hooks: 2.5–4.5 mm depending on yarn weight and the motif scale. Use a smaller hook than usual for tighter, neater motifs if you plan to stuff them.
Stringing base
- Options: cotton twine, jute, pearl cotton cord, or pre-strung LED fairy light strings (use battery-powered LED to avoid heat/safety issues). Choose cord thickness appropriate to eye or loop method used.
Hardware
- Small split rings, lobster swivels, wooden dowel for wall hanging, sticky hooks, small clothespins (for clip-on motifs), or clear fishing line for invisible hang.
Sizing & spacing math (quick how-to)
- Decide total garland length (e.g., 6 ft = 72″).
- Decide motif width (e.g., hearts are 2″ each).
- Decide spacing between motifs (e.g., 3″).
- Compute number of motifs = floor( (total_length + spacing) ÷ (motif_width + spacing) ).
- Example: motifs = floor( (72 + 3) ÷ (2 + 3) ) = floor(75 ÷ 5) = 15 motifs.
Safety (lights & coverings)
- Only use low-heat LED string lights with crochet covers — do not cover filament or high-wattage bulbs with yarn. Battery-powered LED strings are safest.
- Never leave lit garlands unattended if they’re switched to mains power or if covers are tightly wrapped around the bulbs.
- For outdoor use, use weatherproof LED lights and yarn fading/rot resistance (acrylic is better outdoors). Avoid electrical hazards.
1. Crochet String of Hearts Garland Pattern
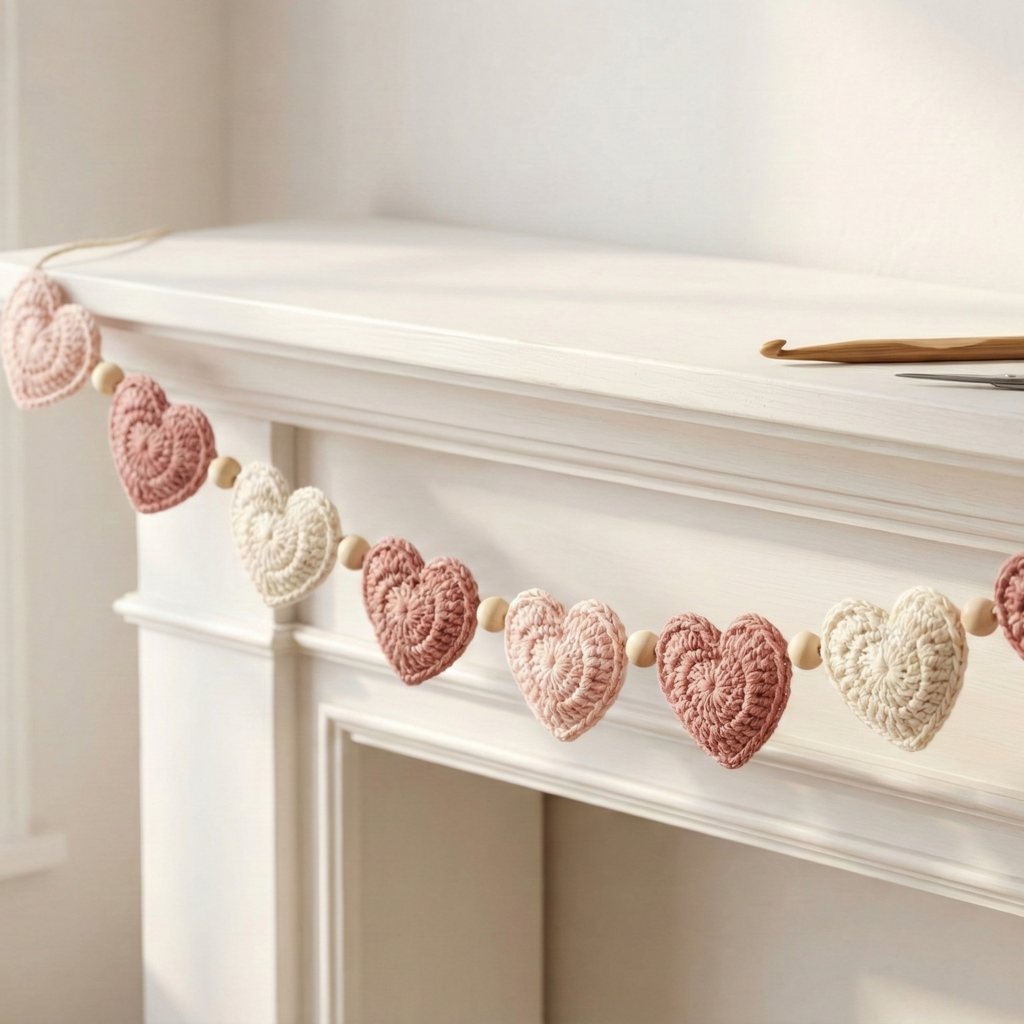
A romantic, classic garland: tiny hearts evenly spaced on a cord — great for weddings, Valentine’s Day, or nursery decor.
Vibe
Sweet, simple, highly scrap-friendly. Makes a lovely backdrop or doorway swag.
Materials & tools
- DK cotton or cotton-blend in main color (or multiple colors) — small amount per heart (~5–10 yd).
- Hook: 3.5 mm (adjust to get desired heart size).
- Cotton twine or 2 mm cord, tapestry needle, small stuffing (optional), scissors.
- Optional: small wooden beads to space/weight the garland.
Finished motif example
- Heart width ≈ 2″, height ≈ 1.75″ using DK + 3.5 mm hook.
Motif (tiny puff heart, worked flat then seamed)
- Make 1 heart base
- MR, ch1, 6 sc in ring. (6)
- R2: [inc] ×6 → 12.
- R3: [sc1, inc] ×6 → 18.
- R4: [sc2, inc] ×6 → 24.
- R5: sc around (24). Fasten off, leave long tail.
- Shape heart top lobes & point
- Fold circle in half and mark center. Starting from one edge, work sc, hdc, 3 dc, hdc, sc into each lobe region across the fold to create two petal-like lobes; decrease a couple of stitches at bottom center and stitch to a point. (If you prefer, use a simple heart pattern: ch10, sc in 2nd ch back to start, shape with shells on each side.)
- Optional stuffing
- Stuff hearts very lightly before fully closing so they have a little body; too much stuffing makes them stiff.
- Finish
- Weave tails to back, tidy edges. Make 15 hearts per 6-ft garland (use spacing math above).
Assembly (stringing method — no sewing each time)
- Decide spacing (e.g., 3″ between hearts). Cut cord 6–8″ longer than finished length for tying.
- Add a small wooden bead at each spacing position to hold hearts steady (optional).
- For attachment: sew a small loop of yarn to the top center of each heart and slide the heart onto the cord; or tie a little slip knot around the cord through the heart loop for fixed spacing. Alternatively, chain a small loop at the heart top while crocheting and slip it onto the cord.
Variations & styling
- Make an ombré garland using graded colors.
- Make double-strand garland: two cords with offset hearts for depth.
- Mini hearts + beads alternation for an airy look.
2. Crochet Scrap-Buster Holiday Light Garland Pattern
Use up scraps by making little crochet covers/cups for LED string lights or tiny ornaments that hang between bulbs. This is a high ROI project for crafters with lots of leftover yarn.
Vibe
Fun, resourceful, festival-ready. Works for Christmas, Diwali, Halloween (use colors accordingly).
Materials & tools
- Assortment of scrap yarn bits (fingering → DK).
- LED fairy lights (battery LED recommended), 2.5–3.5 mm hook depending on yarn.
- Small stuffing (optional for ornament shapes), tapestry needle.
Important safety note: ONLY use low-heat LED lights. Do NOT attempt to cover incandescent bulbs or tightly wrap yarn around mains-powered bulbs.
Two approaches
A. Crochet mini-cups that sit over bulbs (covers)
B. Make small scrap ornaments (stars, mini balls, tiny stockings) and tie to light cord between bulbs
A — Mini bulb cup (quick)
- Make a tiny cup to slip over LED bulbs: ch6, join to ring; R1: 8 sc in ring; R2: inc around (16); R3-R4: sc around (16) — this creates a small cylinder that fits snugly over tiny LED bulbs (measure first!). If your bulb is wider, continue increases and then a few sc rounds for height. Slip over each LED and leave the rest of the strand showing. (Optional: add small decorative edging: sc, picot, sc.)
B — Tiny scrap ornaments
- Mini star (very small): MR, ch1, 6 sc in ring; break, then chain points and sc back to form 5 points — fast and flat.
- Mini ball / pom-pom: crochet 2 small disks, sc-seam them leaving a small opening, stuff, close.
- Tiny stocking: work small rectangle, shape toe, and seam.
Tie small loop to ornament and hang it on the light string between bulbs or clip with clothespins.
Spacing & assembly tips
- Measure distance between bulbs (most fairy lights have 3–4″ spacing). Plan to hang ornaments in the gaps or over bulbs.
- If attaching over bulbs, make cups a snug fit so they won’t fall; or add a tiny loop and secure with a short chain clip.
Variations & finishing
- Make color-themed scrap garlands (pastel, jewel tones).
- Make an entire strand of varied mini shapes for a whimsical party garland.
3. Crochet Strawberry Garland Pattern
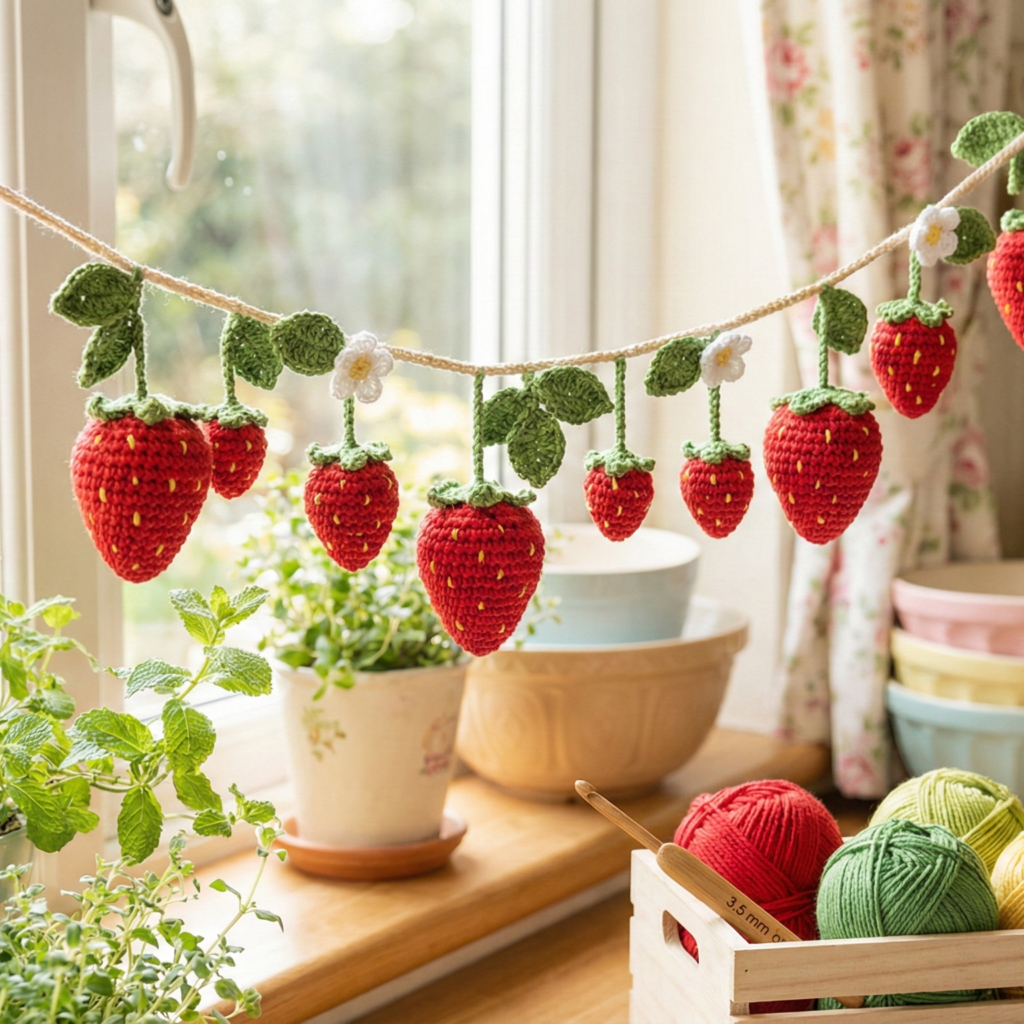
Cute and whimsical — tiny strawberries and leaves strung together. Perfect for kitchen decor, spring parties, baby showers.
Vibe
Playful, cottagecore, perfect for kitchens or garden parties.
Materials & tools
- DK cotton in red (berry), green (leaves), yellow/brown (seeds), 3.5 mm hook, cotton cord, stuffing for berries, tapestry needle.
Finished motif example
- Strawberry: ~1–1.25″ tall; leaf ~0.75–1″.
Strawberry motif (worked in the round)
- Berry body
- MR, ch1, 6 sc in ring. (6)
- R2: inc around → 12
- R3: sc1, inc ×6 → 18
- R4: sc2, inc ×6 → 24
- R5: sc around 2 rounds (24, 24) — shape into drop by reducing: R7: sc2, dec ×6 → 18; R8: dec around → 9. Stuff lightly before final decrease. Fasten off leaving tail.
- Calyx (leaf top)
- Join green at top: ch6, sc back along chain (5 sc). Make 3–4 small leaves around top by repeating ch6 → shell petal: (sc, hdc, 3 dc, hdc, sc) into each loop. Fasten off and sew securely to berry.
- Seeds
- Embroider tiny French knots or attach tiny yellow seed beads evenly over the berry.
Assembly (stringing)
- Option A: Make a small loop at berry top when finishing calyx and slip onto cord.
- Option B: Sew berries directly to cord by wrapping the loop around the cord and stitching through loop. Space strawberries 4–6″ apart (or use spacing math described earlier).
Leaf accents
- Between berries, add crochet leaves (ch8, sc back along chain with tapering decreases) to make the garland look lush.
Variations & display
- Make mini and midi berries mixed for botanical realism.
- Hang across a kitchen window or as a cake table swag.
4. Crochet Wisteria Garland Pattern
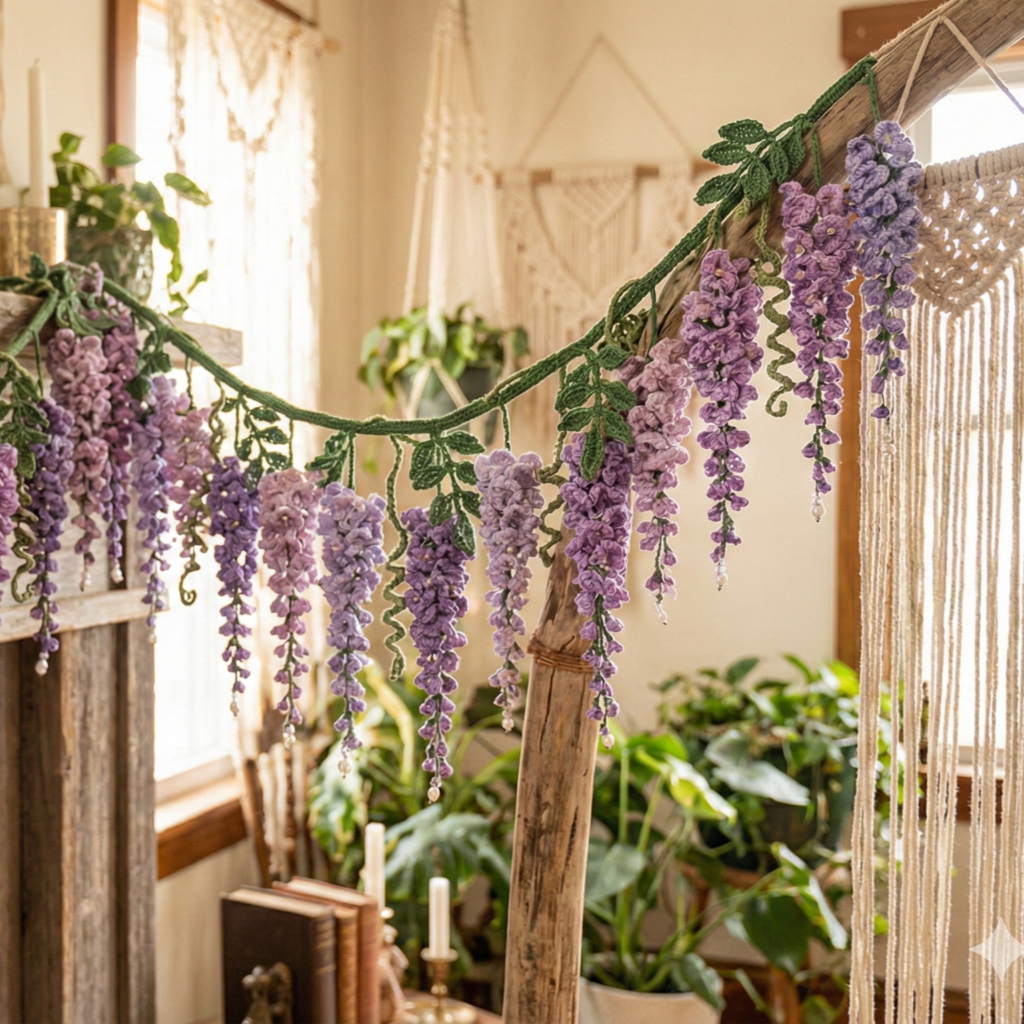
A dramatic, romantic garland of cascading “wisteria” clusters — lovely above mantels, arches or for boho weddings.
Vibe
Elegant, drooping cascades of texture; more time-consuming but showstopping.
Materials & tools
- Fingering or sport cotton for bloom clusters (choose lilac/lavender/purple + green for vines), 2.5–3.5 mm hook, cotton cord or rope, fine florist wire (optional for shaping), tapestry needle.
Finished motif example
- Single bloom cluster (a strand of tiny flower clusters) length ~4–6″; multiple clusters tied to main cord create cascades.
Wisteria “cluster” (make many)
- Small flower unit
- ch6, sl st in 2nd ch from hook, dc in next, hdc in next, sc in next, picot or sl st — this is one tiny petal/flower. Fasten off. Make 5–12 such petals and join them head-to-tail to form a small hanging chain.
- Cluster length
- Make chains of 6–12 flowers; each chain becomes one hanging wisteria tendril (longer chains = fuller cascade). Vary lengths for natural look.
- Assemble clusters
- Bundle several flower chains (3–7) together at a single top point and tie to main cord (knot or whipstitch). Space bundles along the cord every 6–12″ depending on fullness desired.
- Optional vine & leaves
- Crochet a twisted chain or i-cord in green to serve as vine, and attach leaf motifs (ch6 shaped leaves) near cluster tops.
Spacing & hanging
- For a 6 ft garland, make 8–12 clusters of varying lengths to create a staggered canopy effect.
- If outdoors or hung high, weigh cluster bottoms very lightly with tiny beads so they hang straight.
Variations & tips
- Use ombré purples for depth — darkest at the stem and lighter toward the tips.
- For dramatic installation, drape multiple garlands at different heights from a branch or dowel.
5. Crochet Aesthetic Leaf Garland Pattern
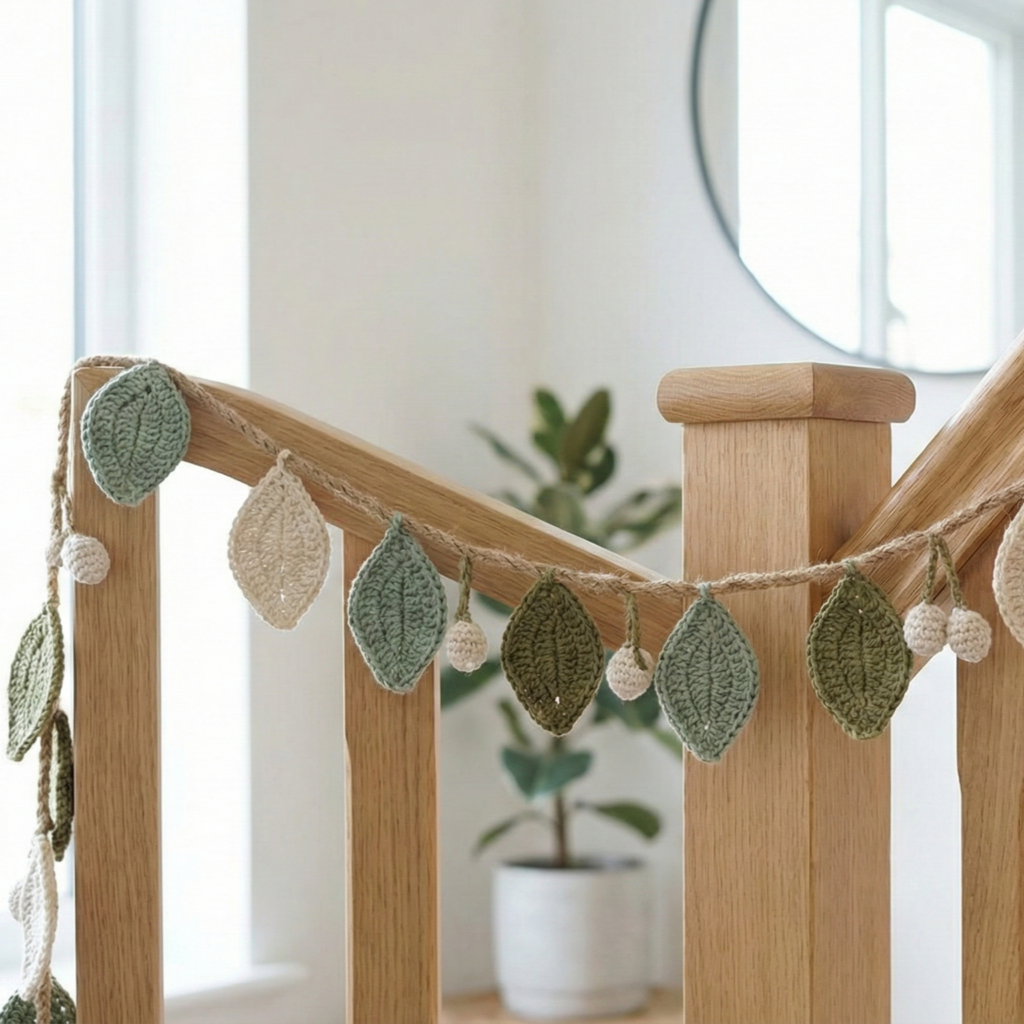
A modern, minimalist garland of stylized leaves — clean lines, great for year-round décor or seasonal updates.
Vibe
Scandi / neutral / aesthetic. Looks great wrapped around banisters, mirrors, or as backdrop greenery.
Materials & tools
- DK cotton in 2–3 greens (or neutrals), 3.0–4.0 mm hook, cotton cord or jute, tapestry needle.
Leaf motif (worked flat)
- Leaf pattern (one size) — flat asymmetric leaf
- ch12. Row 1: sc in 2nd ch from hook, hdc, dc, hdc, sc, sl st in next 2 as base ridge, sc in next 2, hdc, dc, hdc, sc in last. (This is a sample; adjust stitch counts to get the shape you prefer.)
- Row 2: work around whole chain to create a full leaf outline: in each ch space work (sc, hdc, dc, hdc, sc) tapering toward tip and repeat on other side. Fasten off and shape with light blocking.
- Alternative simple leaf
- MR, ch1, 6 sc in ring; R2: [inc] ×6 → 12; then work elongated rows on one side to create the leaf tip, then mirror. (Many leaf charts available — choose one matching your aesthetic.)
Assembly
- Make many leaves in varying sizes (small: 2.0–2.5″; medium: 3.0–4.0″).
- Attach to cord by sewing a small loop at leaf base and sliding onto the cord, or use single stitches to secure every 2–4″ for a dense garland. For a natural look, alternate leaf sizes and rotate leaf directions.
Styling & variations
- Make neutral beige/cream leaves for an autumnal or boho vibe.
- Mix in tiny crochet berries (small amigurumi balls) for seasonal accents.
Extra finishing, display & care tips (applies to all garlands)
- Finishing edges & blocking: For cotton leaves/flowers it helps to lightly spray and pin them to a shape board to dry so they hang neatly. Use steam blocking for acrylic blends sparingly.
- Tidy joins: When you sew loops for sliding motifs onto cord, hide knots inside the motif or under a decorative leaf to avoid visible bulky joins.
- Weights & balance: If motif clusters cause sagging, add very small, well-hidden beads (wood or glass) to the bottom of motifs as weights. For outdoor garlands, secure spaced ties to the support structure.
- Storage: Store rolled around a tube or in a breathable bag to keep shape.
- Light safety: Never cover hot bulbs. Use LED micro-lights, and if you employ covers over bulbs, make the covers short and airy (cup style) and check heat after 10 minutes of use.
conclusion
You now have five fully developed crochet garland patterns — from sweet String of Hearts and playful Strawberry Garland to resourceful Scrap-Buster Holiday Light Garland, romantic Wisteria Garland, and minimalist Aesthetic Leaf Garland. Each pattern is crafted to be adaptable, scrap-friendly, and safe (especially when combining yarn with lights).