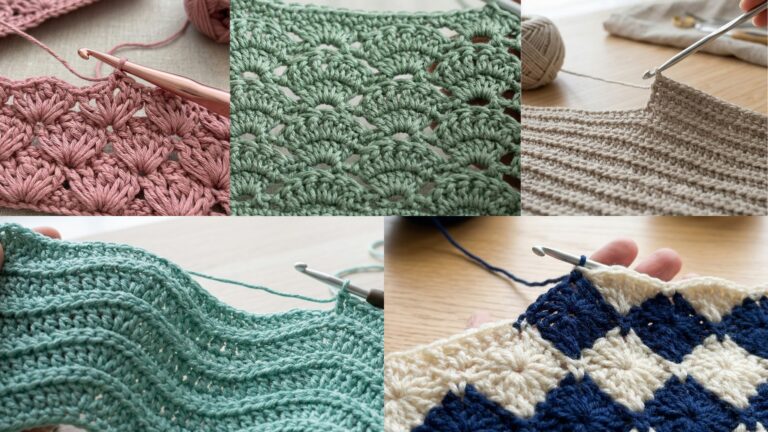
Blankets are meaningful, practical gifts: they wrap someone in color, warmth and time you spent making them. Below is one solid introduction that applies to all five blanket patterns (materials, measuring, gauge, sizing, finishing and abbreviations), followed by five detailed, step-by-step patterns: Colorful Waffle Stitch, Dragon Scales (Crocodile), Red & White Checkered Granny Squares, Picot Blanket, and Cow Print Afghan. Each pattern includes skill level, materials (with sensible yarn/yardage ranges), finished size targets, a clear foundation/body/border recipe, shaping/variations, and finishing + care notes.
Read the intro first (it saves time) and then pick the pattern that fits the recipient.
yarn, hooks, sizing, gauge, construction & abbreviations
Yarn & hook basics
- Fiber choice: For gifts, choose yarn that matches the recipient and care expectations. Common choices:
- Worsted weight (Aran / #4) — versatile, good warmth, widely available; great for throws and adult blankets.
- DK / Light Worsted (#3) — lighter, drapier blankets that still have substance.
- Bulky (#5) — quick-to-work, plush blankets that are very warm but heavier.
- Cotton / cotton blends — breathable and machine-washable (good for baby blankets in warm climates).
- Acrylic blends — easy care and budget friendly.
- Hook: Use the hook recommended on the yarn label as a starting point then swatch. Typical hooks:
- DK: 3.5–4.5 mm
- Worsted: 4.5–6.0 mm
- Bulky: 6.5–10 mm
- Yarn amounts: Yardage depends on weight and finished size. I provide ranges per pattern below — always swatch and recalc yardage for your gauge.
Sizes & finished dimensions (common gift sizes)
- Baby / crib: 30 × 36 in (76 × 91 cm)
- Lap / stroller: 36 × 48 in (91 × 122 cm)
- Throw / couch: 50 × 60 in (127 × 152 cm)
- Twin bed (light): 65 × 90 in (165 × 229 cm)
How to plan using gauge (digit-by-digit example)
- Make a 4-in (10 cm) swatch in the stitch pattern, blocked as you will finish. Count stitches per inch (spi).
- Example: you want a throw 50 in wide. Your swatch gives 4 stitches per inch.
- Compute stitches needed: 50 × 4 = ?
- Digit-by-digit: 50 × 4 = (50 × 2) × 2 = 100 × 2 = 200.
- So you need 200 stitches across (round to a stitch multiple required by the pattern repeat).
- For rows: measure rows per inch (rpi) and multiply by desired height (e.g., 60 in × rpi).
Always round counts to the nearest full repeat/multiple for the stitch pattern you plan to use.
Construction approaches
- Worked flat in rows (most typical): foundation chain → body rows → optional border. Easiest for most patterns.
- Worked in joined motifs (granny squares, hexagons): make motifs and join into rectangles.
- Worked in panels (two halves joined): helpful for very large blankets to manage yarn/weight.
- Borders: simple single crochet or more decorative picot/shell rounds. Borders add stability and a finished look.
Finishing & blocking
- Blocking opens lace and evens stitch height — pin while damp or steam lightly for synthetic blends. For bulky blankets, blocking is light.
- Weave in ends securely — long colourwork blankets can have many ends; use a tidy method (weaving back and forth 1–2 inches inside the blanket).
- Lining/quilt backing (optional): sew a fabric backing for extra warmth and durability; use machine stitching with wide zigzag on the edge to allow stretch.
- Care labels: include yarn care instructions with a gifted blanket.
Abbreviations (US terms)
- ch — chain
- sc — single crochet
- hdc — half double crochet
- dc — double crochet
- tr — treble crochet
- sl st — slip stitch
- st(s) — stitch(es)
- sk — skip
- inc — increase (two stitches in same st)
- dec — decrease (e.g., sc2tog)
- BLO / FLO — back loop only / front loop only
- sp — space
- MR — magic ring
1. Crochet Colorful Waffle Stitch Blanket Pattern
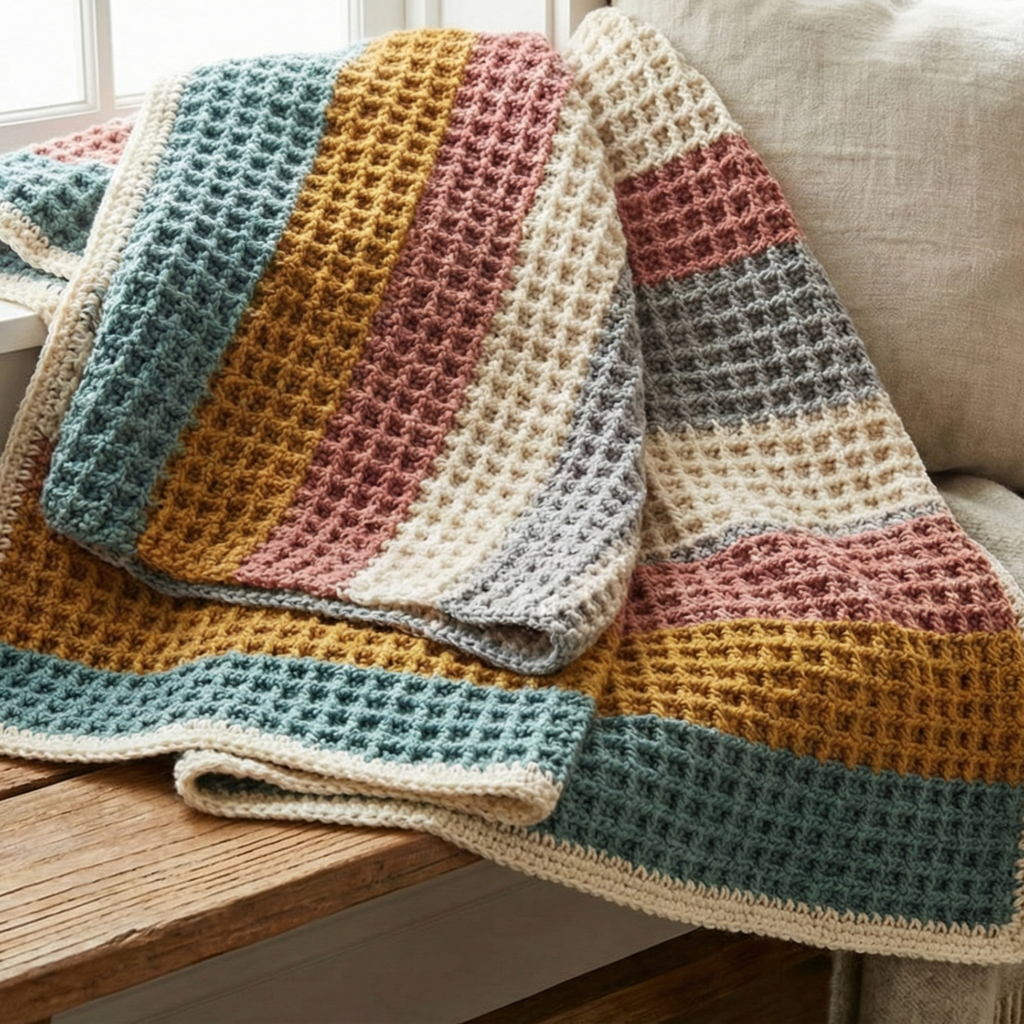
Skill level: Confident beginner — waffle stitch uses front post/ back post dc for texture. A great gift: warm, squishy, and visually rich with stripes or color blocks.
Finished sizes & yarn (examples)
- Baby 30×36 in: worsted ~900–1100 yd (820–1000 m).
- Throw 50×60 in: worsted ~2000–2400 yd (1830–2195 m).
(Actual yardage depends on gauge; these ranges are typical.)
Materials
- Worsted weight yarn in 4–6 colors (or use one variegated + solids) — yardage per color depends on striping.
- Hook: 5.0 mm (adjust to get waffle density).
- Tapestry needle, blocking pins.
Gauge (example waffle repeat)
- In waffle stitch sample: 12 sts × 8 rows = 4″ (this will vary—swatch). Waffle uses post stitches so gauge compresses after blocking.
Stitch summary — classic waffle stitch (worked in multiples of 3 + 2)
Row A (foundation): ch to stitch count (see planning). Row 1: dc across.
Row 2: FPdc around next st, skip 1, dc in next repeat — creates vertical ribs.
Row 3: dc across, etc. The waffle texture is built by alternating a row of FPdc/BPdc with dc rows.
Step-by-step (throw example, stepped recipe)
- Plan width: Suppose desired width 50 in and your swatch gave 3 sts/in in waffle foundation. Compute stitches: 50 × 3 = 150 stitches. (Digit-by-digit: 50×3 = (50×1)×3 = 50×3 = 150.) Round to a multiple of 3 + 2 — 150 is divisible by 3 (150/3 = 50) so add +2 → chain 152. But waffle formula is (multiple of 3) + 2, so chain 152.
- Foundation chain: ch 152 (or your computed chain) + 1 for turning.
- Row 1: dc in 3rd ch from hook and across (or dc across depending on set-up).
- Row 2 (waffle set-up): fpdc around next st, dc in next across. Turn.
- Row 3: dc across. Turn.
- Row 4: repeat Row 2 but use bpdc instead of fpdc on the rows that stack differently to create the waffle pockets. The classic repeat is: Row A (dc row), Row B (fpdc row), Row A, then Row C where you work bpdc into the fpdc posts to lock the waffle square. Continue repeat until desired height.
- Colour changes: For stripes, change color at the end of any row; carry color up inside the waffle ridges to hide floats or weave in ends. For color blocks work X number of rows per color. Because waffle is thick, use large color stripes for visual effect.
- Border: Work two rounds of sc in a contrasting color around the whole blanket to stabilize edges. For a decorative finish, work a third round of crab stitch (reverse sc) or a shell round: sc, skip 2, 5 dc in next across corners: shell, etc., to make a scalloped edge.
Variations & tips
- Double-thick lap: hold two strands together for extra squish; adjust hook accordingly.
- Monochrome waffle: natural wool gives a classically cozy texture.
- Stripe planning: keep stripe heights even (e.g., 10–14 rows per stripe) for balanced color.
Finishing and care
- Block lightly to open waffle pockets. Weave ends in the interior ribs (tuck tail into the post columns and stitch back). Machine wash warm on gentle for acrylic; wool requires hand wash unless superwash.
2. Crochet Dragon Scales (Crocodile) Blanket Pattern
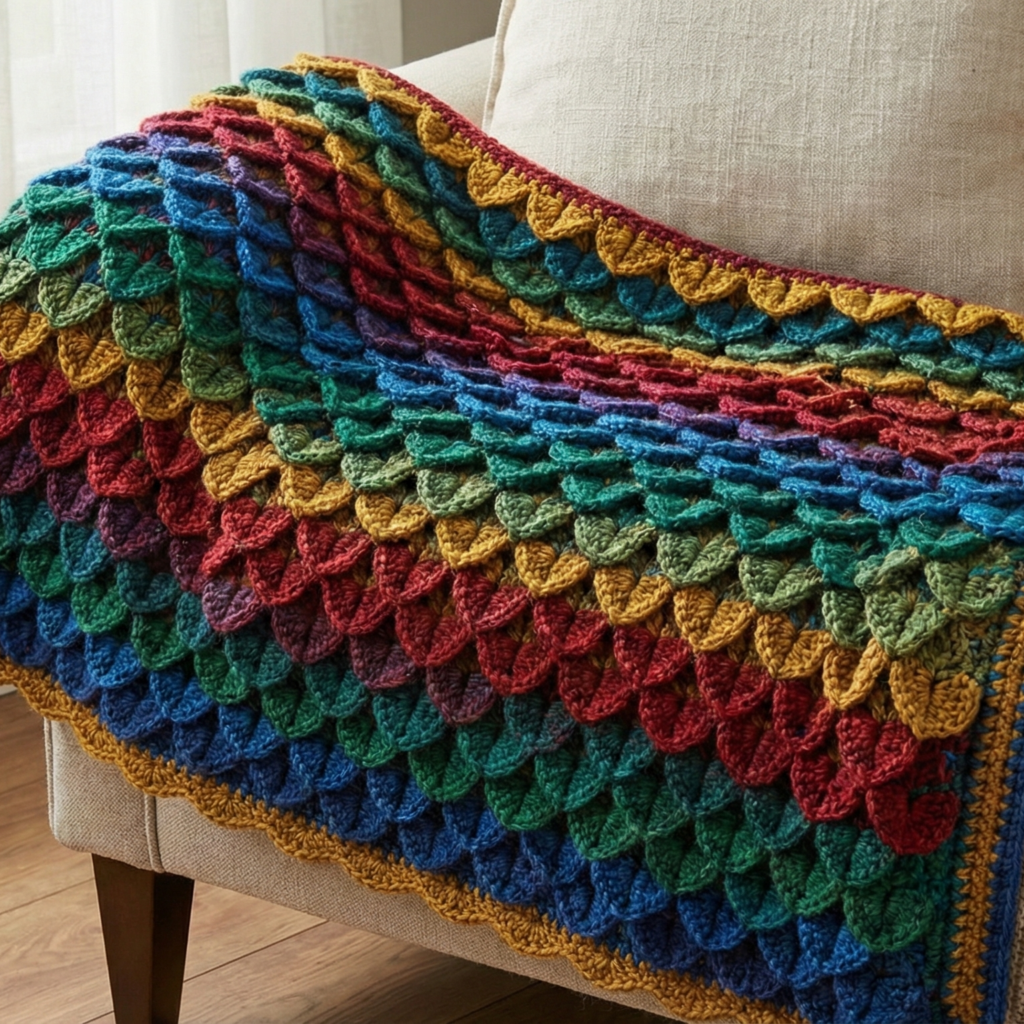
Skill level: Intermediate — Crocodile stitch / dragon scales require working scales in offset rows; yields a dense, scale-like texture perfect for cozy throws and dramatic baby blankets.
Finished sizes & yarn (examples)
- Baby 30×36 in: worsted ~900–1200 yd (820–1100 m).
- Throw 50×60 in: worsted ~2400–3000 yd (2200–2750 m).
Dragon scales use extra yarn; expect 10–20% more yardage than simple dc blankets.
Materials
- Worsted or bulky yarn (bulky gives big scales) — main color or multiple colors for ombré scales.
- Hook: 5.5–6.5 mm for worsted; 8.0 mm for bulky.
- Tapestry needle, stitch markers.
Gauge & stitch concept
- The croc stitch builds pairs of layered half-shells worked around groups of dc. Swatch to determine how many scale rows per inch.
Basic crocodile stitch (one scale)
- Work a row of dc (foundation). For the scale row you make a shell of 5 dc worked around the post of a dc from the previous dc row; the next shell is worked behind that shell on the next dc, creating overlapping scales.
Step-by-step (throw — row-based method)
- Plan width: Example: desired width 50 in, swatch gives 3 sts/in in foundation. Compute: 50×3 = 150 sts. (50×3 = (50×1)×3 = 50×3 = 150.) Chain 150 + 2 turning if your stitch pattern requires extra initial ch.
- Foundation & setup rows: Work base rows (1–3) of dc to create a platform where scales will attach (for stability, do 2–3 dc rows).
- Row A (scale row): Work a shell of 5 dc around the post of the next dc in the row below (go behind the post), skip 1 repeat across to form the first row of forward-facing scales.
- Row B (anchor row): Work a row of sc or dc across to anchor scale bases (this is done in between scale rows).
- Row C (offset scales): Work shells into the gaps between previous scale shells so that scales overlap — this is the hallmark of crocodile texture. Stagger shells so each new scale sits over the gap between two lower scales.
- Repeat Rows B & C until blanket reaches desired height. Scales create a thick, cushiony surface; alternate colors per scale row for a rainbow or ombré effect.
- Edge finishing: Crocodile edges are scalloped naturally; for a tidy finish, work a final round of sc around the entire edge (into the front loops only if you want to preserve scallops). For a decorative edge, add a shell border.
Variations & tips
- Color play: Use a gradient yarn or rotate 2–3 colors every scale row for a dramatic fish/dragon look.
- One-sided scales: For a flatter, more reversible blanket, make smaller shells (3 dc instead of 5) or work scales on both sides alternately to fill gaps.
Finishing & care
- Because of thickness, croc blankets take more time to dry — hand wash/dry flat or machine gentle with low spinning. Avoid heavy tumble-dry for bulky yarn.
3. Crochet Red & White Checkered Granny Squares Blanket Pattern
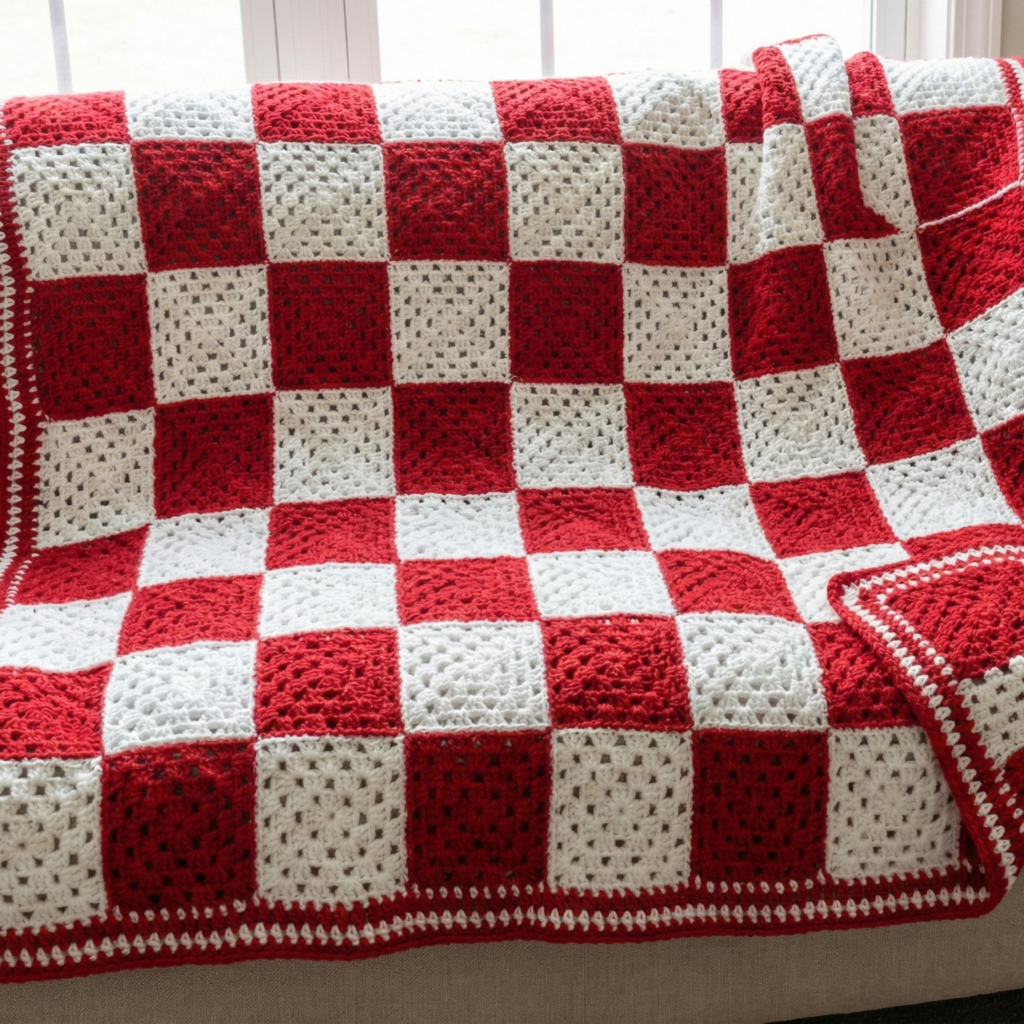
Skill level: Confident beginner — granny squares are modular, soothing to make and easy to adapt; perfect as a gift with a classic look.
Finished sizes & yarn (examples)
- Baby 30×36 in: ~900–1200 yd of worsted (because many joins cost yarn).
- Throw 50×60 in: ~1800–2600 yd depending on square size and number.
Materials
- Worsted weight yarn in red and white (or your color pair) — yardage split depends on number of squares.
- Hook: 4.5–5.5 mm for typical granny square size.
- Tapestry needle, blocking pins.
Planning the grid
- Choose your granny square size (after swatching). Example: 4-in finished granny square:
- For a 50-in wide throw: 50 / 4 = 12.5 → round to 12 or 13 squares across. If 12 squares × 4 in = 48 in, which is close; adjust square count or add a border to reach 50 in.
- Digit-by-digit: 50 ÷ 4 = ? Here we divided to estimate squares across. Use whole squares; adjust border to reach final dimension.
Make the granny squares (classic 3-round granny)
- Round 1: MR, ch3 (counts as dc), 2 dc, ch2, 3 dc, ch2 × 3 more times, join — four corner clusters.
- Round 2: Join contrasting color if desired: in each corner ch2 space work (3 dc, ch2, 3 dc); along sides work 3 dc in side spaces separated by ch1 if you want larger squares. Continue rounds until square reaches desired size.
- Block squares to exact size (4 in) using pins.
Assembly
- Lay out squares in checkerboard order (red, white, red, white).
- Join squares using your preferred join method:
- Whipstitch from RS for an invisible seam.
- Join-as-you-go for no separate join.
- Slip stitch join for a raised join line (good visual effect).
- After joining rows, work a 2–4 round sc border around entire blanket in a unifying color (white often ties checkerboard together). You can add a picot or shell round for a feminine edge.
Variations & tips
- Scale up squares: larger squares reduce seams and speed up work (e.g., 6-in squares).
- Alternate colors: a 3-color checkerboard or ombré granny squares for more modern look.
Finishing & care
- Seam on WS for neat RS. Wash per yarn instructions; cotton blends are very machine-washable for everyday use.
4. Crochet Picot Blanket Pattern

Skill level: Confident beginner → intermediate — focus is on elegant, delicate picot edges or picot stitch body for a refined gift.
Finished sizes & yarn (examples)
- DK or worsted works; choose a plainer ground so picot border shines.
- Baby 30×36 in: ~800–1000 yd (less if DK).
- Throw 50×60 in: ~1600–2200 yd.
Materials
- DK or worsted yarn, 1–2 colors (main + accent for picots).
- Hook: 4.0–6.0 mm depending on yarn.
- Tapestry needle, blocking pins.
Picot stitch refresher
- Picot is typically ch3, sl st into top of the same st to form a three-chain point. Alternatively use ch2 picots for smaller points.
Two approaches
A. Simple body + picot border (elegant and quick)
B. Picot lace body (picots integrated into the stitch repeat across the blanket)
Pattern A — body (dc or shell) with picot border
- Plan width: compute chain (as in waffle example) for desired width and pattern multiple.
- Body: Work rows of dc, or a subtle shell repeat: dc in next, ch1, skip 1, dc to create small texture. Work until desired height.
- Picot border: Work one round sc around the edge, then sc, ch3, sl st into base of ch3 (picot), sc in next 3–4 sts repeat around — put picots every 3–5 stitches. At corners add 3 picots for crisp corner points.
- Finish: Weave ends and block so picots stand up evenly.
Pattern B — all-over picot lace (delicate)
- Foundation: chain multiple of 4 + 1.
- Row 1: sc, ch3, skip 2, sc across (creates picot arches).
- Row 2: ch3, sc in top of next sc — work alternating rows to build lace. This yields a grid of picot loops that will fan out after blocking.
- Repeat until desired height then add final sc round and picot accent row.
Variations & tips
- Trio of yarns: use a thin metallic held with main yarn for a subtle sparkle across the body then keep picot border plain.
- Tiny picots: use ch2 picots for a daintier look; ch4 for pronounced points.
Finishing & care
- Blocking is essential to open picots and show crisp points. Pin each picot gently for uniformity. Hand wash recommended for delicate fibers.
5. Crochet Cow Print Afghan Blanket Pattern
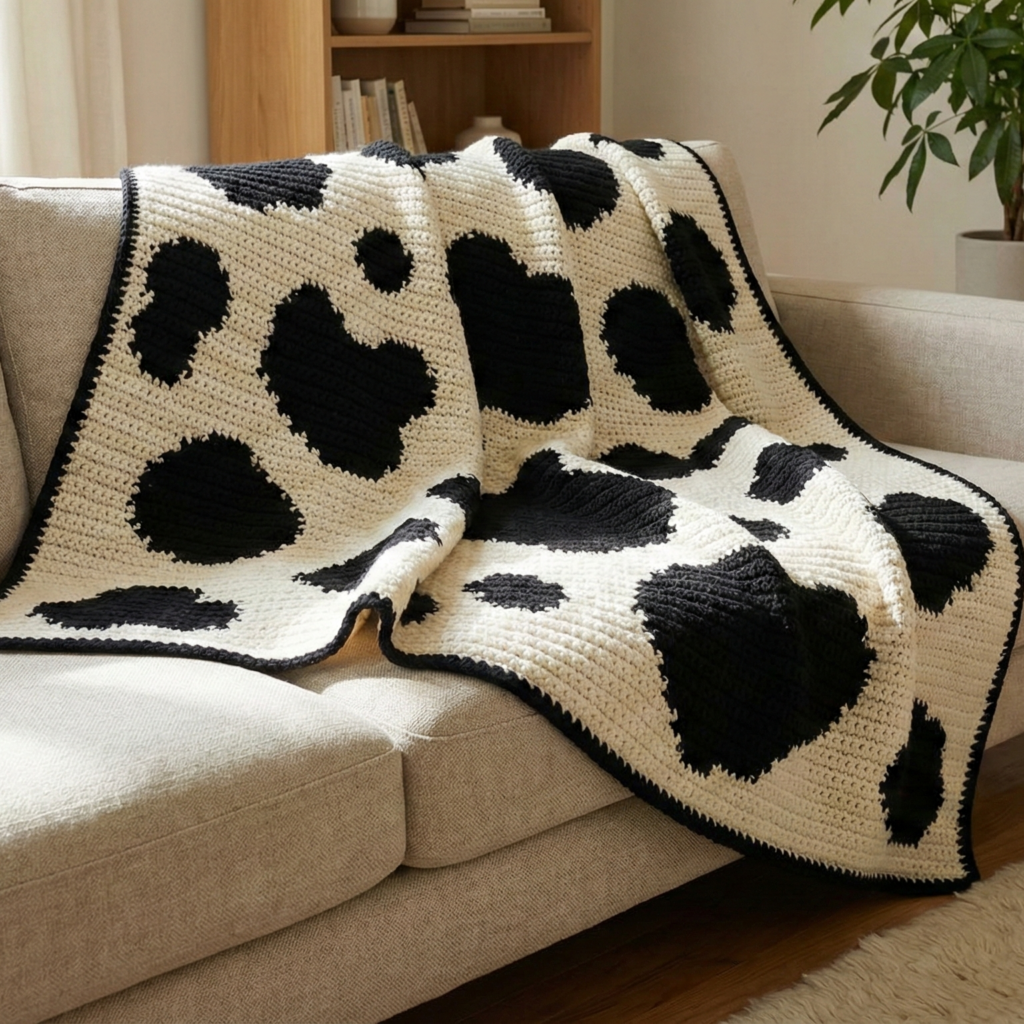
Skill level: Intermediate — uses colorwork to create large irregular spots; fun, whimsical gift especially for farm lovers or kids.
Finished sizes & yarn (examples)
- Use worsted weight for good coverage.
- Baby 30×36 in: ~900–1200 yd.
- Throw 50×60 in: ~1800–2600 yd.
Materials
- Worsted in white (main) and black (spots) or brown/black for spots. Consider a third accent for border.
- Hook: 5.0–6.0 mm.
- Tapestry needle.
Design concept
- Cow print is large irregular splotches on a white field. You can chart pixel-by-pixel using tapestry single crochet or surface-embroider spots onto a white blanket after the body is complete.
Two methods
A. Tapestry crochet — work color changes during sc rows to form spot shapes.
B. Appliqué spots — crochet large irregular circles/ovals in black and sew onto a white ground (gives clean edges and simpler white body).
Method A — tapestry sc (chart method)
- Swatch & charting: Determine stitches per inch from sc tapestry swatch. Design or download a simple spot chart scaled to your stitch count and desired width (e.g., 200 stitches across). Place large blobs randomly across the chart.
- Foundation & rows: Chain required stitches. Work sc in tapestry technique (carry unused color on WS and catch floats every 3–4 sts to avoid long floats). Follow chart row by row to place spots.
- Spots: For organic blobs, avoid perfect circles — use irregular shapes with narrow “tails” or overlapping clusters for a natural spotted look.
- Border: Work a 2–3 round sc border in black or coordinated accent to frame the print.
Method B — appliqué spot method (recommended for easy gifting)
- Make white body: Crochet a simple dc or hdc blanket in white to desired size.
- Make spots: Crochet irregular rounds: MR, R1: 6 sc, R2: inc pattern to make oval-ish shapes, R3: skip some increases to create elongated ovals. Work several sized spots (large, medium, small).
- Placement: Pin spots to the blanket, step back to ensure pleasing randomness avoiding symmetry.
- Sew on securely with matching yarn using invisible whipstitch, catch edges and secure to the white ground.
- Finishing: Block lightly and add border in black or contrasting color.
Variations & tips
- Color swap: Use brown spots on cream for warm “cow” look.
- Soft fuzzy spots: Use boucle yarn for spots for tactile interest.
Care
- For applique method, test the seam strength with gentle tug and wash inside a mesh bag. Use machine wash gentle for acrylic/cotton blends; avoid high heat.
Conclusion
You now have five complete blanket designs that suit a wide range of recipients: textured waffle warmth, dramatic dragon scales, classic checkerboard granny squares, refined picot lace, and playful cow print. A few final, practical tips to make your gift feel professional and enduring:
- Swatch & recalc yardage — always make a 4″ swatch and compute exact yardage needs based on your gauge; yarn labels are estimates and stitch patterns use yarn differently.
- Plan stripes and motifs before starting — make a tiny color mock-up (6–10 rows) to see how colors interact, especially for crochet textures like crocodile or waffle.
- Weave in and secure ends well — for blankets, weave tails back and forth at least 2 in (5 cm) inside the fabric; when colorwork is frequent, consider a final pass of small stitches on the WS to lock loose tails.
- Label your gift — include a small card with fiber content and care instructions (e.g., “worsted acrylic, machine wash cold gentle, lay flat to dry”).
- Present beautifully — roll and tie with a ribbon, or pair a baby blanket with a handmade hat and card for a set.
- Photography tips for your blog: show full blanket flat, a close-up of the stitch texture, and a styled shot draped over a couch or with a mug/child for scale; natural light yields the most accurate color.
- Keep accessibility in mind — if making for older adults, choose lower-maintenance fibers and avoid small appliqués that could snag or come loose.