Crochet backpacks are one of the most practical and rewarding accessories you can make by hand. They offer the perfect mix of style and function, giving you a piece that is useful for everyday wear while still feeling personal and creative. Unlike many small crochet projects, backpacks let you explore shape, texture, color, and structure in a way that feels both fun and satisfying. They are big enough to show off beautiful stitches, but still manageable enough to finish with a sense of accomplishment.
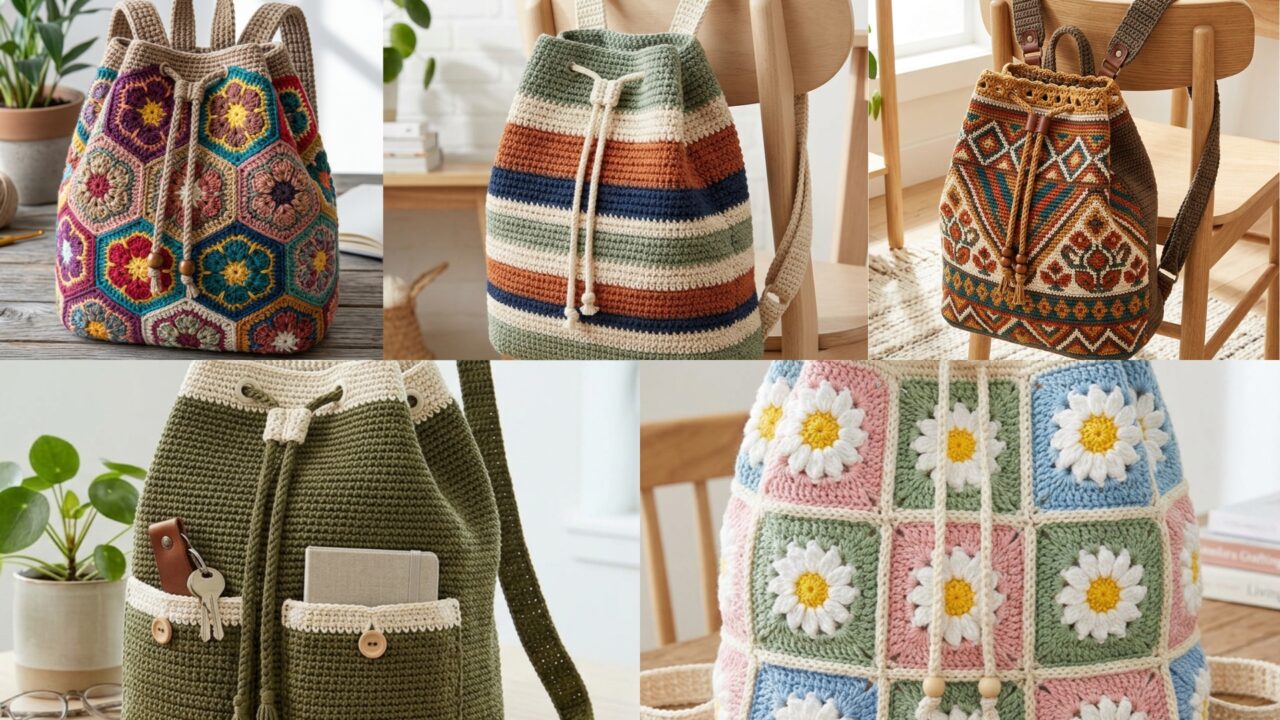
What makes crochet backpacks especially appealing is how versatile they can be. A granny square backpack can feel bright and nostalgic. A striped drawstring backpack brings a clean, casual vibe. A mochila-style tapestry backpack adds rich visual detail and a more artistic look. An African flower hexagon backpack feels bold and beautifully patterned. A pockets drawstring backpack gives you everyday practicality with a modern edge. Each design has its own personality, but all of them are functional enough to carry your essentials and stylish enough to wear confidently.
In this post, you will find five crochet backpack ideas with detailed step-by-step guidance, quick notes, and helpful finishing tips. Each section is written to be easy to follow while still detailed enough to help you plan, crochet, and finish a backpack that looks polished and feels sturdy. If you want a handmade accessory that is both useful and eye-catching, these backpack patterns are a great place to start.
Quick Notes
Project type: Crochet backpacks
Best for: Everyday use, school, errands, travel, gifts, and handmade fashion
Skill level: Beginner to intermediate, depending on structure and stitch detail
Hook size: Usually 3.5 mm to 5.5 mm, depending on yarn weight and firmness needed
Yarn weight: Cotton, cotton blends, DK, or worsted weight yarn
Best yarn choice: Cotton yarn for structure, durability, and cleaner shape
Finished size: Usually medium backpack size, adjustable by panel and strap length
Time to complete: Several hours to several days depending on detail and assembly
Helpful stitches: Chain, slip stitch, single crochet, half double crochet, double crochet, increase, decrease, tapestry crochet, granny stitch, hexagon joining, drawstring channel, seaming, strap making
Common Materials
Most crochet backpack patterns can be made with a similar set of supplies.
- Yarn in your chosen colors
- Crochet hook matched to the yarn weight
- Yarn needle
- Scissors
- Stitch markers
- Measuring tape
- Optional lining fabric
- Optional zipper, cord, button, or snap closure
- Optional bag straps or hardware
- Optional bag stiffener or interfacing
For backpacks, yarn choice matters a lot because the finished item needs to support weight and hold its shape. Cotton yarn is usually the best choice because it is durable, neat-looking, and less likely to stretch out too much. If you want a softer, slouchier look, you can use a cotton blend or another yarn with a bit more drape, but for everyday use a firmer yarn will usually work better.
1. Crochet Daisy Granny Square Drawstring Backpack Pattern
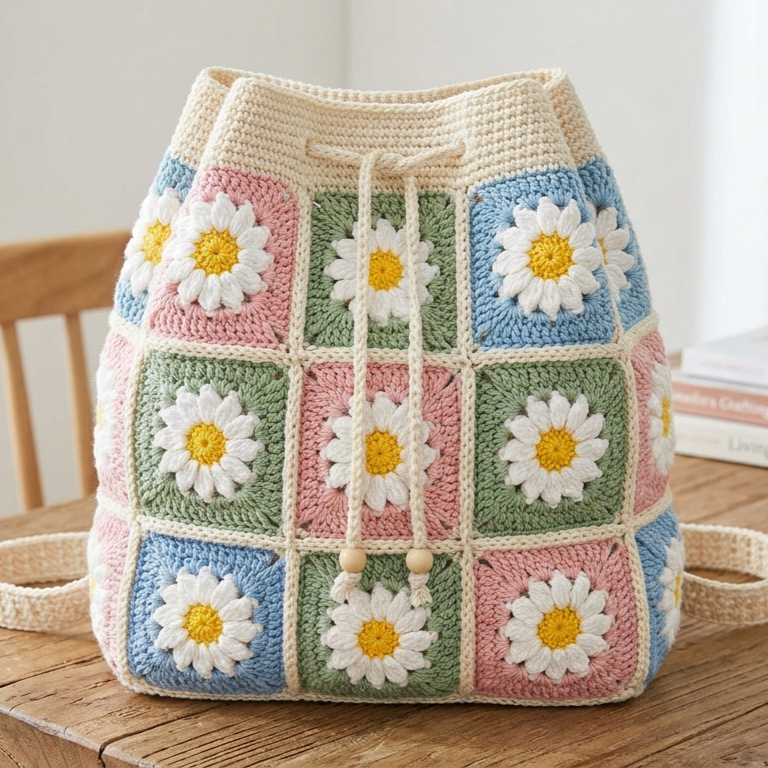
A daisy granny square drawstring backpack is cheerful, modern, and full of handmade charm. It combines the classic beauty of granny squares with the fresh look of a daisy motif, creating a backpack that feels playful without losing its functionality. The drawstring closure makes it easy to use, while the square-based construction gives the bag a structured and appealing shape.
Quick Notes
Skill level: Beginner to intermediate
Finished size: Medium backpack with drawstring closure
Style: Bright, nostalgic, handmade, playful, modern
Best colors: White, yellow, cream, pastel pink, sage, sky blue, or multicolor palettes
Materials
- Cotton yarn in daisy and background colors
- Crochet hook suited to yarn weight
- Yarn needle
- Scissors
- Stitch markers
- Drawstring cord or crocheted chain cord
- Optional lining fabric
Step-by-Step Guide
Step 1: Crochet the daisy granny squares
Begin by making the daisy motifs that will form the front and back of the backpack. Each square usually starts with a flower center and petal rounds, then expands into a granny square shape. Keep the petals neat and the square edges even so the pieces join properly later.
The daisy motif is the heart of the design.
Step 2: Make enough squares for the body
For a backpack, you will usually need several squares depending on your desired size and layout. You can use two large squares for the front and back or combine several smaller squares into each panel. Arrange the squares before joining them so the design feels balanced and symmetrical.
Planning the layout helps the backpack look more polished.
Step 3: Join the squares into panels
Use whip stitch, slip stitch, or crochet join methods to connect the squares into front and back panels. Make sure the joins are neat and the edges line up well. This step creates the main body of the backpack and gives it structure.
A tidy join makes the backpack feel sturdy and professional.
Step 4: Shape the backpack body
Once the panels are complete, seam the sides and bottom together to create the bag shape. Leave the top open for the drawstring. Keep the seams strong enough to hold daily items without stretching out.
A secure body is important for a functional backpack.
Step 5: Create the drawstring channel
Work a row near the top edge with small chain spaces or a slightly open stitch pattern to create a channel for the cord. This allows the backpack to close securely when pulled. Be sure the openings are large enough for the drawstring to move smoothly.
The drawstring channel is what makes the bag practical.
Step 6: Add the drawstring cord
Crochet a long cord or use a ready-made cord to thread through the channel. Pull it through evenly so both sides are balanced. Tie the ends securely so the cord does not slip out.
A neat drawstring adds both function and charm.
Step 7: Add the straps
Crochet or attach backpack straps to the lower back portion of the bag and the upper sides. Make sure the straps are firm and comfortable enough for regular wear. If you want extra durability, line the backpack and reinforce the strap areas.
Helpful Tips
Daisy granny square backpacks look especially lovely in soft pastels or warm sunny tones. If you want a brighter look, mix several cheerful colors. If you want a more modern style, stick to a neutral square center with a simple background color. Lining the inside is highly recommended if you plan to carry small items.
2. Crochet Striped Drawstring Backpack Pattern
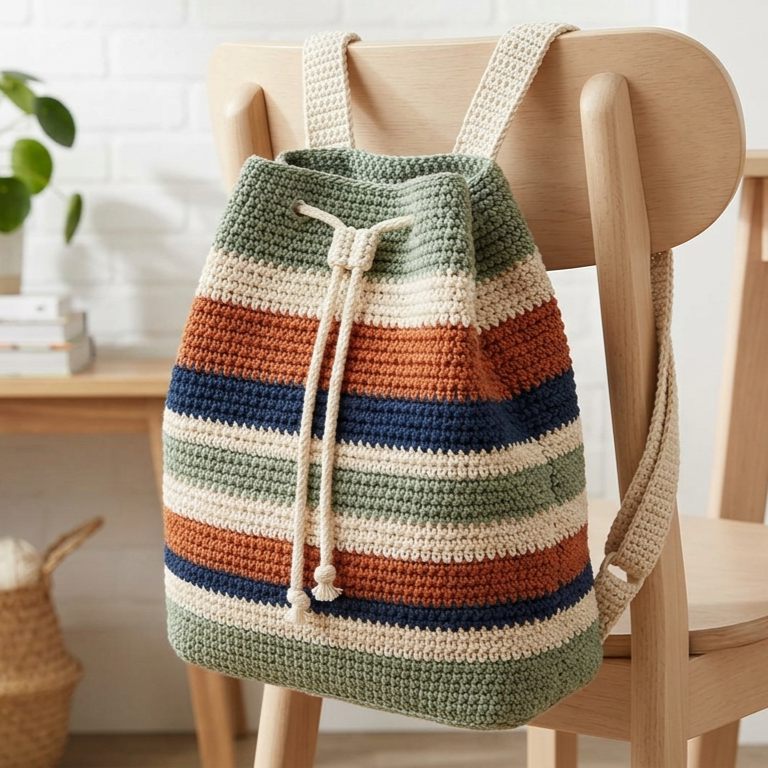
A striped drawstring backpack is casual, clean, and easy to style with everyday outfits. The stripes create a modern look that can be bold or subtle depending on the colors you choose. This design is perfect if you want a backpack that feels simple, practical, and modern without a lot of extra shaping.
Quick Notes
Skill level: Beginner
Finished size: Medium drawstring backpack
Style: Clean, sporty, modern, casual
Best colors: Two-tone combinations, rainbow stripes, earthy neutrals, or soft monochrome palettes
Materials
- Yarn in two or more colors
- Crochet hook suited to yarn weight
- Yarn needle
- Scissors
- Stitch markers
- Drawstring cord
- Optional lining fabric
Step-by-Step Guide
Step 1: Decide on the stripe pattern
Before starting, choose how wide each stripe should be and how many colors you want to use. You can keep the stripes large and bold or make them thinner for a more subtle effect. A planned stripe sequence keeps the backpack looking organized and modern.
A clear stripe plan gives the bag a polished look.
Step 2: Crochet the base panel
Start with a flat rectangle or panel that will become the front or back of the backpack. Use a sturdy stitch like single crochet or half double crochet so the fabric holds its shape. Keep the stitch tension even to maintain clean lines.
A firm base helps the stripes stand out.
Step 3: Add the stripes
Change colors at the end of rows or rounds according to your stripe plan. Keep the transitions neat so the color lines look sharp. Stripes work best when the edges are crisp and the yarn ends are woven in carefully.
The stripe pattern is the visual center of this backpack.
Step 4: Make the second panel
Create a second panel the same size as the first. Match the stripe sequence if you want the backpack to look symmetrical, or alternate the placement if you want a more casual handmade feel. The two panels should align well when joined.
Matching panels help the backpack look balanced.
Step 5: Seam the panels
Join the sides and bottom securely, leaving the top open. Strong seams are important because backpacks often carry heavier items than small bags. Take your time with this step so the structure feels dependable.
A secure seam means the backpack can handle daily use.
Step 6: Add the drawstring channel
Work the top edge with chain spaces or a row that creates an opening for the drawstring cord. This keeps the opening easy to close and open. Make sure both sides of the channel are even so the cord pulls smoothly.
The closure should be both functional and tidy.
Step 7: Attach the drawstring and straps
Thread the cord through the top channel and secure the ends. Then attach the straps, either crocheted or purchased, to the back and bottom sections of the bag. Make sure the straps are the right length for comfortable wear.
Helpful Tips
Striped drawstring backpacks look especially strong when the color palette feels intentional. Two-color combinations can look modern and minimal, while rainbow stripes create a playful, youthful vibe. If you want a more refined look, use muted tones like sage, cream, rust, or navy.
3. Crochet Mochila Boho Tapestry Drawstring Backpack Pattern
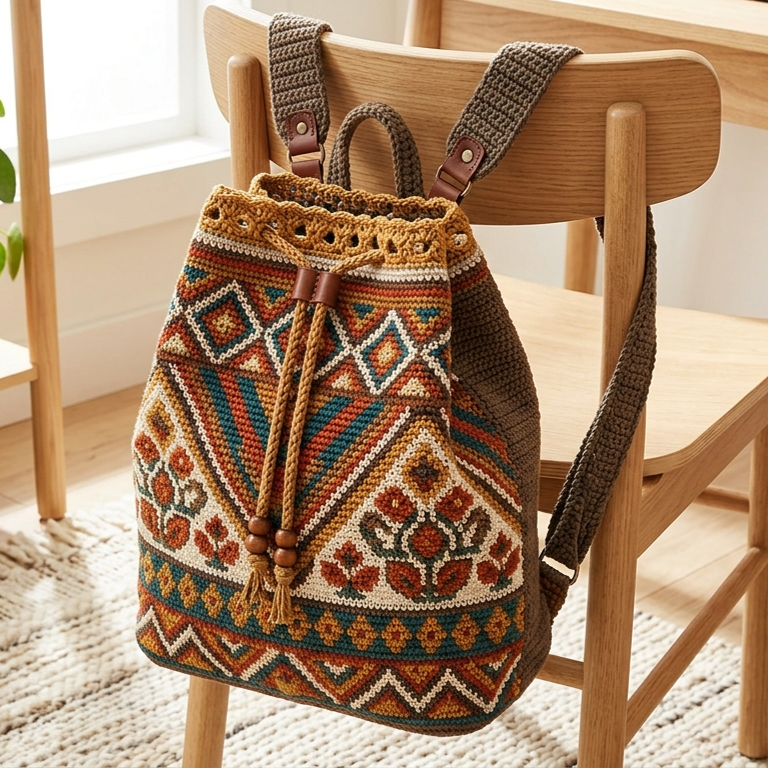
A mochila boho tapestry drawstring backpack is a statement piece. It brings together detailed tapestry crochet, bohemian colorwork, and a functional drawstring shape. This style is a great choice if you love bags with a richer visual story and want a backpack that feels artistic and unique.
Quick Notes
Skill level: Intermediate
Finished size: Medium backpack with detailed front panel
Style: Boho, artistic, patterned, statement-making
Best colors: Earth tones, jewel tones, sunset shades, or high-contrast boho palettes
Materials
- Multiple yarn colors
- Crochet hook suited to yarn weight
- Yarn needle
- Scissors
- Stitch markers
- Drawstring cord
- Optional lining fabric and straps
Step-by-Step Guide
Step 1: Choose the tapestry design
The tapestry portion can feature geometric shapes, boho diamonds, tribal-inspired patterns, or floral motifs. Choose a design that fits the size of your backpack and feels visually balanced. Because tapestry crochet often uses color changes, a thoughtful layout is important.
A planned motif makes the backpack feel intentional.
Step 2: Crochet the front tapestry panel
Work the front panel using tapestry crochet technique, carrying unused yarn inside the stitches as you change colors. Keep your tension even so the fabric stays smooth and the design appears crisp. This front panel will be the focal point of the backpack.
The front panel is the showpiece of the bag.
Step 3: Make the back panel
Create the back panel in a solid color or a simpler version of the front so the bag feels balanced. This helps the tapestry front remain the star while keeping the back practical and clean. Use the same size and stitch count so the pieces match.
A simpler back can make the backpack more wearable.
Step 4: Shape and seam the body
Join the front and back panels along the sides and bottom. Be sure the seams are secure because tapestry panels can be denser than regular crochet. The backpack should hold its shape while still being comfortable to carry.
A strong seam is especially important for structured bags.
Step 5: Add the drawstring opening
At the top of the backpack, create a row or two of chain spaces to form the drawstring channel. Make sure the channel is wide enough for the cord to pass through easily. The drawstring opening should feel functional and neat.
The closure should match the detailed look of the bag.
Step 6: Thread the cord
Use a long drawstring cord in a coordinating color and weave it through the channel. Pull both sides evenly so the bag closes smoothly. Secure the ends so they are easy to grab and pull.
A good cord adds both beauty and practicality.
Step 7: Attach straps and reinforce
Add crocheted straps or sturdy straps to the back of the backpack. Reinforce the strap areas with extra stitches or lining if needed. Since tapestry crochet can be a little heavier than simple crochet, durable strap attachment is especially important.
Helpful Tips
Mochila backpacks look gorgeous in rich boho palettes. Try earthy browns with rust and cream, or bold jewel tones for a more dramatic effect. If you want a cleaner modern style, choose only two or three colors and keep the motif geometric.
4. Crochet African Flower Granny Hexagon Drawstring Backpack Pattern
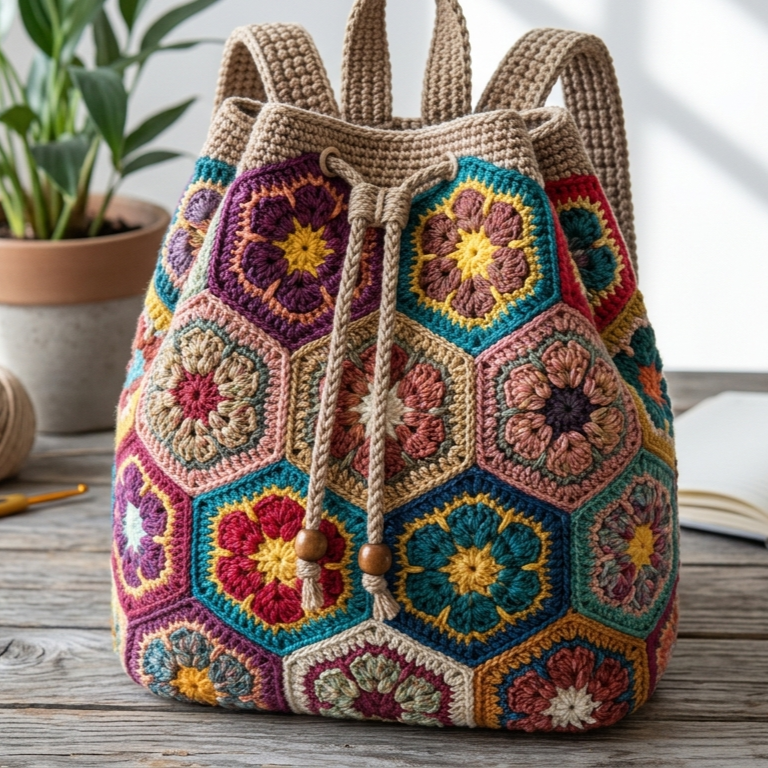
An African flower granny hexagon backpack is bold, beautiful, and visually striking. The flower motif creates an intricate look that feels both traditional and stylish. Because hexagons can be joined in creative ways, this bag offers lots of room for personal expression while still functioning as a useful drawstring backpack.
Quick Notes
Skill level: Intermediate
Finished size: Medium backpack with hexagon panels
Style: Floral, colorful, geometric, artistic
Best colors: Bright multicolor palettes, jewel tones, muted floral shades, or earthy combinations
Materials
- Yarn in multiple colors
- Crochet hook suited to yarn weight
- Yarn needle
- Scissors
- Stitch markers
- Drawstring cord
- Optional lining fabric
Step-by-Step Guide
Step 1: Crochet the African flower hexagons
Start by making the African flower motifs in hexagon form. These motifs are usually created with layered petals and a hexagonal outline. Keep the petals even and the hexagon shape consistent so the pieces join neatly.
Each hexagon should be balanced and well-shaped.
Step 2: Make enough hexagons for the backpack
Plan how many hexagons you need for the front and back panels. For a medium backpack, you may need several joined together for each side. Lay them out before joining to find the best arrangement.
A good layout helps the bag feel symmetrical.
Step 3: Join the hexagons
Use crochet join or sewing methods to connect the hexagons into panels. Keep the joins neat and even so the floral motifs remain clear. The goal is to create a panel that feels cohesive rather than patchy.
A clean join strengthens the visual flow.
Step 4: Shape the bag
Once the panels are made, seam the sides and bottom together. Leave the top open. The flower motifs will give the backpack a rich texture, so make sure the bag shape remains simple enough to balance the visual detail.
The structure should support the patterned panels.
Step 5: Add the drawstring channel
Crochet a row near the top that creates a cord opening. This helps the backpack close securely while keeping the floral design visible. Make sure the channel does not interrupt the motif too much.
The opening should feel smooth and functional.
Step 6: Thread the cord and close
Thread a drawstring cord through the channel and pull it evenly. Secure the ends so the bag can be closed quickly. A matching or contrasting cord can change the mood of the entire backpack.
Step 7: Add straps and finish
Attach straps securely to the lower back and upper sides. Reinforce the strap attachment points with extra stitches. If the backpack will be used regularly, lining the inside is a very good idea.
Helpful Tips
African flower backpacks look stunning in bright, joyful color combinations, but they can also be made in more muted tones for a softer, sophisticated result. This style is especially good for makers who love motif-based crochet and want a backpack that stands out.
5. Crochet Pockets Drawstring Backpack Pattern

A pockets drawstring backpack is practical, modern, and perfect for everyday use. The pocket detail gives it extra function while keeping the design simple and wearable. This is a great option if you want a backpack that looks stylish but still helps you organize your belongings.
Quick Notes
Skill level: Beginner to intermediate
Finished size: Medium backpack with front pockets
Style: Functional, clean, modern, everyday
Best colors: Neutrals, navy, olive, black, cream, or coordinated two-tone shades
Materials
- Yarn in your chosen colors
- Crochet hook suited to yarn weight
- Yarn needle
- Scissors
- Stitch markers
- Drawstring cord
- Optional lining fabric
Step-by-Step Guide
Step 1: Plan the pocket placement
Before you begin, decide where the pockets should go. The most common option is a front pocket, but you can also add side pockets or multiple smaller pockets. The placement should make the backpack easier to use without making it too bulky.
Planning the pockets early keeps the design balanced.
Step 2: Crochet the main backpack body
Make the front and back panels using a sturdy stitch such as single crochet or half double crochet. Keep the fabric firm and even so it can support the weight of the pockets and daily items. The body should be simple so the pocket detail stands out clearly.
A clean main body helps the bag stay modern.
Step 3: Crochet the pockets
Make the pockets separately in the size you want. They can be simple rectangles or slightly shaped pockets depending on the style you like. Keep the edges neat and the fabric sturdy enough to hold small items.
The pockets should be practical as well as decorative.
Step 4: Attach the pockets
Sew the pockets onto the front panel securely. Make sure they are level and evenly spaced. Reinforce the top corners and sides so they stay strong with use. If you want a more polished look, add a border around the pocket edges before attaching them.
Pocket placement makes a big difference in the final appearance.
Step 5: Join the backpack panels
Once the pocket is attached, seam the front and back panels together. Leave the top open and make sure the bag shape stays even. A well-shaped body will keep the pockets looking neat and functional.
Step 6: Create the drawstring channel
Add a row at the top to make a cord channel. The drawstring should glide smoothly through the opening. This closure keeps the bag secure and easy to open when needed.
Step 7: Add the straps
Attach sturdy straps to the back and lower section of the bag. Since the pockets add extra function, the backpack should also have strong, comfortable straps. Consider lining the bag if you want it to feel extra durable.
Helpful Tips
This style is especially good in neutral colors because the pockets feel modern and practical. If you want a more casual everyday look, try canvas-inspired shades like cream, olive, navy, or black. You can also add contrast stitching or small label details for a more finished appearance.
Conclusion
Crochet backpacks are such a rewarding project because they combine usefulness with creativity. They are more than just accessories. They are practical bags that can hold daily essentials while also showing off your stitch work, color choices, and personal style. That balance makes them one of the most satisfying crochet projects to make.
These five backpack patterns each bring something different to the table. The daisy granny square backpack feels bright and nostalgic. The striped drawstring backpack is clean and casual. The mochila boho tapestry backpack offers rich artistic detail. The African flower hexagon backpack is bold and colorful. The pockets drawstring backpack adds everyday function with a modern look. Together, they show how flexible crochet can be when you want to make something stylish and useful.
A handmade backpack has a way of feeling special every time you carry it. It is sturdy enough for regular use, but personal enough to feel like a true reflection of your style. With the right yarn, careful shaping, and neat finishing, these backpack patterns can become everyday favorites that are both beautiful and functional.