Bucket hats are back and better than ever — they’re casual, cool, and a perfect canvas for playful details. Below is a full blog-ready post you can publish: a helpful introduction covering yarn, hooks, sizing, gauge, and basic bucket-hat construction, followed by five complete pattern guides with materials, skill level, step-by-step instructions (crown → crown increases → body → brim), shaping notes, finishing, and style/fit tips. Each pattern explains how to size up/down and how to add the novelty elements (cat ears, Shrek ears, layered cheeseburger, Hello Kitty bow, and pastel stripes).
I wrote everything so you can copy/paste into your post, use screenshots, or turn into downloadable patterns. Let’s make some hats!
Quick Intro — yarn, hooks, sizing, gauge, basic construction & care
Yarn choices & feel
- Juicy couture–style plush / velvet / chenille — ultra-soft, luxe look for the Luna Bucket Hat with Cat Ears. These yarns are fluffy and give that juicy, sculptural shape; they’re warm and slightly stretchy.
- Worsted weight (4) cotton or cotton blends — great for warmer-weather bucket hats (breathable, holds shape). Use for Pastel Stripes and Hello Kitty.
- Acrylic / acrylic blends — inexpensive, colorfast, and easy-care; good for novelty hats (Shrek ears, cheeseburger layers).
- Bulky / aran for structure — if you want a firm brim that holds shape, use bulky yarn or hold two strands together.
Quick tip: plush/chenille yarn hides detailed stitch patterns. Use simple stitchwork (hdc, dc) when working with plush yarn.
Hooks & notions
- Typical hooks: 4.0–8.0 mm depending on yarn. I’ll recommend per pattern.
- Notions: tapestry needle, stitch markers, measuring tape, small amount of stuffing (polyfill) for ears or cheeseburger layers, fabric interfacing or plastic canvas (optional) for extra-stiff brims, scissors, sewing needle + thread for sewn attachments, safety eyes/buttons only for adult hats (avoid small parts for kids).
Basic bucket-hat construction (common to all patterns)
Most bucket hats are made in rounds, bottom-up:
- Crown (top) — start with a small circle worked flat (magic ring or chain loop) and increase evenly to form a flat round that reaches the head crown width.
- Body / side — once crown diameter is reached, stop increasing and work even rounds to create the hat’s side height (typically 3–4 inches for adult bucket hats; adjust for style).
- Brim — after body, work wider increases into the brim rounds to create flat or slightly flared brims; the number and frequency of increases determine whether the brim lies flat or flares. Add extra rounds for depth. Optionally add a stiffener (plastic canvas or interfacing) inside a fabric-lined brim for structure.
Sizing guide (adult / teen / child)
- Adult head circumference (average): 22–23.5 in (56–60 cm)
- Teen / small adult: 20–21.5 in (51–55 cm)
- Child: 18–19.5 in (46–50 cm)
Measure your head at the widest point (just above ears). Use this table to pick a target crown diameter before you start increases: typical flat crown diameter needed to fit the top of the head comfortably is about 7.5–8.5 in (19–21.5 cm) for adults (this converts to stitch counts via your gauge).
How to calculate crown increases (simple method)
- Make a gauge swatch in the stitch you’ll use for the crown (e.g., dc rounds). Measure stitches-per-inch (spi). Multiply target crown diameter by spi to get number of stitches across. Use the standard circular increase scheme below and stop when your round stitch count is near the target.
Common increase formula (works well for dc rounds)
- R1: MR, 8 dc (8)
- R2: inc around → 16
- R3: dc1, inc → 24
- R4: dc2, inc → 32
- R5: dc3, inc → 40
- R6: dc4, inc → 48
- Continue adding one more dc between increases each round. This produces a nicely flat circle (adjust if your yarn/gauge is different).
Gauge example (work it!)
Make a 4″ swatch in same stitch and yarn for crown rounds. If your gauge is 4 dc = 1 in and you want a crown diameter of 8 in, you need 4 × 8 = 32 stitches around. Using the increase scheme above, you’ll reach 32 stitches at R6 — so stop increasing at R6 and start side rounds.
Brim shaping quick rules
- Flat brim: increase at a moderate rate (e.g., add 8–10 stitches per round evenly for first few brim rounds).
- Downturned brim: fewer increases or even work a couple rounds without increases; use smaller hook for brim rounds to tighten fabric.
- Flared brim: increase more frequently and/or use larger hook for final rounds.
Finishing & care
- For plush yarns: wash per label (often hand wash or machine wash gentle); air dry flat. Plush may shed a little — wash gently.
- For cotton/ acrylic: machine wash gentle; reshape when damp.
- Add a lightweight fabric sweatband inside for comfort and to protect yarn from oils.
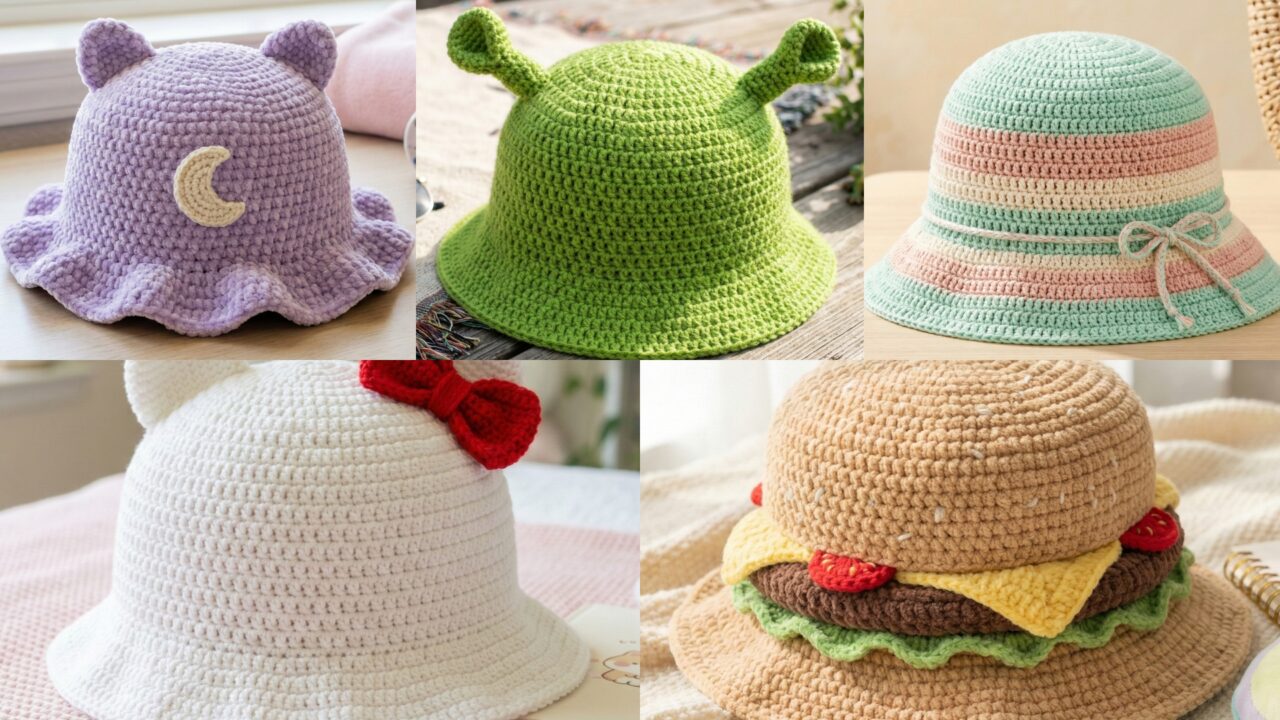
1. Crochet Luna Bucket Hat with Cat Ears
(made with juicy-couture–style plush yarn — think velvet/chenille)
Soft, luxe, and perfectly cuddly — the Luna hat adds subtle cat ears for kawaii vibes. Because the yarn is plush, keep stitch patterns simple (hdc or dc) so the fabric reads as a smooth velvety surface.
Skill level: confident beginner
Materials (adult)
- Juicy-couture–style plush/velvet/chenille yarn (super bulky or velvety bulky) — about 250–350 yd depending on brim width
- Hook: 8.0–10.0 mm (use label guidelines; slightly smaller if you want denser fabric)
- Tapestry needle, stitch markers, small amount polyfill for ears (optional), felt slip for inner brim (optional)
Finished measurements (example adult)
- Head circumference: 22.5 in (adjustable)
- Crown diameter: ~8.5 in
- Body height: 3.5 in
- Brim width: 2.5–3 in
Stitch abbreviations used (US)
- MR, ch, sc, hdc, dc, sl st, inc (2 dc in same st), BLO
Construction overview
- Work crown with dc increases until desired diameter.
- Body / side in hdc or dc even rounds.
- Brim — 4–6 rounds with increases for a soft floppy brim.
- Add cat ears: two small triangular ears worked flat, lightly stuffed and sewn to top. Because plush yarn hides shaping, make ears with tighter stitches (sc) and sew firmly.
Step-by-step (adult size example)
Crown (top)
- R1: MR, ch2, 8 dc in ring; sl st to join. (8 dc)
- R2: ch2, inc around — 16 dc.
- R3: ch2, dc1, inc around — 24 dc.
- R4: ch2, dc2, inc around — 32 dc.
- R5: ch2, dc3, inc around — 40 dc. (If by your gauge 40 dc ≈ 8.5 in, stop; otherwise continue pattern until crown measures desired diameter.)
Side / body
- R6–R10: ch2, dc around (even rounds) for 4–5 rounds to build vertical height (adjust for shorter or taller hat). Keep stitches loose enough so plush stitches don’t bunch.
Brim
- R11: ch2, dc around, adding 8 evenly spaced increases (for example every 5th st) → +8 sts.
- R12: ch2, dc around adding 10 increases evenly spaced.
- R13–R14: ch2, dc around (no increases) or add final decorative round in sc for a firmer rim.
- For a softly floppy brim, you can do one last round in BLO with hdc to tidy edge.
Cat ears (make 2)
- Using a smaller hook (1–2 mm smaller) and sc for compact shape. Work a small triangle: ch7. Row1: sc in 2nd ch from hook and across (6); Row2: ch1, sc dec at both ends (sc4); Row3: ch1 sc dec both ends (sc2). Fasten off leaving tail. Fold triangle center and sew base closed slightly; stuff lightly and sew to crown top where desired (use stitch markers to mark positions). Reinforce with several passes of sewing through hat fabric.
Tip (ear stability): Cut a small felt triangle and sew it to the ear base inside to give more body, then sew the felt+ear through the hat.
Finishing
- Weave in ends. Add an internal fabric sweatband if desired. For extra polish, add a narrow crocheted band around base of crown (1–2 rounds sc) in matching plush yarn.
Scale notes
- To size for teen/small adult reduce crown increases until crown diameter ~8 in; fewer rounds for body. For child, stop increases earlier for 7–7.5 in crown.
Care
- Follow plush yarn care. For routine cleaning, spot clean. If washable, machine wash gentle in mesh bag and air dry flat.
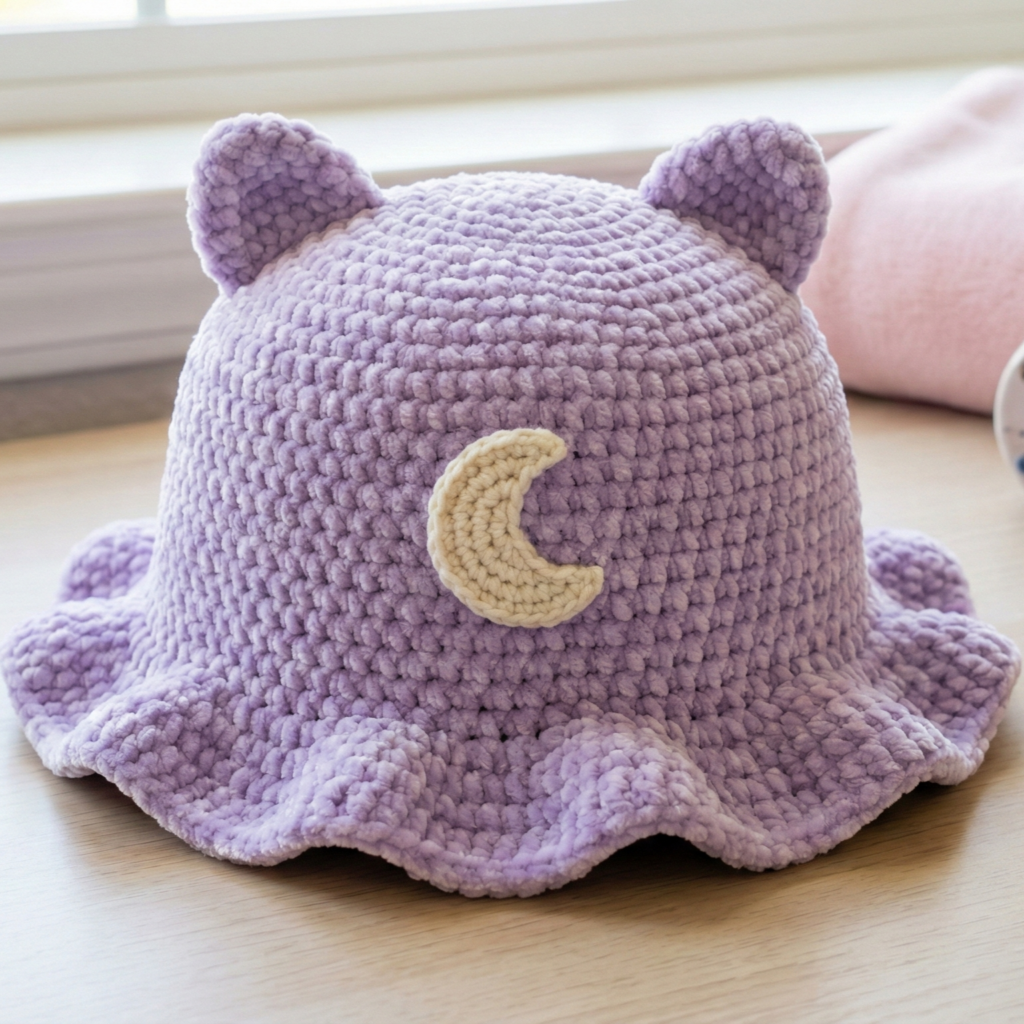
2. Crochet Pastel Stripes Bucket Hat Pattern
A soft, seaside-ready bucket with wide pastel stripes — great for summer and very customizable.
Skill level: confident beginner
Materials (adult)
- DK or worsted cotton yarn in 3–5 pastel colors (approx 350–500 yd total)
- Hook: 4.5–5.5 mm (depends on yarn and desired drape)
- Tapestry needle, stitch markers, fabric for optional sweatband
Finished measurements (adult example)
- Head circumference: 22–23 in
- Crown diameter: ~8.5 in
- Body height: 3.25–3.5 in
- Brim width: 2.5 in
Stitch set & approach
- Use dc for the crown and body for nice drape; change colors every set number of rounds to create stripes. A simple 4-round stripe unit (2 rounds color A, 2 rounds color B) looks modern.
Step-by-step
Crown (flat increases)
- R1: MR, ch2, 8 dc in ring (8). R2: inc → 16. R3: dc1, inc → 24. R4: dc2, inc → 32. R5: dc3, inc → 40 (stop when crown diameter reaches target — check gauge).
Body & striping
- R6–R9: in Color A, ch2, dc around (4 rounds).
- Change to Color B: R10–R11: ch2, dc around (2 rounds).
- Repeat stripe sequence until body reaches about 3.25–3.5 in. Keep color changes tidy: join new color at beginning of a round, weave ends along inside.
Brim shaping
- R?: (first brim round) ch2, dc around adding 8 evenly spaced increases (mark increase points).
- R?: ch2, dc around (no increases) for 1 round to stabilize.
- R?: ch2, dc around adding 12 increases to create a gentle flare. Work 2–3 rounds more in dc (no increases) based on desired brim width.
- Optional final round: sc in BLO to create a tidy firm edge.
Color planning
- Use a palette of 3 colors (mint + blush + cream) and change colors every 2–4 rows. For smoother color joins, carry color up side or invisibly weave in ends.
Finish & optional details
- Add a narrow crocheted tie (ch cord) threaded around base of crown for boho style — secure with small button or simple bow.
Sizing & variations
- Use thinner yarn and smaller hook to scale down for children; use two strands held together for thicker fabric.
Care
- Cotton: machine wash gentle and dry flat to keep brim shape.
3. Crochet Shrek Ears Bucket Hat Pattern
Playful and perfect for costume parties or festival looks — Shrek-style ear flaps that stick out. Build the hat in classic bucket style and add two rounded ear horns that stand out.
Skill level: intermediate (ear shaping + secure attachment)
Materials (adult)
- Worsted acrylic (green) for hat body — ~350–450 yd
- Hook: 5.0 mm
- Small amount of stuffing for ears, tapestry needle, stitch markers
Finished measurements (adult)
- Head circumference: 22–23 in
- Crown diameter: ~8.5 in
- Body height: 3.25 in
- Brim width: 2.5 in
Construction notes
- Ears are small horn/cone shapes worked in continuous rounds or in a flat triangle seamed and stuffed. Attach ears firmly to sides of crown where ear positions fall.
Step-by-step
Hat body
- Crown increases as usual: R1 8 dc in MR → R2 inc → R3 dc1 inc etc. Stop when crown ~8.5 in. Work 4 rounds of dc for body height.
Brim
- Add 2 brim rounds with moderate increases (8–12 increases per round) to create a little flare. Finish with 1–2 rounds sc in front loop to firm edge.
Ear shape (make 2)
Method A — cone shaped ear (continuous rounds):
- MR, ch1, 6 sc in MR (6). R2: sc around. R3: sc1, inc → 9 sc. R4: sc all around. R5: sc2, inc → 12 sc. R6–R8: sc around to lengthen ear. R9: decrease rows: sc2, dec etc. Finish leaving tail. Lightly stuff and shape. Sew base on the outside of hat at ear positions (approx 2 in up from brim edge) — angle them slightly outward. Use multiple passes and secure with extra stitches.
Method B — cup / tab ear (flat semicircle):
- Ch 8, sc in 2nd ch from hook across (7 sc). Row2: ch1, sc across; Row3: ch1, sc2tog at each side to taper, forming a curved tab. Seam tab edges and sew to hat.
Attachment
- Pin ear positions with stitch markers, check the planted angle while trying the hat on. Sew ear base to crown using strong yarn and travel stitches that go through hat fabric to anchor ear. For reinforcement, sew in a felt circle under the ear interior to distribute stress.
Extras
- Add a small embroidered mouth or eyebrow details if you want a Shrek vibe, but keep it subtle to keep hat wearable.
Care
- Acrylic hats: machine wash gentle, lay flat to dry.
4. Crochet Cool Cheeseburger Layered Bucket Hat Pattern
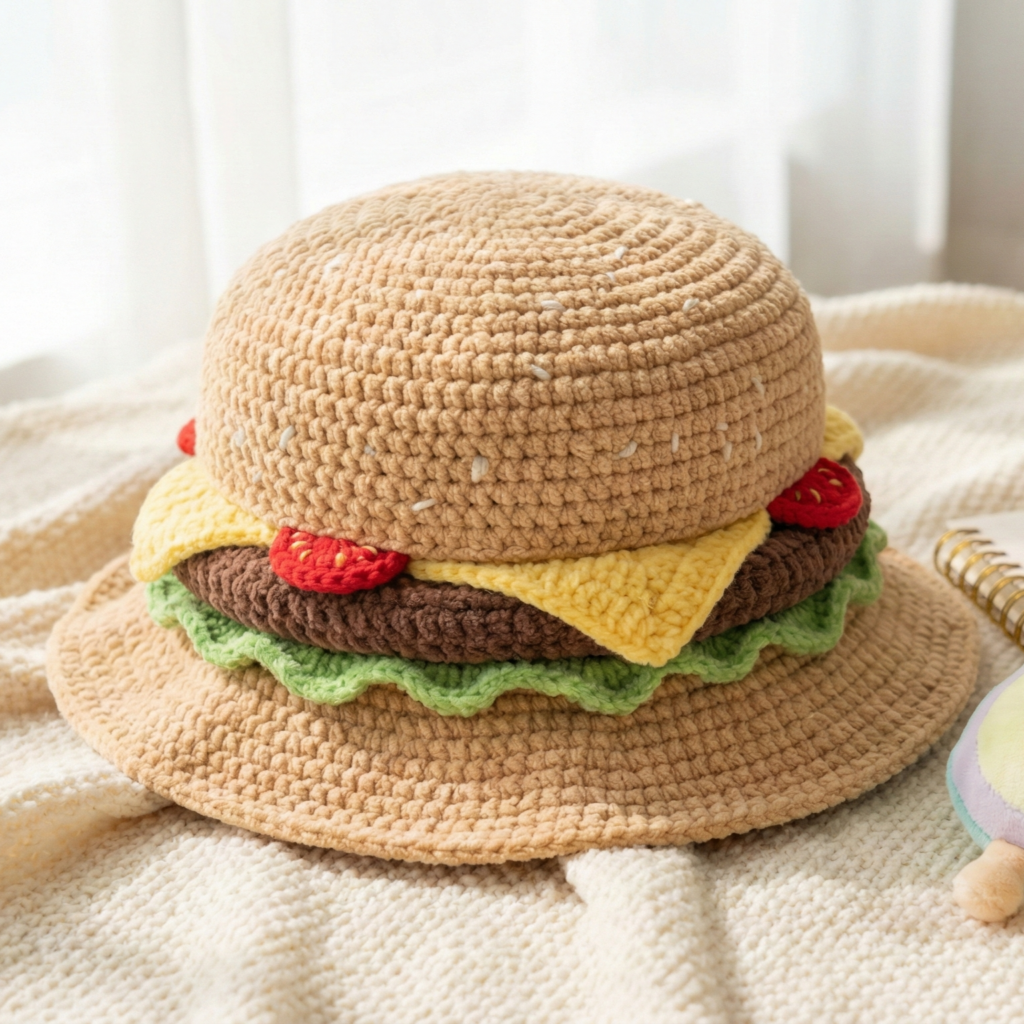
A hilarious, wearable cheeseburger — layers for bun, lettuce, cheese, patty, tomato stacked around the crown. Great for streetwear, festivals, or novelty gifting.
Skill level: intermediate → advanced (many appliqué layers and shaping)
Materials (adult)
- Worsted yarn in: tan (bun), dark brown (patty), yellow (cheese), green (lettuce), red (tomato) — approx 450–600 yd total depending on how thick you make layers
- Hook: 4.5–5.5 mm
- Small amount of polyfill for tomatoes/patty if you want puffier layers, tapestry needle, stitch markers
Finished measurements (example adult)
- Head circumference: 22 in
- Crown diameter: ~8.5 in
- Body height: 3–3.5 in (layers will wrap around)
- Brim width: 2–3 in
Design idea
Work a plain hat in tan as the base (bun). Crochet layered applique strips for lettuce (wavy leaf edges), cheese slice (thin triangular drape that hangs slightly), tomato rounds (small circular slices), and a thick patty band. Sew layers around the hat in the order: bottom bun (base) → patty → cheese → lettuce → tomato → top bun (if desired), or reverse for look.
Step-by-step
Base hat (bun)
- Work crown and body in tan with dc rounds. Make hat slightly shallow (so layers add bulk). Brim in the same tone.
Patty band
- Make a rectangular band to wrap around the hat: chain long enough to go around crown base (measure and add seam allowance). Row1: sc across in dark brown. Row 2–3: bobble stitches or puff stitches across to create textured patty look. Seam band around hat and stitch securely.
Cheese slice
- Make a wide scalloped panel in yellow: ch to half the circumference (because cheese will drape). Work a triangular repeated shell row and shape into a slightly triangular drape (you can make several small corner drops to mimic cheese melting). Attach one edge to top of patty band so cheese drips over the patty.
Lettuce frill (make long ruffle strip)
- Chain long strip to fit circumference. Row1: sc across. Row2: ch4, skip 1, sl st spaced along to create loop frills. Row3: work shells in loops to form cabbage-like waves: (sc, hdc, 3 dc, hdc, sc) in each loop. Sew lettuce strip around hat above cheese with ruffles pointing out from hat.
Tomato slices (make 4–6 small round slices)
- MR, ch1, 6 sc (6). R2: inc around (12). R3: sc around and fasten off leaving tails. Optional: embroider small seeds (white or yellow) with satin stitches. Sew tomato slices evenly spaced across lettuce band.
Top bun (optional)
- You can add a small shallow dome on top in tan to look like the top burger bun (either full closure or small dome), or just leave crown as bun base.
Assembly & stability
- Layer and sew each piece securely through both hat and applique base. Use many passes to ensure heavy layers don’t flop off. For durability, stitch top and bottom of band through the hat so it’s locked in place.
Playful extras
- Add a “sesame seed” stitch on tan hat with small elongated stitches using cream yarn. Make ketchup drips with thin red yarn embroidered under cheese.
Care
- Because of many layers and mixed yarns, hand wash gently and lay flat to dry.
5. Crochet Hello Kitty Bucket Hat Pattern
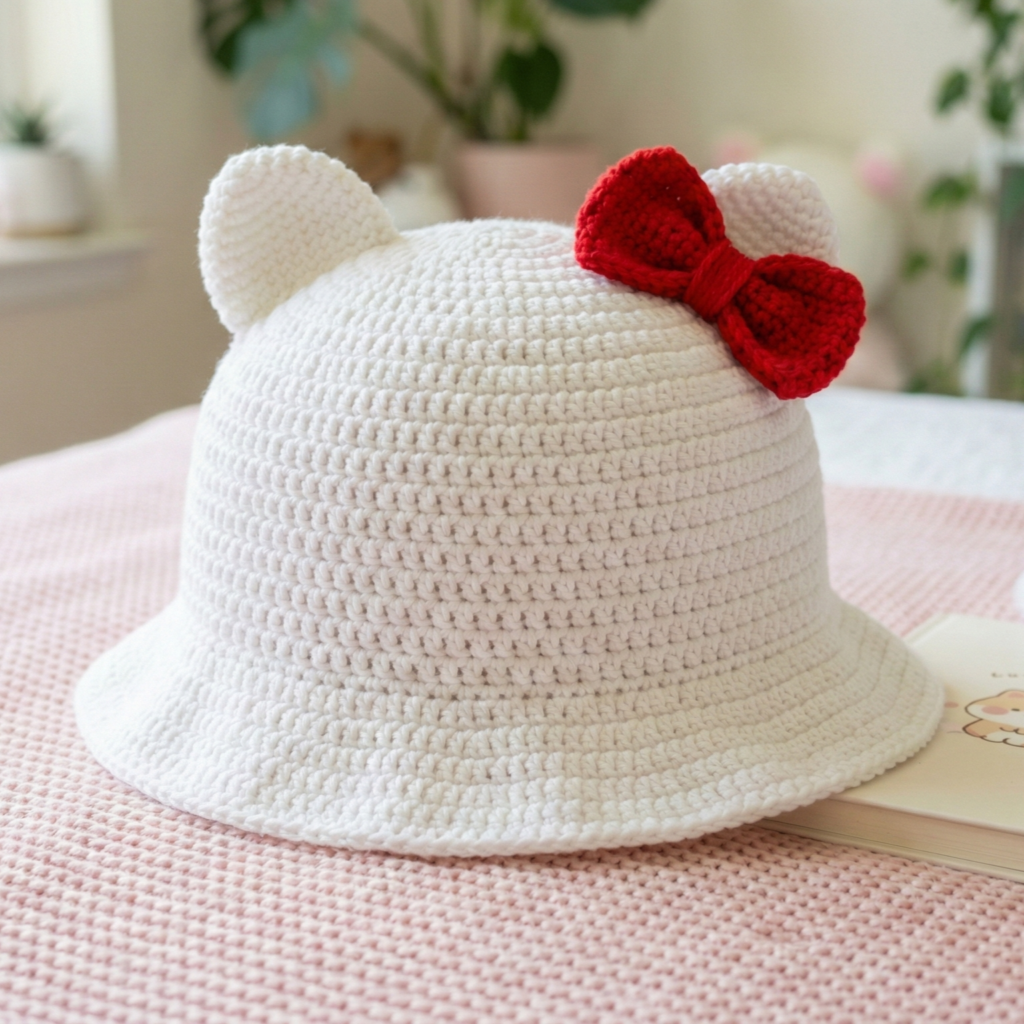
(with ears and signature red bow)
A cute, kawaii bucket hat sporting Hello Kitty-style ears + a bright red bow. Keep facial details minimal for licensing — you can make a “kitty-style” hat with ears and a bow without reproducing the exact copyrighted face.
Skill level: intermediate
Materials (adult)
- Worsted cotton in white (hat), red (bow), pink (optional inner ear) — approx 350–450 yd total
- Hook: 4.5–5.5 mm
- Small felt pieces for internal ear stability, tapestry needle, stitch markers
Finished measurements (adult)
- Head circumference: 22–23 in
- Crown diameter: ~8.5 in
- Body height: 3.25–3.5 in
- Brim width: 2.5 in
Construction notes
- Make a white base bucket hat in same basic method. Add two small rounded ears and a red bow attached to one side or centered front (your choice). If you want a more iconic look, place bow slightly off-center.
Step-by-step
Hat base (white)
- Work crown increases: R1 MR 8 dc → R2 inc → continue until crown diameter ~8.5 in. Work 4 rounds dc for body. Add brim with 2 rounds increase and 2 rounds even as desired.
Ears (make 2)
- Small rounded ear: MR, ch1, 6 sc in ring (6). R2: inc around → 12. R3: sc1, inc around → 18. R4: sc around to build height. Fold base half and whipstitch to form curved ear. Insert small felt triangle inside to give stiffness. Sew ears to top of hat, slightly forward near forehead line for accurate, cute placement.
Bow
- Bow center band: ch 16, sc across for 4 rows, finish. Pinch center of long rectangle and wrap a small narrow strip (ch 6, sc across 3–4 rows) around middle as knot. Stitch wrap closed and sew back underside to secure. Or work a classic bow motif: small rectangle folded and cinched.
Placement
- Sew bow to hat near one ear (off-center) for Hello Kitty styling. Use several secure stitches to hold. If you want removable bow, sew small snap halves to bow and hat so bow can detach for washing.
Face & safety
- Avoid adding small beads / safety eyes if the hat is for little children. Instead, embroider small nose or blush dots if you want. Keep it simple and cute.
Finishing
- Add internal fabric sweatband for comfort. Weave ends and trim.
Care
- Cotton hats: machine wash gentle if sewn attachments are secure; otherwise hand wash.
conclusion
There you have five playful bucket-hat patterns — from luxuriously soft Luna with cute cat ears to a pastel-striped everyday staple, wild Shrek ears for costume fun, the layered novelty Cheeseburger, and the sweet Hello Kitty (kitty-style) hat with bow. A few final tips to make your post extra helpful for readers:
- Provide size options: after the basic adult builds, add quick notes for teen/child scaling: stop increases earlier (smaller crown diameter) or remove one body round for shorter height.
- Photo tutorial idea: ears and cheeseburger layering benefit from step-photos — consider photographing ear placement, side profiles, and sewn base reinforcement.
- Make it washable: when combining different yarn types for novelty hats, remind readers to hand-wash or use a mesh bag to protect applique pieces.
- Pattern bundle idea: offer a downloadable one-page cheat sheet with crown rounds, standard side height, and a brim increase chart (e.g., +8, +10, +12 increases per round = flat vs flared brim).