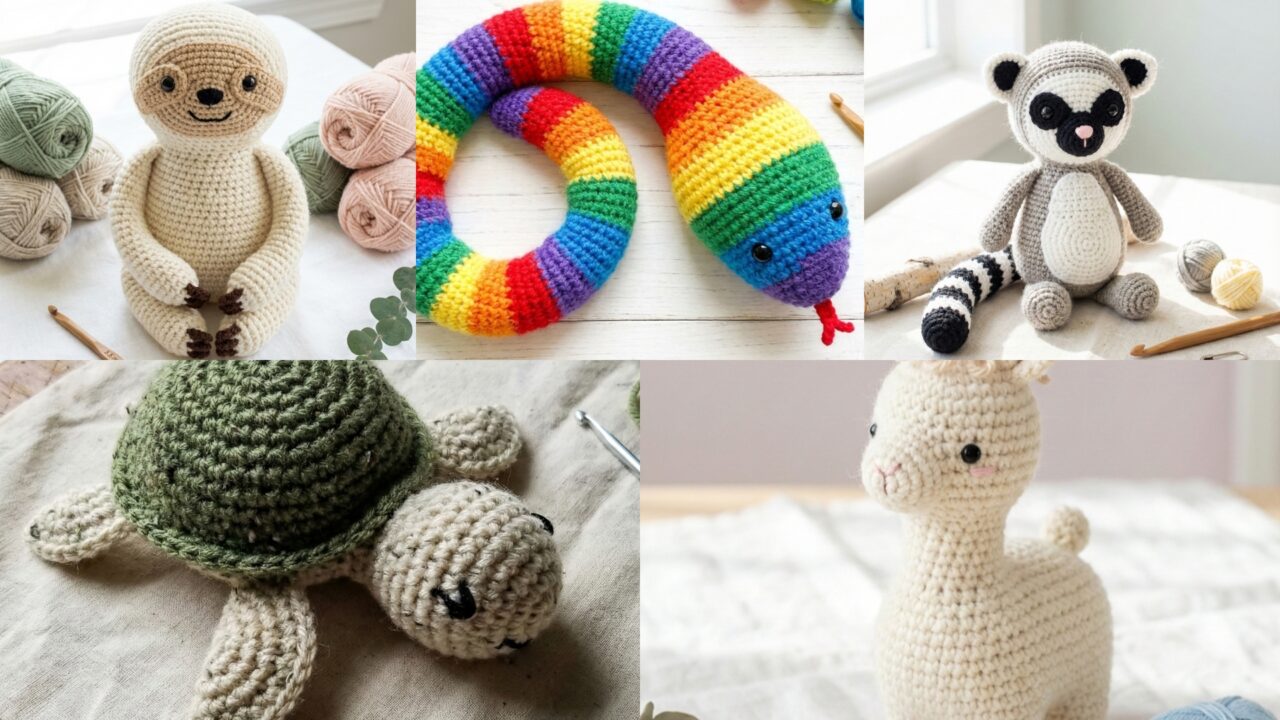
Handmade amigurumi animals are one of the most rewarding small projects — they’re fast to make, great for using stash yarn, and become treasured little friends for kids. This post gives a single friendly introduction (materials, safety, tools, abbreviations, sizing & gauge) followed by five complete, detailed amigurumi patterns you can paste into a blog or use as patterns: No-Sew Baby Turtle, Amigurumi Sloth, Cute Rainbow Snake, Layla the Llama, and Cute Lemur. Each pattern includes skill level, materials, finished size, a clear round-by-round step-by-step construction, finishing/assembly instructions, child-safety notes and variations. The tone is practical and human — written so a confident beginner can follow along.
Intro — materials, safety, tools, sizing, gauge & abbreviations
Materials & yarn
- Yarn: For amigurumi I recommend worsted/Aran weight cotton or cotton blend for a nice stitch definition and easy washing. Acrylic worsted also works and is machine-washable. For small parts or fine detail you can use fingering-weight held single, but keep the fabric tight.
- Hook: Use a hook one size smaller than the yarn label suggests to produce tight stitches that keep stuffing from showing (e.g., for worsted yarn, try 3.5–4.0 mm).
- Stuffing: Polyester toy stuffing (polyfill). For very small toys or to avoid lumps, add a bit of fiberfill in small increments and compact as you go.
- Other notions: stitch marker, tapestry needle, small scissors, blunt embroidery needle, small safety eyes (6–12 mm depending on finished size) or embroidery floss (for secure eyes), optional pipe cleaners for poseable limbs (not for toys for very young kids), optional felt for backing, small amount of worsted yarn for surface details.
- Safety items: If the toy is for a child under 3, do not use plastic safety eyes or beads — embroider eyes instead and make sure all pieces are sewn on securely.
Tools & extras
- Stitch marker: keep track of the beginning of rounds.
- Pins and blocking board: helpful to position pieces before sewing.
- Fabric glue: optional, but do not rely on it for structural joins (sew instead).
- Small bell or rattle insert: optional, but if included ensure it’s sewn and enclosed so it cannot escape.
Sizing & gauge
- Amigurumi sizes vary with yarn and hook. Below each pattern I list an approximate finished size using worsted yarn and a 3.5–4.0 mm hook. If you change yarn or hook your toy will scale accordingly.
- Suggested gauge for worsted in single crochet worked tightly: about 14–16 sc = 4 in (10 cm). You don’t need a precise gauge — shape matters more than exact stitch density — but tighter fabric is better for small toys.
Safety & durability
- For children under 3, avoid small detachable parts (buttons, beads, safety eyes). Embroider eyes and mouths with yarn or floss and firmly weave/anchor all yarn tails.
- Sew parts on with multiple passes of a sharp tapestry needle and hide knots inside the stuffed body. Consider adding a small felt patch under sewn-on pieces on the inside for extra reinforcement.
- Use quality, non-toxic stuffing and washable yarn. Include a tag with washing instructions.
Abbreviations (US)
- MR — magic ring
- ch — chain
- sc — single crochet
- hdc — half double crochet
- dc — double crochet
- sl st — slip stitch
- inc — increase (2 sc in same st)
- dec — decrease (sc2tog)
- BLO / FLO — back loop only / front loop only
- st(s) — stitch(es)
- RS / WS — right side / wrong side
1. Crochet No-Sew Baby Amigurumi Turtle Pattern
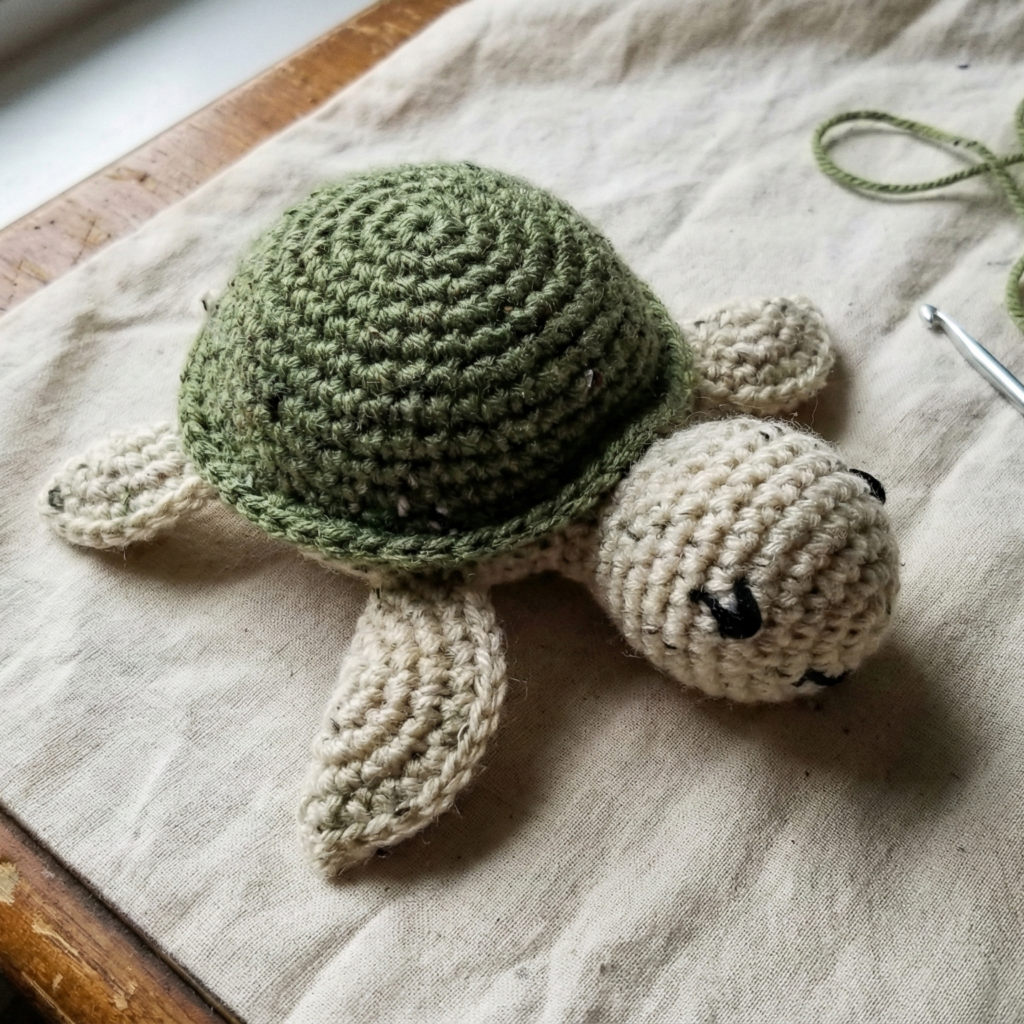
Skill level: Confident beginner (no/very little sewing; most assembly done by crocheting on).
Finished size: approx 4.5–5 in (11–13 cm) long (head to tail) using worsted yarn and 3.5 mm hook.
Materials
- Worsted weight yarn: Main (shell) color ~35–50 g, body color ~25 g, small contrast for spots.
- Hook: 3.5 mm (or size to get tight sc).
- Polyester stuffing.
- Embroidery floss for face (or 6 mm safety eyes if toy not for under 3).
- Stitch marker, tapestry needle.
Pattern concept (no-sew approach)
All elements are crocheted so they can be joined directly by slip stitching or crocheting around edges — minimal separate sewing. The shell is made as a single round piece that is joined to the body by working a joining round that stitches shell to body opening (sl st or sc join). Legs are worked as short tubes and attached by crocheting through shell/body stitches.
Abbreviations reminder
Refer to the short list above.
Body & Head (worked in one piece, bottom-up)
Work in continuous rounds (do not join unless specified), place marker at first st.
Head & neck
- MR, 6 sc in MR (6)
- inc around — 12
- (sc, inc) around — 18
- (2 sc, inc) around — 24
- sc around — 24 — insert safety eyes between rounds 6 and 7 spaced ~6 sts apart OR mark for embroidery
- (3 sc, inc) around — 30
7–11. sc around (5 rounds) — 30 - (3 sc, dec) around — 24
- (2 sc, dec) around — 18
- sc around — 18 — start to lightly stuff head
- (sc, dec) around — 12
- dec around to close to a small opening — stuff firmly and leave tail for closing. Close remaining opening with needle.
Body (continue from head, optional short neck)
17. Attach body color into next back stitch (if you didn’t leave body continuous you can join yarn here). Work sc around 24 stitches for the neck base. If you want a slightly elongated body, work 2–4 rounds even before increasing for body.
Round shaping for bottom
18. inc evenly around (increase to 36) to create round body base
19–24. sc around (6 rounds) — stuffing incrementally as you go. Body should be slightly flattened at the belly so add stuffing and shape.
Stop before the body is completely closed — you want an opening large enough to join shell to body.
Shell (worked flat then edged)
Shell top (flat circle)
- With shell color: MR, 6 sc in MR (6)
- inc around — 12
- (sc, inc) around — 18
- (2 sc, inc) around — 24
- (3 sc, inc) around — 30
- (4 sc, inc) around — 36
7–8. sc around two rounds to build slight dome — 36
Decorative row (spots / colorwork): Switch colors or add small surface embroidered spots now if desired.
Shell edge (join and casing)
9. ch 1, sl st evenly around the shell edge to create a neat rim; you will use this rim to attach to the body.
Joining shell to body — no-sew (crochet join)
- With RS facing and body opening aligned, hold shell centered over body. Starting at the back center, insert hook through a shell edge st and the corresponding body st and sl st through both. Continue sl st-ing through both pieces all the way around; pull snug but not overly tight. This crochets shell to body without sewing. When you are ~3–4 sl st from the start, stuff the tiny cavity between shell and body well with polyfill so the turtle is plump. Finish sl st and fasten off. Weave ends.
Legs & Tail (make 4 legs + tail)
Legs (make 4):
- With body color: MR, 6 sc in MR (6)
2–5. sc around 4 rounds — small tube (6) - dec, sc around — 5 (slightly taper)
- sc around — 5 — stuff lightly
- flatten last row and sl st closed OR leave open and crochet directly into the shell/body rim at desired positions: insert hook into corresponding body stitch and sl st together through leg and body to attach — this avoids separate sewing.
Tail:
- MR, 5 sc (5)
- sc around 3 rounds — 5
- dec around until close, stuff slightly, close and slip st to attach at back base.
Face & finishing touches
- If using safety eyes: ensure they are firmly fastened and hide washers inside body. For children under 3: embroider eyes with satin stitches using embroidery floss; secure by passing needle through stuffing and knotting inside body then weave tail.
- Embroider a tiny smile with embroidery floss.
- Optional: add tiny crochet hexagon applique or surface crochet on shell for pattern — use a contrasting color and small ch3 loops worked across shell.
Variations & tips
- Baby turtle: use sport weight yarn and smaller hook to produce a smaller turtle.
- No-sew choice: If you prefer absolute no-sew, make legs as short “nubs” and slip-stitch them into the shell rim instead of sewing.
- Weighted bottom: add a small pellet pouch (sewn, enclosed) at the base before stuffing for a toy that sits upright — but avoid pellets for baby toys.
Child safety note
- For babies and toddlers, embroider eyes and facial details. Make all joins robust with multiple passes; tuck ends inside body. Avoid any loose decorations that could be pulled off.
2. Crochet Amigurumi Sloth Pattern
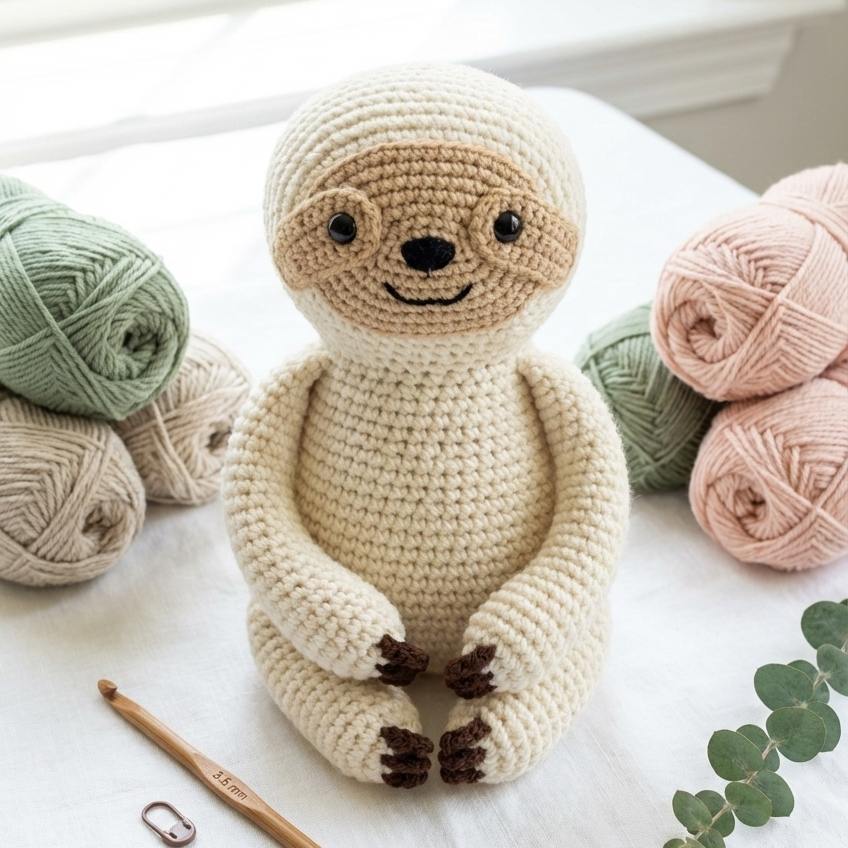
Skill level: Intermediate (shaping, sewing limbs; slow, patient stuffing).
Finished size: approx 8–9 in (20–23 cm) tall when the sloth is seated, using worsted yarn and 3.5 mm hook.
Materials
- Worsted yarn: body color ~80–120 g, face color ~20 g, claws contrast small amount.
- Hook: 3.5 mm.
- Polyester stuffing, 8–10 mm safety eyes (or embroidery), tapestry needle, stitch markers.
Pattern concept
Sloth has a rounded head attached to a plump body. Arms are long and slightly curved so sloth can “hang” — you can crochet a loop inside arms to slip them over a branch toy. Face has a darker mask (crocheted or surface crocheted) and embroidered mouth.
Head
- MR, 6 sc (6)
- inc around — 12
- (sc, inc) around — 18
- (2 sc, inc) around — 24
- (3 sc, inc) around — 30
- (4 sc, inc) around — 36
7–11. sc around 5 rounds — 36 — insert safety eyes between Rounds 8–9 spaced about 6–8 sts apart - (4 sc, dec) around — 30
- (3 sc, dec) around — 24
- sc around — 24 — stuff head firmly
- (2 sc, dec) around — 18
- (sc, dec) around — 12
- dec around to close, leave long tail for sewing to body if not working in one piece.
Body (worked from top where head attaches, or as separate piece)
Option A: Work head and body continuous (recommended for fewer seams) — after round 11 of head, change to body color and continue rounds increasing to create a plump torso. Option B: If sewing body separately, make a spherical/oval body and sew head on.
If continuing:
18. join body color and inc around to 36
19–26. sc around (8 rounds) — stuff as you go
27. (4 sc, dec) around — 30
28. (3 sc, dec) around — 24
29. sc around and finish with opening to attach arms.
If making separate body: MR and build a spherical body with increases to desired width (36 sts), work even rounds, stuff and close leaving opening for head attach.
Arms (make 2; long)
Arms are long, tapered tubes with claws at the end.
- MR, 6 sc (6)
2–18. sc around to lengthen (adjust length for desired sloth arm length; 18–22 rounds for long arms) — stuff lightly but do not overfill (arms should be flexible). - (sc, dec) around to taper (4–6 sts), fasten off leaving long tail for sewing.
Claws (make 3 small per arm)
- Using contrast yarn (light grey/white): ch2, 3 sc in 2nd ch from hook, sl st to next ch to make small button. Sew three to the tip of each arm in a fan.
Attach arms to body:
- With tapestry needle and long tail, sew arm base securely to body at shoulder positions. Because arms are long, go through body core several times and hide tail ends. Position so arms wrap down the torso to the sloth’s lap (or around a pretend branch).
Legs (make 2; short and stout)
- MR, 6 sc (6)
- inc around — 12
3–7. sc around (5 rounds) — 12 - dec around to 6, stuff lightly, close leaving tail for sewing. Sew to lower body front so sloth can sit.
Face marking & finishing
- Using darker face color, either crochet a separate small oval patch (MR -> small oval) and sew on around eyes, or surface crochet the mask directly: chain a small curve and sew/embroider around eye area.
- Embroider small smile with backstitches.
- For extra realism, add small blush dots with pink yarn or fabric paint.
Pose & arm shaping
- To let the sloth “hang” from a soft branch, insert a short flexible pipe cleaner into each arm (not for baby toys) and bend gently. For toys for young children, omit pipe cleaners.
Care & safety
- For under-3 toys: use embroidered facial features only; ensure claws are crocheted and sewn in position (no glued bits). Double-stitch arm/leg joins.
Variations
- Make a mini sloth keyring version by using sport weight yarn and a smaller hook to produce a 3–4 in mini.
3. Crochet Cute Amigurumi Rainbow Snake Pattern
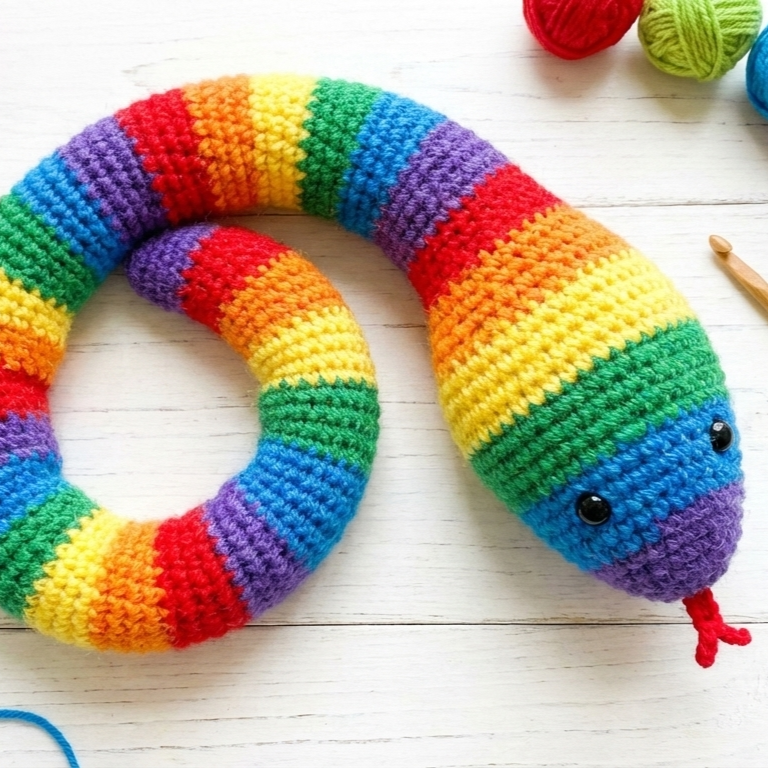
Skill level: Beginner (continuous spiral, color changes).
Finished size: approx 12–18 in (30–45 cm) long depending on how many color stripes you make; easy to scale.
Materials
- Fingering or sport weight yarn in rainbow colors (or worsted for thicker snake).
- Hook: 3.0–3.5 mm for fingering, 3.5–4.0 mm for worsted.
- Stuffing, small felt tongue or red yarn for tongue, embroidery floss for eyes or small safety eyes (avoid small parts for under-3).
Pattern concept
Snake is a tapered tube worked in continuous rounds; color changes create rainbow stripes. Head is shaped with increases then tapered for the snout.
Head & body (worked in one piece, from head to tail)
- MR, 6 sc (6)
- inc around — 12
- (sc, inc) around — 18
- (2 sc, inc) around — 24
- (3 sc, inc) around — 30
6–9. sc around 4 rounds — 30 (place safety eyes on Round 7 if using) - (3 sc, dec) around — 24 — start stuffing head firmly
- (2 sc, dec) around — 18
12–40. sc around — 18 (or lengthen for longer body) — continue to work body in color stripes switching color every 4–6 rounds — stuff lightly as you go
When you want tail taper: (sc, dec) rounds until small opening, stuff and close.
Tongue
- ch 8 in bright red, sl st back to base to make small forked tongue, or for forked end leave loop and split into two short tails. Sew into head opening.
Eyes
- For under-3 kids: embroider small vertical almond eyes using black thread. For older kids: insert small safety eyes on round 6–8.
Color stripes & technique
- Switch colors at the end of a round. To avoid holes, carry colors up the inside of the work or cut and weave in ends — snakes are long so plan color joins carefully. You can use jogless stripes technique if desired.
Variations & play patterns
- Make a stuffed “coiled snake” by crocheting a separate small circle base and stitching snake in a spiral on top so it can sit coiled.
- Add small surface embroidered hearts or stars on body for a cute pattern.
Child safety
- Embroider eyes for toddlers. Ensure all ends are woven in and tail end is closed tightly.
4. Crochet Layla the Llama Amigurumi Pattern
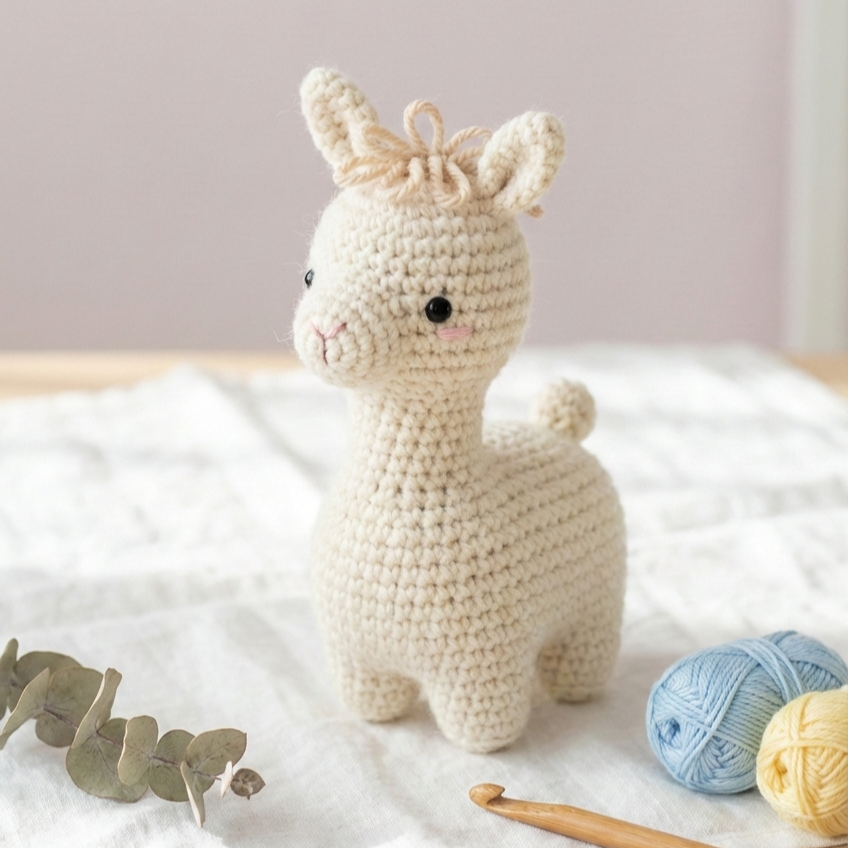
Skill level: Intermediate (multiple pieces, textured fur options).
Finished size: approx 10–12 in (25–30 cm) tall standing with worsted yarn and 3.5 mm hook.
Materials
- Worsted yarn: main body ~200–250 g (ivory/cream), contrast (ears, hooves) small amounts, yarn for mane (eyelash or fluffy yarn optional) ~50 g.
- Hook: 3.5–4.0 mm.
- Safety eyes 8–10 mm (or embroidered), stuffing, tapestry needle.
Pattern concept
Layla has a tall neck and rounded body, four legs sewn on, a pompom tail, and a fluffy mane (either crocheted loop stitch or attached fluffy yarn). Ears are small and slightly pointed.
Body & head (worked continuous top-down)
Head
- MR, 6 sc (6)
- inc around — 12
- (sc, inc) around — 18
- (2 sc, inc) around — 24
- (3 sc, inc) around — 30
6–9. sc around 4 rounds — 30 — insert eyes on Round 8 - (3 sc, dec) around — 24
11–12. sc around 2 rounds — 24 — stuff head firmly
Neck (long)
13–24. sc around 12 rounds (or desired neck length) — keep tubular, lightly stuff.
Body
25. inc evenly to 36–40 sts to form shoulder/upper body
26–36. sc around (10–12 rounds) — stuff gradually
37. (3 sc, dec) around until 24 sts
38. sc around, leave opening for sewing legs & finishing.
Legs (make 4)
- MR, 6 sc (6)
- inc around — 12
3–8. sc around for length (6 rounds) — stuff lightly - dec around to taper to 6 sts
- flatten last round and sc across to close; leave tail to sew. Sew legs to bottom of body equidistant so Layla stands.
Hooves — make small contrast soles by crocheting a flat oval (ch6, sc across, 3 rows), sew to foot bottom.
Ears (make 2)
- ch 6, sc 5 across (5)
- ch1, sc across 2 rows to make a pointed ear, decrease at top to shape, fold and sl st base closed, sew onto head.
Tail (pompom)
- Make a yarn pompom and tie securely to the back with multiple knots. For toddlers, make the pompom small and sew a felt backing inside the body under the tail to anchor the knot.
Mane
- Option A: use eyelash/loop yarn and work a row of sc along the neck to attach strands.
- Option B: loop stitch: in a row along the neck work loop stitches and cut loops to fluff, or attach fringe pieces by folding small bunches of yarn and pull through with hook then knot on underside.
Face details
- Embroider nose with little triangle and mouth with a simple upside-down “Y.” Add blush with pink yarn or washable fabric paint.
Pose & extra touches
- Add a small saddle blanket: crochet a small rectangle or triangle and decorate with tassels.
Safety & finishing
- Long yarn mane can be a pull hazard for small children — for under 3, keep mane very short or use embroidered “faux-mane.” Sew all embellishments tightly.
5. Crochet Cute Lemur Amigurumi Pattern
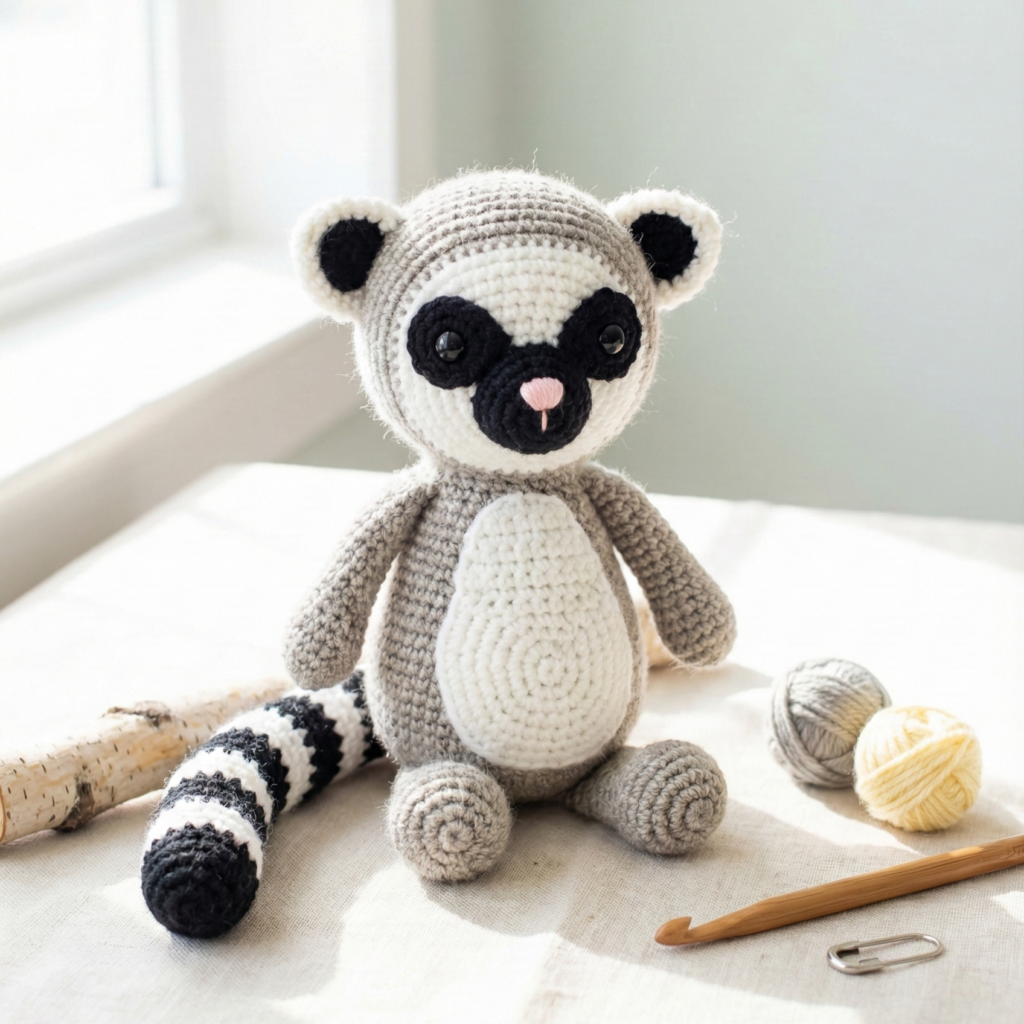
Skill level: Intermediate (striped tail color changes, small parts).
Finished size: approx 9–10 in (23–25 cm) including tail (tail length varies).
Materials
- Worsted yarn: grey ~100 g, white ~50 g, black small amount for mask & tail rings.
- Hook: 3.5 mm.
- Safety eyes 8 mm or embroidered, stuffing, tapestry needle.
Pattern concept
Lemur has a distinctive striped tail (black/white rings), a white belly and dark face mask. Tail is long and lightly stuffed. Ears are small and white-rimmed.
Head (round)
- MR, 6 sc (6)
- inc around — 12
- (sc, inc) around — 18
- (2 sc, inc) around — 24
- (3 sc, inc) around — 30
6–9. sc around 4 rounds — 30 — place safety eyes at round 7–8 - (3 sc, dec) around — 24
- sc around — 24 — stuff head
- (2 sc, dec) around — 18
- (sc, dec) around — 12
- dec to close and sew onto body or continue to body.
Body
- Either continue in the round or make separate body as earlier patterns. Make the belly white by changing color on round where belly begins and add a white oval front by crocheting separate oval and slip-stitching to front if you prefer.
Tail (striped)
- With grey or your base tail color: MR, 6 sc (6)
2–40. sc around (length depends on desired tail) — stuff lightly as you go.
Striping: change colors every 6–8 rounds to create bold rings (alternate black and white). Ensure color joins are neat; carry color inside or weave ends when tail is long.
Attach tail securely to body base (go through multiple times with tape end for durability).
Ears (make 2)
- Small half circles: MR, 6 sc, 2 rows sc, flatten and sl st closed. Add little white rim edge by working sc around ear edge if desired.
Face mask
- Crochet a small black mask: ch 10, sc across as a curved strip to cover eye area, or surface crochet a rounded mask shape; sew or surface crochet onto head with hidden stitches. For toddlers, embroider a large dark eye patch rather than attaching separate mask.
Finishing touches
- Add a little pompom for tail tip (if style) or keep tapered.
- Embroider tiny nose and mouth.
Safety & washing
- For a toy for a small child, embroider face features; keep tail light and avoid very long hanging parts that a child might wrap around fingers.
conclusion
Washing & care
- Machine washable toys: if made from acrylic or machine-washable cotton, place in a laundry bag and machine wash gentle / cool cycle; reshape and air dry. For delicate trims (eyelash yarn, pom poms) hand wash and lay flat to dry.
- Spot clean when possible to preserve shaping and small sewn details.
Child safety checklist before gifting or selling
- For infants/toddlers: embroidered eyes and features only; avoid loose bits, beads, or small buttons. Double-sew any appendages (legs/arms) and hide knots inside bodies.
- Pull test: tug on limbs, ears, tail and attachments to ensure they hold — aim for multiple secure passes of the needle.
- For toys with internal bells, pellets or wiring, ensure these are secured inside a sewn pouch and that the pouch is sewn into the toy’s interior.
Packaging & gift ideas
- Pair a small amigurumi with a handmade blanket or little crocheted accessory (tiny scarf, leaf, or branch for a sloth) for a charming gift set. Include a small card with care instructions and safety age recommendation.
Photography & listing tips (if you sell or blog)
- Show scale: include a photo with a ruler or next to a common object, or worn/held shots to show size.
- Provide close-ups of facial detail, seams, and the underside where you joined pieces (buyers like to see join quality).
- Lifestyle photos: place toy in a kids’ room setting for emotional appeal. Natural light, soft backgrounds, and a neutral palette make yarn colors pop.
Pattern licensing & sharing
- If you publish these patterns, include copyright/licensing notes if you want to allow commercial sales of finished toys or require credit for pattern use.