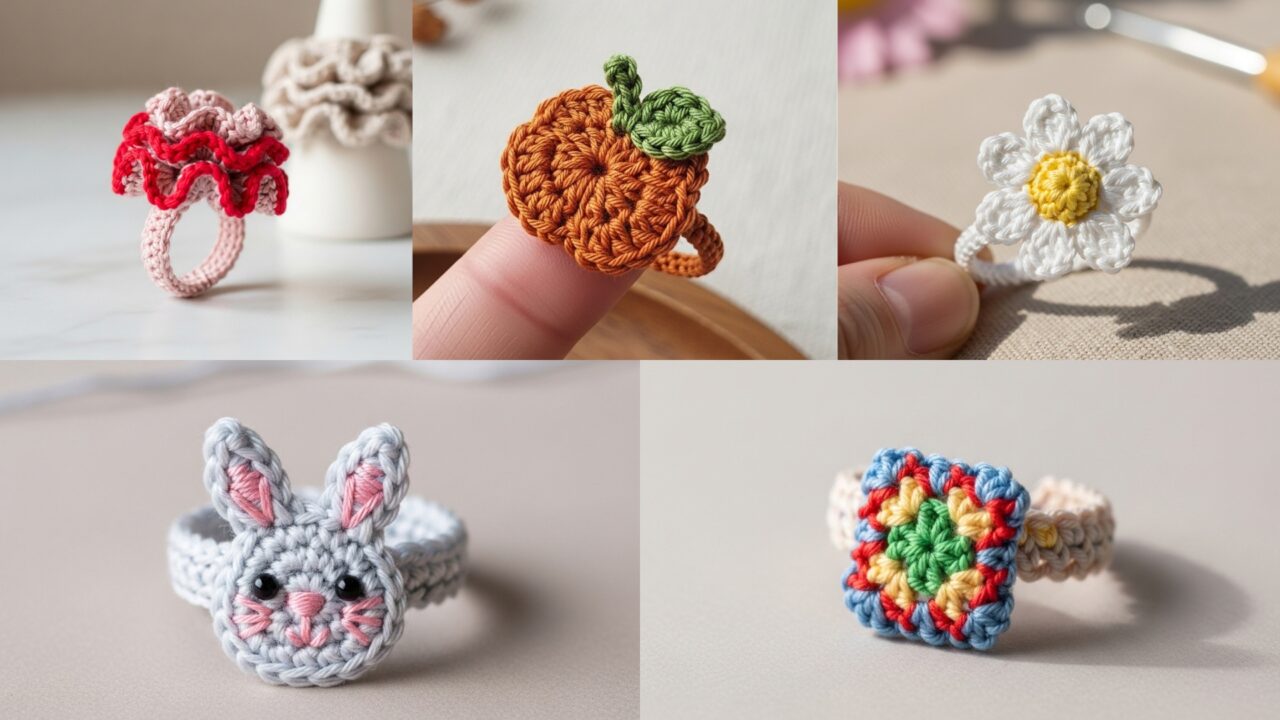
Small, fast, and endlessly customizable — crochet rings are the perfect tiny project for practicing stitches, using leftover yarn, and making charming handmade gifts. This post contains five beginner-friendly ring patterns with everything you need: brief overview, skill level, suggested materials, finished-size guidance and exact step-by-step instructions, plus variations, finishing tips, sizing notes, and safety considerations. All patterns use US crochet terms.
Before you start: make a quick gauge test for the foundation ring where noted, and choose yarn and hook sizes that give a snug, slightly elastic fit. Rings should be comfortable but not loose — you want the band to grip gently.
Quick materials & sizing guide (applies to all patterns)
- Yarn / thread: For wearable rings use cotton crochet thread size 10 for small delicate rings, fingering / sport weight for slightly chunkier look, or DK / light worsted for bold statement rings. For beginners and fastest results, cotton DK or fingering held single works well.
- Hooks: For crochet thread size 10 — 1.5–2.5 mm. For fingering yarn — 2.5–3.5 mm. For DK — 3.5–4.5 mm. Use the hook that gives you a tight, neat fabric for the band.
- Notions: yarn needle, small pair of scissors, stitch marker (optional), small amount of fiberfill for 3D motifs (pumpkin/bunny) if you want them slightly stuffed, and a measuring tape.
- Sizes: Ring band circumference depends on finger. Common inner circumference approximations (unstretched):
- Small: 1.75 in (44–45 mm) — US ring ~ size 4–5
- Medium: 1.9–2.0 in (48–51 mm) — US ring ~ size 6–7
- Large: 2.1–2.25 in (53–57 mm) — US ring ~ size 8–9
To size the band, measure finger or use a paper strip to measure inner circumference. Calculate foundation chain or stitches from your band gauge (stitches per inch). I give example counts that work for average finger sizes — adjust using the sizing tips in each pattern.
- Abbreviations: ch, sc, hdc, dc, sl st, MR = magic ring, inc = 2 sc in same st, dec = sc2tog. All patterns use continuous (spiral) rounds unless stated.
1. Crochet Crazy Ruffle Ring Pattern
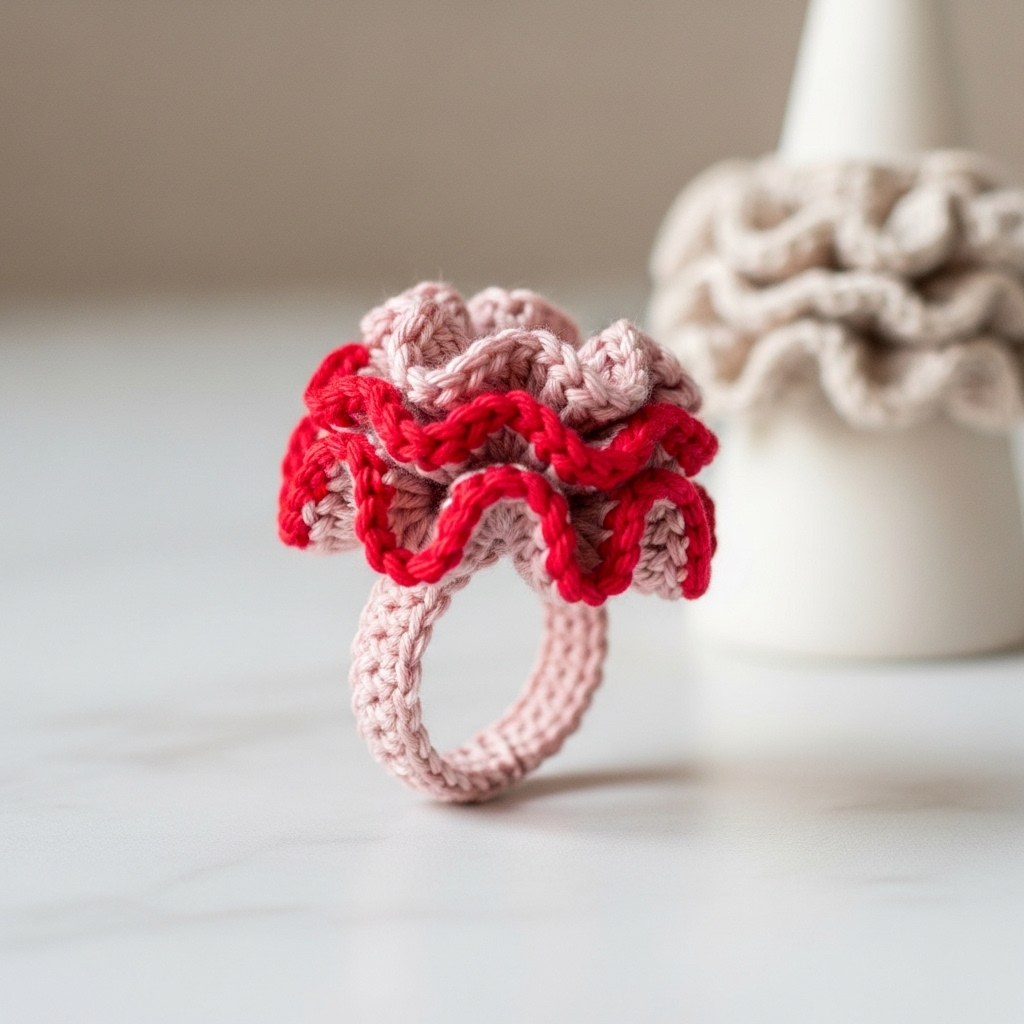
Overview: A playful, textural ring with a tiny ruffled flower or spiral crown. Quick to make and visually dramatic — great as a statement ring or a decorative stack.
Skill level: Beginner — comfortable with working in rounds and basic increases.
Materials
- Fingering or DK cotton yarn (small amount; 5–10 g).
- Hook: 2.5–3.5 mm (match yarn).
- Yarn needle, scissors.
Finished size (example): Band inner circumference ~1.9 in (medium). Crown diameter ~1.25–1.5 in.
Band gauge & foundation
- Example: with fingering yarn and 3.0 mm hook, 8 sc = 1 inch in the band pattern below. For a medium band ~1.9 in, aim for 15 sc around the ring band when worked in the round (this particular band is made by joining a small chain into a ring then sc in the round — counts below assume this approach).
Step-by-step
A. Band (make first; adjusts for size)
- Chain 16 (this gives a small-ish inner circumference; test on finger and adjust). Join with sl st to first ch to form a loop — do not twist. (If you prefer continuous rounds instead of joining, leave a long tail and slip-stitch at the end to close.)
- Round 1: Ch1, sc in each chain around (16 sc). Place a stitch marker at first st.
- Round 2–5: Sc in each st around (4 rounds) — adjust rounds for desired band height (2–4 rounds). For a sturdier band work 4 rounds; for thinner band do 2–3 rounds. Fasten off leaving a tail; weave tail through the base and sew the tail ends to secure the join if needed.
B. Ruffle crown
- Join yarn at any top stitch of band. Ch 1, sc in same st, sc in next st.
- Round 1 (ruffle start): 2 dc in next st, 2 dc in next st around (i.e., 2 dc per st) — this increases and forms ruffle base. Sl st to join.
- Round 2 (ruffle flourish): 3 dc in each st around — this deepens the ruffle. Finish with sl st and fasten off.
- Optional extra row: For a crazier ruffle, add one more round of dc cluster into each st or work shell clusters: (5 dc in one st, skip 1) for more volume.
C. Finishing
- Weave in ends, shape ruffle with fingers. If fabric is too floppy, wet-block lightly and pin to desired ruffle shape. Trim any stray ends. Test fit.
Variations
- Work the ruffle in two contrasting colors: make the base (one round) in color A and last round in color B for a two-tone bloom.
- For a subtler look, make the crown as a small single-row picot edge: sc, ch3, sl st into sc all around.
Sizing notes
- If chain 16 is too small or too large, increase or decrease the initial chain in multiples that approximate your required circumference. Always test on finger and adjust rounds to get snug but comfortable fit.
Safety & wear
- Suitable as jewelry; ruffle can catch on yarn or fabric if very full — keep crown modest for everyday wear.
2. Crochet Pumpkin Ring Pattern
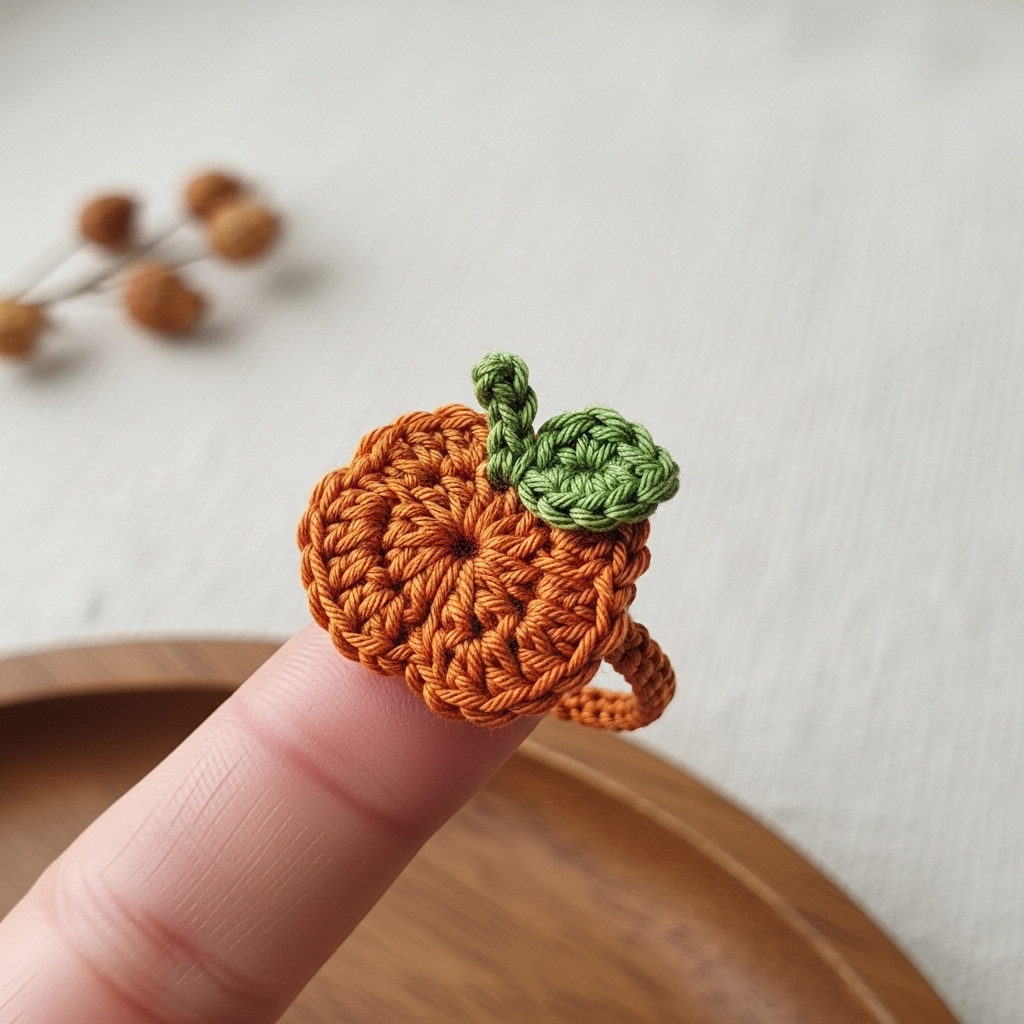
Overview: A cute tiny pumpkin sitting on a narrow band — excellent for fall, Halloween, or playful everyday wear. The motif can be slightly stuffed for 3D effect or kept flat.
Skill level: Beginner → confident beginner (tiny shaping and optional stuffing)
Materials
- Small amounts of worsted or DK yarn: orange (pumpkin), green (stem/leaf), brown (vine — optional).
- Hook 2.75–3.5 mm for a tight fabric.
- Small amount of fiberfill (optional).
- Yarn needle, scissors.
Finished size (example): Pumpkin ~0.9–1.1 in diameter; band medium circumference ~1.9 in.
Step-by-step
A. Band
- Chain 16, join with sl st to make a loop. Round 1: ch1, sc in each ch (16 sc). Work 2–3 rounds of sc for band height. Fasten off leaving tail for sewing; weave tail securely.
B. Pumpkin motif (flat or lightly stuffed)
Flat pumpkin (fast)
- MR, ch1, 6 sc in ring (6). Sl st to join.
- R2: inc around — 12 sc.
- R3: sc 1, inc around — 18 sc.
- R4: sc around 18 sc (one round even) to set size. Fasten off leaving a long tail.
- To create ribbing (pumpkin segments): Thread a long tail through tapestry needle. Run the tail across the pumpkin center-to-edge, pull slightly to create a groove; repeat stitching radiating evenly (6 radial stitches) and pull to form lobes. Knot on wrong side and secure tail. This flattens slightly into pumpkin lobes.
Stuffed pumpkin (3D)
- Follow rounds 1–3 above. For R4, do 2 rounds of sc to make depth. Stuff lightly, then decrease in rounds: R5: sc 2, dec around; R6: sc 1, dec; R7: dec around to close. Fasten off and close. Thread tail to create ribs as above.
C. Stem & leaf
- Stem: With green, ch4, sc 3 back across chain, finish and sew to top center.
- Leaf: ch6; Row: sc in 2nd ch from hook, hdc, dc, hdc, sc — fasten and sew beside stem.
D. Attach motif to band
- Sew pumpkin to top center of band with many small stitches so it won’t detach. Use stronger thread or doubled yarn to secure if ring will be worn often.
Variations
- Make mini pumpkins in pastel shades for a softer look.
- Add an embroidered brown vine swirl using surface embroidery for more character.
Finishing & care
- Weave in all tails. If stuffed, test for security. Hand wash recommended for stuffed items; flatten and reshape while damp.
Safety
- For children’s rings, avoid stuffing and securely sew motifs flat; avoid any small beads.
3. Crochet Daisy Ring Pattern
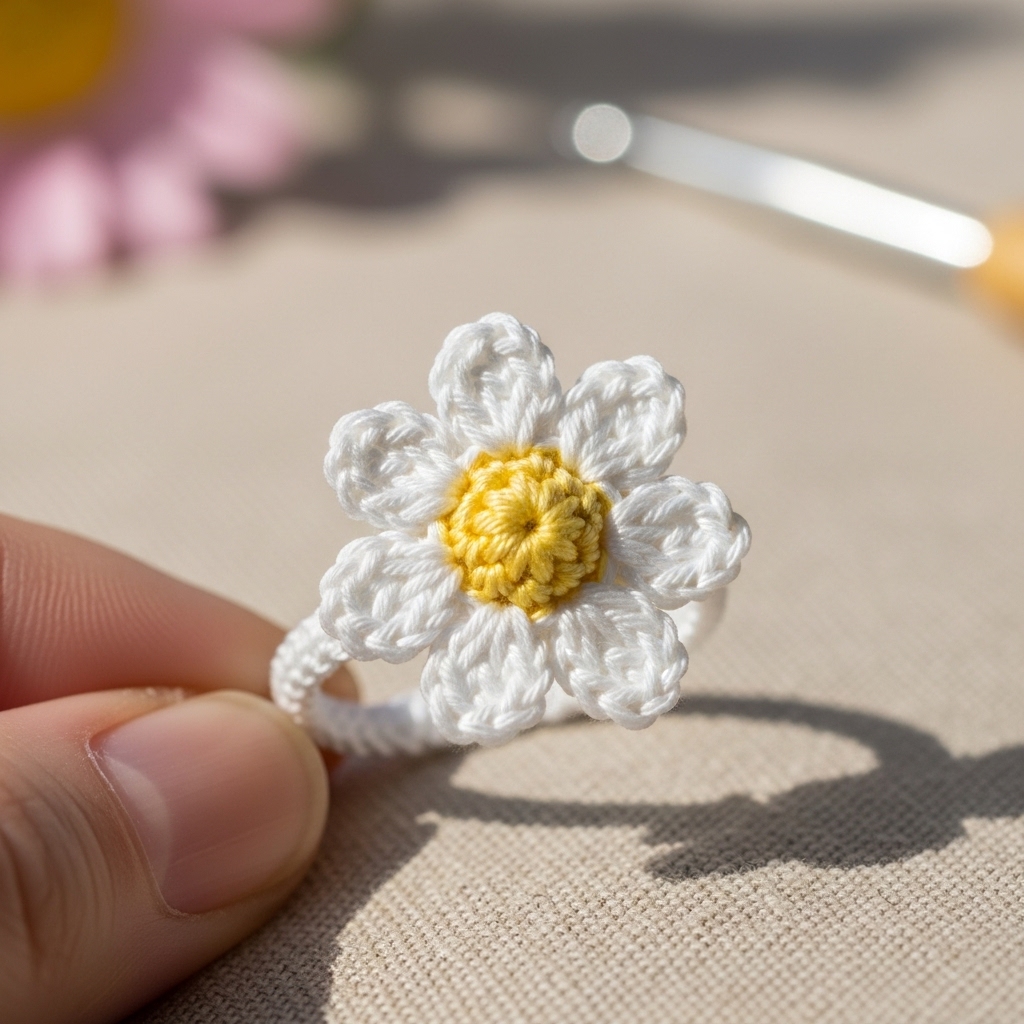
Overview: A delicate daisy with a small round center and 6–8 petals atop a neat band — classic, feminine, and ideal for stacking.
Skill level: Beginner
Materials
- Size 10 crochet thread or fingering cotton for a dainty look (or fingering yarn for bolder ring).
- Hook: 1.75–3.0 mm for thread; 2.5–3.5 mm for yarn.
- Yarn needle, scissors.
Finished size (example): Daisy diameter ~0.9–1.2 in; band medium circumference ~1.9 in.
Step-by-step
A. Band
- Chain 18, join with sl st to form loop. Round 1: ch1, sc in each ch (18 sc). Work 2 rounds total for a narrow band; fasten off and weave in end.
B. Daisy motif
- MR, ch1, 8 sc in ring. Sl st to join. (8 sc center)
- Petal round: ch4, sl st into next sc repeat 8 times to create 8 loops.
- Work into each loop: sc, hdc, dc, hdc, sc (or for thread: sc, sc, hdc, sc, sc) to form 8 petals. Sl st to join. Fasten off leaving tail for sewing.
C. Assembly
- Sew daisy to center top of band catching band stitches beneath to secure. For extra security, sew through the daisy center downward into band to anchor thoroughly.
D. Variations
- Make 6 petals for a simpler look.
- Use a small contrasting bead or French knot in center (adult gift only) — for children, prefer an embroidered center to avoid choking hazard.
Finishing
- Block lightly to flatten petals. Weave in all ends.
Styling
- Stack multiple daisy rings in different colors for a spring set.
4. Crochet Granny Square Ring Pattern

Overview: A tiny granny-square applique turned into a ring. Retro, colorful, and perfect for using small yarn scraps. This pattern produces a flat square on top of a sturdy band.
Skill level: Beginner → confident beginner
Materials
- Small scraps of DK or fingering yarn in contrasting colors.
- Hook: 2.5–3.5 mm.
- Yarn needle.
Finished size (example): Square ~0.9–1.2 in; band circumference ~1.9 in.
Step-by-step
A. Band
- Chain 16, join into loop. Round 1: ch1, sc 16 around. Round 2: sc around. Fasten off leaving tail.
B. Tiny granny square (classic 2-round granny)
- Center: MR, ch3 (counts as dc), 2 dc into MR, ch2, 3 dc into MR, ch2 repeat total of 4 clusters (corners). Sl st to top of ch3 to join. Pull ring closed.
- Round 2: Slip in ch2 space, (3 dc, ch2, 3 dc) into corner ch2, dc in next 3 dc cluster space — only work corner clusters into corners and dc into sides to form small square. For a very small square stop after two rounds to keep tiny size. Fasten off and weave ends.
C. Attach square
- Center square on band and sew securely with small stitches through both square and band. Optionally add a small border round of sc around square in contrast color to tidy edges.
D. Variations
- Use variegated yarn for center with a solid border.
- Make the square slightly raised by adding a padded reverse (tiny round of sc under square) before sewing to band.
Finishing
- Block square if needed; weave in ends. For a neater finish, carry tail through the band and anchor underneath.
Notes
- Because the granny square has holes, you may want an extra round of sc to make the top less snaggy and more comfortable.
5. Crochet Bunny Ring Pattern
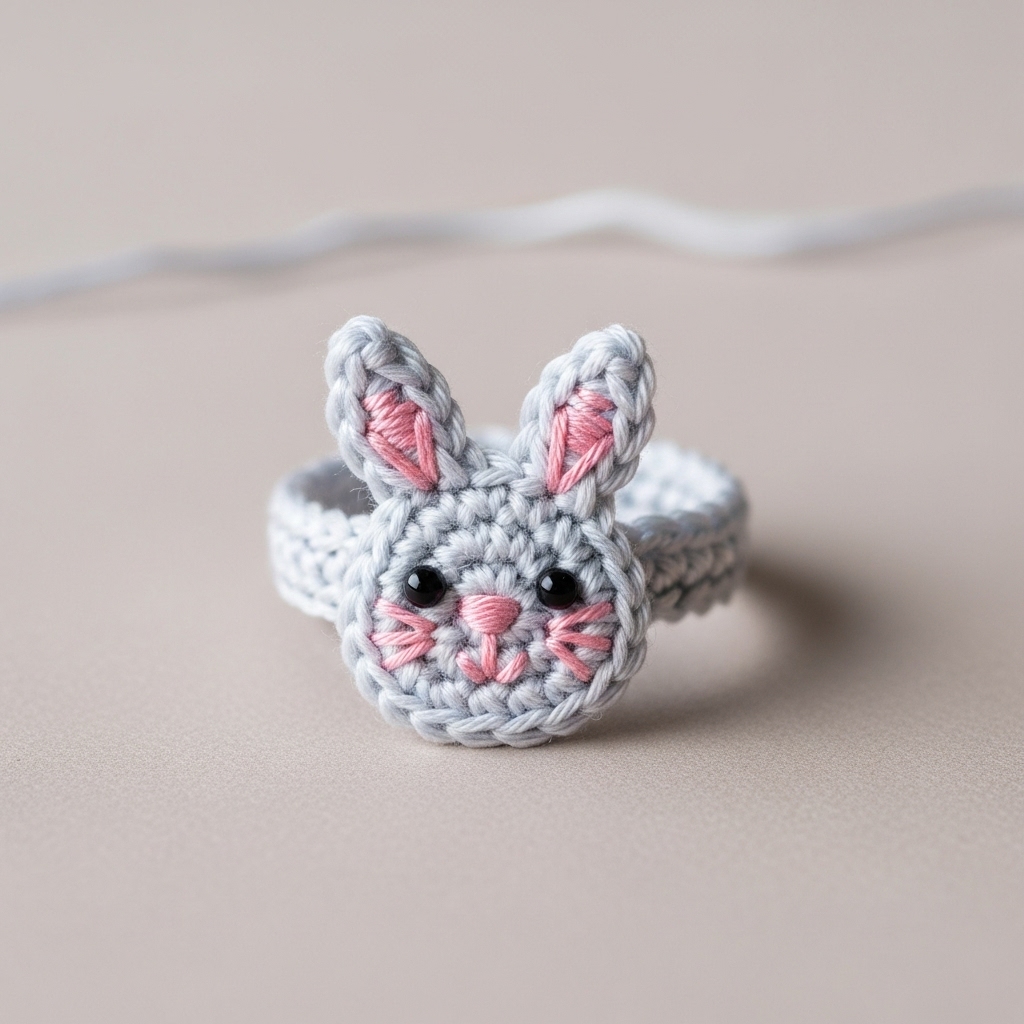
Overview: Adorable tiny bunny face (flat) mounted on a ring band — perfect for Easter, gifts for kids, or whimsical everyday wear. Keep parts embroidered (not buttons) for child safety.
Skill level: Intermediate beginner — small shaping, simple embroidery.
Materials
- Fingering yarn in main bunny color (white/light grey/pastel), small amount of pink for inner ears and cheeks.
- Hook: 2.5–3.5 mm.
- Yarn needle, small amount of fiberfill if you want a slightly padded face (optional).
Finished size (example): Bunny face ~0.9 in high; band circumference ~1.9 in.
Step-by-step
A. Band
- Chain 16, join, Round 1: ch1, sc around (16 sc). Work 3 rounds if you want a wider band. Fasten off leaving tail.
B. Bunny face (flat)
- MR: ch1, 6 sc in MR (6). Sl st to join.
- R2: inc around — 12 sc.
- R3: sc 1, inc around — 18 sc. (This creates a small round face ~0.9 in depending on gauge.)
- Fasten off and weave tail through center to flatten slightly if you prefer a disc shape.
C. Ears (make 2)
- Ch6. Row 1: sc 5, turn. Row 2: sc2tog, sc1, sc2tog (3 sts). Row 3: sc3tog to close small triangular ear. Fasten off leaving tail. Sew ears to top of face; tilt slightly outward.
D. Muzzle / cheeks (optional)
- Tiny pale pink embroiderd circles or small rounds made from MR with 4 sc can be sewn as cheeks.
E. Facial features (embroider — no beads)
- Eyes: With black embroidery thread or yarn, make two small vertical french knot-like stitches or tiny satin stitch ovals.
- Nose: Small triangle with pink embroidery (tiny satin stitch).
- Mouth/whiskers: Single straight stitches for whiskers, small split stitch for mouth.
F. Assembly
- Sew bunny face to band with several passes to secure well. If making a stuffed face, add a tiny dab of fiberfill before closing, but make sure seams are double-sewn.
Variations
- Make a whole bunny head with floppy ears for a playful look (use longer ear pattern).
- Make matching baby bracelet by widening band measurements.
Finishing
- Trim and weave ends inside band. For children’s rings, keep embellishments embroidered and attached with multiple stitches.
Safety
- Avoid beads or glued elements for rings intended for kids under 3. Secure embroidery well.
General finishing & care tips for crochet rings
- Weave in ends carefully: Tiny projects can unravel quickly if tails are not secured. Use the yarn needle to bury tails inside the stitches and make several passes to lock.
- Blocking: For rings with flat appliqués (daisy, granny), a light steam or damp block into shape helps petals/edges look crisp. Avoid over-saturating rings with stuffing.
- Durability: Reinforce motif attachment by sewing through band and motif multiple times; test with gentle tug.
- Washing: Hand wash gently or machine wash in a lingerie bag on delicate if yarn allows; reshape while damp. Avoid tumble drying.
- Sizing adjustments: If the band sits loose, reduce starting chain by 1–2 stitches and retest. If too tight, add 1–2 chains. Use your fingers to test fit during band rounds: the band should slip over the knuckle with gentle resistance and remain comfortable on finger.
Conclusion
These five designs — Crazy Ruffle, Pumpkin, Daisy, Granny Square, and Bunny — give you a versatile set of little rings you can make in an afternoon. They’re perfect beginner-friendly projects that teach working in rounds, simple shaping, tiny appliqué construction, and secure finishing. Use them as quick gifts, party favors, craft-market stock, or playful personal accessories.