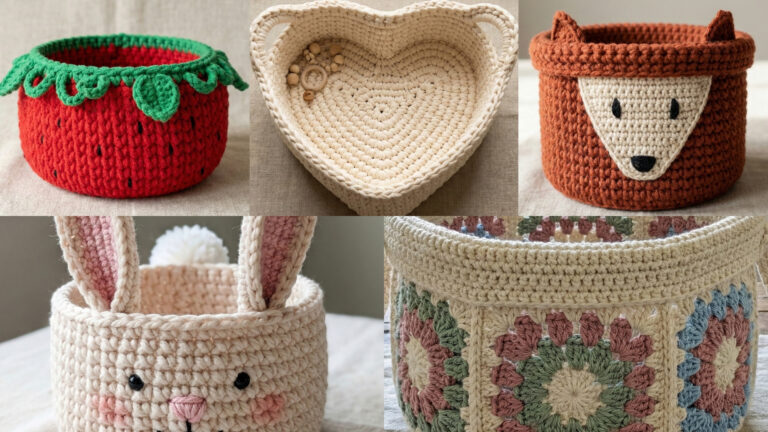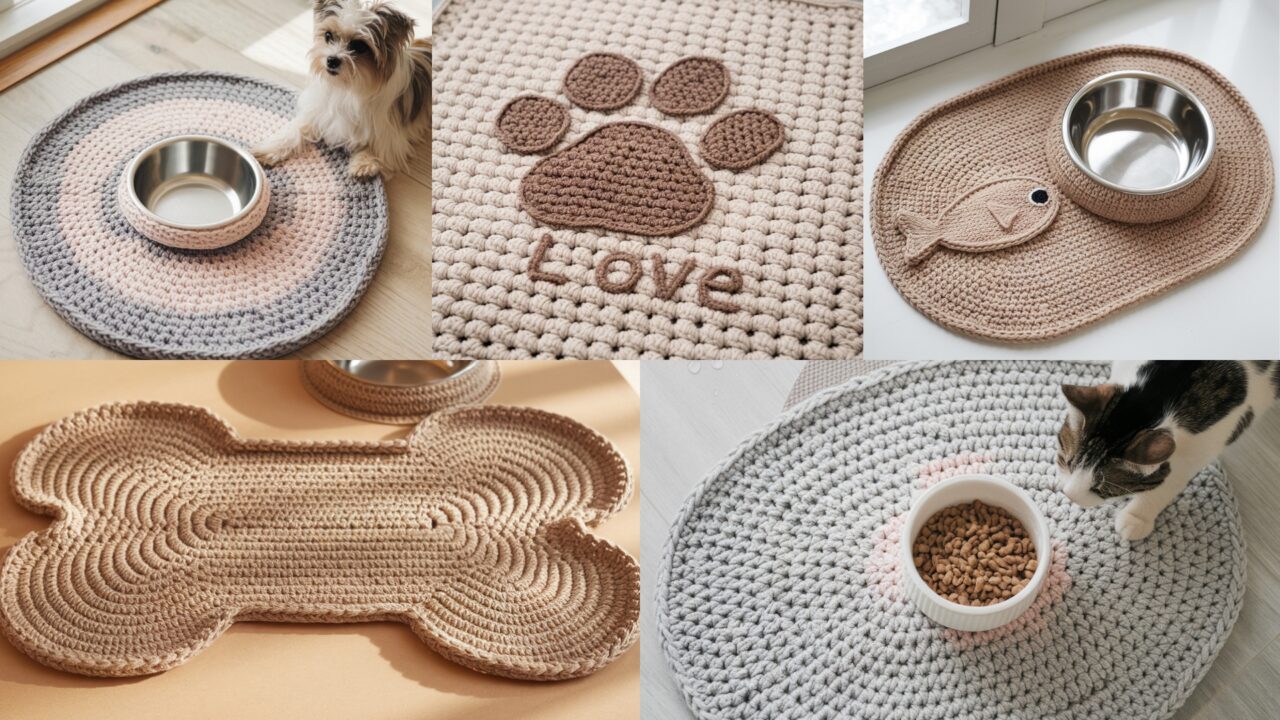
Keeping food and water bowls tidy is a small win that makes life easier — and a handmade crochet mat is functional, washable, and adorable. Below are five easy, beginner-friendly pet bowl mat patterns you can make in an evening. Each pattern includes: Skill level → Finished size → Materials & yardage → Gauge & notes → Step-by-step instructions → Finishing, Tips & Variations → Care. I used US crochet terms throughout.
Quick general notes before you start
- Yarn: I recommend 100% cotton or a cotton/linen blend for durability and washability. Bulky/rope yarn makes cushy mats but uses more yarn. Avoid super-fuzzy yarns — they trap food and don’t wash as well.
- Hook sizes below assume worsted weight (#4) cotton unless otherwise noted. Adjust hook if you want a denser or looser mat.
- For non-slip mats: add a sheet of non-slip shelf liner or a rubber rug pad to the underside, or apply fabric-safe non-slip dots after finishing.
- All mats are machine washable (unless you use delicate specialty yarn) — see each pattern’s Care section.
1. Crochet Dog Bowl Mat
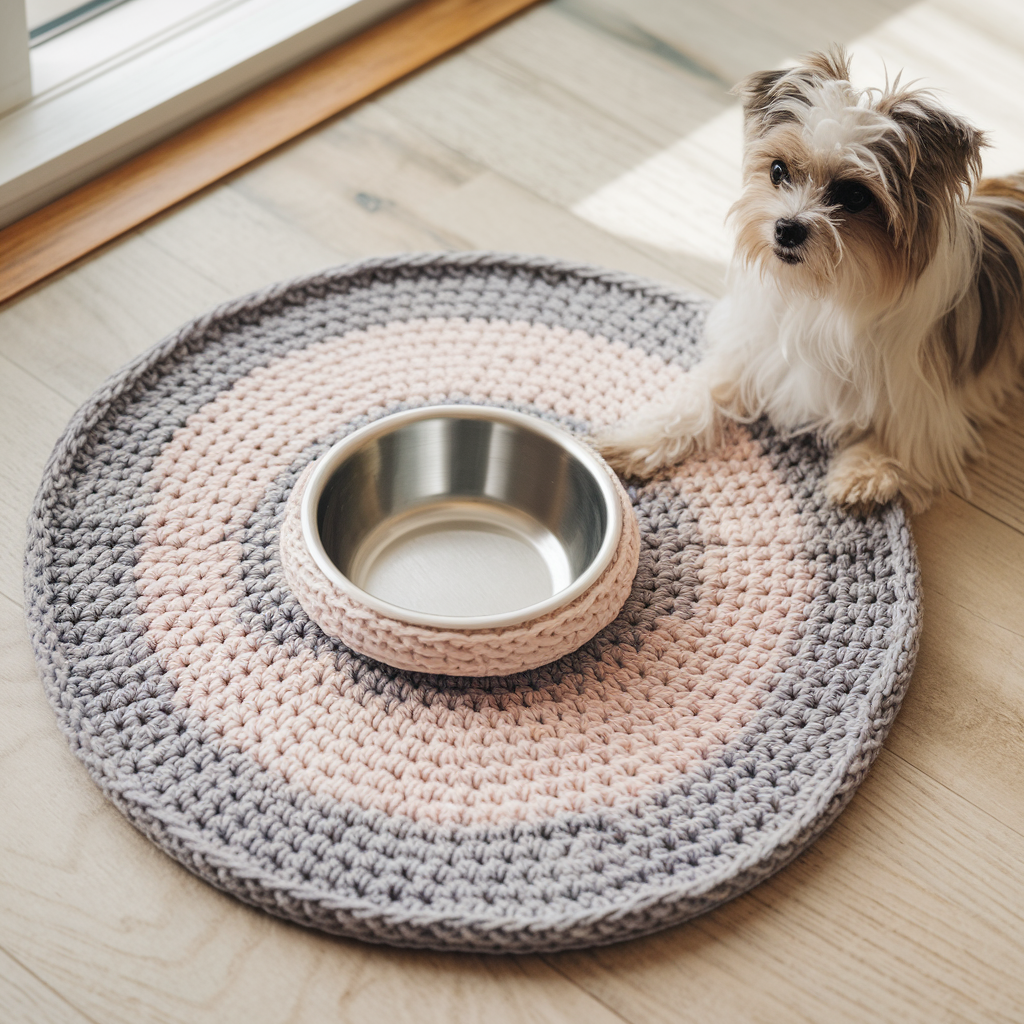
Skill level: Beginner — basic stitches, worked in rounds
Finished size: Approx 12–14” (30–36 cm) diameter — roomy enough for a standard food/water bowl. Make larger by adding rounds.
Materials
- Worsted weight cotton yarn — 200–300 yd (larger size uses more yarn)
- 5.0 mm (H) crochet hook (or 4.5 mm for denser fabric)
- Tapestry needle, scissors
- Optional: non-slip shelf liner cut to mat size
Gauge & notes
- Gauge not critical. Sample: 12 dc × 8 rows ≈ 4″ worked loosely with 5.0 mm.
- The pattern uses dc clusters for quick coverage and a nicely textured surface that resists skid.
Pattern — worked flat in joined rounds
- Magic ring: With yarn, make a magic ring. Ch 2 (counts as first dc).
- Round 1: 11 dc into ring. Join with sl st to top of ch-2. (12 dc)
- Round 2: Ch 2, dc in same st, 2 dc in next — repeat around. Join. (24 dc)
- Round 3: Ch 2, dc in next st, 2 dc in next — repeat around. Join. (36 dc)
- Round 4: Ch 2, dc in next 2 sts, 2 dc in next — repeat around. Join. (48 dc)
- Round 5: Ch 2, dc in next 3 sts, 2 dc in next — repeat around. Join. (60 dc)
- Round 6: Ch 2, dc in next 4 sts, 2 dc in next — repeat around. Join. (72 dc)
- Continue: Keep increasing in this manner (spacing increases evenly) until mat diameter reaches desired size (for ~12–14″ you’ll stop somewhere around 6–9 rounds depending on gauge). When you stop increasing, work even rounds of dc until surface feels suitably cushy (2–4 even rounds).
- Final rounds: Work 1–2 rounds of sc to give a firm edge (sc in each st around). Fasten off and weave ends.
Finishing
- Block gently on flat surface if needed to flatten slight waves.
- Cut a piece of non-slip shelf liner the same size as the mat and either: 1) slip it underneath and tuck edges, or 2) sew it to underside with small whipstitches (use a heavy needle and strong thread).
Tips & variations
- Use hdc (half-double crochet) for a slightly taller surface; sc for denser mat.
- Make a two-color spiral by changing color each round for a fun look.
- For outdoor/garage bowls choose a thicker hook and cotton rope yarn for durability.
Care
Machine wash warm or cold on gentle; air dry. Avoid high dryer heat to prevent shrinkage.
2. Crochet Paw Print Love Mat
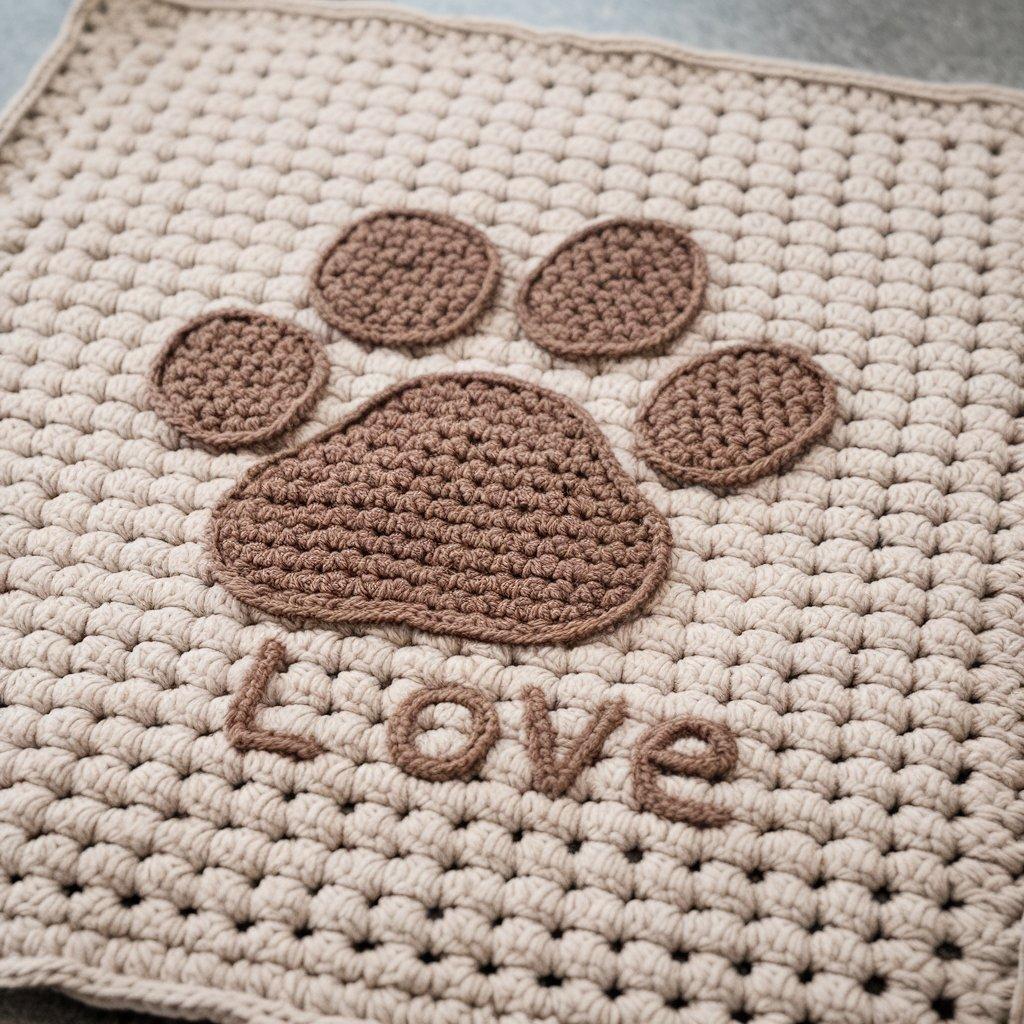
Skill level: Easy — simple square mat + appliqué paws
Finished size: Square 12” × 12” (30 × 30 cm) (good for one bowl)
Materials
- Worsted weight cotton: Main color (MC) ~150 yd, contrast color (CC) for paw ~50 yd
- 4.5 mm (7) hook for firm fabric
- Tapestry needle, scissors, optional non-slip backing
Why a square? It’s quick to work in rows and gives a stable base to sew appliqués.
Mat panel (worked flat in rows)
- Chain foundation: Ch 30 (adjust for desired width).
- Row 1: Sc in 2nd ch from hook and across. (29 sc) Turn.
- Rows 2–30: Ch 1, sc across. Repeat until square measures ~12″. Fasten off and weave ends.
Paw appliqué (make 1 large paw center, or 2 small paws)
Large paw (centerpiece) — makes one paw pad + four toe pads:
- Pad (large center): With CC, magic ring, ch1, 6 sc into ring. Pull tight. R2: ch1, 2 sc in each st around (12). R3: ch1, sc in next st, 2 sc in next around (18). Fasten off leaving long tail.
- Toe (make 4): With CC, ch 4, sl st into 1st ch to make small ring. Ch 1, 6 sc into ring, fasten off leaving tail.
Assembly
- Block the square to even edges. Position the large pad slightly below center and the four toes above it in a paw layout. Use pins if needed.
- Sew appliqués to mat using mattress stitch or whipstitch — sew through both motif and mat tightly so they do not detach in wash. Weave in tails at back.
Finishing & options
- Optionally edge the mat with 1 round of sc in MC for neatness.
- Attach a thin piece of non-slip shelf liner to the wrong side.
Tips & variations
- For a “Love” mat, embroider the word LOVE under paw or stitch a small heart with CC.
- Make tiny repeat paw prints across mat for a puppy pattern.
Care
Machine wash cold on gentle; air dry or tumble low.
3. Crochet Pet Bowl Fish Mat
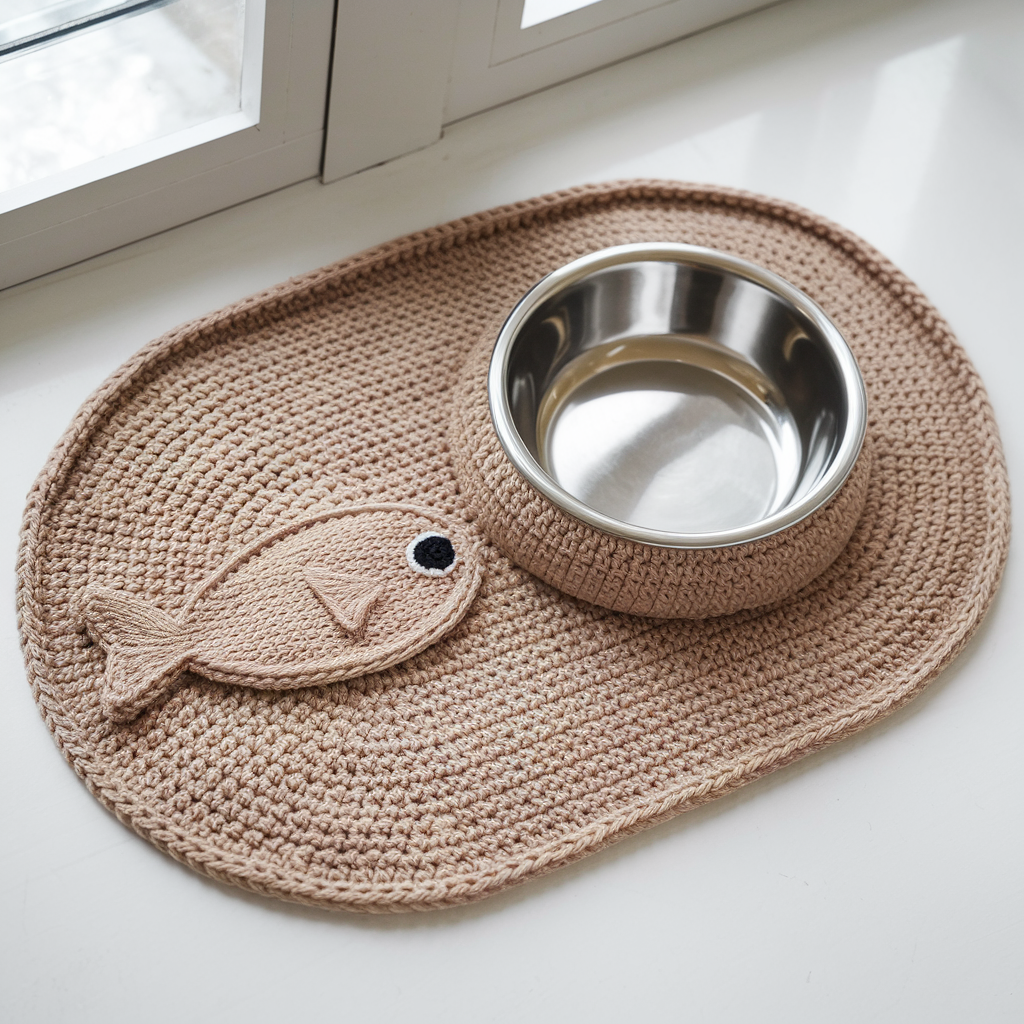
Skill level: Easy → Intermediate — oval mat plus fish appliqué
Finished size: Oval approx 10 × 14” (25 × 36 cm) — perfect for a cat bowl and small water dish beside it.
Materials
- Worsted cotton: MC ~200 yd; fish contrast color ~40–60 yd
- 5.0 mm hook for mat, 4.0 mm for fish details
- Tapestry needle, scissors
Oval mat (worked flat in rows then joined)
- Foundation chain: Ch 26 (this gives a ~10″ width).
- Row 1: Sc in 2nd ch from hook and across. Turn. (25 sc)
- Rows 2–10: Ch 1, sc across until piece measures ~10–12” long (this is half the oval length). Fasten off.
- Make two identical panels (or make one long rectangle and work short round ends — two panels is simple).
- Join panels: Place panels RS together and sc or whipstitch around short ends to form rounded tips (work 2–3 sc in corner stitches to create curve). Then fold and seam sides, or join long edges to make a single flat oval piece. Another approach: seam both short ends and then single-crochet around the outer edge, placing 3 sc in each end corner to round.
Fish appliqué (simple fish silhouette)
- Fish body: With CC, ch 8. R1: sc in 2nd ch and across (7 sc). R2: ch1, sc across. R3: ch1, sc2tog at beginning, sc across, sc2tog at end to shape body narrower. Repeat to create an oval shape ~3–4″ long.
- Tail: At one short end, ch 4, sl st back into next 2 ch to create triangular tail; or crochet two small triangles and sew on. Fasten off leaving tail to sew.
Assembly
- Position fish motif on mat (off-center to one side so both bowls fit). Sew securely through both pieces. Optionally add embroidered eye with black yarn and white seed stitch for highlight.
Tips & variations
- Make two small fish for a playful pair. Use variegated yarn for scales effect.
- Add a zigzag wave border around oval for “water” motif.
Care
Machine wash cold; reshape while damp.
4. Crochet Oval Pet Food Mat
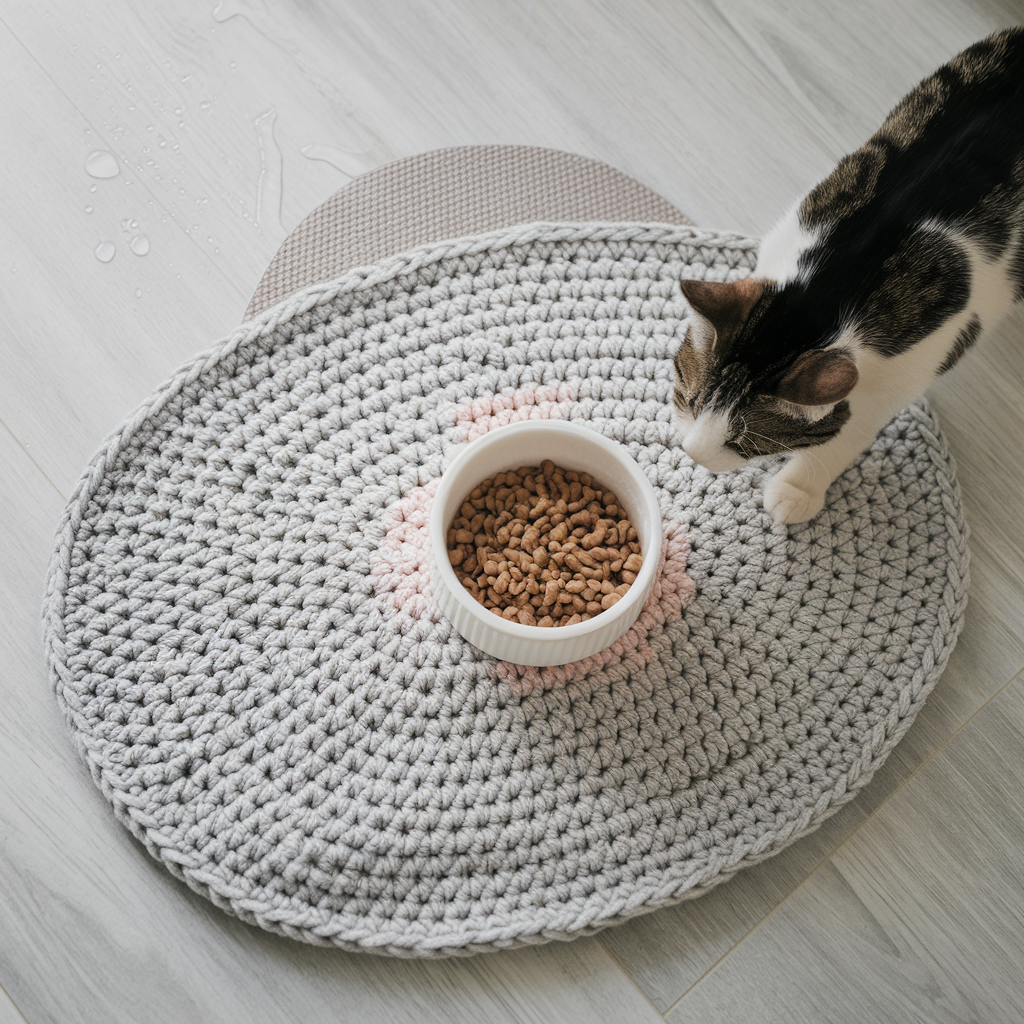
Skill level: Beginner — worked in rows, reversible fabric (moss/linen stitch)
Finished size: Approx 14 × 10” (35 × 25 cm) — roomy and catches spills. Make longer for dual bowls.
Materials
- Bulky cotton or two strands of worsted held together for thick, absorbent mat — ~250–350 yd (bulky)
- 6.5 mm (K) hook if using single bulky yarn; 5.5 mm if using two strands of worsted
- Non-slip rug pad or shelf liner optional
Why reversible? Moss/linen stitch makes a dense, flat, reversible fabric that looks good both sides.
Pattern — worked flat in rows (moss/linen stitch)
- Foundation: Ch 36 (or wider for more width).
- Row 1: Sc in 2nd ch from hook and in next ch, ch 1, skip next ch, sc in next ch — repeat across. This is the set up row. Turn. (You created a sc in every other ch)
- Row 2: Ch 1, sc in each ch-1 space across (work into the spaces created by previous row). Turn.
- Rows 3–XX: Repeat Row 2 until mat measures ~14″ long. Because the stitch alternates, the fabric is reversible and dense. Fasten off.
Finish edges
- Work one round of sc around the perimeter, placing 3 sc in corners to round them if desired — this evens the oval/rectangle edge. Fasten off and weave in ends.
Non-slip backing
- Cut a piece of thin rug gripper slightly smaller than mat size and glue (fabric glue) or hand-stitch to underside. This prevents sliding on tile/wood floors.
Tips & variations
- Carry two colors in stripes by changing yarn every few rows. Because this is reversible, color changes look good on both sides if you use neat join methods.
- Use cotton rope yarn for a rustic look (work sc tightly). This makes a very robust mat that cleans easily.
Care
Machine wash gentle. Lay flat to dry to avoid warp.
5. Crochet Bone-Shaped Food Mat
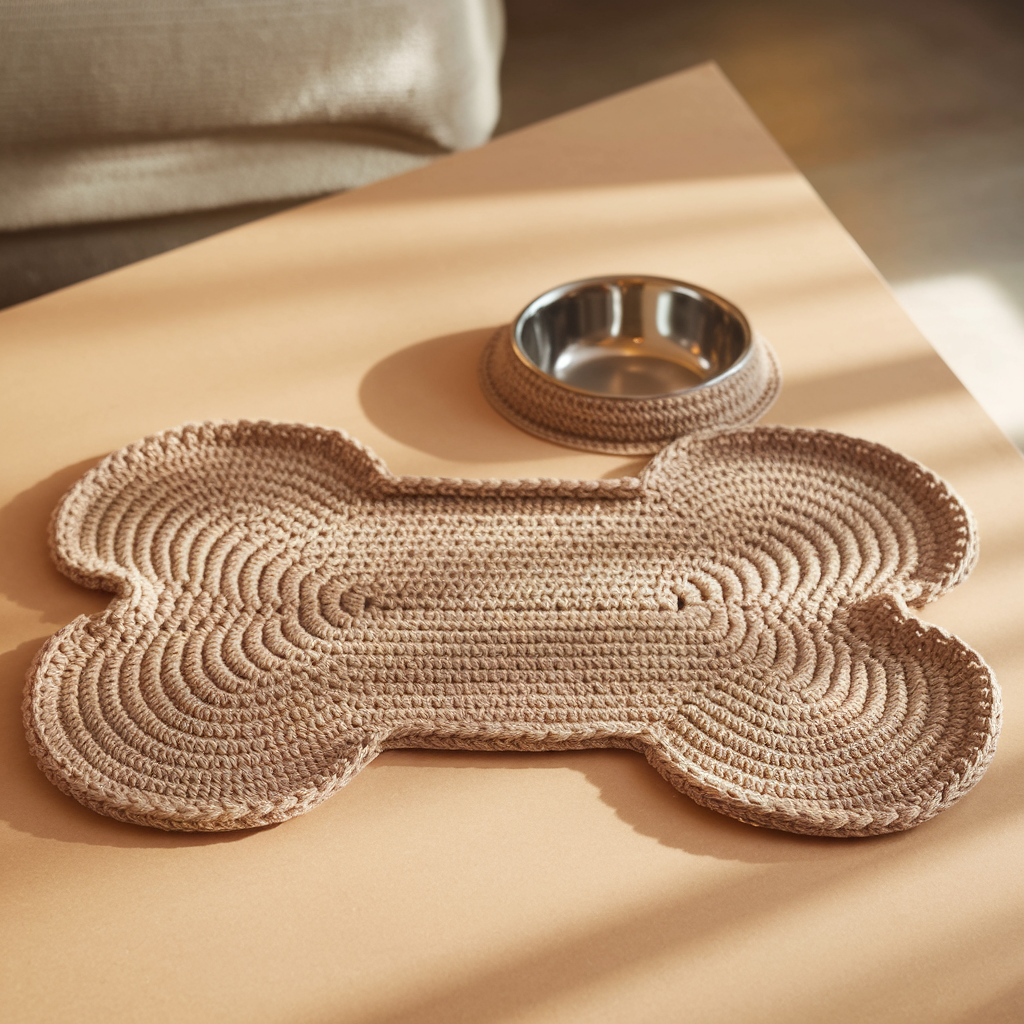
Skill level: Easy → Intermediate — make two round ends and connect with rectangle (sewn together)
Finished size: Approx 8 × 16” (20 × 40 cm) overall (two rounded ends 8” diameter connected by an 8” × 8” center bar). Adjust as desired.
Materials
- Worsted cotton: ~250–300 yd total
- 5.0 mm hook for quick coverage
- Tapestry needle, scissors, non-slip piece optional
Concept
Make two round “knobs” (the bone ends) and a rectangular center strip, then seam them together to form a bone silhouette. It’s a forgiving construction and works well for beginners.
Step-by-step
Round knobs (make 2) — same as simple rounds above:
- Magic ring, ch 2, 11 dc in ring; join. (12)
- Round 2: Ch 2, 2 dc in each st around. (24)
- Round 3: Ch 2, dc in next st, 2 dc in next — repeat (36)
- Round 4: Ch 2, dc in next 2, 2 dc in next — repeat (48)
- Continue increasing until knob diameter ~8″ — this might be 6–8 rounds depending on gauge. You can also make slightly smaller knobs for a more stylized bone.
Center bar (make 1)
- Chain length equal to distance between centers minus overlap. For sample, ch 18. Row 1: sc in 2nd ch and across; turn. Rows 2–16: ch 1, sc across until strip height matches knob thickness (approx 8″ tall in sample) — i.e., make a rectangle approx 8″ × 8″. Fasten off.
Assembly
- Lay out two knobs on either end of center bar with overlaps (about 1″ overlap). Using tapestry needle and yarn, whipstitch or mattress stitch the center bar to the curved edges of each knob. Stitch through both layers for strength and smooth finish. Go around knob perimeter where it meets the bar to create a seamless join.
- Optional: edge entire bone with 1 round of sc for neatness.
Finishing & non-slip
- Add a small piece of non-slip shelf liner cut to the bone shape and attach with fabric glue on underside.
- Optionally sew small felt pads under knob corners to protect floors.
Tips & variations
- Make it in your pet’s color (or with stripes).
- Add embroidered name on the center bar for personalization (great gift idea). Use a contrasting color and simple backstitch.
Care
Machine wash cold; lay flat to dry. If you added backing glue, test wash method first.
Final troubleshooting & general tips
- If your mat cups or ruffles at the edges: either your increases were too frequent (for round mats) — frog a round and space increases more evenly — or use a smaller hook for firmer gauge. Blocking helps flatten minor waves.
- If mat is too floppy: use smaller hook, denser stitches (sc), or hold two strands together. Adding a thin non-slip backing also stabilizes the fabric.
- To make mats thicker & absorbent: hold two strands of yarn together (same color or contrasting) or use cotton rope/t-shirt yarn.
- To make mats dishwasher-safe for stainless bowls: consider using rope yarn and skip any glued add-ons; rope holds up well to washing.
Conclusion
Handmade pet bowl mats are quick to make, practical, and make excellent gifts or craft-fair items — and they’re forgiving projects for beginners. The five patterns above give you a range of styles and construction methods:
- Round dog mat — fast, classic, great to scale for any bowl.
- Paw print square — cute appliqué for pet lovers.
- Fish oval mat — perfect for cat bowls and playful kitchen décor.
- Reversible oval mat — thick, absorbent, and non-slip for hectic feeding stations.
- Bone shaped mat — fun themed design that makes a memorable gift.