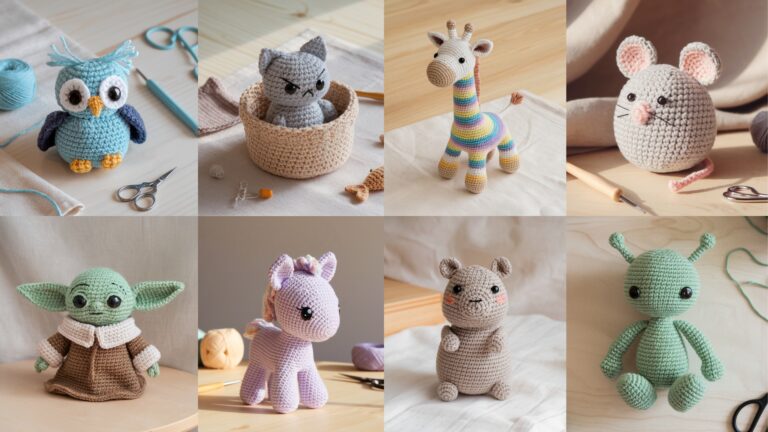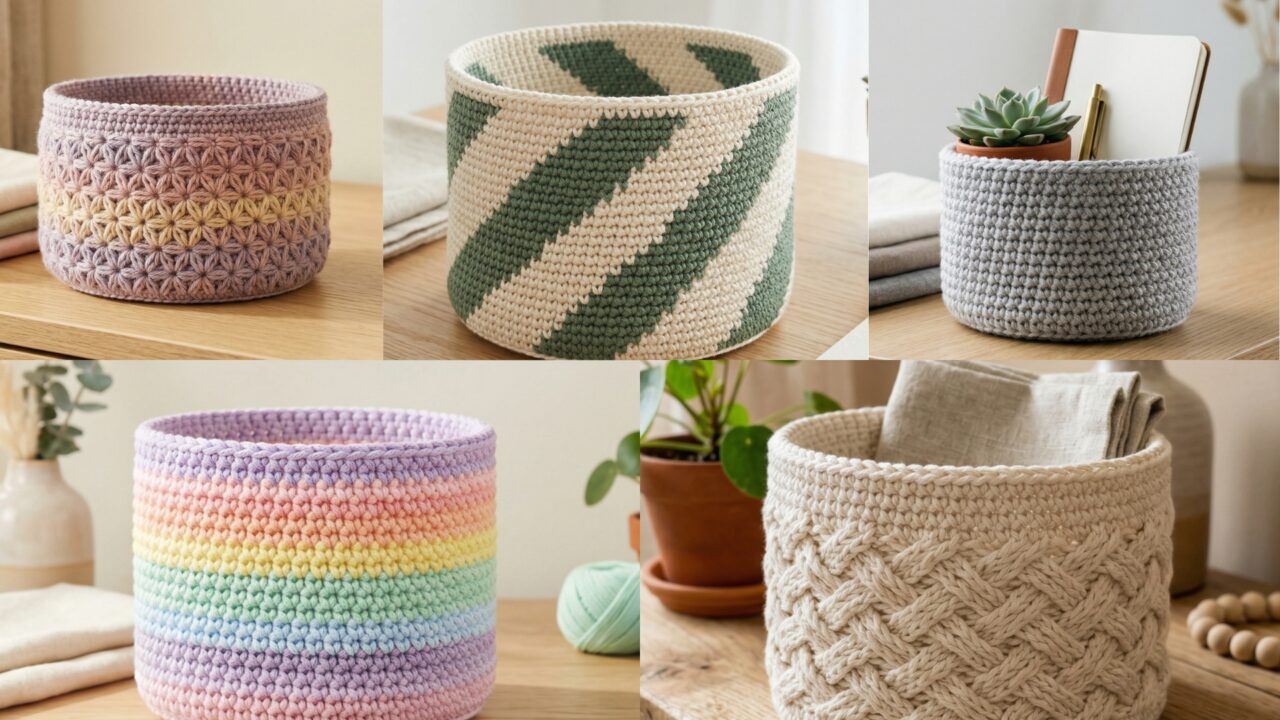
Crochet mini baskets are one of the most satisfying small projects you can make because they are quick, useful, and full of charm. They are the kind of project that feels simple enough for beginners, but still gives you a finished piece that looks polished and purposeful. A mini basket can sit on a desk, hold hair clips, organize small supplies, decorate a shelf, or become a lovely little gift. Even though it is small, it can still make a big difference in how a space looks and feels.
What makes crochet mini baskets especially appealing is how much variety you can create with just a few basic stitches. A Celtic weave basket feels textured and classic. A flower stitch basket adds a soft decorative touch. Oblique lines and stripes create a modern graphic look. Rainbow stripes bring color and joy. A simple modern storage basket gives you a clean everyday piece that works anywhere. Each design has its own personality, but all of them are beginner-friendly and practical.
In this post, you will find five easy crochet mini basket patterns with detailed step-by-step guidance, helpful quick notes, and practical finishing tips. Each one is written to be easy to follow, even if you are still learning. If you want a project that is fun to make, useful around the house, and perfect for using up yarn, these mini basket ideas are a great place to start.
Quick Notes
Project type: Crochet mini baskets
Best for: Desk organization, bathroom storage, nursery decor, gifts, and stash-busting
Skill level: Beginner to intermediate, depending on stitch texture
Hook size: Usually 3.5 mm to 5.5 mm, depending on yarn weight and firmness needed
Yarn weight: Cotton, cotton blends, or sturdy acrylic yarn
Best yarn choice: Cotton yarn for structure, durability, and cleaner shape
Finished size: Usually small basket size, around 4 to 8 inches wide depending on design
Time to complete: A few hours to one day per basket
Helpful stitches: Chain, slip stitch, single crochet, half double crochet, double crochet, increase, decrease, front post stitch, back post stitch, tapestry crochet, color changes
Common Materials
Most mini baskets can be made with a similar set of supplies.
- Yarn in your chosen colors
- Crochet hook suited to the yarn
- Yarn needle
- Scissors
- Stitch markers
- Optional stiffener or fabric insert
- Optional wooden base or cardboard base, if desired
For baskets, yarn choice matters a lot because the basket needs to hold its shape. Cotton yarn is often the best choice because it feels sturdy and clean. If you want the basket to stand up well, choose a tighter stitch and use a hook size that helps create firm fabric. A little structure makes the finished basket much more useful.
1. Crochet Mini Celtic Weave Basket Pattern
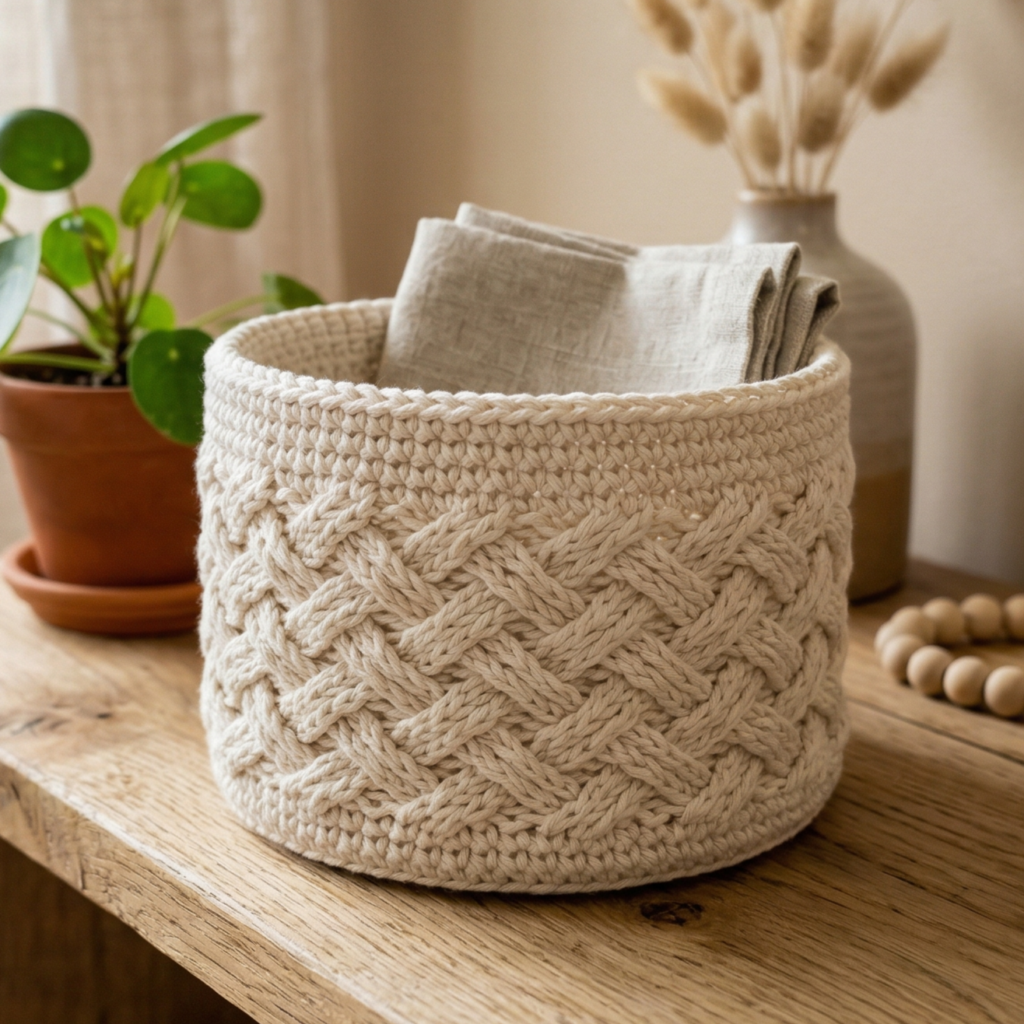
A mini Celtic weave basket is a beautiful textured project that looks much more detailed than it actually is. The woven effect gives the basket a rich handmade look, making it perfect for anyone who wants a basket that feels elegant and classic. Even though the pattern looks intricate, it is still approachable once you learn the repeat.
Quick Notes
Skill level: Beginner to intermediate
Finished size: Small basket, usually 4 to 6 inches wide
Style: Textured, classic, elegant, woven
Best colors: Cream, beige, sage, brown, charcoal, soft gray
Materials
- Cotton yarn or other sturdy yarn
- Crochet hook suited to your yarn
- Yarn needle
- Scissors
- Stitch markers
- Optional stiffener
Step-by-Step Guide
Step 1: Start with a round base
Begin by crocheting a flat circular base. This will form the bottom of the basket and should be wide enough for the storage size you want. Use increases evenly so the base stays flat and does not curl or cup.
A flat base is important because it helps the basket stand properly.
Step 2: Build the sides
Once the base is finished, stop increasing and work upward in the round to create the sides. This begins the basket shape. Keep your stitches tight and even so the walls stay firm and upright.
The sides should start to rise cleanly from the base.
Step 3: Learn the Celtic weave pattern
The Celtic weave look is created with crossing stitches or cable-like texture. Work the repeat slowly at first so the texture forms clearly. This gives the basket its signature woven appearance and makes it feel much more decorative.
The woven texture is the main feature of this basket.
Step 4: Keep the stitch tension firm
Because texture can loosen fabric, make sure your stitches are snug. You want the basket to hold shape rather than flop outward. If your basket feels too soft, go down a hook size next time or tighten your tension slightly.
Firm fabric gives the basket structure.
Step 5: Continue the texture upward
Repeat the Celtic weave rows until the basket reaches the desired height. Keep the pattern consistent so the texture stays balanced around the entire basket. Check the shape as you go to make sure the basket remains even.
Consistency is what makes the texture look polished.
Step 6: Finish the rim
Once the basket is tall enough, add a neat top edge. A round of single crochet or a tighter border can help the rim stay strong and clean. This also makes the basket look finished and more professional.
A tidy rim helps the basket keep its shape.
Step 7: Shape and stiffen if needed
If the basket still feels a little soft, lightly block it or add a bit of stiffener. You can also use a fabric insert inside if you want it to hold shape even better. Let it dry fully before using.
Helpful Tips
A mini Celtic weave basket looks especially beautiful in neutral colors because the texture really stands out. If you want a cozy handmade look, choose cream or taupe. If you want something more modern, try charcoal or sage.
2. Crochet Mini Flower Stitch Basket Pattern
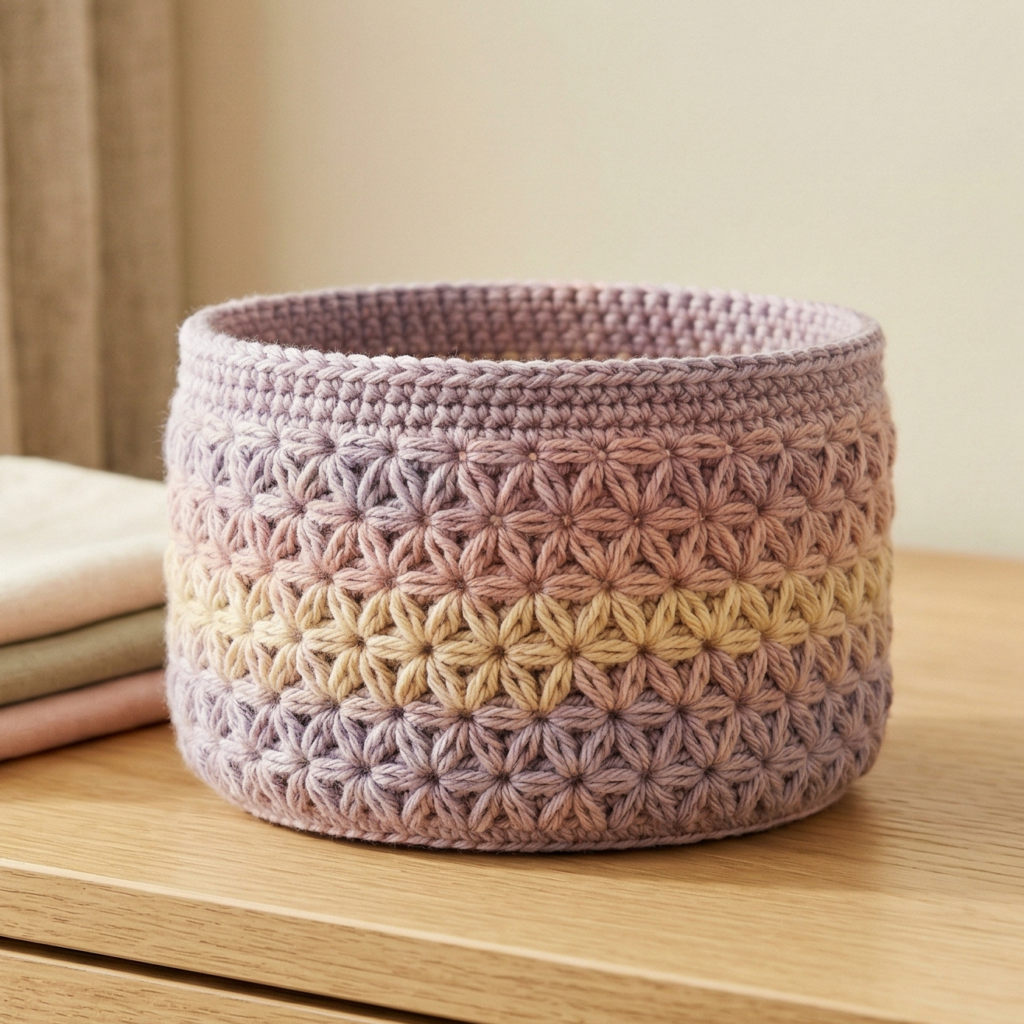
A mini flower stitch basket feels cheerful, delicate, and decorative. The flower stitch adds a soft textured surface that gives the basket a lovely handmade feel. This is a great choice if you want something cute enough for a shelf or dresser but still useful for small items.
Quick Notes
Skill level: Beginner to intermediate
Finished size: Small basket, usually 4 to 7 inches wide
Style: Floral, sweet, decorative, soft
Best colors: Pastels, cream, dusty rose, lavender, mint, pale yellow
Materials
- Cotton yarn
- Crochet hook suited to your yarn
- Yarn needle
- Scissors
- Stitch markers
- Optional fabric stiffener
Step-by-Step Guide
Step 1: Crochet the basket base
Start with a flat round base using even increases. Keep the base neat because the flower stitch will be the decorative part, and a clean base helps everything look balanced.
A solid base gives the basket a strong foundation.
Step 2: Build the basket sides
Once the base is finished, work upward without increasing to start the basket walls. Use a tight stitch so the basket feels sturdy. The sides should rise evenly and begin to form the small basket shape.
The walls should feel firm enough to hold their shape.
Step 3: Work the flower stitch pattern
Begin the flower stitch repeat. This stitch creates little floral shapes across the surface and gives the basket a pretty, textured look. Take your time at first because the repeat may feel new, but it becomes easier once you get into the rhythm.
The flower texture is the focal point of the basket.
Step 4: Keep the pattern balanced
Check that the stitch pattern is staying even all the way around. A basket looks best when the floral texture is consistent and smooth. If the pattern seems uneven, pause and count your stitches before continuing.
Balanced texture makes the basket feel neat.
Step 5: Continue until the basket reaches the right height
Repeat the flower stitch rows until the basket is tall enough for the items you want to store. Mini baskets usually do not need much height, so keep the shape compact and practical.
Step 6: Add a clean top border
Finish the top with a simple border to keep the edge strong. A row of single crochet or half double crochet can help define the rim and make the basket look more finished.
Step 7: Shape the basket
If the basket feels soft or slightly uneven, shape it by hand or lightly block it. The floral texture should stand out clearly, but the basket should still hold its form.
Helpful Tips
This basket looks especially lovely in soft pastel shades because the flower texture feels light and sweet. If you want a nursery-friendly or giftable basket, pale pink, mint, or cream are beautiful choices.
3. Crochet Mini Oblique Lines Stripes Basket Pattern
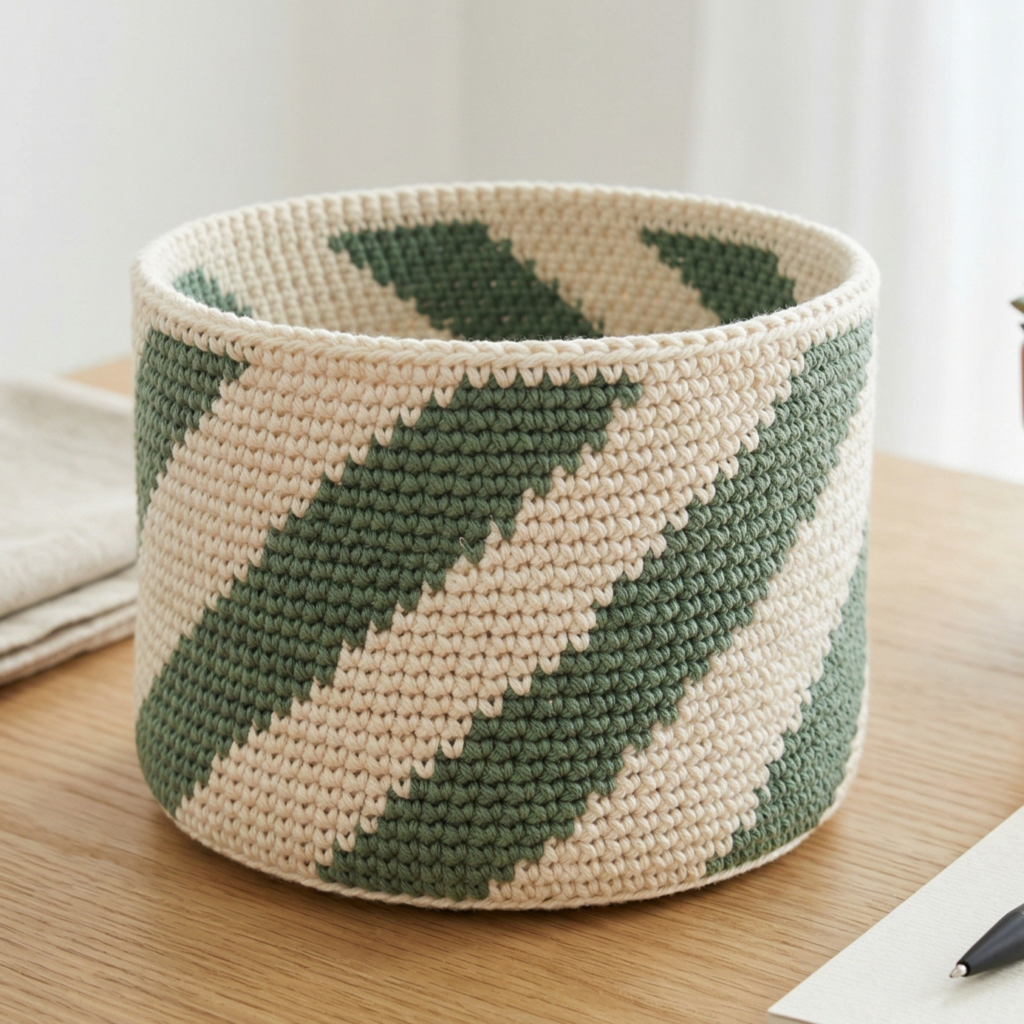
A mini oblique lines stripes basket gives you a clean, modern look with just enough movement to feel interesting. The diagonal stripe effect makes the basket look fresh and stylish, while the simple structure keeps it easy to make. This is a great option if you want a basket that feels contemporary and useful.
Quick Notes
Skill level: Beginner
Finished size: Small basket, usually 4 to 7 inches wide
Style: Modern, graphic, simple, stylish
Best colors: Two-tone combinations, neutrals, bold contrast colors, muted earth tones
Materials
- Cotton yarn in two or more colors
- Crochet hook suited to your yarn
- Yarn needle
- Scissors
- Stitch markers
- Optional fabric stiffener
Step-by-Step Guide
Step 1: Make the base
Start with a flat round base. Keep the increases even so the basket sits flat. The base is simple, which helps the stripe design remain the visual focus later.
A clean base supports the overall structure.
Step 2: Build the sides in one color
Crochet the first round or few rows of the basket sides in your main color. This creates the starting point for the stripe pattern and gives the basket a neat foundation.
The first section should feel smooth and even.
Step 3: Begin the oblique stripe effect
Switch colors in a way that creates diagonal or slanted lines. This may involve changing colors at slightly offset intervals or following a pattern that moves the stripes across the basket wall. Keep the transitions neat so the lines look intentional.
The diagonal look is what makes this basket feel modern.
Step 4: Keep your color changes consistent
When making stripes, consistency is important. Change colors at the same point in each repeat so the pattern stays clean. If you are using two colors, the contrast should be strong enough to show the stripes clearly.
Clear color contrast helps the pattern stand out.
Step 5: Continue upward
Keep repeating the stripe sequence until the basket reaches the right height. Since the basket is mini, the pattern does not need many rows to make a visual impact. Even a few stripes can give the basket a stylish look.
Step 6: Finish the top edge
Add a simple border in one of the stripe colors or in a neutral tone. A neat border keeps the top rim strong and helps the stripes feel complete.
Step 7: Shape and firm the basket
If needed, lightly block the basket or shape it by hand so the walls sit evenly. The oblique stripes should stay crisp and clean.
Helpful Tips
This pattern is great if you want a modern basket without too much texture. Neutral colors feel chic and minimal, while bold color combinations can make the basket playful and graphic. It is a good option for desks, shelves, or bathroom storage.
4. Crochet Mini Bernat Rainbow Stripes Basket Pattern
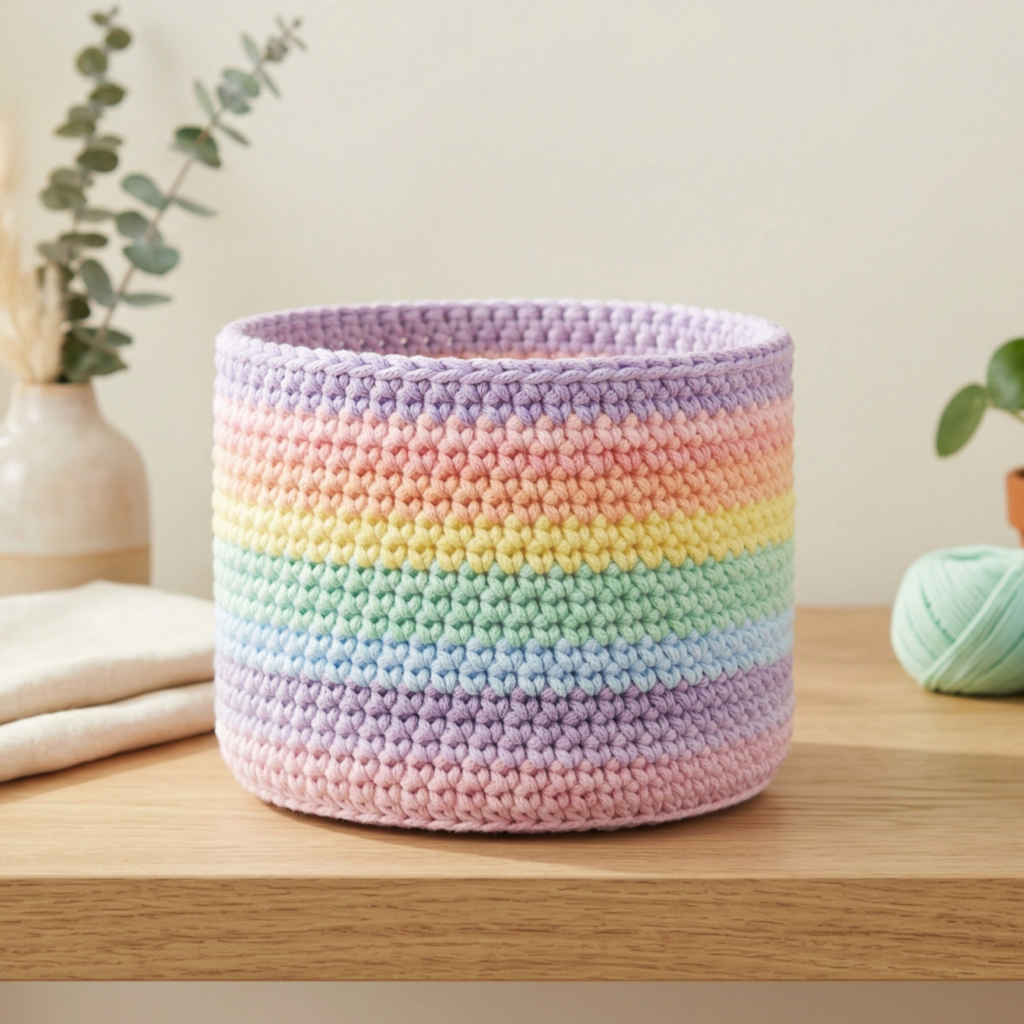
A mini rainbow stripes basket is bright, happy, and full of personality. It is perfect for using leftover yarn in a colorful way while creating something cheerful and useful. This basket works especially well in kids’ rooms, craft spaces, or anywhere that could use a fun splash of color.
Quick Notes
Skill level: Beginner
Finished size: Small basket, usually 4 to 7 inches wide
Style: Cheerful, colorful, playful, vibrant
Best colors: Rainbow shades, pastels, brights, or soft rainbow tones
Materials
- Cotton yarn or sturdy yarn in multiple colors
- Crochet hook suited to your yarn
- Yarn needle
- Scissors
- Stitch markers
- Optional fabric stiffener
Step-by-Step Guide
Step 1: Make a flat base
Start with a circular or slightly oval flat base. Use a neutral first color or one of your rainbow shades. Make sure the base is sturdy and flat so the basket can hold its shape.
A flat base keeps the basket practical.
Step 2: Build the basket sides
Once the base is complete, work upward in the round. Use a firm stitch to create a good structure. This is the section where the rainbow stripes will appear, so keep the stitches even.
The sides should rise cleanly and evenly.
Step 3: Plan the rainbow order
Decide what order you want the colors to appear in. You can use a full rainbow sequence or a softer set of pastel shades. Planning ahead helps the basket look organized rather than random.
A thoughtful color order makes the basket more polished.
Step 4: Crochet the stripe rows
Change colors after each row or after a few rows depending on how wide you want each stripe to appear. Keep the transitions neat and secure. The bright color changes are the main charm of the basket, so let them stay clean and visible.
The stripes give the basket its joyful personality.
Step 5: Continue until the basket is tall enough
Keep working the rainbow sequence until the basket reaches the size you want. Since it is mini, you do not need a large number of rows to show off the color changes.
Step 6: Add a top border
Finish the top with a simple border to help the basket look complete. You can use one of the rainbow colors or a neutral tone to frame the design.
Step 7: Shape the basket
Make sure the basket stands evenly and the stripes stay straight. If needed, lightly block it or shape it by hand. The basket should feel cheerful but still tidy enough for everyday use.
Helpful Tips
Rainbow baskets are especially fun for gift sets or children’s spaces. If you want a softer version, use pastel rainbow shades. If you want a bolder look, use bright colors with strong contrast. This is also a great project for yarn scraps.
5. Crochet Mini Easy Modern Storage Basket Pattern
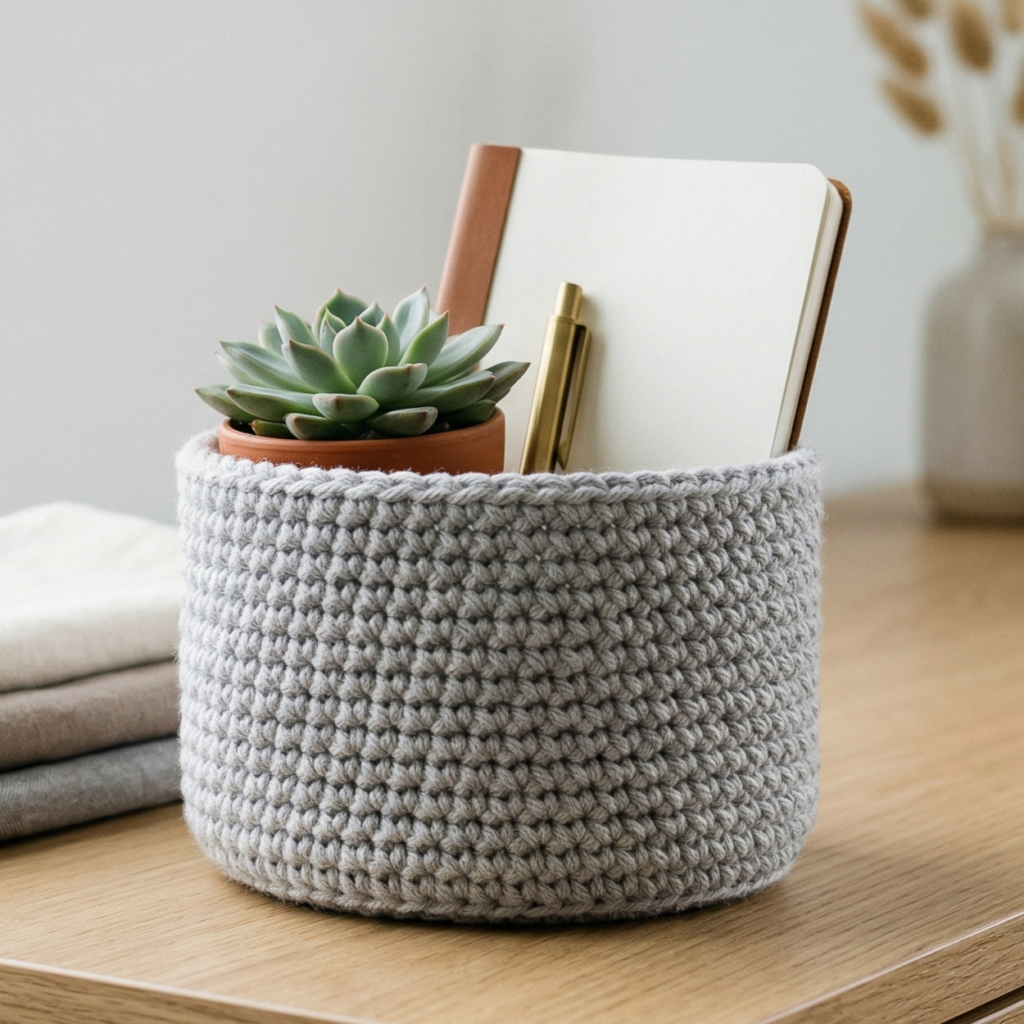
A mini easy modern storage basket is a simple, versatile project that works in almost any room. It usually focuses on clean lines, solid colors, and minimal texture, which makes it perfect if you want a basket that feels stylish and practical without being too complicated. This is a great beginner basket pattern because it is easy to customize.
Quick Notes
Skill level: Beginner
Finished size: Small basket, usually 4 to 8 inches wide
Style: Clean, modern, minimal, practical
Best colors: White, cream, gray, black, beige, olive, navy, taupe
Materials
- Cotton yarn or sturdy acrylic yarn
- Crochet hook suited to your yarn
- Yarn needle
- Scissors
- Stitch markers
- Optional fabric insert or stiffener
Step-by-Step Guide
Step 1: Choose the basket shape
Decide whether you want a round, oval, or square mini basket. A simple round shape is the easiest, while a square one may feel a little more modern. Keep the shape clean and compact so it works as storage without taking up too much space.
A simple shape makes the pattern very beginner-friendly.
Step 2: Crochet the base
Create a flat base using even increases. Make sure it stays flat and smooth so the basket stands well. The base should be strong enough to support the sides and whatever items you want to store.
A good base gives the basket stability.
Step 3: Work the sides
Crochet upward in a simple stitch such as single crochet or half double crochet. Keep the stitches tight and even so the walls stay firm. The modern look comes from the clean shape and minimal texture.
The sides should feel sturdy and simple.
Step 4: Keep the design minimal
Unlike textured baskets, this one should stay clean and uncluttered. Avoid too many decorative details so the shape and color remain the focus. A solid neutral shade can make the basket feel especially modern.
Minimal design often looks the most polished.
Step 5: Continue to the desired height
Work until the basket is tall enough for your intended use. Since it is a mini storage basket, you usually only need a small height. Keep the proportions balanced so it feels useful but still neat.
Step 6: Finish the top rim
Add a strong top border to keep the rim from stretching. A simple single crochet or tight slip stitch edge works very well here. This gives the basket a clean, finished look.
Step 7: Shape and use
Once finished, shape the basket by hand or add a light stiffener if needed. It should stand neatly and work well for small items like clips, keys, makeup, thread, or desk supplies.
Helpful Tips
This is the best option if you want a basket that works in almost any space. A neutral color makes it easy to match with modern decor, and the simple design means it can be made quickly and used in many ways. It is a great beginner pattern if you want something useful and stylish at the same time.
Conclusion
Crochet mini baskets are one of the best beginner-friendly projects because they are quick, practical, and fun to personalize. They let you practice shaping, texture, color changes, and basic structure without taking on a huge project. That makes them perfect for using up yarn, making thoughtful gifts, or adding small handmade touches around your home.
These five mini basket patterns each bring something different to the table. The Celtic weave basket feels rich and textured. The flower stitch basket is soft and decorative. The oblique lines basket gives you a modern striped look. The rainbow basket brings color and joy. The easy modern storage basket keeps things simple and versatile. Together, they show how much variety you can create with just a few basic stitches and a little creativity.
A handmade basket may be small, but it can make a space feel more organized, more beautiful, and more personal. With the right yarn, steady tension, and neat finishing, these mini baskets can become favorite little pieces you use again and again.