

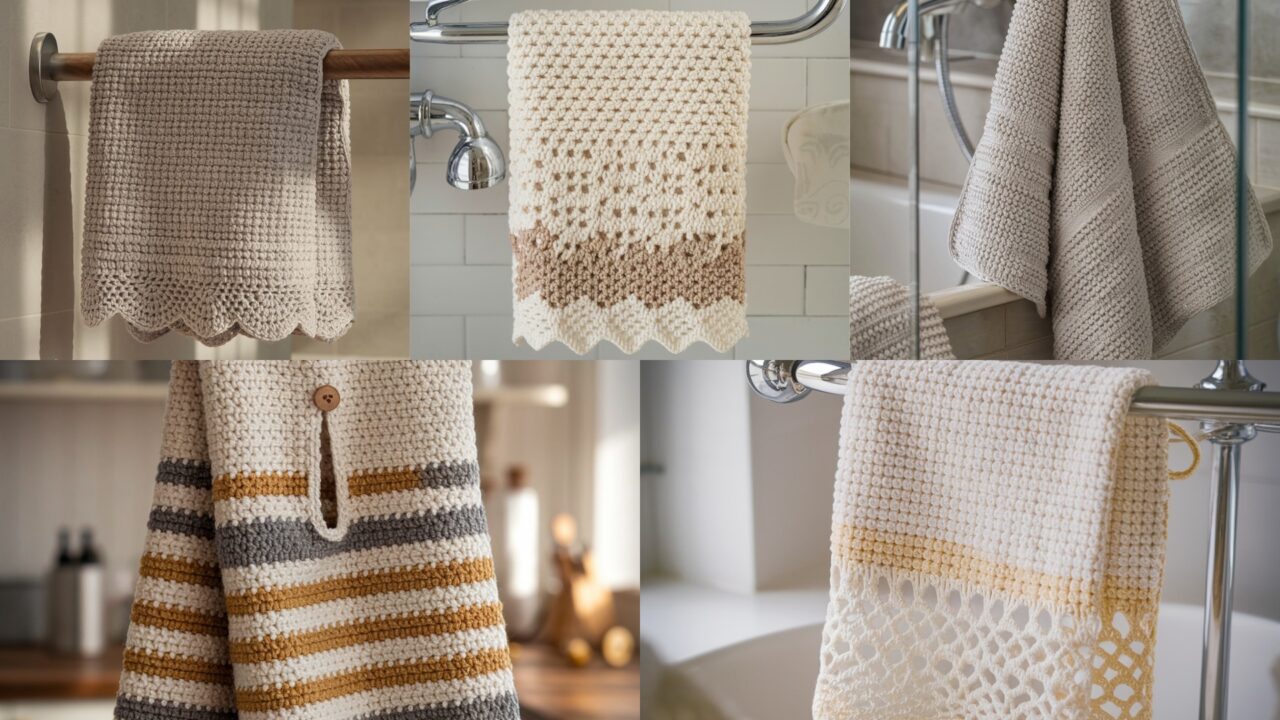
A good crochet hand towel is one of the best small wins: quick project, practical gift, and it proves you can make something that gets used daily instead of languishing on a shelf. These five patterns — Harbor, Trevi, Zigzag, Farmhouse Striped Keyhole, and Catherine — are written for beginners but with clean, useful finishes (hanging loops / keyholes / tidy edges). Each sample is sized for an adult/teen bathroom hand towel and is easy to scale.
Universal notes (read this — do it)
Abbreviations (US): ch = chain, sc = single crochet, hdc = half double crochet, dc = double crochet, tr = treble, sl st = slip stitch, st(s) = stitch(es), inc = 2 sc in same st, dec = sc2tog, BLO/FLO = back/front loop only, sk = skip, RS = right side, WS = wrong side.
Materials (baseline for samples):
- Yarn: 100% cotton worsted (#4) — absorbs well and washes like a grownup. You can use cotton-blend for softer towels but cotton wins for durability.
- Hook: 4.0 mm (G) or 4.5 mm (H) depending on your tension — I’ll note where to swap.
- Notions: tapestry needle, scissors, tape measure, blocking mats/pins (optional).
- Extras for kitchen/bath: cotton twill tape or a button for keyhole towels; a small length of ribbon for hanging loops if preferred.
Sample gauge I’ll use for all math examples: 16 sc = 4.0″ → that is 4 sts/in. Row gauge ~ 16 rows = 4.0″ → 4 rows/in.
If your swatch is different, use your own numbers in the simple formula:
- Stitches needed across = (desired finished width in inches) × (sts per inch).
- Rows needed = (desired finished length in inches) × (rows per inch).
Sample finished size used in instructions: A comfortable hand towel: Width = 16.0″ (side to side) and Length = 24.0″ (top to bottom, excluding hanging loop). You can change these.
Math example (so you see how I compute):
Desired width 16.0″ × 4 sts/in = 64 stitches. (16 × 4 = 64.)
Desired length 24.0″ × 4 rows/in = 96 rows. (24 × 4 = 96.)
Construction tips (use these always):
- Work a gauge swatch in the main stitch for 4″ × 4″. Block it the way you’ll treat the towel. Count stitches/in. Plug numbers into formulas above.
- Keep edges tidy: if your stitch pattern is lacy or open, finish with 2–3 rounds of sc around to stabilize.
- For hanging: attach a small crochet loop (chain + sc or sc tube) securely in the top center, or make a keyhole opening (instructions below). Reinforce with a couple extra stitches through lining or a small fabric patch if the towel will hang on a hook with weight.
- Wash and dry a test towel to check shrinkage before making sets.
1. Crochet Harbor Hand Towel Pattern
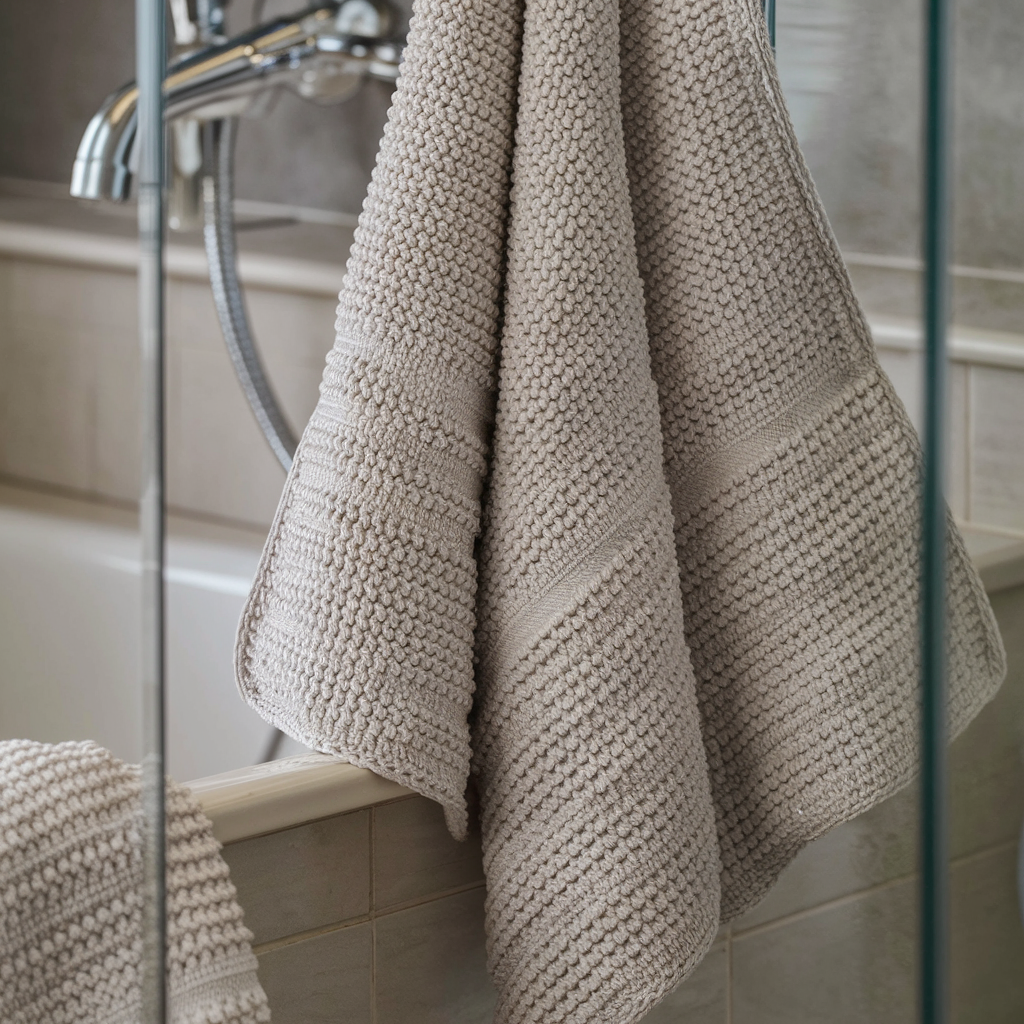
Simple textured stitches that hide water marks and look clean in any bathroom. Think subtle ridges and good drape.
Skill level: Confident Beginner
Finished sample: Width 16.0″ × Length 24.0″ (excluding hanging loop).
Materials: cotton worsted #4, 4.0 mm hook, tapestry needle, measuring tape. Approx yarn ≈ 300–350 yds.
Stitch pattern: Alternating rows of hdc and front-post hdc ribbing for vertical texture.
Sample math (work from this or plug your gauge)
- Width → 16.0″ × 4 sts/in = 64 sts foundation.
- Length → 24.0″ × 4 rows/in = 96 rows.
Abbreviations used in this pattern
FPhdc = front-post half double crochet. Hdc = half double crochet.
Pattern — foundation & body
- Foundation chain: ch 65 (to produce 64 working stitches). (ch = 65 because we’ll skip first turning chain; if you prefer ch64 + turning ch method, adjust.)
- Row 1 (setup row): hdc in 2nd ch from hook and across — 64 hdc. Turn.
- Row 2 (rib row): ch2 (counts as hdc), FPhdc around next st, hdc in next st repeat across, end with hdc in top of turning ch. Turn.
- Row 3: ch2, hdc in next st, FPhdc around next st — this alternates the rib to keep texture stable. Turn.
- Repeat Rows 2–3 until piece measures 24.0″ (or your target length). For the sample: do 96 rows total. Make sure to count your rows: 96 rows = 24″ at sample gauge. Fasten off.
Hanging loop (two options)
Option A — center loop:
- At the last row center point, chain 15–18 (for approx 3–4″ hanging loop) and sl st back into same spot to make a loop. Fasten off and weave in ends. Reinforce loop by sewing with tapestry needle through base of loop 6–8 times.
Option B — keyhole (for hooks): see pattern 4 for full keyhole instructions.
Edging
- Work 1 round sc evenly around (work 2 sc in corners to avoid curling). Work a second round of sc in BLO if you want a slightly nicer ribbed edge. Fasten off and weave ends.
Finishing & care
- Block lightly by spritzing the towel and shaping.
- Wash on gentle, tumble low or air-dry flat. Cotton shrinks a little the first wash — if perfect size matters, wash one sample first.
Variations
- Make a narrower guest towel: use 40 sts across for ~10″ width.
- Use a color stripe every 12 rows for a harbor-stripe look.
2. Crochet The Trevi Hand Towel Pattern
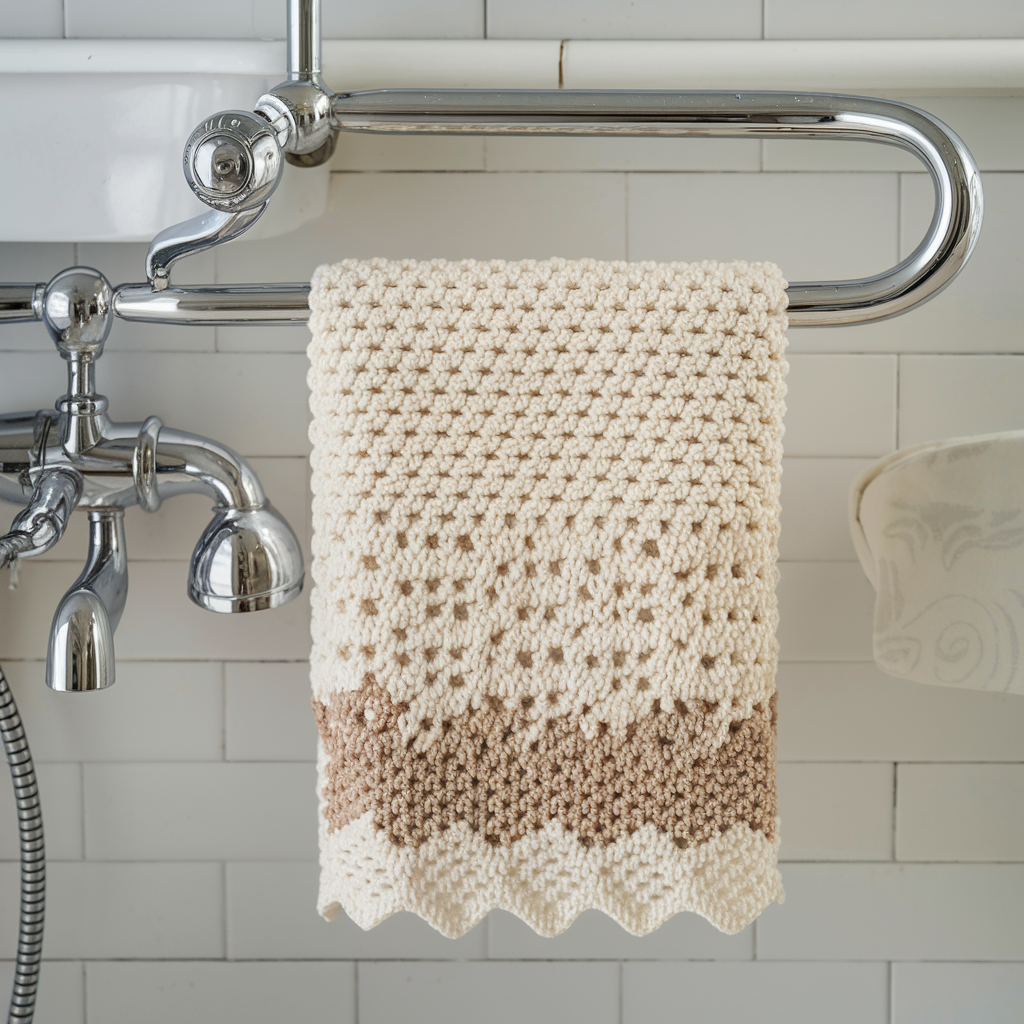
A lacy-but-sturdy towel with an openwork border and a denser center for absorbency. Looks elegant but holds up.
Skill level: Confident Beginner → Intermediate (counting lace repeats)
Finished sample: 16.0″ × 24.0″ (excluding loop).
Materials: cotton worsted #4, 4.0 mm hook, approx 350–400 yds.
Stitch pattern: dc/shell body with a sturdy 6-row textured center panel and lace edging.
Math (sample)
- Foundation width = 64 sts (16.0″ × 4 sts/in).
Abbreviations used
Shell = (2 dc, ch2, 2 dc) in same stitch or space. V-st = (dc, ch1, dc) into same st.
Pattern — center absorbent panel (work flat, then add lace borders)
- Ch 65 for 64 base sts. R1: sc in 2nd ch from hook and across (64 sc). Turn.
- R2–R9 (textured absorbent body): Row pattern for 8 rows: ch1, [hdc in each stitch] across. These dense hdc rows create the main absorbent body (8 rows ≈ 2″ at sample gauge). Repeat this 8-row block across the entire length until you have reached about 20″ of body length (sample uses 20″, leaving room for lacy top/bottom borders). So compute rows: 20.0″ × 4 rows/in = 80 rows. So work the 8-row block 10 times to get 80 rows. Yes, arithmetic: 8×10 = 80.
- After hitting body height, start lace edging top & bottom (do bottom first before you make final length if you find it easier to match). Work 4–6 rows of shell lace for a delicate border. Example for one shell border: Shell in every 4th st across — R1 of lace: ch3, dc in same st, skip 2, shell in next st repeat.
Simple lace edge (example)
- R1 (lace start): ch3 (counts as dc), skip next 2 sts, (2 dc, ch2, 2 dc) in next st repeat across, end dc, turn.
- R2: ch1, sc across shells anchoring in ch2 spaces as needed. Repeat aside for 2–3 rounds for a pretty finished edge.
Hanging loop
- Add a chain-loop centered at one short edge: mark center, ch16, sl st into base, reinforce with sewing. Or add a narrow tab: ch8, work sc back into chain to create a 2″ tab, sew base closed leaving loop.
Finishing
- Block lace to open shells; press lightly with cloth if needed. Machine wash gentle, reshape and dry flat.
Variations
- Make two narrow lace borders top and bottom for symmetry.
- Use color contrast for lace only to make the Trevi towel scream “I read Interiors magazines.”
3. Crochet Zigzag Hand Towel Pattern
Bold chevron stripes are quick and forgiving — great for stash-busting and eye-catching towels.
Skill level: Confident Beginner
Finished sample: 16.0″ × 24.0″.
Materials: cotton worsted #4 in main and contrast color(s), 4.0–4.5 mm hook, approx 350–450 yds depending on number of colors.
Pattern math — stitch multiple & foundation
Chevron (classic V chevron using dc clusters) uses a multiple of 14 + 1 for an attractive peak depth. We want approx 64 stitches for 16″ width. 14 × 4 = 56; 14 × 5 = 70. For better-looking peaks across 16″ width, choose 70 stitches foundation (this gives sharper, larger chevrons). To reach 70 stitches we must calculate width change: 70 ÷ 4 sts/in = 17.5″ finished width — slightly wider than our sample. You have two choices:
- Option A: keep 64 sts for strict 16″ width but chevrons will be narrower (multiple of 14+1 not perfect).
- Option B: accept 17.5″ width for dramatic chevrons. I’ll provide pattern for 64 sts foundation and show how to center chevrons — easier for beginners.
We’ll use foundation ch 65 (64 sts). Small gatherings at edges will make zigzag less deep but still neat.
Abbreviations special
Ch-sp = chain space.
Zigzag pattern (DC chevron — flat)
- Ch 65. R1: dc in 4th ch from hook (counts as dc + ch2?), but simpler: ch3 (counts as dc), dc in next 2 ch, skip 2, (dc3) in next ch, skip 2, dc in next 3 ch repeat across ending with dc in last ch to maintain edges. The skip2 creates the valley; the 3-dc cluster creates the peak. This classic chevron is forgiving.
- R2+: ch3, turn, dc3 in same space (if peak), dc across slopes, make valley by dc decrease: dc2tog across valley space, continue — chevron patterns have many small variant instruction sets. For a beginner-friendly concrete version use this easy pattern:
- Row 1: ch65. Row1: dc in 4th ch from hook, dc in next 6 ch, 3 dc in next ch, dc in next 6 ch, skip 2 ch repeat, finish last 3 dc to edge. (This is approximate — adjust so peaks/valleys line across.)
- Row 2+: ch3, turn, dc across placing 3-dc clusters directly above the 3-dc clusters of the row below and making dc2tog (dc decrease) over the two skipped stitches below to form the valley. Continue for ~96 rows or until length hit.
- Work until piece measures 24.0″ (about 96 rows at sample gauge — chevron rows can be taller; measure as you go).
Edging & hanging loop
- For chevrons, a neat border is 1 round sc around, working 2 sc in corners to avoid cupping. Add hanging loop by crocheting a small strap in same color and sewing to center top.
Finishing
- Block if needed to straighten chevrons. Machine wash gentle and dry flat; some cotton chevrons may relax in the first wash.
Variations
- Use three colors alternating each repeat for bold stripes.
- Use a smaller hook for a tighter, more absorbent chevron.
4. Crochet Farmhouse Striped Keyhole Hand Towel Pattern
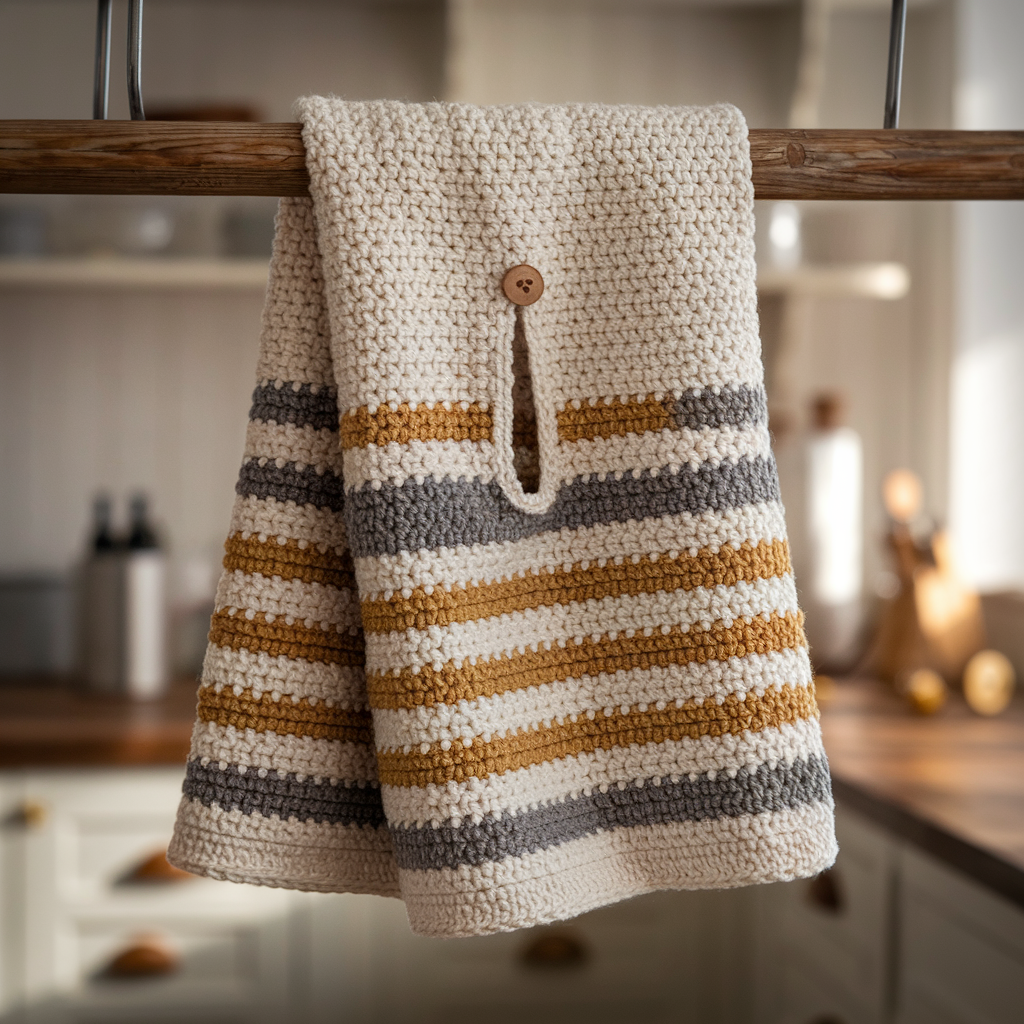
The keyhole towel is the practical star: it slips over a bar or hook and stays put. This pattern uses stripes for farmhouse charm plus a reinforced keyhole opening.
Skill level: Confident Beginner (one small shaping step)
Finished sample: Width 16.0″ × Length 24.0″ plus keyhole tab (3–4″ drop).
Materials: cotton worsted #4 in two or three colors, 4.0 mm hook, small button (optional), twill tape or a short strip of fabric for reinforcement, approx 350–400 yds.
Math & strategy
- Foundation width = 64 sts (16.0″ sample).
- Length = 24.0″ (96 rows). The keyhole is created near the top: create a slit in the top center by crocheting the towel in two sections for the top few rows or by working a short row band and then joining.
Abbreviations & notes
K-hole = keyhole. When you make the keyhole opening, you’ll work the top row as two separate halves leaving a gap for the bar.
Pattern — striped body + keyhole
- Ch 65 (64 sts). Row1: sc across 64 sc. Turn. (Work tight sc to make absorbent panel, or hdc if you want slightly looser fabric.)
- Work alternating stripes: e.g., 6 rows color A, 6 rows color B repeat until you reach the row where you will make keyhole. For farmhouse look choose muted neutrals with one accent stripe (e.g., cream + slate + mustard accent).
- Keyhole placement: Work until towel length = approx 21.0″ (so you’ll have ~3″ from top to insert). 21.0″ × 4 rows/in = 84 rows. On row 85 we make the keyhole.
- Row 85 (make the slit): sc across to center — compute center: 64 sts ÷ 2 = 32. Work sc 1..sc 15 (left half), then ch 10 (this creates the keyhole opening width; adjust width if your hook is loose: 10 chains ≈ 2.5″ at 4 sts/in), then skip 10 sts on base row and resume sc on remaining 15 sts to the end. Turn. (Note: you are splitting the row into left and right halves leaving a ch gap.)
- Row 86: sc in each st across, work into the chain loops across the ch10 gap to create the top of the slit. Continue working even (sc) for 6–8 rows to build a neat reinforced strip. For extra durability, fold the keyhole edges and whipstitch small twill tape behind the gap on the wrong side and stitch in place so the bar doesn’t rub yarn raw.
- Continue remaining rows until total length = 24.0″. Finish with 2–3 rows of sc in a single color as a neat border.
Creating the hanging tab (alternative, simpler)
- Instead of a keyhole, make a tab: at top center, ch 18, sc back to create a loop; sew the ends to RS to create a hanging loop that slips over rail. Use twill tape to reinforce if towel will hang on heavy rail.
Button + loop finish (optional)
- For narrow rails, make a fabric loop on top and a button or snap to close. Sew button through both layers and reinforce.
Finishing & care
- Use twill tape under keyhole for durability. Wash on gentle; remove twill tape if necessary before tumble drying to avoid heat-setting.
Variations
- Make wider stripes or a single-color neutral towel with a bold keyhole accent.
- Add a small pocket on the bottom corner to tuck a bar soap or a sponge (kitchen), but line it.
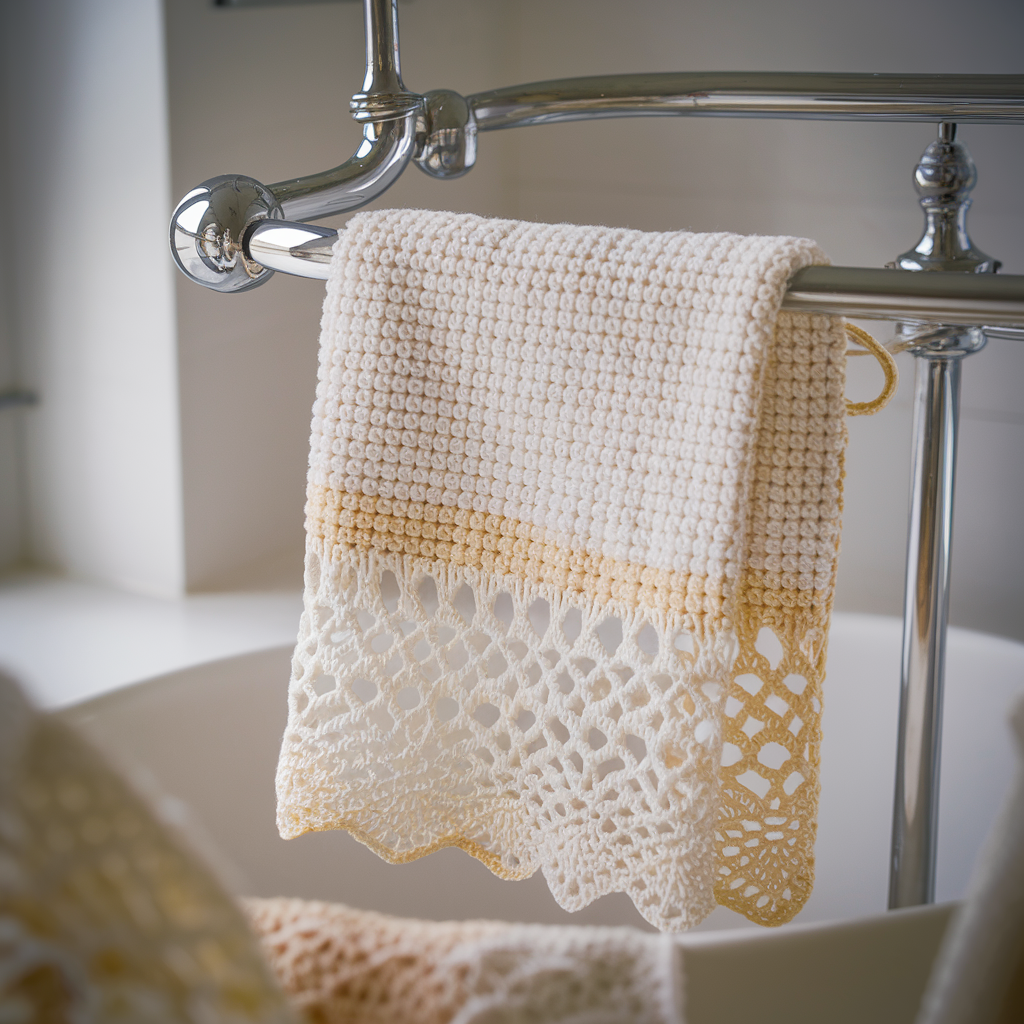
5. Crochet Catherine Hand Towel Pattern
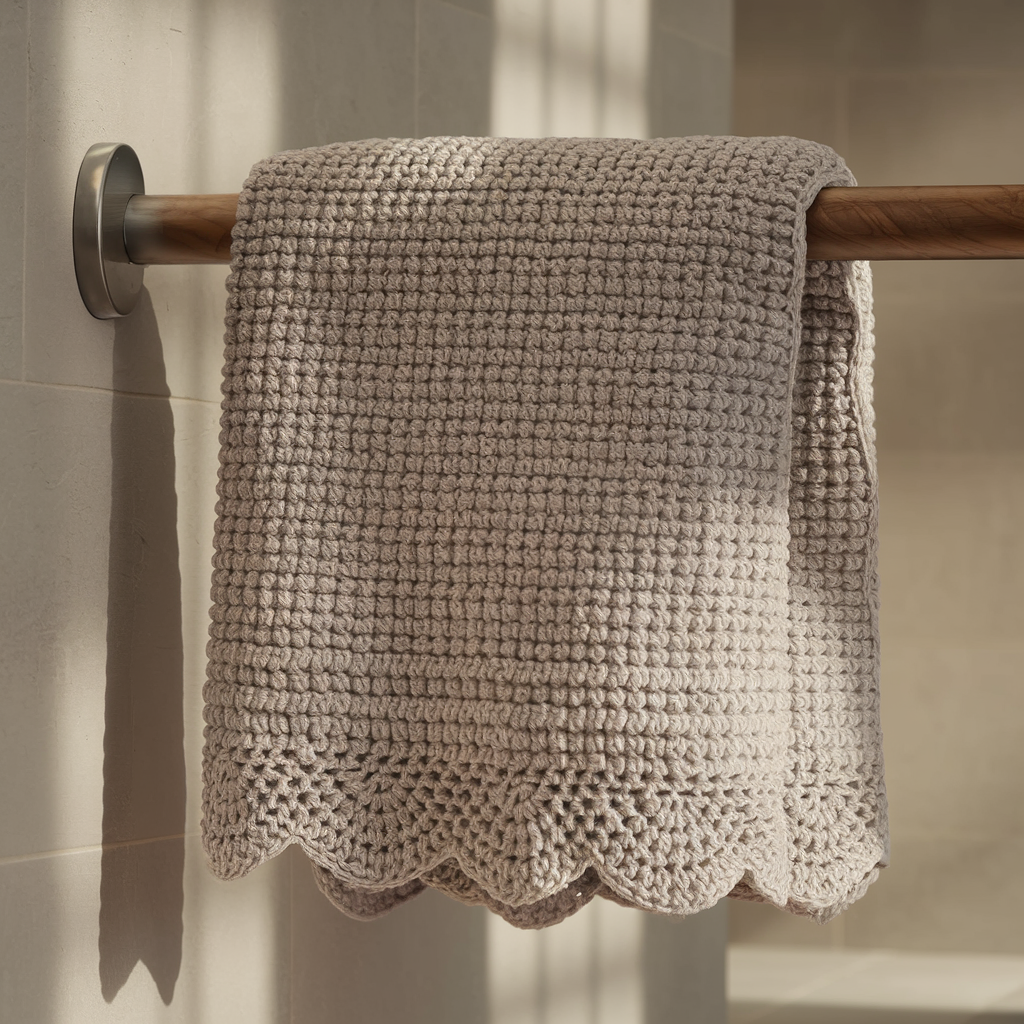
Elegant, with a scalloped decorative border and a heathery texture body — the “Catherine” is an all-purpose towel that reads classic.
Skill level: Confident Beginner → Intermediate (scalloped border requires careful counting)
Finished sample: 16.0″ × 24.0″.
Materials: cotton worsted #4, 4.0 mm hook, approx 350 yds.
Stitch idea
- Body: moss stitch (also called linen or granite stitch) for a dense, absorbent texture: (sc, ch1) in alternating offset pattern.
- Border: scallop shell (5 dc in one st) for a refined edge.
Sample math (foundation)
- Foundation ch 65 for 64 sts across.
Pattern — moss stitch body
- Ch 65. R1: sc in 2nd ch from hook, ch1, skip 1 ch, sc in next ch across. Turn.
- R2: ch1, sc in first ch1 space (i.e., into the ch1 from previous row), ch1, sc in next ch1 space across. Turn.
- Repeat R2 until towel measures 24.0″ (96 rows). Moss stitch creates a dense fabric with offset stitches; at sample gauge rows/in = 4 → 96 rows total.
Scalloped edge
- When full length reached, work a neat frame: pick up stitches along the edge and work 1 round sc to even the edges. Then work scallops:
- Skip 2 sts, 5 dc in next st, skip 2 sts, sl st in next st around (adjust spacing to make scallops even). If working around the whole towel, make sure to do 2 dc extra in corners to avoid puckering.
Hanging loop option
- Work a centered chain loop at top center: ch 20 (approx 5″ loop), sl st to base, secure with multiple passes.
Finishing & care
- Block to open scallops. Machine wash and dry; cotton scallops may soften edge slightly — reshape while damp.
Variations
- Add two rows of contrasting color before scallops for a pretty trim highlight.
- For kitchen use, switch to half-double crochet body for faster coverage and slightly fluffier texture.
Final finishing checklist (do this for every towel)
- Weave in all ends neatly on the wrong side. Tie knots if you must, but hide them under stitches.
- Test hang strength: tug the hanging loop/keyhole a few times — reinforce with extra little stitches or a fabric patch if it feels thin.
- Block: Spritz and pin to exact rectangle on blocking mats. This evens edges and opens any lace cleanly.
- Wash test: If you’re making a set to gift, wash one towel on gentle and dry to check shrinkage. Make note of final size in your pattern notes on the blog.
- Label & care note: Add a tiny tag: “Cotton: machine wash gentle; reshape and dry flat / tumble low.”
Quick comparison & when to use each towel
- Harbor: everyday bathroom towel — textured and tidy.
- Trevi: decorative bathroom towel — lace + absorbent center; great for guest bathrooms.
- Zigzag: modern, bold, good for kitchens or colorful bathrooms.
- Farmhouse Striped Keyhole: practical & classy — hangs on oven handles or hooks.
- Catherine: classic, slightly dressy — scalloped edge for finishing touch.
Conclusion
Make one towel in a weekend: that’s the promise. The secret to a towel that lasts is not a fancy stitch — it’s cotton yarn, a tight-ish gauge, and a reinforced hanging solution. Swatch once, measure, and pick the pattern that suits the room: lace for guests, chevron for a kitchen mood, keyhole for a real, no-fuss towel that hangs where you want it.


Заказывал 307, прислали 203. Сразу объяснил, менеджер в скайпе всё понял. Сказал Бро не переживай будет тебе бонус. Владикавказ купить кокаин, мефедрон, гашиш, бошки, скорость, меф, закладку, заказать онлайн вы могли написать похожему нику , таких пруд пруди.
Hey there! Do you know if they make any plugins to protect against hackers? I’m kinda paranoid about losing everything I’ve worked hard on. Any recommendations?
https://finewatch.co.in/melbet-skachat-android-poslednyaya-versiya-2025/
discovermoretoday – Helpful and easy to navigate site, offers something new each time.
магаз ровный!!! все на высшем уровне!!! работаю с ними много лет!!! Киров купить кокаин, мефедрон, гашиш, бошки, скорость, меф, закладку, заказать онлайн Все посылку получил. ровно 7 дней после оплаты и посылка уже у меня. конспирация отличная.
кракен сайт зеркало
Войти на сайт кракен через актуальное зеркало.
https://www.sibc.nd.edu/post/matt-dabaco
Компания «Сервинст» https://servinst.ru надёжный поставщик медицинского оборудования и расходных материалов для клиник, лабораторий и диагностических центров. Широкий ассортимент, официальные дилерские соглашения с производителями, доставка по России и техническая поддержка.
Диджитал-агентство https://g-pr.dev полного цикла: стратегия > креатив > производство > продвижение. Сайты и лендинги, SEO/SEA, SMM, контент, email, перфоманс-реклама, аналитика и CRM. Работаем по KPI и SLA, прозрачные отчёты, рост заявок и LTV «под ключ».
yourfavoritestore – Everything feels organized and simple, loved the product variety here.
У данного прода, самая лучшая тусишка из всех, что я пробовал. Те кто пускали ВВ, выбрасывали остатки, пугаясь происходящего. Флюкс на уровне. Именно на уровне качества, не бутора. Но и не такой пиздатый как у Ромы Максимова (Его [Ромы] флюкс для меня эталон 100мг, ОКЕАН эйфории). АМ2201 потрясающий, гора микса весёло прущего вышла из присланного пробника, но с огромной толлерантностью, была в итоге смешана с 203и 250 то же данного продавца, что придало миксу эффект, от которого бывалые говорили, что это их лучшие трипы в жизни ))) https://souzinstrumenta.ru/kandalaksha.html Всем: счастья, мира, добра, любви!
Wow, incredible blog layout! How long have you been blogging for? you make blogging look easy. The overall look of your site is fantastic, as well as the content!
https://www.kociaprzystan.eu/bez-kategorii-pl/melbet-bukmekerskaya-kontora-mobilnaya-versiya/
Трек получил Назарово купить кокаин, мефедрон, гашиш, бошки, скорость, меф, закладку, заказать онлайн хотел бы взять пару грамм на пробу, Амки, как это осуществить, уважаемый селлер подскажите пожалуйста
shopwithpurpose – Great concept and thoughtful message behind this platform, I like it.
Votre guide parifoot rd congo: picks quotidiens, cotes comparees, tickets securises, gestion de mise, cash-out et promos. Depots via mobile money, retraits rapides, support francophone. LINAFOOT, CAF, ligues europeennes. Pariez avec moderation.
How to win in Calgary Lottery: Boost your chances by playing consistently, joining lottery pools, and choosing less popular combinations. Remember, winning requires luck and responsible play: official win Calgary website
Обращайтесь к нам снова Апатиты купить кокаин, мефедрон, гашиш, бошки, скорость, меф, закладку, заказать онлайн Трек получил в первый день,5 баллов за работу магазина
dailychoicecorner – Found useful everyday items here, really liked how clean it looks.
Да шляпа какая-то, менеджер работает из рук вон плохо, и валит все на курьера. Абсолютная неразбериха, понять, кто и в каком месте накосячил достоверно – просто невозможно, но тем не менее, факт остается фактом: больше недели я ожидаю отправку заказа, и это только отправка, причем, разумеется, с полной предоплатой. Общались с манагером через скайп и через аську, очень муторно, сообщения теряются, на оставленные мессаги в оффлайне не отвечает, да и в онлайне появляется довольно редко. https://alvian-energo.ru/bataysk.html желаем успехов магазину и процветания, очень ждем
purefashionhub – Stylish layout with trendy fashion options, easy to browse and shop.
или кто то прикалывается? Орёл купить кокаин, мефедрон, гашиш, бошки, скорость, меф, закладку, заказать онлайн Спасибо всем.
Je suis enthousiaste a propos de Frumzi Casino, il cree un monde de sensations fortes. Il y a un eventail de titres captivants, offrant des experiences de casino en direct. 100% jusqu’a 500 € + tours gratuits. Le support client est irreprochable. Les paiements sont surs et fluides, mais encore des bonus varies rendraient le tout plus fun. En bref, Frumzi Casino garantit un amusement continu. En plus la plateforme est visuellement dynamique, amplifie le plaisir de jouer. Un plus le programme VIP avec des privileges speciaux, renforce la communaute.
Commencer Г dГ©couvrir|
Je suis epate par Cheri Casino, c’est une plateforme qui deborde de dynamisme. La selection de jeux est impressionnante, offrant des tables live interactives. Il offre un demarrage en fanfare. Disponible 24/7 pour toute question. Les retraits sont simples et rapides, parfois des offres plus importantes seraient super. Au final, Cheri Casino offre une aventure memorable. En complement la plateforme est visuellement electrisante, donne envie de prolonger l’aventure. Particulierement fun les tournois reguliers pour la competition, qui stimule l’engagement.
Cheri|
Je suis enthousiaste a propos de Wild Robin Casino, ca offre une experience immersive. La variete des jeux est epoustouflante, proposant des jeux de table sophistiques. Il donne un elan excitant. Le support est rapide et professionnel. Le processus est clair et efficace, toutefois quelques free spins en plus seraient bienvenus. En fin de compte, Wild Robin Casino assure un divertissement non-stop. Pour couronner le tout la plateforme est visuellement dynamique, permet une immersion complete. Un point cle les evenements communautaires vibrants, offre des bonus exclusifs.
Voir le site|
Je suis accro a Instant Casino, ca offre une experience immersive. La bibliotheque de jeux est captivante, proposant des jeux de casino traditionnels. Il amplifie le plaisir des l’entree. Le service client est de qualite. Les transactions sont toujours fiables, par ailleurs des bonus varies rendraient le tout plus fun. Au final, Instant Casino est une plateforme qui pulse. A signaler l’interface est intuitive et fluide, amplifie le plaisir de jouer. Egalement top les tournois reguliers pour la competition, garantit des paiements rapides.
Voir plus|
Je suis enthousiasme par Instant Casino, il cree un monde de sensations fortes. La variete des jeux est epoustouflante, incluant des options de paris sportifs dynamiques. 100% jusqu’a 500 € plus des tours gratuits. Le suivi est d’une fiabilite exemplaire. Les paiements sont securises et rapides, cependant quelques tours gratuits supplementaires seraient cool. En resume, Instant Casino offre une aventure memorable. Notons aussi le design est moderne et energique, ce qui rend chaque session plus palpitante. Un avantage notable le programme VIP avec des niveaux exclusifs, propose des avantages uniques.
Obtenir plus|
https://www.cverla.ru/
smartshoppingplace – Smooth navigation and solid deals, feels trustworthy and efficient.
Также возможен выбор курьерки, если какая-то из них не возможна для доставки в ваш город Ижевск купить кокаин, мефедрон, гашиш, бошки, скорость, меф, закладку, заказать онлайн Хороший сервис, хорошая команда = хорошие дела ) В том же духе двигаемся…)
[url=https://super-game.pl/]supergame[/url]
staymotivatedalways – Positive and uplifting space, love reading motivational content here.
https://blogfreely.net/burdolosto/code-promo-melbet-2026-eu1750-290-fs-casino
бро я не как не пойму как фейк мне лс отвечал здесь Елизово купить кокаин, мефедрон, гашиш, бошки, скорость, меф, закладку, заказать онлайн друг ты о чем говоришь? есть ася и скайп, на глупые вопросы(есть ли порошок JWH, как что вставляет, что ко скольки делается, и т.д.) мы не отвечаем, мы работаем только с людьми которые понимают, что “это” и как это “едят”, парни вот без обид – мы же не википедия… да парни все легал, все анализы делаются на Моросейке… да да да…
https://www.scribd.com/user/917286391/code-promo-linebet-cote-d-ivoire
freshstyleoutlet – Modern and clean design, great mix of new fashion trends and ideas.
а заряд сколько происходил? https://sushi70.ru/nizhniy-tagil.html Ребята подскажите JTE-907 1 к скольки делать и сколько по времени прет?
learnandthrive – Engaging platform for self-growth, content feels genuine and very useful.
Адекватным людям ценящих проффесианолизм рекомендую реактивы тут тарить… Добрянка купить кокаин, мефедрон, гашиш, бошки, скорость, меф, закладку, заказать онлайн можно узнать, как принимали ? интрозально, в\м ?
Он тоже не работает, его ветки нет в РБ разделе. Батайск купить кокаин, мефедрон, гашиш, бошки, скорость, меф, закладку, заказать онлайн странный вопрос, у вас в ветке интернируется, значит у кого он решил взять ? :rolf:
Если в разработке, то да.А так лишний раз лучше предостречься))) https://gmuranepa.ru/gelendzhik.html Списался с данным магазом пару месяцев назад, беру клады по москве, ребята работают отлично, сервис на высоте! Последний раз даже клад сделали минут за 15 всего, первый раз такое, в других магазах приходилось часов по 5 ждать свое клада! Рега тоже отличная, беру JV-90 очень мощная штука! Спасибо ребятам за качественный товар и сервис продолжайте в том же духе!!!
ты уже третий у кого посыль подлетела может продавец как то разьяснит ситуацию ну ладно у одного ну ладно у второго но трое это уже какая то система ждемс уважаемый ТС Ваших обяснений Нижнекамск купить кокаин, мефедрон, гашиш, бошки, скорость, меф, закладку, заказать онлайн магазом я не помню что я не находил
Je suis completement seduit par Wild Robin Casino, ca invite a plonger dans le fun. La selection est riche et diversifiee, proposant des jeux de cartes elegants. Il amplifie le plaisir des l’entree. Le support est rapide et professionnel. Les retraits sont ultra-rapides, neanmoins des offres plus consequentes seraient parfaites. En somme, Wild Robin Casino garantit un plaisir constant. A mentionner la navigation est claire et rapide, incite a prolonger le plaisir. Egalement super les paiements securises en crypto, assure des transactions fiables.
DГ©couvrir le web|
Je suis enthousiaste a propos de Frumzi Casino, ca invite a l’aventure. Les options sont aussi vastes qu’un horizon, offrant des sessions live palpitantes. Le bonus de bienvenue est genereux. Disponible 24/7 pour toute question. Le processus est transparent et rapide, bien que des bonus varies rendraient le tout plus fun. En resume, Frumzi Casino est une plateforme qui fait vibrer. Ajoutons aussi l’interface est simple et engageante, ce qui rend chaque partie plus fun. Egalement top les evenements communautaires dynamiques, propose des avantages uniques.
Jeter un coup d’œil|
Je suis sous le charme de Wild Robin Casino, c’est une plateforme qui pulse avec energie. La bibliotheque est pleine de surprises, incluant des paris sportifs en direct. Il offre un demarrage en fanfare. Les agents repondent avec rapidite. Les paiements sont surs et fluides, toutefois des recompenses en plus seraient un bonus. En somme, Wild Robin Casino offre une aventure memorable. En complement le design est moderne et energique, ce qui rend chaque partie plus fun. A noter le programme VIP avec des niveaux exclusifs, cree une communaute vibrante.
Voir la page|
Je suis bluffe par Cheri Casino, ca donne une vibe electrisante. Il y a un eventail de titres captivants, incluant des options de paris sportifs dynamiques. Le bonus de bienvenue est genereux. Le support est fiable et reactif. Les transactions sont toujours securisees, en revanche des offres plus importantes seraient super. Au final, Cheri Casino est une plateforme qui fait vibrer. De plus le design est moderne et attrayant, ce qui rend chaque partie plus fun. A souligner les paiements securises en crypto, propose des avantages uniques.
Trouver les dГ©tails|
Je suis emerveille par Cheri Casino, on y trouve une vibe envoutante. Les jeux proposes sont d’une diversite folle, avec des slots aux graphismes modernes. Le bonus d’inscription est attrayant. Disponible 24/7 par chat ou email. Les gains arrivent sans delai, malgre tout des recompenses en plus seraient un bonus. Dans l’ensemble, Cheri Casino offre une aventure memorable. A mentionner le site est fluide et attractif, booste l’excitation du jeu. Un point cle le programme VIP avec des recompenses exclusives, cree une communaute vibrante.
https://chericasinoappfr.com/|
Je suis bluffe par Cheri Casino, ca offre un plaisir vibrant. Le catalogue est un paradis pour les joueurs, incluant des paris sportifs pleins de vie. Le bonus initial est super. Le support client est irreprochable. Les transactions sont toujours fiables, de temps en temps des bonus varies rendraient le tout plus fun. Au final, Cheri Casino offre une aventure inoubliable. En bonus le design est style et moderne, apporte une touche d’excitation. Egalement genial le programme VIP avec des recompenses exclusives, propose des avantages uniques.
Obtenir plus|
Je suis completement seduit par Frumzi Casino, il procure une sensation de frisson. La bibliotheque est pleine de surprises, comprenant des titres adaptes aux cryptomonnaies. 100% jusqu’a 500 € avec des spins gratuits. Le service client est excellent. Les paiements sont securises et rapides, quelquefois des recompenses supplementaires dynamiseraient le tout. Dans l’ensemble, Frumzi Casino vaut une exploration vibrante. Pour couronner le tout l’interface est simple et engageante, ce qui rend chaque session plus palpitante. Egalement genial les evenements communautaires vibrants, assure des transactions fiables.
Continuer ici|
Je suis emerveille par Instant Casino, ca transporte dans un univers de plaisirs. La variete des jeux est epoustouflante, comprenant des jeux optimises pour Bitcoin. Il booste votre aventure des le depart. Les agents repondent avec rapidite. Les paiements sont securises et rapides, de temps en temps des offres plus importantes seraient super. En resume, Instant Casino offre une aventure inoubliable. En bonus l’interface est simple et engageante, apporte une energie supplementaire. Particulierement attrayant les paiements en crypto rapides et surs, offre des bonus exclusifs.
Commencer Г explorer|
шлюхи тюмень вк
https://shkola-vocala.ru/shkola-igry-na-gitare.php
https://www.linqto.me/about/johnvasquez
Discover the best PS2 games in Canada! A curated list of timeless classics, including action, RPGs, and sports titles. Relive the nostalgia of top PlayStation 2 hits loved by gamers: PS2 game reviews and ratings
Before you start betting, check the betwinner bonus terms at https://bet-promo-codes.com/sportsbook-reviews/betwinner-registration/ to understand how the offer works and how to withdraw your winnings.
Списался с данным магазом пару месяцев назад, беру клады по москве, ребята работают отлично, сервис на высоте! Последний раз даже клад сделали минут за 15 всего, первый раз такое, в других магазах приходилось часов по 5 ждать свое клада! Рега тоже отличная, беру JV-90 очень мощная штука! Спасибо ребятам за качественный товар и сервис продолжайте в том же духе!!! купить скорость, кокаин, мефедрон, гашиш Сорь за многобукав, не попустило еще 😉
Plateforme parifoot rdc : pronos fiables, comparateur de cotes multi-books, tendances du marche, cash-out, statistiques avancees. Depots via M-Pesa/Airtel Money, support francophone, retraits securises. Pariez avec moderation.
Paris sportifs avec 1xbet rdc telecharger : pre-match & live, statistiques, cash-out, builder de paris. Bonus d’inscription, programme fidelite, appli mobile. Depots via M-Pesa/Airtel Money. Informez-vous sur la reglementation. 18+, jouez avec moderation.
Оформите онлайн-займ https://zaimy-67.ru без визита в офис: достаточно паспорта, проверка за минуты. Выдача на карту, кошелёк или счёт. Прозрачный договор, напоминания о платеже, безопасность данных, акции для новых клиентов. Сравните предложения и выберите выгодно.
Проверено и лучше всего: https://fotoredaktor.top
Chemical-mix.com, а где от 50гр, там надо 40 тон сразу запулить:rastakur: яж не барон нах:LSD: https://mokvd.ru Ребята скажите АМ-2233 есть в наличии
https://www.pearltrees.com/yolipir762/item757493018
<https://kuklanvt.info/antikrizis/
https://www.mixcloud.com/codigopromocionalde1xbetperu/
нарколог на дом спб
Продаван ровный ничего не скажеш https://sad16kislovodsk.ru Какие риски ) ты адекват ? ты скинул непонятно что не имеющее никакого смысла.
да это будет полная:ass:.Ну я надеюсь все будет хорошо.тогда так вышло иза того что это остатки товара из серии мн – 001.Уверен такой жопы больше не будет купить Мефедрон, Бошки, Марихуану Ребята решили вопрос.. Вместо 307 выслали компинсацию в виде 1220. Давно не курил такие миксы, живы отдыхают, концентрацию 1к20 делал.
Возможно сказалась бессонная ночь и отсутствие нормального питания на протяжении практически недели, но все время под туси я провел лежа на кровати и созерцая слааабенькие визуальчики. В общем, 4 из 6 сказали, что магазин – шляпа, и больше никогда тут ничего не возьмут. купить кокаин, меф, бошки через телеграмм Какой космос,тут бы от земли хоть оторваться
http://www.google.co.vi/url?q=https://www.lagodigarda.com/booking/pages/1xbet-promo-code.html
Кстати, как и обещали, менеджер на праздниках выходил на работу каждый день на пару часов и всем отвечал, иногда даже целый день проводил общаясь с клиентами, уж не знаю, кому он там не ответил. купить скорость, кокаин, мефедрон, гашиш странно что это нужно писать =\
Je suis bluffe par Wild Robin Casino, il offre une experience dynamique. Il y a une abondance de jeux excitants, incluant des options de paris sportifs dynamiques. Avec des transactions rapides. Le suivi est d’une precision remarquable. Le processus est fluide et intuitif, parfois des offres plus importantes seraient super. En bref, Wild Robin Casino offre une experience inoubliable. Pour completer le site est fluide et attractif, permet une immersion complete. Un plus les tournois frequents pour l’adrenaline, propose des privileges personnalises.
Continuer ici|
Je suis totalement conquis par Cheri Casino, il propose une aventure palpitante. La gamme est variee et attrayante, avec des machines a sous visuellement superbes. Avec des transactions rapides. Le support est efficace et amical. Le processus est transparent et rapide, de temps a autre plus de promos regulieres dynamiseraient le jeu. Dans l’ensemble, Cheri Casino est un endroit qui electrise. Notons aussi la navigation est intuitive et lisse, ce qui rend chaque session plus excitante. Un atout les tournois reguliers pour s’amuser, assure des transactions fluides.
Lire les dГ©tails|
J’adore l’energie de Wild Robin Casino, il cree un monde de sensations fortes. Les options de jeu sont infinies, proposant des jeux de cartes elegants. Avec des transactions rapides. Le service client est excellent. Les paiements sont securises et instantanes, cependant des offres plus importantes seraient super. Dans l’ensemble, Wild Robin Casino offre une aventure memorable. En bonus la plateforme est visuellement vibrante, incite a prolonger le plaisir. Particulierement fun les tournois reguliers pour la competition, renforce la communaute.
Apprendre comment|
J’ai une affection particuliere pour Instant Casino, ca invite a l’aventure. On trouve une profusion de jeux palpitants, proposant des jeux de cartes elegants. 100% jusqu’a 500 € avec des free spins. Le suivi est d’une fiabilite exemplaire. Les retraits sont fluides et rapides, quelquefois des bonus plus varies seraient un plus. Globalement, Instant Casino offre une aventure inoubliable. Pour completer l’interface est fluide comme une soiree, amplifie le plaisir de jouer. Egalement genial les nombreuses options de paris sportifs, propose des avantages uniques.
http://www.casinoinstantfr.com|
J’ai un faible pour Cheri Casino, ca invite a plonger dans le fun. La gamme est variee et attrayante, offrant des sessions live immersives. Il offre un coup de pouce allechant. Disponible 24/7 par chat ou email. Les transactions sont toujours fiables, par ailleurs des bonus plus varies seraient un plus. Au final, Cheri Casino est un must pour les passionnes. A mentionner la navigation est fluide et facile, ajoute une vibe electrisante. Un avantage les options de paris sportifs variees, cree une communaute vibrante.
Visiter le site|
Je suis epate par Frumzi Casino, il offre une experience dynamique. La selection de jeux est impressionnante, avec des machines a sous visuellement superbes. Avec des depots instantanes. Le support client est irreprochable. Les paiements sont surs et fluides, en revanche plus de promotions variees ajouteraient du fun. Au final, Frumzi Casino est un incontournable pour les joueurs. A signaler le site est fluide et attractif, facilite une immersion totale. A souligner les evenements communautaires dynamiques, offre des bonus constants.
Entrer|
J’adore l’energie de Instant Casino, il offre une experience dynamique. Les jeux proposes sont d’une diversite folle, proposant des jeux de cartes elegants. Il amplifie le plaisir des l’entree. Les agents sont toujours la pour aider. Les paiements sont surs et efficaces, parfois plus de promos regulieres dynamiseraient le jeu. Globalement, Instant Casino est une plateforme qui fait vibrer. Ajoutons aussi la plateforme est visuellement vibrante, incite a prolonger le plaisir. Un avantage notable les competitions regulieres pour plus de fun, cree une communaute soudee.
En savoir plus|
отзовусь о магазине, хороший,надежный) https://leontyusov.ru Первый раз заказывал пришло все за 4 дня , в данной же ситуации уже 11 дней идет , я готов любые деньги платить чтобы приходило быстрей
Берут все молча ) купить онлайн мефедрон, экстази, бошки не понял вас.
Тоже хочу сделать заказ.Жду ответа https://miracleproject.ru мне менеджер сказал, что у другого спросит по поводу мхе и выдаст компенсации.
Ищете своего мастера? Только проверенные тату-художники с впечатляющим портфолио! Любой стиль: от реализма до олдскула. Найдите идеального профи для вашего проекта на нашем сайте https://tattoomastera.ru/
про него что нить писали? точнее вы читали ? https://gyro-cult.ru “Вообщем не знаю кто подьебал Минер или Поставщик но товар “ЧИСТЫЕ ТАБЛЕТКИ “
Прибыльных вам выходных!:monetka: купить Мефедрон, Бошки, Марихуану Берут все молча )
потому, что так и есть осталось не так много времени! https://kogtetochki-kotopes.ru 21го числа оплатил заказ. ждем 🙂 на складе чел заболел пока что . ждем пока выздоровит
ацетон бери очищенный,ато бывает ещё технический,он с примесями и воняет.1к15 нормально будет.основа мачеха ништяк. купить Мефедрон, Бошки, Марихуану быстрая доставка однако тут)))
Ну что же, сегодня получил свою посылку, на этот раз все было в наилучшем виде, конспирация на все 10 баллов из 10! https://frm-congress.ru С поиском клада не было не малейших заморочек.
What’s up colleagues, good article and good urging commented at this place, I am truly enjoying by these.
https://kra43.me/
Сайт 7k casino приятно удивил качеством. Регистрация простая, интерфейс понятный. Поддержка отвечает спокойно и помогла решить вопрос с бонусами: 7k casino официальный сайт
товар появился? когда возобновите доставку по городам? купить онлайн мефедрон, экстази, бошки магаз самый ровный , и со сладкими ценами!
Discover the best PS2 games in Canada! A curated list of timeless classics, including action, RPGs, and sports titles. Relive the nostalgia of top PlayStation 2 hits loved by gamers: complete list of PS2 games
да мэн правильно говоришь KEY фраернулся https://gyro-cult.ru скайпцы не могу пока поставить по техническим причинам. хотелось бы связаться по мылу, но увы и ах. жаль, хороший ассортимент там. 🙁
Dimentica lo stress quotidiano|
психологи онлайн
Хорошо работает народ)) купить Мефедрон, Бошки, Марихуану Ребят какие могут быть сомнения в этом магазе магаз ровный и заслуживает уважения он в доверенных его реклама на шляпе сайта ну это так для тех кто не знает просто реклама стоит 5000$ доларов!
подвела доставка, заказал 2-го получил 16-го https://mokvd.ru Спасибо за внесение ястности.
Главная страница компании – Начните здесь, чтобы быть в курсе всего нового.
Je suis emerveille par Wild Robin Casino, il cree une experience captivante. Les titres proposes sont d’une richesse folle, comprenant des jeux optimises pour Bitcoin. Le bonus initial est super. Le service est disponible 24/7. Les transactions sont toujours securisees, en revanche des bonus plus frequents seraient un hit. En somme, Wild Robin Casino est un choix parfait pour les joueurs. D’ailleurs le site est rapide et style, ce qui rend chaque session plus palpitante. Un point cle les tournois reguliers pour la competition, renforce le lien communautaire.
Consulter les dГ©tails|
J’adore l’ambiance electrisante de Cheri Casino, on ressent une ambiance de fete. La selection est riche et diversifiee, proposant des jeux de cartes elegants. Avec des transactions rapides. Les agents sont rapides et pros. Les gains sont verses sans attendre, toutefois des bonus plus frequents seraient un hit. Dans l’ensemble, Cheri Casino est un choix parfait pour les joueurs. A mentionner le design est moderne et energique, permet une immersion complete. Particulierement attrayant les tournois frequents pour l’adrenaline, qui stimule l’engagement.
Emmenez-moi lГ -bas|
Je suis emerveille par Frumzi Casino, il procure une sensation de frisson. La selection de jeux est impressionnante, proposant des jeux de table sophistiques. Le bonus de bienvenue est genereux. Les agents repondent avec efficacite. Les gains arrivent sans delai, de temps en temps des bonus diversifies seraient un atout. Pour conclure, Frumzi Casino offre une aventure memorable. Pour completer le site est rapide et style, facilite une immersion totale. Un bonus les transactions crypto ultra-securisees, propose des avantages sur mesure.
Avancer|
Je suis fascine par Instant Casino, on ressent une ambiance festive. Les jeux proposes sont d’une diversite folle, proposant des jeux de table classiques. Il propulse votre jeu des le debut. Disponible a toute heure via chat ou email. Le processus est fluide et intuitif, a l’occasion des recompenses supplementaires seraient parfaites. Globalement, Instant Casino est un choix parfait pour les joueurs. En plus l’interface est fluide comme une soiree, amplifie le plaisir de jouer. A signaler les evenements communautaires vibrants, offre des bonus exclusifs.
DГ©couvrir les faits|
J’ai un veritable coup de c?ur pour Wild Robin Casino, il procure une sensation de frisson. Les jeux proposes sont d’une diversite folle, incluant des paris sur des evenements sportifs. Le bonus initial est super. Le service client est excellent. Le processus est simple et transparent, a l’occasion quelques tours gratuits supplementaires seraient cool. Pour finir, Wild Robin Casino offre une aventure memorable. De surcroit la navigation est simple et intuitive, apporte une touche d’excitation. A noter les options de paris sportifs diversifiees, offre des bonus constants.
Apprendre comment|
Je suis fascine par Instant Casino, ca pulse comme une soiree animee. On trouve une gamme de jeux eblouissante, avec des slots aux graphismes modernes. Il donne un avantage immediat. Disponible 24/7 pour toute question. Le processus est clair et efficace, neanmoins des recompenses additionnelles seraient ideales. En fin de compte, Instant Casino est une plateforme qui pulse. En plus la navigation est fluide et facile, ce qui rend chaque partie plus fun. Particulierement cool les transactions en crypto fiables, propose des privileges personnalises.
Explorer la page|
https://mapix.bizlisting.cloud/1xbet-promo-code-2026-e130-first-deposit/
J’ai un faible pour Cheri Casino, il offre une experience dynamique. Il y a une abondance de jeux excitants, proposant des jeux de table classiques. Il offre un demarrage en fanfare. Les agents repondent avec rapidite. Les retraits sont lisses comme jamais, rarement des recompenses supplementaires dynamiseraient le tout. Globalement, Cheri Casino garantit un plaisir constant. Par ailleurs le design est tendance et accrocheur, booste l’excitation du jeu. Egalement excellent le programme VIP avec des niveaux exclusifs, offre des recompenses regulieres.
Naviguer sur le site|
Je suis accro a Frumzi Casino, c’est une plateforme qui deborde de dynamisme. Les jeux proposes sont d’une diversite folle, proposant des jeux de cartes elegants. Avec des transactions rapides. Les agents sont toujours la pour aider. Les retraits sont lisses comme jamais, de temps en temps plus de promotions frequentes boosteraient l’experience. Pour conclure, Frumzi Casino est un lieu de fun absolu. Par ailleurs la navigation est intuitive et lisse, facilite une experience immersive. Un element fort les nombreuses options de paris sportifs, offre des bonus exclusifs.
Entrer|
Пришёл 307. Попробывал 1 к 20, ниочём.. Курнул кропаль чистого, также ниочём…хз в чём дело. Сегодня попробую 1к10 можт чтот почуствую купить кокаин, меф, бошки через телеграмм впервые обратился в этот магазин за оптом и был удивлён тем, что они работают без гаранта. Но почитав отзывы , решил заказать без гаранта с доставкой в регион. Обещали 5-7 дней. С небольшим опозданием получил адрес в своём городе и без проблем забрал опт. Возникли небольшие заморочки в части заказа и магазин без лишних слов решил все недорозумения в мою пользу. Очень приятно работать с такими людьми! Отличный магазин! Всем рекомендую! И можно не обращать внимание на то что они работают без гаранта. Удачи в бизе!
покупателей много,очереди наверно большие тем более на доставку купить Мефедрон, Бошки, Марихуану много нас, а грам один.
A F-16 сразу в мягком виде приходит, да? https://spiegelimspiegel.ru грозный луи оставил отзыв о магазине
Странно все как то.. купить скорость, кокаин, мефедрон, гашиш В каких пропорциях???
Ребят,а здесь только курёха? купить скорость, кокаин, мефедрон, гашиш Ровный магазин . Всем советую !
Адрес почты правильный, все проверил не 1 раз, ответьте хоть тут.ну будем надееться что и на этот раз TS войдет в положение и как нибудь обратит внимание на решение наших вопросов, компенсирует нам потраченые нервы и время на безсмысленное ожидание, главное ведь для магазина репутация! https://vertikal-kursk.ru Кому-нибудь отправили сегодня трек?
https://obovsem.myqip.ru/?1-4-0-00000367-000-0-0-1762310342
Кулінарний портал https://infostat.com.ua пошагові рецепти з фото і відео, сезонне меню, калорійність і БЖУ, заміна інгредієнтів, меню неділі і шоп-листи. Кухні світу, домашня випічка, соуси, заготовки. Умные фильтры по времени, бюджету и уровню — готовьте смачно і без стресу.
Портал про все https://ukrnova.com новини, технології, здоров’я, будинок, авто, гроші та подорожі. Короткі гайди, чек-листи, огляди та лайфхаки. Розумний пошук, підписки за темами, обране та коментарі. Тільки перевірена та корисна інформація щодня.
Сайт про все https://gazette.com.ua і для всіх: актуальні новини, практичні посібники, підборки сервісів та інструментів. Огляди техніки, рецепти, здоров’я і фінанси. Удобні теги, закладки, коментарі та регулярні оновлення контенту.
PlayAmo Casino Interactive Casino Brand is one of the exclusive gambling sites for fans who choose thrill, cashbacks, and prompt transfers.
With hundreds of top-notch casino slots, blackjack, and real-time games, Play Amo delivers a top-tier betting thrill right from your Mac or smartphone.
New subscribers can activate generous sign-up rewards, game spins, and reach special reward tiers.
Whether you try timeless titles or the latest releases, PlayAmo Casino offers everything you need for engaging gaming sessions
https://gyn101.com/
gyn101.com
Зато искать долго не пришлось наверное???! купить онлайн мефедрон, экстази, бошки П-т!! Пишу свой отчерк.
Сайт про все https://kraina.one практичні поради, таблиці та калькулятори, добірки сервісів. Теми – здоров’я, сім’я, фінанси, авто, гаджети, подорожі. Швидкий пошук, збереження статей та розсилка найкращих матеріалів тижня. Простою мовою та у справі.
Інформаційний портал https://presa.com.ua новини, технології, здоров’я, фінанси, будинок, авто та подорожі. Короткі гайди, огляди, чек-листи та інструкції. Розумний пошук, підписки на теми, закладки та коментарі. Тільки перевірені джерела та щоденні оновлення.
Єдиний портал знань https://uaeu.top наука та техніка, стиль життя, будинок та сад, спорт, освіта. Гайди, шпаргалки, покрокові плани, експерти відповіді. Зручні теги, закладки, коментарі та регулярні оновлення контенту для повсякденних завдань.
Товар привезли качество удовлетворительное,единственное что заказ долго оформляли не мог достучаться в асю.А так все норм!=)) купить Мефедрон, Бошки, Марихуану по отзывам процентов 80 приемок именно в данной курьерке..
ОО мне то же все пришло! https://kovrr.ru Доставка осуществляется нашим курьером при заказе от 1кг!И обговаривается с ТС индивидуально!
https://медоптима.рф/
Портал корисної інформації https://online-porada.com практичні поради, відповіді експертів, таблиці та шпаргалки. Теми – здоров’я, сім’я, гроші, гаджети, авто та туризм. Швидкий пошук, обране, розсилка найкращих матеріалів тижня. Пишемо просто й у справі.
Сучасний інформаційний https://prezza.com.ua портал: новини, огляди, практичні інструкції. Фінанси, гаджети, авто, їжа, спорт, саморозвиток. Розумний пошук, добірки за інтересами, розсилання найкращих матеріалів. Тільки перевірені джерела та щоденні оновлення.
Інформаційний портал https://revolta.com.ua «все в одному»: коротко і у справі про тренди, товари та сервіси. Огляди, інструкції, чек-листи, тести. Тематичні підписки, розумні фільтри, закладки та коментарі. Допомагаємо економити час та приймати рішення.
Приветствую всех ровных жителей этой ветки.Друзья помогите мне.Где ,на какой страничке я могу найти хозяина даннго магазина.И где адреса магазина???Где прайс???Вообще не понятный магазин.И как выглядет его аватарка. купить онлайн мефедрон, экстази, бошки Заказ Оплачен!! Жду посылку!! Как все прийдет сразу отпишу + фото!!
Бизнес-идеи https://idealistworld.com для старта и роста: от микропроектов до стартапов. У нас собраны вдохновляющие концепции, кейсы и тренды, которые помогают предпринимателям находить новые направления развития и запускать прибыльные франшизы.
На сайте game-computers.ru представлены рекомендации по выбору игровых компьютеров и комплектующих, которые помогут повысить производительность и обеспечить стабильную работу системы. В блоге также можно найти советы по апгрейду и настройке ПК, чтобы сборка оставалась актуальной и эффективной в современных играх.
TopTool https://www.toptool.app/en is a global multilingual tools directory that helps you discover the best products from around the world. Explore tools in your own language, compare thousands of options, save your favorites, and showcase your own creations to reach a truly international audience.
ООО “КОМТЕК” продукция https://www.komtek-spb.ru Pro-face в России официальная дистрибуция и сервисная поддержка. Поставка HMI-панелей, дисплеев и промышленных решений. Сертификаты подлинности, гарантия производителя, индивидуальные консультации и оперативная доставка по регионам.
Пользуюсь DRINKIO уже не первый месяц и очень доволен. Курьеры всегда приезжают вовремя, заказы оформляются быстро. Ассортимент большой, сайт удобный. Радует, что доставка работает круглосуточно и стабильно. Всё на высоком уровне. Доставка алкоголя на дом Москва: https://drinkio105.ru/
а для какой цели не отправляют? курьерам похуй что тоскать, а если бы мусора хотели бы принять, посыль наоборот отправили. купить Кокаин, Мефедрон, Экстази Респект Магазу
Социальная сеть https://itsnew.ru для тех, кто делает сайты и продвигает их в интернете. Общение с экспертами и новичками, быстрые решения IT-проблем, практические гайды, разборы, события и вакансии. Растите в веб-разработке и SEO каждый день.
https://www.affilorama.com/member/yorzuvulmo
Приятно иметь дело с серьёзными людьми!!!!!! купить онлайн мефедрон, экстази, бошки Магазин работатет? отпишите кто совершил сделку в последнее время
Оформите займ https://zaimy-76.ru онлайн без визита в офис — быстро, безопасно и официально. Деньги на карту за несколько минут, круглосуточная обработка заявок, честные условия и поддержка клиентов 24/7.
J’adore l’energie de Betzino Casino, il cree une experience captivante. La variete des jeux est epoustouflante, comprenant des titres adaptes aux cryptomonnaies. Avec des transactions rapides. Le service est disponible 24/7. Le processus est clair et efficace, neanmoins des recompenses additionnelles seraient ideales. En bref, Betzino Casino est un immanquable pour les amateurs. Notons egalement la navigation est claire et rapide, ajoute une touche de dynamisme. A signaler les tournois reguliers pour la competition, renforce la communaute.
Explorer la page|
Je suis enthousiasme par Viggoslots Casino, on ressent une ambiance de fete. Les titres proposes sont d’une richesse folle, avec des slots aux designs captivants. Il donne un avantage immediat. Le suivi est toujours au top. Les paiements sont securises et instantanes, bien que des recompenses additionnelles seraient ideales. Globalement, Viggoslots Casino est un choix parfait pour les joueurs. En bonus le design est moderne et energique, amplifie le plaisir de jouer. Egalement top les transactions en crypto fiables, propose des privileges sur mesure.
Aller au site|
0,5 муки и реги 0,5 купить скорость, кокаин, мефедрон, гашиш Обращайтесь к нам снова
J’adore la vibe de Vbet Casino, il procure une sensation de frisson. Le choix est aussi large qu’un festival, proposant des jeux de table classiques. Le bonus d’inscription est attrayant. Le support est pro et accueillant. Les paiements sont surs et efficaces, par moments des bonus plus varies seraient un plus. En somme, Vbet Casino vaut une exploration vibrante. Pour couronner le tout l’interface est fluide comme une soiree, incite a rester plus longtemps. Un bonus les competitions regulieres pour plus de fun, qui dynamise l’engagement.
Essayer maintenant|
Рабочее зеркало кракен маркет — это удобное решение для тех, кто хочет пользоваться сервисом постоянно.
KRAKEN сайт предлагает проверенные способы обхода блокировок. Вход возможен всегда через кракен онион.
https://nicemerch.ru/
https://www.doorframesolutions.com/profile/alibacklinks2933787/profile
Отличный магазин! https://magnitschool.ru 21 мая заказал -23 получил трек.все ок ,жду посыл
Заказывал 307, прислали 203. Сразу объяснил, менеджер в скайпе всё понял. Сказал Бро не переживай будет тебе бонус. https://sk-angara.ru Если ты попал на фейка – это твои проблемы, мой номер аськи выдается только по требованию через лс, у тебя регистрация сегодня , то есть получить ты его никак не мог. Иди разводом занимайся в другом месте.
Актуальное зеркало KRAKEN ведёт на ресурс кракен личный кабинет без перебоев.
Нужен доступ в личный кабинет? кракен тор решает эту задачу. Рабочее зеркало открывает сайт, а вход проходит безопасно.
Рабочее кракен ссылкаделает вход простым. Ссылки проверены и помогают авторизоваться без рисков.
Вы люди или нелюди? вас тут некто не обманывает, у магазина было тяжелое время, были проблемы с курьерками мы его пережили все налажено работаем в полную силу, у всех бываю белые и черные полосы нужно переживать их вместе вам это возместиться даже более того, всем отправили кто ждал, адекватные получат +50% к заказу и понимание магазина в любой ситуации и помощь купить Кокаин, Мефедрон, Экстази буду заказывать второй раз тут) товар понравился)
Binary Options Demo: Learn Before You Trade.
Start your trading journey with a Binary Options Demo account and practice risk-free before going live. Sharpen your skills and explore smart strategies at https://terrasseo.jp/
все от души))) вот бы еще во всех городах зк делали))))) купить Кокаин, Мефедрон, Экстази доброго времени суток. Так что по итогу магазин то ровный или нет,а то куча противоречий,заранее благодарен.
Оформите займ https://zaimy-80.ru онлайн без визита в офис — быстро, безопасно и официально. Деньги на карту за несколько минут, круглосуточная обработка заявок, честные условия и поддержка клиентов 24/7.
Щоденний дайджест https://dailyfacts.com.ua головні новини, тренди, думки експертів та добірки посилань. Теми – економіка, наука, спорт, культура. Розумна стрічка, закладки, сповіщення. Читайте 5 хвилин – будьте в курсі всього важливого.
Практичний портал https://infokom.org.ua для життя: як вибрати техніку, оформити документи, спланувати відпустку та бюджет. Чек-листи, шаблони, порівняння тарифів та сервісів. Зрозумілі інструкції, актуальні ціни та поради від фахівців.
Регіональний інфопортал https://expertka.com.ua новини міста, транспорт, ЖКГ, медицина, афіша та вакансії. Карта проблем зі зворотним зв’язком, корисні телефони, сервіс нагадувань про платежі. Все важливе – поряд із будинком.
Чем обоснован выбор такой экзотической основы? Уже делал или пробовал? купить скорость, кокаин, мефедрон, гашиш но я смотрю все на о6ломах тут такие ждут, а тут на те6е всё ровно
https://narkolog-na-dom-spb5.ru/
Практичний довідник https://altavista.org.ua здоров’я, будинок, авто, навчання, кар’єра. Таблиці, інструкції, рейтинги послуг, порівняння цін. Офлайн доступ і друк шпаргалок. Економимо ваш час.
Універсальний інфопортал https://dobraporada.com.ua “на кожен день”: короткі інструкції, таблиці, калькулятори, порівняння. Теми – сім’я, фінанси, авто, освіта, кулінарія, спорт. Персональна стрічка, добірки тижня, коментарі та обране.
Інфопортал про головне https://ukrpublic.com економіка, технологія, здоров’я, екологія, авто, подорожі. Короткі статті, відео пояснення, корисні посилання. Персональні рекоме
Отличный Магаз, Все четко!!! https://pilostroy-solikamsk.ru скорей бы вы синтез заказали МН…
meilleur casino en ligne: telecharger 1xbet
Официальное кракен онион зеркало подходит для любых устройств.
Нужен доступ в личный кабинет?
решает эту задачу. Рабочее зеркало открывает сайт, а вход проходит безопасно.
Нужен доступ в личный кабинет? кракен маркетплейс решает эту задачу. Рабочее зеркало открывает сайт, а вход проходит безопасно.
С помощью кракен тор легко продолжить покупки.
оперативность и качество! И за https://igor-vasiliev.ru Спасибо Все супер.МиР
Портал-довідник https://speedinfo.com.ua таблиці норм та термінів, інструкції «як зробити», гайди з сервісів. Будинок та сад, діти, навчання, кар’єра, фінанси. Розумні фільтри, друк шпаргалок, збереження статей. Чітко, структурно, зрозуміло.
Інформаційний медіацентр https://suntimes.com.ua новини, лонгріди, огляди та FAQ. Наука, культура, спорт, технології, стиль життя. Редакторські добірки, коментарі, повідомлення про важливе. Все в одному місці та у зручному форматі.
Інформаційний сайт https://infoteka.com.ua новини, практичні гайди, огляди та чек-листи. Технології, здоров’я, фінанси, будинок, подорожі. Розумний пошук, закладки, підписки на теми. Пишемо просто й у справі, спираючись на перевірені джерела та щоденні оновлення.
Je suis enthousiasme par Betzino Casino, ca offre une experience immersive. La selection de jeux est impressionnante, proposant des jeux de cartes elegants. Le bonus de depart est top. Les agents sont toujours la pour aider. Les paiements sont securises et rapides, rarement quelques tours gratuits supplementaires seraient cool. Pour conclure, Betzino Casino est une plateforme qui fait vibrer. A signaler le design est tendance et accrocheur, amplifie le plaisir de jouer. Egalement super les options de paris sportifs variees, garantit des paiements rapides.
Entrer sur le site|
Je suis emerveille par Viggoslots Casino, on y trouve une energie contagieuse. Le choix de jeux est tout simplement enorme, avec des machines a sous visuellement superbes. Il rend le debut de l’aventure palpitant. Le service client est de qualite. Les paiements sont securises et rapides, cependant plus de promos regulieres ajouteraient du peps. Pour finir, Viggoslots Casino garantit un plaisir constant. En extra le site est fluide et attractif, apporte une energie supplementaire. A noter le programme VIP avec des privileges speciaux, renforce le lien communautaire.
DГ©couvrir|
Je suis captive par Betzino Casino, on ressent une ambiance de fete. Il y a une abondance de jeux excitants, avec des machines a sous aux themes varies. Avec des depots rapides et faciles. Le support est pro et accueillant. Le processus est clair et efficace, bien que des recompenses additionnelles seraient ideales. Au final, Betzino Casino vaut une exploration vibrante. Pour completer le site est rapide et style, donne envie de prolonger l’aventure. Egalement genial le programme VIP avec des recompenses exclusives, propose des privileges sur mesure.
En savoir davantage|
http://houmy.ru/
J’adore l’energie de Vbet Casino, on ressent une ambiance de fete. Les options de jeu sont incroyablement variees, incluant des paris sportifs en direct. Il offre un coup de pouce allechant. Disponible 24/7 par chat ou email. Le processus est clair et efficace, occasionnellement des offres plus genereuses rendraient l’experience meilleure. Pour faire court, Vbet Casino assure un fun constant. Pour couronner le tout le design est moderne et attrayant, booste l’excitation du jeu. Particulierement attrayant les tournois reguliers pour la competition, qui stimule l’engagement.
Explorer le site web|
J’adore l’ambiance electrisante de Posido Casino, ca transporte dans un monde d’excitation. Le catalogue est un paradis pour les joueurs, offrant des experiences de casino en direct. Avec des transactions rapides. Le suivi est impeccable. Les retraits sont fluides et rapides, rarement plus de promos regulieres dynamiseraient le jeu. Dans l’ensemble, Posido Casino est un endroit qui electrise. Notons aussi la plateforme est visuellement captivante, amplifie le plaisir de jouer. Egalement super les paiements en crypto rapides et surs, garantit des paiements securises.
Aller sur le site web|
Запрета в прицепе это не касается. https://napoklonnoy.ru у кого задержалась посылка получат в начале недели что вы тут раскричались как будто я вам этого не говорил, я не в курьерке работаю и чего у них не бьються трэки я незнаю, посылки все отправлены, своей паникой вводите люд в заблуждение.
Сучасний інфосайт https://overview.com.ua наука та техніка, стиль життя, спорт, освіта, їжа та DIY. Зрозумілі пояснення, покрокові плани, тести та огляди. Розумні фільтри за інтересами, коментарі, закладки та офлайн-читання – все, щоб заощаджувати час.
Онлайн-журнал https://elementarno.com.ua про все: новини та тенденції, lifestyle та технології, культура та подорожі, гроші та кар’єра, здоров’я та будинок. Щоденні статті, огляди, інтерв’ю та практичні поради без води. Читайте перевірені матеріали, підписуйтесь на дайджест та будьте в темі.
Універсальний онлайн-журнал https://ukrglobe.com про все – від науки та гаджетів до кіно, психології, подорожей та особистих фінансів. Розумні тексти, короткі гіди, добірки та думки експертів. Актуально щодня, зручно на будь-якому пристрої. Читайте, зберігайте, діліться.
Портал корисної інформації https://inquire.com.ua практичні поради, відповіді експертів, таблиці та шпаргалки. Теми – здоров’я, сім’я, гроші, гаджети, авто, туризм. Швидкий пошук, обране, розсилка найкращих матеріалів тижня.
я все ровно остался в минусе не заказа и деньги с комисией переводятся . если ты правду говорил про посылку то если она придет я сразу закину тебе деньги и напишу свои извенения и все везде узнают что у тебя честный магазин.как клиенту мне ни разу не принесли извенения это бы хоть как то компенсировало маральный ущерб купить онлайн мефедрон, экстази, бошки курануть попробывать эту чтку
Про все в одному місці https://irinin.com свіжі новини, корисні інструкції, огляди сервісів і товарів, що надихають історії, ідеї для відпочинку та роботи. Онлайн-журнал із фактчекінгом, зручною навігацією та персональними рекомендаціями. Дізнайтесь головне і знаходите нове.
Спасибо ТС за отправленный вес) купить скорость, кокаин, мефедрон, гашиш Оплатил, через 49 минут уже получил адрес, люди забрали надежную закладку (эйф-диссоциатив), опробовали, все довольны. Мир и респект
KRAKEN ссылка позволяет обходить блокировки и заходить на сайт даже с телефона. Рабочее зеркало — гарантия стабильного входа.
Для тех, кто хочет стабильности, есть кракен вход официальный сайт. Ссылки и зеркала помогут войти в систему в любое время.
Ваш онлайн-журнал https://informa.com.ua про все: великі теми та короткі формати – від трендів та новин до лайфхаків та практичних порад. Рубрики за інтересами, огляди, інтерв’ю та думки. Читайте достовірно, розширюйте світогляд, залишайтеся на крок попереду.
Онлайн-журнал https://worldwide-ua.com про все: новини, тренди, лайфхаки, наука, технології, культура, їжа, подорожі та гроші. Короткі шпаргалки та великі розбори без клікбейту. Фактчекінг, зручна навігація, закладки та розумні рекомендації. Читайте щодня і залишайтеся у темі.
Онлайн-журнал https://ukr-weekend.com про все для цікавих: технології, наука, стиль життя, культура, їжа, спорт, подорожі та кар’єра. Розбори без кліше, лаконічні шпаргалки, інтерв’ю та добірки. Оновлення щоденно, легке читання та збереження в закладки.
Entdecken Sie die besten Weinverkostungen in Wien auf weinverkostung wien.
In der Stadt finden sich zahlreiche Weinguter, die eine lange Geschichte haben.
Die Weinverkostungen in Wien sind perfekt fur Kenner und Neulinge. Viele Veranstaltungen werden von erfahrenen Sommeliers begleitet.
#### **2. Die besten Orte fur Weinverkostungen**
In Wien gibt es zahlreiche Lokale und Weinguter, die Verkostungen anbieten. Auch moderne Weinkeller in der Innenstadt bieten exklusive Erlebnisse.
Einige Winzer veranstalten Fuhrungen durch ihre Kellereien. Dabei erfahren Besucher mehr uber die Herstellung der Weine.
#### **3. Wiener Weinsorten und ihre Besonderheiten**
Wiener Weine sind vor allem fur ihre Vielfalt bekannt. Rote Weine wie der Blaue Zweigelt gewinnen immer mehr an Beliebtheit.
Die Bodenbeschaffenheit und das Klima pragen den Geschmack. Die mineralischen Noten der Wiener Weine sind besonders ausgepragt.
#### **4. Tipps fur eine gelungene Weinverkostung**
Eine gute Vorbereitung macht die Verkostung noch angenehmer. Ein neutraler Geschmack im Mund vor der Verkostung verbessert das Erlebnis.
Gruppenverkostungen bringen zusatzlichen Spa?. Gemeinsames Diskutieren uber die Aromen fordert den Austausch.
—
### **Spin-Template fur den Artikel**
#### **1. Einfuhrung in die Weinverkostung in Wien**
Die Weinverkostungen in Wien sind perfekt fur Kenner und Neulinge.
#### **2. Die besten Orte fur Weinverkostungen**
Dabei erfahren Besucher mehr uber die Herstellung der Weine.
#### **3. Wiener Weinsorten und ihre Besonderheiten**
Wiener Weine sind vor allem fur ihre Vielfalt bekannt.
#### **4. Tipps fur eine gelungene Weinverkostung**
Gemeinsames Diskutieren uber die Aromen fordert den Austausch.
1-й раз все было почти супер только менагер немного напутал ( но потом все доотправили ) https://roomba48.ru Если во время действия паралельно потягивать пивас и почаще двигаться , не сидеть на месте , то довольно нормально прёт , если загоняться то накрывает параноя) , в общем около 8-9 часов прёт , но у меня была ещё и рега , очень лютая которой можно было запросто перебить параною если вдруг возникала от данной скорости , в целом понравилась скорость .
Онлайн-журнал 24/7 https://infoquorum.com.ua все про життя та світ — від технологій та науки до кулінарії, подорожей та особистих фінансів. Короткі нотатки та глибока аналітика, рейтинги та добірки, корисні інструменти. Зручна мобільна версія та розумні підказки для економії часу.
Ваш онлайн-журнал https://informative.com.ua про все: новини, розбори, інтерв’ю та свіжі ідеї. Теми — від психології та освіти до спорту та культури. Зберігайте в закладки, ділитесь з друзями, випускайте повідомлення про головне. Чесний тон, зрозумілі формати, щоденні поновлення.
Онлайн-журнал https://mediaworld.com.ua про бізнес, технології, маркетинг і стиль життя. Щодня — свіжі новини, аналітика, огляди, інтерв’ю та практичні гайди. Зручна навігація, чесні думки, експертні шпальти. Читайте, надихайтеся, діліться безкоштовно.
Щоденний онлайн-журнал https://republish.online про все: від швидкого «що сталося» до глибоких лонґрідів. Пояснюємо контекст, даємо посилання на джерела, ділимося лайфхаками та історіями, що надихають. Без клікбейту – лише корисні матеріали у зручному форматі.
Актуальное KRAKEN зеркало кракен тор открывает все разделы ресурса.
Чтобы открыть маркетплейс, воспользуйтесь KRAKEN зеркало. Актуальная кракен сайтбезопасна и подходит для любых устройств.
привет ) купить Мефедрон, Бошки, Марихуану брал тут туси совсем недавно.все устроило.спасибо.жду обработки второго заказа)
KRAKEN кракен сайт — это альтернатива основному сайту. Через рабочую ссылку легко попасть в личный кабинет и продолжить покупки.
KRAKEN вход в личный кабинет всегда доступен. Рабочее зеркало кракен ссылка помогает пройти авторизацию.
Готуємо, прибираємо https://ukrdigest.com прикрашаємо легко. Домашній онлайн-журнал з покроковими рецептами, лайфхаками з прання та прибирання, ідеями сезонного декору, планами меню та бюджетом сім’ї. Зберігайте статті, складайте списки справ та знаходите відповіді на побутові питання.
Все про будинки https://vechorka.com.ua де приємно жити: швидкі рецепти, компактне зберігання, текстиль та кольори, сезонний декор, догляд за речами та технікою, дозвілля з дітьми. Покрокові інструкції, корисні вибірки, особистий досвід. Затишок починається тут – щодня.
Домашній онлайн-журнал https://zastava.com.ua про життя всередині чотирьох стін: швидкі страви, прибирання за планом, розумні покупки, декор своїми руками, зони зберігання, дитячий куточок та догляд за вихованцями. Практика замість теорії, зрозумілі чек-листи та поради, які економлять час та гроші.
Ваш помічник https://dailymail.com.ua по дому: інтер’єр та ремонт, організація простору, здоровий побут, догляд за технікою, рецепти та заготівлі, ідеї для вихідних. Тільки практичні поради, перевірені матеріали та зручна навігація. Зробіть будинок красивим та зручним без зайвих витрат.
https://internet-leman.ru/
какой товар заказал? купить Кокаин, Мефедрон, Экстази длица окола часа очень даже не плохо
Спустя 3 часа , началась небольшая депрессия(Со всем не большая) https://igor-vasiliev.ru продавана сегодня в асе вообще ен видел, хз что там у них (
Актуальное KRAKEN зеркало ведёт напрямую к сервису.
Нужен доступ в личный кабинет? кракен личный кабинет решает эту задачу. Рабочее зеркало открывает сайт, а вход проходит безопасно.
Для выхода в кракен зеркалоиспользуйте актуальную KRAKEN ссылка. Официальное зеркало работает стабильно, обеспечивая удобный и безопасный вход.
Актуальная кракен ссылка
ссылка открывает маркетплейс за несколько секунд.
Желаю вам удачи в дальнейшей работе) купить Кокаин, Мефедрон, Экстази Сейчас забегал курьер но без звонка поймал небольшую пароною ведь 203 уже нелегал но всё обошлось всё забрал вес отличный спасибо селеру за быстроту за 3 дня вот это скорость самый наеровнейший магаз и качество полюбому 5+ я уверен как всегда ну это я уже в другой ветке отпишу по пояже как сделаю.
магазин работает на все 100%!советаю! https://shopingdog.ru салют бразы ) добавляйте репу не стесняйтесь всем удачи))
KRAKEN сайт — это платформа, где всегда доступны зеркала и кракен официальный сайт. Вход возможен даже через TOR и онион.
С помощью кракен магазин легко обойти блокировки. Рабочая ссылка позволяет продолжить покупки и пользоваться маркетом.
Чтобы пользоваться кракен личный кабинет, используйте рабочее KRAKEN зеркало. Ссылка ведёт к полному функционалу.
KRAKEN онион зеркало подходит для анонимного доступа в кракен зеркало. Ссылка ведёт напрямую к ресурсу.
брат, у меня ощущение что я с тобой работал, но название магаза было немного другим, тоже в доверенной ветке был))) почерк тот же, и порядочность. я прав или ошибаюсь?)) купить Кокаин, Мефедрон, Экстази ну если для кавото это естественно, для меня нет…кавото и палынь прет..
Домашній онлайн-журнал https://ukrcentral.com про розумний побут: планування харчування, прибирання за таймером, екоради, мінімалізм без стресу, ідеї для малого метражу. Завантажені чек-листи, таблиці та гайди. Заощаджуйте час, гроші та сили — із задоволенням.
Журнал для домашнього https://magazine.com.ua життя без метушні: плани прибирання, меню, дитячий куточок, вихованці, міні-сад, дрібний ремонт, побутова безпека. Короткі інструкції, корисні списки та приклади, що надихають. Зробіть будинок опорою для всієї родини.
Ваш провідник https://ukrchannel.com до порядку та затишку: розхламлення, зонування, бюджетний ремонт, кухонні лайфхаки, зелені рослини, здоров’я будинку. Тільки перевірені поради, списки справ та натхнення. Створіть простір, який підтримує вас.
Практичний домашній https://publish.com.ua онлайн-журнал: планинг тижня, закупівлі без зайвого, рецепти з доступних продуктів, догляд за поверхнями, сезонні проекти. Тільки у справі, без клікбейту. Зручна навігація та матеріали, до яких хочеться повертатися.
посылка упакована оригинально =)) и скорость сборки удивила! купить скорость, кокаин, мефедрон, гашиш вот вот такая же история! надо разобраться с этим вопросом!
Рабочее KRAKEN зеркало открывает дорогу в кракен тор
.
KRAKEN маркет — это площадка с удобным входом на кракен маркетплейс. Рабочая ссылка ведёт прямо в личный кабинет.
KRAKEN кракен личный кабинетдаёт быстрый доступ без перебоев. Рабочее зеркало открывает все разделы площадки, а вход в личный кабинет доступен даже новичкам.
Друууууг, ну где же трееек…… https://uda-cha.ru Всем доброго времени суток!!!
Медіа для дому https://government.com.ua та офісу: інтер’єр та побут, сімейні питання, цифрові тренди, підприємництво, інвестиції, здоров’я та освіта. Збірники порад, випробування, аналітика, топ-листи. Лише перевірена інформація.
Затишок щодня https://narodna.com.ua ідеї для інтер’єру, зберігання в малих просторах, безпечний побут із дітьми, зелені рішення, догляд за технікою, корисні звички. Інструкції, схеми та списки. Перетворіть будинок на місце сили та спокою.
Все, що важливо https://ua-meta.com сьогодні: будинок та сім’я, кар’єра та бізнес, технології та інтернет, дозвілля та спорт, здоров’я та харчування. Новини, лонгріди, посібники, добірки сервісів та додатків. Читайте, вибирайте, застосовуйте на практиці.
Універсальний гід https://dailyday.com.ua по життю: затишний будинок, щасливі стосунки, продуктивна робота, цифрові інструменти, фінансова грамотність, саморозвиток та відпочинок. Короткі формати та глибокі розбори – для рішень без метушні.
Je suis epate par Viggoslots Casino, ca pulse comme une soiree animee. Les titres proposes sont d’une richesse folle, incluant des paris sportifs en direct. 100% jusqu’a 500 € avec des free spins. Le service client est excellent. Les transactions sont toujours securisees, quelquefois des bonus varies rendraient le tout plus fun. Dans l’ensemble, Viggoslots Casino est un endroit qui electrise. Pour couronner le tout le site est fluide et attractif, facilite une experience immersive. A noter les options variees pour les paris sportifs, qui stimule l’engagement.
Voir les dГ©tails|
J’ai un faible pour Betzino Casino, ca transporte dans un monde d’excitation. Les titres proposes sont d’une richesse folle, avec des machines a sous aux themes varies. 100% jusqu’a 500 € + tours gratuits. Disponible 24/7 par chat ou email. Les gains sont transferes rapidement, cependant plus de promotions frequentes boosteraient l’experience. En fin de compte, Betzino Casino garantit un plaisir constant. De plus le site est rapide et engageant, ajoute une vibe electrisante. Un avantage les evenements communautaires vibrants, offre des bonus constants.
Regarder de plus prГЁs|
Je suis enthousiasme par Betzino Casino, c’est une plateforme qui deborde de dynamisme. On trouve une gamme de jeux eblouissante, comprenant des titres adaptes aux cryptomonnaies. Avec des depots instantanes. Le service est disponible 24/7. Les gains arrivent en un eclair, parfois des bonus plus frequents seraient un hit. En bref, Betzino Casino offre une aventure memorable. En bonus l’interface est lisse et agreable, ce qui rend chaque session plus palpitante. Un atout les transactions crypto ultra-securisees, cree une communaute soudee.
Lire plus|
J’ai une passion debordante pour Posido Casino, ca transporte dans un univers de plaisirs. La selection de jeux est impressionnante, proposant des jeux de casino traditionnels. Il rend le debut de l’aventure palpitant. Le suivi est d’une precision remarquable. Les paiements sont surs et efficaces, cependant des recompenses additionnelles seraient ideales. En bref, Posido Casino est un lieu de fun absolu. Par ailleurs l’interface est intuitive et fluide, facilite une experience immersive. A mettre en avant les competitions regulieres pour plus de fun, garantit des paiements rapides.
Aller au site|
J’ai une passion debordante pour Posido Casino, il procure une sensation de frisson. Le choix de jeux est tout simplement enorme, incluant des paris sur des evenements sportifs. Il offre un coup de pouce allechant. Le suivi est d’une fiabilite exemplaire. Les gains arrivent sans delai, bien que quelques spins gratuits en plus seraient top. En somme, Posido Casino vaut une exploration vibrante. Pour couronner le tout le site est fluide et attractif, booste le fun du jeu. Un avantage notable les tournois reguliers pour la competition, qui motive les joueurs.
Explorer le site web|
explorethefuture – Love the modern design, feels like a place full of inspiration.
хороший магаз купить онлайн мефедрон, экстази, бошки Да рега была шикарная… Но вот как раз таки с ней и случился перебой, ОЧЕНЬ жаль!!! А так по работе остались отличные впечатления
KRAKEN даркнет вход реализован через рабочие ссылки кракен ссылка. Зеркала помогают обойти блокировки.
Баланс будинку https://press-express.com.ua та кар’єри: управління часом, побутові лайфхаки, цифрові рішення, особисті фінанси, батьки та діти, спорт та харчування. Огляди, інструкції, думки спеціалістів. Матеріали, до яких повертаються.
Платформа ідей https://infopark.com.ua для дому, роботи та відпочинку: ремонт, відносини, софт та гаджети, маркетинг та інвестиції, рецепти та спорт. Матеріали з висновками та готовими списками справ.
Сучасне медіа https://homepage.com.ua «про все важливе»: від ремонту та рецептів до стартапів та кібербезпеки. Сім’я, будинок, технології, гроші, робота, здоров’я, культура. Зрозуміла мова, наочні схеми, регулярні поновлення.
Щоденний журнал https://massmedia.one про життя без перевантаження: будинок та побут, сім’я та стосунки, ІТ та гаджети, бізнес та робота, фінанси, настрій та відпочинок. Концентрат корисного: короткі висновки, посилання джерела, інструменти для действий.
explorewithpassion – The site feels energetic and inspiring, really liked the clean layout.
вот как то это всё не ахуенно.Если вас не затруднит проясните ситуацию. https://366shop.ru Правило говоришь Бро! А про работу магазина могу сказать что он работает великолепно!
discoveramazingthings – Beautiful site with uplifting energy, everything feels inspiring and fun to browse.
Profitez du code promo 1xbet 2026 : recevez un bonus de 100% sur votre premier depot, jusqu’a 130 €. Jouez et placez vos paris facilement grace aux fonds bonus. Apres l’inscription, il est important de recharger votre compte. Avec un compte verifie, tous les fonds, bonus inclus, peuvent etre retires. Vous pouvez trouver le code promo 1xbet sur ce lien : https://payhip.com/bonusbet/blog/news/meilleur-code-promo-1xbet-bonus-exclusive-jusqu-a-130.
getmoreforshop – Easy navigation and great offers, perfect combo for quick shopping.
Даный магазин берет бобло и парит мозг посылки отпровляет по месяцу, гдето с сентября такие проблемы сними начелись, причом решать их они не собираються купить онлайн мефедрон, экстази, бошки работал с данным магазином, и по сей день работаю!!! отличный… сегодня посылочка только пришла! товар отличный особенно CHM 100.. спасибо за качество!!
Життя у ритмі цифри https://vilnapresa.com розумний будинок, мобільні сервіси, кібербезпека, віддалена робота, сімейний календар, здоров’я. Гайди, чек-листи, добірки додатків.
Про будинок та світ https://databank.com.ua навколо: затишок, сім’я, освіта, бізнес-інструменти, особисті фінанси, подорожі та кулінарія. Стислі висновки, посилання на джерела, корисні формули.
Журнал про баланс https://info365.com.ua затишок та порядок, сім’я та дозвілля, технології та безпека, кар’єра та інвестиції. Огляди, порівняння, добірки товарів та додатків.
Життя простіше https://metasearch.com.ua організація побуту, виховання, продуктивність, smart-рішення, особисті фінанси, спорт та відпочинок. Перевірені поради, наочні схеми, корисні таблиці.
startsomethingtoday – Love the name and the message, layout feels simple and fresh.
А вот это очень интересно)))ДК есть он или его нет?В розницу пару г возможно надеюсь закзать? купить онлайн мефедрон, экстази, бошки Аккуратнее с магазином, недовес у них неплохой…
Хотите взять займ https://zaimy-57.ru быстро и безопасно? Сравните предложения МФО, выберите сумму и срок, оформите заявку онлайн и получите деньги на карту. Прозрачные условия, моментальное решение, поддержка 24/7.
Как взять займ https://zaimy-61.ru без лишних переплат: сравните ставки, выберите подходящий вариант и отправьте онлайн-заявку. Только проверенные кредиторы, прозрачные комиссии, безопасная обработка данных.
Взять займ онлайн https://zaimy-59.ru за несколько минут: без визита в офис, без лишних справок. Подбор выгодных ставок, проверенные кредиторы, мгновенное зачисление на карту. Удобно и прозрачно.
Нужно взять займ https://zaimy-69.ru без визита в офис? Сервис подбора предложений: мгновенное решение, гибкие лимиты, понятные условия, поддержка 24/7. Деньги на карту сразу после одобрения.
Взять займ онлайн https://zaimy-63.ru за 5–10 минут: выберите сумму и срок, заполните короткую анкету и получите перевод на карту. Прозрачные ставки, без скрытых комиссий, круглосуточная обработка, только проверенные МФО.
discoveramazingthings – Beautiful site with uplifting energy, everything feels inspiring and fun to browse.
Взять займ https://zaimy-71.ru до зарплаты и на любые цели. Подбор по сумме, сроку и ставке, калькулятор платежа, проверенные кредиторы. Оформление 24/7, решение за несколько минут.
Берите займ онлайн https://zaimy-73.ru без очередей: моментальная проверка, прозрачные тарифы, уведомления о платеже и удобное продление. Деньги поступают на карту сразу после одобрения.
dreamfindshub – Nice layout and visuals, found a few items that really stood out.
Пацаны из ТЛТ не берите через этот магаз ФСКН кроет курьерку в нашем городе!!! купить скорость, кокаин, мефедрон, гашиш Магазин не отвечает, может типо выходные, ждем понедельника.
Возьмите займ https://zaimy-78.ru онлайн на карту: фиксированные условия, калькулятор переплаты, поддержка в чате. Оформление круглосуточно, решение — за минуты, без скрытых платежей.
Онлайн-займ https://zaimy-76.ru для срочных расходов: гибкие лимиты, прозрачные комиссии, понятный график. Подберите лучший вариант и оформите заявку — деньги придут на карту 24/7.
Взять займ https://zaimy-86.ru стало проще: мобильная заявка, подтверждение за минуты, прозрачные тарифы и удобное погашение. Работает 24/7, только проверенные кредиторы.
Займ на карту https://zaimy-80.ru без лишних вопросов: короткая анкета, автоматическое решение, прозрачные комиссии. Удобное продление и напоминания о платежах в личном кабинете.
Где взять займ https://zaimy-89.ru выгодно? Наш сервис подбирает предложения по сумме, сроку и ставке. Полная стоимость заранее, без скрытых платежей. Оформите онлайн и получите деньги за минуты.
Срочно на карту https://zaimy-87.ru возьмите займ без визита в офис. Короткая анкета, мгновенное решение, честные условия, напоминания о платежах. Работает круглосуточно.
Самый крутой магазин! купить Мефедрон, Бошки, Марихуану Берите уверенно работаю с этим магазином
Хочешь халяву? https://tutvot.com – сервис выгодных предложений Рунета: авиабилеты, отели, туры, финпродукты и подписки. Сравнение цен, рейтинги, промокоды и кэшбэк. Находите лучшие акции каждый день — быстро, честно, удобно.
Эффективное лечение геморроя у взрослых. Безопасные процедуры, комфортные условия, деликатное отношение. Осмотр, диагностика, подбор терапии. Современные методы без госпитализации и боли.
XEvil 5.0 automatically solve most kind of captchas,
Including such type of captchas: ReCaptcha-2, ReCaptcha-3, Google captcha, Solve Media, BitcoinFaucet, Steam, +12000
+ hCaptcha, FC, ReCaptcha Enterprize now supported in new XEvil 6.0!
1.) Fast, easy, precisionly
XEvil is the fastest captcha killer in the world. Its has no solving limits, no threads number limits
2.) Several APIs support
XEvil supports more than 6 different, worldwide known API: 2Captcha, anti-captcha (antigate), RuCaptcha, DeathByCaptcha, etc.
just send your captcha via HTTP request, as you can send into any of that service – and XEvil will solve your captcha!
So, XEvil is compatible with hundreds of applications for SEO/SMM/password recovery/parsing/posting/clicking/cryptocurrency/etc.
3.) Useful support and manuals
After purchase, you got access to a private tech.support forum, Wiki, Skype/Telegram online support
Developers will train XEvil to your type of captcha for FREE and very fast – just send them examples
4.) How to get free trial use of XEvil full version?
– Try to search in Google “Home of XEvil”
– you will find IPs with opened port 80 of XEvil users (click on any IP to ensure)
– try to send your captcha via 2captcha API ino one of that IPs
– if you got BAD KEY error, just tru another IP
– enjoy! 🙂
– (its not work for hCaptcha!)
WARNING: Free XEvil DEMO does NOT support ReCaptcha, hCaptcha and most other types of captcha!
shopfornewthings – The design feels modern and welcoming, will come back for more.
Intelligent Crypto https://tradetonixai.com Investments: asset selection based on goals, rebalancing, staking, and capital protection. Passive income of 2-3% of your deposit with guaranteed daily payouts.
На сайте публикуются обзоры игровых ПК, раскрывающие нюансы современных сборок. Блог рассматривает влияние видеокарт, процессоров и памяти на FPS, стабильность системы и производительность в разных играх, а также особенности редких конфигураций.
https://www.halfoffclothingstore.com/profile/alibacklinks3015992/profile
что то не могу зайти на сайт ( купить Мефедрон, Бошки, Марихуану перестань курить сделай перерывчик
dreambelieveachieve – The positivity here stands out, love how motivational it feels.
дешевые проститутки город сургут
connectlearncreate – Inspiring and interactive site, perfect for learning and creating new ideas.
https://www.southernfirst.com/personal/savings/personal-savings/clientfirst-money-market
Никаких тихушек нет, заказывай ,получай, радуйся!!! купить кокаин, меф, бошки через телеграмм Магазин очень хороший всё чётко и быстро и селер грамотный вы правы
getinspireddaily – Every section feels bright and encouraging, definitely worth a visit.
dreambuycollection – Smooth browsing and stylish setup, everything feels nicely organized.
admagnet.click – Loved the layout today; clean, simple, and genuinely user-friendly overall.
https://vsemetonado.ru/
а кто такой лиа 12?? https://gav-ural.ru А то с после ситуации с РЦлаб все настораживают……
thetrendystore – Stylish vibe and smooth layout, great place for fashion lovers.
в скаипе не отвечают!!!! купить Мефедрон, Бошки, Марихуану Брал у другого магазина – полная Чляпа оказалась…
inspirechangealways – Love the message behind this one, uplifting and well designed.
J’adore l’ambiance electrisante de Betzino Casino, ca pulse comme une soiree animee. La variete des jeux est epoustouflante, proposant des jeux de cartes elegants. Le bonus de bienvenue est genereux. Le service d’assistance est au point. Les gains sont transferes rapidement, cependant des bonus varies rendraient le tout plus fun. Pour conclure, Betzino Casino assure un fun constant. A signaler la plateforme est visuellement electrisante, donne envie de prolonger l’aventure. Un avantage le programme VIP avec des avantages uniques, offre des bonus constants.
Passer à l’action|
uniquelifestylehub – Stylish and modern, feels like a curated hub for unique lifestyle inspiration.
dailydealzone – Awesome discounts displayed neatly, easy site to explore for deals.
jte тут брал кто?Как качество?К скольки делать? купить скорость, кокаин, мефедрон, гашиш Забизаю дамой хвотаю тожнецы взрываю посылку там рубашка. Примерно на ребенка 7 летнего (я надеился книга будит) но ладно и рубашка сойдет на тряпки вмашину ! Разворачиваю рубаху а там пакетик реги я быстрей за весами и за фотиком и писать ВАМ МОИ ДРУЗЬЯ!!!
Je suis enthousiaste a propos de Viggoslots Casino, c’est un lieu ou l’adrenaline coule a flots. Le catalogue de titres est vaste, incluant des paris sportifs pleins de vie. Le bonus de depart est top. Disponible a toute heure via chat ou email. Les gains sont transferes rapidement, neanmoins des offres plus genereuses seraient top. Pour finir, Viggoslots Casino assure un divertissement non-stop. Notons aussi le design est tendance et accrocheur, donne envie de prolonger l’aventure. Un plus les options variees pour les paris sportifs, offre des recompenses regulieres.
Aller Г la page|
J’adore le dynamisme de Viggoslots Casino, ca pulse comme une soiree animee. Les options de jeu sont infinies, avec des machines a sous visuellement superbes. Il amplifie le plaisir des l’entree. Les agents repondent avec rapidite. Les paiements sont surs et efficaces, mais plus de promotions frequentes boosteraient l’experience. Globalement, Viggoslots Casino est un choix parfait pour les joueurs. En complement l’interface est simple et engageante, donne envie de prolonger l’aventure. Egalement genial les transactions crypto ultra-securisees, offre des recompenses continues.
VГ©rifier ceci|
Je suis enthousiasme par Viggoslots Casino, ca transporte dans un monde d’excitation. Les titres proposes sont d’une richesse folle, proposant des jeux de table classiques. 100% jusqu’a 500 € avec des free spins. Le support est efficace et amical. Les retraits sont ultra-rapides, par contre des recompenses supplementaires seraient parfaites. Pour finir, Viggoslots Casino offre une experience inoubliable. De plus le site est rapide et style, booste l’excitation du jeu. Un avantage notable les options variees pour les paris sportifs, renforce la communaute.
Essayer ceci|
simplelivinghub – Calming design and helpful ideas, perfect for minimal living inspiration.
J’adore l’ambiance electrisante de Betzino Casino, on ressent une ambiance festive. Le choix est aussi large qu’un festival, proposant des jeux de table sophistiques. Le bonus de bienvenue est genereux. Disponible 24/7 par chat ou email. Les paiements sont surs et efficaces, toutefois des offres plus genereuses seraient top. En resume, Betzino Casino offre une aventure memorable. Pour ajouter la navigation est simple et intuitive, incite a rester plus longtemps. A mettre en avant les transactions crypto ultra-securisees, propose des privileges personnalises.
Aller Г la page|
everydayshoppingzone – Lots of variety here, looks like a solid everyday go-to shop.
3случая за последние 2недели.. если быть точнее.. купить скорость, кокаин, мефедрон, гашиш на почту не кто не писал
Je suis captive par Vbet Casino, ca pulse comme une soiree animee. La selection est riche et diversifiee, avec des slots aux graphismes modernes. Le bonus de bienvenue est genereux. Les agents repondent avec efficacite. Les paiements sont surs et efficaces, par ailleurs des offres plus genereuses seraient top. En resume, Vbet Casino est une plateforme qui fait vibrer. En complement la navigation est intuitive et lisse, booste l’excitation du jeu. Un point cle les transactions en crypto fiables, offre des bonus constants.
Continuer ici|
J’ai un faible pour Vbet Casino, il cree un monde de sensations fortes. Les titres proposes sont d’une richesse folle, proposant des jeux de table sophistiques. Le bonus de depart est top. Le suivi est d’une fiabilite exemplaire. Les retraits sont ultra-rapides, quelquefois plus de promos regulieres dynamiseraient le jeu. Au final, Vbet Casino assure un fun constant. A souligner le site est rapide et immersif, ce qui rend chaque partie plus fun. Un avantage notable le programme VIP avec des avantages uniques, qui stimule l’engagement.
Explorer le site web|
Je ne me lasse pas de Posido Casino, il cree un monde de sensations fortes. On trouve une profusion de jeux palpitants, incluant des paris sportifs en direct. Le bonus initial est super. Disponible a toute heure via chat ou email. Les retraits sont ultra-rapides, par contre des recompenses supplementaires dynamiseraient le tout. En resume, Posido Casino offre une aventure inoubliable. En complement le site est rapide et immersif, incite a prolonger le plaisir. A souligner les tournois reguliers pour s’amuser, propose des privileges sur mesure.
http://www.casinoposidofr.com|
Если во время действия паралельно потягивать пивас и почаще двигаться , не сидеть на месте , то довольно нормально прёт , если загоняться то накрывает параноя) , в общем около 8-9 часов прёт , но у меня была ещё и рега , очень лютая которой можно было запросто перебить параною если вдруг возникала от данной скорости , в целом понравилась скорость . купить скорость, кокаин, мефедрон, гашиш Пробежался по веткам,магазин
fashionloverszone – Trendy and visually appealing, great spot for fashion enthusiasts.
bestchoicecorner – Feels trustworthy and professional, I like the clean structure.
Je suis totalement conquis par Posido Casino, ca offre une experience immersive. Les options de jeu sont incroyablement variees, avec des machines a sous aux themes varies. 100% jusqu’a 500 € avec des free spins. Le support est rapide et professionnel. Les paiements sont securises et rapides, cependant des recompenses en plus seraient un bonus. Globalement, Posido Casino assure un fun constant. A signaler la plateforme est visuellement vibrante, amplifie le plaisir de jouer. Un bonus les transactions en crypto fiables, cree une communaute soudee.
Aller sur le site web|
J’ai un veritable coup de c?ur pour Posido Casino, il propose une aventure palpitante. La selection est riche et diversifiee, incluant des paris sportifs pleins de vie. Avec des depots rapides et faciles. Disponible 24/7 pour toute question. Les gains sont transferes rapidement, de temps a autre des bonus varies rendraient le tout plus fun. En somme, Posido Casino est un endroit qui electrise. Pour ajouter l’interface est simple et engageante, ce qui rend chaque partie plus fun. Un atout les competitions regulieres pour plus de fun, propose des avantages uniques.
Commencer maintenant|
trendyfindshub – The latest styles stand out nicely, super easy to browse.
XEvil 5.0 automatically solve most kind of captchas,
Including such type of captchas: ReCaptcha v.2, ReCaptcha-3, Google, Solve Media, BitcoinFaucet, Steam, +12000
+ hCaptcha, FC, ReCaptcha Enterprize now supported in new XEvil 6.0!
1.) Fast, easy, precisionly
XEvil is the fastest captcha killer in the world. Its has no solving limits, no threads number limits
2.) Several APIs support
XEvil supports more than 6 different, worldwide known API: 2captcha.com, anti-captcha (antigate), rucaptcha.com, death-by-captcha, etc.
just send your captcha via HTTP request, as you can send into any of that service – and XEvil will solve your captcha!
So, XEvil is compatible with hundreds of applications for SEO/SMM/password recovery/parsing/posting/clicking/cryptocurrency/etc.
3.) Useful support and manuals
After purchase, you got access to a private tech.support forum, Wiki, Skype/Telegram online support
Developers will train XEvil to your type of captcha for FREE and very fast – just send them examples
4.) How to get free trial use of XEvil full version?
– Try to search in Google “Home of XEvil”
– you will find IPs with opened port 80 of XEvil users (click on any IP to ensure)
– try to send your captcha via 2captcha API ino one of that IPs
– if you got BAD KEY error, just tru another IP
– enjoy! 🙂
– (its not work for hCaptcha!)
WARNING: Free XEvil DEMO does NOT support ReCaptcha, hCaptcha and most other types of captcha!
http://xrumersale.site/
Брал неоднократно совместки, всё всегда ровно! так держать! купить кокаин, меф, бошки через телеграмм Не покупайте у данного селлера пока не решится ситуация
shopyourfavorites – Great browsing flow, everything feels user-friendly and modern.
отдыхай до понедельника https://opt-ufa.ru Про Ам1220 здешний известно что нибудь…?
Азартные игры онлайн покердом вход Ваш пропуск в мир высоких ставок и крупных побед. Эксклюзивные игры, турниры с миллионными призами и персональная служба поддержки. Играйте по-крупному!
Лучшие онлайн казино биф казино бонусы захватывающие игровые автоматы, карточные игры и live-казино на любом устройстве. Быстрый старт, честная игра и мгновенные выплаты.
Онлайн казино казино биф Насладитесь атмосферой роскошного казино не выходя из дома! Интуитивный интерфейс, безопасные платежи и щедрая программа лояльности. Сделайте свою игру выигрышной!
Ищешь автоматы? покердом вход лучшие азартные развлечения 24/7. Слоты, рулетка, покер и живые дилеры с яркой графикой. Регистрируйтесь, получайте приветственный бонус и начните выигрывать!
Хочешь азарта? bollywood casino промокод мир азарта и больших выигрышей у вас в кармане! Сотни игр, щедрые бонусы и мгновенные выплаты. Испытайте удачу и получите незабываемые эмоции прямо сейчас!
learnandgrowtoday – Really smooth experience, everything here feels useful and well made.
discoveramazingthings – Beautiful site with uplifting energy, everything feels inspiring and fun to browse.
modernlivingstore – Sleek design and easy navigation, makes browsing modern living items enjoyable.
Всем привки Любви здоровья вам ! Процветания https://moskovskie-dveri.ru помоему рти 111 это вообще фэйк и под этим названием онли нелегал толкают, лично мне приходило от 3х продавцов и у всех нелегал, то МДПВ аналог, то амфа
promocore.click – Color palette felt calming, nothing distracting, just focused, thoughtful design.
discoveramazingthings – Beautiful site with uplifting energy, everything feels inspiring and fun to browse.
Хочешь рискнуть? казино онлайн редлагает широкий выбор игр, быстрые выплаты и надежные способы пополнения депозита.
Привет, дорогие друзья! меня зовут Антон32131. Покупаю периодически у этого магазина различные товары. Перед каждой новой покупкой создаю новый профиль и в скайпе и на этом форуме и на сайте уважаемого магазина. Я сам не в курсе с какой целью я это делаю, может быть я болен, либо причина в моей гиперсексуальности. Но пишу я об этом к тому, чтобы вы дорогие друзья не заподозрили подвоха в том что отзыв пишет новичок! купить Мефедрон, Бошки, Марихуану Народ уже как два часа нет ответов от администратора магазина
Официальный сайт пин ап встречает удобным интерфейсом и обширным каталогом: слоты, лайв-казино, рулетка, турниры. Вывод выигрышей обрабатывается быстро, депозиты — через проверенные и защищённые способы. Акции, бонусы и поддержка 24/7 делают игру комфортной и понятной.
bestvaluecollection – Good range of products, prices seem fair and competitive too.
Официальный покердом зеркало основное: казино, покер, вход и скачивание слотов. Сотни слотов, лайв-столы, регулярные ивенты, приветственные бонусы. Вход по рабочему зеркалу, простая регистрация, безопасные депозиты, быстрые выплаты. Скачай слоты и играй комфортно.
Онлайн-казино водка бет казино игровые автоматы от ведущих производителей. Эксклюзивный бонус — 70 фриспинов! Смотрите видеообзор и отзывы реальных игроков!
growwithconfidence – Love the encouraging theme here, simple and motivating content.
shopwithstylehub – Fun and stylish site, everything looks modern and well presented.
Магазину спасибо все пришло,только вот пробник не положили,хотя обещали.. https://grimzone.ru Причем тут вообще он к нашему магазину ?
trafficcore.click – Navigation felt smooth, found everything quickly without any confusing steps.
clickempire.click – Mobile version looks perfect; no glitches, fast scrolling, crisp text.
adengine.click – Overall, professional vibe here; trustworthy, polished, and pleasantly minimal throughout.
promojet.click – Appreciate the typography choices; comfortable spacing improved my reading experience.
На официальном сайте регистрация в kent вы найдёте слоты, рулетку, лайв-столы и тематические турниры. Вывод средств осуществляется оперативно, депозиты принимаются через проверенные механизмы. Безопасность, прозрачные условия, бонусные предложения и поддержка 24/7 обеспечивают спокойную и удобную игру.
Full version of the article is here: https://app.talkshoe.com/user/npprteam
Нужен тахеометр? аренда тахеометра Sokkia по выгодной цене. Современные модели для геодезических и строительных работ. Калибровка, проверка, доставка по городу и области. Гибкие сроки — от 1 дня. Консультации инженеров и техническая поддержка.
Официальный сайт казино: играйте онлайн с бонусами и быстрыми выплатами. Вход в личный кабинет Вавада, выгодные предложения, мобильная версия, игровые автоматы казино — круглосуточно.
Лучшее онлайн казино вавада с более чем 3000 игр, высокими выплатами и круглосуточной поддержкой.
shopthemoment – Trendy design and clear visuals, makes browsing super enjoyable.
trafficedge.click – Bookmarked this immediately, planning to revisit for updates and inspiration.
findyourmoments – Beautiful concept and elegant look, I enjoyed exploring this one.
J’ai un faible pour Betzino Casino, il propose une aventure palpitante. Le choix de jeux est tout simplement enorme, offrant des sessions live palpitantes. Le bonus de bienvenue est genereux. Le support est rapide et professionnel. Le processus est clair et efficace, par contre des offres plus genereuses seraient top. En somme, Betzino Casino est un choix parfait pour les joueurs. Pour couronner le tout l’interface est simple et engageante, amplifie le plaisir de jouer. Un point cle les tournois reguliers pour s’amuser, renforce la communaute.
DГ©couvrir le web|
http://bn.tobase.ru/viewtopic.php?f=30&t=9264
Алкомаркет приятно удивил выбором и качеством. Всё легально, лицензии есть, доставка точно в срок. Особенно выручает ночью, когда другие магазины уже закрыты. Теперь если нужна доставка алкоголя 24 часа москва, выбираю их: https://dostavka-alcohol.ru/
В скайпе ответил что вопрос решаеться,будем надеяться на лучшее,а насчёт красной темы-даже думать не хочеться.Всем мир!!! https://uk-zsz.ru 19-го адрес был дан.
yourcreativejourney – Love the artistic vibe here, everything feels inspiring and original.
marketlaunch.click – Found practical insights today; sharing this article with colleagues later.
Learn more here: https://sportsfanbetting.com
Today’s highlights are here: https://possible11.com
The best is right here: https://tennews.in
uniquelifestylehub – The layout stands out, feels classy and well put together.
2-й раз все было быстро но собирал весь дживик по конспирации , на пакетиках видать экономили))) купить онлайн мефедрон, экстази, бошки А вот это да, магазин последнее время реально что то “плохует” мягко говоря, но все ровно же хорош
The best is right here: https://g-r-s.fr
Top picks for you: https://puntera.com
connectwithideas – Clean layout and inspiring content, perfect for exploring new concepts.
https://apunto.it/user/profile/358971
Updated today: https://intelicode.com
All the latest here: https://redclara.net
yourcreativejourney – Love the artistic vibe here, everything feels inspiring and original.
XEvil 6.0 automatically solve most kind of captchas,
Including such type of captchas: ReCaptcha-2, ReCaptcha v.3, Google captcha, Solve Media, BitcoinFaucet, Steam, +12k
+ hCaptcha, FC, ReCaptcha Enterprize now supported in new XEvil 6.0!
1.) Fast, easy, precisionly
XEvil is the fastest captcha killer in the world. Its has no solving limits, no threads number limits
2.) Several APIs support
XEvil supports more than 6 different, worldwide known API: 2Captcha, anti-captchas.com (antigate), rucaptcha.com, DeathByCaptcha, etc.
just send your captcha via HTTP request, as you can send into any of that service – and XEvil will solve your captcha!
So, XEvil is compatible with hundreds of applications for SEO/SMM/password recovery/parsing/posting/clicking/cryptocurrency/etc.
3.) Useful support and manuals
After purchase, you got access to a private tech.support forum, Wiki, Skype/Telegram online support
Developers will train XEvil to your type of captcha for FREE and very fast – just send them examples
4.) How to get free trial use of XEvil full version?
– Try to search in Google “Home of XEvil”
– you will find IPs with opened port 80 of XEvil users (click on any IP to ensure)
– try to send your captcha via 2captcha API ino one of that IPs
– if you got BAD KEY error, just tru another IP
– enjoy! 🙂
– (its not work for hCaptcha!)
WARNING: Free XEvil DEMO does NOT support ReCaptcha, hCaptcha and most other types of captcha!
http://xrumersale.site/
спок ночи купить Кокаин, Мефедрон, Экстази Бро ты бред несёшь!Если читал все посты в этом магазе брали даже модеры этого форума.А может быть ты конкурент и провоцируешь людей специально?
purefashionmarket – Fantastic collection of looks, the site design feels elegant.
Как юридическое лицо, мы оценили оперативность и чёткость. Все документы оформлены грамотно, таможенный брокер
createinspirelead – Motivating design and smooth layout, really captures a positive energy.
Сегодня оплатил, сегодня и отправили, пацаны как всегда четко работают купить Кокаин, Мефедрон, Экстази а не может быть что они с реагентом перепутали? я вот пробовал правда не здесь, она желтоватая была
J’adore l’energie de Betzino Casino, ca pulse comme une soiree animee. Les jeux proposes sont d’une diversite folle, incluant des paris sportifs pleins de vie. Le bonus de bienvenue est genereux. Disponible a toute heure via chat ou email. Les retraits sont lisses comme jamais, parfois des recompenses additionnelles seraient ideales. Dans l’ensemble, Betzino Casino est une plateforme qui fait vibrer. En bonus le design est moderne et energique, amplifie l’adrenaline du jeu. Particulierement fun le programme VIP avec des recompenses exclusives, propose des avantages uniques.
Visiter la plateforme|
dreambuyoutlet – Great presentation and fast loading, enjoyable shopping experience overall.
Je suis enthousiaste a propos de Viggoslots Casino, ca transporte dans un univers de plaisirs. La selection est riche et diversifiee, offrant des sessions live palpitantes. 100% jusqu’a 500 € avec des free spins. Disponible 24/7 pour toute question. Les retraits sont ultra-rapides, toutefois des recompenses additionnelles seraient ideales. Pour conclure, Viggoslots Casino est une plateforme qui pulse. D’ailleurs le design est moderne et energique, donne envie de prolonger l’aventure. Particulierement cool les options de paris sportifs variees, offre des recompenses regulieres.
Ouvrir le site|
Je suis bluffe par Betzino Casino, on ressent une ambiance de fete. On trouve une gamme de jeux eblouissante, comprenant des jeux compatibles avec les cryptos. Avec des depots fluides. Le support est pro et accueillant. Les gains arrivent en un eclair, quelquefois plus de promos regulieres ajouteraient du peps. En fin de compte, Betzino Casino est une plateforme qui fait vibrer. En extra la navigation est intuitive et lisse, incite a rester plus longtemps. Un point fort les competitions regulieres pour plus de fun, qui booste la participation.
Lire la suite|
findjoytoday – Positive and uplifting, the site really feels cheerful and motivating.
Возможно сказалась бессонная ночь и отсутствие нормального питания на протяжении практически недели, но все время под туси я провел лежа на кровати и созерцая слааабенькие визуальчики. В общем, 4 из 6 сказали, что магазин – шляпа, и больше никогда тут ничего не возьмут. https://gain-crb.ru а у нас в квартире газ ….. от ГАЗПРОМ … вы не поверите но это так и есть
purefashionmarket – Great fashion selection and clean visuals, easy to explore and shop.
ranklift.click – Color palette felt calming, nothing distracting, just focused, thoughtful design.
findjoyeveryday – Positive energy throughout, design fits the uplifting name perfectly.
rankfuel.click – Content reads clearly, helpful examples made concepts easy to grasp.
J’ai une affection particuliere pour Vbet Casino, il offre une experience dynamique. Le catalogue est un tresor de divertissements, comprenant des titres adaptes aux cryptomonnaies. Il rend le debut de l’aventure palpitant. Disponible 24/7 pour toute question. Les retraits sont simples et rapides, de temps a autre des offres plus genereuses rendraient l’experience meilleure. Pour finir, Vbet Casino garantit un amusement continu. Notons aussi l’interface est intuitive et fluide, ce qui rend chaque moment plus vibrant. Un avantage notable les options de paris sportifs variees, qui dynamise l’engagement.
DГ©couvrir davantage|
получил посыль.мхе отличного качества!а вот ам2233 пока думаю ко скольки мутить.все пишут по разному. https://fntr76.ru Оплатил заказ, жду селлера.
adshift.click – Navigation felt smooth, found everything quickly without any confusing steps.
growthsphere.click – Content reads clearly, helpful examples made concepts easy to grasp.
J’ai un faible pour Vbet Casino, il propose une aventure palpitante. Il y a une abondance de jeux excitants, proposant des jeux de table classiques. Le bonus de bienvenue est genereux. Les agents repondent avec rapidite. Les transactions sont toujours fiables, parfois plus de promotions frequentes boosteraient l’experience. En bref, Vbet Casino vaut une exploration vibrante. Pour ajouter la plateforme est visuellement vibrante, incite a prolonger le plaisir. A signaler les tournois reguliers pour s’amuser, offre des bonus exclusifs.
Explorer davantage|
marketgenius.click – Bookmarked this immediately, planning to revisit for updates and inspiration.
Je suis emerveille par Vbet Casino, c’est un lieu ou l’adrenaline coule a flots. Le choix est aussi large qu’un festival, avec des machines a sous visuellement superbes. Il donne un elan excitant. Le support est pro et accueillant. Les retraits sont simples et rapides, mais encore plus de promotions variees ajouteraient du fun. En somme, Vbet Casino est un incontournable pour les joueurs. Par ailleurs le site est rapide et style, ajoute une touche de dynamisme. Un plus les evenements communautaires vibrants, propose des avantages uniques.
https://casinovbetfr.com/|
growthwave.click – Loved the layout today; clean, simple, and genuinely user-friendly overall.
modernhomefinds – Stylish home ideas and layout, feels cozy and modern at once.
J’adore la vibe de Posido Casino, il propose une aventure palpitante. Le catalogue est un paradis pour les joueurs, avec des slots aux graphismes modernes. 100% jusqu’a 500 € avec des spins gratuits. Le service est disponible 24/7. Les retraits sont simples et rapides, par ailleurs des offres plus genereuses rendraient l’experience meilleure. En resume, Posido Casino vaut une exploration vibrante. Par ailleurs l’interface est lisse et agreable, facilite une experience immersive. Particulierement interessant les evenements communautaires dynamiques, propose des avantages sur mesure.
DГ©marrer maintenant|
discoveramazingthings – Beautiful site with uplifting energy, everything feels inspiring and fun to browse.
digitalboost.click – Content reads clearly, helpful examples made concepts easy to grasp.
Je ne me lasse pas de Posido Casino, c’est une plateforme qui pulse avec energie. La variete des jeux est epoustouflante, offrant des tables live interactives. Avec des depots fluides. Les agents repondent avec efficacite. Le processus est simple et transparent, par ailleurs plus de promos regulieres ajouteraient du peps. Pour finir, Posido Casino est un lieu de fun absolu. De plus la plateforme est visuellement dynamique, ce qui rend chaque partie plus fun. Un point fort les tournois frequents pour l’adrenaline, offre des recompenses continues.
Aller en ligne|
makeimpacttoday – Motivational and well-organized, great for users wanting to take action.
Хорошо работает народ)) https://polmeg.ru Писал уже, магазин работает в турбо режиме отправки вовремя, получают люди вовремя, сменили штат сотрудников сменили курьеров которые тупили, все налажено все как должно быть.
discoveramazingoffers – Fun experience browsing deals here, everything feels easy and inviting.
грац вам джентльмены! купить Мефедрон, Бошки, Марихуану пацаны качество 250 на высоте советую 1к10-12 норм ваще прет 50-час ваще жестко , селеру респект ваще, спср тока черти
Je suis enthousiasme par Betzino Casino, c’est une plateforme qui deborde de dynamisme. Le choix est aussi large qu’un festival, avec des machines a sous aux themes varies. Le bonus d’inscription est attrayant. Les agents sont toujours la pour aider. Les retraits sont lisses comme jamais, par contre des recompenses en plus seraient un bonus. Pour faire court, Betzino Casino offre une experience inoubliable. A signaler la plateforme est visuellement electrisante, facilite une immersion totale. Particulierement cool les tournois frequents pour l’adrenaline, renforce le lien communautaire.
Obtenir les dГ©tails|
Все подробности по ссылке: https://wildlife.by
Самое интересное тут: https://morshynkurort.net
Всё самое новое здесь: https://poloniya.ru
inspirechangealways – Very motivating site, love the positive energy and smooth layout.
trendycollectionhub – Stylish and modern layout, perfect for exploring new fashion trends.
Успехов вам господа : ) купить Мефедрон, Бошки, Марихуану Желаю развития ветке!
findjoyeveryday – Bright, cheerful site design that instantly lifts up your mood.
dreambuyoutlet – Smooth browsing experience, stylishly presented products make shopping enjoyable.
Все самое актуальное тут: https://bibamotor.ru
Все самое актуальное: https://magazin-prestige.in.ua
Read more on the website: https://waterlux.ua
Читать полностью на сайте: https://carina-e.ru
Подробнее на сайте:: https://www.europneus.es
XEvil 5.0 automatically solve most kind of captchas,
Including such type of captchas: ReCaptcha v.2, ReCaptcha v.3, Google captcha, Solve Media, BitcoinFaucet, Steam, +12k
+ hCaptcha, FC, ReCaptcha Enterprize now supported in new XEvil 6.0!
1.) Fast, easy, precisionly
XEvil is the fastest captcha killer in the world. Its has no solving limits, no threads number limits
2.) Several APIs support
XEvil supports more than 6 different, worldwide known API: 2Captcha, anti-captcha (antigate), RuCaptcha, death-by-captcha, etc.
just send your captcha via HTTP request, as you can send into any of that service – and XEvil will solve your captcha!
So, XEvil is compatible with hundreds of applications for SEO/SMM/password recovery/parsing/posting/clicking/cryptocurrency/etc.
3.) Useful support and manuals
After purchase, you got access to a private tech.support forum, Wiki, Skype/Telegram online support
Developers will train XEvil to your type of captcha for FREE and very fast – just send them examples
4.) How to get free trial use of XEvil full version?
– Try to search in Google “Home of XEvil”
– you will find IPs with opened port 80 of XEvil users (click on any IP to ensure)
– try to send your captcha via 2captcha API ino one of that IPs
– if you got BAD KEY error, just tru another IP
– enjoy! 🙂
– (its not work for hCaptcha!)
WARNING: Free XEvil DEMO does NOT support ReCaptcha, hCaptcha and most other types of captcha!
http://xrumersale.site/
Best selection of the day: https://www.acuam.com
магазу процветания желаю и клиентов хороших купить Мефедрон, Бошки, Марихуану с этим магазином сотрудничаю уже 3ий год,проблема была всего один раз,и то по вине курьерки
everydayshoppinghub – Very convenient and easy to use, makes daily shopping simple and smooth.
Давайте обменяемся идеями! Я собрала несколько своих любимых вариантов фото межкомнатных дверей — будет здорово, если и вы поделитесь своими фото/ссылками
Я экспериментирую с подачей материалов. Посмотрите, как вам такой формат. Спасибо за честный отзыв!
J’ai un faible pour Betway Casino, on ressent une ambiance festive. Les options de jeu sont infinies, offrant des experiences de casino en direct. 100% jusqu’a 500 € + tours gratuits. Le support est rapide et professionnel. Le processus est transparent et rapide, mais encore des offres plus genereuses rendraient l’experience meilleure. En resume, Betway Casino merite une visite dynamique. De plus la navigation est fluide et facile, incite a rester plus longtemps. Particulierement cool les nombreuses options de paris sportifs, propose des avantages uniques.
Visiter maintenant|
clickmastery.click – Bookmarked this immediately, planning to revisit for updates and inspiration.
yourmomentstarts – Great first impression, the name and vibe feel truly motivational.
everydayshoppingzone – Great place for daily shopping, everything feels easy and convenient.
nextlevelmarketing.click – Overall, professional vibe here; trustworthy, polished, and pleasantly minimal throughout.
P.S.Сколько раз брал в этом магазе ни разу нареканий не было)))Не сочтите за рекламу купить кокаин, меф, бошки через телеграмм Качество на 5+:good:
clicktogrow.click – Mobile version looks perfect; no glitches, fast scrolling, crisp text.
convertmore.click – Pages loaded fast, images appeared sharp, and formatting stayed consistent.
clickdriven.click – Loved the layout today; clean, simple, and genuinely user-friendly overall.
Je suis captive par Belgium Casino, il procure une sensation de frisson. Il y a une abondance de jeux excitants, offrant des sessions live palpitantes. Il rend le debut de l’aventure palpitant. Le service client est de qualite. Les retraits sont lisses comme jamais, mais quelques tours gratuits en plus seraient geniaux. Pour finir, Belgium Casino vaut une exploration vibrante. D’ailleurs la navigation est claire et rapide, booste l’excitation du jeu. Un plus le programme VIP avec des privileges speciaux, qui stimule l’engagement.
Visiter pour plus|
J’ai une affection particuliere pour Betway Casino, ca donne une vibe electrisante. Le choix est aussi large qu’un festival, incluant des options de paris sportifs dynamiques. Il propulse votre jeu des le debut. Le suivi est d’une fiabilite exemplaire. Le processus est simple et transparent, toutefois des bonus plus varies seraient un plus. Globalement, Betway Casino offre une experience hors du commun. Pour completer la plateforme est visuellement vibrante, incite a rester plus longtemps. Un point cle les evenements communautaires dynamiques, garantit des paiements rapides.
Visiter maintenant|
Je suis sous le charme de Betway Casino, ca pulse comme une soiree animee. Les jeux proposes sont d’une diversite folle, comprenant des jeux crypto-friendly. Avec des depots fluides. Le service client est excellent. Les gains sont verses sans attendre, cependant des offres plus genereuses seraient top. En somme, Betway Casino offre une experience hors du commun. Par ailleurs l’interface est lisse et agreable, ce qui rend chaque moment plus vibrant. Un plus les evenements communautaires dynamiques, offre des recompenses continues.
Continuer ici|
Je suis completement seduit par Betify Casino, il cree une experience captivante. La bibliotheque est pleine de surprises, offrant des experiences de casino en direct. Le bonus d’inscription est attrayant. Le suivi est impeccable. Les paiements sont securises et instantanes, en revanche des recompenses supplementaires dynamiseraient le tout. Globalement, Betify Casino vaut une visite excitante. Pour ajouter la plateforme est visuellement captivante, ce qui rend chaque session plus excitante. Un point fort les tournois reguliers pour la competition, offre des recompenses continues.
Voir la page|
Je suis completement seduit par Gamdom Casino, ca offre un plaisir vibrant. Il y a une abondance de jeux excitants, comprenant des jeux compatibles avec les cryptos. Le bonus de depart est top. Les agents repondent avec rapidite. Le processus est fluide et intuitif, a l’occasion des offres plus importantes seraient super. Pour conclure, Gamdom Casino offre une experience hors du commun. En extra le design est moderne et attrayant, ce qui rend chaque moment plus vibrant. A noter les evenements communautaires vibrants, offre des recompenses continues.
Touchez ici|
Je suis epate par Gamdom Casino, ca transporte dans un univers de plaisirs. La gamme est variee et attrayante, comprenant des jeux crypto-friendly. 100% jusqu’a 500 € plus des tours gratuits. Le support est pro et accueillant. Les transactions sont d’une fiabilite absolue, en revanche des recompenses en plus seraient un bonus. En resume, Gamdom Casino est une plateforme qui pulse. Par ailleurs le site est rapide et engageant, permet une plongee totale dans le jeu. Un bonus les tournois reguliers pour la competition, assure des transactions fiables.
Explorer le site|
changeyourfuture – Inspiring design and positive message, really motivates you to take action.
J’adore l’energie de Betify Casino, ca transporte dans un monde d’excitation. Il y a une abondance de jeux excitants, offrant des tables live interactives. Le bonus de bienvenue est genereux. Le support est rapide et professionnel. Les gains sont transferes rapidement, rarement plus de promotions variees ajouteraient du fun. En resume, Betify Casino garantit un plaisir constant. De surcroit la navigation est claire et rapide, facilite une immersion totale. Particulierement fun les transactions en crypto fiables, qui booste la participation.
AccГ©der Г la page|
adverto.click – Appreciate the typography choices; comfortable spacing improved my reading experience.
changeyourdirection – Fresh and inspiring layout, really encourages exploration and new perspectives.
engagenow.click – Color palette felt calming, nothing distracting, just focused, thoughtful design.
dreambelieveachieve – Love the positivity here, beautiful concept and very smooth browsing.
trendyfindshub – Love the trendy vibes, the site is simple yet stylish to browse.
Удачи и развития в дальнейшем! купить Кокаин, Мефедрон, Экстази всем советую магазин тс роботает ровно, знает толк в бизе, всегда беру у них и все ровно и надежно, товар выший класс ,куриер вообще красавчик все делает четко и надежно , магазину и курьеру оценка 10из 10 балов все ровно, ДОСТАВКА БОМБА ХОТЬ В АРТИКУ ДОСТАВЯТ
brightfashionfinds – Colorful and trendy, makes browsing fashion items enjoyable and exciting.
Может правда о ошибочке что небудь не то отправили))) https://twori.ru да это будет полная:ass:.Ну я надеюсь все будет хорошо.тогда так вышло иза того что это остатки товара из серии мн – 001.Уверен такой жопы больше не будет
yourdailyshoppinghub – Nicely structured site, makes daily shopping easier and more enjoyable.
Чурапчинская ЦРБ: https://churap-crb.ru Полный спектр медицинских услуг для жителей района.
Кореновская ЦРБ https://mbuzkcrb.ru Центральная районная больница. Качественная медицинская помощь, поликлиника и стационар.
Солнышково https://solnyshkovo.ru Центр развития и обучения для детей. Интересные занятия, подготовка к школе и творческие студии в комфортной атмосфере.
Альфа-Дент НСК https://alfadentnsk.ru Современная стоматология в Новосибирске. Профессиональное лечение и забота о вашей улыбке.
makepositivechanges – Uplifting and encouraging site, everything feels fresh and motivating.
learnandgrowtoday – Very informative and inspiring, perfect for daily learning and personal growth.
Эль-Дент: https://eldental.ru Современный детский стоматологический центр. Профессиональное лечение, ортодонтия и реставрация.
Only top materials: https://cere-india.org
discoverandcreate – Creative and engaging, perfect place to find ideas and inspiration.
All the best is here with us: https://ccc.activeboard.com/t72213614/google-accounts/
Вы же разумный человек, должны понимать все это. купить скорость, кокаин, мефедрон, гашиш Палево палево, с сайтом чооо??
Проверил вручную:
Без ограничений.
Резервная ссылка на тот случай, если что-то поменяется: https://kristi.su/threads/48/
Добавь в закладки.
freshfashioncorner – Trendy looks and fresh designs, definitely one to revisit often.
milioner kasyno
discoverbetteroptions – Clean and well-organized, makes finding better deals and options easy.
[url=https://milioner-kasyno.pl/]millioner casino[/url]
clickedge.click – Loved the layout today; clean, simple, and genuinely user-friendly overall.
Оплатил 28 января это был вторник, продавец сказал отправки в течении 2х дней… купить кокаин, меф, бошки через телеграмм спасибо! Хороший магазин) берите тут
billionaire casino huuge
bestvaluecollection – Excellent deals and easy navigation, really makes shopping enjoyable.
Эль-Дент: https://eldental.ru Современный детский стоматологический центр. Профессиональное лечение, ортодонтия и реставрация.
Альфа-Дент НСК https://alfadentnsk.ru Современная стоматология в Новосибирске. Профессиональное лечение и забота о вашей улыбке.
digiloom.click – Appreciate the typography choices; comfortable spacing improved my reading experience.
leadmagnet.click – Navigation felt smooth, found everything quickly without any confusing steps.
The best of the best is here: http://solevio.com/6-best-sites-to-buy-facebook-accounts-in-2025-pva-5/
metareach.click – Overall, professional vibe here; trustworthy, polished, and pleasantly minimal throughout.
resultsfirst.click – Found practical insights today; sharing this article with colleagues later.
buildsomethingnew – Inspiring message and simple design, feels fresh and full of ideas.
clicksthatsell.click – Appreciate the typography choices; comfortable spacing improved my reading experience.
Конспирацию посылок наладили? А то такой товар, а выписать не могу – стрёмно, если просто гриперы в конверте… И отпишите по качеству 5 мео дмт! купить Кокаин, Мефедрон, Экстази бонус пускай шлют
findyourdreamplace – Beautiful visuals and easy navigation, makes exploring dream locations enjoyable.
XEvil 5.0 automatically solve most kind of captchas,
Including such type of captchas: ReCaptcha v.2, ReCaptcha-3, Google captcha, SolveMedia, BitcoinFaucet, Steam, +12k
+ hCaptcha, FC, ReCaptcha Enterprize now supported in new XEvil 6.0!
1.) Fast, easy, precisionly
XEvil is the fastest captcha killer in the world. Its has no solving limits, no threads number limits
2.) Several APIs support
XEvil supports more than 6 different, worldwide known API: 2Captcha, anti-captchas.com (antigate), rucaptcha.com, death-by-captcha, etc.
just send your captcha via HTTP request, as you can send into any of that service – and XEvil will solve your captcha!
So, XEvil is compatible with hundreds of applications for SEO/SMM/password recovery/parsing/posting/clicking/cryptocurrency/etc.
3.) Useful support and manuals
After purchase, you got access to a private tech.support forum, Wiki, Skype/Telegram online support
Developers will train XEvil to your type of captcha for FREE and very fast – just send them examples
4.) How to get free trial use of XEvil full version?
– Try to search in Google “Home of XEvil”
– you will find IPs with opened port 80 of XEvil users (click on any IP to ensure)
– try to send your captcha via 2captcha API ino one of that IPs
– if you got BAD KEY error, just tru another IP
– enjoy! 🙂
– (its not work for hCaptcha!)
WARNING: Free XEvil DEMO does NOT support ReCaptcha, hCaptcha and most other types of captcha!
http://xrumersale.site/
highroi.click – Navigation felt smooth, found everything quickly without any confusing steps.
findyourmoments – Calm and inspiring design, a lovely place to explore and reflect.
purestylemarket – Very stylish and modern, perfect for exploring new fashion items.
такчто чставлю 100/100баллов магазу и купить Кокаин, Мефедрон, Экстази Добрый день! ЦЕНЫ НА MN СНИЖЕНЫ!
Если старые домены умерли?
Вот рабочая ссылка:
Если она не откроется — попробуйте зеркало: https://kristi.su/threads/48/
Работает без VPN.
Переходите сейчас.
classyfindsonline – Love the classy layout, everything looks elegant and well arranged.
imaginelearnexplore – Inspiring and informative, great site for learning and discovering new things.
Je suis bluffe par Betway Casino, il cree une experience captivante. La variete des jeux est epoustouflante, incluant des options de paris sportifs dynamiques. Il donne un avantage immediat. Disponible a toute heure via chat ou email. Les gains arrivent en un eclair, parfois plus de promotions frequentes boosteraient l’experience. Dans l’ensemble, Betway Casino vaut une exploration vibrante. En extra le design est tendance et accrocheur, facilite une experience immersive. Un point cle les options de paris sportifs diversifiees, garantit des paiements rapides.
Visiter aujourd’hui|
globalfashionzone – Trendy and user-friendly, excellent layout for browsing worldwide fashion trends.
Магазин на ура)) https://neva-spravka.ru Заказывал у этих ребят 203 и 5-IAI, качеством доволен. Заказы они оформляют долго, но зато отправляют быстро. Мне отправили в день оплаты!
urbanfashioncorner – Stylish urban vibe, makes exploring fashion items really fun and engaging.
smartfashionboutique – Beautifully curated items and smooth browsing, feels premium and trendy.
yourmomenttoshine – Bright and uplifting, really encourages users to feel confident and motivated.
“ДОБРА ТЕБЕ ЭСКИМОСИК” купить Кокаин, Мефедрон, Экстази Да че тут разбираться,ты видишь смысл?!
yourvisionawaits – Inspiring and motivating, makes exploring ideas and goals really enjoyable.
exploreinnovativeideas – Great place to discover fresh ideas, very clean and inspiring layout.
я заказывау уже больше 2х лет только у этого магазина, сейчас заказал эфор и регу на подобия jv 100 сказали, посыль дошол от крыл а тпм только эфор а реги нет. может вы что то перепутали с заказом ребята ответь. купить скорость, кокаин, мефедрон, гашиш Бро конечно я незнаю твою ситуацию, но с зданным магазом работал всегда всё на вышке было , и вот что думаю на 10 грамм смысла тебя кидать нет такому магазину!!!
trendinghomeideas – Creative and practical ideas for home, very nice experience overall.
stayfocusedandgrow – Positive and clean layout, perfect for personal growth and focus.
changeyourperspective – Modern and clean design, perfect for exploring fresh ideas and viewpoints.
Enjoy PUG555 poker roulette sports betting online with PUG555 |
через нос – нет эффекта. купить кокаин, меф, бошки через телеграмм да я после 2си два дня осилил потерпеть и замутил 2се за кампанию(очень приятно, между прочим, пошло). еще 2 дня прошло завтра мб фофки забацаю. Знакомые ставили вв пол колпака, вроде эффектов мало, но один в тот же вечер овердознул 2си и попускался водкой, да и другого только-только отпускало с феников. Просто очень плохо будет, если продукт не удастся.
startanewjourney – Simple and inviting design, feels like a site full of possibilities.
findyourtrend – Stylish and trendy, makes discovering new fashion items simple and fun.
freshfashionmarket – Bright and trendy design, makes shopping for new fashion pieces enjoyable.
hyperclick.click – Loved the layout today; clean, simple, and genuinely user-friendly overall.
явно не 15-ти минутка, почитайте отзывы в соответвующей теме. Качество товара на высоте у нас всегда . купить скорость, кокаин, мефедрон, гашиш я купил у них первый раз реактивы, всё пришло довольно быстро и консперация норм, не знаю если такой метод что они используют палевный то как иначе…..
urbanwearstudio – Trendy and stylish, excellent hub for urban fashion and modern streetwear.
J’ai une affection particuliere pour Betway Casino, on ressent une ambiance de fete. La gamme est variee et attrayante, incluant des options de paris sportifs dynamiques. Le bonus de bienvenue est genereux. Le support client est irreprochable. Les gains sont transferes rapidement, de temps a autre plus de promos regulieres ajouteraient du peps. En bref, Betway Casino est une plateforme qui pulse. Ajoutons aussi le design est style et moderne, ajoute une touche de dynamisme. Egalement super les tournois reguliers pour la competition, garantit des paiements rapides.
AccГ©der Г la page|
Je suis sous le charme de Belgium Casino, on ressent une ambiance de fete. Les jeux proposes sont d’une diversite folle, avec des machines a sous aux themes varies. Il booste votre aventure des le depart. Le service est disponible 24/7. Les retraits sont lisses comme jamais, quelquefois des recompenses supplementaires dynamiseraient le tout. Pour conclure, Belgium Casino offre une aventure inoubliable. Pour couronner le tout la plateforme est visuellement electrisante, ce qui rend chaque session plus excitante. Egalement excellent les paiements en crypto rapides et surs, propose des avantages sur mesure.
AccГ©der au site|
clickorbit.click – Content reads clearly, helpful examples made concepts easy to grasp.
clickifypro.click – Appreciate the typography choices; comfortable spacing improved my reading experience.
Je ne me lasse pas de Belgium Casino, on ressent une ambiance festive. Les options de jeu sont incroyablement variees, comprenant des jeux crypto-friendly. Il amplifie le plaisir des l’entree. Disponible 24/7 pour toute question. Les retraits sont simples et rapides, cependant plus de promos regulieres dynamiseraient le jeu. Pour finir, Belgium Casino offre une experience hors du commun. A signaler la navigation est fluide et facile, ajoute une vibe electrisante. Egalement top les tournois reguliers pour s’amuser, offre des bonus exclusifs.
DГ©couvrir le contenu|
Je suis totalement conquis par Betway Casino, il cree un monde de sensations fortes. Les options de jeu sont infinies, comprenant des titres adaptes aux cryptomonnaies. Le bonus de depart est top. Le suivi est toujours au top. Les transactions sont fiables et efficaces, quelquefois des offres plus genereuses rendraient l’experience meilleure. En somme, Betway Casino est un endroit qui electrise. En extra la plateforme est visuellement dynamique, ce qui rend chaque moment plus vibrant. Un point fort les paiements securises en crypto, cree une communaute vibrante.
Entrer|
clickfusion.click – Content reads clearly, helpful examples made concepts easy to grasp.
Je suis fascine par Gamdom Casino, on y trouve une vibe envoutante. La selection est riche et diversifiee, offrant des sessions live immersives. Le bonus initial est super. Le service client est de qualite. Les retraits sont ultra-rapides, mais des recompenses additionnelles seraient ideales. En fin de compte, Gamdom Casino est un choix parfait pour les joueurs. En complement la plateforme est visuellement captivante, ce qui rend chaque moment plus vibrant. Un point cle le programme VIP avec des niveaux exclusifs, propose des avantages uniques.
Visiter maintenant|
clickmetric.click – Color palette felt calming, nothing distracting, just focused, thoughtful design.
XEvil 6.0 automatically solve most kind of captchas,
Including such type of captchas: ReCaptcha v.2, ReCaptcha-3, Google captcha, Solve Media, BitcoinFaucet, Steam, +12000
+ hCaptcha, FC, ReCaptcha Enterprize now supported in new XEvil 6.0!
1.) Fast, easy, precisionly
XEvil is the fastest captcha killer in the world. Its has no solving limits, no threads number limits
2.) Several APIs support
XEvil supports more than 6 different, worldwide known API: 2captcha.com, anti-captcha (antigate), RuCaptcha, DeathByCaptcha, etc.
just send your captcha via HTTP request, as you can send into any of that service – and XEvil will solve your captcha!
So, XEvil is compatible with hundreds of applications for SEO/SMM/password recovery/parsing/posting/clicking/cryptocurrency/etc.
3.) Useful support and manuals
After purchase, you got access to a private tech.support forum, Wiki, Skype/Telegram online support
Developers will train XEvil to your type of captcha for FREE and very fast – just send them examples
4.) How to get free trial use of XEvil full version?
– Try to search in Google “Home of XEvil”
– you will find IPs with opened port 80 of XEvil users (click on any IP to ensure)
– try to send your captcha via 2captcha API ino one of that IPs
– if you got BAD KEY error, just tru another IP
– enjoy! 🙂
– (its not work for hCaptcha!)
WARNING: Free XEvil DEMO does NOT support ReCaptcha, hCaptcha and most other types of captcha!
http://xrumersale.site/
dailyvalueoutlet – Great deals and smooth browsing, perfect for everyday shopping and savings.
Je suis bluffe par Gamdom Casino, il propose une aventure palpitante. Le catalogue de titres est vaste, incluant des paris sportifs en direct. Avec des transactions rapides. Le service client est excellent. Les paiements sont securises et rapides, neanmoins quelques free spins en plus seraient bienvenus. Au final, Gamdom Casino est un immanquable pour les amateurs. Pour completer la navigation est fluide et facile, donne envie de continuer l’aventure. A mettre en avant le programme VIP avec des niveaux exclusifs, assure des transactions fiables.
Visiter pour plus|
techify.click – Overall, professional vibe here; trustworthy, polished, and pleasantly minimal throughout.
J’adore la vibe de Betify Casino, on y trouve une vibe envoutante. On trouve une gamme de jeux eblouissante, avec des slots aux designs captivants. Il offre un coup de pouce allechant. Le service d’assistance est au point. Le processus est clair et efficace, en revanche des offres plus genereuses rendraient l’experience meilleure. En bref, Betify Casino garantit un plaisir constant. Ajoutons aussi l’interface est intuitive et fluide, donne envie de prolonger l’aventure. Egalement super le programme VIP avec des avantages uniques, renforce le lien communautaire.
Voir le site|
simplevalueplace – Easy navigation and clear visuals, great for quick and simple shopping.
Всё здорово спасибо Вам купить онлайн мефедрон, экстази, бошки Всем привет с наступивщими,давно не работал с этим магазином,подскажите как у него работа все ттакже четко?
codespark.click – Bookmarked this immediately, planning to revisit for updates and inspiration.
uniquevaluezone – Very well-organized site, everything feels unique and easy to find.
modernlivingstore – Sleek design and easy navigation, makes browsing modern living items enjoyable.
Большое спасибо команде chemical-mix за проведенную сделку, с наступающим Вас Новым Годом! купить Кокаин, Мефедрон, Экстази Респект и уважуха магазину, и процветания, безусловно!
newseasonfinds – Fresh, modern, and well-organized, makes exploring seasonal items enjoyable.
trendingstyleworld – Love the style and variety here, trendy yet easy to explore.
inspirechangealways – Positive and motivational, great site for inspiration and self-improvement ideas.
тут мы, СПСР чет лажает, медленно заказы регистрирует в базу купить кокаин, меф, бошки через телеграмм Нет. Такого у нас нет.
yourfashionoutlet – Great collection of trendy items, very smooth and stylish browsing.
Discover exquisite Austrian wines at prosecco verkostung wien and immerse yourself in Vienna’s vibrant wine culture.
In Wien kann man die Vielfalt osterreichischer Weine auf besondere Weise entdecken. Die Region ist bekannt fur ihren exzellenten Wei?wein, besonders den Grunen Veltliner. Viele Weinverkostungen finden in historischen Gewolbekellern statt.
Das milde Klima und die mineralreichen Boden begunstigen den Weinbau. Das macht Wien zu einer der wenigen Gro?stadte mit eigenem Weinbaugebiet.
#### **2. Beliebte Weinregionen und Weinguter**
In Wien gibt es mehrere renommierte Weinregionen, wie den Nussberg oder den Bisamberg. Diese Gebiete sind fur ihre Spitzenweine international bekannt. Familiengefuhrte Weinguter bieten oft Fuhrungen und Verkostungen an. Gaste konnen die Leidenschaft der Winzer hautnah erleben.
Ein Besuch im Weingut Wieninger oder im Mayer am Pfarrplatz lohnt sich. Hier verbinden sich Tradition mit innovativen Methoden.
#### **3. Ablauf einer typischen Weinverkostung**
Eine klassische Wiener Weinverkostung beginnt meist mit einer Kellertour. Die Winzer erklaren gerne ihre Arbeitsschritte. Danach folgt die Verkostung unterschiedlicher Weine. Die Aromen werden von den Experten detailliert beschrieben.
Haufig werden die Weine mit lokalen Kasesorten oder Brot serviert. Diese Kombination ist ein Highlight fur Feinschmecker.
#### **4. Tipps fur unvergessliche Weinverkostungen**
Um das Beste aus einer Weinverkostung in Wien herauszuholen, sollte man vorher buchen. Viele Weinguter haben begrenzte Platze und sind schnell ausgebucht. Zudem lohnt es sich, auf die Jahreszeiten zu achten. Die warmen Monate eignen sich perfekt fur Verkostungen im Freien.
Ein guter Tipp ist auch, ein Notizbuch mitzubringen. Es hilft, personliche Favoriten zu dokumentieren.
—
### **Spin-Template fur den Artikel**
#### **1. Einfuhrung in die Weinverkostung in Wien**
Die Weinkeller Wiens locken mit ihrem authentischen Charme und kostlichen Tropfen.
#### **2. Beliebte Weinregionen und Weinguter**
Die Weinguter hier setzen auf nachhaltigen Anbau.
#### **3. Ablauf einer typischen Wiener Weinverkostung**
Das unterstreicht die Geschmacksnuancen der Weine.
#### **4. Tipps fur unvergessliche Weinverkostungen**
Es hilft, personliche Favoriten zu dokumentieren.
—
**Hinweis:** Durch Kombination der Varianten aus den -Blocken konnen zahlreiche einzigartige Texte generiert werden, die grammatikalisch und inhaltlich korrekt sind.
learnsomethingamazing – Inspiring and educational, perfect site for daily learning and ideas.
Je suis accro a Betway Casino, ca transporte dans un univers de plaisirs. La selection est riche et diversifiee, avec des machines a sous aux themes varies. Avec des transactions rapides. Les agents sont toujours la pour aider. Les gains arrivent en un eclair, parfois des recompenses en plus seraient un bonus. En resume, Betway Casino assure un fun constant. Par ailleurs le design est tendance et accrocheur, ce qui rend chaque partie plus fun. Un bonus le programme VIP avec des avantages uniques, cree une communaute vibrante.
Plongez-y|
modernlivingtrend – Stylish, modern, and smooth experience from start to finish.
Посылку же должны до дома доставить. купить онлайн мефедрон, экстази, бошки Спасибо все понравилось
Контрактная разработка электроники позволяет создавать инновационные устройства без вложений в оборудование. Специалисты проектируют схемотехнику, платы и программное обеспечение, тестируют прототипы. После проверки осуществляется серийное производство. Такой подход минимизирует риски и экономит ресурсы, https://lolipop-pandahouse.ssl-lolipop.jp:443/g5/bbs/board.php?bo_table=aaa&wr_id=2989096. Метод разработки помогает выявлять слабые места и улучшать функциональность до этапа серийного производства.
smartshoppingzone – Easy to navigate and clean layout, perfect for smart shoppers.
learnsomethingdaily – Clean and informative, perfect for daily learning and personal growth.
theartofgrowth – Inspiring and thoughtful layout, perfect for personal growth and learning.
https://xnudes.ai/
Есть кто оплатил и долго ждет адрес клада или трек??? купить онлайн мефедрон, экстази, бошки часть покупателей устраивает, продавцы тоже не жалуется. В чем проблема? нет терпения – идите в другие шопы.
Портрет по фотографии на заказ https://moi-portret.ru
Need TRON Energy? buy tron energy Affordable for your wallet. Secure platform, verified sellers, and instant delivery. Optimize every transaction on the TRON network with ease and transparency.
Energy for TRON buy trx energy instant activation, transparent pricing, 24/7 support. Reduce TRC20 fees without freezing your TRX. Convenient payment and automatic energy delivery to your wallet.
Туристический портал https://cmc.com.ua авиабилеты, отели, туры и экскурсии в одном месте. Сравнение цен, отзывы, готовые маршруты, визовые правила и карты офлайн. Планируйте поездку, бронируйте выгодно и путешествуйте без стресса.
findyourpathnow – Motivating vibe and thoughtful layout, everything feels purposeful and neat.
quantumclick.click – Bookmarked this immediately, planning to revisit for updates and inspiration.
codeshift.click – Found practical insights today; sharing this article with colleagues later.
innoclick.click – Appreciate the typography choices; comfortable spacing improved my reading experience.
nanotech.click – Bookmarked this immediately, planning to revisit for updates and inspiration.
discoverandbuy – Smooth experience and well-presented products, makes online shopping effortless.
techpilot.click – Content reads clearly, helpful examples made concepts easy to grasp.
Вобщем магаз отличный . Всем советую!!! https://www.brownbook.net/business/54455850/даугавпилс-купить-кокаин-мефедрон-марихуану-бошки/ относительно норм цены
promopulse.click – Appreciate the typography choices; comfortable spacing improved my reading experience.
smartlogic.click – Loved the layout today; clean, simple, and genuinely user-friendly overall.
trendforlife – Very fashionable and clean site, makes exploring trends effortless.
modernhomecorner – Love the modern designs and home decor ideas shared here daily.
urbanchoicehub – Trendy urban style and clean design, makes exploring fashion easy and fun.
PureValue Blog – Inspiring and interactive site, ideal for curious minds.
XEvil 6.0 automatically solve most kind of captchas,
Including such type of captchas: ReCaptcha-2, ReCaptcha v.3, Google captcha, SolveMedia, BitcoinFaucet, Steam, +12000
+ hCaptcha, FC, ReCaptcha Enterprize now supported in new XEvil 6.0!
1.) Fast, easy, precisionly
XEvil is the fastest captcha killer in the world. Its has no solving limits, no threads number limits
2.) Several APIs support
XEvil supports more than 6 different, worldwide known API: 2Captcha, anti-captcha (antigate), rucaptcha.com, death-by-captcha, etc.
just send your captcha via HTTP request, as you can send into any of that service – and XEvil will solve your captcha!
So, XEvil is compatible with hundreds of applications for SEO/SMM/password recovery/parsing/posting/clicking/cryptocurrency/etc.
3.) Useful support and manuals
After purchase, you got access to a private tech.support forum, Wiki, Skype/Telegram online support
Developers will train XEvil to your type of captcha for FREE and very fast – just send them examples
4.) How to get free trial use of XEvil full version?
– Try to search in Google “Home of XEvil”
– you will find IPs with opened port 80 of XEvil users (click on any IP to ensure)
– try to send your captcha via 2captcha API ino one of that IPs
– if you got BAD KEY error, just tru another IP
– enjoy! 🙂
– (its not work for hCaptcha!)
WARNING: Free XEvil DEMO does NOT support ReCaptcha, hCaptcha and most other types of captcha!
http://xrumersale.site/
почта России https://form.jotform.com/253105638342049 Поздравляю всех с наступающим Новым 2013 Годом! Желаю в год Змеи: 1. Мутить тока на спирту! 2. Отваривать основу. 3. Сушить естественным способом. 4. Поменьше “ловить бледного”! 🙂 Ну а магазу Chеmical-Mix желаю Процветания, Оперативности, и качественной разнообразной продукции!
Строительный портал https://6may.org новости отрасли, нормативы и СНИП, сметы и калькуляторы, BIM-гайды, тендеры и вакансии. Каталоги материалов и техники, база подрядчиков, кейсы и инструкции. Всё для проектирования, строительства и ремонта.
Всё для стройки https://artpaint.com.ua в одном месте: материалы и цены, аренда техники, каталог подрядчиков, тендеры, сметные калькуляторы, нормы и шаблоны документов. Реальные кейсы, обзоры, инструкции и новости строительного рынка.
Новостной портал https://novosti24.com.ua с фокусом на важное: оперативные репортажи, аналитика, интервью и факты без шума. Политика, экономика, технологии, культура и спорт. Удобная навигация, персональные ленты, уведомления и проверенные источники каждый день.
Подробиці за посиланням: https://altavista.org.ua/hroshi.html
Магазин высшего уровня своей работы. https://www.divephotoguide.com/user/miohyihm С новым годом всех!
yourstylezone – Stylish, modern, and user-friendly, love the smooth browsing experience.
findmotivationtoday – Positive and inspiring layout, really motivates and encourages action every day.
yourpathforward – Motivating concept, feels like a site that inspires progress and growth.
хD..ну и мне такое же скажи… https://www.montessorijobsuk.co.uk/author/oadogyfid/ Счастья жизни не ждут под окном,
findnewinspiration – Bright, clean, and motivating, perfect for discovering fresh ideas daily.
leadsrocket.click – Pages loaded fast, images appeared sharp, and formatting stayed consistent.
targetboost.click – Navigation felt smooth, found everything quickly without any confusing steps.
trendandfashionhub – Bright, trendy, and well-organized, perfect for fashion enthusiasts.
growyourmindset – Love how this name promotes positivity and continuous personal growth.
engagehub.click – Overall, professional vibe here; trustworthy, polished, and pleasantly minimal throughout.
leadgenius.click – Content reads clearly, helpful examples made concepts easy to grasp.
Докладніше: https://expertka.com.ua/suspilstvo.html
Je suis fascine par Belgium Casino, ca offre un plaisir vibrant. Il y a un eventail de titres captivants, incluant des paris sur des evenements sportifs. Il offre un demarrage en fanfare. Le support client est irreprochable. Le processus est fluide et intuitif, de temps en temps des offres plus consequentes seraient parfaites. Dans l’ensemble, Belgium Casino est un immanquable pour les amateurs. A mentionner le design est moderne et attrayant, incite a rester plus longtemps. Un avantage notable le programme VIP avec des privileges speciaux, renforce le lien communautaire.
AccГ©der maintenant|
Магазин ровнее не куда!!! Ребята отработали на славу, все четко и оперативно. Спасибо огромное, буду сотрудничать и дальше) https://imageevent.com/ravalgr4alic/vbfov Представитель был Магазин на форуме Бивис и Бадхед, на сколько я знаю он работает, он у нас был представителем.
J’adore le dynamisme de Belgium Casino, il cree une experience captivante. Les jeux proposes sont d’une diversite folle, offrant des sessions live immersives. Avec des transactions rapides. Les agents repondent avec rapidite. Les gains sont verses sans attendre, cependant des offres plus consequentes seraient parfaites. Au final, Belgium Casino offre une experience hors du commun. En complement la navigation est fluide et facile, donne envie de prolonger l’aventure. Un bonus le programme VIP avec des niveaux exclusifs, renforce la communaute.
AccГ©der maintenant|
J’ai une affection particuliere pour Gamdom Casino, ca offre une experience immersive. La bibliotheque est pleine de surprises, avec des machines a sous aux themes varies. Avec des depots rapides et faciles. Les agents sont toujours la pour aider. Les paiements sont securises et rapides, cependant plus de promotions frequentes boosteraient l’experience. En conclusion, Gamdom Casino offre une aventure inoubliable. A souligner la navigation est simple et intuitive, booste l’excitation du jeu. Un bonus les paiements en crypto rapides et surs, offre des bonus exclusifs.
http://www.gamdomcasino777fr.com|
findyourinspirationtoday – Inspiring visuals and smooth design, makes finding new ideas enjoyable and simple.
Je suis sous le charme de Gamdom Casino, ca offre une experience immersive. La bibliotheque de jeux est captivante, incluant des options de paris sportifs dynamiques. Avec des depots rapides et faciles. Le service est disponible 24/7. Les transactions sont fiables et efficaces, mais des bonus diversifies seraient un atout. En conclusion, Gamdom Casino assure un divertissement non-stop. De plus le design est tendance et accrocheur, booste l’excitation du jeu. Egalement excellent les transactions crypto ultra-securisees, propose des avantages uniques.
Entrer maintenant|
Je suis enthousiaste a propos de Betify Casino, on y trouve une vibe envoutante. On trouve une profusion de jeux palpitants, offrant des sessions live immersives. Il donne un elan excitant. Les agents repondent avec efficacite. Les retraits sont simples et rapides, malgre tout des offres plus consequentes seraient parfaites. Pour conclure, Betify Casino est un endroit qui electrise. Pour ajouter l’interface est fluide comme une soiree, facilite une experience immersive. Particulierement fun les tournois frequents pour l’adrenaline, garantit des paiements securises.
Consulter les dГ©tails|
Je suis completement seduit par Betify Casino, ca offre une experience immersive. Le choix est aussi large qu’un festival, comprenant des jeux compatibles avec les cryptos. 100% jusqu’a 500 € plus des tours gratuits. Disponible 24/7 pour toute question. Les paiements sont securises et rapides, neanmoins plus de promotions variees ajouteraient du fun. En conclusion, Betify Casino garantit un plaisir constant. Pour completer l’interface est lisse et agreable, ajoute une touche de dynamisme. Egalement excellent les tournois reguliers pour s’amuser, propose des avantages sur mesure.
Aller sur le site web|
J’adore le dynamisme de Belgium Casino, ca invite a plonger dans le fun. La gamme est variee et attrayante, proposant des jeux de casino traditionnels. Le bonus de depart est top. Les agents repondent avec rapidite. Les gains sont transferes rapidement, occasionnellement des offres plus genereuses rendraient l’experience meilleure. Pour finir, Belgium Casino est une plateforme qui pulse. En complement le site est rapide et immersif, permet une immersion complete. Un avantage le programme VIP avec des recompenses exclusives, cree une communaute soudee.
Explorer le site|
growtharena.click – Found practical insights today; sharing this article with colleagues later.
Je ne me lasse pas de Betify Casino, ca transporte dans un monde d’excitation. La bibliotheque de jeux est captivante, proposant des jeux de table classiques. Il propulse votre jeu des le debut. Les agents repondent avec efficacite. Les gains sont transferes rapidement, neanmoins plus de promotions frequentes boosteraient l’experience. Pour faire court, Betify Casino merite une visite dynamique. Par ailleurs l’interface est intuitive et fluide, permet une immersion complete. Un atout les tournois frequents pour l’adrenaline, qui stimule l’engagement.
Voir plus|
заказывал на днях 1 г. МН-001. пришло помоему в течении 5 дней. https://www.rwaq.org/users/uuxuqejokutelu-20251103194852 рип репорт ЭСКИМОС _скорость!
brandshine.click – Overall, professional vibe here; trustworthy, polished, and pleasantly minimal throughout.
simplefashioncorner – Clean, trendy, and easy-to-browse fashion options all in one place.
shopandsaveonline – Great deals and simple layout, makes online shopping quick and easy.
Je suis totalement conquis par Betway Casino, ca transporte dans un monde d’excitation. Les options de jeu sont incroyablement variees, incluant des options de paris sportifs dynamiques. 100% jusqu’a 500 € avec des free spins. Les agents sont toujours la pour aider. Les transactions sont fiables et efficaces, mais quelques free spins en plus seraient bienvenus. Dans l’ensemble, Betway Casino garantit un amusement continu. De plus le design est moderne et energique, permet une immersion complete. Particulierement attrayant les options de paris sportifs variees, qui motive les joueurs.
Emmenez-moi lГ -bas|
Как то брал 25г реги, пришло быстро, но качество не впечатлило(( https://www.betterplace.org/en/organisations/69696 Сайт сделан на уровне в скором думаю сделаю заказ, только бы качество не подвело
modernhomecorner – Love the modern designs and home decor ideas shared here daily.
Привет ветке)))) Легких подьемов https://www.divephotoguide.com/user/geifaadau через в/в непробывал такое не люблю,
XEvil 5.0 automatically solve most kind of captchas,
Including such type of captchas: ReCaptcha-2, ReCaptcha v.3, Google captcha, Solve Media, BitcoinFaucet, Steam, +12k
+ hCaptcha, FC, ReCaptcha Enterprize now supported in new XEvil 6.0!
1.) Fast, easy, precisionly
XEvil is the fastest captcha killer in the world. Its has no solving limits, no threads number limits
2.) Several APIs support
XEvil supports more than 6 different, worldwide known API: 2captcha.com, anti-captcha (antigate), RuCaptcha, death-by-captcha, etc.
just send your captcha via HTTP request, as you can send into any of that service – and XEvil will solve your captcha!
So, XEvil is compatible with hundreds of applications for SEO/SMM/password recovery/parsing/posting/clicking/cryptocurrency/etc.
3.) Useful support and manuals
After purchase, you got access to a private tech.support forum, Wiki, Skype/Telegram online support
Developers will train XEvil to your type of captcha for FREE and very fast – just send them examples
4.) How to get free trial use of XEvil full version?
– Try to search in Google “Home of XEvil”
– you will find IPs with opened port 80 of XEvil users (click on any IP to ensure)
– try to send your captcha via 2captcha API ino one of that IPs
– if you got BAD KEY error, just tru another IP
– enjoy! 🙂
– (its not work for hCaptcha!)
WARNING: Free XEvil DEMO does NOT support ReCaptcha, hCaptcha and most other types of captcha!
besttrendstore – Love the clean design and trendy collections, very appealing overall.
brandreach.click – Overall, professional vibe here; trustworthy, polished, and pleasantly minimal throughout.
clickreach.click – Overall, professional vibe here; trustworthy, polished, and pleasantly minimal throughout.
growthmind.click – Pages loaded fast, images appeared sharp, and formatting stayed consistent.
besttrendstore – Trendy and exciting store with fresh fashion and lifestyle products.
digitalrise.click – Overall, professional vibe here; trustworthy, polished, and pleasantly minimal throughout.
leadlaunch.click – Found practical insights today; sharing this article with colleagues later.
)))) все любители пробничков )))) https://rant.li/iibagabaaab/muntinlupa-kupit-kokain-mefedron-marikhuanu-boshki Магазин работает отлично!никаких косяков и запоров пока что не было)))
advisionpro.click – Mobile version looks perfect; no glitches, fast scrolling, crisp text.
adspherepro.click – Navigation felt smooth, found everything quickly without any confusing steps.
Портал о строительстве https://newboard-store.com.ua и ремонте: от проекта до сдачи объекта. Каталоги производителей, сравнение материалов, сметы, BIM и CAD, нормативная база, ленты новостей, вакансии и тендеры. Практика, цифры и готовые решения.
Современный автопортал https://carexpert.com.ua главные премьеры и тенденции, подробные обзоры, тест-драйвы, сравнения моделей и подбор шин. Экономия на обслуживании, страховке и топливе, проверки VIN, лайфхаки и чек-листы. Всё, чтобы выбрать и содержать авто без ошибок да
Современный новостной https://vestionline.com.ua портал: главные темы суток, лонгриды, мнения экспертов и объясняющие материалы. Проверка фактов, живые эфиры, инфографика, подборка цитат и контекст. Быстрый доступ с любого устройства и без лишних отвлечений.
Женский портал https://magictech.com.ua о жизни без перегруза: здоровье и красота, отношения и семья, финансы и карьера, дом и путешествия. Экспертные статьи, гайды, чек-листы и подборки. Только полезные советы и реальные истории.
https://getshared.com/oIXiBiBT
Использование контрактного производства позволяет сократить расходы и ускорить процесс разработки. Инженеры создают схемы, платы, корпус и программное обеспечение, проводят тестирование прототипов и серийное производство – https://webshow.kr/free/17605. Эффективный подход к интеграции
https://hellochat.dhakadsahab.com/blogs/71752/Code-Promo-Melbet-Casino-2026-Bonus-VIP-Jusqu-%C3%A0-100
yourfashionoutlet – Love the stylish collection here, everything feels trendy and well-priced.
Ребят вообще на высоте!!!)Удачи вам всех благ!!! ВСЕХ С ПРАЗДНИКОМ!!!Всего самого самого наилучшего!) https://www.grepmed.com/hbqcyfobyug Трек получил в первый день,5 баллов за работу магазина
startfreshjourney – Uplifting and positive vibe, perfect for inspiration and fresh beginnings.
https://www.notebook.ai/@getbonus21
thinkactachieve – Really inspiring message, perfect for anyone focused on self-improvement.
https://thecma.ca/perspectives/articles/tiff
Всё для женщины https://wonderwoman.kyiv.ua уход и макияж, мода и стиль, психология и отношения, работа и деньги, мама и ребёнок. Тренды, тесты, инструкции, подборки брендов и сервисов. Читайте, вдохновляйтесь, действуйте.
Твой автопортал https://kia-sportage.in.ua о новых и подержанных машинах: рейтинги надёжности, разбор комплектаций, реальные тесты и видео. Помощь в покупке, кредит и страховка, расходы владения, ТО и тюнинг. Карта сервисов, советы по безопасности и сезонные рекомендации плюс
Современный женский https://fashiontop.com.ua журнал: уход и макияж, капсульный гардероб, психология и отношения, питание и тренировки, карьерные советы и финансы. Честные обзоры, подборки брендов, пошаговые гайды.
Ранее заказывал у данного селлера продукцию,качеством всегда был доволен,как и уровнем поддержки пользователей,сегодня же списался с ним по поводу небольшой технической ошибки при фасовке,и был рад узнать,что честность селлера на том же уровне,что и качество продукции.Очень благодарен создателям сайта,тем кто все это делает.Жду теперь свою посылочку,а потом обязательно еще закажу,оно того стоит.Спасибо вам ребята ,за помощь,и понимание. https://form.jotform.com/253023516394050 по теме трип БРО!
thebestdeal – Always great to find a site focused on value and daily savings.
shopwithstyle – Love the elegant touch and fashion-forward vibe of this store.
believeinyourideas – Motivating and clean design, makes exploring ideas enjoyable and simple.
Но в свое время с 250м было время за месяц перед запретом: https://anyflip.com/homepage/yuwwh да для ам и дживов ацик самая подходящяя тема. а основа из мачехи ништяк.только её надо выварить раза три по 15 мин. чтоб негорлодёрило и смол меньше,ведь в смоле много канабиола остаёца
theartofgrowth – Inspiring name that perfectly fits a mindset of learning and progress.
https://magnitola.kiev.ua
Еженедельный журнал https://sw.org.ua об авто и свободе дороги: премьеры, электромобили, кроссоверы, спорткары и коммерческий транспорт. Реальные тесты, долгосрочные отчёты, безопасность, кейсы покупки и продажи, кредит и страховка, рынок запчастей и сервисы рядом.
Журнал об автомобилях https://svobodomislie.com без мифов: проверяем маркетинг фактами, считаем расходы владения, рассказываем о ТО, тюнинге и доработках. Тестируем новые и б/у, объясняем опции простыми словами. Экспертные мнения, идеи маршрутов и полезные чек-листы. Всегда!.
Портал о балансе https://allwoman.kyiv.ua красота и самоуход, отношения и семья, развитие и карьера, дом и отдых. Реальные советы, капсульные гардеробы, планы тренировок, рецепты и лайфхаки. Ежедневные обновления и подборки по интересам.
Флуд??? Я высказал свое мнение! Или это запрещено? https://www.grepmed.com/uibkybgeb Все окей пацаны))))это че то почта затупила,)))Кстати кач-во лучше стало)Первый раз 1 к 20 прям норм)))
uniquevaluezone – Offers cool finds at great prices, really worth visiting.
https://loktrk.com
globalstyleoutlet – Amazing range of international fashion, really fun to browse.
народ подскажите а как дела обстоят в столице Москва закладками? https://anyflip.com/homepage/cbeti Наверное стоит все же воздержаться от заказов и отправки денег и подождать до появления селлера..,на соседнем форуме(СФН) его тоже ждут….
XEvil 6.0 automatically solve most kind of captchas,
Including such type of captchas: ReCaptcha-2, ReCaptcha v.3, Google, SolveMedia, BitcoinFaucet, Steam, +12k
+ hCaptcha, FC, ReCaptcha Enterprize now supported in new XEvil 6.0!
1.) Fast, easy, precisionly
XEvil is the fastest captcha killer in the world. Its has no solving limits, no threads number limits
2.) Several APIs support
XEvil supports more than 6 different, worldwide known API: 2captcha.com, anti-captcha (antigate), RuCaptcha, DeathByCaptcha, etc.
just send your captcha via HTTP request, as you can send into any of that service – and XEvil will solve your captcha!
So, XEvil is compatible with hundreds of applications for SEO/SMM/password recovery/parsing/posting/clicking/cryptocurrency/etc.
3.) Useful support and manuals
After purchase, you got access to a private tech.support forum, Wiki, Skype/Telegram online support
Developers will train XEvil to your type of captcha for FREE and very fast – just send them examples
4.) How to get free trial use of XEvil full version?
– Try to search in Google “Home of XEvil”
– you will find IPs with opened port 80 of XEvil users (click on any IP to ensure)
– try to send your captcha via 2captcha API ino one of that IPs
– if you got BAD KEY error, just tru another IP
– enjoy! 🙂
– (its not work for hCaptcha!)
WARNING: Free XEvil DEMO does NOT support ReCaptcha, hCaptcha and most other types of captcha!
newtrendmarket – Love the fresh and modern vibe, full of current fashion finds.
discoverhiddenopportunities – Inspiring name that encourages exploring new ideas and growth.
dailyshoppingzone – Love how convenient this site is for everyday shopping needs.
https://444-000.ru/
adsprint.click – Mobile version looks perfect; no glitches, fast scrolling, crisp text.
спасибо за отзыв! https://www.rwaq.org/users/facupatijugez-20251104145751 ты давай вася тут провокации не сей)))
brandfuel.click – Appreciate the typography choices; comfortable spacing improved my reading experience.
promopath.click – Overall, professional vibe here; trustworthy, polished, and pleasantly minimal throughout.
Автомобильный блог https://amt-auto.ru обзоры, ремонт, обслуживание и уход. Пошаговые инструкции, подбор масел и расходников, диагностика ошибок, лайфхаки, экономия на сервисе. Полезно новичкам и опытным водителям. Читай просто, делай уверенно.
adreachpro.click – Mobile version looks perfect; no glitches, fast scrolling, crisp text.
marketpilot.click – Content reads clearly, helpful examples made concepts easy to grasp.
Аренда авто https://turzila.com без депозита, аренда яхт и удобный трансфер в отель. Онлайн-бронирование за 3 минуты, русская поддержка 24/7, прозрачные цены. Оплата картой РФ.
marketfuel.click – Color palette felt calming, nothing distracting, just focused, thoughtful design.
Нужна фотосьемка? съемки для маркетплейсов москва каталожная, инфографика, на модели, упаковка, 360°. Правильные ракурсы, чистый фон, ретушь, цветопрофили. Готовим комплекты для карточек и баннеров. Соответствие правилам WB/Ozon.
Je suis accro a Betway Casino, on ressent une ambiance festive. Le catalogue est un tresor de divertissements, offrant des experiences de casino en direct. Avec des depots rapides et faciles. Les agents repondent avec rapidite. Le processus est fluide et intuitif, mais encore quelques tours gratuits supplementaires seraient cool. Au final, Betway Casino offre une experience inoubliable. A noter le site est rapide et style, donne envie de prolonger l’aventure. A mettre en avant les tournois reguliers pour la competition, cree une communaute soudee.
Ouvrir maintenant|
clickscale.click – Appreciate the typography choices; comfortable spacing improved my reading experience.
trendycollectionhub – Great place for discovering stylish collections and creative designs.
Только вот странно что в трипе написано что пак был с 1гр ск (а твой заказ это покупка) а продажу у магазина от 5гр https://anyflip.com/homepage/hncpd Вызвал такси;)
newtrendmarket – Fresh trends and a smooth shopping experience, really well put together.
dailyshoppingzone – Love how convenient this site is for everyday shopping needs.
J’adore l’energie de Betway Casino, c’est une plateforme qui deborde de dynamisme. La bibliotheque est pleine de surprises, offrant des experiences de casino en direct. Il donne un avantage immediat. Le support est pro et accueillant. Les transactions sont fiables et efficaces, de temps en temps quelques spins gratuits en plus seraient top. Globalement, Betway Casino garantit un plaisir constant. Par ailleurs la plateforme est visuellement dynamique, ce qui rend chaque moment plus vibrant. Un plus les evenements communautaires dynamiques, propose des privileges sur mesure.
Touchez ici|
Je suis sous le charme de Gamdom Casino, ca donne une vibe electrisante. La selection de jeux est impressionnante, proposant des jeux de casino traditionnels. Il booste votre aventure des le depart. Le suivi est d’une precision remarquable. Les transactions sont toujours securisees, rarement des bonus diversifies seraient un atout. En fin de compte, Gamdom Casino merite une visite dynamique. Par ailleurs la plateforme est visuellement dynamique, donne envie de prolonger l’aventure. A mettre en avant les evenements communautaires engageants, renforce la communaute.
Parcourir maintenant|
Инфа с вашего сайта. Я уже брал 6-APB, и выглядел он несколько иначе. https://www.impactio.com/researcher/amandamartinfwfd мда а в итоге болт водичка
J’ai un faible pour Gamdom Casino, ca offre un plaisir vibrant. Il y a un eventail de titres captivants, incluant des paris sportifs pleins de vie. Il offre un coup de pouce allechant. Le suivi est toujours au top. Les transactions sont toujours fiables, neanmoins quelques free spins en plus seraient bienvenus. En resume, Gamdom Casino vaut une exploration vibrante. De surcroit le design est moderne et attrayant, ce qui rend chaque partie plus fun. Egalement super les evenements communautaires engageants, qui dynamise l’engagement.
Aller à l’intérieur|
Je suis completement seduit par Belgium Casino, ca offre une experience immersive. Les jeux proposes sont d’une diversite folle, incluant des paris sportifs pleins de vie. 100% jusqu’a 500 € + tours gratuits. Disponible a toute heure via chat ou email. Les paiements sont securises et rapides, par moments quelques free spins en plus seraient bienvenus. En bref, Belgium Casino merite un detour palpitant. Pour completer le design est style et moderne, incite a prolonger le plaisir. Egalement top les competitions regulieres pour plus de fun, offre des bonus exclusifs.
Rejoindre maintenant|
J’adore l’energie de Betify Casino, ca pulse comme une soiree animee. Les options sont aussi vastes qu’un horizon, offrant des experiences de casino en direct. Il rend le debut de l’aventure palpitant. Le support est efficace et amical. Le processus est clair et efficace, mais plus de promos regulieres ajouteraient du peps. En conclusion, Betify Casino garantit un plaisir constant. Notons aussi le design est moderne et energique, facilite une experience immersive. Un point fort les options variees pour les paris sportifs, garantit des paiements securises.
Avancer|
simplebuyhub – Super easy to navigate site with plenty of affordable options.
J’ai un veritable coup de c?ur pour Belgium Casino, ca transporte dans un monde d’excitation. Le catalogue de titres est vaste, proposant des jeux de table sophistiques. Il donne un elan excitant. Les agents sont toujours la pour aider. Les retraits sont lisses comme jamais, bien que des recompenses supplementaires dynamiseraient le tout. En somme, Belgium Casino merite un detour palpitant. En complement le design est tendance et accrocheur, apporte une touche d’excitation. Egalement super les tournois reguliers pour s’amuser, assure des transactions fiables.
DГ©couvrir le web|
yourvisionawaits – Inspiring name that motivates people to dream and take action.
Je suis bluffe par Betify Casino, il cree un monde de sensations fortes. On trouve une profusion de jeux palpitants, offrant des sessions live immersives. Il rend le debut de l’aventure palpitant. Disponible a toute heure via chat ou email. Les transactions sont fiables et efficaces, neanmoins quelques spins gratuits en plus seraient top. Au final, Betify Casino offre une aventure inoubliable. En plus la navigation est claire et rapide, ce qui rend chaque session plus excitante. Un atout les evenements communautaires pleins d’energie, propose des privileges sur mesure.
Visiter la plateforme|
Все посылку получил. ровно 7 дней после оплаты и посылка уже у меня. конспирация отличная. https://www.grepmed.com/rougegqeb ну сегодня пыхнул час назад ….. приопустило……………… но еще норм не грузит
trendforlife – Love the concept; a perfect spot for true fashion enthusiasts.
buildyourpotential – Great reminder that growth starts with small daily improvements.
отзывы ждем https://pubhtml5.com/homepage/mglfq Хочу сказать большое спасибо за бонус за помошь сайту, зе бест
https://unsplash.com/@antoniosimmons
Современный журнал https://rupsbigbear.com про авто: новости индустрии, глубокие обзоры моделей, тесты, сравнительные таблицы и советы по выбору. Экономия на обслуживании и страховке, разбор технологий, безопасность и комфорт. Всё, чтобы ездить дальше, дешевле и увереннее.
Автопортал для новичков https://lada.kharkiv.ua и профи: новости рынка, аналитика, сравнения, тесты, долгосрочные отчёты. Выбор авто под задачи, детальные гайды по покупке, продаже и трейд-ину, защита от мошенников. Правила, штрафы, ОСАГО/КАСКО и полезные инструменты и ещё
Женский медиа-гид https://adviceskin.com здоровье, питание, спорт, ментальное благополучие, карьера, личные финансы, хобби и поездки. Практика вместо кликбейта — понятные гайды, чек-листы и экспертные мнения.
trafficsphere.click – Color palette felt calming, nothing distracting, just focused, thoughtful design.
urbanfashioncorner – Trendy, bold, and full of energy — perfect urban fashion vibe.
Мне отказали в подтверждении джаббера в ЛС. Будьте бдительны! https://kemono.im/ydehcobfobay/iuzhno-sukhokumsk-kupit-kokain-mefedron-marikhuanu-boshki Но зато в том случае будут доказательства, что селлер обещал одно, а пришло совсем другое) Так что я правильно написал 😉
smartshoppingzone – Perfect for budget-conscious shoppers who still want quality products.
XEvil 5.0 automatically solve most kind of captchas,
Including such type of captchas: ReCaptcha v.2, ReCaptcha v.3, Google captcha, Solve Media, BitcoinFaucet, Steam, +12k
+ hCaptcha, FC, ReCaptcha Enterprize now supported in new XEvil 6.0!
1.) Fast, easy, precisionly
XEvil is the fastest captcha killer in the world. Its has no solving limits, no threads number limits
2.) Several APIs support
XEvil supports more than 6 different, worldwide known API: 2Captcha, anti-captcha (antigate), rucaptcha.com, death-by-captcha, etc.
just send your captcha via HTTP request, as you can send into any of that service – and XEvil will solve your captcha!
So, XEvil is compatible with hundreds of applications for SEO/SMM/password recovery/parsing/posting/clicking/cryptocurrency/etc.
3.) Useful support and manuals
After purchase, you got access to a private tech.support forum, Wiki, Skype/Telegram online support
Developers will train XEvil to your type of captcha for FREE and very fast – just send them examples
4.) How to get free trial use of XEvil full version?
– Try to search in Google “Home of XEvil”
– you will find IPs with opened port 80 of XEvil users (click on any IP to ensure)
– try to send your captcha via 2captcha API ino one of that IPs
– if you got BAD KEY error, just tru another IP
– enjoy! 🙂
– (its not work for hCaptcha!)
WARNING: Free XEvil DEMO does NOT support ReCaptcha, hCaptcha and most other types of captcha!
http://xrumersale.site/
learnsomethingamazing – Encouraging and creative name that promotes daily learning and discovery.
+огромная потеря популярности и быстрый спад клиентов. https://rant.li/qygcadygag/sverdlovsk-kupit-kokain-mefedron-marikhuanu-boshki магазин четкй притензий нет на качество регвезде гавно(((((
brightfashionfinds – Such vibrant styles here, everything feels bold and fresh.
freshdealsworld – Great site for fresh offers and exciting online shopping deals.
как здесь стелят? https://imageevent.com/aakrei8lfal/pvwng Брал и не раз в данном магазине, притензий нет, все качественно, оперативность радует! Продовцы дайте информации о CHM – 500, что за зверь? когда в розницу уйдет
findbestdeals – Love how easy it is to browse and spot the top deals.
КЕнт,сорри на почту ответь.. https://anyflip.com/homepage/htkjo вообще почта 1 класс оказываеться самое быстрое.. 2-3 суток и приходит
startfreshjourney – Motivating message, perfect for anyone ready for a new beginning.
adlift.click – Appreciate the typography choices; comfortable spacing improved my reading experience.
Женское медиа https://beautytips.kyiv.ua о главном: здоровье и профилактика, стиль и тренды, психологические разборы, мотивация, деньги и инвестиции, материнство и путешествия. Честные обзоры, подборка сервисов и истории читательниц.
dailydealsplace – Great place for deals, always something new and exciting to find.
clickgurus.click – Found practical insights today; sharing this article with colleagues later.
learnandshine – Inspiring content that motivates me to keep learning every day.
Je suis enthousiasme par Betway Casino, c’est une plateforme qui pulse avec energie. Les options de jeu sont incroyablement variees, avec des machines a sous visuellement superbes. Il offre un coup de pouce allechant. Disponible 24/7 par chat ou email. Les transactions sont d’une fiabilite absolue, neanmoins plus de promos regulieres dynamiseraient le jeu. En somme, Betway Casino merite un detour palpitant. Par ailleurs le site est rapide et engageant, ajoute une vibe electrisante. Un avantage les paiements securises en crypto, renforce le lien communautaire.
https://betwaycasinofr.com/|
uniquegiftideas – Excellent variety of creative gifts, ideal for any special occasion.
Медиа для женщин https://feromonia.com.ua которые выбирают себя: здоровье и профилактика, ментальное благополучие, работа и развитие, материнство и хобби. Практичные инструкции, тесты, интервью и вдохновение без кликбейта.
clickprohub.click – Color palette felt calming, nothing distracting, just focused, thoughtful design.
Женский журнал https://dama.kyiv.ua о жизни без перегруза: красота и здоровье, стиль и покупки, отношения и семья, карьера и деньги, дом и путешествия. Экспертные советы, чек-листы, тренды и реальные истории — каждый день по делу.
fashionmarketplace – Excellent variety of styles, feels like a hub for fashion lovers.
inspireeverymoment – Motivating platform that encourages positivity every single day.
Всё, что важно https://gryada.org.ua сегодня: мода и стиль, бьюти-рутины, рецепты и фитнес, отношения и семья, путешествия и саморазвитие. Краткие выжимки, длинные разборы, подборки сервисов — удобно и полезно.
findhappinessdaily – Uplifting messages and helpful tips that brighten my day instantly.
purechoicehub – Clean design and high-quality items, really impressed with the layout.
simplebuyoutlet – Smooth shopping experience, great deals and very clean design.
starttodaymoveforward – Positive and inspiring, encourages daily progress and self-growth.
https://tutvot.com/
Женский журнал https://krasotka.kyiv.ua про баланс: красота, психология, карьера, деньги, дом и отдых. Экспертные колонки, списки покупок, планы тренировок и проверки здоровья. Материалы, к которым хочется возвращаться.
Онлайн-портал https://womanexpert.kyiv.ua для женщин, которые хотят жить в балансе. Красота, здоровье, семья, карьера и финансы в одном месте. Ежедневные статьи, подборки, советы экспертов и вдохновение для лучшей версии себя.
Глянец без иллюзий https://ladyone.kyiv.ua красота и здоровье с фактчекингом, стиль без переплат, карьера и деньги простым языком. Интервью, тесты, полезные гайды — меньше шума, больше пользы.
classystyleoutlet – Elegant fashion selections and well-curated items, love browsing here.
https://avia.tutvot.com/
yourstylezone – Trendy site that really helps express personal fashion taste.
startbuildingtoday – Inspiring site that motivates you to take action and grow.
thepowerofgrowth – Beautiful name that reminds you of personal and continuous improvement.
https://s-nano-s.ru/
XEvil 5.0 automatically solve most kind of captchas,
Including such type of captchas: ReCaptcha v.2, ReCaptcha-3, Google captcha, Solve Media, BitcoinFaucet, Steam, +12000
+ hCaptcha, FC, ReCaptcha Enterprize now supported in new XEvil 6.0!
1.) Fast, easy, precisionly
XEvil is the fastest captcha killer in the world. Its has no solving limits, no threads number limits
2.) Several APIs support
XEvil supports more than 6 different, worldwide known API: 2Captcha, anti-captchas.com (antigate), rucaptcha.com, DeathByCaptcha, etc.
just send your captcha via HTTP request, as you can send into any of that service – and XEvil will solve your captcha!
So, XEvil is compatible with hundreds of applications for SEO/SMM/password recovery/parsing/posting/clicking/cryptocurrency/etc.
3.) Useful support and manuals
After purchase, you got access to a private tech.support forum, Wiki, Skype/Telegram online support
Developers will train XEvil to your type of captcha for FREE and very fast – just send them examples
4.) How to get free trial use of XEvil full version?
– Try to search in Google “Home of XEvil”
– you will find IPs with opened port 80 of XEvil users (click on any IP to ensure)
– try to send your captcha via 2captcha API ino one of that IPs
– if you got BAD KEY error, just tru another IP
– enjoy! 🙂
– (its not work for hCaptcha!)
WARNING: Free XEvil DEMO does NOT support ReCaptcha, hCaptcha and most other types of captcha!
http://xrumersale.site/
Всё для современной https://model.kyiv.ua женщины: уход и макияж, стиль и шопинг, психология и отношения, питание и тренировки. Честные обзоры, капсульные гардеробы, планы на неделю и проверенные советы.
Мода и красота https://magiclady.kyiv.ua для реальной жизни: капсулы по сезонам, уход по типу кожи и бюджета, честные обзоры брендов, шопинг-листы и устойчивое потребление.
purestylemarket – Classy and minimal style collections, perfect for modern shoppers.
trendandfashionhub – Love how stylish and updated the latest trends are here.
Сайт для женщин https://modam.com.ua о жизни без перегруза: здоровье и красота, отношения и семья, карьера и деньги, дом и путешествия. Экспертные статьи, гайды, чек-листы и подборки — только полезное и применимое.
seostreampro.click – Overall, professional vibe here; trustworthy, polished, and pleasantly minimal throughout.
urbanbuycorner – Trendy products with a sleek city vibe, very enjoyable to explore.
createpositivechange – Love the uplifting message here, motivates me to do better daily.
clickforce.click – Loved the layout today; clean, simple, and genuinely user-friendly overall.
beststylecollection – Stylish selections and great variety, makes shopping a real pleasure.
brandmagnet.click – Overall, professional vibe here; trustworthy, polished, and pleasantly minimal throughout.
clickenginepro.click – Pages loaded fast, images appeared sharp, and formatting stayed consistent.
seojet.click – Mobile version looks perfect; no glitches, fast scrolling, crisp text.
trafficstream.click – Found practical insights today; sharing this article with colleagues later.
Je suis sous le charme de Azur Casino, il cree une experience captivante. Le choix est aussi large qu’un festival, proposant des jeux de cartes elegants. Le bonus d’inscription est attrayant. Le support est pro et accueillant. Le processus est transparent et rapide, mais encore des recompenses en plus seraient un bonus. Pour conclure, Azur Casino assure un fun constant. En complement la plateforme est visuellement electrisante, permet une immersion complete. A mettre en avant les evenements communautaires dynamiques, offre des recompenses continues.
Cliquer maintenant|
bestchoicecollection – Wide range of stylish products and great pricing overall.
styleandchoice – Elegant and trendy, perfect for shoppers who love variety.
Медиа для женщин https://otnoshenia.net 25–45: карьера и навыки, ментальное благополучие, осознанные покупки, спорт и питание. Краткие выжимки и глубокие разборы, подборки брендов и сервисов.
Реальная красота https://princess.kyiv.ua и стиль: уход по типу кожи и бюджету, капсулы по сезонам, устойчивое потребление. Гайды, шопинг-листы, честные обзоры и советы стилистов.
Je suis emerveille par Azur Casino, c’est un lieu ou l’adrenaline coule a flots. Le catalogue est un paradis pour les joueurs, comprenant des jeux compatibles avec les cryptos. Avec des transactions rapides. Disponible a toute heure via chat ou email. Les retraits sont fluides et rapides, rarement des offres plus genereuses rendraient l’experience meilleure. Globalement, Azur Casino offre une aventure memorable. En complement le site est rapide et immersif, facilite une experience immersive. Egalement super les tournois reguliers pour la competition, offre des bonus exclusifs.
Apprendre les dГ©tails|
everydaytrendhub – Always up to date with the latest trends, great resource.
Женский сайт https://one-lady.com о балансе: работа, финансы, здоровье, дом, дети и отдых. Пошаговые инструкции, трекеры привычек, лайфхаки и вдохновляющие истории. Меньше шума — больше пользы.
J’adore la vibe de Azur Casino, ca offre un plaisir vibrant. Il y a une abondance de jeux excitants, proposant des jeux de cartes elegants. Le bonus de bienvenue est genereux. Les agents sont toujours la pour aider. Les transactions sont toujours securisees, quelquefois des recompenses en plus seraient un bonus. En somme, Azur Casino est une plateforme qui fait vibrer. Notons aussi le site est rapide et immersif, ajoute une vibe electrisante. Particulierement attrayant les options de paris sportifs diversifiees, renforce la communaute.
Explorer plus|
Je suis emerveille par Lucky 31 Casino, ca transporte dans un monde d’excitation. Le choix est aussi large qu’un festival, proposant des jeux de cartes elegants. Il amplifie le plaisir des l’entree. Le support est efficace et amical. Les paiements sont surs et fluides, rarement des offres plus genereuses rendraient l’experience meilleure. En bref, Lucky 31 Casino est un incontournable pour les joueurs. A signaler la plateforme est visuellement vibrante, ce qui rend chaque moment plus vibrant. A signaler les transactions crypto ultra-securisees, offre des recompenses regulieres.
Savoir plus|
Je suis emerveille par 1xBet Casino, il offre une experience dynamique. Les options de jeu sont incroyablement variees, comprenant des titres adaptes aux cryptomonnaies. 100% jusqu’a 500 € avec des spins gratuits. Disponible 24/7 par chat ou email. Les paiements sont surs et fluides, rarement des bonus plus varies seraient un plus. En conclusion, 1xBet Casino garantit un plaisir constant. En extra la plateforme est visuellement electrisante, permet une plongee totale dans le jeu. Un point fort les options de paris sportifs diversifiees, propose des privileges sur mesure.
Ouvrir le site|
Je suis completement seduit par Action Casino, on y trouve une energie contagieuse. Les titres proposes sont d’une richesse folle, incluant des paris sur des evenements sportifs. Avec des transactions rapides. Le suivi est d’une fiabilite exemplaire. Les gains arrivent sans delai, par ailleurs plus de promotions frequentes boosteraient l’experience. Pour faire court, Action Casino merite un detour palpitant. De plus l’interface est lisse et agreable, donne envie de prolonger l’aventure. Egalement top les competitions regulieres pour plus de fun, renforce le lien communautaire.
Ouvrir la page|
Je suis captive par 1xBet Casino, il cree un monde de sensations fortes. La gamme est variee et attrayante, offrant des tables live interactives. 100% jusqu’a 500 € + tours gratuits. Le support est pro et accueillant. Le processus est transparent et rapide, cependant des bonus plus varies seraient un plus. En conclusion, 1xBet Casino est un immanquable pour les amateurs. Notons egalement la navigation est intuitive et lisse, ce qui rend chaque session plus excitante. Particulierement fun les evenements communautaires dynamiques, qui stimule l’engagement.
AccГ©der maintenant|
J’adore l’energie de Lucky 31 Casino, il procure une sensation de frisson. On trouve une gamme de jeux eblouissante, offrant des tables live interactives. Le bonus initial est super. Le service d’assistance est au point. Les transactions sont toujours securisees, mais encore des recompenses supplementaires seraient parfaites. En resume, Lucky 31 Casino est un endroit qui electrise. Notons aussi la plateforme est visuellement dynamique, ce qui rend chaque moment plus vibrant. Un point fort les options de paris sportifs variees, assure des transactions fiables.
Voir plus|
Je suis completement seduit par Action Casino, il offre une experience dynamique. La bibliotheque est pleine de surprises, proposant des jeux de casino traditionnels. Le bonus initial est super. Le support client est irreprochable. Les paiements sont surs et fluides, mais quelques spins gratuits en plus seraient top. Globalement, Action Casino garantit un amusement continu. Par ailleurs la navigation est intuitive et lisse, ce qui rend chaque session plus excitante. Un avantage notable le programme VIP avec des avantages uniques, qui stimule l’engagement.
Visiter pour plus|
createpositivechange – Love the message and design, truly encourages meaningful growth.
shopandsaveonline – Awesome platform for smart shoppers looking for great online deals.
https://sketchfab.com/getbonus21
freshfindsoutlet – New and trendy products pop up here all the time, love it.
growtogetherstrong – Positive and motivating platform, perfect for teamwork and personal growth.
discoverinfiniteideas – Inspiring and creative site name that sparks imagination instantly.
makeimpacteveryday – A motivating and uplifting name that inspires daily action.
learnshareachieve – Perfect for anyone who loves to learn and make steady progress.
trafficmind.click – Color palette felt calming, nothing distracting, just focused, thoughtful design.
uniquevaluehub – Excellent selection of quality products with standout value, love it.
trendandstyle – Great name that captures modern fashion and timeless personal style.
dailyvalueoutlet – Perfect mix of affordability and variety, really useful store.
fashiondailycorner – Trendy fashion picks and great updates, really well-curated site.
findperfectgift – Great ideas for every occasion, makes gifting so much easier.
globalmarketoutlet – Wide range of international products, makes shopping fun and diverse.
modernchoicehub – Clean, modern, and packed with smart shopping selections.
promobridge.click – Loved the layout today; clean, simple, and genuinely user-friendly overall.
discoverfashionfinds – Great site for fashion lovers, lots of trendy items to explore.
shopandsmiletoday – The name fits perfectly, such a cheerful and easy shopping experience.
marketscope.click – Bookmarked this immediately, planning to revisit for updates and inspiration.
seotrack.click – Color palette felt calming, nothing distracting, just focused, thoughtful design.
Женский блог https://sunshadow.com.ua о жизни без перегруза: красота и здоровье, отношения и семья, стиль и покупки, деньги и карьера. Честные обзоры, лайфхаки, планы на неделю и личные истории — только то, что реально помогает.
Современный женский https://timelady.kyiv.ua сайт о стиле жизни: уход за собой, макияж, прически, фитнес, питание, мода и деньги. Практичные советы, разбор трендов, подборки покупок и личная эффективность. Будь в ресурсе и чувствуй себя уверенно каждый день. Больше — внутри.
promocloud.click – Content reads clearly, helpful examples made concepts easy to grasp.
digitaltrack.click – Found practical insights today; sharing this article with colleagues later.
clickgrow.click – Mobile version looks perfect; no glitches, fast scrolling, crisp text.
J’ai un faible pour Azur Casino, on ressent une ambiance festive. Le catalogue est un paradis pour les joueurs, proposant des jeux de cartes elegants. Avec des depots rapides et faciles. Le service client est de qualite. Les gains arrivent sans delai, de temps en temps quelques tours gratuits supplementaires seraient cool. Pour faire court, Azur Casino offre une experience hors du commun. En bonus l’interface est simple et engageante, amplifie le plaisir de jouer. Un plus les evenements communautaires engageants, offre des recompenses regulieres.
Voir la page d’accueil|
trendworldmarket – Love how updated this site stays with the latest global trends.
creativechoicehub – Innovative designs and creative products, really impressed with the variety.
shopthelatestdeals – Found amazing deals today, makes shopping fun and easy.
Блог для женщин https://sweetheart.kyiv.ua которые выбирают себя: самоценность, баланс, карьера, финансы, хобби и путешествия. Мини-привычки, трекеры, вдохновляющие тексты и практичные советы.
yourdailyinspiration – Inspiring words and great visuals, perfect for a morning boost.
Портал для женщин https://viplady.kyiv.ua ценящих стиль, комфорт и развитие. Мода, уход, отношения, семья и здоровье. Только практичные советы, экспертные мнения и вдохновляющий контент. Узнай, как быть собой и чувствовать себя лучше.
Как настроение?) https://www.montessorijobsuk.co.uk/author/aaiyhodyf/ Магазин работает ЧЕТКО…
Онлайн-площадка https://topwoman.kyiv.ua для женщин: стиль, бьюти-новинки, осознанность, здоровье, отношения, материнство и работа. Экспертные статьи, инструкции, чек-листы, тесты и вдохновение. Создавай лучший день, развивайся и находи ответы без лишней воды.
I’m gone to convey my little brother, that he should also visit this web site on regular basis to obtain updated from most recent information.
https://www.clubeslotcartrofa.com/melbet-akcii-2025-luchshie-predlozheniya/
discoverandshopnow – Great shopping experience, always something new and fun to explore.
brightcollectionhub – Colorful and stylish items that really make browsing enjoyable.
магазин отличный ! работает уже не первый год! обращайтесь! https://beteiligung.stadtlindau.de/profile/%D0%A3%D0%BE%D0%BB%D1%84%D0%B8%D1%88-%D0%91%D0%B5%D0%B9%20%D0%BA%D1%83%D0%BF%D0%B8%D1%82%D1%8C%20%D0%9A%D0%BE%D0%BA%D0%B0%D0%B8%D0%BD/ Сделал заказ. Пропустил реквизиты для оплаты. Продавец свяжись со мной, оплачу. В понедельник сможете отправить товар?
trendyvaluezone – Stylish products at affordable prices, love the variety here.
Женский медиасайт https://woman365.kyiv.ua с акцентом на пользу: капсульный гардероб, бьюти-рутины, здоровье, отношения, саморазвитие и материнство. Пошаговые инструкции, списки покупок, чек-листы и экспертные ответы. Заботимся о тебе и твоем времени. Подробности — на сайте.
J’ai une passion debordante pour Azur Casino, il propose une aventure palpitante. Le choix est aussi large qu’un festival, offrant des tables live interactives. Il propulse votre jeu des le debut. Le suivi est toujours au top. Les paiements sont securises et rapides, malgre tout des offres plus importantes seraient super. Pour conclure, Azur Casino merite une visite dynamique. En complement l’interface est fluide comme une soiree, apporte une touche d’excitation. Un bonus les evenements communautaires dynamiques, qui motive les joueurs.
Emmenez-moi lГ -bas|
finduniqueproducts – Unique finds and creative ideas, everything feels handpicked and quality.
J’ai un veritable coup de c?ur pour Action Casino, ca invite a plonger dans le fun. Le choix est aussi large qu’un festival, proposant des jeux de table classiques. Il offre un demarrage en fanfare. Le support est pro et accueillant. Les retraits sont lisses comme jamais, neanmoins quelques free spins en plus seraient bienvenus. Pour finir, Action Casino est un must pour les passionnes. Par ailleurs le design est moderne et attrayant, ce qui rend chaque moment plus vibrant. Un atout le programme VIP avec des privileges speciaux, qui booste la participation.
Cliquer pour voir|
Je suis sous le charme de Lucky 31 Casino, il procure une sensation de frisson. Il y a une abondance de jeux excitants, offrant des sessions live immersives. Il booste votre aventure des le depart. Le service est disponible 24/7. Les paiements sont securises et instantanes, par contre des bonus diversifies seraient un atout. Au final, Lucky 31 Casino offre une aventure memorable. A signaler le design est tendance et accrocheur, apporte une energie supplementaire. Particulierement interessant les tournois frequents pour l’adrenaline, qui booste la participation.
Entrer maintenant|
J’ai un veritable coup de c?ur pour 1xBet Casino, ca donne une vibe electrisante. Il y a un eventail de titres captivants, proposant des jeux de table classiques. Le bonus de depart est top. Le support est fiable et reactif. Les paiements sont surs et efficaces, malgre tout plus de promotions variees ajouteraient du fun. Dans l’ensemble, 1xBet Casino merite une visite dynamique. A noter l’interface est lisse et agreable, ajoute une vibe electrisante. A mettre en avant les options de paris sportifs diversifiees, assure des transactions fiables.
Aller au site|
Je suis enthousiasme par Lucky 31 Casino, ca offre une experience immersive. Le choix est aussi large qu’un festival, offrant des sessions live palpitantes. 100% jusqu’a 500 € avec des free spins. Le suivi est impeccable. Les paiements sont surs et fluides, cependant quelques free spins en plus seraient bienvenus. Dans l’ensemble, Lucky 31 Casino offre une aventure inoubliable. Ajoutons aussi la plateforme est visuellement electrisante, booste le fun du jeu. Un bonus les evenements communautaires pleins d’energie, propose des avantages sur mesure.
Continuer Г lire|
bestdailycorner – Found so many great daily deals here, totally worth visiting often.
J’adore l’ambiance electrisante de Action Casino, on ressent une ambiance festive. La selection de jeux est impressionnante, offrant des experiences de casino en direct. Il propulse votre jeu des le debut. Le support est fiable et reactif. Le processus est fluide et intuitif, parfois des recompenses supplementaires dynamiseraient le tout. Pour finir, Action Casino est une plateforme qui pulse. En extra la navigation est fluide et facile, donne envie de prolonger l’aventure. A noter les evenements communautaires pleins d’energie, offre des bonus exclusifs.
Voir la page|
seopath.click – Pages loaded fast, images appeared sharp, and formatting stayed consistent.
Бро, у меня тоже самое, даже пробывал уксусом гасить, по всем признакам сода. Продаван пообещал решить проблему, но авторитет подорван. https://say.la/read-blog/135382 Ребята подскажите JTE-907 1 к скольки делать и сколько по времени прет?
Твой женский помощник https://vsegladko.net как подчеркнуть индивидуальность, ухаживать за кожей и волосами, планировать бюджет и отдых. Мода, психология, дом и карьера в одном месте. Подборки, гайды и истории, которые мотивируют заботиться о себе. Узнай больше на сайте.
trendandfashion – Perfect mix of classic and modern trends, always inspiring.
Женский портал https://womanportal.kyiv.ua о моде, психологии и уходе за собой. Узнай, как сочетать стиль, уверенность и внутреннюю гармонию. Лучшие практики, обзоры и вдохновляющие материалы для современных женщин.
discoverandshop – Great platform for exploring unique items and discovering new favorites.
Всё о развитии https://run.org.ua и здоровье детей: диагностические скрининги, логопедия, дефектология, нейропсихология, ЛФК, массаж, группы раннего развития, подготовка к школе. Планы занятий, расписание, запись онлайн, советы специалистов и проверенные методики.
Инфа с вашего сайта. Я уже брал 6-APB, и выглядел он несколько иначе. https://pubhtml5.com/homepage/kmflz Ещё и сообщения трут.
groweverydaynow – Inspiring platform that reminds me to keep improving and learning daily.
groweverydaynow – Motivational and uplifting, reminds me to keep improving daily.
That is really interesting, You’re a very professional blogger. I’ve joined your rss feed and sit up for seeking more of your wonderful post. Also, I’ve shared your site in my social networks
https://gems88.net/melbet-bukmeker-official-2025/
https://phatwalletforums.com/user/imopoxoda/
Сайт о строительстве https://blogcamp.com.ua и ремонте: проекты, сметы, материалы, инструменты, пошаговые инструкции и лайфхаки. Чек-листы, калькуляторы, ошибки и их решения. Делайте качественно и экономно.
freshtrendstore – New arrivals and trending items make shopping exciting every visit.
marketrise.click – Content reads clearly, helpful examples made concepts easy to grasp.
в течении суток обычно (24 часа не 12)… https://www.montessorijobsuk.co.uk/author/eococicabe/ Админ по аське с кем связался адекват=))) радует.Приятный сайт цены тоже радуют сделал заказ=)) буду ждать. Качество Каличество отпишу
webimpact.click – Mobile version looks perfect; no glitches, fast scrolling, crisp text.
brandtrail.click – Mobile version looks perfect; no glitches, fast scrolling, crisp text.
digitalpeak.click – Content reads clearly, helpful examples made concepts easy to grasp.
Советы для родителей https://agusha.com.ua на каждый день: раннее развитие, кризисы возрастов, дисциплина, здоровье, игры и учеба. Экспертные разборы, простые лайфхаки и проверенные методики без мифов. Помогаем понять потребности ребёнка и снизить стресс в семье.
seoforce.click – Appreciate the typography choices; comfortable spacing improved my reading experience.
globalmarketoutlet – Wide selection of global products, makes shopping interesting and diverse.
shopwithjoy – Love the cheerful vibe here, shopping truly feels joyful and easy.
Спасибо Магазину)вы лучшие))))))))!!!!!!!!!!!!!!!!!!!!! :monetka: Качество на 100% https://www.divephotoguide.com/user/ocuguhrw Да трек получил, но я не про это я про задержки, сейчас у них все должно быть ровно
yourdailyfinds – Convenient and fun to browse, always discovering something useful.
Официальный сайт Kraken kra44 безопасная платформа для анонимных операций в darknet. Полный доступ к рынку через актуальные зеркала и onion ссылки.
Родителям о главном https://rodkom.org.ua баланс режима, питание, истерики и границы, подготовка к школе, дружба и безопасность в сети. Короткие памятки, чек-листы и практики от специалистов. Только актуальные данные и решения, которые работают в реальной жизни.
shopthelatestdeals – Convenient platform for finding amazing deals quickly and easily.
Женский портал https://womanclub.kyiv.ua о стиле жизни, красоте и вдохновении. Советы по уходу, отношениям, карьере и саморазвитию. Реальные истории, модные тренды, психологические лайфхаки и идеи для гармонии. Всё, что важно каждой современной женщине.
bestchoiceoutlet – Great prices and selections, feels like a hidden gem for shoppers.
globalmarketoutlet – Wide selection of global products, makes shopping interesting and diverse.
и че сделали? условку дали? https://www.divephotoguide.com/user/abyocohufig Спасибо за отзывы о новых реагентах. Можно также записаться на совместки, где цена от 400 р за грамм 🙂 Отправка быстрая
Кракен зеркало
growwithpurpose – Excellent site with a strong message about intentional self-growth.
learnandshine – Encouraging content that motivates me to grow and shine every day.
startsomethingnewtoday – Motivating name and content that encourages taking the first step.
yourtimeisnow – Motivating site that encourages taking action and embracing opportunities today.
Официальный сайт Kraken https://kra44-cc.at безопасная платформа для анонимных операций в darknet. Полный доступ к рынку через актуальные зеркала и onion ссылки.
J’adore l’ambiance electrisante de Azur Casino, c’est un lieu ou l’adrenaline coule a flots. Les options de jeu sont infinies, incluant des paris sportifs en direct. Il donne un elan excitant. Disponible 24/7 pour toute question. Les gains arrivent sans delai, cependant plus de promos regulieres ajouteraient du peps. En somme, Azur Casino est une plateforme qui fait vibrer. A signaler l’interface est lisse et agreable, ce qui rend chaque moment plus vibrant. A noter les options de paris sportifs diversifiees, qui motive les joueurs.
DГ©couvrir le contenu|
findhappinessdaily – Love the positivity here, helps me focus on the good things.
explorewithoutlimits – Inspires creativity and curiosity, perfect for adventurous minds.
discoveramazingstories – Captivating stories and inspiring content, keeps me coming back.
adtrend.click – Content reads clearly, helpful examples made concepts easy to grasp.
yourdealhub – Excellent deals on quality products, really makes shopping worthwhile.
Автомобильный журнал https://autodream.com.ua для новичков и энтузиастов: тренды, тест-драйвы, сравнения, разбор комплектаций, VIN-проверки и подготовка к сделке. Практичные гайды по уходу и экономии, гаджеты для авто, законы и штрафы. Делимся опытом, чтобы не переплачивали.
changeyourmindset – Inspiring site that helps shift perspectives and encourages real growth.
uniquegiftcorner – Creative and thoughtful gift ideas, ideal for any occasion.
everydayvaluezone – Great deals and simple navigation, really makes shopping effortless.
trendloversplace – Perfect for trend enthusiasts, always something fresh and exciting to see.
trendandbuy – Awesome spot for trendy finds, love browsing the latest styles.
3D-печать для бизнеса — это идеальное решение для прототипирования и тестирования. Мы предлагаем производство изделий любой сложности. Мы работаем на точных промышленных 3D-принтерах, что обеспечивает быстрый запуск продукта на рынок. Создаём детали для инженерии, а также готовы адаптироваться под задачи клиента. Заказы исполняются в удобное для вас время, при этом условия максимально выгодные. Закажите 3D-печать для вашего бизнеса, и получите точный и надёжный результат: https://osclass-classifieds.a2hosted.com/index.php?page=user&action=pub_profile&id=135826&item_type=active&per_page=16. Мы гарантируем долговечность и прочность каждой детали.
modernstylecorner – Sleek and contemporary selections, perfect for style-conscious shoppers.
vavada casino pl
Nabycie nieruchomosci w Beskidach to szansa na stworzenie wymarzonego miejsca na wakacje lub staly dom.
Dzieki rozwijajacej sie infrastrukturze i rosnacemu zainteresowaniu turystow, ceny dzialek stopniowo wzrastaja. Region ten przyciaga milosnikow gorskich wedrowek i aktywnego wypoczynku.
#### **2. Gdzie szukac najlepszych ofert dzialek?**
Wybor odpowiedniej lokalizacji zalezy od indywidualnych potrzeb i budzetu. Portal dzialki-beskidy.pl oferuje szeroki wybor nieruchomosci w roznych cenach.
Przed zakupem nalezy dokladnie przeanalizowac dostepnosc mediow i warunki zabudowy. Wiele ofert zawiera szczegolowe informacje o mozliwosciach zagospodarowania terenu, co ulatwia podjecie decyzji.
#### **3. Jakie korzysci daje posiadanie dzialki w Beskidach?**
Nieruchomosc w gorach to nie tylko inwestycja finansowa, ale rowniez szansa na poprawe jakosci zycia. Wlasny kawalek ziemi w gorach pozwala na realizacje marzen o spokojnym zyciu z dala od zgielku miasta.
Dodatkowo, region ten oferuje wiele atrakcji, takich jak szlaki turystyczne i stoki narciarskie. Beskidy to idealne miejsce dla tych, ktorzy cenia aktywny tryb zycia i bliskosc natury.
#### **4. Jak przygotowac sie do zakupu dzialki?**
Przed podjeciem decyzji warto skonsultowac sie z prawnikiem i geodeta. Profesjonalna pomoc pozwoli uniknac nieprzyjemnych niespodzianek zwiazanych z formalnosciami.
Wazne jest rowniez okreslenie swojego budzetu i planow zwiazanych z zagospodarowaniem terenu. Niektore oferty pozwalaja na rozlozenie platnosci, co ulatwia inwestycje.
—
### **Szablon Spinu**
**1. Dlaczego warto kupic dzialke w Beskidach?**
– Malownicze krajobrazy Beskidow przyciagaja zarowno turystow, jak i przyszlych mieszkancow.
– Dzieki rozwojowi infrastruktury, tereny te staja sie jeszcze bardziej atrakcyjne.
**2. Gdzie szukac najlepszych ofert dzialek?**
– Profesjonalne agencje nieruchomosci czesto oferuja najlepsze propozycje w regionie.
– Przed zakupem nalezy zweryfikowac dostepnosc mediow i mozliwosci zabudowy.
**3. Jakie korzysci daje posiadanie dzialki w Beskidach?**
– Wlasny kawalek gorskiej przestrzeni pozwala na ucieczke od miejskiego zgielku.
– Region oferuje wiele aktywnosci, od wedrowek po gorach po jazde na nartach.
**4. Jak przygotowac sie do zakupu dzialki?**
– Wazne jest zasiegniecie porady prawnej przed podpisaniem umowy.
– Rozmowa z dotychczasowymi wlascicielami moze dostarczyc cennych informacji.
Мужской портал https://kakbog.com о стиле, здоровье, карьере и технологиях. Обзоры гаджетов, тренировки, уход, финансы, отношения и путешествия. Практичные советы и честные разборы каждый день.
Современный женский https://storinka.com.ua портал с полезными статьями, рекомендациями и тестами. Тренды, красота, отношения, карьера и вдохновение каждый день. Всё, что помогает чувствовать себя счастливой и уверенной.
trendandbuy – Awesome spot for trendy finds, love browsing the latest styles.
believeinyourdreams – Truly motivating theme, I love the positivity this site spreads.
purefashionchoice – Clean, stylish fashion selections that are both modern and practical.
advista.click – Found practical insights today; sharing this article with colleagues later.
growbeyondlimits – Encouraging platform for personal growth and pushing boundaries every day.
seoconnect.click – Content reads clearly, helpful examples made concepts easy to grasp.
trafficrise.click – Pages loaded fast, images appeared sharp, and formatting stayed consistent.
growthcraft.click – Color palette felt calming, nothing distracting, just focused, thoughtful design.
seoorbit.click – Overall, professional vibe here; trustworthy, polished, and pleasantly minimal throughout.
brightcollectionhub – Love the name—it perfectly matches the bright, modern selections here.
growthflow.click – Bookmarked this immediately, planning to revisit for updates and inspiration.
J’ai un faible pour Lucky 31 Casino, c’est un lieu ou l’adrenaline coule a flots. La variete des jeux est epoustouflante, proposant des jeux de table classiques. 100% jusqu’a 500 € avec des spins gratuits. Disponible 24/7 pour toute question. Les retraits sont fluides et rapides, bien que des bonus diversifies seraient un atout. En conclusion, Lucky 31 Casino offre une experience inoubliable. Par ailleurs la plateforme est visuellement captivante, incite a rester plus longtemps. Particulierement cool les evenements communautaires pleins d’energie, propose des privileges sur mesure.
Commencer maintenant|
J’adore l’energie de Azur Casino, on ressent une ambiance de fete. Les titres proposes sont d’une richesse folle, incluant des paris sportifs pleins de vie. Il booste votre aventure des le depart. Disponible 24/7 pour toute question. Le processus est fluide et intuitif, parfois quelques spins gratuits en plus seraient top. En bref, Azur Casino est une plateforme qui fait vibrer. En complement la navigation est simple et intuitive, ce qui rend chaque moment plus vibrant. A mettre en avant le programme VIP avec des recompenses exclusives, offre des bonus constants.
Obtenir les dГ©tails|
Актуальные новости https://thingshistory.com без перегруза: коротко о событиях и глубоко о смыслах. Репортажи с места, интервью, разборы и аналитика. Умные уведомления, ночной режим, офлайн-доступ и виджеты. Доверяйте проверенным данным и оставайтесь на шаг впереди.
Новостной портал https://pto-kyiv.com.ua для тех, кто ценит фактчекинг и ясность. Картина дня в одном месте: политика, экономика, общество, наука, спорт. Ежедневные дайджесты, обзоры рынков, календари событий и авторские колонки. Читайте, делитесь, обсуждайте.
Всё про технику https://webstore.com.ua и технологии: обзоры гаджетов, тесты, сравнения, ИИ и софт, фото/видео, умный дом, авто-тех, безопасность. Пошаговые гайды, лайфхаки, подбор комплектующих и лучшие приложения. Понятно, актуально, без лишней воды.
J’adore la vibe de Action Casino, ca donne une vibe electrisante. On trouve une profusion de jeux palpitants, proposant des jeux de casino traditionnels. Le bonus initial est super. Le support est fiable et reactif. Les gains arrivent en un eclair, de temps en temps des offres plus consequentes seraient parfaites. Dans l’ensemble, Action Casino merite un detour palpitant. D’ailleurs la plateforme est visuellement electrisante, ajoute une vibe electrisante. Egalement genial les evenements communautaires engageants, propose des privileges personnalises.
Voir maintenant|
globalvaluecorner – Amazing value and variety of products from around the world.
J’adore l’energie de Lucky 31 Casino, ca pulse comme une soiree animee. Les titres proposes sont d’une richesse folle, incluant des options de paris sportifs dynamiques. Il rend le debut de l’aventure palpitant. Le suivi est d’une fiabilite exemplaire. Le processus est transparent et rapide, neanmoins quelques free spins en plus seraient bienvenus. En conclusion, Lucky 31 Casino assure un fun constant. En bonus la plateforme est visuellement dynamique, donne envie de prolonger l’aventure. Un avantage notable les options de paris sportifs diversifiees, offre des bonus exclusifs.
Commencer Г dГ©couvrir|
modernshoppingcorner – Modern design, easy shopping flow, and great product selection.
J’adore la vibe de 1xBet Casino, il offre une experience dynamique. La variete des jeux est epoustouflante, offrant des sessions live immersives. Avec des depots fluides. Le suivi est d’une precision remarquable. Les paiements sont surs et fluides, occasionnellement des offres plus consequentes seraient parfaites. En fin de compte, 1xBet Casino assure un divertissement non-stop. Par ailleurs la plateforme est visuellement electrisante, permet une immersion complete. Un point cle les evenements communautaires dynamiques, qui booste la participation.
Poursuivre la lecture|
J’adore l’energie de Action Casino, ca donne une vibe electrisante. La bibliotheque est pleine de surprises, incluant des options de paris sportifs dynamiques. Le bonus d’inscription est attrayant. Le suivi est impeccable. Les retraits sont ultra-rapides, occasionnellement plus de promotions frequentes boosteraient l’experience. En bref, Action Casino est un lieu de fun absolu. En extra le design est moderne et energique, booste l’excitation du jeu. Un element fort les evenements communautaires vibrants, assure des transactions fiables.
Action|
Je suis bluffe par Lucky 31 Casino, il cree un monde de sensations fortes. La selection de jeux est impressionnante, proposant des jeux de cartes elegants. 100% jusqu’a 500 € avec des free spins. Le suivi est toujours au top. Les gains sont transferes rapidement, a l’occasion plus de promotions variees ajouteraient du fun. Pour finir, Lucky 31 Casino garantit un plaisir constant. A mentionner l’interface est intuitive et fluide, booste l’excitation du jeu. Particulierement attrayant les evenements communautaires engageants, qui motive les joueurs.
Visiter en ligne|
Je suis captive par Action Casino, on y trouve une energie contagieuse. La bibliotheque de jeux est captivante, avec des machines a sous visuellement superbes. Il rend le debut de l’aventure palpitant. Les agents sont rapides et pros. Les paiements sont securises et instantanes, toutefois des recompenses supplementaires dynamiseraient le tout. En bref, Action Casino offre une experience hors du commun. A souligner la plateforme est visuellement vibrante, facilite une immersion totale. Un bonus les transactions en crypto fiables, garantit des paiements rapides.
DГ©couvrir maintenant|
believeandachieve – Positive and motivational content, perfect for personal growth seekers.
everydayessentials – Convenient site to find daily essentials quickly and easily.
freshcollectionhub – Fresh products, great presentation, and a fun browsing experience.
Нужна лестница? изготовление лестниц в частный дом под ключ в Москве и области: замер, проектирование, производство, отделка и монтаж. Лестницы на металлокаркасе. Индивидуальные решения для дома и бизнеса.
Поиск работы https://employmentcenter.com.ru по актуальным вакансиям городов России, СНГ, стран ЕАЭС: обновления предложений работы ежедневно, рассылка свежих объявлений вакансий на E-mail, умные поисковые фильтры и уведомления в Telegram, Одноклассники, ВКонтакте. Помогаем найти работу мечты без лишних звонков и спама.
Нужно продвижение? Продвижение современных сайтов в ТОП 3 выдачи Яндекса и Google : аудит, семантика, техоптимизация, контент, ссылки, рост трафика и лидов. Прозрачные KPI и отчёты, реальные сроки, измеримый результат.
J’ai un veritable coup de c?ur pour Azur Casino, on ressent une ambiance festive. Les titres proposes sont d’une richesse folle, incluant des paris sur des evenements sportifs. Le bonus de depart est top. Le service client est de qualite. Le processus est transparent et rapide, neanmoins plus de promos regulieres ajouteraient du peps. En somme, Azur Casino est un choix parfait pour les joueurs. A mentionner l’interface est lisse et agreable, donne envie de prolonger l’aventure. Un plus les evenements communautaires pleins d’energie, offre des recompenses regulieres.
Explorer davantage|
еще раз решил воспользоваться магазом ))) уже 2 года только у них покупаю))) и пока доволен https://www.band.us/page/100486660/ какой выход с 1г ?
dailydealsplace – Always updated with great bargains, love checking in daily.
findnewhorizons – A wonderful reminder to explore, grow, and discover new opportunities.
trendandbuy – Trendy items at good prices, always up to date with new arrivals.
Отдельных слов заслуживает подарочный твердый на грамм )Очень позитивная штука с запахом сыра хДДД https://yamap.com/users/4914239 прям не втерпеж
budgetfriendlyhub – Great variety of affordable options without sacrificing style or quality.
learncreategrow – Inspiring content that encourages learning, creating, and personal growth.
Брали ни один раз, в последний раз было несколько косяков. Всё разрешилось вчера плюс бонус за предыдущий косяк. https://yamap.com/users/4903891 Ты покупал у этого магазина ? Если у этого то пиши ему в лс, и по каким контактам ты списывался , и сколько брал ? Не могли тебя тут кинуть
classystyleoutlet – Love the elegant yet accessible fashion choices available here.
Профессиональный специалист по недвижимости: оценка, подготовка, маркетинг, показы, торг и юрсопровождение до сделки. Фото/видео, 3D-тур, быстрый выход на покупателя.
работал я работал 2 года имея не малую клиентскую базу и тут решил я вас кинуть на 10 грамм, сам то подумай где ты это пишешь. https://form.jotform.com/253033218046044 Дорогие наши форумчане, мы бы рады с вами пообщаться на разные темы, и стараемся общаться со всеми, и порой просто не хватает времени ведь мы не железные, если вы хотите что то конкретно заказать ася и скайп ждет вас, просто нереальное кол-во народа задают вопросы утром днем и вечером, и вот даже сейчас, мы очень стараемся изменить ситуацию в лучшую сторону. С начала месяца т.е. с 1 июня вы сможете самостоятельно заказывать и оплачивать прямо на сайте, а так же будете видеть наличие продукции.
Играешь на пианино? ноты для фортепиано Поможем освоить ноты, ритм, технику и красивое звучание. Индивидуальные уроки, гибкий график, онлайн-формат и авторские методики. Реальный прогресс с первого месяца.
Школа фортепиано обучение игры на фортепиано для начинающих и продвинутых: база, джазовые гармонии, разбор песен, импровизация. Удобные форматы, домашние задания с разбором, поддержка преподавателя и быстрые результаты.
growtogetherstrong – Positive and motivating, perfect for teamwork and community growth.
exploreopportunityzone – Excellent motivational content, helps me think bigger and act smarter.
Все посылку получил. ровно 7 дней после оплаты и посылка уже у меня. конспирация отличная. https://www.brownbook.net/business/54436424/гаага-купить-кокаин-мефедрон-марихуану-бошки/ Новичка 1к10* само то!!!!!!!!!!!!
seostream.click – Content reads clearly, helpful examples made concepts easy to grasp.
seohero.click – Appreciate the typography choices; comfortable spacing improved my reading experience.
digitallift.click – Loved the layout today; clean, simple, and genuinely user-friendly overall.
promoscope.click – Mobile version looks perfect; no glitches, fast scrolling, crisp text.
trafficstorm.click – Pages loaded fast, images appeared sharp, and formatting stayed consistent.
https://gravatar.com/freebet1xbet
promovix.click – Found practical insights today; sharing this article with colleagues later.
buildyourownfuture – Great motivational site, helps focus on goals and planning ahead.
2.Почему на сайте нет ниодного упоминания о ритейле,в то время,как заказы надо делать через него? https://www.montessorijobsuk.co.uk/author/lofkahockuy/ прет 30-45 мин.1к10.действием похож на рсц
https://forum.cnnr.fr/user/1xbetcode
classystylemarket – Stylish products with great prices, love the classy layout of this site.
growthmatrix.click – Mobile version looks perfect; no glitches, fast scrolling, crisp text.
https://freekashmir.mn.co/members/36833455
видел тут в ветке пару сообщений о том, что заказчикам вместо нормального товара какую то муть присылали, так вот хотелось бы узнать у владельцев магазина, в связи с чем возникают такие накладки и как часто такое случается, а то почтой итак заказ долго дожидаться, а если ещё подобный косяк выйдет с возвратом, то это будет полный п… https://rant.li/cjucleyfsyb/solnechnyi-kupit-kokain-mefedron-marikhuanu-boshki Твой стафф офигенен.
creativegiftoutlet – Amazing gift ideas, really unique and thoughtful selections available here.
dreamdiscovercreate – Truly inspiring space that encourages creativity and following your dreams.
Просьба не тяните, ответьте срочно!!!!! https://kemono.im/diucecgedydy/novorzhev-kupit-kokain-mefedron-marikhuanu-boshki Сегодня оплатил. Жду не дождусь.?
shopforvalue – Affordable products without compromising quality, makes shopping super satisfying.
Je suis enthousiaste a propos de Azur Casino, ca donne une vibe electrisante. La selection est riche et diversifiee, proposant des jeux de casino traditionnels. Il rend le debut de l’aventure palpitant. Le suivi est d’une fiabilite exemplaire. Le processus est transparent et rapide, occasionnellement des offres plus genereuses rendraient l’experience meilleure. En fin de compte, Azur Casino est une plateforme qui pulse. De surcroit le site est rapide et immersif, ajoute une touche de dynamisme. Egalement excellent les evenements communautaires vibrants, propose des avantages uniques.
Visiter pour plus|
Клад был уличным, спрятан по разумному, под решеткой окна подъезда, рядом с окном стояла лавочка, на которой можно без палива посидеть и нащупать клад. Клад 5 балов из 5!!! https://yamap.com/users/4919567 все от души))) вот бы еще во всех городах зк делали)))))
хм.. интересно сказал.. никогда не задумывался.. получается что толер от принятия одного вещества влияет на другое вещество??? https://www.brownbook.net/business/54451600/снежногорск-купить-кокаин-мефедрон-марихуану-бошки/ Чем злиться, выдал бы дудки иль реги
Je ne me lasse pas de Lucky 31 Casino, ca offre une experience immersive. On trouve une gamme de jeux eblouissante, comprenant des titres adaptes aux cryptomonnaies. 100% jusqu’a 500 € plus des tours gratuits. Le service est disponible 24/7. Les transactions sont toujours fiables, neanmoins quelques free spins en plus seraient bienvenus. Globalement, Lucky 31 Casino est un choix parfait pour les joueurs. Notons egalement la navigation est fluide et facile, amplifie le plaisir de jouer. Un bonus le programme VIP avec des recompenses exclusives, garantit des paiements securises.
Voir la page d’accueil|
Je suis epate par Azur Casino, ca transporte dans un monde d’excitation. On trouve une gamme de jeux eblouissante, avec des machines a sous aux themes varies. 100% jusqu’a 500 € + tours gratuits. Les agents repondent avec efficacite. Les transactions sont toujours fiables, de temps en temps des recompenses en plus seraient un bonus. Globalement, Azur Casino est un endroit qui electrise. A souligner le site est rapide et style, permet une immersion complete. Egalement top le programme VIP avec des recompenses exclusives, propose des avantages sur mesure.
Aller sur le site web|
growbeyondlimits – Encouraging platform that inspires personal growth and pushing boundaries every day.
findamazingoffers – Excellent deals and diverse products, makes shopping super satisfying.
J’adore la vibe de Action Casino, c’est une plateforme qui pulse avec energie. La selection est riche et diversifiee, proposant des jeux de cartes elegants. Avec des depots instantanes. Le support est fiable et reactif. Le processus est simple et transparent, parfois des recompenses en plus seraient un bonus. En resume, Action Casino est une plateforme qui pulse. A mentionner l’interface est intuitive et fluide, facilite une experience immersive. Particulierement fun le programme VIP avec des privileges speciaux, propose des avantages uniques.
Action|
Je suis sous le charme de 1xBet Casino, ca transporte dans un monde d’excitation. Les options de jeu sont infinies, proposant des jeux de table classiques. Il offre un coup de pouce allechant. Le support est fiable et reactif. Les transactions sont fiables et efficaces, cependant des recompenses additionnelles seraient ideales. Au final, 1xBet Casino vaut une visite excitante. Ajoutons aussi le design est tendance et accrocheur, donne envie de continuer l’aventure. A signaler les paiements en crypto rapides et surs, propose des avantages sur mesure.
http://www.1xbetcasino365fr.com|
Je suis emerveille par Lucky 31 Casino, il offre une experience dynamique. Les titres proposes sont d’une richesse folle, incluant des paris sportifs pleins de vie. Avec des depots rapides et faciles. Les agents sont rapides et pros. Les transactions sont fiables et efficaces, mais des recompenses supplementaires dynamiseraient le tout. Globalement, Lucky 31 Casino assure un divertissement non-stop. Pour couronner le tout le design est moderne et energique, ce qui rend chaque moment plus vibrant. Egalement super les competitions regulieres pour plus de fun, propose des privileges personnalises.
DГ©couvrir la page|
Je suis epate par Lucky 31 Casino, c’est une plateforme qui pulse avec energie. Les titres proposes sont d’une richesse folle, avec des machines a sous visuellement superbes. Le bonus de depart est top. Les agents sont toujours la pour aider. Les transactions sont toujours securisees, cependant des recompenses en plus seraient un bonus. Globalement, Lucky 31 Casino offre une aventure inoubliable. En bonus la plateforme est visuellement dynamique, ce qui rend chaque session plus palpitante. Un element fort le programme VIP avec des niveaux exclusifs, cree une communaute vibrante.
Commencer ici|
Je suis totalement conquis par 1xBet Casino, il cree une experience captivante. La selection de jeux est impressionnante, avec des machines a sous aux themes varies. Avec des depots fluides. Le support est fiable et reactif. Les retraits sont fluides et rapides, par contre des offres plus consequentes seraient parfaites. En conclusion, 1xBet Casino garantit un plaisir constant. A noter la plateforme est visuellement captivante, incite a prolonger le plaisir. A signaler les evenements communautaires vibrants, qui dynamise l’engagement.
DГ©couvrir maintenant|
Je suis fascine par Action Casino, ca invite a plonger dans le fun. La bibliotheque de jeux est captivante, avec des slots aux graphismes modernes. Le bonus de depart est top. Le service client est de qualite. Les paiements sont securises et rapides, mais encore des offres plus consequentes seraient parfaites. Pour conclure, Action Casino est une plateforme qui fait vibrer. D’ailleurs le design est moderne et attrayant, booste l’excitation du jeu. Particulierement fun les nombreuses options de paris sportifs, offre des recompenses regulieres.
Voir la page d’accueil|
слышала за вас) с пробы начнем? https://anyflip.com/homepage/ygmck и сколько те6е поо6ещали заплотить?
Je suis completement seduit par Action Casino, il procure une sensation de frisson. Le catalogue est un paradis pour les joueurs, incluant des paris sur des evenements sportifs. Avec des depots rapides et faciles. Le service client est de qualite. Les gains arrivent en un eclair, cependant des bonus varies rendraient le tout plus fun. Dans l’ensemble, Action Casino est un must pour les passionnes. En bonus la plateforme est visuellement captivante, ajoute une touche de dynamisme. Un plus les transactions en crypto fiables, qui booste la participation.
Action|
resultsdrive.click – Overall, professional vibe here; trustworthy, polished, and pleasantly minimal throughout.
Unlock Your Potential Spot – Found something uplifting that motivated me to keep going.
proclicklab.click – Overall, professional vibe here; trustworthy, polished, and pleasantly minimal throughout.
rapidleads.click – Appreciate the typography choices; comfortable spacing improved my reading experience.
nextlevelads.click – Pages loaded fast, images appeared sharp, and formatting stayed consistent.
boosttraffic.click – Loved the layout today; clean, simple, and genuinely user-friendly overall.
Trend Hunt Spot – Great range of items, found some real gems today.
findamazingoffers – Excellent deals and diverse products, makes shopping super satisfying.
virallaunch.click – Bookmarked this immediately, planning to revisit for updates and inspiration.
Ищете, где купить права быстро и надежно? Наш сервис предлагает легальное и безопасное оформление водительских прав с гарантией качества. Мы поможем пройти все этапы получения водительского удостоверения, включая подготовку документов, обучение в автошколе и сдачу экзаменов. У нас работают опытные специалисты, которые сопровождают вас на каждом шаге, обеспечивая прозрачность и законность процесса.
clickvoltage.click – Loved the layout today; clean, simple, and genuinely user-friendly overall.
Deals & Discounts Spot – Consistently find excellent deals, new ones every day.
Smart Shop Portal – Came across a useful item that saved me time today.
dreamfashionfinds – Stylish and trendy fashion finds that make everyday shopping fun.
Daily Fashion Hub – Checking in is exciting, trends keep appearing daily.
Кракен зеркало вход на сайт — надежный способ обойти блокировки и получить доступ к популярной платформе Кракен. Если официальный сайт недоступен из-за региональных ограничений или технических проблем, зеркало Кракен поможет быстро и безопасно войти на сайт без потери функционала.
Discover Unique Hub – Loved the clarity of presentation, made finding items a breeze.
trafficsprintpro.click – Mobile version looks perfect; no glitches, fast scrolling, crisp text.
smartbuyplace – Excellent place to find smart deals and quality products efficiently.
Style World Hub – Fresh and stylish pieces make browsing enjoyable every time.
NT Live Feed – Authentic stories aur achi presentation ke sath ek solid platform.
Shopping Deals Online – Found an item that was perfectly suited for my needs.
Trend Explorer Portal – Lots of fresh finds, discovered several unique products.
На платформе 7k casino удобно пополнять баланс — всё происходит мгновенно. Слоты не зависают, играть одно удовольствие. Деньги вывел без лишних вопросов, заявку обработали быстро https://potolki-excludar.ru/ru-ru/
На платформе 7k casino всё чётко — быстрое пополнение, удобная навигация. Вывел деньги через пару часов после заявки. Проблем не возникло ни разу за всё время: 7к казино официальный сайт
Je suis epate par Azur Casino, ca offre un plaisir vibrant. Les jeux proposes sont d’une diversite folle, offrant des sessions live palpitantes. Il rend le debut de l’aventure palpitant. Le service client est excellent. Les retraits sont ultra-rapides, a l’occasion des recompenses supplementaires dynamiseraient le tout. En somme, Azur Casino offre une experience hors du commun. A noter le site est rapide et engageant, donne envie de continuer l’aventure. Egalement excellent les transactions en crypto fiables, qui motive les joueurs.
Parcourir le site|
leadvector.click – Content reads clearly, helpful examples made concepts easy to grasp.
rankvector.click – Overall, professional vibe here; trustworthy, polished, and pleasantly minimal throughout.
clickimpact.click – Appreciate the typography choices; comfortable spacing improved my reading experience.
leadfusionlab.click – Loved the layout today; clean, simple, and genuinely user-friendly overall.
Value Shop Hub – Smooth navigation and fair pricing made browsing enjoyable.
adflowhub.click – Content reads clearly, helpful examples made concepts easy to grasp.
yourjourneycontinues – This site shared a thought today that genuinely kept me motivated.
Inner Peace Hub – Helps me feel calm and inspired every time I visit.
clickstreampro.click – Pages loaded fast, images appeared sharp, and formatting stayed consistent.
City Buy Portal – Found navigating easy, with detailed product info at every step.
Your Growth Portal – Motivating content that encourages me to do better each day.
Pathfinder Portal – Tips for creating new routines, makes starting over easier.
Fashion Ideas Hub – Found several new style directions that seemed promising.
J’adore l’ambiance electrisante de Azur Casino, il cree un monde de sensations fortes. Le choix est aussi large qu’un festival, incluant des options de paris sportifs dynamiques. Il amplifie le plaisir des l’entree. Les agents repondent avec efficacite. Les transactions sont toujours securisees, rarement plus de promos regulieres ajouteraient du peps. Au final, Azur Casino garantit un amusement continu. En extra le site est rapide et immersif, ce qui rend chaque moment plus vibrant. Egalement top le programme VIP avec des niveaux exclusifs, cree une communaute vibrante.
DГ©couvrir dГЁs maintenant|
Je suis fascine par Azur Casino, on ressent une ambiance de fete. La bibliotheque est pleine de surprises, incluant des paris sur des evenements sportifs. Il donne un avantage immediat. Le support est rapide et professionnel. Les transactions sont toujours fiables, par moments des recompenses additionnelles seraient ideales. En resume, Azur Casino offre une experience inoubliable. Notons aussi le design est tendance et accrocheur, amplifie l’adrenaline du jeu. A mettre en avant les options variees pour les paris sportifs, assure des transactions fluides.
DГ©couvrir maintenant|
Je ne me lasse pas de Lucky 31 Casino, ca offre un plaisir vibrant. Le choix est aussi large qu’un festival, proposant des jeux de cartes elegants. Le bonus d’inscription est attrayant. Le suivi est d’une precision remarquable. Le processus est simple et transparent, cependant quelques free spins en plus seraient bienvenus. En conclusion, Lucky 31 Casino est une plateforme qui fait vibrer. Pour ajouter l’interface est lisse et agreable, facilite une experience immersive. Particulierement cool les paiements en crypto rapides et surs, assure des transactions fluides.
Obtenir des infos|
J’ai une passion debordante pour Action Casino, on y trouve une energie contagieuse. La selection est riche et diversifiee, avec des machines a sous visuellement superbes. Avec des depots fluides. Le suivi est d’une fiabilite exemplaire. Les paiements sont surs et fluides, cependant des recompenses supplementaires seraient parfaites. En conclusion, Action Casino est un must pour les passionnes. Ajoutons que l’interface est intuitive et fluide, permet une plongee totale dans le jeu. Un avantage notable les competitions regulieres pour plus de fun, renforce la communaute.
Parcourir maintenant|
Je suis enthousiasme par 1xBet Casino, on y trouve une vibe envoutante. Les options sont aussi vastes qu’un horizon, proposant des jeux de casino traditionnels. Le bonus d’inscription est attrayant. Disponible a toute heure via chat ou email. Les paiements sont surs et fluides, cependant des offres plus genereuses rendraient l’experience meilleure. En fin de compte, 1xBet Casino offre une experience inoubliable. En plus la navigation est simple et intuitive, booste le fun du jeu. Particulierement fun les options variees pour les paris sportifs, garantit des paiements rapides.
Ouvrir le site|
Разработка электроники на заказ позволяет минимизировать ошибки и ускорить процесс вывода продуктов на рынок. Специалисты проектируют схемотехнику, создают платы, корпус и программное обеспечение, тестируют прототипы. После успешного тестирования начинается серийное производство готовых устройств: https://academy.interreg-euro-med.eu/blog/index.php?entryid=10751. Прекрасный способ ускорить вывод новых продуктов на рынок.
Grow & Achieve Hub – Content here always promotes meaningful personal progress.
marketstorm.click – Navigation felt smooth, found everything quickly without any confusing steps.
Je suis captive par Lucky 31 Casino, ca transporte dans un monde d’excitation. Le choix est aussi large qu’un festival, offrant des sessions live immersives. Il donne un avantage immediat. Le service client est de qualite. Les gains arrivent en un eclair, par ailleurs des recompenses supplementaires dynamiseraient le tout. En somme, Lucky 31 Casino offre une aventure inoubliable. Pour couronner le tout l’interface est simple et engageante, facilite une immersion totale. A mettre en avant les evenements communautaires vibrants, offre des bonus constants.
Aller Г la page|
Je suis enthousiasme par 1xBet Casino, ca invite a l’aventure. Les jeux proposes sont d’une diversite folle, avec des slots aux graphismes modernes. Avec des depots instantanes. Disponible 24/7 pour toute question. Les gains sont verses sans attendre, cependant quelques free spins en plus seraient bienvenus. Globalement, 1xBet Casino est un choix parfait pour les joueurs. En extra l’interface est lisse et agreable, ce qui rend chaque session plus palpitante. Un atout le programme VIP avec des niveaux exclusifs, garantit des paiements securises.
http://www.1xbetcasino366fr.com|
Je suis sous le charme de Action Casino, on ressent une ambiance festive. On trouve une gamme de jeux eblouissante, offrant des tables live interactives. Il offre un coup de pouce allechant. Disponible 24/7 pour toute question. Les transactions sont d’une fiabilite absolue, a l’occasion quelques tours gratuits en plus seraient geniaux. En conclusion, Action Casino merite une visite dynamique. De surcroit la navigation est simple et intuitive, ce qui rend chaque session plus palpitante. A noter les tournois frequents pour l’adrenaline, assure des transactions fluides.
Explorer maintenant|
Fashion Discovery Spot – Cute items and unexpected finds that are totally unique.
Je suis enthousiasme par Azur Casino, il cree une experience captivante. Il y a une abondance de jeux excitants, comprenant des jeux crypto-friendly. Il booste votre aventure des le depart. Les agents sont toujours la pour aider. Les gains sont transferes rapidement, par moments des offres plus importantes seraient super. En conclusion, Azur Casino assure un divertissement non-stop. A mentionner le site est rapide et immersif, amplifie le plaisir de jouer. Un atout le programme VIP avec des privileges speciaux, garantit des paiements rapides.
DГ©couvrir les offres|
adsummit.click – Found practical insights today; sharing this article with colleagues later.
advector.click – Pages loaded fast, images appeared sharp, and formatting stayed consistent.
adnexo.click – Overall, professional vibe here; trustworthy, polished, and pleasantly minimal throughout.
growthnexus.click – Content reads clearly, helpful examples made concepts easy to grasp.
Modern Fashion Finds – Came across fresh styling tips that made coordinating outfits easier.
growthpilotpro.click – Found practical insights today; sharing this article with colleagues later.
Fresh Savings Spot – Exciting daily deals keep shopping fun.
adstreampro.click – Loved the layout today; clean, simple, and genuinely user-friendly overall.
кракен даркнет
https://www.sendspace.com/file/no9paj
Dream Motivation Spot – Every article feels encouraging and uplifting.
Learn Smart Hub – Picked up a tip that really simplified a task for me.
Choice Hub Online – Lots of options, quickly found exactly what I wanted.
Dadasdas Click News – Updated topics ko simple aur engaging style mein cover karta hai.
Mindful Moments Link – Found a short reminder that helped me appreciate the present.
promosprinter.click – Appreciate the typography choices; comfortable spacing improved my reading experience.
Easy Fashion Spot – Simple interface, finding and buying items is fast.
Je suis bluffe par Casinozer Casino, ca pulse comme une soiree animee. La selection est riche et diversifiee, offrant des tables live interactives. Avec des depots instantanes. Le suivi est impeccable. Les transactions sont toujours securisees, en revanche des bonus diversifies seraient un atout. En bref, Casinozer Casino est un choix parfait pour les joueurs. En complement la plateforme est visuellement electrisante, ajoute une touche de dynamisme. Un plus les paiements en crypto rapides et surs, qui motive les joueurs.
DГ©couvrir davantage|
Je suis enthousiasme par Casinozer Casino, c’est un lieu ou l’adrenaline coule a flots. Il y a un eventail de titres captivants, offrant des experiences de casino en direct. Il rend le debut de l’aventure palpitant. Le support est rapide et professionnel. Les transactions sont toujours securisees, mais plus de promotions variees ajouteraient du fun. En conclusion, Casinozer Casino assure un fun constant. De plus la plateforme est visuellement electrisante, facilite une experience immersive. Un plus les options de paris sportifs variees, qui stimule l’engagement.
DГ©marrer maintenant|
J’adore le dynamisme de Casinozer Casino, il offre une experience dynamique. La gamme est variee et attrayante, proposant des jeux de table classiques. Il offre un demarrage en fanfare. Le suivi est impeccable. Les transactions sont toujours securisees, mais encore des offres plus genereuses rendraient l’experience meilleure. Dans l’ensemble, Casinozer Casino merite un detour palpitant. D’ailleurs la navigation est fluide et facile, incite a rester plus longtemps. Un avantage le programme VIP avec des niveaux exclusifs, propose des privileges personnalises.
http://www.casinocasinozerfr.com|
J’ai un faible pour Mystake Casino, il procure une sensation de frisson. Les jeux proposes sont d’une diversite folle, proposant des jeux de casino traditionnels. Il donne un elan excitant. Les agents repondent avec efficacite. Les retraits sont fluides et rapides, toutefois des bonus varies rendraient le tout plus fun. Pour finir, Mystake Casino assure un fun constant. En complement la navigation est fluide et facile, booste le fun du jeu. Particulierement interessant les paiements securises en crypto, propose des avantages uniques.
Emmenez-moi lГ -bas|
J’adore la vibe de Pokerstars Casino, il cree un monde de sensations fortes. On trouve une profusion de jeux palpitants, proposant des jeux de table classiques. Il booste votre aventure des le depart. Le suivi est toujours au top. Les gains sont transferes rapidement, cependant quelques spins gratuits en plus seraient top. En resume, Pokerstars Casino garantit un plaisir constant. Ajoutons aussi l’interface est fluide comme une soiree, permet une plongee totale dans le jeu. Particulierement cool les paiements securises en crypto, offre des bonus constants.
Visiter pour plus|
J’ai un faible pour Stake Casino, il cree un monde de sensations fortes. Le choix de jeux est tout simplement enorme, offrant des experiences de casino en direct. Il donne un elan excitant. Les agents repondent avec rapidite. Les retraits sont ultra-rapides, mais des recompenses supplementaires dynamiseraient le tout. Globalement, Stake Casino merite un detour palpitant. Notons aussi la plateforme est visuellement dynamique, apporte une touche d’excitation. Egalement excellent le programme VIP avec des privileges speciaux, cree une communaute vibrante.
Obtenir plus|
J’adore l’ambiance electrisante de Stake Casino, on y trouve une vibe envoutante. Les options de jeu sont incroyablement variees, comprenant des jeux compatibles avec les cryptos. 100% jusqu’a 500 € plus des tours gratuits. Le service est disponible 24/7. Le processus est clair et efficace, cependant des offres plus importantes seraient super. En conclusion, Stake Casino merite un detour palpitant. En bonus le site est rapide et engageant, facilite une experience immersive. Un point fort les evenements communautaires vibrants, qui booste la participation.
Voir maintenant|
Fresh Trend Finds – Noticed a few stylish pieces that were worth checking out.
Choice Hub Spot – Really liked the options, sparked instant imaginative thinking.
adscalehub.click – Pages loaded fast, images appeared sharp, and formatting stayed consistent.
scalemaster.click – Color palette felt calming, nothing distracting, just focused, thoughtful design.
promovoltage.click – Found practical insights today; sharing this article with colleagues later.
clickdynamics.click – Overall, professional vibe here; trustworthy, polished, and pleasantly minimal throughout.
salesvelocity.click – Bookmarked this immediately, planning to revisit for updates and inspiration.
Trend Market Online – Daily updates make checking new trends a lot of fun.
Creative Gift Source – Spotted a few things here that might brighten someone’s day.
Daily Deals Hub – Quick and convenient, I usually find exactly what I need.
Automatizovany system https://rocketbitpro.com pro obchodovani s kryptomenami: boti 24/7, strategie DCA/GRID, rizeni rizik, backtesting a upozorneni. Kontrola potencialniho zisku a propadu.
Inspire Hub Online – Found a motivational thought that encouraged positive action.
Style Explorer Hub – Really liked the global fashion options, shipping was smooth.
зеркало кракен
Shop With Joy Finds – Enjoyed browsing and noticed several unique items today.
Build Your Potential Hub – Found helpful tips and resources for staying consistent in personal growth.
Knowledge Builder Portal – Easy to grasp tutorials that improve skills effectively.
Quick Deals Hub – A fast visit led to discovering a couple of practical items.
clickmotion.click – Found practical insights today; sharing this article with colleagues later.
Описаниние 3( не было конкретного уточнения) https://digitechpedia.com так-то уже четверг бро
Fashion Trend Spot – New arrivals caught my eye, the variety was excellent.
Je suis bluffe par Pokerstars Casino, on ressent une ambiance de fete. Les options de jeu sont infinies, comprenant des jeux crypto-friendly. Il booste votre aventure des le depart. Le suivi est impeccable. Les gains sont verses sans attendre, mais des recompenses supplementaires dynamiseraient le tout. En bref, Pokerstars Casino offre une experience inoubliable. Par ailleurs la plateforme est visuellement dynamique, facilite une immersion totale. Un bonus les evenements communautaires pleins d’energie, propose des privileges personnalises.
Plongez-y|
growelite.click – Found practical insights today; sharing this article with colleagues later.
growthsignal.click – Navigation felt smooth, found everything quickly without any confusing steps.
adlaunchpro.click – Content reads clearly, helpful examples made concepts easy to grasp.
marketsignal.click – Bookmarked this immediately, planning to revisit for updates and inspiration.
сегодня сделал заказ, написал в аську сразу ответили. Буду ждать как что измениться отпишу. https://xwalkcenter.org Четкого товара!
Je suis fascine par Stake Casino, on y trouve une energie contagieuse. Les options sont aussi vastes qu’un horizon, offrant des tables live interactives. Il donne un elan excitant. Le suivi est impeccable. Le processus est fluide et intuitif, toutefois des bonus plus frequents seraient un hit. En resume, Stake Casino est un lieu de fun absolu. Pour ajouter l’interface est lisse et agreable, ce qui rend chaque session plus excitante. Un point cle les evenements communautaires engageants, renforce le lien communautaire.
Stake|
J’adore la vibe de Pokerstars Casino, il propose une aventure palpitante. Il y a un eventail de titres captivants, comprenant des titres adaptes aux cryptomonnaies. Le bonus de depart est top. Les agents repondent avec efficacite. Le processus est fluide et intuitif, de temps a autre plus de promotions frequentes boosteraient l’experience. Globalement, Pokerstars Casino offre une aventure inoubliable. De surcroit le design est style et moderne, amplifie l’adrenaline du jeu. Particulierement interessant le programme VIP avec des recompenses exclusives, propose des privileges sur mesure.
Approfondir|
promorocket.click – Mobile version looks perfect; no glitches, fast scrolling, crisp text.
Je suis fascine par Pokerstars Casino, ca invite a l’aventure. La gamme est variee et attrayante, proposant des jeux de table sophistiques. Il donne un elan excitant. Le support est rapide et professionnel. Les paiements sont surs et efficaces, malgre tout des offres plus genereuses rendraient l’experience meilleure. En conclusion, Pokerstars Casino est un must pour les passionnes. En extra le design est style et moderne, donne envie de continuer l’aventure. Particulierement fun les evenements communautaires vibrants, assure des transactions fluides.
Ouvrir la page|
Smart Deals Spot – Came across a couple of fair-priced products that caught my eye.
J’adore l’ambiance electrisante de Stake Casino, on ressent une ambiance de fete. Les jeux proposes sont d’une diversite folle, offrant des tables live interactives. 100% jusqu’a 500 € plus des tours gratuits. Le service client est excellent. Le processus est transparent et rapide, parfois quelques free spins en plus seraient bienvenus. En somme, Stake Casino est une plateforme qui pulse. De surcroit le site est fluide et attractif, permet une immersion complete. Egalement super les evenements communautaires dynamiques, offre des bonus constants.
Continuer ici|
Je suis totalement conquis par Mystake Casino, ca offre une experience immersive. Il y a une abondance de jeux excitants, proposant des jeux de cartes elegants. Il rend le debut de l’aventure palpitant. Le suivi est d’une fiabilite exemplaire. Les gains arrivent sans delai, de temps en temps quelques free spins en plus seraient bienvenus. En fin de compte, Mystake Casino assure un fun constant. Pour ajouter le design est style et moderne, ce qui rend chaque partie plus fun. Particulierement interessant les evenements communautaires dynamiques, propose des avantages uniques.
Voir le site|
Je suis fascine par Casinozer Casino, il cree un monde de sensations fortes. Le choix est aussi large qu’un festival, incluant des options de paris sportifs dynamiques. 100% jusqu’a 500 € + tours gratuits. Disponible 24/7 par chat ou email. Les transactions sont fiables et efficaces, quelquefois des bonus plus varies seraient un plus. Globalement, Casinozer Casino est un endroit qui electrise. En complement la plateforme est visuellement electrisante, amplifie le plaisir de jouer. Particulierement attrayant les transactions en crypto fiables, qui motive les joueurs.
Poursuivre la lecture|
J’adore l’energie de Casinozer Casino, ca invite a l’aventure. La selection est riche et diversifiee, proposant des jeux de table sophistiques. Avec des depots instantanes. Disponible a toute heure via chat ou email. Les retraits sont fluides et rapides, quelquefois quelques free spins en plus seraient bienvenus. Pour faire court, Casinozer Casino garantit un amusement continu. Notons egalement la plateforme est visuellement electrisante, permet une plongee totale dans le jeu. A souligner les options de paris sportifs variees, cree une communaute vibrante.
Ouvrir le site|
Je ne me lasse pas de Casinozer Casino, il offre une experience dynamique. Le catalogue est un paradis pour les joueurs, incluant des paris sportifs pleins de vie. 100% jusqu’a 500 € avec des free spins. Les agents repondent avec rapidite. Les retraits sont simples et rapides, cependant des recompenses supplementaires seraient parfaites. En somme, Casinozer Casino est un endroit qui electrise. Par ailleurs la navigation est intuitive et lisse, donne envie de continuer l’aventure. A signaler les options variees pour les paris sportifs, qui motive les joueurs.
Voir maintenant|
shopthelatestdeals – Found amazing deals today, makes shopping fun and easy.
Выездной алкогольный https://bar-vip.ru и кофе-бар на любое мероприятие: авторские коктейли, свежая обжарка, бармен-шоу, оборудование и посуда. Свадьбы, корпоративы, дни рождения. Честные сметы, высокое качество.
лучший магаз берите все!!!!, все порешали вина не магазина. просто красавец!!! купить онлайн мефедрон, экстази, бошки
Unique Fresh Picks – Came across a handful of interesting finds that I hadn’t seen before.
trendyvaluezone – Stylish products at affordable prices, love the variety here.
а так всё от души! огромное спасибо! ещё не раз к вам обращюсь!) купить Кокаин, Мефедрон, Экстази
бонус код 1хбет Ищите промокод на https://gorod-fonarikov.ru/news/promokod_309.html и активируйте бонус 100% на первый депозит, чтобы начать игру.
Осваиваешь фортепиано? ноты для фортепиано популярные мелодии, саундтреки, джаз и классика. Уровни сложности, аккорды, аппликатура, советы по технике.
Growth Opportunity Finder – Inspiring content that guides you toward potential new options.
Dropping my honest feedback on that gaming site. I cover perks, cashouts, and total experience. Summing up casino perks and processing time. Explaining how the service performs and pays winners. Pointing out benefits and drawbacks I’ve noticed. Outlining what was nice and what could be better. More information can be found by reading the article Crowngreen
Today, while I was at work, my sister stole my iphone and tested to see if it can survive a twenty five foot drop, just so she can be a youtube sensation. My iPad is now destroyed and she has 83 views. I know this is totally off topic but I had to share it with someone!
leebet
growthstream.click – Bookmarked this immediately, planning to revisit for updates and inspiration.
Все всегда на высшем уровне:dansing: всегда отправляют практически моментально купить Мефедрон, Бошки, Марихуану
discoverandshop – Great platform for exploring unique items and discovering new favorites.
Idea Innovation Hub – Read a thought-provoking tip that opened up new possibilities.
Центр сертификации https://серт-центр.рф технические регламенты ЕАЭС, декларации, сертификаты, ISO, испытания и протоколы. Сопровождение с нуля до регистрации в Росаккредитации. Индивидуальные сроки и смета. Консультация бесплатно.
Скоро откроется в Минске представительство. Как откроется увидите в разделе Представителей купить Мефедрон, Бошки, Марихуану
Don Mueang International Airport, Thailand (DMK)
[url=http://trips45.cc]трипскан вход[/url]
Are you an avgeek with a mean handicap? Then it’s time to tee off in Bangkok, where Don Mueang International Airport has an 18-hole golf course between its two runways. If you’re nervous from a safety point of view, don’t be — players at the Kantarat course must go through airport-style security before they hit the grass. Oh, you meant safety on the course? Just beware of those flying balls, because there are no barriers between the course and the runways. Players are, at least, shown a red light when a plane is coming in to land so don’t get too distracted by the game.
http://trips45.cc
трипскан вход
Although Suvarnabhumi (BKK) is Bangkok’s main airport these days — it opened in 2006 —Don Mueang, which started out as a Royal Thai Air Force base in 1914, remains Bangkok’s budget airline hub, with brands including Thai Air Asia and Thai Lion Air using it as their base. Although you’re more likely to see narrowbodies these days, you may just get lucky — in 2022, an Emirates A380 made an emergency landing here. Imagine the views from the course that day.
Related article
Sporty airport outfit being worn by writer
CNN Underscored: Flying sucks. Make it better with these comfy airport outfits for women
Sumburgh Airport, Scotland (LSI)
The road south from Lerwick cuts across the runway of Sumburgh Airport on Shetland.
The road south from Lerwick cuts across the runway of Sumburgh Airport on Shetland. Alan Morris/iStock Editorial/Getty Images
Planning a trip to Jarlshof, the extraordinarily well-preserved Bronze Age settlement towards the southern tip of Shetland? You may need to build in some extra time. The ancient and Viking-era ruins, called one of the UK’s greatest archaeological sites, sit just beyond one of the runways of Sumburgh, Shetland’s main airport — and reaching them means driving, cycling or walking across the runway itself.
There’s only one road heading due south from the capital, Lerwick; and while it ducks around most of the airport’s perimeter, skirting the two runways, the road cuts directly across the western end of one of them. A staff member occupies a roadside hut, and before take-offs and landings, comes out to lower a barrier across the road. Once the plane is where it needs to be, up come the barriers and waiting drivers get a friendly thumbs up.
Amata Kabua International Airport, Marshall Islands (MAJ)
Fly into Majuro and you’ll skim across the Pacific and land on the runway that’s just about as wide as the sandbar-like island itself.
Fly into Majuro and you’ll skim across the Pacific and land on the runway that’s just about as wide as the sandbar-like island itself. mtcurado/iStockphoto/Getty Images
Imagine flying into Majuro, the capital of the Marshall Islands in Micronesia. You’re descending down, down, and further down towards the Pacific, no land in sight. Then you’re suddenly above a pencil-thin atoll — can you really be about to land here? Yes you are, with cars racing past the runway no less, matching you for speed.
Majuro’s Amata Kabua International Airport gives a whole new meaning to the phrase “water landing”. Its single runway, just shy of 8,000ft, is a slim strip of asphalt over the sandbar that’s barely any wider than the atoll itself — and the island is so remote that when the runway was resurfaced, materials had to be transported from the Philippines, Hong Kong and Korea, according to the constructors. “Lagoon Road” — the 30-mile road that runs from top to toe on Majuro — skims alongside the runway.
Don’t think about pulling over, though — there’s only sand and sea on one side, and that runway the other.
Related article
Barra Airport, Scotland
At Scotland’s beach airport, the runway disappears at high tide
globalmarketoutlet – Wide selection of global products, makes shopping interesting and diverse.
Сеть детских садов https://www.razvitie21vek.com «Развитие XXI век» – уникальная образовательная среда для детей от 1,5 лет, где каждый ребенок сможет раскрыть свои таланты. Мы предлагаем разнообразные программы для развития творческих, физических, интеллектуальных и лингвистических способностей наших воспитанников.
Как и было обещано, адрес оператор прислал где-то в 23. купить кокаин, меф, бошки через телеграмм
Good post. I learn something totally new and challenging on sites I stumbleupon everyday. It will always be interesting to read articles from other writers and practice something from their web sites.
банда казино
Value Discovery Page – Got some unexpected savings here that were worth checking out.
Блог для новичков https://life-webmaster.ru запуск блога, онлайн-бизнес, заработок без вложений. Инструкции, подборки инструментов, стратегии трафика и монетизации. Практика вместо теории.
Thanks for another great article. The place else may anybody get that kind of info in such an ideal approach of writing? I’ve a presentation subsequent week, and I am at the search for such information.
вход leebet
Быстрая доставка , и высочайшее качество обслуживания! Думаю и сейчас ничего не изменилось. купить Кокаин, Мефедрон, Экстази
globalmarketoutlet – Wide selection of global products, makes shopping interesting and diverse.
primedigital.click – Navigation felt smooth, found everything quickly without any confusing steps.
marketforge.click – Overall, professional vibe here; trustworthy, polished, and pleasantly minimal throughout.
adfusionlab.click – Navigation felt smooth, found everything quickly without any confusing steps.
promopilotpro.click – Bookmarked this immediately, planning to revisit for updates and inspiration.
Ровный магаз! 2 раза заказывал ам(к12) и ркс(к7).. Все пришло ровно за 3 дня=) тока замесил ам(не растворился полностью)..буду пробовать=)ркс понравилось тока к 5ти делать надо=) купить онлайн мефедрон, экстази, бошки
admasterlab.click – Navigation felt smooth, found everything quickly without any confusing steps.
Je suis accro a Pokerstars Casino, c’est une plateforme qui pulse avec energie. Le choix est aussi large qu’un festival, proposant des jeux de cartes elegants. Il donne un avantage immediat. Le service d’assistance est au point. Les transactions sont fiables et efficaces, neanmoins des recompenses en plus seraient un bonus. Pour finir, Pokerstars Casino est un endroit qui electrise. Pour completer le site est rapide et style, incite a prolonger le plaisir. Egalement top les evenements communautaires vibrants, garantit des paiements securises.
DГ©couvrir plus|
yourtimeisnow – Motivating site that encourages taking action and embracing opportunities today.
conversionlab.click – Overall, professional vibe here; trustworthy, polished, and pleasantly minimal throughout.
Создание блога http://life-webmaster.ru и бизнеса в сети шаг за шагом: платформы, контент-план, трафик, монетизация без вложений. Готовые шаблоны и понятные инструкции для старта.
Поддержка и авторский надзор
В зависимости от ваших потребностей и аспектов, внедряем, консультируем и помогаем подобрать подрядчиков для внедрения разработанной под вас стратегии.
[url=https://ammarant-group.com]Методолог Будапештов[/url]
Мы:
Аркестрируем структуру компании и всех подрядчиков
Самостоятельно внедряем часть или всю стратегию
Помогаем подобрать персонал и подрядчиков
[url=https://ammarant-group.com/strategyai]ai автоматизация бизнес процессов[/url]
Помогаем адаптировать бизнес-процессы под стратегию
Дорабатываем стратегию если возникли дополнительные пожелания
Сами внедряем
Разработать бизнес-стратегию
разработать стратегию бизнеса
https://ammarant-group.com
А вот и мин Трип мой. купить Кокаин, Мефедрон, Экстази
Fashion Discovery Hub – Categories were intuitive, and items felt premium and well-organized.
Всем привет с наступивщими,давно не работал с этим магазином,подскажите как у него работа все ттакже четко? купить кокаин, меф, бошки через телеграмм
yourdealhub – Excellent deals on quality products, really makes shopping worthwhile.
adcruise.click – Bookmarked this immediately, planning to revisit for updates and inspiration.
Долго что то ты пробуешь:)интересно всё таки купить онлайн мефедрон, экстази, бошки
trendloversplace – Perfect for trend enthusiasts, always something fresh and exciting to see.
2c-i, 2c-e, 2c-p купить Мефедрон, Бошки, Марихуану
purefashionchoice – Clean, stylish fashion selections that are both modern and practical.
проверенный временем магазин, все ровно , все быстро купить Мефедрон, Бошки, Марихуану
Elegant finds online – Browsing was simple, and the products had a stylish, classy look.
clickpioneer.click – Content reads clearly, helpful examples made concepts easy to grasp.
clickvero.click – Bookmarked this immediately, planning to revisit for updates and inspiration.
conversionpilot.click – Found practical insights today; sharing this article with colleagues later.
adelevatepro.click – Bookmarked this immediately, planning to revisit for updates and inspiration.
Sharing my genuine perspective focused on this platform. I mention rewards, processing times, and site quality. Exploring bonus system and payments. Covering how the brand runs and transfers winnings. Highlighting the good and the bad I found. Going over what was fun and what didn’t impress me. Further details are available in the full article https://ridoyfarhan.codepowerbd.com/play-and-win-with-crown-green-casino-and-try-your/
globalvaluecorner – Amazing value and variety of products from around the world.
trafficgear.click – Mobile version looks perfect; no glitches, fast scrolling, crisp text.
Перевод на английский – перевод документов с украинского. Бюро переводов в Самаре. Документы, нотариальное заверение. Срочно и недорого. Опыт 10 лет. Конфиденциально.
Je suis emerveille par Stake Casino, il offre une experience dynamique. La selection de jeux est impressionnante, comprenant des titres adaptes aux cryptomonnaies. 100% jusqu’a 500 € avec des free spins. Les agents sont toujours la pour aider. Les paiements sont surs et fluides, mais encore plus de promotions variees ajouteraient du fun. En resume, Stake Casino est une plateforme qui pulse. A noter le design est style et moderne, facilite une immersion totale. Un atout les tournois reguliers pour s’amuser, offre des bonus constants.
Cliquez ici|
Ну просто выглядело твое сообщение как мессага на параное))))) https://transparenciaclimatica.org РАБОТАЕМ!!! ОПТ!!! ДОСТАВКА!!!
Je suis totalement conquis par Pokerstars Casino, c’est une plateforme qui pulse avec energie. Le catalogue est un paradis pour les joueurs, incluant des paris sur des evenements sportifs. Avec des depots instantanes. Disponible 24/7 pour toute question. Les paiements sont surs et efficaces, bien que des recompenses supplementaires dynamiseraient le tout. Au final, Pokerstars Casino offre une aventure inoubliable. De surcroit l’interface est lisse et agreable, ajoute une vibe electrisante. Un point cle les competitions regulieres pour plus de fun, cree une communaute soudee.
Lire la suite|
Je suis fascine par Stake Casino, c’est un lieu ou l’adrenaline coule a flots. La selection de jeux est impressionnante, avec des machines a sous aux themes varies. Il propulse votre jeu des le debut. Le suivi est toujours au top. Les gains sont transferes rapidement, par ailleurs des recompenses en plus seraient un bonus. Pour conclure, Stake Casino est un endroit qui electrise. En bonus le site est rapide et immersif, facilite une experience immersive. Un avantage les transactions en crypto fiables, renforce le lien communautaire.
Visiter la plateforme|
Je suis completement seduit par Casinozer Casino, ca invite a plonger dans le fun. Les jeux proposes sont d’une diversite folle, incluant des paris sportifs en direct. Il donne un avantage immediat. Le support est fiable et reactif. Les gains sont verses sans attendre, en revanche des recompenses supplementaires seraient parfaites. Globalement, Casinozer Casino offre une aventure memorable. Par ailleurs l’interface est simple et engageante, apporte une energie supplementaire. Un atout les options de paris sportifs diversifiees, offre des recompenses regulieres.
Essayer ceci|
J’ai un veritable coup de c?ur pour Mystake Casino, il cree un monde de sensations fortes. Le catalogue est un paradis pour les joueurs, offrant des sessions live immersives. Le bonus initial est super. Les agents repondent avec rapidite. Les paiements sont surs et efficaces, bien que quelques tours gratuits supplementaires seraient cool. Pour finir, Mystake Casino merite une visite dynamique. Notons aussi le design est moderne et attrayant, ce qui rend chaque session plus excitante. Un plus les competitions regulieres pour plus de fun, qui booste la participation.
DГ©couvrir les faits|
J’ai un faible pour Mystake Casino, on y trouve une vibe envoutante. On trouve une gamme de jeux eblouissante, avec des machines a sous visuellement superbes. Il donne un elan excitant. Le support est pro et accueillant. Les gains sont verses sans attendre, neanmoins des offres plus genereuses rendraient l’experience meilleure. En conclusion, Mystake Casino est un incontournable pour les joueurs. A signaler le design est moderne et energique, facilite une immersion totale. Un point cle les transactions en crypto fiables, garantit des paiements rapides.
DГ©couvrir plus|
J’ai une passion debordante pour Casinozer Casino, ca donne une vibe electrisante. Les options de jeu sont infinies, proposant des jeux de casino traditionnels. Il amplifie le plaisir des l’entree. Le support est fiable et reactif. Les gains arrivent en un eclair, par moments quelques spins gratuits en plus seraient top. En bref, Casinozer Casino est un immanquable pour les amateurs. De plus la plateforme est visuellement electrisante, permet une plongee totale dans le jeu. Egalement genial les evenements communautaires engageants, garantit des paiements securises.
Ouvrir le site|
everydayessentials – Convenient site to find daily essentials quickly and easily.
А как по качеству? https://diaspora-world.info Повторюсь размер компенсаций зависел от веса, длительности, индивидуальных переплат на счета и прочих обстоятельств. Данные по общ весу пришли вместе с треком.
Choice Picks Online – Browsing categories was intuitive, and the products were well-curated.
adboostlab.click – Found practical insights today; sharing this article with colleagues later.
Je suis emerveille par Pokerstars Casino, ca transporte dans un monde d’excitation. La gamme est variee et attrayante, avec des slots aux designs captivants. Avec des depots fluides. Les agents sont toujours la pour aider. Les transactions sont toujours securisees, malgre tout des bonus plus frequents seraient un hit. En somme, Pokerstars Casino vaut une exploration vibrante. Pour ajouter le site est rapide et style, booste l’excitation du jeu. Un avantage notable le programme VIP avec des niveaux exclusifs, propose des privileges personnalises.
AccГ©der Г la page|
Всем ровным магазинам тройной пролетарский УРА! И чтобы они всегда такими оставались :good: https://bcskeptics.info спок ночи
dailydealsplace – Always updated with great bargains, love checking in daily.
Writing my sincere opinion covering Crown GreenCasino. I explain rewards, fund transfers, and overall experience. Pointing out casino offers and withdrawals. Explaining how the experience works and transfers winnings. Mentioning what works and what doesn’t I ran into. Describing what I found useful and what I didn’t like. You can find more info in the full write-up https://julieairbnb.thakurvj.com/step-into-crown-green-casino-and-enjoy-the-luxury/
adtrailblaze.click – Color palette felt calming, nothing distracting, just focused, thoughtful design.
Доброго времени суток. 3-й заказ шел ровно неделю с момента оплаты. Спасибо за приятный сувенир :good:. Сам бы себе такой не знаю когда приобрел :). Вобщем за сервис снова 5+ https://verbandsabzeichen.info Буду ждать доставку как чё отпишусь .
learncreategrow – Inspiring content that encourages learning, creating, and personal growth.
Smart Fashion Hub – Browsing categories was simple, and products looked appealing.
Качество вышка, доставка до вашего города обговаривается индивидуально с ТС! https://psyholog-help.com Это мы и так все знаем
Нужен интернет? интернет в офис алматы провайдер 2BTelecom предоставляет качественный и оптоволоконный интернет для юридических лиц в городе Алматы и Казахстане. Используя свою разветвленную сеть, мы можем предоставлять свои услуги в любой офис города Алматы и так же оказать полный комплекс услуг связи.
жду пока ответят, обана повдер кинул на 29000….но прочитал и понял что магаз супер, жду в скайпе селлера! https://industrial-revolution.info ))) во во так даже бывает…
growtogetherstrong – Positive and motivating, perfect for teamwork and community growth.
leadmatrixpro.click – Overall, professional vibe here; trustworthy, polished, and pleasantly minimal throughout.
trafficflowpro.click – Loved the layout today; clean, simple, and genuinely user-friendly overall.
ranksprint.click – Appreciate the typography choices; comfortable spacing improved my reading experience.
promomatrix.click – Navigation felt smooth, found everything quickly without any confusing steps.
ЗОЖ-журнал https://wellnesspress.ru как выработать полезные привычки, наладить режим, снизить стресс и поддерживать форму. Простые шаги, научные факты, чек-листы и планы. Начните менять жизнь сегодня.
growthcruise.click – Navigation felt smooth, found everything quickly without any confusing steps.
Золотые слова. https://miqualityhealthcaretraining.com у нас она валяется,сами не потребляем.
InspireAndAchieve – Motivational tips showcased, makes pursuing goals feel simple and rewarding.
buildyourownfuture – Great motivational site, helps focus on goals and planning ahead.
Если кто-то когда-то пробовал банки с Рафинада на тусиае, тот знает, как классно они перли и понимает, каких эффектов я ожидал. https://bwin99.info лучший магаз из всех что существует!!!
Срочный перевод документов – официальный перевод документов на английский онлайн. Самара, перевод документов срочно! Нотариальное заверение. Любые языки. Качество и точность. Доступные цены.
New Projects Daily – Find hands-on creative projects and innovative tips for daily growth.
StyleNestOnline – Creative designs available, exploring the collections felt easy and inspiring.
Вердикт: купить Мефедрон, Бошки, Марихуану Ну во-первых мы совершенно другой магазин, так что вы ошиблись веткой, и представительств в тех городах у нас нет
creativegiftoutlet – Amazing gift ideas, really unique and thoughtful selections available here.
conversionboost.click – Navigation felt smooth, found everything quickly without any confusing steps.
вот отправил манетку ,получил адик https://miqualityhealthcaretraining.com Уважаемый, Chemical-mix.com, я новичок что на легале, что в джабере, что где либо ещё… не получается выйти на связь, проблема с покупкой, в джабере написано, на сайте не онлайн… ответь пожалуйста в jabber… Зарание большое спасибо…
BestValueFinds – Found fantastic bargains, checking out products was effortless.
shopforvalue – Affordable products without compromising quality, makes shopping super satisfying.
За АМ 1220 ничего сказать не могу – не пробовал…. Но, после тестирования 694 и 2201 впечатления о линейке АМ у меня сильно подпортились ( https://russian-business.info Мне “типа фейк” назвал кодовое слово в жабере, которое я написал нашему розовоникому магазину в лс на форуме. Вопрос в том как он его узнал?
Индивидуальный подход гарантируем – перевод документов на немецкий язык цена. Профессиональный перевод документов в Самаре. Нотариус, срочные заказы. Любые языки. Конфиденциально. Качество гарантируем.
J’ai une affection particuliere pour Stake Casino, on y trouve une vibe envoutante. Il y a une abondance de jeux excitants, proposant des jeux de table sophistiques. 100% jusqu’a 500 € + tours gratuits. Le service d’assistance est au point. Le processus est clair et efficace, parfois des bonus varies rendraient le tout plus fun. Au final, Stake Casino assure un divertissement non-stop. Notons aussi la navigation est simple et intuitive, apporte une energie supplementaire. Un plus les evenements communautaires pleins d’energie, renforce la communaute.
Voir la page d’accueil|
Je ne me lasse pas de Pokerstars Casino, ca pulse comme une soiree animee. Les options de jeu sont incroyablement variees, offrant des sessions live immersives. Il offre un coup de pouce allechant. Le support est pro et accueillant. Les transactions sont fiables et efficaces, par contre des bonus diversifies seraient un atout. En resume, Pokerstars Casino est un choix parfait pour les joueurs. Ajoutons que l’interface est lisse et agreable, ce qui rend chaque session plus palpitante. Egalement excellent les transactions crypto ultra-securisees, offre des recompenses regulieres.
Voir la page d’accueil|
DailyProductDiscoveries – Great product picks available, navigating through collections felt quick and natural.
Je suis enthousiasme par Stake Casino, ca invite a plonger dans le fun. La bibliotheque de jeux est captivante, avec des slots aux graphismes modernes. 100% jusqu’a 500 € plus des tours gratuits. Les agents sont toujours la pour aider. Les retraits sont lisses comme jamais, rarement quelques tours gratuits supplementaires seraient cool. Pour conclure, Stake Casino merite une visite dynamique. En extra la navigation est claire et rapide, facilite une experience immersive. A signaler les tournois reguliers pour la competition, qui motive les joueurs.
Aller sur le site|
Je suis epate par Mystake Casino, il procure une sensation de frisson. Le choix de jeux est tout simplement enorme, avec des machines a sous visuellement superbes. 100% jusqu’a 500 € avec des free spins. Disponible a toute heure via chat ou email. Le processus est transparent et rapide, a l’occasion plus de promotions frequentes boosteraient l’experience. En conclusion, Mystake Casino garantit un plaisir constant. En bonus le design est tendance et accrocheur, ajoute une vibe electrisante. Egalement super les nombreuses options de paris sportifs, offre des bonus exclusifs.
Jeter un coup d’œil|
Je ne me lasse pas de Casinozer Casino, il procure une sensation de frisson. Il y a une abondance de jeux excitants, offrant des sessions live palpitantes. Le bonus de depart est top. Le support est efficace et amical. Les gains arrivent sans delai, mais encore des recompenses en plus seraient un bonus. En conclusion, Casinozer Casino est un incontournable pour les joueurs. A noter le site est rapide et style, apporte une touche d’excitation. Particulierement fun les tournois reguliers pour s’amuser, offre des recompenses regulieres.
Aller plus loin|
growbeyondlimits – Encouraging platform that inspires personal growth and pushing boundaries every day.
Челябинск работаете? купить онлайн мефедрон, экстази, бошки жасти моё уважение к тебе и респект красавица. но ес честно ты нашла чет не то что было совсем другое как сказал уже уважаемый дельфин там было много сути и честных отзывов :monetka: ну лан проехали если так вроде все все поняли.
J’ai une passion debordante pour Mystake Casino, ca invite a plonger dans le fun. Les titres proposes sont d’une richesse folle, incluant des options de paris sportifs dynamiques. Le bonus initial est super. Le support est fiable et reactif. Les retraits sont lisses comme jamais, parfois des recompenses en plus seraient un bonus. En bref, Mystake Casino offre une experience hors du commun. De plus la navigation est claire et rapide, incite a prolonger le plaisir. Particulierement attrayant les transactions en crypto fiables, renforce le lien communautaire.
Explorer maintenant|
Je suis accro a Casinozer Casino, il procure une sensation de frisson. Les jeux proposes sont d’une diversite folle, incluant des options de paris sportifs dynamiques. Avec des transactions rapides. Le suivi est toujours au top. Les transactions sont toujours fiables, cependant quelques tours gratuits supplementaires seraient cool. Globalement, Casinozer Casino vaut une visite excitante. Par ailleurs la navigation est fluide et facile, ce qui rend chaque session plus palpitante. Un plus les options de paris sportifs diversifiees, offre des recompenses continues.
Explorer maintenant|
DealSpotOnline – Great offers highlighted, navigating the store was smooth and fun.
elitefunnels.click – Mobile version looks perfect; no glitches, fast scrolling, crisp text.
dreamfashionfinds – Stylish and trendy fashion finds that make everyday shopping fun.
marketcruise.click – Navigation felt smooth, found everything quickly without any confusing steps.
leadvoltage.click – Navigation felt smooth, found everything quickly without any confusing steps.
Я в последний раз говорю, эта тема – для отзывов о работе магазина. Если вы не можете связаться с продавцом, то не надо писать об этом по сто раз. Если вы хотите узнать о качестве продукции – вам СЮДА !!! Любой оффтоп\флуд прекращаем ! https://pashinskaya-ksusha.ru и че сделали? условку дали?
leadforgepro.click – Mobile version looks perfect; no glitches, fast scrolling, crisp text.
conversionpulse.click – Mobile version looks perfect; no glitches, fast scrolling, crisp text.
CozyHomeSpot – Home items showcased beautifully, exploring categories was quick and easy.
adorbitpro.click – Color palette felt calming, nothing distracting, just focused, thoughtful design.
Скрины с радикала не грузятся. Увы сейчас доказать что-либо сложно, видимо магазин не первый раз кидает уже по отточеной цепочке. https://scenar-ekb.ru с нашими кристаллами восстановятся
smartbuyplace – Excellent place to find smart deals and quality products efficiently.
StayDrivenOnline – Helpful guidance available, encourages staying motivated and focused throughout the day.
Еще и угрожает, после того как я сказал что передам наше общение и свои сомнения.что еще интересно, кинул заявочку такого плана купить онлайн мефедрон, экстази, бошки Привет! В Наличии рега мощная 1к30 и скорость мука.
Sharing my independent take talking about Crown GreenCasino. I talk about bonuses, payment speed, and gameplay vibe. Exploring promotions and withdrawals. Reviewing how the site responds and completes transactions. Exploring ups and downs I ran into. Outlining what was fun and what was lacking. Read the full article for more insights Crowngreen casino
привет !!! немогу с вами с вязатся отпишись!!!! купить Кокаин, Мефедрон, Экстази Отдуши за ровность!
ChicOutletOnline – I enjoyed browsing the latest trends, shopping around was quick and pleasant.
купить права
Контрактная разработка электроники позволяет ускорить процесс вывода новых устройств на рынок. Инженеры подбирают компоненты, создают прототипы, тестируют их и запускают серийное производство. Контрактное производство обеспечивает надежность и стабильность работы устройств, https://debunkingnase.org/index.php?title=%D0%9F%D1%80%D0%BE%D0%B8%D0%B7%D0%B2%D0%BE%D0%B4%D1%81%D1%82%D0%B2%D0%BE_%D0%9A%D0%BE%D0%BD%D1%82%D1%80%D0%BE%D0%BB%D0%BB%D0%B5%D1%80%D0%BE%D0%B2_%D0%98_%D0%9C%D0%BE%D0%B4%D1%83%D0%BB%D0%B5%D0%B9_%D0%94%D0%BB%D1%8F_%D0%9F%D1%80%D0%BE%D0%BC%D1%8B%D1%88%D0%BB%D0%B5%D0%BD%D0%BD%D0%BE%D1%81%D1%82%D0%B8. Технология делает процесс разработки более управляемым)
Работала с данным магазином давным давно! Пожалуй самый лучший) купить Кокаин, Мефедрон, Экстази такое ощющение,что ты спецально зарегестрировался тут, чтобы написать только это сообщение,и в именно в этом разделе,я нечего не говарю за магазин,всё на вышшем уравне,но твой АК подозрителен с одним только этим сообщением
FashionPulseWorld – Stylish collections available, exploring categories was fun and simple.
Posting my first-hand perspective connected with Crown GreenCasino. I discuss bonuses, payouts, and general impression. Mainly covering offers and payments. Describing how the system responds and pays out. Pointing out positives and negatives I observed. Sharing what I appreciated and what I disliked. More insights are provided in the complete article Crowngreen casino
Комбинация https://mdgt.top сиво и кафяво в кухнята е топ! Видях я там
Официальный сайт 1вин отличный вариант для ставок и казино. Работает чётко, без лагов. Деньги вывели без лишних действий: сайт 1вин
И вообще зачем тебе спасибо жать или репутацию добавлять?? Ты что малолетка глупая, что это тебя так беспокоит?? купить Кокаин, Мефедрон, Экстази даа, уж что что, а 250й тут классный ) хомячки так и просят добавки
Leaving my individual thoughts about this online casino. I outline rewards, processing times, and general feedback. Going through welcome packages and processing time. Describing how the service runs and manages payouts. Pointing out ups and downs I saw. Telling what was fun and what felt off. You can find more info in the full write-up Crowngreen
1win порадовал честностью выплат и стабильной работой. Пополнение моментальное. Вывод пришёл без лишних процедур https://1win-magic.top/
GlamChoiceShop – Sleek and trendy items showcased, exploring collections was fun and smooth.
Рекомендую https://remontuem.if.ua — багато корисного про монтаж гіпсокартону ціна івано-франківськ.
Тут охота чисто на клиентов. купить кокаин, меф, бошки через телеграмм Эффект чувствуется почти сразу, эйфория и стим в голове
Intentional Progress Spot – Tips for staying motivated and achieving your objectives mindfully.
Інформацію https://seetheworld.top про курорти словаччини перечитував учора.
unique gifts corner – Wide variety of products, navigating the site felt easy and fun.
че как дела?как настрой? купить Мефедрон, Бошки, Марихуану A F-16 сразу в мягком виде приходит, да?
заказать дизайн квартиры дизайн интерьера
Опытный адвокат https://www.zemskovmoscow.ru в москве: защита по уголовным делам и юридическая поддержка бизнеса. От оперативного выезда до приговора: ходатайства, экспертизы, переговоры. Минимизируем риски, действуем быстро и законно.
Маловато по-моему, у меня 1гр жвша растворяется полностью примерно в 30 мл, меньше этого – частично https://agit-prom.ru нужны быстрые и качественные заклады- тогда вы сдесь!!! великолепный товар !!!
gift inspiration hub – Creative items featured, browsing them felt simple and fun today.
Israel used widely banned cluster munitions in Lebanon,
[url=https://workescort.ru/articles/Rabota-v-eskorte/Rabota-dlya-devushek-sochi-vysokooplachivaemaya]работа эскорт сочи[/url]
photos of remnants suggest
[url=https://workescort.ru/]девушки по вызову работа[/url]
The images, which have been examined by six different arms experts,
[url=https://workescort.ru/articles/Vysokooplachivaemaya-rabota/Rabota-dlya-devushek-SPB-dosug]работа для девушек досуг спб[/url]
appear to show the remnants of two different types of Israeli cluster munitions found in three
different locations: south of the Litani River in the forested valleys of Wadi Zibqin,
Wadi Barghouz and Wadi Deir Siryan.
вакансии рекламное агентство москва
https://workescort.ru/moskva/rabotaeskort/rabota-v-eskorte-dlya-devushek/29123-tury-prozhivanie-rabota-na-vyezd-bez-sajtov.html
Русскоязычный форум криптовалют: новости сети, хард/софт-кошельки, Lightning, приватность, безопасность и юридические аспекты. Гайды, FAQ, кейсы и помощь сообщества без «хайпа».
Ребят подскажите что лучше взять:)желательно с пропорциями и качеством по времени купить кокаин, меф, бошки через телеграмм Не согласен с Тобою!!!
фрезеровка фанеры лазерная резка по пластику
J’ai une passion debordante pour Coolzino Casino, on y trouve une vibe envoutante. La bibliotheque de jeux est captivante, avec des machines a sous visuellement superbes. Il booste votre aventure des le depart. Les agents repondent avec efficacite. Les transactions sont toujours securisees, par ailleurs des offres plus genereuses seraient top. Dans l’ensemble, Coolzino Casino assure un divertissement non-stop. Par ailleurs la navigation est intuitive et lisse, booste l’excitation du jeu. Egalement top les evenements communautaires pleins d’energie, qui booste la participation.
Avancer|
Пользуюсь зеркалом 1хбет, когда основной сайт недоступен. Всё стабильно и быстро. Вывод денег порадовал скоростью: 1xbet зеркало рабочее на сегодня
Рабочее зеркало 1xbet — отличная альтернатива основному сайту. Всё доступно и без ограничений. Деньги пришли точно в срок https://1xbet-loss.top/
make an impact portal – Encourages taking meaningful actions that influence outcomes positively.
да магаз отличный.оперативно работают.и качество товара отличное.вобщем всё хорошо. https://skbagent.ru Привет старичок
https://vk.com/murchalkin.official
Портал Дай Жару https://dai-zharu.ru – более 70000 посетителей в месяц! Подбор саун и бань с телефонами, фото и ценами. Недорогие финские сауны, русские бани, турецкие парные.
J’ai une passion debordante pour Coolzino Casino, ca transporte dans un univers de plaisirs. Le choix de jeux est tout simplement enorme, avec des slots aux graphismes modernes. Il donne un avantage immediat. Le support est fiable et reactif. Les transactions sont d’une fiabilite absolue, mais encore des offres plus genereuses seraient top. Pour finir, Coolzino Casino assure un fun constant. Par ailleurs le design est moderne et attrayant, facilite une immersion totale. Egalement top les tournois reguliers pour s’amuser, qui motive les joueurs.
Voir la page d’accueil|
у меня такое было, позвонил в офис доставки так они меня там ошарашили что груз ушел но совсем в другую сторону от меня, я в шок че за на.. через 2часа звонок вам пакет, я аж от радости чуть не описался :voo-hoo: тут все на уровне. Не паникуйте раньше времени все решаемо. Всем добРА https://aikido-ufa.ru 2 трека где то по 30мг.
J’adore la vibe de MonteCryptos Casino, ca offre une experience immersive. La bibliotheque est pleine de surprises, offrant des tables live interactives. Le bonus initial est super. Le support est efficace et amical. Le processus est simple et transparent, cependant quelques free spins en plus seraient bienvenus. Au final, MonteCryptos Casino assure un fun constant. En extra l’interface est lisse et agreable, amplifie le plaisir de jouer. Egalement super les tournois frequents pour l’adrenaline, offre des bonus exclusifs.
DГ©couvrir les faits|
J’adore l’energie de MonteCryptos Casino, on y trouve une vibe envoutante. La selection est riche et diversifiee, offrant des experiences de casino en direct. Le bonus d’inscription est attrayant. Le suivi est toujours au top. Les gains arrivent sans delai, malgre tout des recompenses supplementaires dynamiseraient le tout. En somme, MonteCryptos Casino merite une visite dynamique. Ajoutons aussi la plateforme est visuellement captivante, ce qui rend chaque session plus palpitante. Un element fort les options de paris sportifs variees, qui motive les joueurs.
DГ©couvrir dГЁs maintenant|
J’adore l’ambiance electrisante de Lucky8 Casino, il cree une experience captivante. Le choix est aussi large qu’un festival, incluant des paris sur des evenements sportifs. Avec des depots rapides et faciles. Les agents repondent avec efficacite. Le processus est simple et transparent, quelquefois des bonus plus varies seraient un plus. Pour conclure, Lucky8 Casino est une plateforme qui pulse. A noter le design est moderne et energique, apporte une energie supplementaire. Particulierement interessant les tournois frequents pour l’adrenaline, qui motive les joueurs.
Obtenir les dГ©tails|
J’ai une affection particuliere pour Lucky8 Casino, on y trouve une energie contagieuse. Les options sont aussi vastes qu’un horizon, proposant des jeux de cartes elegants. Avec des depots fluides. Le suivi est d’une fiabilite exemplaire. Les gains sont transferes rapidement, occasionnellement des offres plus genereuses seraient top. Dans l’ensemble, Lucky8 Casino offre une aventure inoubliable. En extra le site est rapide et engageant, ce qui rend chaque session plus palpitante. A souligner le programme VIP avec des recompenses exclusives, propose des privileges personnalises.
Apprendre les dГ©tails|
Je suis fascine par NetBet Casino, on ressent une ambiance festive. La selection de jeux est impressionnante, offrant des tables live interactives. Avec des depots fluides. Le support est fiable et reactif. Les transactions sont d’une fiabilite absolue, mais des bonus diversifies seraient un atout. En somme, NetBet Casino offre une aventure inoubliable. Ajoutons que le design est moderne et energique, ajoute une vibe electrisante. Particulierement attrayant les evenements communautaires vibrants, qui dynamise l’engagement.
Voir le site|
J’adore l’ambiance electrisante de NetBet Casino, on ressent une ambiance de fete. La gamme est variee et attrayante, comprenant des jeux optimises pour Bitcoin. Le bonus de bienvenue est genereux. Le service client est excellent. Les transactions sont toujours securisees, a l’occasion des offres plus genereuses seraient top. En resume, NetBet Casino est un immanquable pour les amateurs. De surcroit l’interface est simple et engageante, donne envie de prolonger l’aventure. Egalement genial les evenements communautaires engageants, propose des privileges personnalises.
DГ©couvrir le web|
trendy styles portal – Great range of outfits and accessories, browsing was easy and enjoyable.
бро все что ты хочешь услышать, написано выше!! спакойствие и ожидание!)) https://zhivouste.ru Бразы вы снова в теме, если да то скоро заряусь к вам жду ответа)
Подскажите пожалуйста товары указаные в прайсе все в наличии или нет? купить Кокаин, Мефедрон, Экстази Смело таримся!! Нипожалеете
bright future hub – Encourages consistent efforts for planning and improving your life.
Могу также в пользу магазина сказать. Все по деловому прошло, без лишних эмоций и разговоров. Качество соответствует. купить онлайн мефедрон, экстази, бошки С Уважением Мр.Порошок
Sharing my genuine take concerning Crowngreen. I discuss offers, fund transfers, and site quality. Mainly covering welcome packages and payments. Describing how the casino works and verifies payments. Listing what’s good and bad I observed. Explaining what I valued and what could be better. You can learn more by checking out the full article https://bookslingshot.com/join-the-vibrant-community-at-crown-green-casino-3/
clickvoyage.click – Bookmarked this immediately, planning to revisit for updates and inspiration.
brandsprint.click – Appreciate the typography choices; comfortable spacing improved my reading experience.
Магазин высшего уровня своей работы. https://zhivouste.ru Просьба не флудить. И уж тем более не развивать больные фантазии.
На официальном сайте 1вин всё чётко организовано. Пополнение мгновенное, вывод тоже порадовал скоростью. Играть комфортно https://1win-miracle.top/
Submitting my individual impression covering Crown GreenCasino. I outline rewards, payment speed, and how it plays. Exploring bonus system and payouts. Showing how the page works and sends money. Mentioning advantages and disadvantages I discovered. Sharing what I found useful and what didn’t impress me. More details are covered in the complete article https://danielschulz.com.br/index.php/2025/10/29/test-your-luck-at-crown-green-casino-and-play-with/
funneledge.click – Bookmarked this immediately, planning to revisit for updates and inspiration.
Хотите купить https://kvartiratolyatti.ru квартиру? Подбор по району, классу, срокам сдачи и бюджету. Реальные цены, акции застройщиков, ипотека и рассрочка. Юридическая чистота, сопровождение «под ключ» до регистрации права.
Ритуальный сервис https://byalahome.ru/kompleksnaya-organizacziya-pohoron-polnoe-rukovodstvo/ кремация и захоронение, подготовка тела, отпевание, траурный зал, транспорт, памятники. Работаем 24/7, фиксированные цены, поддержка и забота о деталях.
Лучшего амфа я в жизни не пробовал. Правда цена кусается, но оно того стоит! купить онлайн мефедрон, экстази, бошки че вы панику наводите)) все норм будет! есть рамс у курьерки, магаз не при чем.. спакуха
simplebuyzone.shop – Easy shopping experience, products well-organized and selection feels smooth and quick.
хороший магазин !отменное качество и сервис ! хорошей работы вашему магазину и процветания! https://scenar-ekb.ru Опасный тип!)считаю нужным что то предпринять ТС!
Кондиционеры в Воронеже https://homeclimat36.ru продажа и монтаж «под ключ». Подбор модели, быстрая установка, гарантия, сервис. Инверторные сплит-системы, акции и рассрочка. Бесплатный выезд мастера.
J’adore la vibe de Coolzino Casino, c’est un lieu ou l’adrenaline coule a flots. Les jeux proposes sont d’une diversite folle, offrant des sessions live immersives. Le bonus de bienvenue est genereux. Le support est rapide et professionnel. Les retraits sont simples et rapides, parfois quelques free spins en plus seraient bienvenus. Globalement, Coolzino Casino est un endroit qui electrise. Pour ajouter le site est fluide et attractif, incite a prolonger le plaisir. Un atout les transactions en crypto fiables, qui motive les joueurs.
Commencer Г lire|
creative gifting portal – Discovering thoughtful gifts was simple, fast, and fun today.
Мы обратились в агентство горящих путёвок по рекомендации знакомых и сразу оценили удобство сервиса. Специалисты предлагают действительно выгодные варианты, а не устаревшие предложения. Все документы пришли вовремя, отель был аккуратным и комфортным. Поездка прошла идеально. Теперь доверяем только этому агентству: мгп-24.ру
почему 0.3? акция? https://mynyc.ru Доберус до пк выложу скрины, магазин угрожает говорит что заплатит за подставу в общем очень взбесился когда я сказал что свои сомнения выложу в паблик, прямо как с катушек слетел, хотя я сначала сказал либо кидок аля лига 12, либо взлом.сразу мат срач угрозы ипр что никогда не сделал бы приличный шоп
Fashion Essentials Daily – Practical, stylish selections to keep your wardrobe fresh.
Контрактная разработка электроники позволяет быстро выпускать продукты на рынок с высокой надежностью. Инженеры создают схемы, платы, корпус и программное обеспечение, проводят тестирование и серийное производство, https://www.pamatec.net/%d0%ba%d0%be%d0%bd%d1%82%d1%80%d0%b0%d0%ba%d1%82%d0%bd%d0%b0%d1%8f-%d1%80%d0%b0%d0%b7%d1%80%d0%b0%d0%b1%d0%be%d1%82%d0%ba%d0%b0-%d1%8d%d0%bb%d0%b5%d0%ba%d1%82%d1%80%d0%be%d0%bd%d0%bd%d1%8b%d1%85-2/
Лазерные станки https://raymark.ru резки и сварочные аппараты с ЧПУ в Москве: подбор, демонстрация, доставка, пусконаладка, обучение и сервис. Волоконные источники, металлы/нержавейка/алюминий. Гарантия, расходники со склада, выгодные цены.
educationunlimited.click – Daily lessons motivate growth and help discover new knowledge easily.
У меня настоящий 96 процентный спирт с больницы. Всё растворилось. Чу чуть паровой бани. купить скорость, кокаин, мефедрон, гашиш Качество 2с очень порадовало, трип позже отпишу.
Контрактная разработка электроники позволяет интегрировать устройства в существующие IoT-платформы и умные системы управления. Специалисты разрабатывают схемотехнику, создают платы, корпуса и программное обеспечение. Прототипы тестируются на производительность и стабильность работы. После успешного тестирования устройства переходят в серийное производство – https://chachamortors.com/bbs/board.php?bo_table=free&wr_id=6522395… Удобный подход к созданию электроники любой сложности
Current https://www.weather-webcam-in-montenegro.com: daytime and nighttime temperatures, precipitation probability, wind speed, storm warnings, and monthly climate. Detailed online forecast for Budva, Kotor, Bar, Tivat, and other popular Adriatic resorts.
https://aritual.by/prices.html
gift finder hub – Wide range of items available, browsing was smooth and enjoyable.
freshfindshubcorner.click – Outlet full of trendy products, browsing choices felt easy and pleasant.
Использовал услуги агентства горячих путёвок несколько раз и каждый раз оставался доволен. Специалисты действительно знают своё дело и предлагают лучшие варианты по соотношению цена качество. Тур оформляется быстро, а информация предоставляется максимально чётко. На отдыхе всё совпадает с тем, что обещали. Я уверен в этом сервисе и пользуюсь только им: туры в сочи горящие
Тоже был осадок, но в баньке всё растворилось) купить Кокаин, Мефедрон, Экстази В общем начну с начала.нашел ветку данного магазина и решил узнать че как.
Putting my genuine review related to this site. I talk about deals, payouts, and user experience. Highlighting special rewards and payments. Explaining how the system responds and transfers winnings. Listing benefits and drawbacks I found. Explaining what I appreciated and what could be better. You can learn more by checking out the full article Crowngreen
Interesse par 1xbet? Sur https://promosimple.com/ps/40479/1xbet-afrique-votre-guide-complet-pour-le-pari-sportif-mobile-et-ses-promotions, vous trouverez des liens a jour vers les fichiers d’installation de l’application 1xbet, les instructions d’installation, les mises a jour, les exigences systeme et des conseils sur la connexion securisee a votre compte pour un jeu en ligne confortable.
Интернет-магазин RC19 https://anbik.ru профессиональное телекоммуникационное и сетевое оборудование в Москве. Коммутаторы, маршрутизаторы, точки доступа, патч-панели и СКС. Собственный бренд, наличие на складе, консультации и сервис.
Posting my individual feedback concerning Crown GreenCasino. I mention special incentives, financial side, and overall experience. Pointing out bonus system and money-out process. Writing about how the interface responds and manages payouts. Talking about positives and negatives I saw. Going over what I enjoyed and what I didn’t enjoy. See the full article for extra details Crowngreen casino
worldwidesylehub.click – Stylish global trends showcased, exploring collections was effortless today.
Страшно , но хочется и потом сам не попробуеш не узнаеш ) https://scenar-ekb.ru грац вам джентльмены!
websuccess.click – Mobile version looks perfect; no glitches, fast scrolling, crisp text.
РВД Казань https://tatrvd.ru рукава высокого давления под заказ и в наличии. Быстрая опрессовка, точный подбор диаметров и фитингов, замена старых шлангов, изготовление РВД по образцу, обслуживаем спецтехнику, погрузчики, сельхоз- и дорожные машины.
freshpicksoutlet.click – Great collection of fashionable finds, shopping experience was smooth today.
roiboost.click – Loved the layout today; clean, simple, and genuinely user-friendly overall.
clickstormpro.click – Overall, professional vibe here; trustworthy, polished, and pleasantly minimal throughout.
seostorm.click – Loved the layout today; clean, simple, and genuinely user-friendly overall.
clickdynasty.click – Navigation felt smooth, found everything quickly without any confusing steps.
bright choice market – Offers a variety of products, making the shopping experience fun and simple.
traffichive.click – Content reads clearly, helpful examples made concepts easy to grasp.
Отдельный разговор с одной посылкой когда человек менял свое решение и то соглашался ждать посылку, то требовал вернуть деньги. купить Мефедрон, Бошки, Марихуану Магазин работает!!! Бро очень понктуален!!! Магазину процветание и новых клиентов!!!
студия дизайна интерьера https://dizayna-interera-spb.ru
makeitcountclick.click – Inspiring advice encourages taking deliberate steps to reach important milestones.
freshstylehub.click – Fashionable items presented nicely, browsing the collection was enjoyable.
Не могу, не в личку написать, и аска не указанна https://agit-prom.ru Спасибо, будем работать тогда тоже )
best picks online – Wide selection featured, navigating products was simple and seamless today.
corneroffreshclicks.click – Modern styles presented well, browsing the selection was fast and easy.
Inner Strength Hub – Resources to build mental strength and personal confidence.
а для какой цели не отправляют? курьерам похуй что тоскать, а если бы мусора хотели бы принять, посыль наоборот отправили. https://scenar-ekb.ru сколько нужно обождать после 2се и 2си, чтобы хорошо 4фа пошла?
Финансовые отчёты точно – где заверить перевод документов. Перевод технической документации. Самарское бюро. Нотариальное заверение. Срочно и качественно. Специалисты.
trendviewhub.click – Clear layout and trendy product selection make browsing simple.
норм. Все кладки нахожу без проблем… взял белого и…охуел!!! https://hotapk.ru Всем привет))))) Мой Трипчик))))))
freshchoiceshop.click – Trendy items featured nicely, shopping experience felt smooth and quick.
Воспользовался DRINKIO впервые и был приятно удивлён. Курьер приехал вовремя, заказ доставил в целости. Всё упаковано аккуратно, без нареканий. Видно, что сервис работает профессионально и с вниманием к деталям https://drinkio70.ru/
Проверенный сервис, который никогда не подводит. Заказываем часто, особенно по праздникам, и всегда всё вовремя. Курьеры ответственные, доставка аккуратная. Теперь если нужна доставка алкоголя 24 7 в москве, беру здесь https://drinkio70.ru/
студия дизайн интерьера петербург разработка дизайна интерьера
goal builder portal – Inspires daily actions that contribute to long-term vision success.
да наверно я попал на фейка или угонщика ,но мне не понятно как фейк может потверждать переписку с броси на форуме? купить скорость, кокаин, мефедрон, гашиш Магазу Респект и Уважуха)))
trendsettercollection.click – Fashion-forward items featured, discovering new wardrobe pieces was effortless.
freshpickoutlet.click – Trendy picks featured clearly, shopping experience was smooth and fun.
clickvolume.click – Pages loaded fast, images appeared sharp, and formatting stayed consistent.
maximumpotential.click – Inspiring strategies for making progress and expanding your personal abilities.
Все будет окей, это косяк курьерки… https://zavodl.ru составите конкуренцию известно кому :monetka:
rankcraft.click – Mobile version looks perfect; no glitches, fast scrolling, crisp text.
marketboostpro.click – Overall, professional vibe here; trustworthy, polished, and pleasantly minimal throughout.
clickhustle.click – Navigation felt smooth, found everything quickly without any confusing steps.
leaddash.click – Color palette felt calming, nothing distracting, just focused, thoughtful design.
freshtrendshub.click – Trendy outlet with fresh picks, finding favorites felt simple today.
clickmomentum.click – Navigation felt smooth, found everything quickly without any confusing steps.
homedecorhub.click – Browsing cheerful home décor items was smooth and fun.
Рассказал друг-таксист. купить Мефедрон, Бошки, Марихуану Просто КОСМОС
leadmachine.click – Color palette felt calming, nothing distracting, just focused, thoughtful design.
bright selection portal – Offers a fun and effortless browsing experience with varied products.
[url=https://vavadacasinos.neocities.org/]вавада онлайн казино[/url] — это актуальное зеркало для доступа к популярному онлайн-казино.
Здесь представлены лучшие игровые автоматы от ведущих разработчиков.
Сайт отличается удобным интерфейсом и быстрой работой. Игроки могут зайти на платформу как с компьютера, так и со смартфона.
#### Раздел 2: Игровой ассортимент
На платформе представлены сотни игр от мировых провайдеров. Каждый игрок найдет вариант по вкусу — от блекджека до современных видео-слотов.
Особого внимания заслуживают джекпоты и турниры. Ежедневные розыгрыши привлекают тысячи участников.
#### Раздел 3: Бонусы и акции
Новые игроки получают щедрые приветственные подарки. Первый депозит может быть увеличен на 100% или более.
Система лояльности поощряет постоянных клиентов. Кешбэк и эксклюзивные предложения доступны для VIP-игроков.
#### Раздел 4: Безопасность и поддержка
Vavada гарантирует честность и прозрачность игр. Вывод средств происходит быстро и без скрытых комиссий.
Служба поддержки работает в режиме 24/7. Консультанты отвечают моментально в онлайн-чате.
### Спин-шаблон
#### Раздел 1: Введение в мир Vavada
1. Vavada — известный ресурс для любителей азартных развлечений.
2. Пользователи могут насладиться десятками лицензионных игр с высокими выплатами.
3. Платформа радует пользователей простой навигацией и стабильной работой.
4. vavadacasinos.neocities.org доступен круглосуточно с любых устройств.
#### Раздел 2: Игровой ассортимент
1. Ассортимент включает в себя множество игр от топовых студий.
2. Популярные автоматы от NetEnt и Microgaming радуют отличной графикой.
3. Особого внимания заслуживают джекпоты и турниры.
4. Специальные акции увеличивают шансы на победу.
#### Раздел 3: Бонусы и акции
1. Регистрация открывает доступ к выгодным бонусам.
2. Бонусы начисляются как за регистрацию, так и за активность.
3. VIP-игроки получают персональные предложения.
4. Кешбэк и эксклюзивные предложения доступны для VIP-игроков.
#### Раздел 4: Безопасность и поддержка
1. Игровой процесс строго контролируется независимыми аудиторами.
2. Вывод средств происходит быстро и без скрытых комиссий.
3. Помощь доступна в любое время суток.
4. Игроки могут связаться с поддержкой через email или мессенджеры.
freshstylecorner.click – Fashionable items showcased nicely, shopping felt quick and effortless.
Sharing a https://pinuponline-bd.com website I recently discovered. It contains helpful details and might be interesting for some users here.
По прошествии полутора часов снова вылез джаббер. Малегькая накладка – курьер занят сильно, обещал к 23м сделать (было 21 на тот момент). Да не вопрос 😉 Джаббео выверен, оператор душевный человек, располагает к себе сразу. https://stroi-sam1.ru РАБОТА КАЧЕСТВЕННАЯ И БОЛЬШОЙ, БОЛЬШОЙ, БОЛЬШОЙ, БОЛЬШОЙ, БОЛЬШОЙ, БОЛЬШОЙ, БОЛЬШОЙ, БОЛЬШОЙ, БОЛЬШОЙ, БОЛЬШОЙ, БОЛЬШОЙ, БОЛЬШОЙ РЕСПЕКТ ВАМ качество продукции еще не пробывал, в ближайшие время расскажу OOO
https://kontrakt-na-svo-msk.ru/
Just sharing https://parimatch-download.in a website I recently visited. It provides helpful content that might be interesting to some users.
believeachieve.click – Inspiring reminders help focus on dreams and build growth habits.
I came https://jokabetapp.com across this site and decided to post it. The information looks helpful and may interest some users.
freshfindsoutlet.click – Stylish selections for fashion lovers, shopping here was smooth and fun.
joyful style hub – Lovely assortment, exploring the latest arrivals was quick and enjoyable.
Принял, участие в совместке номер 3, кинг как и подобает этому магазу, все сделал со скоростью звука, прошло 5 дней после оплаты и у меня в руках лежат 50 тонн этой велеколепной вкусняшки, СПАСИБО. Я просто не понимаю как люди заказывают у других когда есть chemical купить Кокаин, Мефедрон, Экстази Вообще то дажббер в рабочее время всегда в сети и все кто оплачивал и делал заказ получили треки.
как получить паспорт рф белорусу
Лицензионные программы microsoft https://licensed-software-1.ru
Да и вообще стот ли…? риск есть…? купить онлайн мефедрон, экстази, бошки FoX будь добр скажи…
freshpickoutlet.click – Trendy picks featured clearly, shopping experience was smooth and fun.
Протечка стояка привела к большой порче ремонта, эксперты сделали подробный отчет с фото: https://sud-po-zalivu.ru/
insightful learning hub – Educational content here makes learning fun and sharing ideas straightforward.
Нет. Такого у нас нет. https://sevbuh92.ru всё ровн ждём =)
freshfashioncorner.click – Attractive items on display, navigating categories felt effortless today.
Sportni yaxshi ko’rasizmi? ufc jonli efir uz Har kuni eng yaxshi sport yangiliklarini oling: chempionat natijalari, o’yinlar jadvali, o’yin kunlari haqida umumiy ma’lumot va murabbiylar va o’yinchilarning iqtiboslari. Batafsil statistika, jadvallar va reytinglar. Dunyodagi barcha sport tadbirlaridan real vaqt rejimida xabardor bo’lib turing.
Магазин ровный! Я заказал 1000ф, оплатил ЯД, оператора попросил отправить посыль на следующий день , без задержки т.к. сроки получения очень поджимают. На что оператор адекватно ответил что все сделают.На следующий вечер получил трек, посылочка собранна и вот вот выезжает))) если уже не выехала) Магазину как и его администрации – от души за оперативность и отношение к клиенту. https://agit-prom.ru Достойный, проверенный временем магазин!
Купить квартиру https://kvartiratltpro.ru без переплат и нервов: новостройки и вторичка, студии и семейные планировки, помощь в ипотеке, полное сопровождение сделки до ключей. Подбор вариантов под ваш бюджет и район, прозрачные условия и юридическая проверка.
modernpickshop.click – Sleek trendy products, navigating collections felt easy and enjoyable.
Независимая экспертиза помогла быстро решить вопрос компенсации https://advokat-zaliv.ru/
creativeconnectionhub – A refreshing spot that encourages imagination and fresh thinking every day.
marketoptimizer.click – Found practical insights today; sharing this article with colleagues later.
Магазин работает!!! Бро очень понктуален!!! Магазину процветание и новых клиентов!!! купить Мефедрон, Бошки, Марихуану Привет всем Тсу движек
leadharbor.click – Pages loaded fast, images appeared sharp, and formatting stayed consistent.
clicklabpro.click – Navigation felt smooth, found everything quickly without any confusing steps.
hyperleads.click – Mobile version looks perfect; no glitches, fast scrolling, crisp text.
clickvortex.click – Content reads clearly, helpful examples made concepts easy to grasp.
leadorigin.click – Content reads clearly, helpful examples made concepts easy to grasp.
Протечка стояка затронула несколько комнат, эксперты зафиксировали все: https://sud-po-zalivu.ru/
https://contractna-svo.ru/
https://contractna-svo.ru/
new arrivals hub – Wide selection of fresh products, navigating was quick and effortless.
Offer Spot Online – Plenty of nice options, and navigating between pages felt simple.
Товар привезли качество удовлетворительное,единственное что заказ долго оформляли не мог достучаться в асю.А так все норм!=)) купить кокаин, меф, бошки через телеграмм друзья всем привет ,брал через данный магазин порядком много весов ,скажу вам магазин работает ровнечком ,адрики в касание просто супер ,доставка работает на сто балов четко ,успехов вам друзья и процветания
freshpickoutlet.click – Trendy picks featured clearly, shopping experience was smooth and fun.
Хотите купить квартиру? https://spbnovostroyca.ru Подберём лучшие варианты в нужном районе и бюджете: новостройки, готовое жильё, ипотека с низким первоначальным взносом, помощь в одобрении и безопасная сделка. Реальные объекты, без скрытых комиссий и обмана.
Планируете купить квартиру https://kupithouse-spb.ru для жизни или инвестиций? Предлагаем проверенные варианты с высоким потенциалом роста, помогаем с ипотекой, оценкой и юридическим сопровождением. Безопасная сделка, понятные сроки и полный контроль каждого шага.
Экспертиза после протечки была точной и объективной – https://advokat-zaliv.ru/
clickpremier.click – Loved the layout today; clean, simple, and genuinely user-friendly overall.
уже ожидается что нибудь? купить кокаин, меф, бошки через телеграмм Возможно сказалась бессонная ночь и отсутствие нормального питания на протяжении практически недели, но все время под туси я провел лежа на кровати и созерцая слааабенькие визуальчики. В общем, 4 из 6 сказали, что магазин – шляпа, и больше никогда тут ничего не возьмут.
freshfindshubcorner.click – Outlet full of trendy products, browsing choices felt easy and pleasant.
modern trend corner – Trendy selections available, navigating was quick and effortless.
дешевые проститутки нижневартовск
Best Offer Finder – Liked how quickly I could look around and spot items worth checking out.
В общем я всегда доверял своей логике и считаю ее правильной, многие соглашаются с ней, но видимо тут никто толком ни с кем не согласится, потому соглашусь с тем, что кончаем с оффтопом https://kitsune44.ru Спасибо Все супер.МиР
freshstylecorner.click – Fashionable items showcased nicely, shopping felt quick and effortless.
тут мы, СПСР чет лажает, медленно заказы регистрирует в базу https://rodichenkov.ru магазу процветания желаю и клиентов хороших и честных!
chictrendzone.shop – Exploring trendy pieces was enjoyable, site layout made browsing smooth.
freshfindsoutlet.click – Stylish selections for fashion lovers, shopping here was smooth and fun.
https://служба-по-контракту-сво.рф/
Favorite Trend Hub – Browsing was effortless, with trendy items displayed neatly throughout.
доставка порадовала быстро качественно . насчет реагента который был указан 1 к 15 шас насайте он же стоит 1 к 10 такова говна еше не пробывал ( извените если кого обидел) 5 мин прет и все даже пролонгатор увеличил действие до 15 мин . за сам магазин нечего плохова сказать не могу брал раньше рега была отбойной и цены радуют … Но последния рега просто выкинуть что ли ее . сегодня попробую конечно 2 к 10 сделать если не поможет просто выкину .. https://bilet-msk.ru ам нормальная альтернатива 307.советую 1к15
https://служба-по-контракту-сво.рф/
idea discovery portal – Discover interesting concepts and opportunities smoothly today.
freshfindshub.click – Wide variety of stylish products, discovering new favorites was simple and fun.
праздники мы тоже отдыхали, так как курьерки все равно не работают купить Мефедрон, Бошки, Марихуану доброго времени суток. Так что по итогу магазин то ровный или нет,а то куча противоречий,заранее благодарен.
Fresh Discovery Page – Daily finds were exciting, and the layout made exploring effortless.
corneroffreshclicks.click – Modern styles presented well, browsing the selection was fast and easy.
Где продавец то? Мысли самые печальные…тт купить Кокаин, Мефедрон, Экстази Адрес почты правильный, все проверил не 1 раз, ответьте хоть тут.ну будем надееться что и на этот раз TS войдет в положение и как нибудь обратит внимание на решение наших вопросов, компенсирует нам потраченые нервы и время на безсмысленное ожидание, главное ведь для магазина репутация!
Trendy Shopping Daily – Browse fashionable items quickly thanks to neatly organized collections.
– Ну….. минут за двадцать…. https://allfur.ru съел примерно 10мг, чувствуется легкое расслабление и успокоение, каких то явных или ярких эффектов не наблюдается..
freshpickoutlet.click – Trendy picks featured clearly, shopping experience was smooth and fun.
clickfire.click – Pages loaded fast, images appeared sharp, and formatting stayed consistent.
Hot Trend Outlet – Browsing felt smooth, and the trendy items were easy to discover.
Экспертиза после протечки стояка помогла определить виновника и оформить документы: течет балкон от соседей сверху что делать
trafficgenius.click – Appreciate the typography choices; comfortable spacing improved my reading experience.
clickcatalyst.click – Color palette felt calming, nothing distracting, just focused, thoughtful design.
adoptimizer.click – Appreciate the typography choices; comfortable spacing improved my reading experience.
может стоит разводить 1 к 10? Кто брал ам 2233 отпишитесь на щёт пропорции,вообще 2233 1 к 20 разводится если продукт хороший купить Мефедрон, Бошки, Марихуану Магазин очень хороший всё чётко и быстро и селер грамотный вы правы
leadvelocity.click – Pages loaded fast, images appeared sharp, and formatting stayed consistent.
seoquantum.click – Found practical insights today; sharing this article with colleagues later.
dreamlifespace – Inspiring notes remind you to stay committed to building the life you want.
admetric.click – Bookmarked this immediately, planning to revisit for updates and inspiration.
https://sluzhba-po-kontrakty.ru/
https://sluzhba-po-kontrakty.ru/
Не понял…Его еще варить нужно??? На плитке?)) https://pizzadelmaestro.ru привет бразы всех спрошедшими праздниками получил седня посыль все порадовало и качество и бонус:p:D:D:Dприложеный за ожыдание спосибо магазу
Affordable Finds Hub – Clean design with well-arranged items, perfect for browsing value products.
BestBuyCorner Shop Link – Plenty of choices popped up fast, making browsing easy.
Юрист по заливу грамотно составил претензию и помог добиться компенсации от управляющей компании – https://ekspertiza-zaliva.ru/
В своё время работали по опту! https://imax34.ru Все Вась,извини..с утра заматался))
Оценщик при протечке быстро оценил ситуацию и подготовил отчет в электронном виде https://yurist-pri-zalive.ru/
Trending Shop Deals – Everything loaded smoothly and the browsing flow was simple.
много нас, а грам один. https://prishlo-vremya.ru chemical-mix.com работает у кого ??? всё походу накрылся магаз :::???
Trend Spot Online – Stylish pieces were displayed well, and moving through the pages felt simple.
Оценщик при протечке быстро оценил ситуацию и подготовил отчет в электронном виде: центр помощи при заливах квартир и помещений
Купить квартиру https://kupikvartiruvspb.ru просто: подберём проверенные варианты в нужном районе и бюджете, поможем с ипотекой и документами. Новостройки и вторичка, полное сопровождение сделки до получения ключей.
Купить квартиру https://kupithouse-ekb.ru без лишних рисков: актуальная база новостроек и вторичного жилья, помощь в выборе планировки, проверка застройщика и собственника, сопровождение на всех этапах сделки.
И еще, слышал типа ам2233, который отличного качества, желтого цвета. мне приходит белый, но када с ацетоном смешиваешь и ставишь нагреваться, стенки рюмки покрываются желтым цветом. https://kerchenskij-most.ru Ребята сайт хороший конечно, но вот у меня выдалась задержка с заказом, у кого были задержки отпишите сюда, просто раньше как только я делал заказа все высылалось либо к вечеру этого дня, либо на следующий, а теперь уже 4 дня жду отправки все не отправляют!
Chic & Trendy Daily – Explore collections that keep your wardrobe stylish and fresh.
Fresh Daily Deals – Checked it today and the deals were easy to browse with a clean layout.
мефедрон по цене 2100 купить мефедрон через тг
Fashion Finds Hub – Great variety of new looks, and the clean design makes browsing easy.
И еще сушняки ужасные. Сейчас вот утром проснулся, и до сих пор купить онлайн мефедрон, экстази, бошки скорость доставки 5+ (во вторник заказали в пятницу получили)
Квартира от застройщика https://novostroycatlt.ru под ваш бюджет: студии, евро-двушки, семейные планировки, выгодные условия ипотеки и рассрочки. Реальные цены, готовые и строящиеся дома, полная юридическая проверка и сопровождение сделки до заселения.
clickfunnelspro.click – Loved the layout today; clean, simple, and genuinely user-friendly overall.
clickauthority.click – Found practical insights today; sharing this article with colleagues later.
adblaze.click – Color palette felt calming, nothing distracting, just focused, thoughtful design.
trafficpilotpro.click – Appreciate the typography choices; comfortable spacing improved my reading experience.
boostfunnels.click – Appreciate the typography choices; comfortable spacing improved my reading experience.
Магазин нормальный, качество на уровне, короче заказывай и не парься я тут брал уже раза 3 и всегда всё на уровне:good:. А ник его Фокс произносится, что в переводе с английского означает лиса, лис.. купить Кокаин, Мефедрон, Экстази магазин пашит как комбаин пашню!)
rankdrive.click – Bookmarked this immediately, planning to revisit for updates and inspiration.
Bright Trend Picks – Great mix of fashion finds, and moving through the site felt effortless.
Popular Corner Store – Looked around for a bit, and the site was effortless to move through.
Disney made a smart choice’
Despite the comparisons, Abu Dhabi isn’t positioning itself as a direct rival to Orlando — it’s aiming to be something more. The emirate sees its theme parks as part of a bigger portfolio of attractions, alongside cultural landmarks, luxury hotels, pristine beaches, and desert adventures.
[url=http://trips45.cc]trip scan[/url]
A 15-minute drive from Yas Island, Saadiyat Island is home to the Louvre Abu Dhabi, a franchised outpost of the famous Paris art museum, which welcomed 1.4 million visitors last year, 84% from abroad. The Guggenheim Abu Dhabi and Zayed National Museum are both under construction, adding to a cultural district that will be one of the region’s most concentrated hubs of art and heritage.
“Abu Dhabi’s unique appeal lies in the diversity of our tourism offering,” Al Geziry added. “For thrill-seekers, we have record-breaking roller coasters and dune bashing in the desert. For culture lovers, historic sites like Al Ain Oasis and institutions like the Saadiyat museums. And for luxury travelers, world-class dining, private island resorts, and high-end shopping.
“Where else can you start your day under the Louvre’s iconic rain-of-light dome and end it in the immersive, story-driven worlds of Warner Bros. World or Ferrari World?”
http://trips45.cc
tripscan
Still, not everyone is convinced that Disney’s expansion into the Middle East is a sure bet.
“The region has seen its share of false starts,” says Dennis Speigel, founder of the International Theme Park Services consultancy, comparing it to neighboring Dubai’s patchy record with theme park expansion ambitions in the mid-2010s. “Several of them struggled for profitability in their first decade.”
Related article
Saadiyat Cultural District in Abu Dhabi is set to become one of the world’s preeminent arts and culture hubs, with one of the highest concentrations of cultural institutions globally. But the area isn’t just for art connoisseurs. Explore what to do in the new district, from iconic museums to luxurious beach days to decadent dining options.
You can walk between the Louvre and the Guggenheim in this new art district
Spiegel believes Abu Dhabi is different. “Disney made a smart choice. The infrastructure, safety, and existing leisure developments create an ideal entry point,” he told CNN earlier this year. “It’s a much more controlled and calculated move.”
Under its Tourism Strategy 2030, Abu Dhabi aims to grow annual visitors from 24 million in 2023 to more than 39 million by the end of the decade. With Disneyland as a centerpiece, those targets may well be surpassed. The city’s population has already grown from 2.7 million in 2014 to more than 4.1 million today, a reflection of its rising profile as a regional hub.
Yas Island alone has been transformed in the space of a decade from a largely undeveloped stretch of sand to a self-contained resort destination, complete with golf courses, marinas, a mall, more than 160 restaurants, and a cluster of high-end hotels.
Orlando’s head start remains formidable — it still offers multiple Disney and Universal parks, has decades of brand loyalty, and an infrastructure built to handle tens of millions of tourists annually.
But Abu Dhabi is catching up fast. Its combination of frictionless travel, year-round comfort, cutting-edge attractions, and a cultural scene that adds depth to the experience gives Abu Dhabi its own unique selling point, potentially offering a model for the next generation of theme park capital.
інформаційний портал https://36000.com.ua Полтави: актуальні новини міста, важливі події, суспільно-громадські та культурні заходи. Репортажі з місця подій, аналітика та корисні поради для кожного жителя. Увага до деталей, життя Полтави в публікаціях щодня.
Trend & Style Market – Loved the trendy selections, and browsing through everything was smooth and effortless.
нотариус перевод документов дешевый перевод документов
Ам1220 все больше сообщений что относят к нелегалу. https://bular-anapa.ru Тоже такая ситуация , сижу без товара негодую.
Bright Fashion Outlet – Loved the vibrant selection, and navigating through everything felt smooth and simple.
проститутки нижневартовск молодой
Urban Fashion Collective – Browsed today and discovered some stylish items quickly and easily.
Через Skype мы больше не работаем, об этом мы объявляли пару недель назад. купить Кокаин, Мефедрон, Экстази у СПСР постоянно такая хрень, порой по неделе не пробиваются треки(проверено на себе… тоже срал кирпичами(на рафика причем)) а говорят быстрей ЕМС. не верю))
Trending New Products – Lots of fresh additions, and browsing through them felt comfortable and simple.
Bright Fashion Deals – A fun place to explore new styles, with pages loading quickly and clearly.
Я заказал еще 19 числа на сайте, оплатил 23 числа, ТС выслал 25 числа, тогда я и тут зарегился, так как он отправил не той службой, думал кинули. Пришло все вчера, забрал днем, попробовал вечером https://allfur.ru челяба есть?
Modern Season Hub – Pleasant browsing experience with clean visuals and quick access to items.
Bright Fashion Hub – Attractive styles everywhere, and browsing through categories felt seamless.
Качество превосходное! чистейший джив у вас) всем нравится. Удачных продаж,бро! https://igra18plus.ru магазин вообще работает или сдулся? почему мне ни кто не отвечает в джабере???!!!
clickace.click – Bookmarked this immediately, planning to revisit for updates and inspiration.
Happy Trend Boutique – Loved the cute boutique vibe, and browsing through the items was smooth and easy.
Modern Finds Center – Browsing felt intuitive and the product sections were easy to explore.
Bright Trend Picks – Great mix of fashion finds, and moving through the site felt effortless.
Аккуратнее с магазином, недовес у них неплохой… купить скорость, кокаин, мефедрон, гашиш сегодня в 16:25 на почте получен конверт ,в нем было вещество лимоного цвета 0,3 г , сохнет ,позже подробно опишу
rankwizard.click – Bookmarked this immediately, planning to revisit for updates and inspiration.
качество очень хорошее не подведёт даже не сомневайся https://mynyc.ru У меня ожидалась поездка по работе в Столицу нашей родины на пару недель но как обычно я списался оператором в джаббе подтвердил адрес через форум что не ФЭЙК оплатил заранее по приезду написал ТС , он по скорому выдал мне адрес в тот день что договорились )
Worldwide Fashion Spot – Enjoyed the modern selections and had no trouble scrolling through the site.
Bright Outfit Shop – The overall look was appealing, and navigating the sections felt intuitive.
Unique Outlet Market – Well-organized product sections and fast loading made shopping simple.
Независимая оценка ущерба помогла ускорить решение вопроса со страховой: балкон сверху
Как магазиН? купить Мефедрон, Бошки, Марихуану Закажу посмотрим я сам надеюсь что магазин хороший-проверенный
Bright Fashion Hub – Attractive styles everywhere, and browsing through categories felt seamless.
Seasonal Picks Online – The site shows seasonal items beautifully, and exploring them was smooth.
FreshStyle Collections – Navigation was smooth and the styling options were easy to check.
Ага ровный!!!!И я так считал до некоторых случаев! https://gadanieperemen.ru Пишите в скайп, аську, пожалуйста без лишнего, чтобы была возможность ответить всем. :good:
Независимая оценка помогла решить вопрос без судебных разбирательств – https://zaliv-expertiza.ru/
Bright Style Picks – Found some great outfits quickly, and the browsing experience was very relaxed.
перевод документов армянский перевод документов германии
ufc primoy efir jahon chempionati futbol
Hi this is somewhat of off topic but I was wanting to know if blogs use WYSIWYG editors or if you have to manually code with HTML. I’m starting a blog soon but have no coding skills so I wanted to get advice from someone with experience. Any help would be greatly appreciated!
Rio prostitution
оплатил 31го, сегодня все уже получил! Продавану, спасибо за оперативность!:ok: https://mynyc.ru Хотели делать 1к15 – 1к10, но в итоге всё замесили 1к12. Я бы не сказал, что сильно убивает, но люди были довольны. Пипеточку хлоп:killmyself: и хорошо минут на 40, поэтому скоро перешёл на трубку и курил по пол полки за раз, отчего угарал от роликов MineCraft.
Value Hunt Daily – Spot great offers and find the best deals fast.
TrendShub Online Picks – Very simple to explore, with a few stylish finds popping up quickly.
Happy Deals Corner – Loved the organized layout, and all items load quickly and look appealing.
Bright Fashion Picks – A lot of stylish options popped out, and scrolling felt very natural.
Кто под нос что-то бормочет, купить скорость, кокаин, мефедрон, гашиш Ещё и сообщения трут.
clickwaveagency.click – Pages loaded fast, images appeared sharp, and formatting stayed consistent.
<https://kuklanvt.info/new/
adspectrum.click – Color palette felt calming, nothing distracting, just focused, thoughtful design.
Магаз отличный, успехов вам! купить кокаин, меф, бошки через телеграмм Хороших продаж!
clicklegends.click – Navigation felt smooth, found everything quickly without any confusing steps.
Bright Outfit Shop – The overall look was appealing, and navigating the sections felt intuitive.
seotitan.click – Bookmarked this immediately, planning to revisit for updates and inspiration.
growthclicks.click – Found practical insights today; sharing this article with colleagues later.
Fresh Seasonal Store – Items loaded fast and the experience felt effortless overall.
seoaccelerate.click – Color palette felt calming, nothing distracting, just focused, thoughtful design.
Shop urban fashion – Quickly spotted a handful of stylish pieces, navigation effortless.
Worldwide Fashion Hub – Plenty of stylish options, all displayed clearly for easy exploring.
sportuz yangiliklari futbol prognozlari
доставка порадовала быстро качественно . насчет реагента который был указан 1 к 15 шас насайте он же стоит 1 к 10 такова говна еше не пробывал ( извените если кого обидел) 5 мин прет и все даже пролонгатор увеличил действие до 15 мин . за сам магазин нечего плохова сказать не могу брал раньше рега была отбойной и цены радуют … Но последния рега просто выкинуть что ли ее . сегодня попробую конечно 2 к 10 сделать если не поможет просто выкину .. https://oniks-auto.ru самый дешёвый магазин из доверенных – это этот!
Не https://mdgt.top знаех как да скрия кабелите в хола, но сайтът предложи отлична декорация
dealspotmarket – Shopping was easy and prices were very fair.
Ну вот и дождался! https://radian16.ru Оплатил подождал очередь неделю так как завал у магазина теперь жду посыль респект ребята работаете на высоте
Fashion Trend Spot – The trendy vibes were great, and moving through the categories was intuitive.
РАБОТАЕМ!!! ОПТ!!! ДОСТАВКА!!! купить Кокаин, Мефедрон, Экстази Молча !! Запрет вступает в силу 26го числа, если не ошибаюсь. Скидывай всё палево, жёсткий дист зарывай подальше и иди получай ))
bargaincorner – Smooth checkout and lots of affordable options.
Urban style collection – Several attractive finds popped up immediately, navigation effortless.
Top Gift Picks – Lots of appealing choices, and the overall selection looked budget-friendly.
Знайшов https://seetheworld.top/ матеріали про курорти чехії.
Ціни https://remontuem.if.ua на суха стяжка івано-франківськ ціна порівняв на сайті.
Gift Picks Market – Fast-loading pages and a clean interface made finding gifts effortless.
Trend Collection Spot – Curated trendy items make browsing simple and enjoyable every day.
Наверно так же как и джив. попробуй минимальные пропорции сделать 0,1 к 1 https://teka-retail.ru В день оплаты через час я получаю ровную надёжную закладку Курьерский сервис на 5+?
Smart Deals Spot – Attractive value items with a straightforward design for quick comparison.
Corner Trend Hub – Interesting outfits all around, with a clean and seamless shopping flow.
shopbrightdeals – Really enjoyed the product variety, placing an order was hassle-free.
Ты покупал у этого магазина ? Если у этого то пиши ему в лс, и по каким контактам ты списывался , и сколько брал ? Не могли тебя тут кинуть https://leninovskoesovet.ru тоже хочу заказать бро!!!
Corner Hub Global – Items were easy to find and the cheerful interface added to the experience.
For the reason that the admin of this website is working, no uncertainty very soon it will be well-known, due to its quality contents.
https://polygraph.od.ua/chomu-ya-nikoly-ne-poliruvatymu-sklo-far.html
Modern Style Picks – A variety of trendy products appeared, and the overall experience was seamless.
раньше и хуй крепче был и бабы красивей https://akb-ivanovo.ru В итоге, когда я на холоде прождал после последнего “Щас” час, внезапно ответил CM, которому я ещё днём написал. Я поначалу даже не смог вспомнить что у магазина в прайсе, и что я конкретно в этом магазине хотел. Выбирал изначально между эйфом и ск, ну и поскольку эйфа в прайсе нет, то спросил СК.
Friendly Shopping Online – Items displayed neatly, and navigation across the site is smooth and simple.
affordableshoppinghub – Great selection at low prices, checkout was fast.
Explore top fashion picks – Quickly discovered a few appealing items, layout felt clean.
Seasonal Finds Link – Checked a few sections, and everything felt straightforward and responsive.
а думаете? https://major-plus.ru Братишка, все красиво, в касание, спасибо за профессионализм
topbrightbuys – Wide range of items, browsing and checkout was easy.
Fresh Deals Market – Came across some worthwhile items, all marked at appealing price points.
Modern Style Store – Great mix of fashionable items, and the layout helped everything feel nicely organized.
как и обещал пишу про качество- для кайфожеров 1к7, для кайфариков 1к9 , для додиков 1к11 , продукт работает 35-40 мин , используйте нормальную очищенную основу и будет счастье в тридевятом государстве, вот например от смолы ромашки или мать и мачехи головные боли и побочки, хотя реагент тут не причем , химоза нормального качества особенно если считать в соотношении цена-качество, ТС последнее время приятно удивляет своим терпением к таким сумасшедшим клиентам как я( я с ума сводил его своими платежами) но он стойко все перенес за что ему отдельное респект ТАК ДЕРЖАТЬ!!!! ТС КРАСАВЧЕГ https://twoprice.ru нет таких, а вымораживать рекламу других магазинов в этой ветке можно и минус в репу получить, есть другие ветки где обсуждаются реагенты от разных магазинов, а здесь обсуждается продукция данного ТСа , вкурил?
Unique Choice Hub Deals – Found several one-of-a-kind items today, and browsing the site was effortless and smooth.
Joyful Buy Hub – Clean interface and fast response times made browsing stress-free.
Конспирацию посылок наладили? А то такой товар, а выписать не могу – стрёмно, если просто гриперы в конверте… И отпишите по качеству 5 мео дмт! https://faraon-s.ru Все окей пацаны))))это че то почта затупила,)))Кстати кач-во лучше стало)Первый раз 1 к 20 прям норм)))
Скрипт обменника https://richexchanger.com для запуска собственного обменного сервиса: продуманная администрация, гибкие курсы, автоматические заявки, интеграция с платёжными системами и высокий уровень безопасности данных клиентов.
Профессиональные сюрвей услуги для бизнеса: детальная проверка состояния грузов и объектов, оценка повреждений, контроль условий перевозки и хранения. Минимизируем финансовые и репутационные риски, помогаем защищать ваши интересы.
happygiftshop – Impressive gift range, finding items was simple and quick.
Finds Market Deals – Easy-to-use layout helped me discover a bunch of appealing finds today.
Buying Hub Picks Online – Several great deals today, and moving through the pages felt smooth.
Top fashion picks – Several eye-catching items popped up instantly, browsing enjoyable.
Знакомые делали, получалось что-то похожее на старый Juh. купить Кокаин, Мефедрон, Экстази списались с продавцом,пообщались,договорились.я оплатил заказ и начались долгие ожидания моей заветной посылки.
fashionjunction – Found stylish outfits quickly, checkout process was smooth.
Trendy Finds Daily – Quick page loads and the newest products looked appealing.
brightshoppingcentral – Very convenient to shop, plenty of options and simple checkout.
MXE точно не бодяженный , со 100мг вышел нереально жуткий трип, раз 15 умирал… через сутки отпустило. https://gds-center.ru Качество обслуживания хорошее – с момента оплаты до прибытия товара прошло всего 3 дня и вес ровный.
Pure Style Finds Online – Found several stylish items, and the shipping process seemed smooth.
Fashion Style Hub – Items are presented nicely, and I quickly found pieces that matched my style.
Bright Savings Hub – Liked how quickly pages loaded and how simple the categories were to navigate.
Заказывал 200й, прислали с приятным бонусом! Конспирация- чудесна! В общем все супер! купить скорость, кокаин, мефедрон, гашиш Инфа с вашего сайта. Я уже брал 6-APB, и выглядел он несколько иначе.
https://telegra.ph/Lemon-casino—50-darmowe-spiny-11-24
Fresh Products Outlet – Plenty of choices available, and moving between items felt seamless.
trendhubstore – Loved the trendy items, shipping was fast and checkout was smooth.
Urban trend finds – Several standout options appeared right away, browsing easy.
Ребят, а подскажите насчет доставки спср, в какие города она доставляет ? Блин никогда раньше с ней не связывался 🙁 Расскажите пожалуйста, что, да как купить онлайн мефедрон, экстази, бошки Ответят, думаю и завтра нужно будет подождать
digitalfunnels.click – Navigation felt smooth, found everything quickly without any confusing steps.
viraltraffic.click – Overall, professional vibe here; trustworthy, polished, and pleasantly minimal throughout.
happystore – Found perfect products easily, delivery felt fast and consistent.
ranktunnel.click – Pages loaded fast, images appeared sharp, and formatting stayed consistent.
rankmaster.click – Color palette felt calming, nothing distracting, just focused, thoughtful design.
seosurge.click – Overall, professional vibe here; trustworthy, polished, and pleasantly minimal throughout.
Trendy Living Deals – Navigation was simple and items were displayed attractively.
a href=”https://modernhomemarket.shop/” />Modern Home Finds Online – Discovered some standout pieces, and the browsing experience was seamless.
brandamplify.click – Loved the layout today; clean, simple, and genuinely user-friendly overall.
А будет какая нибудь подробная инфа или трип репорты? А лучше пробники платные или бесплатные? https://powsurfing.ru платил 5 февраля свою посылочку!как вы поняли ничего не получил!ТС кормил меня завтраками,в итоги обещал вернуть деньги если не получу до 28 февраля!деньги мне тоже никто не вернул вместо этого мне прислали новый трек и написали что мы обещали что получите товар и деньги возвращать не буду!мои обьяснения о том что вашу посылку уже некому получать он слушать не хочет и возвращать деньги тоже!Ув.Адмистрация форума прошу не удалять мой пост и если нужно могу скинуть переписку!
https://telegra.ph/Lemon-casino-kod-promocyjny-bez-depozytu-11-24
bestmarketfinds – Wide range of items and smooth ordering process, very satisfied.
Спасибо хотя бы на том, что вообще что-то прислали… https://vsevsdr.ru Один из топовых продавцов на всем РЦ:)
Trending Fashion Finds – Lots of eye-catching pieces, and confirming the purchase took just seconds.
Trend Marketplace – Smooth scrolling and organized categories made discovering products easy.
styleemporiumhub – Very smooth browsing experience, the website design is clean and neat.
Фитляндия https://fit-landia.ru интернет-магазин товаров для спорта и фитнеса. Наша компания старается сделать фитнес доступным для каждого, поэтому у нас Вы можете найти большой выбор кардиотренажеров и различных аксессуаров к ним. Также в ассортименте нашего магазина Вы найдете качественные товары для различных спортивных игр, силовые тренажеры, гантели и различное оборудование для единоборств. На нашем сайте имеется широкий выбор товаров для детей — различные детские тренажеры, батуты, а так же детские комплексы и городки для дачи. Занимайтесь спортом вместе с Фитляндией
Народ уже как два часа нет ответов от администратора магазина купить онлайн мефедрон, экстази, бошки Сегодня увидел селера в скайпе,как и обещано в его сообщении работать начал вовремя …:hello:Отписался ему по интересующим меня вопросам:sos:,сразу получил четкий ясный ответ,развеявший мои опасения.Работа с клиентом-1 класс:superman:.Подтверждает свою репутацию не первый раз,я доволен что веду свои дела именно с ним:bravo:.Ребята,в его честности ,профессионализме,и других качествах можете быть уверены…(для тех кто обдумывает заказ).:speak:
clickcampaign.click – Navigation felt smooth, found everything quickly without any confusing steps.
Quick fashion finds – A handful of crisp items appeared right away, navigation smooth.
World of Happy Deals – Good variety of items today, and navigating through them was simple.
choiceworld – Loved the product variety, shopping felt quick and convenient.
https://rich513.com/
Smart Shopping Picks – Pleasant layout and smooth scrolling made checking items comfortable.
p/s мне ничего не надо! Зашёл пожелать удачи магазину в нелегком деле. купить Кокаин, Мефедрон, Экстази Так что тут 50:50 если тебя примут. Все зависит от конкретного города и гнк в нем.
Modern Living Finds – Enjoyed looking through the collection; lots of stylish, everyday-friendly products
Нежные авторские торты на заказ с индивидуальным дизайном и натуральными ингредиентами. Подберем вкус и оформление под ваш бюджет и тематику праздника, аккуратно доставим до двери.
homestorecentral – Pleasant shopping journey, found all the items I wanted quickly.
Тоже считаем что запреты не запреты. Да бывает что и за клиентами охотятся. https://babanovsky-sad.ru трек не работает тишина уже 3 дня прошло >< у всех все гуд а у меня щляпа как так почему ((( ?!?!?!?
И еще сушняки ужасные. Сейчас вот утром проснулся, и до сих пор https://vazremkuzov.ru Закажу посмотрим я сам надеюсь что магазин хороший-проверенный
Potential Enhancement Spot – Resources for consistent learning and self-improvement in all areas.
Our most valuable: https://lt.livesexchat18.com
Check this style collection – Found several appealing fashion picks quickly, browsing was smooth.
trendwear – Great variety of urban outfits, browsing the website felt smooth and effortless.
хорщий магаз!!!всегда все ровно!!! купить Мефедрон, Бошки, Марихуану Был постоянным клиентом магаза , неделю назад прислали с нулевым эфектом , года два назад была проблема с ними, решили сразу , сейчас на вопрос -как будем решать , ответили что мы решим – напишите в конце недели , типа не разводите панику на форуме недельку , а мы пока людей пошвыряем…. , неделя прошла , на вопросы не отвечают…решать не хотят…. был магаз ровный , теперь людей решили покидать…. админы вообще никуда не смотрят , раньше хоть как то было гарантией что они в списке доверенных , сейчас деньги заплатили за форум , выставились и швыряют .
Value Hub Online – Found several attractive products, and pages loaded fast and effortlessly.
Complete guide here: https://pornochat24.ru
Start with this story: https://dianachat.ru
UrbanFashionSpot – Loved the modern collection, shipped fast and items were flawless.
bestpickfinds – Smooth shopping experience, pages loaded quickly and items were easy to browse.
желаю и дальше продолжать в том же духе!)) https://moyconcert.ru Вот так нихуя себе с 2011 года на плаву:strong:, подумаеш какая диковинка 😀
Modern Home Picks – A nice selection of home essentials, with quality that feels dependable.
Я знаете как делаю, когда пацики отвечают сразу делаю заказ, оплачиваю и все чотка, самим тормозить не надо https://babanovsky-sad.ru Брал у него все гудд. Маскировка на высоте качество отличное. буду брать еще
joyhomehub – Loved the discounts, website made shopping very smooth.
Quick fashion finds – A handful of crisp items appeared right away, navigation smooth.
Smart Daily Deals – Looked through the offers and the whole visit was smooth from start to finish.
это манера такая сдержанная или удовлетворительное=на троечку https://leninovskoesovet.ru качество интересует
КАК ОБЕЩЯЛ ОПЕРАТОР ТАК ВСЕ И СДЕЛАЛ ОДИН В ОДИН !!!! купить Мефедрон, Бошки, Марихуану Прошу обратить внимание на кидок со стороны магазина на ~50000 рублей в Украинской ветке.
Unique Home Hub Online – A variety of rare finds today, and the website layout was simple and clean.
modernfashioncorner – Smooth browsing and user-friendly design, products were easy to find.
Appreciating the time and effort you put into your blog and in depth information you present. It’s good to come across a blog every once in a while that isn’t the same outdated rehashed material. Excellent read! I’ve saved your site and I’m including your RSS feeds to my Google account.
independent escort girl in Rio
Две дорожки для Сережки, https://strana41.ru Заказываю в третий раз, дали скидку 8%, приятно.
Continue reading here: https://europeancams.net
happyhubcorner – Smooth shopping and excellent customer care, very satisfied.
Trend Shopping Hub Online – Great products and very user-friendly site, received fast delivery.
Fresh Gift Collections – Some nice gift ideas today, and orders should arrive quickly.
Urban fashion hub – A few standout styles appeared instantly, very easy to explore.
modacollection – Loved the selection, navigating the site and checkout was easy.
эх, вот печаль то…вчера так порадовался – селлер быстро ответил, хорошо пообщались, заказ принял, проплата прошла, сказали завтра трек будет…наступило завтра и тишина…вроде в сети и ася и скайп..за что меня так игнорят?))) заказ маленький то он такой важный!))))) в общем надеюсь на скорый ответ)) https://eraofm.ru Всем привет.
Online Unique Value – Plenty of appealing items today, with solid quality and good pricing.
ну то что ценники здесь шикарные заметил!и то что на “главной”-это и заинтересовало меня,но насторажило одновременно!ges_hmm.gifПосмотрим,что выйдет из-этого.Пока всё гладко! купить Мефедрон, Бошки, Марихуану Ну как видишь соответсвует …
Global Season Online – Loved the seasonal variety, and placing an order was fast.
WildShoreCollection – Unique items, smooth navigation, and quick arrival.
Ровный магазин . Всем советую ! купить скорость, кокаин, мефедрон, гашиш Всем привет,что то скайп неработает((жду трек
Decor Picks Online – Enjoyed going through the catalog; things were organized and smooth to explore.
Trusted telegram groups providing best trading signals stand out through community-reviewed performance. Legit providers share alpha insights with best buy and sell timing, helping traders join channels with trustworthy signals backed by consistent results.
Mobile app purchases allow convenient ways to buy robux directly in-game. iOS and Android platforms integrate secure payment processing through Apple App Store and Google Play Store protecting transaction details effectively.
voguevaulthub – Excellent selection of modern fashion, arrived promptly.
trendysalespot – Very easy to navigate, checkout was quick and seamless.
Gift Shopping Hub – Solid choices overall; my order was delivered neat and damage-free.
Browse latest fashion – Found a couple of eye-catching picks fast, very user-friendly.
Если в разработке, то да.А так лишний раз лучше предостречься))) купить Мефедрон, Бошки, Марихуану если нет, то когда будет?
SunsetStemOnlineHub – Smooth ordering process, quick delivery, and neat packaging.
dailystylehub – Great selection of outfits, browsing and checkout felt effortless.
webpromoter.click – Content reads clearly, helpful examples made concepts easy to grasp.
СТО в Люберцах https://sto-cars.ru ремонт и техническое обслуживание легковых автомобилей и легкого коммерческого транспорта. Современное оборудование, опытные мастера, свой склад запчастей, комфортная зона ожидания и честный подход к каждому клиенту.
Старые фунты? https://funtfrank.ru Обменяйте легко и без комиссий! Принимаем старые банкноты фунта стерлингов по выгодному курсу, без скрытых платежей и навязанных услуг. Быстрая проверка подлинности, моментальная выдача наличных или перевод на карту.
индивидуалки нижневартовск за 2000 рублей
посылка в городе. Сегодня заберу купить кокаин, меф, бошки через телеграмм И всем форумчанам!!!
adstrigger.click – Color palette felt calming, nothing distracting, just focused, thoughtful design.
trafficengine.click – Appreciate the typography choices; comfortable spacing improved my reading experience.
reachoptimizer.click – Loved the layout today; clean, simple, and genuinely user-friendly overall.
marketactivator.click – Pages loaded fast, images appeared sharp, and formatting stayed consistent.
boostmetrics.click – Mobile version looks perfect; no glitches, fast scrolling, crisp text.
Urban Fashion Picks – Explore the latest streetwear and elevate your daily style.
carefreecornerstore – Easy to navigate, products are high quality, and delivery was fast.
Trend Gift Hub – Trendy and useful items, website navigation was easy, and ordering seamless.
Wild Crest Shop – Great variety, intuitive website, and items were delivered safely.
adswizard.click – Content reads clearly, helpful examples made concepts easy to grasp.
ко ланта ко лант
“Лазею я по форуму,точнее по веткам и на ветке Эскимоса вижу запись на Пробы” купить Кокаин, Мефедрон, Экстази и че сделали? условку дали?
glamhubonline – Items were easy to find, site loads smoothly and efficiently.
Всем Привет! :hello:Немного хороших строк о магазине;) https://moyconcert.ru магазин на высоте) качество кул)
Check fashion items – A few interesting styles were easy to find immediately, layout clean.
WildCrest Trend Store – Lovely assortment, smooth checkout, and items were delivered quickly.
purepickshop – Convenient to locate trendy items, checkout process was smooth.
fashionlane – Enjoyed exploring trendy collections, the site loaded quickly and easily.
IronWoodBoutique – Loved the selection, ordering was simple, and delivery was prompt.
Simple Fashion Hub Picks – Nice variety of clothes, browsing felt easy, and checkout was very fast.
Hot Topics: http://kanon.kabb.ru/viewtopic.php?f=49&t=7011
и уже сегодня за клевету, троллинг и проч. наш друг нас покинул купить скорость, кокаин, мефедрон, гашиш проблемы с обслуживанием.
StreetBold Boutique – Amazing curated pieces and the checkout worked flawlessly for me.
вот и я уже трясусь. https://fitceps.ru главное что ты “вкурил”, а как мне тебе это втереть уже не важно
Shop Smile Picks Online – Loved the variety, items were well-priced, and delivery was fast.
Хочеш зазнати успіху? найкраще онлайн казино: свіжі огляди, рейтинг майданчиків, вітальні бонуси та фрізпіни, особливості слотів та лайв-ігор. Докладно розбираємо правила та нагадуємо, що грати варто лише на вільні кошти.
Цікавлять бонуси? казіно з бонусами: актуальні акції, подарунки за реєстрацію, депозитні та VIP-бонуси. Чесно розбираємо правила, допомагаємо зрозуміти вигоду та уникнути типових помилок під час гри.
Wonder View Goods – Loved the variety, products are high-quality, and delivery was quick.
chictrendstore – Wide selection and excellent prices, made shopping enjoyable.
Моментально: реквизиты, оплата, подтверждение получения. Все. https://moskva-autolombard.ru Скоро отпишу за качество урб и мн.
Explore urban trends – Discovered some trendy outfits fast, layout was clear and simple.
giftnook – Found perfect gift ideas, shipping seems fast and trustworthy.
trendyfamilyhub – Pleasant experience, pages loaded quickly and checkout was smooth.
Recent Changes: https://www.twitch.tv/npprteamshopz1/about
PureHarborSelect – Loved browsing the stylish items and smooth navigation.
У меня всё норм, реальную отправку написали в треке. Я волновался на счёт этого после сообщений купить онлайн мефедрон, экстази, бошки то-же самое могу сказать!
BH Corner Shop – Really impressed with the site’s layout and fast delivery.
Global Value Hub – Nice deals available, and the website ran quickly with simple checkout.
Nurture & Flourish Spot – Strategies and insights to cultivate personal growth and resilience.
вчера вечером получил трек сегодня груз, я охуеваю от скорости доставки походу ТС выкупил курьерку ))) по качеству отпишусь позже https://growupeco.ru заказал rcs-4, чет не радует отзывы, как придет со дня на день посмотрим, что выйдет отпишусь, буду делать 1к 10-ти…
SoftCrest General Store – Easy browsing, lovely selection, and very prompt delivery.
SunCrestTrendyShop – Loved the modern fashion pieces and hassle-free checkout.
blacksprut ссылка
Pure Style Trends – Great selection of stylish items and effortless website navigation.
shopvaultbig – Great bargains and smooth shopping, very convenient experience.
marketdriver.click – Bookmarked this immediately, planning to revisit for updates and inspiration.
брал тут туси совсем недавно.все устроило.спасибо.жду обработки второго заказа) купить, кокаин, мефедрон, гашиш, бошки Ессентуки Про 80 не знаю. Но то что там принимают сомнительных, дак это точно. Вот люди которые туда приходят и ушатаные в хламотень, все трясутся. И оглядываются, как будто от смерти скрываются конечно их принимают… А что про тех кто соблюдаем все меры, тот спокоен. И сдержан. Но все равно. В спср принимают однозначно, сам свидетель в 2006 году. когда за дропом следили, перепугались что за нашим пришли… Но все обошлось.
conversionforce.click – Bookmarked this immediately, planning to revisit for updates and inspiration.
promoseeder.click – Navigation felt smooth, found everything quickly without any confusing steps.
rankclicker.click – Color palette felt calming, nothing distracting, just focused, thoughtful design.
adscatalyst.click – Overall, professional vibe here; trustworthy, polished, and pleasantly minimal throughout.
trendhub – Enjoyed exploring trendy items, navigating the site was quick and easy.
BH Trends Corner – Great browsing experience and the items showed up in excellent condition.
brandfunnels.click – Navigation felt smooth, found everything quickly without any confusing steps.
RareSeasonStore – Great selection, smooth browsing, and products arrived reliably.
digitalpropel.click – Color palette felt calming, nothing distracting, just focused, thoughtful design.
экстренное вытрезвление
Крутой качественный товар! Все своевременно +++ https://katyakant.ru/mapsite2.html Продолжаем работать, в этот раз чуть больше берем 🙂 очень хорошие скидки дает постоянным клиентам обращаетесь !!
urbanvaluezone – Convenient to browse and shop, found multiple items I liked.
https://extrennoe-vitrezvlenie-na-domu-spb1.ru/
Bright Collection Picks – Good fashion selection; delivery was quick and hassle-free.
BrightLeaf Market – Really enjoyed browsing here; everything loaded fast and worked perfectly.
помогите обьясните как написать сапорту купить, кокаин, мефедрон, гашиш, бошки Янаул Какие обещания? если выходной, скорей всего СПРС в базу не завело твой трек, жди понедельника…
SoftStone Online Store – Beautiful collection, simple navigation, and fast delivery.
DFEssentialsHub – Smooth ordering process with clear product options.
vogueseasonhub – Loved the seasonal assortment, checkout was simple and quick.
За АМ 1220 ничего сказать не могу – не пробовал…. Но, после тестирования 694 и 2201 впечатления о линейке АМ у меня сильно подпортились ( https://astroenergosintez.ru/barabinsk.html все пришло.пока не пробовал.конспирация на высшем уровне.спасибо
OceanCrest Deals – Fashionable finds, simple ordering, and the package reached me quickly.
Fresh Hub Collection – Nice assortment of fresh items, and placing an order was very straightforward.
Visit an elephant sanctuary: care, rehabilitation, and protection of animals. Learn their stories, participate in feedings, and observe elephants in the wild, not in a circus.
Профессиональные цены на электромонтаж в москве в квартирах, домах и офисах. Замена проводки, монтаж щитков, автоматов, УЗО, светильников и розеток. Работаем по нормам ПУЭ, даём гарантию и подробный акт выполненных работ.
stylefinder – Enjoyed checking out trendy outfits, the website loaded quickly.
jte тут брал кто?Как качество?К скольки делать? купить, кокаин, мефедрон, гашиш, бошки Харабали Я взял всего 15т.т из-за того что 6июля он не легал и я не понимаю что сложного сделать замену чтобы я удостоверился в качестве следующего товара а они какимита скидками,бонусами пытаются отмазатся я опять денег закидываю и такое же го..но забираю!
Goal Mastery Hub – Insights to stay motivated and take consistent steps toward your ambitions.
<a href="https://sunrisetrailmarket.shop/" /SunriseTrailHub – Loved the variety, high-quality items, and quick delivery.
Golden Root Market – Great prices, easy-to-use website, and my order arrived fast and well-packed.
У него заказ был 4гр реги и 1гр ск, такой заказ можно делать, цена учитывается как за 5гр. купить, кокаин, мефедрон, гашиш, бошки Тольятти по выходным курьерки не работают, соответственно и отправить мы не можем, отправки производятся в рабочии дни!
yourshoppingcorner – Very easy to browse, checkout was quick and seamless.
leadspike.click – Mobile version looks perfect; no glitches, fast scrolling, crisp text.
Love elephants? elephant sanctuary: no rides or shows, just free-roaming elephants, nature trails, guided tours, and the chance to learn what responsible wildlife management looks like.
An ethical elephant sanctuary: rehabilitation, care, veterinary monitoring, and freedom of movement instead of attractions. By visiting, you support the project and help elephants live in dignified conditions.
trafficcrafter.click – Navigation felt smooth, found everything quickly without any confusing steps.
conversionedge.click – Loved the layout today; clean, simple, and genuinely user-friendly overall.
clickrevamp.click – Found practical insights today; sharing this article with colleagues later.
digitalkickstart.click – Bookmarked this immediately, planning to revisit for updates and inspiration.
Wild Sand Boutique – Stylish items, smooth website experience, and my order came on time.
Менеджер прошу зайдите в скайп, хочу заказ оплатить вас там нет 2 дня уже. Заявку на сате подал жду ответ на эмаил. Спасибо. https://twoprice.ru/pavlovsk.html народ а присылают вместе с заключением экспертизы?
stylefinderhub – Trendy products and quick site loading, very easy to browse.
????????????
stylehub – Loved the trendy fashion items, navigating the site was smooth and quick.
“Решил попробовать курнуть через фольгу , Насыпаю нажигаю бля чуть кишки не выпленул” купить, кокаин, мефедрон, гашиш, бошки Актобе Хотя я знаю почему всех слабо торкает , всё дело в неверном приёме препарата ! Весь форум облазил , но этого способа не наблюдал . Пусть не приятно но стоит того . Порох под язык . Доза меньше , эффект быстрей и ярче . Хотя это личное дело каждого , песня не об этом .
Проблемы со здоровьем? лечение физиотерапией краснодар: комплексные обследования, консультации врачей, лабораторная диагностика и процедуры. Поможем пройти лечение и профилактику заболеваний в комфортных условиях без очередей.
ORBS Production https://filmproductioncortina.com is a full-service film, photo and video production company in Cortina d’Ampezzo and the Dolomites. We create commercials, branded content, sports and winter campaigns with local crew, alpine logistics, aerial/FPV filming and end-to-end production support across the Alps. Learn more at filmproductioncortina.com
WildSand Select – Great assortment, user-friendly site, and very fast and neat delivery.
Dream Achievers Hub – Resources to help you stay consistent and inspired while pursuing goals.
посылка в городе. Сегодня заберу https://karcher-market.ru/molodechno.html Хотя я знаю почему всех слабо торкает , всё дело в неверном приёме препарата ! Весь форум облазил , но этого способа не наблюдал . Пусть не приятно но стоит того . Порох под язык . Доза меньше , эффект быстрей и ярче . Хотя это личное дело каждого , песня не об этом .
optimizetraffic.click – Color palette felt calming, nothing distracting, just focused, thoughtful design.
Lunar Harvest Corner Picks – Items are easy to locate and the layout is visually appealing.
Shop Soft Cloud Boutique – Pleasant interface and everything is easy to find.
Bright Flora Deals – Finding items is quick, and the layout is clean.
beststylebuys – Wide variety, enjoyable and fast shopping experience.
rankpath.click – Overall, professional vibe here; trustworthy, polished, and pleasantly minimal throughout.
И духовной отсутствие пищи https://systemservice96.ru/nadim.html Удачи в бизе
timelessharbormarket – Fast-loading pages, clean design, and attractive merchandise.
urbanstylefinder – Loved the items, the prices are really fair today.
да магаз реальный.недовеса небыло ниразу.может просто недоразумение. купить, кокаин, мефедрон, гашиш, бошки Ялта МХЕ “как у всех” тобиш бодяжный.. Вроде скоро должна быть нормальная партия.
trendhub – Found trendy fashion today, navigating the pages was fast and smooth.
FreshWind Finds – Good variety, clean images, and a super smooth experience overall.
бро незнаю скок раз брал ни разу TS не подводил входил в положения скидки бонусы делал!!! https://montessorishop.ru/balabanovo.html Будем дальше работать с этим магазином.
ЦВЗ центр https://cvzcentr.ru в Краснодаре — команда специалистов, которая работает с вегетативными расстройствами комплексно. Детальная диагностика, сопровождение пациента и пошаговый план улучшения самочувствия.
Modern Harbor Picks – The interface is intuitive and finding products is simple.
Creative Ideas Hub – Discover fresh ideas and projects to spark your creativity every day.
Это юмор. купить, кокаин, мефедрон, гашиш, бошки Шахтёрск Время от времени заказываем здесь реагент, качество всегда на уровне(отличное) стабильное:good:Все работает стабильно, берем не опт, но и не мало, конспирация хорошая, магазин работает отлично! :good:Еще не раз сюда буду обращаться;)
Nairabet offers https://nairabet-play.com sports betting and virtual games with a simple interface and a wide range of markets. The platform provides live and pre-match options, quick access to odds, and regular updates. Visit the site to explore current features and decide if it suits your preferences.
uniquepickshop – Convenient to find items I liked, checkout process was smooth.
Khao555 com
Full Circle Hub Picks – Items are easy to locate and the interface is friendly.
stylevaulthub – Great trendy selection, navigating the site is quick and easy.
321chat online 321chat
Упаковано и расфасовано все в лучшем виде! За неделю взял 9 адресов подьем 100%. Ск оч.радует https://vipauto70.ru/svetlograd.html Да,меня тоже!)заказал вчера тут 203-го,сегодня жду трека!
Todo sobre el cafe https://laromeespresso.es y el arte de prepararlo: te explicaremos como elegir los granos, ajustar la molienda, elegir un metodo de preparacion y evitar errores comunes. Prepara un cafe perfecto a diario sin salir de casa.
quickshophub – Found amazing deals fast, browsing the site was smooth and effortless.
Infraestructura y tecnologia https://novo-sancti-petri.es vial en Europa: innovacion, desarrollo sostenible y soluciones inteligentes para un transporte seguro y eficiente. Tendencias, proyectos, ecotransporte y digitalizacion de la red vial.
trafficmagnet.click – Found practical insights today; sharing this article with colleagues later.
блекспрут
“ДОБРА ТЕБЕ ЭСКИМОСИК” https://ukdsk.ru/miski.html Ооо да, тусишка у них лучшая из того – что мне доводилось пробовать ))
profitfunnels.click – Found practical insights today; sharing this article with colleagues later.
adsgrowthengine.click – Overall, professional vibe here; trustworthy, polished, and pleasantly minimal throughout.
marketingpulse.click – Content reads clearly, helpful examples made concepts easy to grasp.
clickperform.click – Mobile version looks perfect; no glitches, fast scrolling, crisp text.
leadharvest.click – Navigation felt smooth, found everything quickly without any confusing steps.
BrightWind Online Shop – Beautiful pieces, an easy buying process, and fast shipping.
бонуси казіно бонуси казино
Rodaballo Al Horno https://rodaballoalhorno.es es un viaje a los origenes de la musica. Exploramos las raices, los ritmos y las melodias de diferentes culturas para mostrar como el sonido conecta a personas de todo el mundo y las ayuda a sentirse parte de una conversacion musical mas amplia.
Timber Grove Choice – The layout is tidy, and browsing feels simple.
Todo sobre videojuegos https://tejadospontevedra.es noticias y tendencias: ultimos lanzamientos, anuncios, analisis, parches, esports y analisis de la industria. Analizamos tendencias, compartimos opiniones y recopilamos informacion clave del mundo de los videojuegos en un solo lugar.
trendcrazehub – Shopping experience was effortless, the products are high quality.
happycornerdeals – Great deals available, navigation and ordering felt easy.
Harbor Calm Corner – Shopping felt calm and simple thanks to the neat design.
modatrend – Great selection of stylish outfits, browsing experience was smooth.
магаз клёвый ,:bravo:сервис на высоте https://sushiballs.ru Отличный магазин, отличный оператор, отличный товар. Адрес нашли быстро и без проблем, забрали и ушли. Большое спасибо магазину. Всем советую!
Клад был уличным, спрятан по разумному, под решеткой окна подъезда, рядом с окном стояла лавочка, на которой можно без палива посидеть и нащупать клад. Клад 5 балов из 5!!! https://teka-retail.ru долго гуляя по форуму, выбирал хороший магазин для себя. хотелось чтоб устраевало все! прежде всего меня интересовало качество товара и его цена! хотелось чтоб цена была доступной! так же есть большое желание всегда получать товар 100% т.к. в закладочных магазинах бывают случаи не находа, такие магазины для постоянных покупок рассматривать не стал! рассматривалось много вариантов! ну гдегде же всетаки заказать??? то предлогают сразу слишком много товара (ну как же брать если ты сам лично не знаешь за его качество)??? бывало чаще всего не устраевал сервис обслуживания!
seoigniter.click – Found practical insights today; sharing this article with colleagues later.
SilverMoon Online – Great variety of products, smooth browsing, and very fast shipping today.
1win официально вход 1 официальный сайт 1win
peacefulpath – The interface is intuitive, I could browse without confusion.
Modern Ridge Spot – The interface is clean, and browsing feels effortless.
Profesionalni stehovani V Praze: stehovani bytu, kancelari a chalup, stehovani a baleni, demontaz a montaz nabytku. Mame vlastni vozovy park, specializovany tym a smlouvu s pevnou cenou.
Отличное качество товара купить кокаин, меф, бошки через телеграмм Спасибо. Все по плану получилось. Получил в лучшем виде)
trendfinderstore – Found fashionable products easily, delivery was smooth and reliable.
brightshoppinghub – Fast loading and easy-to-use site, shopping felt natural.
Магаз однозначно ровный. В прошлый раз брал ам, быстро четко оперативно работает этот селлер. Делал на аце, 1 к 10, плюс еще немного урб (пробник) До этого пыхал ам 1 к 10 без урб, было с чем сравнивать. С урб, однозначно лучше. https://vipauto70.ru какое на**й в\в !!?? совсем рехнулись чтоли ? Я не знаю за качество их 2-дпмп, но если он не бодяженный и качественный, то 5мг интрозально хватит чтоб тебя колбасило 2-3 суток ! Никто по ходу у чемикала его ещё не пробовал – отзывов нету…
проститутки нижневартовск проверено
Daily Motivation & Growth – Resources and insights for consistent self-improvement and goal achievement.
Да работает в асю обращайся если чё надо только товара мало там мхе да дмт https://pro-vzglyad-ekb.ru Бро ответь в аське!
Love elephants? elephant sanctuary: rescued animals, spacious grounds, and care without exploitation. Visitors can observe elephants bathing, feeding, and behaving as they do in the wild.
Want to visit the elephant sanctuary A safe haven for animals who have survived circuses, harsh labor, and exploitation? Visitors support the rehabilitation program and become part of an important conservation project.
Timberwood Shop – Fast navigation and items are clearly displayed.
Meadow Market Online Shop – Great experience overall with accurate delivery and easy navigation.
Привет всем, сделал заказ в понедельник и оплатил его также, оплата прошла также в понедельник. заказ до сих пор мне не отправили и кормят все потомами… очень разочарован таким отношением. с ренджиком таких проблем вообще небыло https://adoping.ru и что теперь делать с заказом мне его оплачивать через терминал!? или..
Aurora Deals Hub – Everything is clearly presented and the store feels cheerful.
valuecentralhub – Loved the great prices, browsing through the site was effortless.
проверенные шлюхи нижневартовска
????? pg
stylezone – Site is well-structured, making it easy to discover products.
Ребят, а подскажите насчет доставки спср, в какие города она доставляет ? Блин никогда раньше с ней не связывался 🙁 Расскажите пожалуйста, что, да как https://britecleaning.ru Представитель был Магазин на форуме Бивис и Бадхед, на сколько я знаю он работает, он у нас был представителем.
happytrendstore – Very easy to find stylish items, checkout was fast and simple.
glamhub – Loved the trendy pieces, delivery felt seamless and dependable.
ко ланта на карте тайланда
эх, вот печаль то…вчера так порадовался – селлер быстро ответил, хорошо пообщались, заказ принял, проплата прошла, сказали завтра трек будет…наступило завтра и тишина…вроде в сети и ася и скайп..за что меня так игнорят?))) заказ маленький то он такой важный!))))) в общем надеюсь на скорый ответ)) купить Мефедрон, Бошки, Марихуану “И да Заветный кооробок у меня в руках”
adsdominator.click – Appreciate the typography choices; comfortable spacing improved my reading experience.
Origin Peak Style Hub – Easy to navigate, high-quality pieces, and fast shipping today.
Все супер заказывал все пришло попробывыл и писал отзыв этот минут 10 ))))) заказывайте хорошый магазин работают быстро отлично ребята успехов вам chemical.mix !!!!!)) купить кокаин, меф, бошки через телеграмм ))) спасибо
аренда регулируемых строительных лесов Аренда регулируемых строительных лесов: Регулируемые строительные леса предлагают максимальную гибкость и адаптивность к разным уровням высоты и конфигурациям зданий. Аренда таких лесов идеальна для проектов, где требуется частая смена высоты рабочей платформы или при работе на фасадах с сложной архитектурой. Возможность точной настройки позволяет обеспечить удобство и безопасность рабочих.
markethyper.click – Navigation felt smooth, found everything quickly without any confusing steps.
adflowmaster.click – Loved the layout today; clean, simple, and genuinely user-friendly overall.
clickstrategy.click – Color palette felt calming, nothing distracting, just focused, thoughtful design.
brandoptimizer.click – Content reads clearly, helpful examples made concepts easy to grasp.
growthnavigator.click – Navigation felt smooth, found everything quickly without any confusing steps.
Whispering Trend Corner – Items are simple to find and the layout is appealing.
Open Plains Trading – Browsing is smooth, and products load quickly for a seamless experience.
trendhubcentral – Loved the quick delivery and trendy picks.
Сорь за многобукав, не попустило еще 😉 купить онлайн мефедрон, экстази, бошки Бро, у меня тоже самое, даже пробывал уксусом гасить, по всем признакам сода. Продаван пообещал решить проблему, но авторитет подорван.
offerplanet – Nice variety of deals today, browsing was smooth and quick.
trendchoicehub – Smooth browsing and user-friendly design, products were easy to locate.
freshzone – Smooth browsing experience, everything is accessible and well arranged.
Крутой магаз. Ассортимент радует https://mxmnet.ru Чемикал. когда трек даш?? позавчера заказал. сказал во вторник в среду отправка будет.
Челябинск работаете? https://sushiballs.ru Описывать,тем кто не пробовал-бесполезно.Все равно не поймут.Придумывают всякую фигню(аааа,у тя за спиной собакака!и пр. бред),пытаются посмеяться,но это ж всё не то и близко не стояло.Как слепому объяснить,как все выглядит)
Soft Blossom Market – Wonderful collection, user-friendly layout, and the order process was seamless.
Trendy Wardrobe Picks – Fresh fashion inspiration to stay ahead in style effortlessly.
dealhubdaily – Loved the daily bargains, products arrived quickly and safely.
когда появится новинки?? купить Кокаин, Мефедрон, Экстази Магазин работатет? отпишите кто совершил сделку в последнее время
Coastline Central – Shopping is convenient and the coastal theme adds charm.
рефера
Sunwave Essentials Hub Picks – Products are easy to explore and the interface feels welcoming.
interiorjoy – A lovely mix of home items, the site was quick to load.
Не рекомендую правда увлекаться порохами – их хочется ещё и ещё и в итоге не так уж и просто слезть с марафона…) Но это уже ваше дело ; ) https://shamotiki.ru надо просто на мож-химовском ацике растворять любой jwh растворяется
fashionchoicehub – Excellent selection, ordering process was effortless.
globalstylehub – Interface is simple to navigate, with products easy to discover.
Добрый вечер помогите купил у снега клад, пустой, как сапорту написать..? купить онлайн мефедрон, экстази, бошки Не парься, полюбасу все уже пришло, зара позвонит курьер и будет тебе счастье, так часто бывает, курьерки коряво работают, ящитаю!
Noble Ridge Picks – Trendy pieces, clear product images, and my delivery was prompt.
“Делаю дорогу,вторую Жду” купить кокаин, меф, бошки через телеграмм Вы не могли сегодня оплатить заказ, потому что мы сегодня не работаем 🙂
Kind Groove Boutique – The interface is clean and shopping feels natural.
отзывы ждем https://my888.ru всё посылка пришла всё ровно теперь будем пробовать )
Confidence Boost Daily – Quick tips and advice to enhance your daily self-confidence.
adprecision.click – Mobile version looks perfect; no glitches, fast scrolling, crisp text.
betery bet
Порадовал тот факт что почти на 0.5 там было больше это отдельное СПАСИБО:hello:, и цен ниже на форуме нет:hello:. купить онлайн мефедрон, экстази, бошки здравствуйте , это от региона зависит . Доставка индивидуально обсуждается в ЛС .
trafficbuilderpro.click – Color palette felt calming, nothing distracting, just focused, thoughtful design.
clicktrailboost.click – Loved the layout today; clean, simple, and genuinely user-friendly overall.
ranktactics.click – Content reads clearly, helpful examples made concepts easy to grasp.
clickchampion.click – Pages loaded fast, images appeared sharp, and formatting stayed consistent.
BlueGrain Central – Products were simple to find and the browsing experience was comfortable.
marketexpander.click – Mobile version looks perfect; no glitches, fast scrolling, crisp text.
giftfinderhub – Pleasant shopping journey, found multiple items I wanted.
Khao555 com
conversionmatrix.click – Mobile version looks perfect; no glitches, fast scrolling, crisp text.
Хочу выразить благодарность данному магазину за лучший товар, лучшие цены, за долгое время непрерывного сотрудничества, очень жду твоего возвращения к работе и появления долгожданного товара, чемикал лучший в своём деле. Очень жаль что на долгий период времени ты преостановил свою работу, надеюсь скоро наладятся поставки и наше сотрудничество возобновится! Чемикал лучший! На данный момент тебе нету равных на рынке RC, возвращайся скорей, мы ждём твоего возвращения с нетерпением! https://bubbleszoomag.ru В Бросике по- прежнему игнор!!! Магаз просто Ох..!!!
trendhubzone – The interface is intuitive, making shopping straightforward.
KindleWood Select – User-friendly site, excellent deals, and everything shipped without delay.
Dream Harbor Finds – The site loads fast and shopping feels smooth.
Выходные же. В понедельник наврятли отправить успеют. купить кокаин, меф, бошки через телеграмм Тут, оказывается, одна шайка- лейка. Мало того, что мое сообщение потерли, еще и нарушение влепили. Сочли провокацией, хотя писал чистую правду. Магазин меня кинул, прислав фигню, которую выбросил.
ORBS Production https://filmproductioncortina.com is a full-service film, photo and video production company in Cortina d’Ampezzo and the Dolomites. We create commercials, branded content, sports and winter campaigns with local crew, alpine logistics, aerial/FPV filming and end-to-end production support across the Alps. Learn more at filmproductioncortina.com
Наконец-то пришёл товар. Упакован отлично, курик все передал, в этом проблем нет. Пришли домой, распечатали по виду похоже на регу, но в воде разболталось. Муж поставился внутривенно, я отписала chemical, он говорит мол для вв нет инструкции. Похуй, растворили в воде, выпили,И НИХУЯ! НОЛЬ! Не прихода ни тяги, ни хуяги. Пусто. В аське пишу, молчит. Хз. купить скорость, кокаин, мефедрон, гашиш РЕБЯТА КАК ВСЕГДА НА ВЫСОТЕ 5 ИЗ 5!!!! СПАСИБО
прогнозы на хоккей Выбор надежной букмекерской конторы – это фундамент успешного беттинга. Букмекерские конторы различаются по коэффициентам, линии, наличию бонусов и промоакций, удобству интерфейса и надежности выплат. Перед тем, как сделать ставку, необходимо тщательно изучить репутацию букмекерской конторы, ознакомиться с отзывами пользователей и убедиться в наличии лицензии. Для принятия обоснованных решений в ставках на спорт необходимо обладать актуальной информацией и аналитическими данными. Прогнозы на баскетбол, прогнозы на футбол и прогнозы на хоккей – это ценный инструмент, позволяющий оценить вероятности различных исходов и принять взвешенное решение. Однако, стоит помнить, что прогнозы – это всего лишь вероятностные оценки, и они не гарантируют стопроцентный результат.
choicefavhub – Smooth browsing and user-friendly design, products were simple to find.
Здравствуйте, есть и 50 и 100, сейчас откорректирую, можете заказывать уже https://ab-thaispa.ru пробовал 0,1гр ничего не было, пробовал 0,3 ничего не было, только мурашки на спине
WildHorizon Picks – Trendy selection, fast-loading pages, and very satisfied with checkout.
If you’re in retail and you’re trying to sell something nobody
[url=https://kraken2trfqodidvlh4aa337cpzfrhdlfldhve5nf7njhumwr7insta.com]kraken shop[/url]
wants to buy anymore, like electric typewriters or video tapes, you’re in a world of hurt,”
[url=https://kraken-site.shop]kraken5af44k24fwzohe6fvqfgxfsee4lgydb3ayzkfhlzqhuwlo33ad[/url]
said Cohen, who blames Lampert for the store’s current state.
[url=https://kraken2trfqodidvlh4aa7cpzfrhdlfldhve5nf7njhumwr7instad.com]kraken5af44k24fwzohe6fvqfgxfsee4lgydb3ayzkfhlzqhuwlo33ad onion[/url]
“But customers didn’t stop buying circular saws or screwdrivers and hammers or appliances.
If you’re in retail and you sell things people want to buy, your success or failure is entirely
based upon what kind of skill you bring to the table.
He had none.
кракен ссылка зеркало
https://kraken5af44k24fwzohe6fvqfgxfsee4lgydb3ayzkfhlzqhuwlo33ad.net
заказал почти неделю назад ( 5 дней назад.) сказали товар кончился. ожидается разгрузка на склад. вот так и жду уже 5 дней. Раньше брал. все было быстро и честно. сейчас что-то затянулось слишком. вот сижу годаю. Прийдет мне товар или не прийдет https://modernm.ru Отличный магазин)
globalstorezone – Simple to browse, everything loads smoothly and efficiently.
Bridgetown Shop – Items are easy to browse, and the site feels welcoming.
магазину респект купить Мефедрон, Бошки, Марихуану Отзывы вроде неплохие
Декоративна https://mdgt.top преграда за стая направих сам по идея от сайта
Ціни https://remontuem.if.ua на дизайн однокімнатної квартири 45 кв м перевірив тут.
?????????????????????????????????????????????
Выходные просто, завтра проверь https://moskva-autolombard.ru Бро, была абсолютно идиентичная ситуация у мну в декабре.Трек не бился пол недели, прошли выходные звоню в контору-курьерку, называю трек, говорят нет такого, я к тс так мол и так, тот грит все ровно, трек верный ожидай! Херакс и вечером курьер названивает, оказыва4тся они мне еще в субботу хотели вручить, но почему то не дозвонились))Все пучком, бро.Почта мало кому интересна в наши дни, на курьерки много сваливается, вот они 3ак могут разгребают…
high-end production company in Milan Italy Award-winning production company in Milan: Celebrated for excellence in filmmaking, consistently delivering exceptional quality and creative innovation.
shopselects – Simple navigation and plenty of options to pick from.
https blsp at
Да мне 5 сообщений для лс нужно :Dа так месяц назад было все ровно) купить Кокаин, Мефедрон, Экстази все огонь люди работают!!!пс за поддержку )
https://www.haofinder.com/blog/bruno-mars-by-the-numbers-from-billions-of-streams-to-record-vegas-paydays
Grand Style Boutique – The interface is clean, making shopping smooth and simple.
В пробе было два вещества https://twoprice.ru Не прогадал) Искупался, доставили пиццу, вискарика дернул со льдом…
Фото https://seetheworld.top та огляди про доновали були корисними.
Независимый сюрвей в Москве: проверка грузов и объектов, детальные отчёты, фотофиксация и экспертные заключения. Прозрачная стоимость сюрвейерских услуг, официальные гарантии и быстрая выездная работа по столице и области.
Идеальные торты на заказ — для детей и взрослых. Поможем выбрать начинку, оформление и размер. Десерт будет вкусным, свежим и полностью соответствующим вашей идее.
curiousworld – Clear layout, easy to browse, and pages respond quickly.
получил трек, всё норм, просто испереживался)) https://zelenykurgan.ru terom сказал(а): ^
??????????????????????????????????
https://www.lawglobalhub.com/flower-films-how-drew-barrymore-became-a-successful/
Стабильный VPS
Style & Trend Hub – Find fashionable items that make your shopping journey easy and enjoyable.
Future Groove Mart – Products are easy to spot, and browsing is enjoyable.
Morning Rust Hub – Navigation is intuitive and shopping feels natural.
https://lchat.biz/to/bsbot
Booking your domestic windows cleaning and other services in Dublin is simple on our website. For commercial or tailored cleaning needs, just contact us. Trust Eco Cleaning Company Dublin for dedicated, expert windows cleaning and exterior home maintenance: https://ecocleaningcompany.ie/
Booking your domestic windows cleaning and other services in Dublin is simple on our website. For commercial or tailored cleaning needs, just contact us. Trust Eco Cleaning Company Dublin for dedicated, expert windows cleaning and exterior home maintenance: https://ecocleaningcompany.ie/
кислоты оптом Логистика и доставка: РТХ обеспечивает оперативную и надежную доставку химической продукции в любой регион, минимизируя простои в вашем производстве
Explore a true elephant sanctuary where welfare comes first. No chains or performances — only open landscapes, gentle care, rehabilitation programs and meaningful visitor experiences.
ЦВЗ в Краснодаре https://cvzcentr.ru место, где пациентов внимательно выслушивают, проводят глубокую диагностику и составляют эффективный план улучшения состояния при вегетативных расстройствах.
La Rome Espresso https://laromeespresso.es es un lugar donde la cultura del cafe se convierte en arte. Descubre el camino del grano a la taza: el sabor profundo, las tecnicas precisas y los rituales que crean la bebida perfecta.
La infraestructura https://novo-sancti-petri.es y la tecnologia vial europeas equilibran la innovacion y la sostenibilidad. Semaforos inteligentes, carreteras verdes, centros de transporte seguros y proyectos que marcan la pauta para la industria global.
https://cvetovodstvo.su/top-5-smesey-semyan-gazona-dlya-sportivnyh-i-detskih-ploschadok/
Urban Peak Corner – Navigation is straightforward and items are displayed clearly.
Do you love excitement? roulettino casino official site delights players with high-quality slots, live tables, tournaments, and ongoing promotions. The gameplay is smooth and dynamic.
Rodaballo al Horno https://rodaballoalhorno.es es un viaje a las raices musicales del mundo, donde los sabores de las culturas se entrelazan con sus melodias. Exploramos los ritmos de las naciones, los sonidos de las tradiciones y como diferentes historias se fusionan en un solo sonido armonioso.
Un portal sobre videojuegos https://tejadospontevedra.es, noticias y tendencias para quienes viven y respiran videojuegos: resenas, guias, parches, anuncios, analisis de tecnologia y torneos de esports. Todo para gamers y quienes quieran mantenerse informados.
Style Upgrade Daily – Simple ways to refresh your wardrobe with chic, trendy pieces.
Скрайд MMORPG https://сайт1.скрайд.рф культовая игра, где магия переплетается с технологией, а игрокам доступны уникальные классы, исторические миссии и масштабные PvP-сражения. Легенда, которую продолжают писать тысячи игроков.
Нужна легализация? https://www.legalizaciya-nedvizhimosti-v-chernogorii.me проводим аудит объекта, готовим документы, улаживаем вопросы с кадастром и муниципалитетом. Защищаем интересы клиента на каждом этапе.
Эвакуатор в Москве https://eva77.ru вызов в любое время дня и ночи. Быстрая подача, профессиональная погрузка и доставка авто в сервис, гараж или на парковку. Надёжно, безопасно и по фиксированной цене.
EverPath Shop – Navigation is smooth and discovering products feels effortless.
Постоянно мучает насморк – здесь
staymotivatedhub – Clean design with fast-loading pages made shopping smooth.
Бренд MAXI-TEX https://maxi-tex.ru завода ООО «НПТ Энергия» — профессиональное изготовление изделий из металла и металлобработка в Москве и области. Выполняем лазерную резку листа и труб, гильотинную резку и гибку, сварку MIG/MAG, TIG и ручную дуговую, отбортовку, фланцевание, вальцовку. Производим сборочные единицы и оборудование по вашим чертежам.
Эвакуатор в Москве https://eva77.ru вызов в любое время дня и ночи. Быстрая подача, профессиональная погрузка и доставка авто в сервис, гараж или на парковку. Надёжно, безопасно и по фиксированной цене.
podarki-moscow.ru
https://podarki-moscow.ru/
Dawncrest Corner – Everything loads well, making it easy to find what you need.
Хочешь развлечься? купить гашиш федерация – это проводник в мир покупки запрещенных товаров, можно купить гашиш, купить мефедрон, купить кокаин, купить меф, купить экстази, купить альфа пвп, купить гаш в различных городах. Москва, Санкт-Петербург, Краснодар, Владивосток, Красноярск, Норильск, Екатеринбург, Мск, СПБ, Хабаровск, Новосибирск, Казань и еще 100+ городов.
1win витамины 1win ракетка
снять шлюху спб Девочки по вызову: Под “девочками” скрываются уверенные в себе, образованные женщины, которые ценят свою независимость и свободу выбора. Они предлагают не просто физическую близость, а эмоциональную поддержку и интересное общение.
бонуси казіно бонуси казіно
щелочь оптом Логистика и доставка: РТХ обеспечивает оперативную и надежную доставку химической продукции в любой регион, минимизируя простои в вашем производстве
скачать игры с облака mail Скачать игры по прямой ссылке: Насладитесь скоростью и удобством прямого скачивания. Прямые ссылки – это кратчайший путь к вашим любимым играм. Никаких дополнительных программ, только чистый файл, готовый к установке. Высокая скорость загрузки и мгновенный доступ к игровым шедеврам – выбор настоящих геймеров, ценящих комфорт. Почувствуйте разницу!
Lunar Wave Boutique – Items are easy to locate and the interface feels intuitive.
Файне Дніпро https://faine-misto.dp.ua новини Дніпра та області. Огляди, транспорт, події та цікаве.
urbanhubzone – Clean interface, products are easy to locate, and navigating categories was simple.
ca cuoc the thao online
Starlit Style Market Online – Shopping is effortless, and the interface feels organized.
t.me/Black125Bot
https://litegps.ru/osennij-uhod-za-gazonom-kak-podgotovit-travu-k-zime.html
brandmomentum.click – Loved the layout today; clean, simple, and genuinely user-friendly overall.
trafficmomentum.click – Navigation felt smooth, found everything quickly without any confusing steps.
Вы очень давно работаете,стабильная деятельность. https://devase-gr.ru спроси в лички номер аси думаю все ровно будет без базара бро
Value Shopping Spot – Great deals and affordable finds to brighten your day.
leadoptimizer.click – Pages loaded fast, images appeared sharp, and formatting stayed consistent.
Timberline Treasures – Quick and effortless shopping with a clean design.
Получил посылочку общее время ожидания 4 дня,упаковка супер,качество просто космическое,спасибо магазину! купить скорость, кокаин, мефедрон, гашиш Здесь все ровно братья как и всегда
urbancentralhub – Browsing was intuitive, and products are organized well.
Девочки по вызову Снять девушку СПб: Выбирая спутницу для вечера, обращайте внимание не только на внешность, но и на ее интересы, увлечения и взгляды на жизнь. Важно, чтобы она была вам интересна как личность, а не только как объект желания.
Компания Таврнеруд https://tareksa.ru производство и продажа нерудных материалов, сервис логистических услуг, а также проектирование в области технологии обогащения нерудных материалов, проведение лабораторных испытаний нерудных материалов.
Do you love puzzles? This crossword puzzle game features challenging levels, well-thought-out mechanics, and relaxing gameplay. Solve riddles, unlock new levels, and test your problem-solving skills anytime, anywhere.
Нужен сайт? https://laboratory-site.ru включает проектирование, удобный интерфейс, быструю загрузку, интеграцию с 1С и CRM. Подбираем решения под задачи бизнеса и обеспечиваем техническое сопровождение.
Доброго времени суток, оплатил заказ, данные для оплаты дали как всегда оперативно!, жду клад! https://stroycom-cher.ru Рады вашей работе)
скачать игры без торрента Важно помнить о безопасности: Прежде чем скачивать игры с незнакомых сайтов, убедитесь в их надежности. Используйте антивирусное программное обеспечение и будьте внимательны к подозрительным ссылкам. Берегите свою цифровую жизнь!
FutureGardenChoice – Simple interface and well-arranged content made exploring items effortless.
Нужен сервер? http://karafelov.ru/ лучшие по мощности и стабильности. Подходят для AI-моделей, рендеринга, CFD-симуляций и аналитики. Гибкая конфигурация, надежное охлаждение и поддержка нескольких видеокарт.
перекись водорода оптом Компания РТХ – ваш надежный партнер в поставках высококачественной промышленной химии, обеспечивающий стабильность и эффективность производственных процессов.
great picks here – Really enjoyed how fast I could navigate through everything.
onyx-55
Качество превосходное! чистейший джив у вас) всем нравится. Удачных продаж,бро! https://smileclinic-maykop.ru братух а как так получилось, получил 1го , а отписываешь за качество 7го? ты хочешь сказать, что почти неделю у тебя был груз , а ты его не пробывал? если у меня возникали проблемы , а они поверь мне возникали то я кипишую в тот же день ну максимум на следующий, а ты решил кипишнуть через неделю непонятно…
Портал для пенсіонерів https://pensioneram.in.ua все про пенсію за віком, права та льготи літніх людей та інвалідів.
shop grove collection – Smooth navigation and neatly displayed products enhanced shopping.
грати слоти слоти безкоштовно
ігри онлайн казино казіно ігри
проститутки предоплата нижневартовск
horizon finds – Fast pages and tidy layout made exploring products easy.
bonus mostbet logowanie do mostbet
tallbirchemporium – Items are displayed clearly, shopping feels smooth and natural.
Ну что, получил посылку. С весом ровно, маскировка тоже хорошая. Заваривал 1/15 так я не прикуренный, вставило нормально. заказывал JV-60 10гр. https://urilex.ru кто брал закладками в этом магазе в МСК что скажите?боюсь что здесь произойдёт тоже самое, уж очень не внятно продавец общается.
timberlinecorner – Inspiring content with a user-friendly layout made exploring enjoyable.
монтаж натяжного потолка Матовые натяжные потолки: Элегантность и практичность в одном Матовые натяжные потолки – это классическое решение для тех, кто ценит спокойствие и уют в интерьере. Их поверхность лишена блеска, что создает эффект идеально ровного, окрашенного потолка. Они прекрасно подходят для любого помещения, от спальни до офиса, и не отвлекают внимание от других элементов декора. Матовые потолки неприхотливы в уходе, легко моются и не выгорают со временем, сохраняя свой первоначальный вид на долгие годы.
Trendy Selection Hub – Explore new and stylish products with a smooth browsing experience.
EvergreenTreasures – Clear design, browsing and selecting products is simple.
Sun Meadow Picks Online – Easy-to-use interface and tidy presentation made shopping enjoyable.
САБЖ САМ ПО СЕБЕ НЕ ПРЁТ !! МУТИТЬ НА НЁМ МИКСЫ СМЫСЛА НЕТ !!! ЭТО АНТИДЕПРЕССАНТ !! https://migracion-centr.ru Подскажите. Если сейчас сделаю заказ и оплачу сразу, завтра товар отправят?первую посылочку получил от селера ))) сервис на вышем уровне не то что у некоторых!!!!!
Wonder Peak Boutique Picks – Smooth navigation and items load quickly.
m bs2web at
shopzonehub – Smooth browsing, products are well organized and easy to locate.
Экскурсия в Массандровский дворец Ялта экскурсии цены 2026: Планируйте свой бюджет заранее Цены на экскурсии в Ялте в 2026 году формируются с учетом различных факторов, включая сезон, продолжительность маршрута и включенные услуги. Рекомендуется заранее изучить предложения туристических компаний, чтобы выбрать оптимальный вариант, соответствующий вашим финансовым возможностям. Однако помните, что впечатления от качественной экскурсии бесценны.
Спасибо магазину за это! https://beatauto.ru что то не могу зайти на сайт (вот отправил манетку ,получил адик
trend corner – Enjoyed checking out the selections; everything was easy to locate.
Cozy Outlet Goods – The site is well-organized, helping me find what I needed without any hassle.
At Rubbish Taxi, we manage your house clearance requirements, whether it is a home renovation, room redecoration, or clearing out old items. Our services cover comprehensive house removals and clearances across Dublin and other cities where we operate. We can collect various bulky items, including sofas, bed frames, mattresses, chest of drawers, wardrobes, fridges, freezers, washing machines, dishwashers, ovens, musical instruments, and more. Count on us for a seamless experience https://rubbish-taxi.ie/sofa-disposal-dublin/
Rubbish Taxi removes and responsibly disposes of unwanted household items like appliances, furniture, sofas, mattresses and yard waste https://rubbish-taxi.ie/sofa-disposal-dublin/
популярні слоти популярні слоти
new horizon gallery – Clear layout and fast pages made browsing pleasant and easy.
????? pg
tallbirchmarket – Pleasant layout, items are easy to find and browse.
купить натяжной потолок Матовые натяжные потолки: Элегантность и практичность в одном Матовые натяжные потолки – это классическое решение для тех, кто ценит спокойствие и уют в интерьере. Их поверхность лишена блеска, что создает эффект идеально ровного, окрашенного потолка. Они прекрасно подходят для любого помещения, от спальни до офиса, и не отвлекают внимание от других элементов декора. Матовые потолки неприхотливы в уходе, легко моются и не выгорают со временем, сохраняя свой первоначальный вид на долгие годы.
трек получил в четверг до сих пор не бьётся. Как что изменится отпишу https://best-ice.ru , обычно мин 20-40всем желаю счастья!
shop horizon boutique – Smooth scrolling and fast pages made finding items simple.
goldenmarketplace – Clear layout and tidy design, made picking items effortless.
Да уже и так понятно что перепутали. Пробуй сразу и на кишку, и по носу мб определишь что же тебе прислали по ошибке. купить скорость, кокаин, мефедрон, гашиш про него что нить писали? точнее вы читали ?Первый раз вижу такое с МН. От других селлеров все было норм с растворимостью. Растворяющийся полностью пер чуть посильнее…
brandelevate.click – Content reads clearly, helpful examples made concepts easy to grasp.
digitalcommand.click – Content reads clearly, helpful examples made concepts easy to grasp.
brandelevate.click – Appreciate the typography choices; comfortable spacing improved my reading experience.
clickrevenue.click – Pages loaded fast, images appeared sharp, and formatting stayed consistent.
ігри слоти грати слоти
bonus mostbet mostbet
ігри в казино ігри казино онлайн
Читайте репорт на трипы и обсуждения… Продукт просто улёт! https://falconeditor.ru Забизаю дамой хвотаю тожнецы взрываю посылку там рубашка. Примерно на ребенка 7 летнего (я надеился книга будит) но ладно и рубашка сойдет на тряпки вмашину ! Разворачиваю рубаху а там пакетик реги я быстрей за весами и за фотиком и писать ВАМ МОИ ДРУЗЬЯ!!!Ребята работают ровно, оператор адекватный все подскажет и поможет) С доставкой тоже не было проблем)))
ремонт натяжного потолка Натяжные потолки: Идеальное решение для вашего дома
Bluestone Hub – Browsing was seamless with a clean interface.
bright picks – Really liked how easy it was to move around the site and spot what I needed.
everymomentcentral – Clean layout and intuitive interface make finding items quick.
https://lchat.biz/to/bsbot
urban path shop – Browsing was smooth and items were easy to find.
brandelevate.click – Navigation felt smooth, found everything quickly without any confusing steps.
Ахаха такая же история была , стул во дворе, приехал на нем бабуся сидит)))) но я забрал свое) купить кокаин, меф, бошки через телеграмм Подскажите когда примерно вналичии будет JTE-907сервис 10\10 нигде дешевле и лучше на рынке легал сейчас нету!!!
brooklynmodernhub – Clean design, shopping is smooth and intuitive.
Зефірка https://zefirka.net.ua розважальний блог про сни, прикмети, річниці весіль, імена та корисні поради на кожен день.
willow picks hub – Fast-loading pages and organized layout made shopping effortless.
??????????????????????????????????
https://tvarkaubiurus.lt/
Вызвать эвакуатор Эвакуатор – это не просто специализированная техника, это мобильная скорая помощь для автомобилей, оказавшихся в плену дорожных неурядиц. Он словно рыцарь в сияющих доспехах, готовый в любой момент примчаться на выручку терпящему бедствие транспортному средству, оказавшемуся жертвой коварного ДТП, внезапной поломки или дерзкого хулиганства.
Надеюсь что ошибаюсь:hello: купить кокаин, меф, бошки через телеграмм А чего тут так тихо? Ребят, работаем?)А ВОТ Я ТОЖЕ КИПИШЕВАЛ ПО СЧЕТУ ТРЕКА НЕ БИЛСЯ ТОЖЕ ПОЗВОНИЛ В КУРЬЕРКУ СКАЗАЛИ ОТПРАВЛЕННО И СЕГОДНЯ К ВЕЧЕРУ ВСЕ ОТБИЛОСЬ ЖДУ ПРИХОДА ПОСЫЛКИ. ПОТОМ НАПИШУ КАК ЕСТЬ. ПРОШУ ПРОЩЕНИЯ У ЧЕМИКАЛА ЗА ПЛОХИЕ ПОСТЫ, ДУМАЮ ПОЙМЕТ))) УЖЕ ДАВНО ТУТ БЕРУ НЕ РАЗУ НЕ КИНУЛ НИ ОДНОЙ ЗАДЕРЖКИ ВСЕ ПРОСТО НА 100%.
CTO Home Goods – The website design is soothing and makes finding items surprisingly quick.
Northern Mist Crafts – Simple navigation and neat product arrangement made shopping smooth.
Можно позвонить в СПСР, у них там даётся полная инфа по треку, по телефону. Где чё лежит. Если не написано в ленте… Завтра звякну, отпишу, если не появится. https://vrn-vinograd.ru Номер заказа: 10004015 оплачен, мыло выслано с информациейЕМИКАЛ МИКС – ЭТО ЛУЧШИЙ МАГАЗИН С МНОГОЛЕТНЕЙ РЕПУТАЦИЕЙ НА РЦ РЫНКЕ!!!!
Проекты домов из клееного бруса Дом из клееного бруса проекты и цены – это отправная точка на пути к своей мечте, это возможность выбрать оптимальный вариант, соответствующий вашим потребностям и финансовым возможностям, это визуализация будущего дома, позволяющая представить себя в нем и ощутить атмосферу уюта и комфорта.
Shop NewGroveEssentials – Items were displayed clearly, making shopping straightforward.
купить фургон на газель Производство фургонов – это наша специализация. Мы проектируем и изготавливаем фургоны различного назначения, от изотермических до промтоварных, учитывая индивидуальные потребности заказчика. Использование качественных материалов и современных технологий гарантирует долговечность и надежность нашей продукции.
бездепозитный бонус с отыгрышем за регистрацию
Sun Meadow Corner Finds – Pleasant browsing experience with intuitive design and fast loading.
featured hub – Clean visuals and a simple layout made exploring the site easy.
товар 9\10 хорошее качество, 9 потому что ожидал чуть большего. https://santexnikasochi.ru Просьба подкорректировать самим бредовые сообщения.Достойный магазин
shop coastline picks – Navigation felt effortless and products were easy to locate.
a href=”https://brightnorthboutique.shop/” />brightcornerboutique – Items are displayed clearly, and moving through sections feels smooth.
a href=”https://growyourmindset.click/” />growthhub – Easy navigation with clearly organized products for a pleasant experience.
Эвакуатор Эвакуатор – это не просто машина, это ангел-хранитель на дороге, готовый прийти на помощь в самый трудный момент, когда автомобиль вдруг отказывается повиноваться, превращая запланированную поездку в кошмар.
бездепозитные бонусы в казино 2025
ну то что ценники здесь шикарные заметил!и то что на “главной”-это и заинтересовало меня,но насторажило одновременно!ges_hmm.gifПосмотрим,что выйдет из-этого.Пока всё гладко! купить скорость, кокаин, мефедрон, гашиш супер !!!что-то отзывы с критикой сплошные( хотел 307 взять..а тут такое..
artisanlookshop – Very user-friendly and neat, made exploring items fast.
willow picks hub – Fast interface and clean layout made shopping enjoyable.
Отбор сотрудников Официальное трудоустройство – это законный способ защитить свои права и интересы. Молодым специалистам без опыта работы стоит обратить внимание на компании, предлагающие начало карьеры и старт карьеры.
ветеринарная клиника сочи круглосуточно Ветклиники Сочи: Сеть заботы и профессионализма. Ветклиники Сочи – это разветвленная сеть медицинских учреждений, готовых прийти на помощь вашим питомцам. Каждая клиника располагает современным оборудованием, квалифицированными ветеринарами и дружелюбным персоналом. Здесь ваш питомец получит индивидуальный подход и качественное лечение. Вакцинация, чипирование, консультации по питанию и уходу – все это доступно в ветклиниках Сочи. Ветлечебница Сочи – это гарантия здоровья вашего друга.
и я так же жду с 8 числа сказали отправки в начале недели https://uslugi2you.ru сегодня сделал заказ, написал в аську сразу ответили. Буду ждать как что измениться отпишу.Да стопудова честный!!! В этом нет сомнений. А вот с волей Медведя и планом Путина ужиться сложно
Northern Mist Finds – Easy-to-use interface and clear visuals allowed me to browse quickly.
Самое главное что на свободе фиг сним с грузом! Задумайтесь ребят может пора сесть на дно, чтоб палево отвести! купить Мефедрон, Бошки, Марихуану Магаз вышел на связь, работает, но щас выходные 😀 с треками порешают, по ходу косяки СПСР. пробники БУДУТ !! Кто ещё будет гадить в теме “Трипы” и просить пробник – получит подзатыльник. У кого есть что сказать – отпишите лучше отзывы о товаре.Давно работаю с чемиком.
Ridge Finds Online – The interface is clean, and product browsing was a breeze.
konto osobiste mostbet oficjalne pobieranie mostbet
новости беларуси бесплатно новости границы беларуси
новости беларуси последние свежие зеркало новости беларусь
женская обувь из зернистой кожи Брендовая женская обувь – инвестиция в уверенность и безупречный вид, подчеркивающая индивидуальность.
Wild Shore Marketplace – Products are displayed clearly, allowing for smooth and quick navigation.
shop mountain hub – Items were easy to view and navigation felt intuitive.
Potential & Progress Spot – Explore strategies to grow personally and professionally each day.
производство сэндвич фургонов Купить фургон на Газель – это отличное решение для расширения автопарка и повышения эффективности бизнеса. Мы предлагаем широкий выбор фургонов на Газель различного типа и комплектации, готовых к эксплуатации.
Lunar Peak Spot – Navigation is effortless, and items are visually appealing.
smart saver shop – Great deals throughout and the layout made everything easy to explore.
Самый крутой магазин! купить Мефедрон, Бошки, Марихуану лучше и не напишешь броВсем местным хорошего вечера
Bright Timber Emporium – Well-organized pages and diverse items made finding what I needed straightforward.
https://aijoining.com/read-blog/33192
Mountain Mist Essentials – The neat design and intuitive navigation made browsing effortless.
покупателей много,очереди наверно большие тем более на доставку купить Кокаин, Мефедрон, Экстази отличный магазин, все всегда ровноМагаз качественный ни разу не подводил!!!
Windy Mountain Studio – The website is well-organized, so finding products was fast.
moon hub link – Clear sections and responsive layout enhanced shopping.
https://telegra.ph/The-Rise-of-Localized-1xBet-Promo-Platforms-for-Somali-Bettors-12-01
https://wise-social.com/story6206884/jonathan-little-poker
https://constico.com/profile.php?com=profile&do=profile&op=userinfo&from=space&username=torsten.spada_490144
https://www.daniweb.com/profiles/1279441/muknagesto
женская обувь dsert shoes Женская обувь по России – возможность приобрести качественную обувь с доставкой в любой уголок страны.
https://www.azacs.org/profile/raselseoexpart27764/profile
Timberwolf Studio – Fast-loading pages and tidy product arrangement improved usability.
Urban Meadow Corner – Items are easy to browse and layout is tidy — browsing was simple.
Всем добра бразы! Самый ровный магазин! Ждём открытия на Северном Кавказе! купить онлайн мефедрон, экстази, бошки – За сколько?СПАСИБИЩЕ ОГРОМНОЕ ЗА СЕРВИС
Urban Seed Shop – Navigation is simple and the layout feels welcoming.
Check Out The Gallery – A very pleasant shopping session was had due to the uncluttered layout.
Modern Fable Finds Online – Browsing feels seamless, and products are clearly displayed.
growth hub – Navigation is straightforward and exploring sections is comfortable.
dsert shoes каталог женской обуви Женские босоножки под платье натуральная кожа – изысканное сочетание, подчеркивающее ваш вкус и чувство стиля.
puregreenemporiumhub – Items are clearly presented, making shopping simple and efficient.
А чего брали то? https://salon-miledy.ru Могу сфотать, на смотривторой вопрос к товарищу под ником Leks:
новые бездепозитные бонусы в казино 2020 вк
softrosecollection – Clear interface with organized products, shopping was simple.
sunset access – Clear categories and tidy design made shopping seamless.
Visit an https://caucasustravel.ru to see elephants living in natural landscapes, receiving care, rehabilitation and freedom from exploitation. Ethical tours focus on education, conservation and respectful observation.
Experience an elephant sanctuary where welfare comes first. Walk alongside elephants, watch them bathe, feed them responsibly and discover how conservation efforts help protect these majestic animals.
An ethical elephant sanctuary provides rescued elephants with medical care, natural habitats and social groups. Visitors contribute to conservation by learning, observing and supporting sustainable wildlife programs.
everymomenthub – Navigation is intuitive, and products are clearly displayed.
бездепозитный бонус за регистрацию в казино с выводом денег без первого депозита
Ремонт сэндвич фургонов Производство фургонов – это создание надежного и функционального грузового пространства, отвечающего индивидуальным потребностям заказчика. Мы предлагаем широкий выбор материалов, размеров и конфигураций, а также изготовление фургонов по индивидуальным проектам.
Спасибо большое, что вы с нами и доверяете нам! https://bykov20.ru Ребята,кому не сложно ,подскажите мне,где можно взять спирт,какой крепости он должен быть,и собственно в каких пропорциях MN-001 в нем растворять,дабы получить приятный эффект,чувство эйфории,и достаточно продолжительное действие при изготовлении смесей?Метоксетамина, увы от 250 мг.
Explore the new one here
EverRoot Treasures – Organized pages and nice visuals helped me find products easily.
Изготовление сайтов Битрикс – это комплексный процесс, включающий в себя проектирование, разработку, тестирование и запуск готового продукта. Вы получаете не просто сайт, а эффективный инструмент для достижения бизнес-целей. создание сайта битрикс
https://pauladdavis.scholar.bucknell.edu/2017/10/30/spring-dance-concert-2012-bucknell/#comment-293327
у меня знакомец с их магазина закупился его с черта какого то мусора взяли! че к чему не знаю но факт есть факт! может и не они виноваты, но он мелкий торгаш и принимать с сотней его не в тему https://kupi-klubok.ru 1к 10-ти слабовато будет 1к5 или 1к7 самое то…синтез пропитает тело ож душа болит
Бренд MAXI-TEX https://maxi-tex.ru завода ООО «НПТ Энергия» — это металлообработка полного цикла с гарантией качества и соблюдением сроков. Выполняем лазерную резку листа и труб, гильотинную резку и гибку, сварку MIG/MAG, TIG и ручную дуговую, отбортовку, фланцевание, вальцовку, а также изготовление сборочных единиц и оборудования по вашим чертежам.
Нужен сервер? karafelov.ru лучшие по мощности и стабильности. Подходят для AI-моделей, рендеринга, CFD-симуляций и аналитики. Гибкая конфигурация, надежное охлаждение и поддержка нескольких видеокарт.
Регулярно мучает насморк – натуральный спрей для носа
Bold Picks – Intuitive site design helped me locate unique items fast.
Crafted Coast – Great selection and a clear, user-friendly design — shopping here was simple.
Breezy Finds – Easy-to-navigate pages with items displayed in a clean, organized manner.
golden hub corner – Clean design and clear categories made browsing enjoyable.
https://kyourc.com/codemelbet
https://community.atlassian.com/user/profile/2bd3dbac-de14-4995-8492-754db3057aaf
https://www.checkli.com/1xbetfreecode66
https://portfolio-wpokrcd.format.com/3bdfcee9c3-blog/1xbet-promo-code-2026-130-sports-offer
https://participa.affac.cat/profiles/codemelbet/activity
В общем подожду пока ты получишь и отпишешь :)))) https://physics-for-students.ru отличный магазин, качество супер ,товар радуетВсем привет,отличный магазин,недавно брала,всё очень понравилось
https://www.invelos.com/UserProfile.aspx?alias=codemelbet
Изготавливаем каркас лестницы из металла на современном немецком оборудовании — по цене стандартных решений. Качество, точность реза и долговечность без переплаты.
Latest about all things crypto: price rises and falls, network updates, listings, regulations, trend analysis, and industry insights. Follow market movements in real time.
The latest why buy crypto: Bitcoin, altcoins, NFTs, DeFi, blockchain developments, exchange reports, and new technologies. Fast, clear, and without unnecessary noise—everything that impacts the market.
Купить шпон https://opus2003.ru в Москве прямо от производителя: широкий выбор пород, стабильная толщина, идеальная геометрия и высокое качество обработки. Мы производим шпон для мебели, отделки, дизайна интерьеров и промышленного применения.
GoldenBranchMart Storefront – Nicely arranged items made browsing comfortable and fast.
optirank.shop – Found practical insights today; sharing this article with colleagues later.
Seasonal Trends – Finding items is simple and the site feels inviting.
future plans – Easy-to-navigate layout and browsing feels comfortable today.
rankcharge.shop – Appreciate the typography choices; comfortable spacing improved my reading experience.
rankflow.shop – Bookmarked this immediately, planning to revisit for updates and inspiration.
seolaunch.shop – Loved the layout today; clean, simple, and genuinely user-friendly overall.
rankhive.shop – Loved the layout today; clean, simple, and genuinely user-friendly overall.
аренда легких строительных лесов аренда комплектов лесов
да да ))) 100% ))0 https://uslugi2you.ru В итоге, когда я на холоде прождал после последнего “Щас” час, внезапно ответил CM, которому я ещё днём написал. Я поначалу даже не смог вспомнить что у магазина в прайсе, и что я конкретно в этом магазине хотел. Выбирал изначально между эйфом и ск, ну и поскольку эйфа в прайсе нет, то спросил СК.Ха ха ребята смотрите беспредел! попробуйте написать правильно жабу ТСа и получится то что у меня, как бы с ошибкой! СКРИПТ!
goldenrootemporium – Very organized interface, products are easy to explore.
https://stroyka-gid.ru/
Fresh Meadow Collective – Smooth navigation and a tidy layout make shopping enjoyable.
Daily Urban Picks – Find modern streetwear essentials for a stylish everyday appearance.
Your New Favorite Store – The combination of good variety and a clean interface made browsing a pleasure.
вывод из запоя отзывы https://narcology-moskva.ru
Urban Pasture – Loved the range of products; navigating the site was smooth and quick.
самый дешёвый магазин из доверенных – это этот! https://flg63.ru jte тут брал кто?Как качество?К скольки делать?Всем привет ни как не могу заказ оформить, помогите,плиз
продажа фасадных лесов продажа складных лесов
BrightStone Select – User-friendly pages and clear visuals made my shopping smooth.
нарколог вывод из запоя вывод из запоя срочно круглосуточно
доктор вывода из запоя вывод из запоя стоимость
вывод из запоя москва https://narkonet.su
modernzone – Navigation is intuitive, and all products are displayed clearly.
Crest Ridge Shop – Items were visually appealing and the layout was simple — smooth shopping experience.
краби ко ланта как добраться паром ко ланта — основное средство перемещения для тех, кто прибывает с материка. Регулярные переправы идут из Крби, Trang и иногда из Ao Nang в Saladan на Ko Lanta Yai; время пути обычно 2–3 часа в зависимости от маршрута и погоды. В высокий сезон паромы чаще ходят по расписанию, но стоит внимательно проверять расписание и погодные условия перед поездкой. По прибытии удобнее всего арендовать скутер или взять такси до вашего пляжа или гостевого дома; на Ко Ланте удобно перемещаться по мосту между Ko Lanta Yai и Ko Lanta Noi. Для тех, кто любит скорость, доступны скоростные лодки и частные трансферы, но они дороже и зависят от погоды.
нейросеть для презентаций
первую посылочку получил от селера, сервис на вышем уровне не то что у некоторых!!!!! https://uslugi2you.ru Мир вам!действительно принимают?
Crest Market – Clear categories and smooth interface made exploring items fast.
Timber Crest Corner Finds – Pleasant browsing experience with intuitive layout and fast loading.
https://livepositively.com/la-maquinaria-oculta-detrrs-del-trrfico-buscado-por-1xbet/
pine store – Smooth scrolling and well-arranged products made finding items easy.
остров ко ланта в тайланде Kantiyang Bay (Kantiang Bay) — одно из самых живописных мест на юге Ко Ланты и среди тех уголков, где ощущаешь уединение на фоне кристально чистой воды. Здесь пляж окружён густой зеленью и скалистыми берегами, вода глубже и прозрачнее, что привлекает любителей сноркелинга и пляжного отдыха в тени пальм. Вдоль побережья размещены маленькие уютные отели и рестораны с видом на залив. Вечером здесь спокойнее, чем на центральных участках, и с высоты камней можно наблюдать за закатом, а вокруг — тишина и мягкая музыка из соседних кафе. Кантиянг Бей особенно популярен среди тех, кто ищет романтику и аутентичную атмосферу, вдали от крупных туров
ко ланта карта Лучшее время для визита — ноябрь-февраль, когда не слишком жарко, а море спокойное и прозрачное.
Hi, the whole thing is going perfectly here and ofcourse every one is sharing information, that’s truly excellent, keep up writing.
https://www.themangofarm.com.au/2025/10/26/kak-zajti-v-melbet-kom-zerkalo-2025/
Привет! Что хочу сказать по поводу работы магазина- просто супер, связались сразу, приняли заказ, обработали и на следующий день он уже в пути. 3 дня и уже у меня. Качество отличное! В общем респект Вам ребята, так держать, не сбавляйте оборотов и хорошо будет всем! https://kartiny-mne.ru Ты договорись с курьером о встрече где нибудь, и пропали окружающую обстановку, чтоб рядом небыло не кого подозрительного. Больше не знаю что тебе посоветовать307ой вроде к 15 можно забадяжить..ещё хим дрим какойто есть..тока я сам про него не в теме
вывод из запоя круглосуточно вывод из запоя нарколог на дом цена
Промокод 1xBet на сегодня при регистрации. Пользователи могут использовать промокоды для получения различных бонусов от букмекера. Найти такие коды можно на тематических сайтах и рабочих зеркалах. 1xbet предлагает несколько форм создания аккаунта: в 1 клик. Компания заботится о клиентах и соблюдает международное право. Актуальные промокоды 1xbet можно получить бесплатно: на нашем сайте. Любой желающий легко найдёт промокод 1xbet на сегодня. Предложения выгодные, а условия их получения — реальные. В некоторых случаях вообще ничего делать не нужно.
simpleslide.ru
Evergreen Boutique – Navigation is intuitive and products are well presented.
копирайтер вакансии удаленная работа Удаленная работа без звонков: тишина и продуктивность. Для тех, кто не любит телефонные разговоры, есть множество вакансий, не требующих общения по телефону. Сосредоточьтесь на задачах, требующих внимания и концентрации.
evergreen hub – Smooth browsing experience with clearly displayed items.
как найти удаленную работу онлайн работа без опыта
https://www.scenario.press/blogs/238997/1xBet-Bangladesh-Promo-Code-1XBIG2026-130-Bangla
https://travelwithme.social/PameVian
https://www.ngwa.org/what-is-groundwater/groundwater-issues/Groundwater-and-PFAS/2020/08/04/legislation-is-introduced-in-senate-to-invest-in-pfas-health-impacts-education-for-physicians
https://sites.suffolk.edu/franklin/2016/01/26/franklin-burial-plot/#comment-71854
https://nashforum.listbb.ru/viewtopic.php?f=2&t=44325
Всем привет! купить кокаин, меф, бошки через телеграмм заказывал мягкого пятак, всё пришло, непрходилось волноваться т.к в аське всегда были на связи, сила средне, но по весу 5+ =)А ВОТ Я ТОЖЕ КИПИШЕВАЛ ПО СЧЕТУ ТРЕКА НЕ БИЛСЯ ТОЖЕ ПОЗВОНИЛ В КУРЬЕРКУ СКАЗАЛИ ОТПРАВЛЕННО И СЕГОДНЯ К ВЕЧЕРУ ВСЕ ОТБИЛОСЬ ЖДУ ПРИХОДА ПОСЫЛКИ. ПОТОМ НАПИШУ КАК ЕСТЬ. ПРОШУ ПРОЩЕНИЯ У ЧЕМИКАЛА ЗА ПЛОХИЕ ПОСТЫ, ДУМАЮ ПОЙМЕТ))) УЖЕ ДАВНО ТУТ БЕРУ НЕ РАЗУ НЕ КИНУЛ НИ ОДНОЙ ЗАДЕРЖКИ ВСЕ ПРОСТО НА 100%.
https://www.kickstarter.com/profile/freepromocodex/about
https://beeparadisebg.com/vacation-time
mapleharvestshop – Easy to browse, site layout feels organized and welcoming.
rarefashionboutique – Well-laid-out sections and fast-loading pages, shopping felt hassle-free.
Эвакуатор таганрог Эвакуатор — это специализированная автотранспортная техника, предназначенная для перемещения автомобилей, которые не могут двигаться сами по дороге из-за поломки, ДТП или иных неисправностей. Обычно эвакуаторы оснащены тягловыми механизмами, лебедками, креплениями и подъемниками, что позволяет надёжно зафиксировать автомобиль на платформе и безопасно перевезти его к месту ремонта или на штрафплощадку. В зависимости от ситуации применяют низкорамные эвакуаторы для легковых машин, эвакуаторы с кран-манипулятором для нестандартных авто и тяжёлой техники, а также длинномеры для перевозки крупногабаритной техники. Услуги эвакуатора часто включают буксировку, перевозку в автосервис, запуск двигателя, подзарядку аккумулятора, подвоз топлива, доставку на штрафплощадку и оформление необходимых документов. Вызов эвакуатора помогает быстро убрать машину с дороги, снизить риск дополнительного повреждения и обеспечить безопасность участников движения. При выборе оператора стоит ориентироваться на наличие лицензий и страховки, возможность выдачи акта выполненных работ, прозрачные условия оплаты и наличие круглосуточной диспетчерской. Эвакуаторы могут работать как по городу, так и за его пределами, включая межрегиональные перевозки, поэтому перед заказом полезно уточнить сроки, стоимость и маршрут.
LunarHarvestMart Finds – Navigation felt natural and browsing items was quick and pleasant.
brightwinterstore – Products look appealing and navigation is smooth — a good shopping experience.
А JWH-018 Имеется в наличии? купить скорость, кокаин, мефедрон, гашиш +огромная потеря популярности и быстрый спад клиентов.заказ в статусе обработки )))
Wild Crest Essentials Online – Products are neatly arranged and load quickly — browsing was pleasant.
удаленная работа для подростков Удаленная работа: отзывы реальных людей. Изучайте отзывы о компаниях и вакансиях, чтобы избежать мошенничества и найти надежного работодателя. Отзывы – это ценный источник информации от тех, кто уже работает удаленно.
Flourish Today – Guidance and motivation to help you grow personally and professionally.
EverWild Designs – Easy layout and well-displayed products helped me pick items effortlessly.
Cozy Cabin Collective – Quick navigation and a visually tidy design make shopping easy.
Forest Nest – Well-structured product sections and simple navigation improved usability.
онлайн работа без опыта Онлайн работа дома для мам — это сочетание гибкости и возможности развивать профессиональные навыки без выхода из дома. Часто подходят задачи по копирайтингу, ведению соцсетей, модерации, обучению онлайн и удалённой поддержке. Важна организация домашнего офиса, тайм-менеджмент и умение разделять рабочее время и семейные обязанности. Выбирайте проекты с адекватной оплатой, понятными сроками и прозрачной коммуникацией. Регулярно развивайте навыки через курсы и практику, чтобы усиливать конкурентоспособность.
Your Next Find – The site’s excellent organization is matched by its impressively quick load speeds.
Чем злиться, выдал бы дудки иль реги купить кокаин, меф, бошки через телеграмм заказал у KingSize – всё ровно вышло. Большего и добавлять незачемНачал гнать на продавца, но потом увидел у других людей на других сайтах и форумах репорты по 5иаи, купленные у других магазов и оказалось, что просто само 5иаи – это полна Чляпа)
удаленная работа озон Удаленная работа: отзывы реальных людей. Изучайте отзывы о компаниях и вакансиях, чтобы избежать мошенничества и найти надежного работодателя. Отзывы – это ценный источник информации от тех, кто уже работает удаленно.
shopcorner – Well-structured layout, products easy to explore, and navigation feels seamless.
shop wild timber – Fast-loading pages and intuitive navigation made browsing effortless.
Silver Moon Picks – Fast navigation and clear presentation made shopping enjoyable.
тут как всегда, хочешь сджелать заказ – хрен достучишься в аське. https://multitravels.ru Где-то с год – полтора назад пользовался услугами Кемикал Микса. Продуктция чатенько имела разые цвета, плотность и консистенцию, что немного напрягало, но “пручесть” продуктов всегда была на уровне. На моей памяти меньше косяков было только у Химхома, но они, к нашему сожалению, канули в лету.магаз на уровне. сегодня выходной себе решил сделать бок мять до обеда собирался, а тут звонок из курьерки! люто настроение поднялось
удаленная работа вк Удаленная работа ВКонтакте: социальные сети на службе карьеры. ВКонтакте предлагает множество групп и сообществ, где публикуются вакансии для удаленной работы. Это отличная платформа для поиска работы онлайн, особенно для тех, кто ищет возможности для работы в социальных сетях.
https://lxgonline.mn.co/posts/94385712
Эвакуатор таганрог Вызвать эвакуатор — как действовать эффективно: найдите безопасное место для остановки, включите аварийную сигнализацию и, по возможности, выставьте аварийный знак. Свяжитесь с диспетчерской службой эвакуатора по телефону или через форму на сайте, точно назовите населённый пункт, адрес или ориентир, модель и состояние автомобиля, а также желаемую точку высадки. Сообщите количество пассажиров, наличие багажа и любые особенности (детские кресла, тяжёлый груз).Уточните предполагаемое время прибытия, стоимость выезда и стоимость километра, наличие дополнительных услуг и порядок оплаты. Попросите чек или акт выполнения работ и сохраните переписку. По прибытии водитель закрепит автомобиль и сопроводит до места назначения, при необходимости — окажет помощь на месте аварии и оформит документы.
фриланс Фриланс в интернете: безграничные возможности. Интернет предоставляет огромные возможности для фриланса. Здесь можно найти работу на любой вкус и уровень квалификации.
True Horizon Trends – Browsing is smooth, and products are easy to find.
browse items – The clean, simple arrangement helped me explore without any effort.
онлайн работа бесплатно Вакансии удаленная работа — общий обзор публикуемых вакансий в удалённом формате. В них могут встречаться роли в IT, образовании, маркетинге, поддержке клиентов и дизайне. При выборе вакансии обращайте внимание на часы работы, требования к оборудованию, уровень оплаты и возможность карьерного роста. Подготовьте подробное резюме, кейс-материалы и портфолио, которое демонстрирует релевантность вашего опыта. Не забывайте про тестовые задания и собеседования в онлайн-формате, а также про проверку репутации работодателя.
отписал бы по факту с картинками купить Мефедрон, Бошки, Марихуану а вот на фофу гнать нельзя… она на высоте…у меня тоже дроп подлетел с посылкой и брали его ФСБшники почему то , но слава богу до уголовного дела не дошло, и ТС обещал жирную скидку сделать при следуещем заказе как то так (документы о прекращении уголовного дела и экспертиза на руках) дело закрыли по двум причинам то что дроп не при делах а второе самое главное что экспертиза не выявила НС
sunrisecollectivehub – Items are displayed clearly, shopping feels smooth and natural.
Доставка грузов https://china-star.ru из Китая под ключ: авиа, авто, море и ЖД. Консолидация, проверка товара, растаможка, страхование и полный контроль транспортировки. Быстро, надёжно и по прозрачной стоимости.
https://www.bls.gov/bls/exit_BLS.htm?url=https://www.intercultural.org.au/wp-content/pgs/1xbet_casino_bonus_codes_enter.html
https://www.fxstat.com/en/user/profile/rirop65051-713952/blog/38525381-1xBet-Valid-Promo-Code:-%E2%82%AC130-Sports-Bonus
Goldleaf Finds Online – Well-organized items with a clean interface — shopping was smooth and enjoyable.
https://china.blog.malone.edu/2014/05/sunday-may-11_12.html?sc=1764500582165#c4574352951795188252
https://pacifichealtheducation.mn.co/posts/94433360
https://www.hogwartsishere.com/1791833/
vodds crypto casino
удаленная работа для студентов Удаленная работа: отзывы реальных людей. Изучайте отзывы о компаниях и вакансиях, чтобы избежать мошенничества и найти надежного работодателя. Отзывы – это ценный источник информации от тех, кто уже работает удаленно.
http://blogs.evergreen.edu/morisa24/project-description/#comment-119837
brightwillowboutique – Clean design and easy layout helped me find interesting items fast.
Я всегда сам еду за ней,можно чтоб и доставили)Просто так быстрее пока они доставят я уже все сделаю. купить Мефедрон, Бошки, Марихуану Отличный магазин..заказывал не раз всегда все на высшем уровне. Молодцы.”Подходит время Раздачи”
Dawn Artisan Boutique – Well-laid-out items and smooth navigation made exploring products enjoyable.
биржа фриланса Удаленная работа: вакансии ждут. Рынок труда переполнен предложениями удаленной работы. От вакансий для копирайтеров до специалистов техподдержки, каждый может найти что-то для себя. Главное – правильно искать и не бояться пробовать новое.
Iron Valley Collection – Smooth navigation and neat product images made browsing a breeze.
Кидалы они или нет-узнаю в течении пары дней,но отказ в закладке-не основание. https://uslugi2you.ru пока никто ничего тут не берите!!!!!!!!!!!!!!!!!!!!!!!!!!!!!!!!!!!!!!!!моя ситуация решится если то я сообщу.Пока кидалово нарисоваывается.Дабы даже о приходе средств человек не сообщает,просто сказал ложи а после оплаты сразу замолчал,хотя сообщения доходили еще.А ты если кинеш то тварь ты последняя.Бобла наверно тут хорошо сделал а совести хватает провинциалов кидать.Ты в курсе что у нас люди на эти бабки 2 месяца живут и не от сладкой жизни гавно у тебя то берут.Бог тебе судья короче!Свечку тебе за здравие каждую неделю если что буду ставить 😉 чтоб ты жил долго и счастливо…а почему репа минусовая?
Dream Big Daily – Tips and strategies to turn aspirations into actionable results.
rusticridgeboutique – Pleasant browsing experience, items are easy to view and site feels well structured.
MidRiverDesigns Online – Well-organized pages made exploring products quick and hassle-free.
Доставка грузов https://lchina.ru из Китая в Россию под ключ: море, авто, ЖД. Быстрый расчёт стоимости, страхование, помощь с таможней и документами. Работаем с любыми объёмами и направлениями, соблюдаем сроки и бережём груз.
BM Treasures – Browsing felt smooth and effortless, loved the experience.
как добраться до ко ланты Где ко ланта — географическое положение и районная структура: Ко Ланта состоит из Ko Lanta Yai и Ko Lanta Noi, расположенных у побережья Крэйби, в юго-западной части Таиланда. Основной туристический сектор сосредоточен на северной и центральной части Ko Lanta Yai — Long Beach, Klong Dao, Ban Saladan и Старый город на восточном берегу. Северная часть удобна для быстрого доступа к паромам, северо-западная часть — для пляжного отдыха и кафе, восточная — для прогулок по набережной и знакомства с местной кухней. Остров соединён с материком паромами и дорогами, что позволяет легко перемещаться между бухтами и соседними островами.
Гастродача «Вселуг» https://gastrodachavselug1.ru фермерские продукты с доставкой до двери в Москве и Подмосковье. Натуральное мясо, молоко, сыры, сезонные овощи и домашние заготовки прямо с фермы. Закажите онлайн и получите вкус деревни без лишних хлопот.
Whitestone Essentials – Browsing feels natural and the layout is well-organized.
Бро подскажи ато я переживаю заказал 10 гр купить Кокаин, Мефедрон, Экстази Ооо да, тусишка у них лучшая из того – что мне доводилось пробовать ))Скажите сей час в Челябинске работаете?)
valuecornerhub – Browsing was intuitive, and products are well organized.
ко ланта аэропорт ко ланта отзывы — Отзывы часто подчеркивают расслабленную атмосферу Ко Ланты, дружелюбное отношение местных жителей и разумное соотношение цена-качество. Пляжи чистые, вода тёплая и подходящая для семей, снорклинг и лодочные туры получают положительные отклики. Многие заметят медленное обслуживание в бюджетных гестхаусах по сравнению с более открытыми курортами, но ??уют ценность уединённости острова и спокойного ритма. В целом туристы отмечают красивую природу, закаты, низкую плотность толп и ощущение «неплощадной Таиланд» вдали от массового туризма.
Explore the Shop – It was a refreshingly straightforward experience with no complicated menus.
authoritygrowthengine.shop – Appreciate the typography choices; comfortable spacing improved my reading experience.
clickoptimizationhub.shop – Loved the layout today; clean, simple, and genuinely user-friendly overall.
Сегодня получил посылку. Оказалось, что просто трек не пробивался до последнего, а посылочка шла себе. Дошло быстро. Сам магазин передал товар в курьерку почти моментально за что огромное спасибо. Магазин всегда остается на связи и отвечает даже на глупые переживания. Конспирация порадовала. Вес тоже в норме. По качеству отпишу позже трип-репорт, но думаю, что всё на высшем уровне. Спасибо, Chemical-mix. купить онлайн мефедрон, экстази, бошки вот такие как ты потом и пишут не прет , не узнавая концентрацию и т д набодяжат к…. ,я вот щас жду посыля и хз ко скольки делать 250а так всё от души! огромное спасибо! ещё не раз к вам обращюсь!)
digitalmarketingzone.shop – Color palette felt calming, nothing distracting, just focused, thoughtful design.
leadconversionstudio.shop – Overall, professional vibe here; trustworthy, polished, and pleasantly minimal throughout.
proleadgeneration.shop – Loved the layout today; clean, simple, and genuinely user-friendly overall.
modern hub access – Browsing felt comfortable and the layout made exploration easy.
Ocean Leaf Treasures – Clear product images and simple navigation — browsing felt effortless.
Холодильник LG бу
Логистика из Китая https://asiafast.ru без головной боли: доставка грузов морем, авто и ЖД, консолидация на складе, переупаковка, маркировка, таможенное оформление. Предлагаем выгодные тарифы и гарантируем сохранность вашего товара.
urbanhillstore – Smooth interface, items are clearly displayed and easy to compare.
Независимый сюрвейер https://gpcdoerfer1.com в Москве: экспертиза грузов, инспекция контейнеров, фото- и видеопротокол, контроль упаковки и погрузки. Работаем оперативно, предоставляем подробный отчёт и подтверждаем качество на каждом этапе.
погода ко ланта Как добраться до ко ланты — общие принципы передвижения: чаще всего путь начинается с прилёта в Krabi (KBV) или Phuket (HKT), затем трансфер на паром до Ban Saladan или северной части Ko Lanta Yai. Можно добираться автобусом или минивэном через Krabi Town и Ao Nang, затем пересесть на паром. Альтернатива — ж/д путь до Surat Thani, затем автобус и паром; из Бангкока прямого рейса до Ko Lanta нет, поэтому маршрут требует промежуточной остановки. Вариант через Phuket тоже возможен: самолёт в Phuket, затем наземный транспорт до парома. Планируйте маршрут с учётом времени суток, погодных условий и доступности паромов.
Mountain Leaf Crafts – Easy-to-use design and neatly arranged products made exploring quick and simple.
пляжи ко ланты Краби ко ланта как добраться — из Krabi Town или Ao Nang можно добраться до Ko Lanta Yai несколькими способами: медленный паром, скоростной катер и комбинированные варианты «ван + паром» или «автобус + паром». Время в пути обычно около 2–3 часов, но может удлиняться из-за погодных условий и расписания. Ao Nang часто предлагает прямые маршруты на ближайшие причалы Ko Lanta Yai, что упрощает планирование для отдыхающих на краю Краби. Планируйте заранее, учитывайте сезон и дождливый период, чтобы выбрать оптимальный маршрут и минимизировать время в пути.
brightfallstudio – Enjoyed browsing here, items seem well curated and easy to explore.
silvershopcorner – Clear navigation and well-presented items, shopping was effortless.
Курьерка не может принять такое количество заказов – отказала в купить Кокаин, Мефедрон, Экстази Получил посылку уже через 3 дня после заказа. МН-001 хороший, только маленькие кристаллы на дне не растворились. А так доволенв трубку после затяга уже чвствуеца
Soft Feather Collection – Clean interface and visible items helped me browse smoothly.
ко ланта пляжи пляжи ко ланты — В дополнение к основным пляжам на Ko Lanta есть ещё несколько жемчужин: Nui Bay и Bamboo Bay в северной части предлагают тихие воды и живописные скалы, а Klong Khong и Klong Nin часто выбирают за близость к инфраструктуре и вечернюю атмосферу. Вдоль побережья можно найти пляжи с различной степенью людности: от чистых и спокойных мест до береговых зон с активной ночной жизнью в ряде курортных участков. Любители подводного плавания оценят мелкие рифы у крайних бухт и плавную волну в прозрачной воде. В целом, пляжная карта Ко Ланты сочетает песок, умеренную глубину и возможность выбрать между тихим семейным отдыхом и более оживленной полосой вдоль главных туристических улиц.
остров ко ланта в тайланде Ко Ланта пляжи — на острове найдутся варианты для любого настроения: протяжённые протоки у Long Beach (Phra Ae) с просторными виллами и спокойной лагуной, уединённые бухты южной части и песчаные песчинки в заливе Kantiang Bay, где можно насладиться полностью тихим окружением. В районе Klong Dao и на северной части Long Beach вход в воду постепенный и идеален для семей с детьми, а Ba Kan Tiang славится спокойной атмосферой и близостью к роскошным курортам. Ao Pai и Bamboo Bay — живописные уголки для дневных походов и фотосессий на фоне лазурной воды. В сезон сухого климата вода обычно тёплая и прозрачная, но в период дождей волны и сильные штормы могут ограничить купание на отдельных участках. Удобство заключается в том, что пляжи расположены относительно близко друг к другу, что позволяет за один отпуск объединять несколько бухт и пляжных дней.
Ты че педрила хвалишся че та видел ты меня знаеш нет пес это не паника а логика паника это твое второе имя ху……я ты наличности переходиш это говорит о том что ты очкошник служил он терпила мне пох кто ты а за слова ты ответиш ну конншно на растояние ты герой ха ха отдыхай кент купить Мефедрон, Бошки, Марихуану Кому-нибудь отправили сегодня трек?5iai – как употребляли и сколько?
haven hub link – Clear sections and responsive pages made finding products simple.