Crochet drawstring pouches are one of the most useful small projects you can make, especially if you are looking for something quick, cute, and beginner-friendly. They work up faster than larger bags, use less yarn, and still give you a finished item that feels thoughtful and practical. A drawstring pouch can hold earbuds, lip balm, coins, hair ties, small gifts, jewelry, or little everyday essentials, which makes it a wonderful project for both personal use and gifting.
What makes crochet drawstring pouches especially fun is how much personality you can put into such a small piece. A simple pouch can become a character-inspired accessory, a textured floral design, a fruity motif, or a sweet animal-themed storage piece. Because they are small, they are also a great way to practice shaping, stitch texture, color changes, and simple closures without the pressure of making a full-sized bag. That makes them especially appealing for beginners who want something satisfying and achievable.
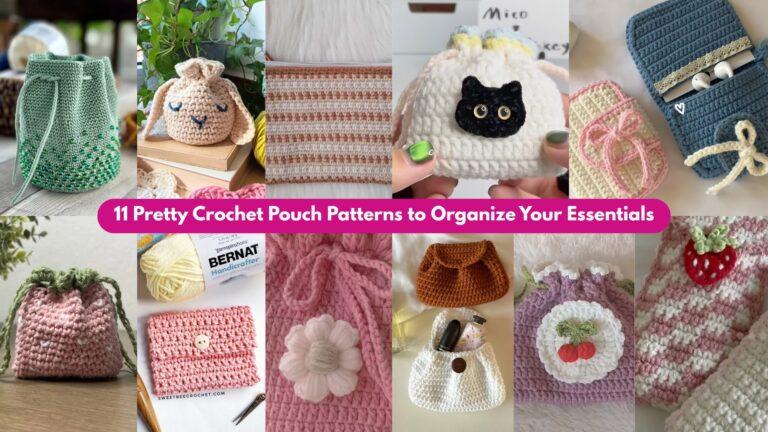
In this post, you will find five easy crochet drawstring pouch ideas with detailed step-by-step guidance, useful notes, and practical finishing tips. Each one is written to be easy to follow while still giving you enough detail to create a pouch that looks neat, functions well, and feels special. Whether you are making these for yourself, for gifts, or for a craft fair table, these patterns are a great place to start.
Quick Notes
Project type: Crochet drawstring pouches
Best for: Gifts, everyday storage, earbuds, coins, jewelry, small accessories, and craft fairs
Skill level: Beginner to intermediate
Hook size: Usually 2.5 mm to 4.5 mm, depending on yarn weight and firmness needed
Yarn weight: Cotton, cotton blends, DK, or lightweight worsted yarn
Best yarn choice: Cotton yarn for structure, durability, and neat stitch definition
Finished size: Usually 4 to 8 inches tall depending on the pouch design
Time to complete: A few hours to one day per pouch
Helpful stitches: Chain, slip stitch, single crochet, half double crochet, double crochet, increase, decrease, magic ring, shell stitch, texture stitches, appliqué, drawstring channel
Common Materials
Most crochet drawstring pouches can be made with the same basic supplies.
- Cotton yarn in your chosen colors
- Crochet hook suited to the yarn
- Yarn needle
- Scissors
- Stitch markers
- Drawstring cord, ribbon, or crocheted chain
- Optional stuffing for decorative appliqués
- Optional safety eyes or embroidery thread for character details
- Optional lining fabric if you want extra durability
For pouches, yarn choice matters because the bag needs to hold shape while also remaining easy to open and close. Cotton yarn is usually the best choice because it is sturdy, neat, and easy to wash. If you want the pouch to feel softer or more decorative, you can use a blend, but for beginners, cotton is often the most reliable option.
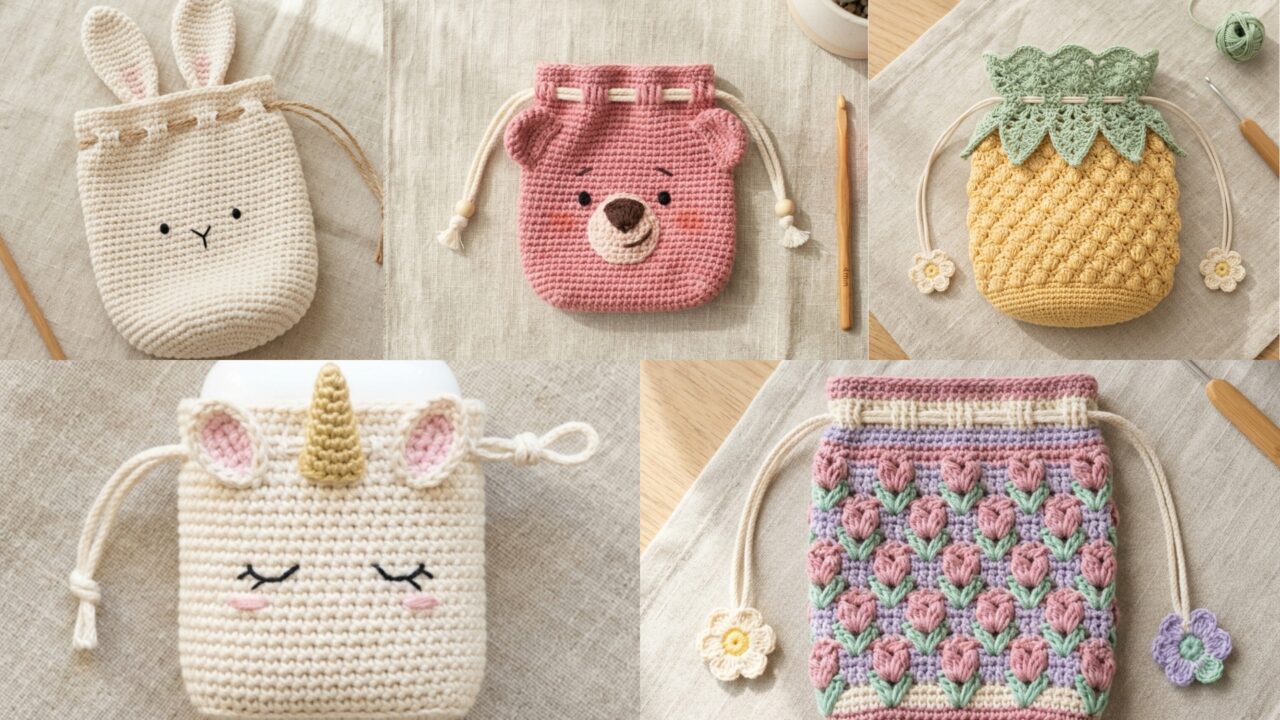
1. Crochet Lotso Bear Drawstring Pouch Pattern
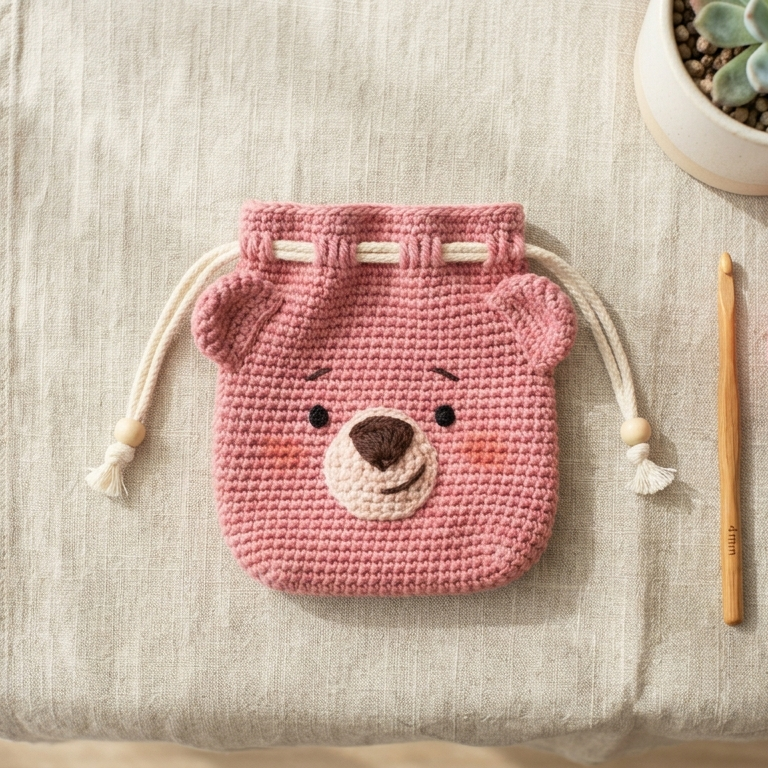
A Lotso bear inspired drawstring pouch is playful, soft, and full of character. It is a fun project if you enjoy cute character-themed accessories and want a pouch that stands out. Because the design is small, you can keep the shape simple while adding just enough facial detail to make it recognizable and adorable.
Quick Notes
Skill level: Beginner to intermediate
Finished size: Small to medium pouch
Style: Cute, character-inspired, playful, soft
Best colors: Pink, blush, strawberry pink, cream, soft brown accents
Materials
- Pink cotton yarn or yarn in a similar shade
- Small amount of cream or darker yarn for details
- Crochet hook suited to your yarn
- Yarn needle
- Scissors
- Drawstring cord or ribbon
- Optional safety eyes or embroidery thread
- Optional felt backing for face details
Step-by-Step Guide
Step 1: Decide on the pouch size
Before beginning, think about what you want the pouch to hold. If it is for earbuds or jewelry, a smaller pouch is enough. If you want it to hold small gifts or cosmetics, make it a little taller. The size will determine how many rounds you need for the body.
A clear size goal makes the project easier to finish neatly.
Step 2: Crochet the base circle
Start with a magic ring and work a flat round base. Make sure the circle is even and flat so the pouch can stand or sit properly when filled. A neat base will also help the pouch keep its shape once the sides are added.
A balanced base gives the pouch structure.
Step 3: Build the sides
Once the base is complete, stop increasing and work upward in the round. This creates the pouch walls. Keep the stitches consistent so the sides stay smooth and the pouch does not flare too much.
The body should rise evenly and stay soft.
Step 4: Add the bear face
Use embroidery thread or crochet appliqué details to create the bear’s face. The face can be simple: small eyes, a little nose, and perhaps tiny cheeks or a mouth. Keep the features centered so the pouch looks balanced and cute.
A minimal face often looks best on small accessories.
Step 5: Add ear details
Crochet two small rounded ears and sew them onto the top section of the pouch. These ears are what give the design its bear identity, so make sure they are visible but not too bulky. Place them symmetrically for a polished look.
The ears are the signature feature of the pouch.
Step 6: Create the drawstring channel
Near the top edge, work a row with chain spaces or a slightly open stitch pattern to create the drawstring channel. This allows the cord to slide through easily. Keep the openings even so the drawstring closes smoothly.
A clean channel makes the pouch easy to use.
Step 7: Add the drawstring
Thread a cord or ribbon through the channel and tie the ends securely. Make sure the pouch closes evenly when pulled. The closure should feel strong enough for everyday use and simple enough to open quickly.
Helpful Tips
This pouch looks especially sweet in soft pink and cream. If you want a more playful version, add tiny blush cheeks or a slightly darker nose. Keep all features securely attached so the pouch stays durable.
2. Crochet Tulip Stitch Drawstring Pouch Pattern
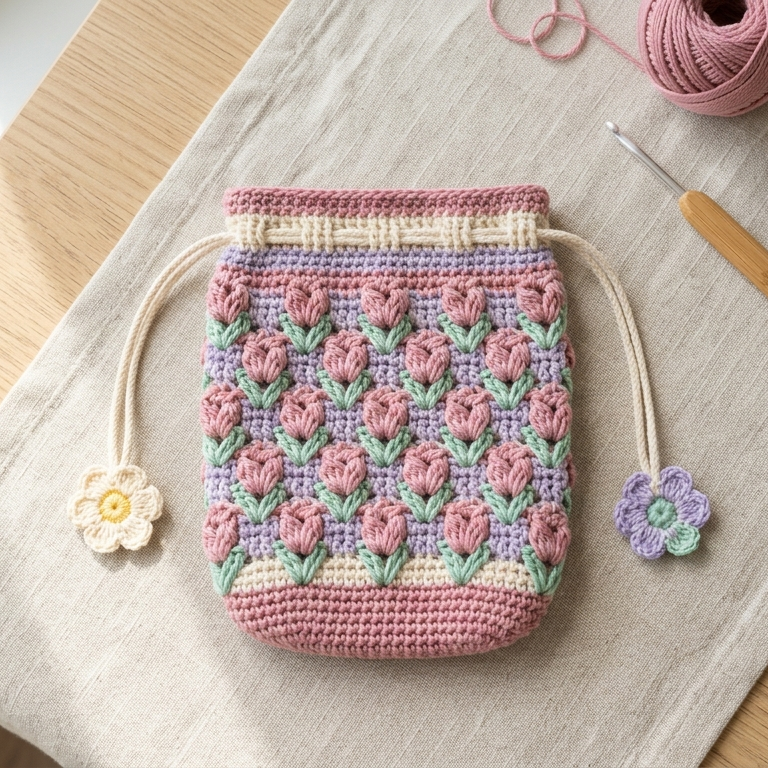
A tulip stitch drawstring pouch is soft, textured, and beautifully feminine. The tulip stitch gives the pouch a lovely floral surface that feels elegant without being too complicated. This pattern is great if you want something small and pretty that works well for gifts or personal storage.
Quick Notes
Skill level: Beginner to intermediate
Finished size: Small to medium pouch
Style: Floral, elegant, soft, delicate
Best colors: Pink, lavender, cream, mint, yellow, dusty rose
Materials
- Cotton yarn
- Crochet hook suited to your yarn
- Yarn needle
- Scissors
- Drawstring cord or ribbon
- Optional lining fabric
Step-by-Step Guide
Step 1: Make the base
Start with a flat circular or oval base, depending on the shape you want. A round base gives the pouch a more classic look, while an oval base can feel slightly modern. Keep the base neat and flat so the pouch stands well when opened.
A sturdy base helps the pouch keep its shape.
Step 2: Build the body in tulip stitch
Work upward using the tulip stitch repeat. This stitch creates a pretty floral-like texture across the pouch surface. Keep the rows consistent so the tulip shapes show clearly. It may take a few rows to get into the rhythm, but once you do, it becomes very satisfying to make.
The tulip stitch is the main decorative feature.
Step 3: Keep the sides even
As you continue upward, check that the pouch stays straight and even. A consistent stitch count will help the pouch sit neatly. If the sides begin to flare too much, adjust your tension slightly or use a smaller hook next time.
A neat shape makes the pouch more useful.
Step 4: Continue until the pouch is tall enough
Work the body until the pouch reaches the height you want. For small storage pouches, you may only need a short height. For gift pouches, a slightly taller shape can make it feel more substantial.
Step 5: Add the drawstring channel
At the top, create a row with chain spaces or a slightly open band for the drawstring. The openings should be neat and evenly spaced so the cord can move smoothly.
A clean channel keeps the pouch functional.
Step 6: Thread the cord
Use a ribbon, chain cord, or yarn tie to close the pouch. Pull the drawstring evenly so the top gathers neatly. Tie the ends securely so they do not slip back through.
Step 7: Finish and shape
Weave in all ends carefully and lightly shape the pouch with your hands. If the fabric feels soft, you can line the pouch for extra strength or leave it as is for a more flexible finish.
Helpful Tips
Tulip stitch pouches look especially beautiful in pastel yarns. If you want a more elegant effect, use cream or blush. If you want a spring-inspired look, lavender and mint work beautifully together.
3. Crochet Pineapple Inspired Drawstring Pouch Pattern
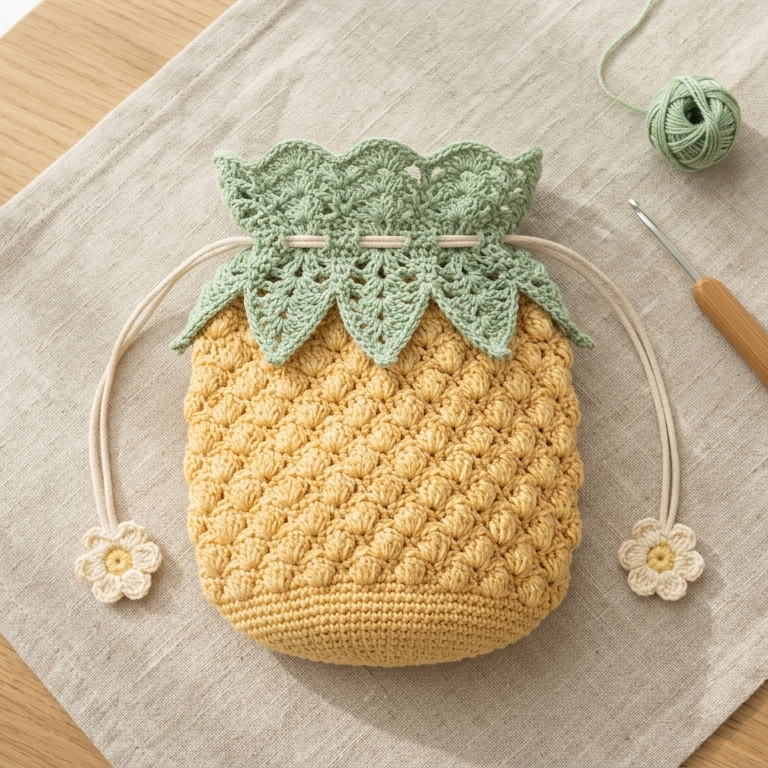
A pineapple inspired drawstring pouch is bright, textured, and cheerful. It is the kind of project that feels tropical and fun while still being practical. The pineapple-inspired texture gives the pouch a lovely decorative surface that stands out beautifully in small handmade gifts or accessories.
Quick Notes
Skill level: Beginner to intermediate
Finished size: Small to medium pouch
Style: Tropical, textured, cheerful, decorative
Best colors: Yellow, green, cream, white, coral, turquoise
Materials
- Cotton yarn
- Crochet hook suited to your yarn
- Yarn needle
- Scissors
- Drawstring cord or ribbon
- Optional lining or small felt backing for decorations
Step-by-Step Guide
Step 1: Choose the pineapple look
Decide whether you want the pouch to resemble a pineapple through color, texture, or both. A yellow body with a green top creates a clear pineapple theme, while a textured stitch pattern can make the design feel more subtle and decorative.
A clear theme helps the pouch feel intentional.
Step 2: Crochet the base
Begin with a flat round base in yellow or your main color. Make sure the base is smooth and even so the pouch can stand nicely. A flat bottom makes the finished pouch more practical for storing small items.
A sturdy base gives the pouch structure.
Step 3: Add the body texture
Work the body using a pineapple-like stitch pattern or a textured openwork repeat. Keep the repeat even so the design remains balanced. This section creates the surface detail that makes the pouch feel tropical and fun.
The texture is what makes the pouch stand out.
Step 4: Shape the pouch upward
Continue crocheting in the round until the pouch reaches the desired height. The body should remain smooth and not become too wide. Keep checking the shape to make sure it stays neat.
A balanced body helps the design look polished.
Step 5: Add the pineapple crown
Use green yarn to create the leafy top detail. This can be done with small pointed leaves or a decorative upper edging that resembles pineapple leaves. The crown should sit neatly at the top without making the pouch too bulky.
The leafy top is the finishing touch.
Step 6: Add the drawstring channel
Create a row of chain spaces or a slightly open top section for the drawstring. This allows the pouch to close securely and keep small items safe. Make sure the channel is even and strong.
Step 7: Thread and finish
Thread a cord or ribbon through the channel, tie it securely, and weave in all ends. Shape the leaves and body gently so the pouch looks tidy and fun.
Helpful Tips
This pattern is especially cute in yellow and green, but it can also look lovely in coral, cream, or soft tropical colors. It makes a great gift pouch for summer markets or handmade gift sets.
4. Crochet Unicorn Face Airpods Drawstring Pouch Pattern
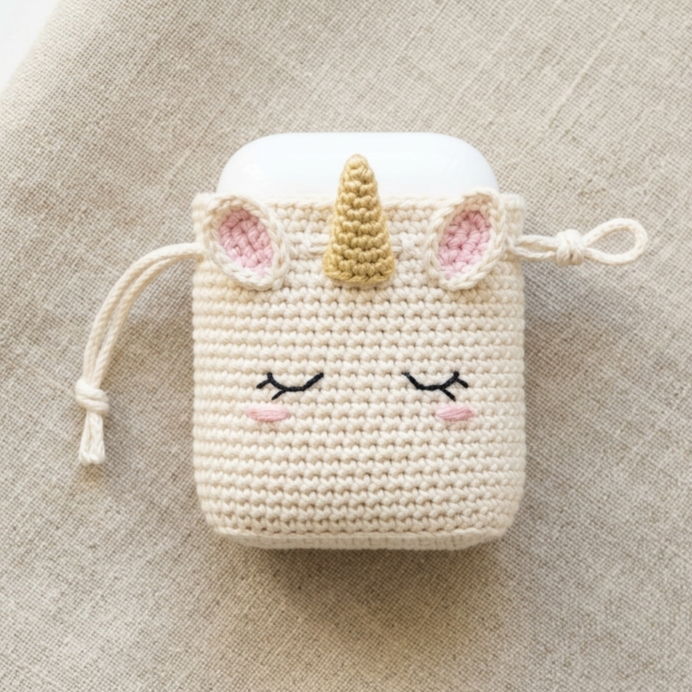
A unicorn face AirPods drawstring pouch is playful, magical, and wonderfully cute. It is a perfect mini accessory for earbuds or tiny items. Because it is small, it works up quickly while still giving you a chance to add sweet character details like a horn, ears, and a tiny face.
Quick Notes
Skill level: Beginner to intermediate
Finished size: Small AirPods-sized pouch
Style: Magical, cute, whimsical, compact
Best colors: White, pink, lavender, pastel blue, mint, gold accents
Materials
- Fine cotton yarn
- Small crochet hook
- Yarn needle
- Scissors
- Drawstring cord or ribbon
- Optional embroidery thread, felt, or tiny safety details
Step-by-Step Guide
Step 1: Measure the pouch size
Since this pouch is designed for AirPods or similarly small items, begin by measuring the size you need. A small cylinder or oval pouch usually works best. The pouch should be compact, but still wide enough to slip the earbuds in easily.
A good fit makes the pouch practical.
Step 2: Crochet the pouch body
Begin with a small flat base and crochet upward in the round. Keep the fabric firm so the pouch holds its shape and protects the earbuds. The body should be smooth and neat because the unicorn details will be added on top.
A small, sturdy body is the foundation.
Step 3: Add the unicorn face
Use embroidery to create the eyes, lashes, or tiny cheeks. Keep the face simple and sweet. A minimal face works best on a small pouch because it leaves room for the horn and ears to shine.
A gentle face keeps the design charming.
Step 4: Crochet the horn
Create a tiny cone-shaped horn in gold or another bright accent color. Sew it to the top center of the pouch. The horn should be small and secure, not too tall or heavy. It is the most recognizable part of the unicorn theme.
The horn gives the pouch its magical identity.
Step 5: Add the ears
Crochet two small ears and place them on either side of the horn. The ears should be balanced and slightly curved so they frame the face nicely. Together, the horn and ears make the pouch instantly recognizable.
The ears complete the unicorn look.
Step 6: Create the drawstring channel
Near the top edge, work a row that allows the drawstring to pass through. Since the pouch is small, the channel should be neat and not overly wide. A slim closure works best for tiny accessories.
The closure keeps the earbuds secure.
Step 7: Finish and attach the cord
Thread a ribbon or cord through the channel and tie it securely. Make sure the pouch closes evenly and that the decorations do not interfere with opening and closing it. Trim and weave in all ends carefully.
Helpful Tips
This pouch looks especially adorable in pastel pink and white with a gold horn. If you want a softer version, use lilac and cream. Since it is for AirPods, keep the pouch slim and lightweight so it fits comfortably in a bag or pocket.
5. Crochet Bunny Inspired Drawstring Pouch Pattern
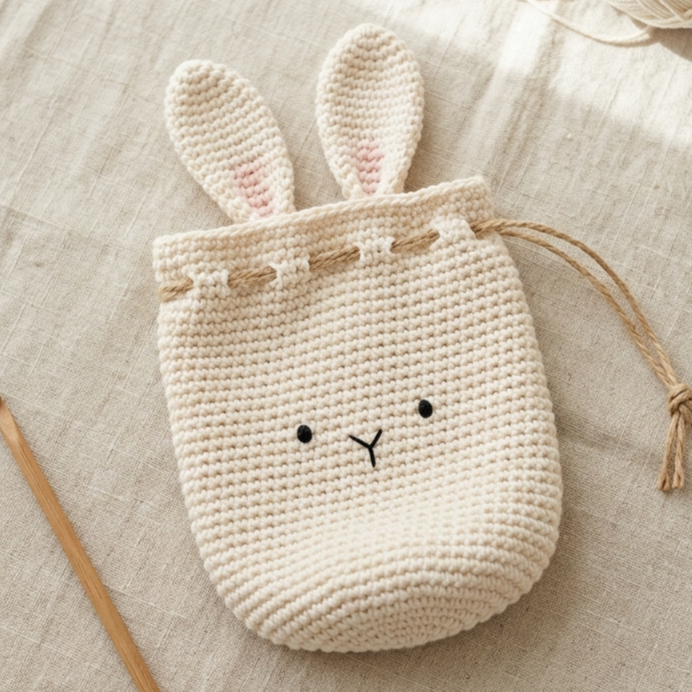
A bunny inspired drawstring pouch is sweet, playful, and perfect for spring gifts or year-round cute storage. It is a lovely choice for holding little treats, jewelry, or tiny essentials. The bunny features can be kept subtle or bold depending on your style.
Quick Notes
Skill level: Beginner
Finished size: Small to medium pouch
Style: Cute, spring-inspired, playful, soft
Best colors: White, cream, pastel pink, gray, beige, soft blue
Materials
- Cotton yarn in bunny-inspired colors
- Crochet hook suited to your yarn
- Yarn needle
- Scissors
- Drawstring cord or ribbon
- Optional felt or embroidery thread for details
Step-by-Step Guide
Step 1: Crochet the pouch base
Begin with a flat round base and work upward to form the body of the pouch. Keep the stitches even and firm so the pouch holds shape. The base should be wide enough for the items you want to store.
A neat base helps the pouch stand properly.
Step 2: Build the pouch walls
Continue crocheting in the round until the pouch reaches the desired height. Keep the sides smooth and balanced. Since bunny-inspired designs are usually soft and sweet, a simple body works very well.
The body should stay compact and functional.
Step 3: Add the bunny ears
Crochet two small ears separately and sew them near the top edge. They can be long and floppy or short and rounded depending on the style you want. The ears should sit upright enough to be visible but not so tall that they make the pouch awkward to use.
The ears are the main bunny feature.
Step 4: Add the face, optional
You can embroider a tiny bunny face on the front with simple eyes and a nose. Keep the features very soft and minimal so the pouch feels cute rather than overly busy. A small face can make the pouch feel especially charming.
A tiny face adds personality.
Step 5: Create the drawstring channel
At the top of the pouch, work a row with openings for the drawstring or ribbon. This will let you gather the top securely. Make sure the openings are neat and evenly spaced.
The channel should be functional and tidy.
Step 6: Thread the closure
Insert the ribbon or cord through the channel and tie it securely. The top should gather neatly when pulled. A soft ribbon can make the bunny pouch feel especially sweet and giftable.
Step 7: Finish all details
Weave in ends carefully and make sure the ears are secure. If needed, lightly shape the pouch with your hands so the bunny features sit neatly. The finished piece should feel soft, cute, and practical.
Helpful Tips
Bunny pouches look especially beautiful in cream, white, and blush pink. If you want a more spring-themed version, pastel yellow or lavender can also work nicely. This is a great pouch for Easter gifts or cute everyday storage.
Conclusion
Crochet drawstring pouches are such a rewarding project because they are small, useful, and full of personality. They are quick enough to make in a short sitting, but still feel thoughtful and polished when finished. That balance makes them ideal for beginners who want something satisfying, and for experienced crocheters who want a fun make with practical use.
These five pouch patterns each bring something different to the table. The Lotso bear pouch feels cute and character-inspired. The tulip stitch pouch is soft and floral. The pineapple inspired pouch is bright and tropical. The unicorn face AirPods pouch is magical and compact. The bunny inspired pouch is sweet and spring-like. Together, they show how much variety you can create with just a little yarn and a simple drawstring closure.
Whether you are making these pouches for yourself, as gifts, or for a craft fair, they prove that small crochet projects can still be special. With the right yarn, a neat finish, and a little creativity, these pouches can become tiny handmade favorites that are both useful and adorable.