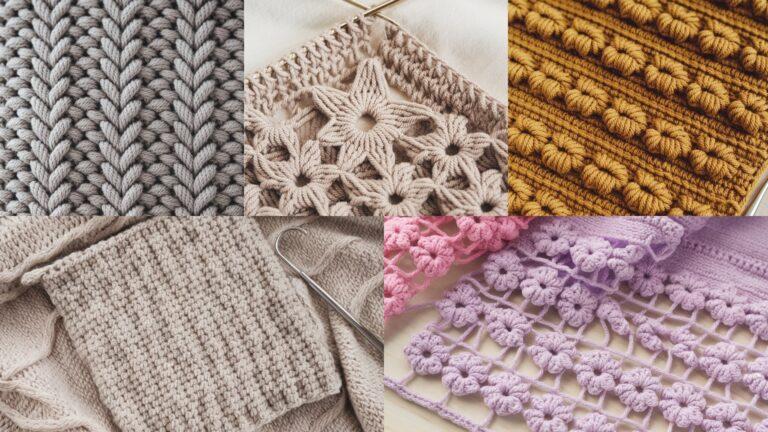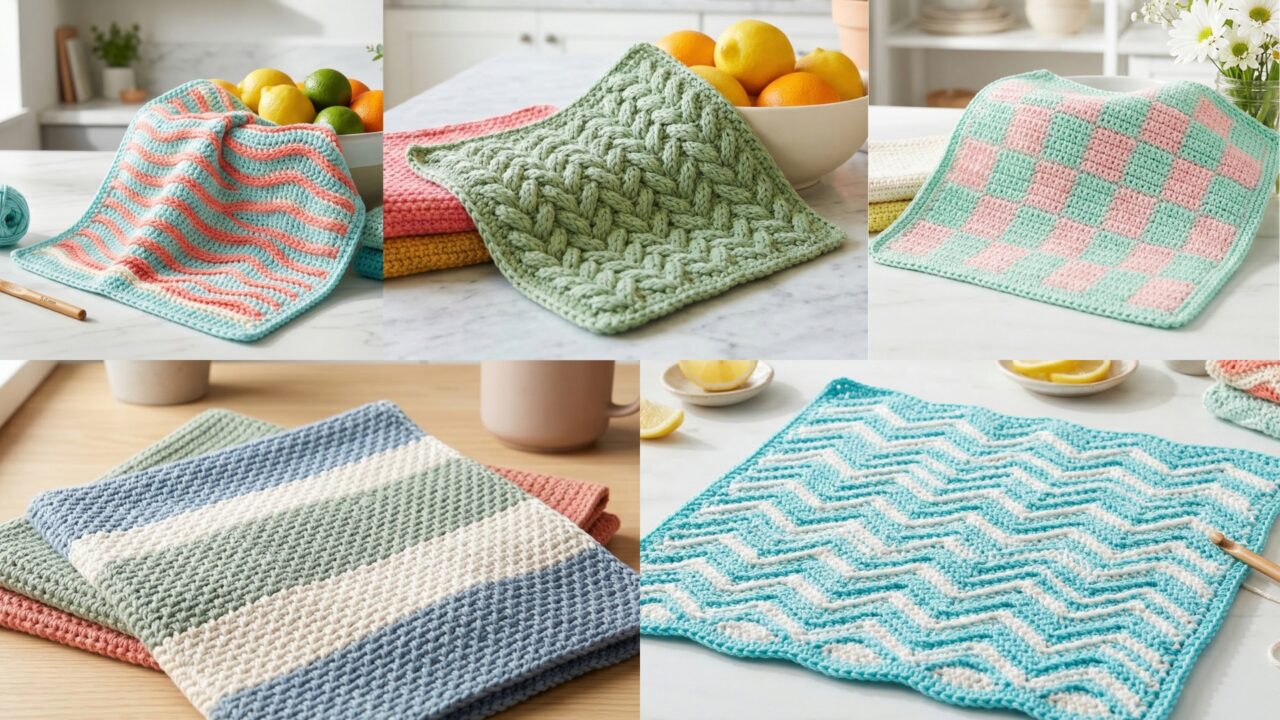
Durable dishcloths are the ultimate practical crochet project: quick to make, great for practicing texture stitches, and perfect for gift sets. Cotton dishcloths absorb well, stand up to scrubbing, and machine-wash nicely when you make them sturdy. Below are five durable, well-tested dishcloth patterns — Braided Beans, Coral Raised Waves, Spring Gingham, Double Stitch, and Ripple Effect — each with: skill level, finished size, materials, gauge, full step-by-step construction, finishing, variations, and care tips so your readers can make dishcloths that actually last.
Quick notes that apply to every pattern
- Use 100% cotton (dishcloth cotton, mercerized cotton, or cotton/linen blends). They’re absorbent, heat-resistant, and won’t pill like many acrylics.
- Recommended hook for most patterns: H/5.0 mm or G/4.0 mm depending on the stitch — I give a suggested hook with each pattern. If the finished cloth feels floppy, go down 0.5—1 mm for a denser fabric.
- To protect surfaces and increase lifetime, back your cloth with a thin piece of cork or use a slightly denser stitch.
- Always weave in ends securely — dishcloths get tugged and laundered a lot.
- Measurements below are approximate — cotton tension varies widely; make one cloth as a swatch and adjust.
Common abbreviations (US)
- ch — chain
- sc — single crochet
- hdc — half double crochet
- dc — double crochet
- tr — treble crochet
- sl st — slip stitch
- st(s) — stitch(es)
- BLO / FLO — back/front loop only
- MR — magic ring
- rep — repeat
- sp — space
- inc — increase (2 sc in same st)
- dec — decrease (sc2tog)
1. Crochet Braided Beans Stitch Dishcloth Pattern
A dense, scrubbable cloth with little raised “beans” arranged so they seem to braid across the surface. The beans give gentle texture for scrubbing, while the background sc keeps it sturdy.
Skill level: Intermediate (bean/puff stitches + offset rows)
Finished size: ~8″ × 8″ (20 × 20 cm) sample
Materials
- 100% cotton worsted/DK (one strand) — ~120–160 yards
- Hook: 4.0–5.0 mm (start with 5.0 mm; go down if too loose)
- Tapestry needle, scissors
Gauge (informal): Dense sc fabric — aim for a firm hand; ~14–16 sc = 4″ in sc.
Notes on the bean stitch used here
The bean stitch below is a small 5-loop cluster pulled through once — it makes a plump raised bump that sits on the surface. We’ll place beans in alternating columns so they braid visually.
Foundation / sizing
- Chain a multiple of 4 + 1 to make a square (this gives you full repeats across).
- Sample: ch 33 (32 + 1) produces a cloth about 8″ wide in the gauge I used. Adjust by measuring your chain.
Stitch definition — bean (worked into a single base stitch)
Bean: (yo, insert hook, pull up loop) ×5 (five times total) — you now have 6 loops on hook; yo, pull through all loops, ch1 to close.
- The ch1 after the bean secures it and gives a little stem.
Pattern (row-by-row)
- Ch multiple of 4 + 1 (sample ch 33). Turn.
- Row 1: sc in 2nd ch from hook and in each ch across. (This makes a firm base). Turn.
- Row 2 (establish beans in odd positions): ch2 (counts as hdc), bean in next st, sc in next st — rep across ending with sc. Turn.
- Row 3: ch1, sc across (this anchors beans). Turn.
- Row 4 (shifted beans for braided look): ch2, sc in first st (this offsets the pattern), bean in next st, sc in next st — rep across ending with sc. Turn.
- Row 5: ch1, sc across. Turn.
- Repeat Rows 2–5 until cloth is square or reaches desired length (for 8″ aim for ~28–32 rows depending on gauge). End on a sc row.
Edge finishing
- Work 1 round of sc evenly around the whole cloth; place 3 sc in each corner so the cloth lies flat. Optionally add a very tight crab stitch (reverse sc) round to produce a neat, slightly ridged edge that resists curling.
Assembly & blocking
- Wet-block or steam lightly pinned to square shape. This opens texture slightly and evens the edges.
Tips for durability
- Use tighter tension and a slightly smaller hook if you want a very dense cloth for heavier scrubbing.
- If you want extra scrubbing power, hold two strands of cotton together (works well with smaller hook 4.0 mm).
Variations
- Make a set: alternate a natural cotton cloth with a colorful border for easy sorting.
- Use two colors in stripes; place beans in contrast color by changing color at the start of every other sc row.
Care
- Machine wash warm, tumble dry low or air-dry lying flat. Cotton may shrink slightly on first wash; pre-wash yarn if you want exact final size.
2. Crochet Coral Raised Waves Cotton Dishcloth Pattern
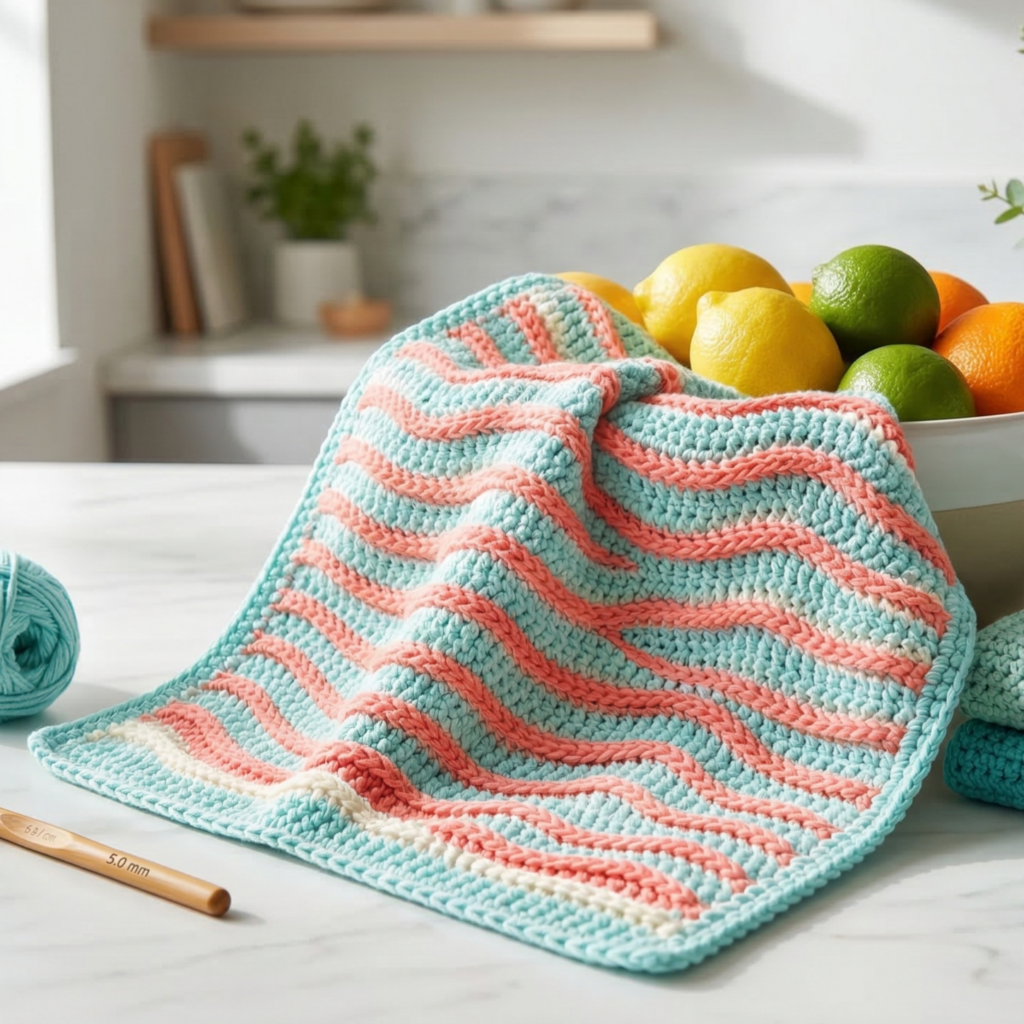
A shallow 3-D wave formed with front-post and back-post stitches — the raised ridges channel moisture and provide a cushioned scrub surface.
Skill level: Intermediate (post stitches)
Finished size: ~9″ × 9″ (23 × 23 cm) sample
Materials
- 100% cotton worsted yarn — ~140–180 yards
- Hook: 5.0 mm (H) recommended for good drape of waves
- Tapestry needle
Gauge: A denser fabric gives better performance; aim for roughly 14 sc across = 4″ in worsted yarn.
Stitch palette
- fpdc = front post double crochet
- bpdc = back post double crochet
- dc and sc for anchor rows
Foundation & repeat
- Chain a multiple of 6 + 2 (sample ch 38). The 6-st repeat forms a wave segment.
Pattern (wave building)
- Ch multiple of 6 + 2 (sample ch 38). Turn.
- Row 1: dc in 3rd ch from hook and across. Turn. (This establishes height for post stitches.)
- Row 2 (anchor row): ch1, sc across. Turn.
- Row 3 (wave row — raised ribs): ch2 (counts as hdc), fpdc around next 3 dc (these will be raised ridges), bpdc around next 3 dc (these push the fabric back), rep across; end last rep to match pattern, finish with hdc or sc to turn. Turn.
- Practically: work 3 fpdc in a block, then 3 bpdc, repeat; this creates raised/low panels.
- Row 4: ch1, sc across to lock the posts. Turn.
- Repeat Rows 3–4 until cloth reaches square size (approx 20–24 rows for 9″ height depending on gauge). End with a sc round.
Edge finishing
- Work one round sc around the cloth; in corners work 3 sc to keep flat. Optional: a final round of hdc gives a soft frame.
Why this is durable
- Post stitches compress and rebound — they stand up to scrubbing without flattening quickly. The dc body keeps it flexible.
Variations
- Use alternating colors per wave repeat for a coral reef look (e.g., mint & cream).
- For a chunkier kitchen scrubber, hold two strands and work with 6.0 mm hook.
Care
- Cotton dishcloths love hot water; they can be washed and bleached if stained (check fiber content). Dry flat to avoid hardening of post stitches.
3. Crochet Spring Gingham Dishcloth Pattern
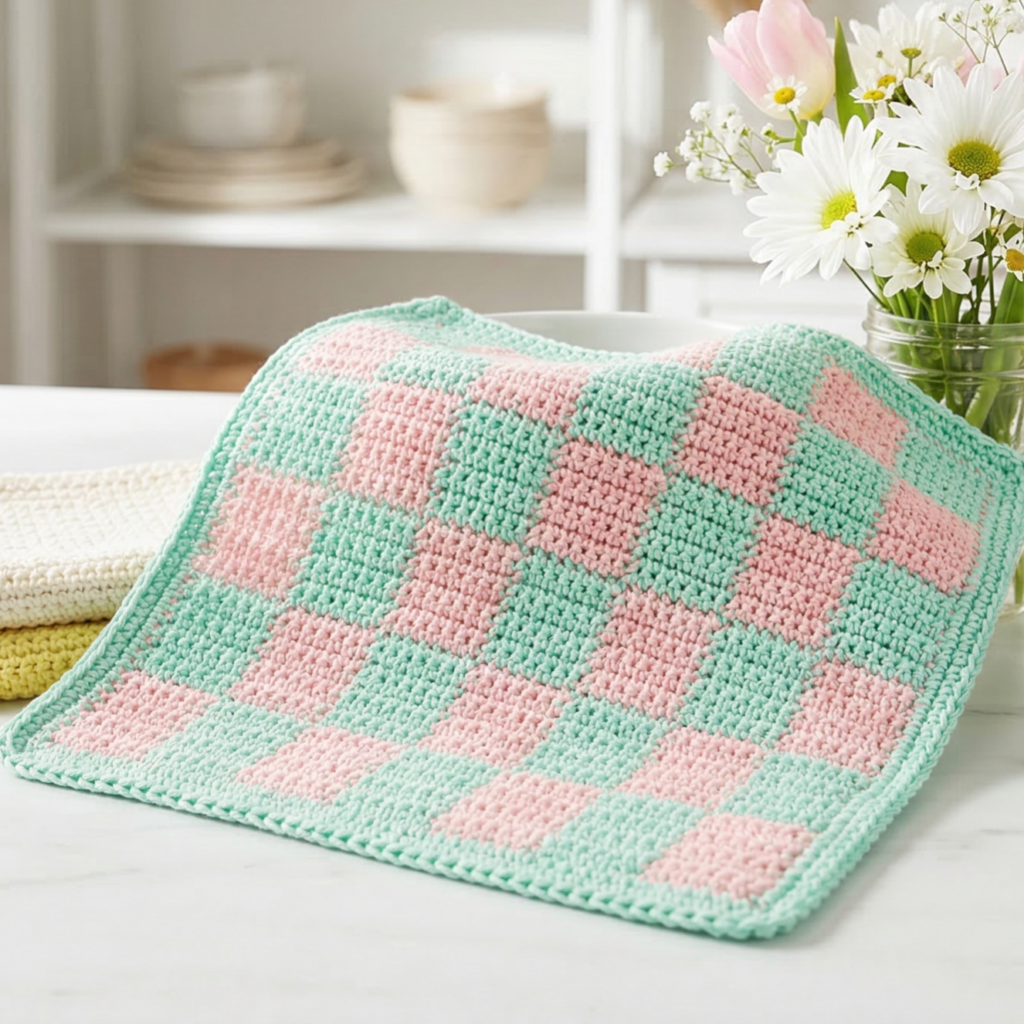
A crisp checkerboard (gingham) look created with alternating small blocks of color — charming for spring kitchens and easy to scale.
Skill level: Intermediate (two-color blockwork)
Finished size: ~8″–9″ square sample (you can make a whole placemat using same technique)
Materials
- Two colors 100% cotton (Color A: background; Color B: accent) — ~100–150 yds total (small amounts of each)
- Hook: 4.0–5.0 mm (choose based on yarn; smaller hook yields denser cloth)
- Tapestry needle
Concept & construction notes
Gingham is visual — small squares of one color sit over a grid created by alternating small blocks of rows and stitches. Because color changes happen often, use short floats or manage yarn ends by carrying the unused color up the side (or cut & weave tails for small cloths).
Sizing rule
- Work a foundation chain that’s a multiple of 8 + 1 for an even grid of 4×4 mini-blocks (each block is 4 sts wide × 4 rows tall).
- Sample: ch 33 (32 + 1) gives eight 4-st blocks across.
Pattern (two-color block gingham)
- Ch multiple of 8 + 1 (sample ch 33). Turn.
- Row 1 (Color A): sc across in Color A. Turn.
- Rows 2–4 (Color A block height): repeat Row 1 two more times (so Color A occupies 4 rows for the first band).
- Rows 5–8 (Color B blocks across): switch to Color B and sc across for 4 rows. This creates a horizontal band of color B.
At this point you’ll have horizontal stripes of 4 rows each in alternating colors. To create the checkerboard (with vertical banding), we offset the color blocks every other band:
- Row 9–12 (Color A again) — but begin Row 9 by changing the first 2 stitches to Color B before continuing in Color A — this offsets the vertical blocks by half a block. Practically: on the first sc or two of the row, work them in the opposite color then resume the main color so the vertical columns shift.
- Continue alternating 4-row blocks of Color A and Color B, alternating which color starts each band every other band so the blocks align in a checkerboard. In short: every other 4-row band, begin the row with a 2-st offset (or a 2-st color switch) so the vertical bands shift to create squares.
- Repeat until the dishcloth reaches desired height (about same number of rows as width to make a square). Finish with one round of sc in a neutral color to tidy edges.
Tips for neat color changes
- To minimize ends, carry the unused color up the side for up to 3–4 stitches — then twist and carry the other color especially where floats are short. For a dishcloth that will be laundered, I recommend weaving ends rather than long floats — cut & weave every few color changes for longevity.
Variations
- Make block size larger (6×6) for a bolder pattern, or smaller (2×2) for micro gingham.
- Use pastel spring colors (mint + blush) or classic red + white for a vintage look.
Care
- Because there are many color joins, machine wash gentle; check for any loose ends after the first wash and re-weave if needed.
4. Crochet Double Stitch Dishcloth Pattern

A wonderfully dense, almost woven fabric created by a compact “double” stitch repeat — very long-lasting and pleasingly textured.
Skill level: Beginner–Intermediate (repeating simple combo)
Finished size: ~8″ × 8″ sample
Materials
- 100% cotton worsted / cotton DK — ~120–160 yards
- Hook: 4.0 mm recommended (use 3.5 mm for extra density)
- Tapestry needle
What I mean by “double stitch” here
For this pattern the double stitch is a two-part sequence worked across rows which produces a tight, reversible linen-like fabric: sc, ch1, skip, sc into ch-space on next row (sometimes called linen or moss stitch variant). This yields a dense woven surface that doesn’t display holes and resists sagging.
Foundation & repeat
- Chain any even number to get a neat rectangle. Sample chain 32 + 1 turning = ch33.
Pattern — linen-style double stitch (row-by-row)
- Ch even number + 1 (sample ch 33). Turn.
- Row 1: sc in 2nd ch from hook, ch1, skip next ch, sc in next ch — repeat across, end with sc in last ch. Turn.
- This creates a row of small ch1 spaces separated by sc.
- Row 2: ch1, sc into the first ch1 space (not in the sc), ch1, sc into next ch1 space across; end with sc in top of turning chain. Turn.
- Repeat Row 2 for the body until piece is square. Because you always work into ch1 spaces, the cloth builds a densely interlocked grid (two-row repeat is the double stitch pattern).
Edge finishing
- Work 1 round of sc around; 3 sc in corners to preserve flat-square shape. Optionally do one round in BLO to create a neat ribbed border.
Why this lasts
- The interlocked ch1/sc fabric has minimal loops exposed and resists stretching while still being flexible. It’s one of the best stitch choices for a durable, no-hole dishcloth.
Variations
- Hold two strands of fine cotton together for a super-dense, long-wearing scrub cloth.
- Work in single color or stripe every N rows for a subtle banded effect.
Care
- Machine wash warm and dry on low; the linen-like texture softens slightly with use but keeps its structure.
5. Crochet Ripple Effect Dishcloth Pattern
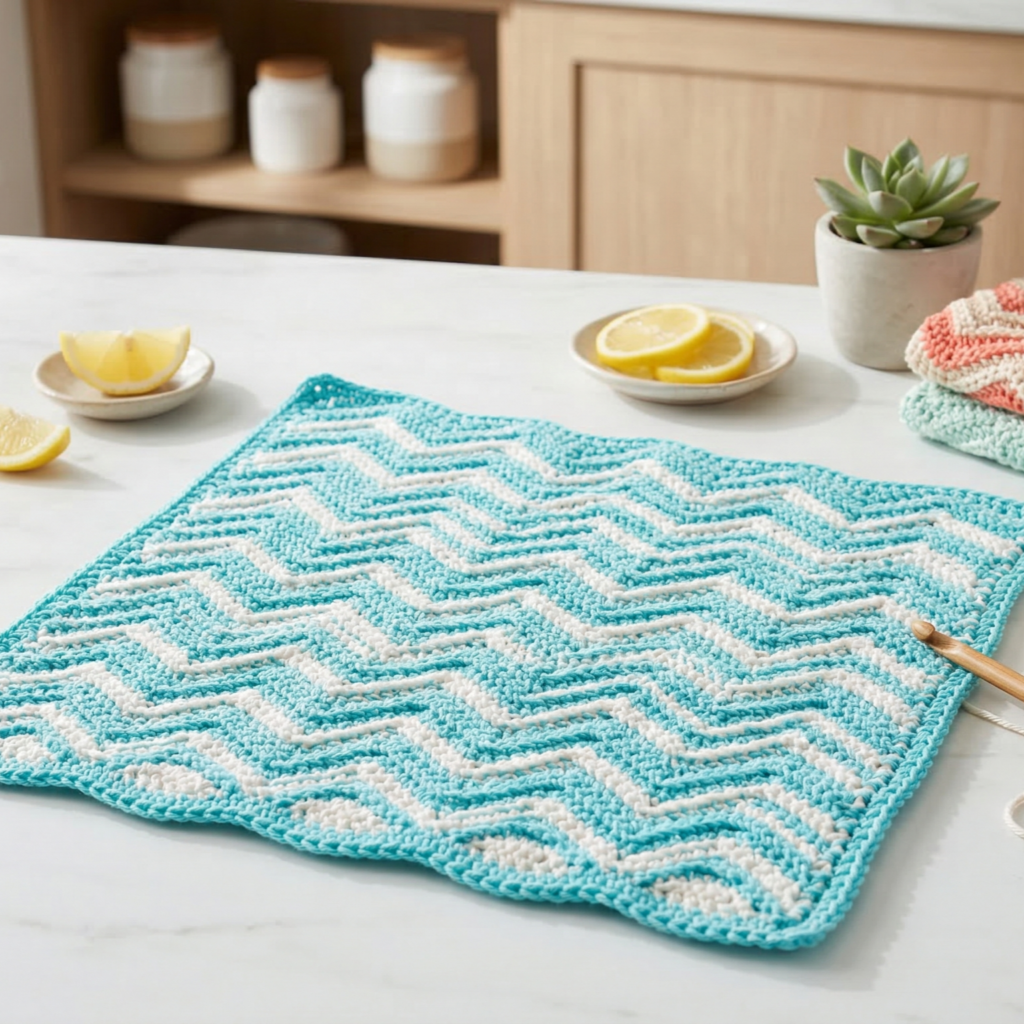
A classic chevron ripple that creates textured ridges and troughs — comfortable to hold and great at channeling drips away from the cup.
Skill level: Beginner–Intermediate (increases/decreases for ripple)
Finished size: ~8″ × 9″ (depending on number of repeats)
Materials
- 100% cotton worsted — ~140–180 yards
- Hook: 5.0 mm recommended for an airy yet sturdy ripple
- Tapestry needle
Ripple math — sizing
- A ripple repeat usually requires a multiple of 12 (or 14) stitches depending on peak/trough setup. For this pattern we’ll use a multiple of 12 + 3 so that each repeat includes two decreases (valleys) and two increases (peaks) per repeat.
- Sample: chain 39 (which is 12×3 + 3) gives about 3 full ripples across.
Pattern (classic chevron with dc)
- Chain a multiple of 12 + 3 (sample ch 39). Turn.
- Row 1: dc in 4th ch from hook and in next 8 chs, dc3tog (decrease over next 3 stitches) — this forms the valley; dc in next 9 chs, (3 dc in next ch) (increase for peak); dc in next 9 chs, dc3tog, dc in next 9 chs, 3 dc in next ch — repeat across according to chain length; finish last section with dc to end. Turn.
- Practical explicit stitch sequence for one repeat (12-st repeat plus peak/valley): [dc x9, dc3tog, dc x9, 3 dc in one st, dc x9] — adapt depending on total stitch count.
- A dc3tog is made by working partial dcs (yo, insert, pull up), leaving loops, then yo and pull through all loops to close — it’s a 3-stitch decrease.
- Row 2: ch3 (count as dc), dc across each dc and into the 3-dc group as 3 separate dc (work 3 dc into the same st for the peak), and treat the dc3tog as a single st — work accordingly so decreases align below increases. Turn.
- Repeat Row 2 until dishcloth reaches square size (generally 18–20 rows for 8–9″ height depending on gauge).
Edge finishing
- Work a round of sc around the edge for neatness; in corner peaks place 3 sc to keep it flat.
Tips for neat ripples
- Keep tension even — uneven tension shows quickly on a chevron.
- If you prefer softer waves, substitute hdc for dc and reduce hook size.
Variations
- Striped ripple: change color every 2–4 rows for bold stripes.
- Use narrower yarn and a smaller hook to create delicate ripples for a guest set.
Care
- Cotton ripple dishcloths handle frequent washing; reshape after each wash to maintain crisp peaks.
Conclusion
Those five patterns give you a full toolkit for durable, useful dishcloths that look good and last: Braided Beans (textured scrub), Coral Raised Waves (post-stitch ridges), Spring Gingham (charming color blocks), Double Stitch (dense woven fabric), and Ripple Effect (classic chevron texture).
Final practical tips to make them last:
- Choose good cotton — 100% cotton or cotton/linen blends are best for longevity, absorbency, and heat resistance. Mercerized cotton gives a more polished look and a slightly firmer fabric.
- Tighten tension for scrubby cloths. If a cloth feels floppy when dry, go down a hook size.
- Secure all ends and consider a small stitched backing patch if you mount a cloth into a heavy-use area (e.g., under a sink scrubber).
- Label care: include a small card with fiber content and care: “Machine wash warm; tumble dry low or air dry; reshape while damp.”
- Gift idea: make sets of 3 in a box — a textured scrub cloth (Braided Beans), a patterned cloth (Gingham), and a soft linen (Double Stitch). Tie with twine and a small soap bar for a handmade housewarming gift.