Tiny wreath ornaments are one of the easiest, most charming ways to bring handmade warmth to seasonal decor. They’re quick to make, use small yarn scraps, and look delightful hung on a tree, tied to a present, used as napkin rings, or strung into a garland. Below you’ll find five complete wreath ornament patterns — each with clear materials lists, skill levels, step-by-step instructions, finishing tips, variations, and presentation ideas so you can make a batch in an afternoon.
I wrote each pattern so you can follow it without chasing details: exact stitch counts, where to add embellishments, and how to make a neat hanging loop. I also include quick swaps (thicker yarn, metallic thread, felt backing) if you want sturdier or glossier ornaments.
Quick notes common to all patterns
- Gauge is not critical for small ornaments, but keep tension even so wreaths look neat and match in size.
- Abbreviations used: ch = chain, sl st = slip stitch, sc = single crochet, hdc = half double crochet, dc = double crochet, st = stitch, inc = increase (2 sts in same st), dec = decrease, MR = magic ring.
- Supplies on hand: tapestry needle, small scissors, optional hot glue, small stuffing (polyfill) if you want puffed wreaths, jewelry jump rings for hanging, and small beads, ribbon, or jingle bells for embellishment.
- Yarn choice: fingering, sport, or worsted scraps all work. Cotton gives crisp stitches; acrylic or wool gives fluff and warmth. Use thicker yarn/hook for larger wreaths.
- Safety: If ornaments will be accessible to small children, avoid tiny glued beads and use embroidered or securely stitched embellishments.
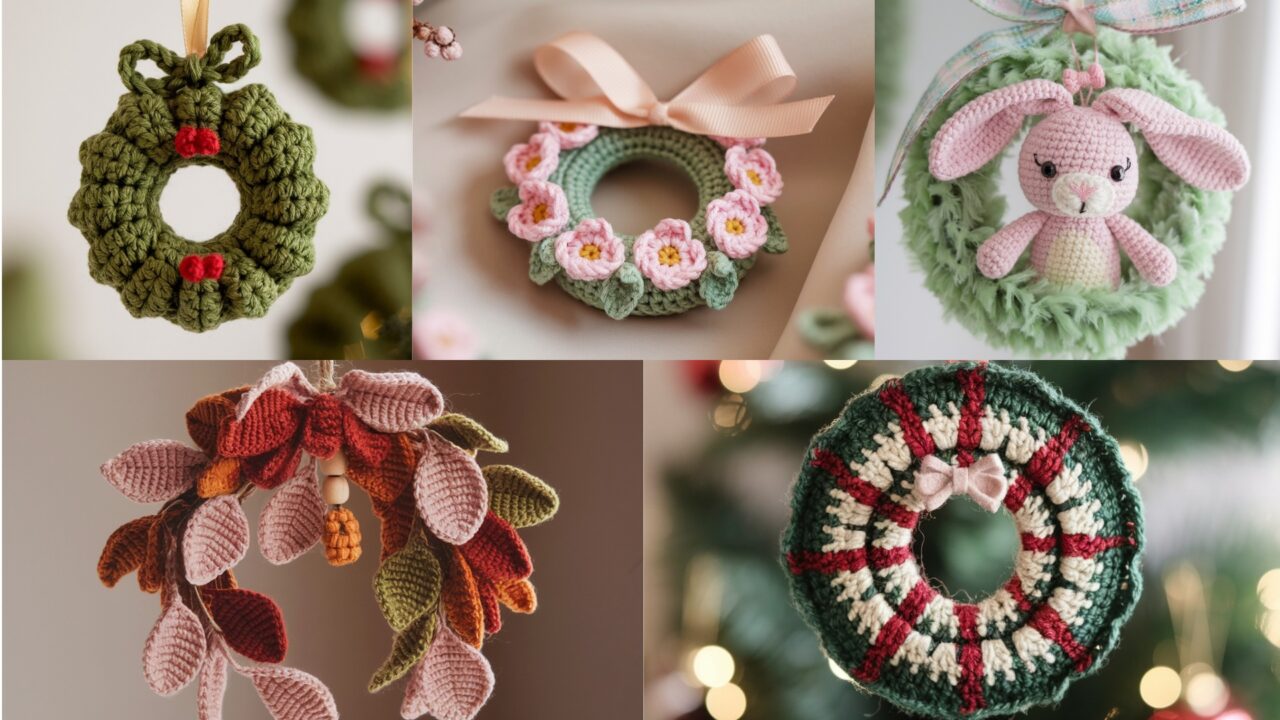
1. Crochet Mini Christmas Wreath Ornament Pattern
Finished size: ~2–3 inches diameter (with fingering yarn; scale with yarn/hook)
Time: 15–30 minutes per wreath
Skill level: Beginner (basic rounds and simple assembly)
Materials:
- Worsted or fingering weight yarn (green for wreath, optional red/white for berries) — small amounts (~10–20 yards).
- Hook: 3.0–4.5 mm (adjust for yarn).
- Tapestry needle, scissors.
- Small ribbon or thread for hanger; a tiny jingle bell or bead (optional).
Why this wreath?
Classic, fast, and endlessly customizable. The pattern creates a neat ring you can accent with berries, ribbon, or a tiny bow.
Pattern — step-by-step
- Make the ring base (MR method). MR; ch 1, work 10 sc into the magic ring. Pull tight and join with sl st to first sc. (10 sc) — this is the small center circle.
- Round 2 — bulk the ring. Ch 1, work 2 sc into each st around (inc in each st) — 20 sc. Join. This widens the ring to give wreath depth.
- Round 3 — texture row (optional). Ch 1, sc in next st, hdc in next st — repeat to the end for a subtly textured surface; join and fasten off leaving a 6–8″ tail for sewing.
- Optional puff wreath (for puffy look). Repeat Round 2 (another inc round) to make a thicker wreath — you can also add a tube of stuffing inside before closing if you want plushness.
- Berries & bow. For berries: with red yarn, make tiny knots or French-knots (embroidery), or MR and 4 sc (tiny ball); sew 2–3 berries to one side. For a bow: make a small bow from leftover yarn or tie ribbon and stitch to top.
- Hanger loop. Make a 6–8 ch loop with green yarn at the top and sl st back into the same top stitch; or use a small length of ribbon/jump ring to hang. Weave in ends.
Finishing & variations
- Add a tiny jingle bell sewn inside or beneath the bow for sound.
- Make a mixed-color wreath with variegated yarn to get tonal shading without extra sewing.
- For sturdier store-bought look, wind yarn around a 1.5–2″ metal or foam ring instead of crocheting the ring.
Presentation ideas: Tie wreath to a small gift as a reusable tag or make a set of six in different greens for a mini garland.
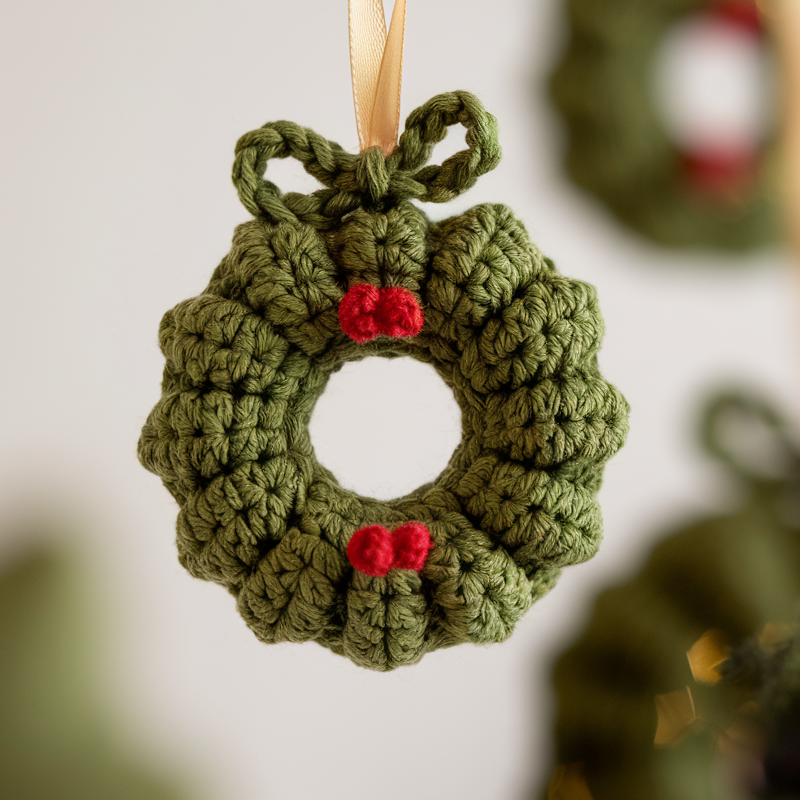
2. Crochet Bunny Wreath Ornament Pattern
Finished size: ~3–3.5 inches tall (including ears) — sweet for spring/Easter or nursery decor
Time: 25–45 minutes each
Skill level: Beginner → Intermediate (small shaping & applique)
Materials:
- Pink or white yarn for bunny accent, green yarn for wreath base; small amounts of cream/contrasting color for belly/ears.
- Hook: 3.0–4.5 mm.
- Tapestry needle, stuffing for small parts (optional), small safety eyes or embroidery thread for face.
- Thin wire or pipe cleaner optional for shaping ears.
Why this wreath?
A playful seasonal ornament — a tiny bunny peeks out of a wreath. Great for themed trees or springtime gifts.
Pattern — step-by-step
A. Wreath base (same as Mini Christmas Wreath)
- MR, 10 sc; join. Round 2: 2 sc in each = 20 sc; join. Round 3: sc around or sc/hdc alternate; join and fasten off leaving long tail for sewing.
B. Bunny head (tiny/made separate)
2. MR with pink: 6 sc into ring (6). R2: inc around (12). R3: sc, inc around (18). R4: sc around (18). Stuff lightly and dec: sc, dec around (12). Fasten off and sew closed, leaving tail to attach to wreath.
C. Ears (make 2)
3. Ch 6. Row 1: sc in 2nd ch from hook across (5 sc). Row 2: ch 1, sc across. Row 3: ch 1, dec in first 2 sts, sc in next, dec last 2 sts — you get a tapered ear. Fasten off leaving tail to sew. For floppy/curved ears, sew a pipe cleaner or thin wire into the ear tube before attaching.
D. Face details
4. Embroider tiny eyes (two French knots with embroidery thread) or stitch-on small safety eyes before closing the head. Sew a small pale yarn oval on belly or a small snout shape.
E. Assembly
5. Position the head at the bottom or side of the wreath (whatever looks cute). Sew tightly through the back of the head into the wreath base. Attach ears behind the head; add a bow or small felt flower to one ear for charm.
F. Loop & finish
6. Add a hanger loop at the top of the wreath as for Pattern 1. Weave in ends. Trim any loose fibers.
Variations & tips
- Make a whole family of bunnies in cream, grey, and pink for a themed garland.
- Use fuzzy yarn (eyelash or mohair) for a soft bunny texture — reduce hook size to keep tight stitches.
Presentation idea: Attach the bunny wreath to a baby shower favor or use as a place-card for spring brunch.
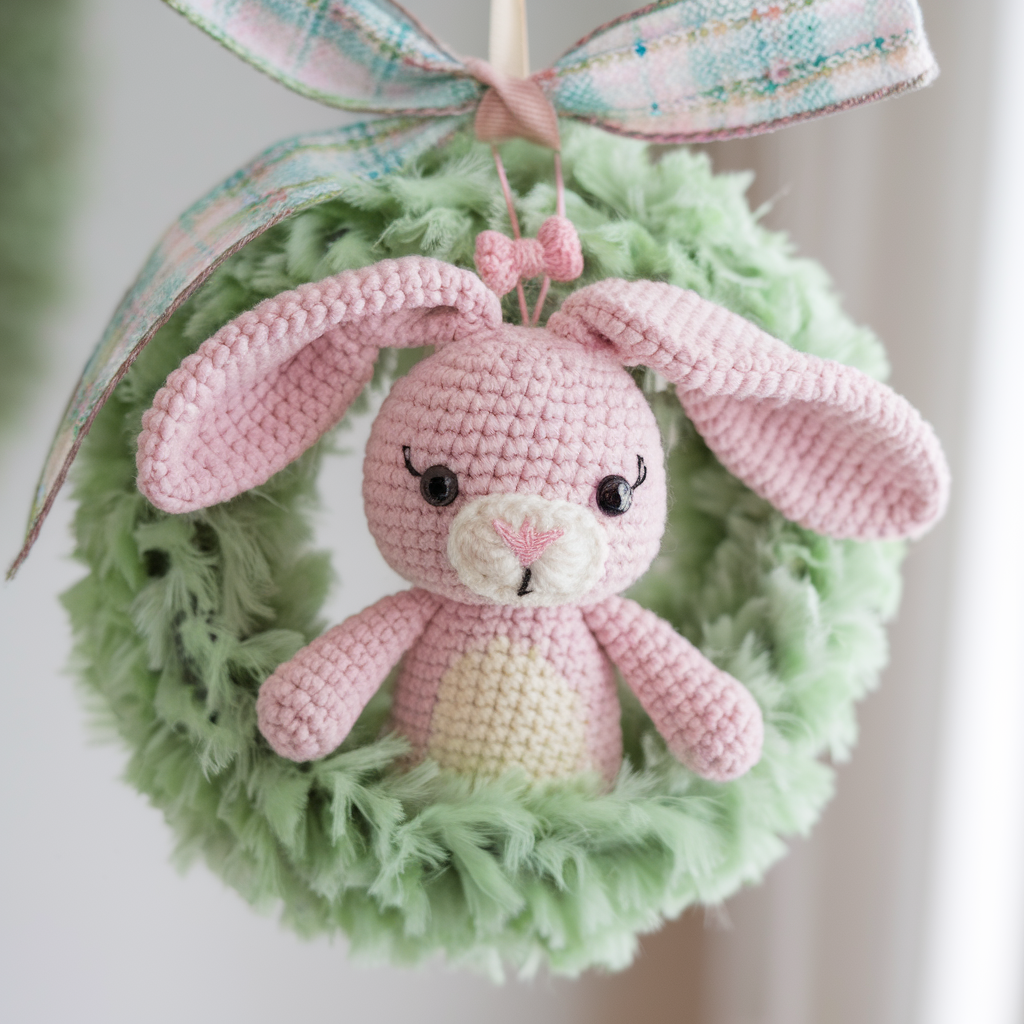
3. Crochet Flower Wreath Ornament Pattern
Finished size: ~2.5–4 inches depending on flower size
Time: 20–40 minutes per wreath (varies by number of flowers)
Skill level: Beginner → Intermediate (applique + assembly)
Materials:
- Several pink shades + green for foliage; small amounts of yellow or cream for flower centers.
- Hook: 2.75–4.5 mm.
- Tapestry needle, small glue dot (optional), felt circles for backing (optional).
Why this wreath?
A floral cluster wreath reads feminine and festive — make a small base and appliqué tiny flowers and leaves to create a lush miniature bouquet.
Pattern — step-by-step
A. Base
- Work a small ring as base: MR, 8–10 sc; R2: inc in each = 16–20 sc; join and fasten off.
B. Tiny blossom (make multiple, 3–7 depending on wreath size)
2. MR with pink: ch 1, work 8 sc into ring; pull tight and join. Round 2: ch 2, 3 dc in next sc, ch 2, sl st in same sc — repeat for each sc to create 8 small petals. Fasten off leaving tail. This forms a tiny rosette. For a fuller flower, use a longer petal: (ch 3, 5 dc, ch 3, sl st) per petal.
C. Leaves (make several)
3. Ch 8. Row: sc in 2nd ch from hook, hdc, dc, tr, dc, hdc, sc — gives a small leaf. Fasten off and leave tail.
D. Assembly
4. Arrange flowers around the top half or circle of the base wreath. Use felting glue or whip-stitch the flower bases to the wreath. Add leaves in between flowers to fill and create a natural silhouette. Sew or glue a small yellow center bead or embroidered French knot in each flower center.
5. Add a tiny ribbon bow to one side for a classic finish. Attach hanger loop at the top.
Variations & tips
- Mix in tiny crocheted berries (small MR 6 sc) for texture.
- Sew wreath to a small felt circle before attaching flowers if you want to hide stitches and create a neat back.
Presentation idea: Group three floral wreaths on a small wall or attach to napkin rings for a spring dinner.
4. Crochet Falling Leaves Wreath Ornament Pattern
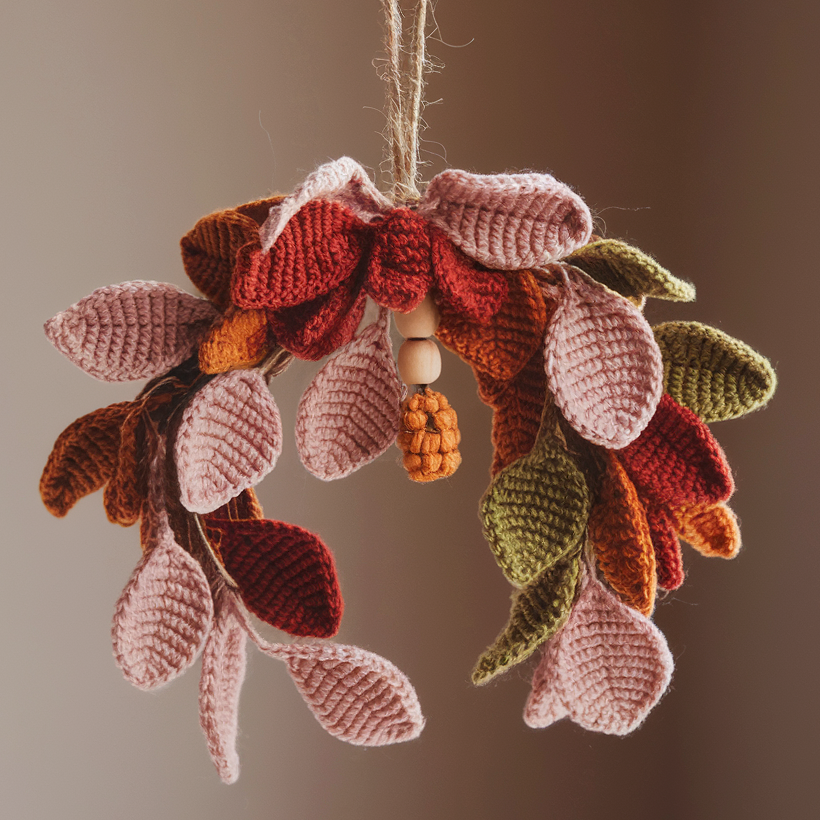
Finished size: ~3–4 inches diameter — great for fall color palettes or year-round natural decor
Time: 20–40 minutes per wreath
Skill level: Beginner (leaf shaping + assembly)
Materials:
- Yarn in autumn tones: dusty pinks, rust, ochre, olive—small amounts.
- Hook: 3.0–4.5 mm.
- Tapestry needle, optional small wooden bead for center accent.
Why this wreath?
A seasonal wreath that interprets “falling leaves” in crocheted form — leaves are flattering in pinks and golds as much as in oranges and browns.
Pattern — step-by-step
A. Base ring
- MR, 10 sc; R2: 2 sc in each = 20 sc; join and fasten off.
B. Leaf (make 5–8 leaves)
2. Ch 12 (or 14 for larger leaf). Row 1: sc in 2nd ch from hook, hdc, dc, tr, dc, hdc, sc — work across to make a tapered leaf spine (adjust lengths as desired). Turn and sl st along the opposite side of the foundation chain to make a closed leaf shape with a neat edge. Fasten off leaving long tail for sewing. Alternatively, work a symmetrical leaf by working back along the chain with mirror stitches: after working foundation chain across, work a row of stitches back along the chain (sc, hdc, dc, tr, dc, hdc, sc) and then join.
C. Add leaf vein (optional)
3. With contrasting yarn, use surface slip-stitch or simple running stitches along center to suggest a vein.
D. Assembly — “falling” layout
4. Arrange leaves around the wreath so they look like they’ve fallen into a loose ring — tips overlapping is visually pleasing. Sew leaves to base by stitching through leaf base and into wreath ring. Add small wooden bead cluster or tiny pom-poms in the center for a focal point if you like.
5. Attach a hanger loop on top, or make a little loop of jute for a rustic feeling.
Variations & tips
- Make leaves in variegated yarn to get natural color gradient without color changes.
- For sturdier ornament, sew leaves onto a small cardboard ring before covering with yarn.
Presentation idea: Tie a set of three leaves to a present or cluster several on a twig to make a quick table centerpiece.
5. Crochet Plaid Wreath Ornament Pattern
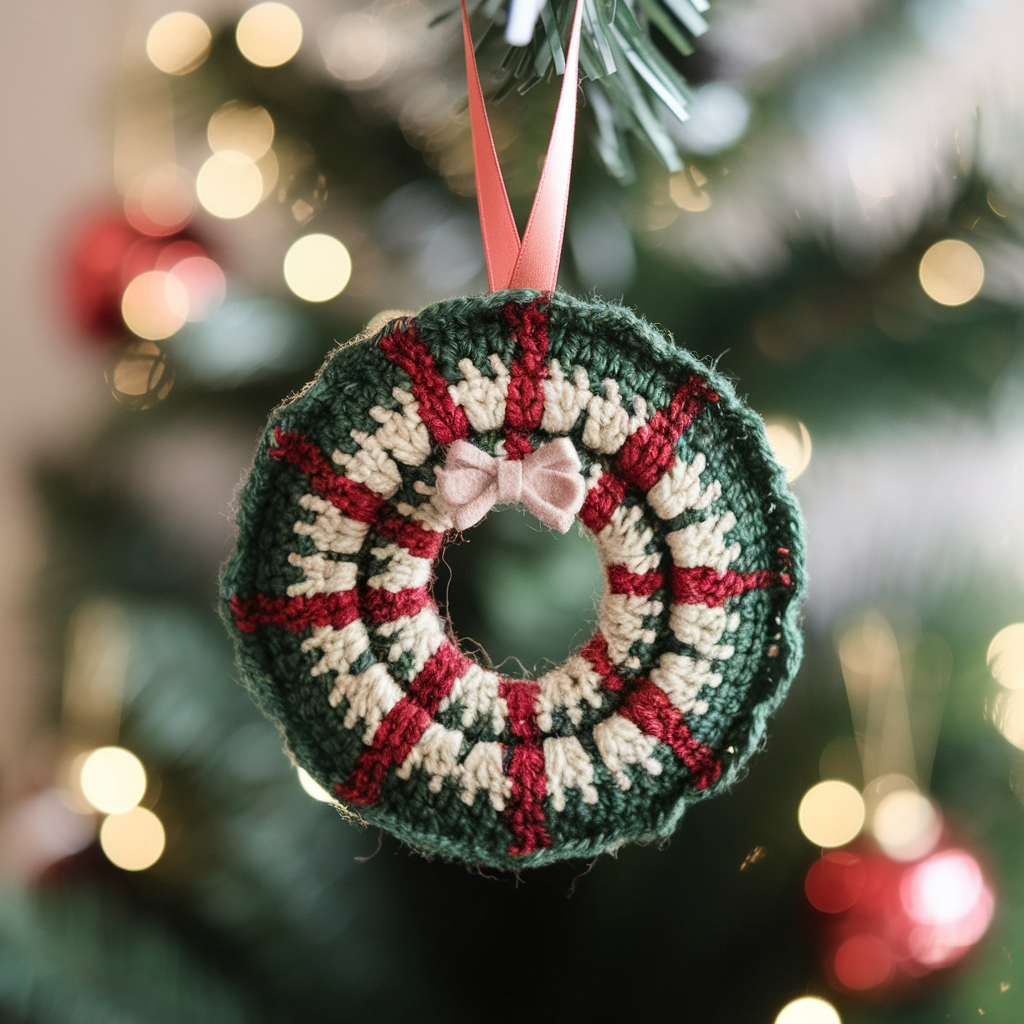
Finished size: ~3–4 inches diameter — looks classic and cozy for holiday trees
Time: 25–45 minutes per ornament
Skill level: Intermediate (requires tidy color changes and optional surface slip-stitch)
Materials:
- Three small yarn colors: base green, accent pink or red for plaid lines, neutral for contrast.
- Hook: 3.0–4.5 mm.
- Tapestry needle, scissors, small ribbon for top.
Why this wreath?
Plaid looks homespun and festive; translating it to a little wreath gives a textile-pattern pop on a tree.
Pattern — step-by-step
A. Base ring
- MR; ch 1, 10 sc into MR; pull tight and join. R2: 2 sc in each st = 20 sc; join. R3: sc around to tidy (20 sc). Fasten off base color leaving a long tail to stitch in plaid details if desired.
B. Plaid stripes — two methods
Method 1 — surface slip-stitch plaid (simpler)
2. Using a contrasting color, create vertical lines across the wreath: insert hook from front to back at the inner edge, pull up a loop, then sl st across surface to the opposite side, making a small dash; repeat spaced every 3–4 stitches. Use a second accent color to add horizontal dashes crossing the verticals (work short sl st segments that cross the verticals) to create a plaid grid look. Tie off and weave ends to back.
Method 2 — crocheted overlay (more defined)
3. Make short bars: with accent color, ch 4, sl st back into skip spaces across the outer edge; stitch these bars at regular intervals around the ring. Then add crossing bars by sewing narrow chain pieces across the ring and securing ends with a few stitches. This builds a slightly raised plaid effect.
C. Embellish
4. Add a small felt bow, tiny stitched holly leaves, or a mini pom as a center focal point. Sew an elegant ribbon hanger loop at the top.
Variations & tips
- Use metallic thread for one of the plaid colors to add sparkle.
- For a tartan look, use two accent colors for crossed lines and alternate spacing for a more complex motif.
Presentation idea: Make a set of plaid wreaths in coordinating colorways and package three in a small box as hostess gifts.
Finishing touches for all wreaths
Blocking & shaping: For crisp shapes, lightly block cotton/plant-fiber wreaths on a small mat; pin into shape and mist with water (or starch for more rigidity) and let dry. Avoid soaking mohair or fuzzy yarns.
Backing (optional): If you want a neat back, cut small felt circles the size of the wreath center and whipstitch or glue them to the back to hide knotwork and secure embellishments.
Hanging hardware: Sew or tie a small loop of yarn, ribbon, or a metal jump ring into the top of the wreath. For durable tree ornaments, use jewelry jump rings threaded through the top seam and attached to a small ribbon loop.
Batch-making tips:
- Use a foundation ring (foam/cardboard) to speed production: wrap and crochet around the ring, or wind yarn and stitch embellishments to it.
- Work in assembly-line style: make all wreath bases first, then all flowers, then all leaves, and finally assemble — it’s faster and keeps your hands in rhythm.
Care, storage & safety
- Store ornaments flat in a box with tissue paper to avoid crushing. Keep off damp basements to prevent mildew.
- If ornaments get dusty, use a soft brush or a brief low-heat blast with a hairdryer, or gently hand-wash and air-dry if yarn type allows.
- For kid-safe decorations, avoid small glued embellishments — stitch them firmly or use embroidered features.
Conclusion
Wreath ornaments are small in size but big in personality. They’re perfect for stash-busting, last-minute gifts, and making your home feel handmade and warm. Each of the five designs above — classic Christmas wreath, peek-a-boo bunny, floral halo, autumn leaf ring and cozy plaid — can be made in under an hour with a little practice. Mix colors, experiment with yarn textures, and assemble a batch to scatter across your tree, use as gift tags, or string into garlands.