Crochet towel holders are one of the most useful little kitchen projects you can make. They are quick, practical, and adorable, and they help keep hand towels from slipping off the oven handle, drawer pull, or cabinet knob. Best of all, they are a great way to use small amounts of yarn while making something that looks thoughtful and handmade.
The five patterns below are designed to be decorative and functional at the same time. Each one includes a crocheted loop or holder section that can button around a towel, so the towel stays in place and is easy to remove for washing. Whether you like seasonal designs, fruit themes, floral styles, or textured stitches, there is something here for every kitchen.
A few quick notes before you begin:
Cotton yarn is usually the best choice for kitchen projects because it is absorbent, sturdy, and easy to wash. A smaller hook will help the towel holder keep its shape. For the button closure, choose a button that is large enough to hold securely, but not so large that it feels bulky. If you want the holder to last longer, reinforce the button area with extra stitches.
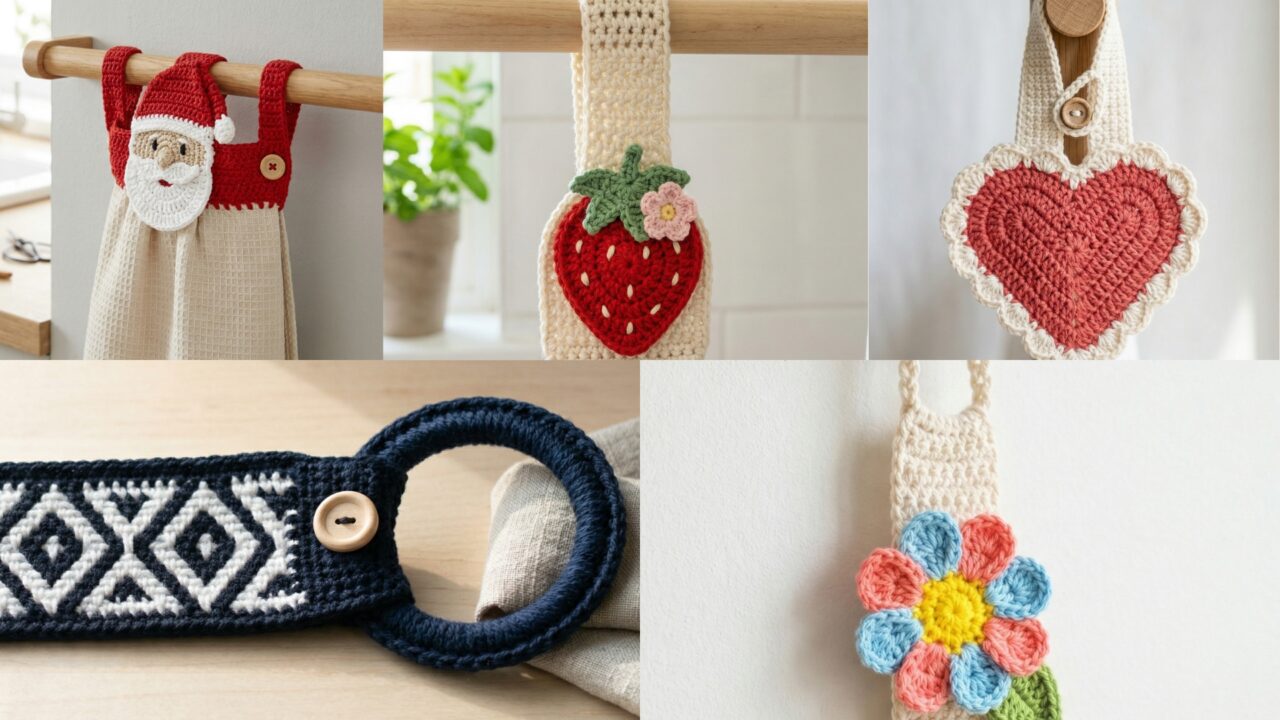
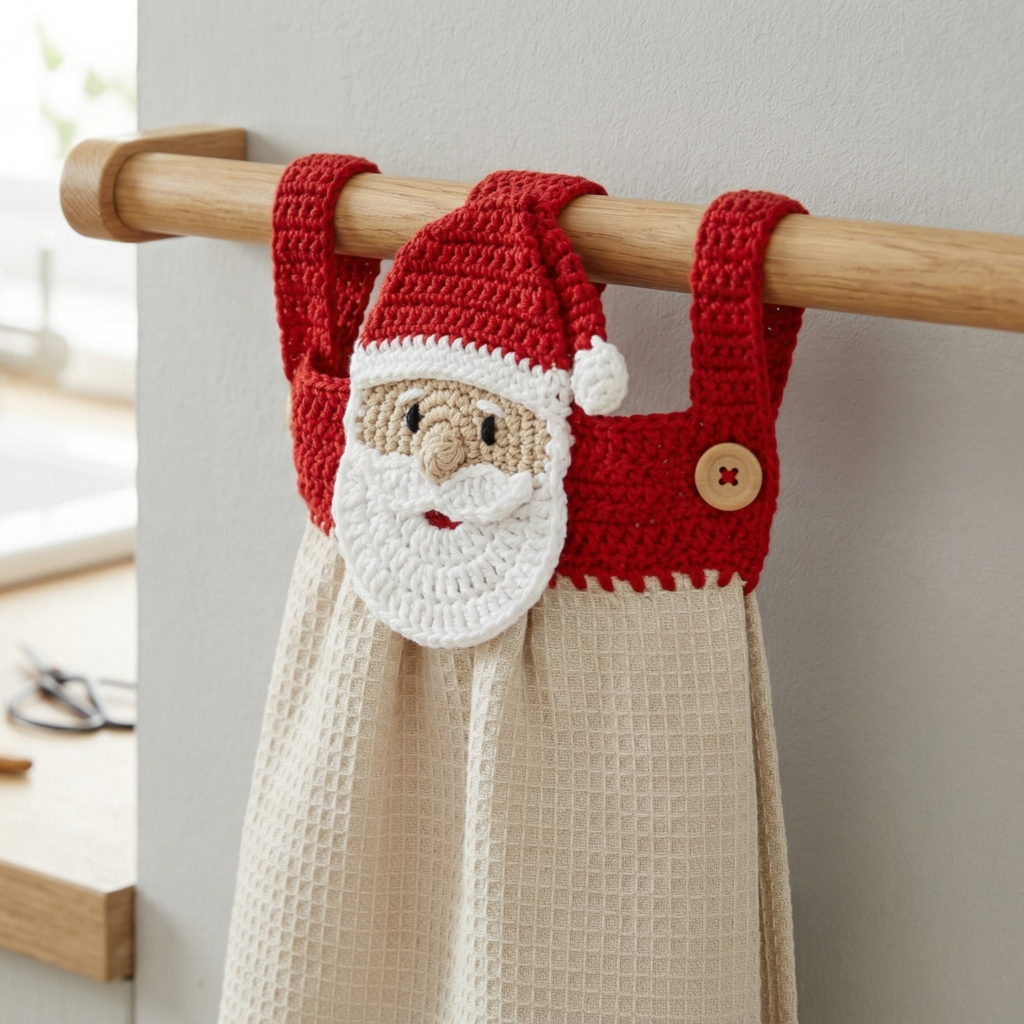
1. Crochet Santa Towel Holder Pattern
Skill level: Beginner to intermediate
Style: Festive, seasonal, and fun
Best for: Christmas kitchens, holiday gifts, seasonal décor
This Santa towel holder brings a cheerful holiday touch to the kitchen. It is a perfect December project and makes a sweet handmade gift for someone who loves festive décor. The design is usually made as a small topper that hangs over the towel bar and buttons in place.
Materials
- Red, white, black, and skin-tone or beige cotton yarn
- Crochet hook, usually 3.0 mm to 4.0 mm
- Tapestry needle
- Scissors
- Button
- Sewing needle or crochet hook for attachment
- Optional: small stuffing for the hat trim or beard
Step-by-step guide
Step 1: Make the holder band
- Chain the width you want for the towel holder band.
- Work several rows of single crochet to create a firm rectangle.
- This rectangle should be wide enough to fold around the towel handle or bar.
- Make sure the stitches are tight so the holder stays sturdy.
Step 2: Shape the Santa base
- Use beige or skin-tone yarn to crochet Santa’s face section.
- Work a small circle or oval for the face.
- Crochet a red hat shape above the face by increasing rows into a pointed triangle.
- Add a white brim at the bottom of the hat.
Step 3: Add Santa details
- Crochet a white beard using small chain spaces or shell stitches.
- Sew the beard under the face.
- Add a tiny black line or a small button-like detail for the eyes if desired.
- Keep the face simple and sweet.
Step 4: Attach the Santa topper to the band
- Place the Santa piece over the top of the band.
- Sew it securely so it stays flat against the holder.
- Make sure the holder band still bends easily around the towel bar.
Step 5: Add the button loop
- On one end of the band, create a chain loop for the button.
- On the other end, sew on a button.
- Test the closure to make sure it is snug but not too tight.
Step 6: Finish the piece
- Weave in all ends carefully.
- Check that the towel holder opens and closes easily.
- Smooth the Santa face and beard with your fingers.
Finishing tips
- A fluffy beard makes the Santa design extra charming.
- Use bright red for the hat and a clean white for the trim.
- Add a tiny crochet pom-pom on the tip of the hat for a classic holiday finish.
Style ideas
This towel holder works beautifully with other Christmas kitchen accessories like mitts, pot holders, or holiday towels.
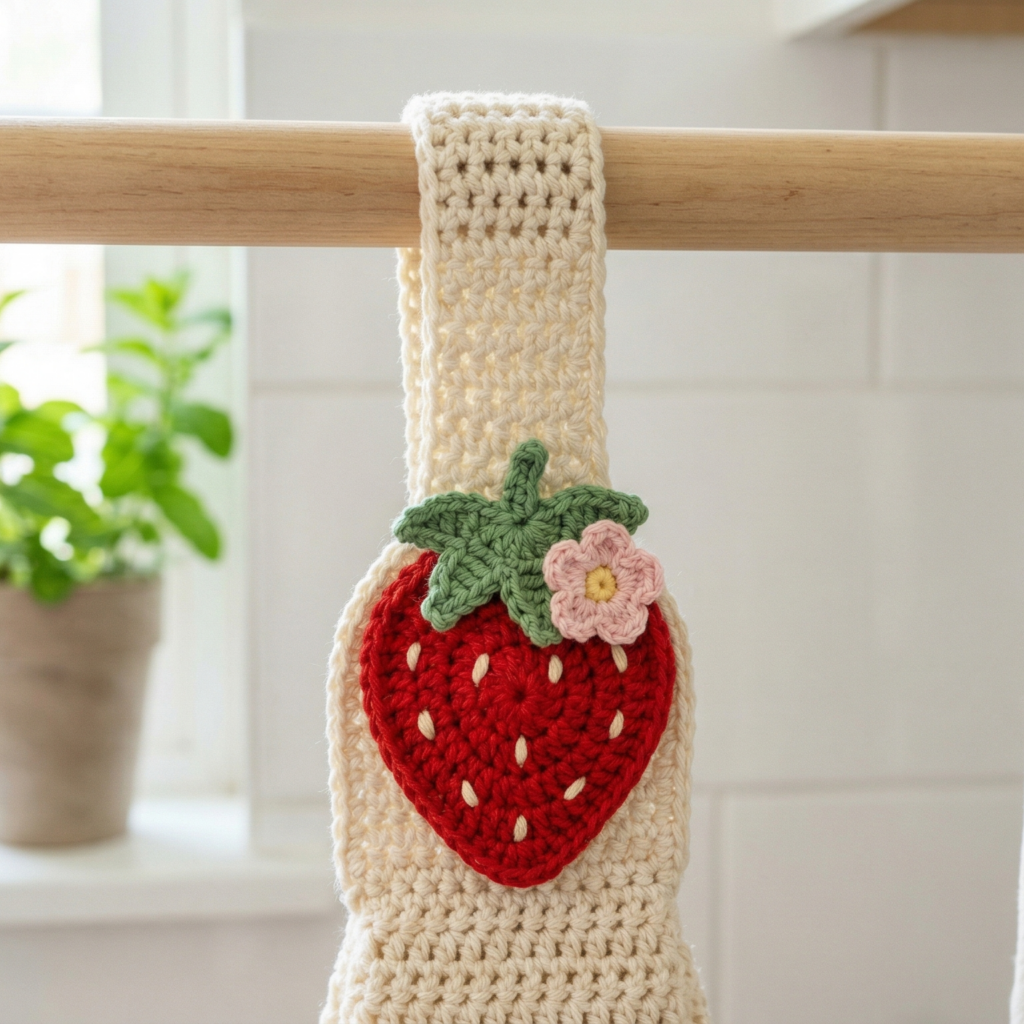
2. Crochet Strawberry Towel Holder Pattern
Skill level: Beginner
Style: Cute, fruity, and cottage-inspired
Best for: Spring and summer kitchens, farmhouse décor
A strawberry towel holder is sweet, playful, and perfect for adding color to the kitchen. It looks especially pretty in red, green, and cream, but you can also make it in pink for a softer fruit-inspired style.
Materials
- Red, green, and optional cream cotton yarn
- Crochet hook, usually 3.0 mm to 4.0 mm
- Tapestry needle
- Scissors
- Button
- Optional embroidery thread for seeds
Step-by-step guide
Step 1: Make the towel holder band
- Chain the width you want for the holder.
- Work rows of single crochet or half double crochet until the band is strong and firm.
- Keep the tension even so the band does not stretch too much.
Step 2: Crochet the strawberry body
- Start with a magic ring.
- Work a round of single crochet to begin the strawberry shape.
- Increase evenly in the next rounds to form the rounded top.
- Begin decreasing slightly toward the bottom to make the strawberry point.
Step 3: Add strawberry seeds
- Use cream or yellow yarn to embroider small seed marks on the strawberry.
- Space them evenly across the body.
- Keep the seed stitches tiny so the design stays neat.
Step 4: Make the leafy top
- Use green yarn to crochet a small leafy crown.
- Make several short leaf shapes with chain stitches and slip stitches.
- Sew the leaves to the top of the strawberry.
- Make sure they sit flat and look balanced.
Step 5: Attach the strawberry to the band
- Position the strawberry at the center of the band.
- Sew it down securely on all sides.
- Keep the stitching firm so it does not shift when the holder is used.
Step 6: Add the closure
- Make a chain loop on one end of the band.
- Sew a button on the other end.
- Test the fit around your towel bar or oven handle.
Finishing tips
- A bright red strawberry with green leaves looks classic and cheerful.
- A soft pink strawberry creates a more delicate look.
- Add tiny embroidered seeds for extra detail.
Style ideas
This towel holder looks lovely in a farmhouse kitchen, a cottage-style kitchen, or a spring gift basket.
3. Crochet Scalloped Edge Heart Towel Holder Pattern
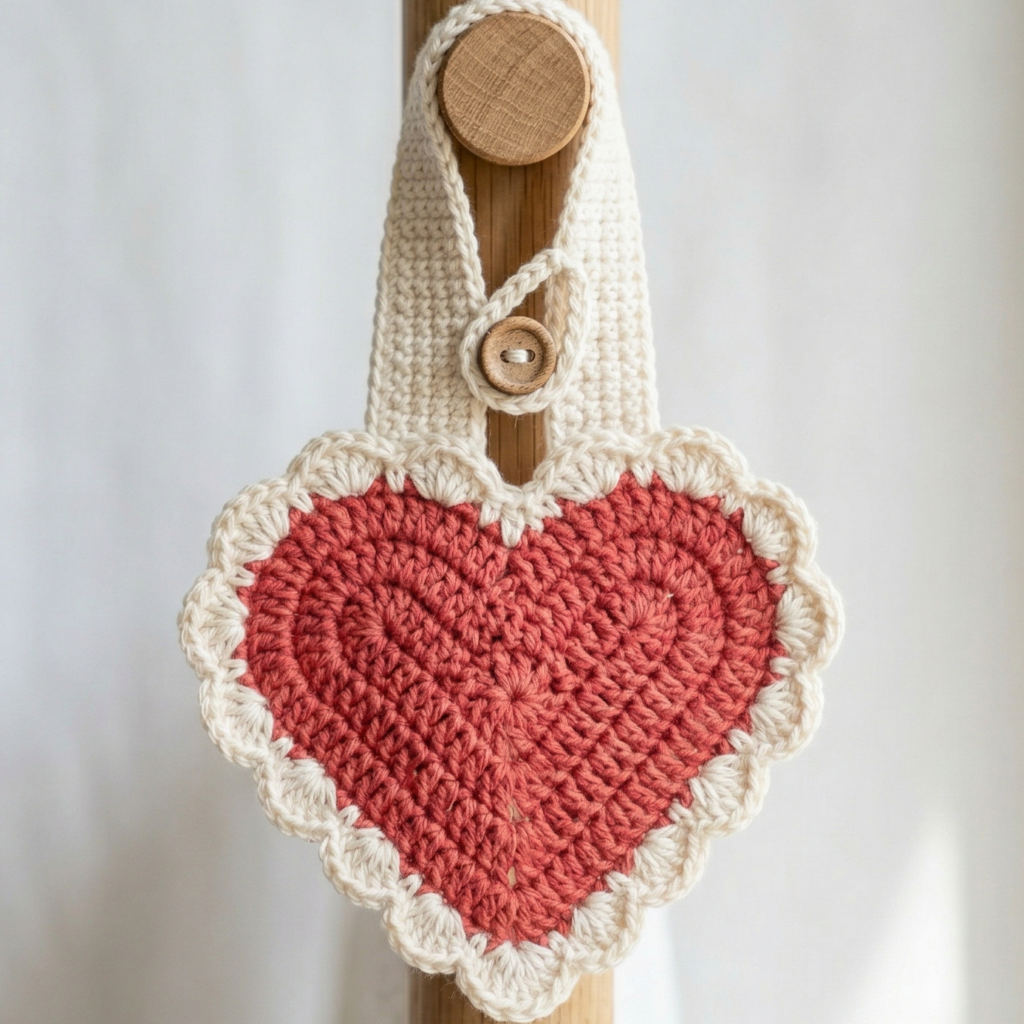
Skill level: Beginner to intermediate
Style: Romantic, soft, and decorative
Best for: Valentine décor, gifts, pretty everyday kitchens
This design features a heart motif with a scalloped edge, which gives it a sweet handmade feel. It is a lovely gift idea for someone who enjoys soft colors and charming kitchen décor.
Materials
- Cotton yarn in pink, red, cream, or any color combination you like
- Crochet hook, 3.0 mm to 4.0 mm
- Tapestry needle
- Scissors
- Button
- Optional: small lining piece for extra strength
Step-by-step guide
Step 1: Make the towel holder base
- Chain enough stitches to fit around the towel bar.
- Work rows of single crochet for a firm rectangular band.
- Keep the stitches tight and even.
Step 2: Crochet the heart
- Start with a magic ring or a chain ring.
- Work stitches to form the two heart lobes at the top.
- Shape the point at the bottom by working decreases or using a tapered stitch pattern.
- Make the heart slightly larger than the width of the band so it stands out.
Step 3: Add the scalloped edge
- On the outer edge of the heart, work scallop stitches.
- A scallop can be made by placing several double crochet stitches into one stitch or space.
- Continue evenly around the heart to create a soft decorative border.
Step 4: Attach the heart to the band
- Place the heart on the front center of the holder band.
- Sew it in place using matching yarn.
- Reinforce the center and edges so it stays secure.
Step 5: Add the button loop
- Create a chain loop at one end of the band.
- Sew a button on the opposite end.
- Make sure the loop fits comfortably around the button.
Step 6: Finish the piece
- Weave in all loose ends.
- Shape the heart gently with your hands.
- Check that the towel holder bends easily around the towel bar.
Finishing tips
- Soft pink and cream create a sweet, romantic look.
- Red and white make the heart stand out more boldly.
- Scallops look best when kept even and consistent.
Style ideas
This pattern is lovely for Valentine’s Day, anniversary gifts, or any kitchen that needs a soft decorative touch.
4. Crochet Flower Shaped Towel Holder Pattern
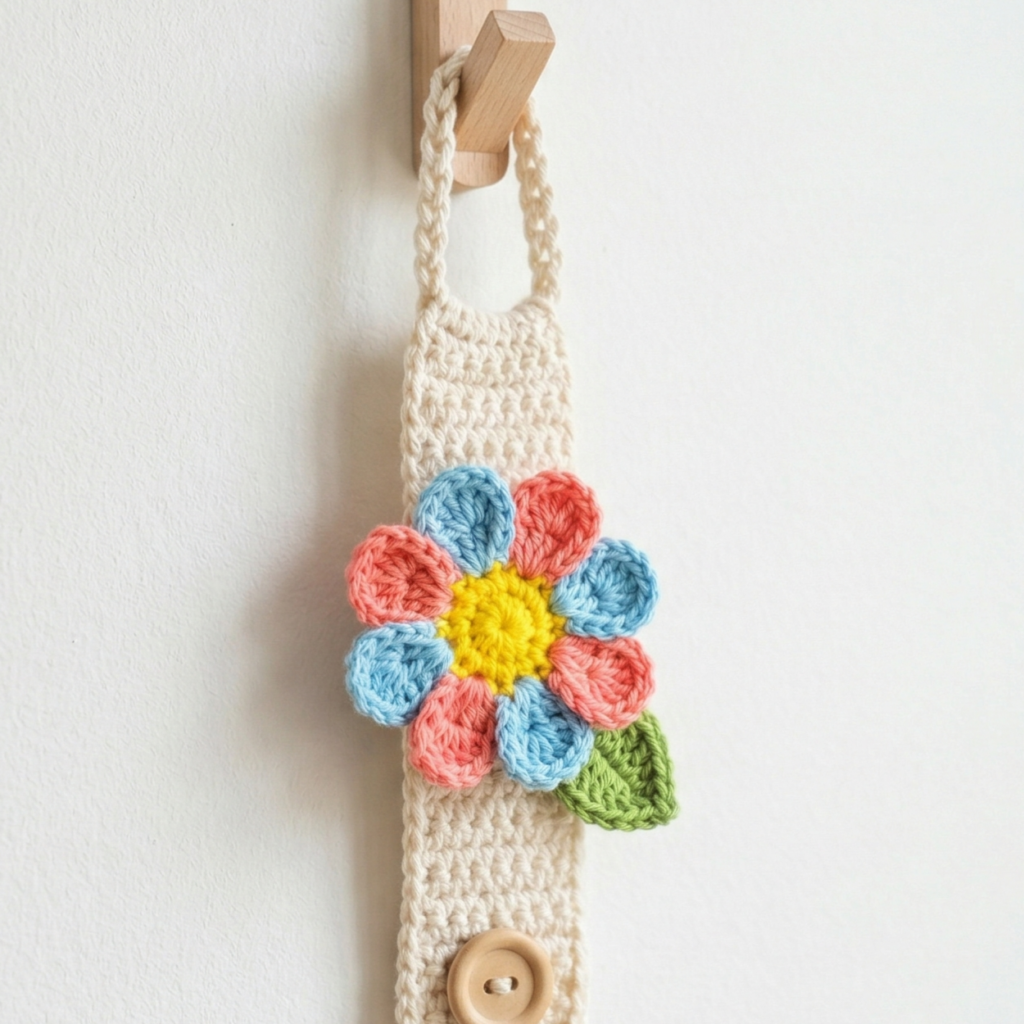
Skill level: Beginner to intermediate
Style: Fresh, cheerful, and colorful
Best for: Spring kitchens, floral décor, gift sets
A flower-shaped towel holder is one of the most cheerful kitchen projects you can make. It adds brightness to the room and can be customized with many color combinations, from daisy-style white petals to bold multi-color blooms.
Materials
- Cotton yarn in petal and center colors
- Crochet hook, 3.0 mm to 4.0 mm
- Tapestry needle
- Scissors
- Button
- Optional: small decorative leaf
Step-by-step guide
Step 1: Make the holder band
- Chain the width you want for the towel holder base.
- Crochet rows of single crochet or half double crochet until the band is the right length.
- Keep the band neat and firm.
Step 2: Crochet the flower center
- Start with a magic ring.
- Work several single crochet stitches into the ring.
- Pull the ring tight and join the round.
Step 3: Create the petals
- Make chain loops around the center.
- Work petal stitches into each loop, using double crochet or a combination of dc, hdc, and sc.
- Continue until the flower has a full round of petals.
Step 4: Add a second petal round if desired
- For a fuller flower, make a second round of petals behind the first.
- Use a slightly different color to create depth.
- Keep the petals even and balanced.
Step 5: Attach the flower to the band
- Place the flower in the middle of the band.
- Sew it securely to the front.
- Make sure the petals are not too stiff so they move naturally.
Step 6: Add the button closure
- Make a chain loop on one end.
- Sew a button on the other end.
- Test the closure on a towel bar or handle.
Finishing tips
- Use bright yellow for the flower center and soft colors for the petals.
- A two-tone flower looks especially pretty.
- Keep the holder band simple so the flower is the main feature.
Style ideas
This design is perfect for spring, Easter, Mother’s Day gifts, or colorful farmhouse kitchens.
5. Crochet Mosaic Stitch Towel Holder Pattern
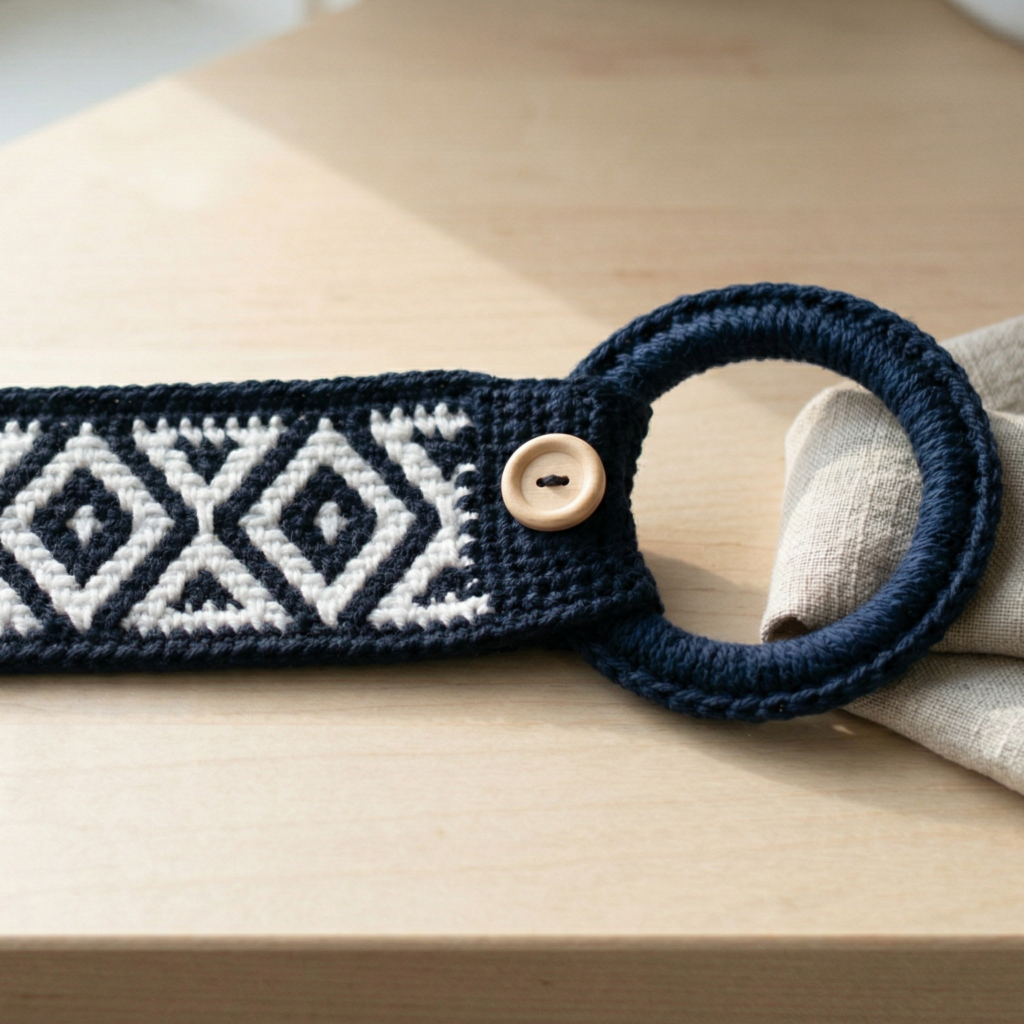
Skill level: Intermediate
Style: Textured, modern, and eye-catching
Best for: Everyday use, handmade gift sets, coordinating kitchen décor
A mosaic stitch towel holder has a polished, textured look that feels more modern than novelty-shaped designs. It is a great choice if you want something decorative but still clean and practical.
Materials
- Cotton yarn in two contrasting colors
- Crochet hook, 3.0 mm to 4.0 mm
- Tapestry needle
- Scissors
- Button
- Optional lining strip for extra strength
Step-by-step guide
Step 1: Make the foundation band
- Chain the width you want for the holder.
- Work several rows of single crochet or half double crochet in one color.
- Keep the band firm so it holds the mosaic texture well.
Step 2: Begin the mosaic pattern
- Switch to the second color for the first mosaic row.
- Follow a repeated pattern of stitches and skipped stitches to create the geometric design.
- Keep the pattern neat so the shapes stay crisp.
Step 3: Alternate colors
- Use the second color to build the mosaic sections.
- Return to the first color as needed for contrast.
- Repeat the colorwork rows until the band is tall enough.
Step 4: Make the holder shape
- Once the design is complete, make sure the band is the right length.
- Add one final round in a plain color if you want a cleaner edge.
- The band should be firm but flexible.
Step 5: Add the closure
- Create a button loop on one end.
- Sew a button on the other end.
- Reinforce the loop with extra stitches if needed.
Step 6: Finish
- Weave in all yarn tails carefully.
- Block lightly if the mosaic pattern needs to be more even.
- Test the towel holder around a kitchen handle.
Finishing tips
- High-contrast colors show off the mosaic pattern best.
- Black and white create a modern look, while navy and cream feel softer.
- Keep the back neat by weaving ends securely.
Style ideas
This pattern looks lovely in a matching set with dishcloths or pot holders in the same color palette.
Conclusion
Crochet towel holders are small projects that bring a lot of charm and usefulness to a kitchen. They are quick to make, easy to personalize, and ideal for gifts because they feel thoughtful and handmade. Whether you prefer a seasonal Santa design, a bright strawberry shape, a romantic heart, a cheerful flower, or a modern mosaic stitch pattern, each one adds personality to an everyday item.
The best part about these towel holders is that they do not require much yarn, yet they create something useful that can be enjoyed every day. Choosing cotton yarn, keeping your stitches firm, and adding a secure button closure will help your towel holder look neat and last longer. You can also coordinate them with dishcloths, pot holders, or matching kitchen accessories to make a complete handmade gift set.