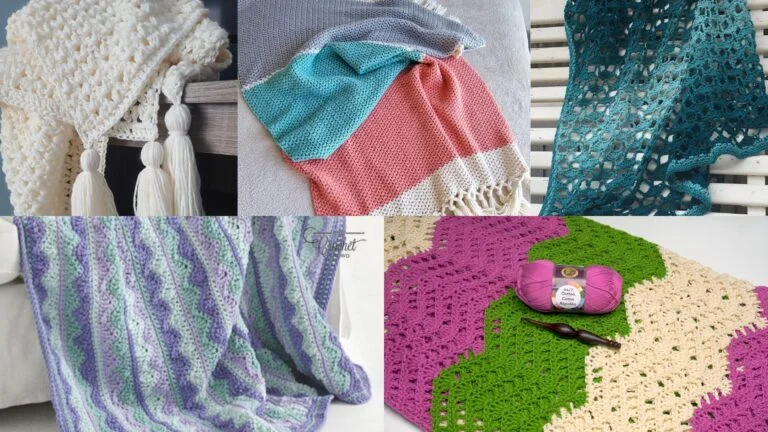
Crochet table mats are one of those small home décor projects that make a big difference. They add warmth to a table, create a handmade touch in any room, and make thoughtful gifts for housewarmings, birthdays, holidays, and special occasions. Because they are smaller than full table runners or blankets, they are also a great project for using leftover yarn while still creating something beautiful and useful.
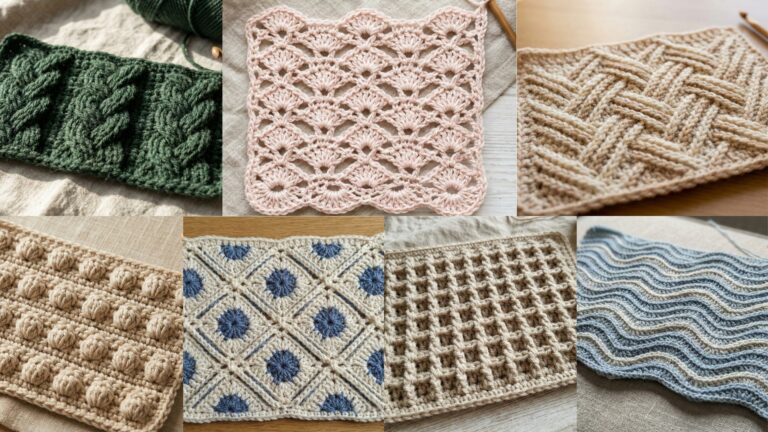
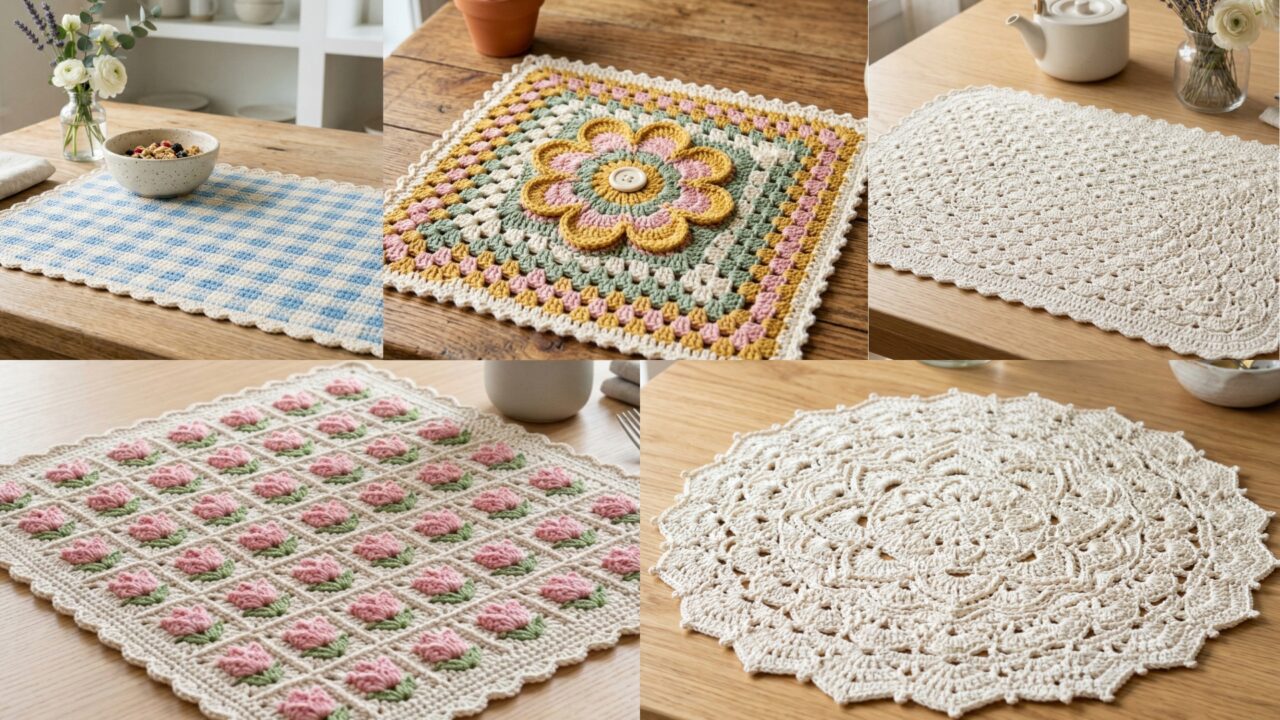
The five table mat patterns below each have a different style, so you can choose the one that best suits your taste or the person you are gifting it to. You will find a retro flower design, a tulip stitch mat, a simple round mat, a scalloped gingham mat, and an adjacent shells mat. Each pattern includes helpful materials, step-by-step instructions, and finishing tips so the finished piece looks polished and gift-ready.
A few quick notes before you start:
Cotton yarn is usually the best choice for table mats because it is sturdy, easy to wash, and holds its shape well. A slightly smaller hook than usual can help keep the stitches tight and neat. If you want the mat to lie flat on a table, take time to block it after finishing.
1. Crochet Retro Flower Table Mat Pattern
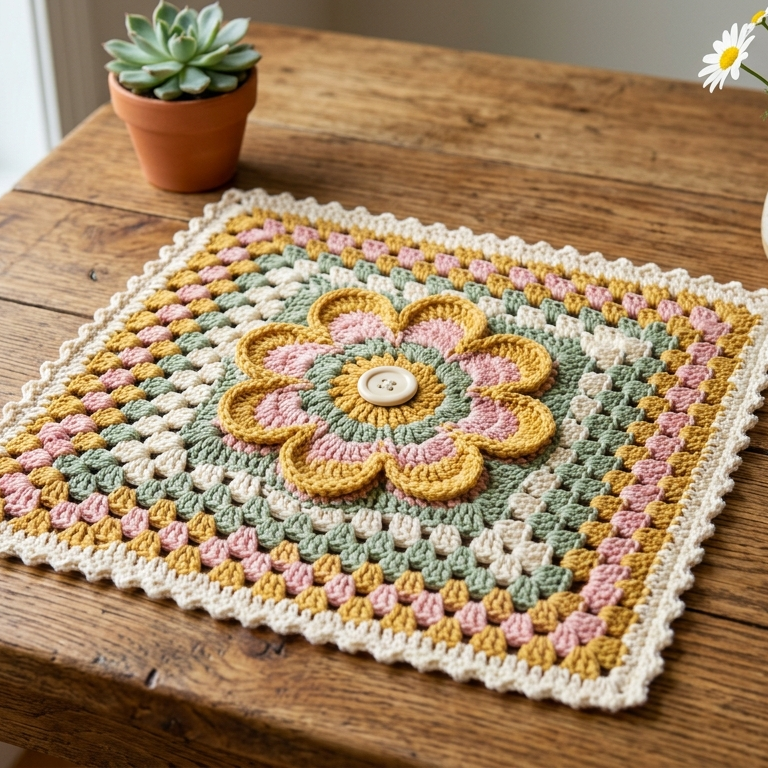
Skill level: Beginner to intermediate
Finished size: about 12 to 14 inches across
This retro flower mat has a playful, vintage-inspired look that makes it perfect for gifting. The flower shape gives the table mat a cheerful style, and it can be made in soft pastel colors or bold retro shades depending on the mood you want.
Materials
- Cotton yarn in 2 to 4 colors
- Crochet hook, usually 3.5 mm to 4.5 mm
- Tapestry needle
- Scissors
Step-by-step guide
Step 1: Make the center
- Start with a magic ring.
- Work several single crochet stitches into the ring to form the center circle.
- Pull the ring tight and join neatly.
- This center becomes the middle of the flower.
Step 2: Build the petals
- Work chain spaces around the center to create petal bases.
- In each chain space, work a group of double crochet stitches to form a petal.
- Continue around until all petals are complete.
- Keep the petals even so the flower shape stays balanced.
Step 3: Add another round
- If you want a fuller mat, add a second round behind the petals.
- Work additional stitches between petal spaces to expand the mat.
- This makes the mat larger and gives it more structure.
Step 4: Shape the mat
- Continue increasing around the outer edge.
- If the mat starts to ripple, reduce the number of increases.
- If it curls inward, add a few more increases evenly.
Step 5: Finish the edge
- Add a round of single crochet around the outside.
- If you want a more decorative finish, use shell stitches or picots.
- Fasten off and weave in the ends carefully.
Finishing tips
- Use contrasting colors for the center and petals to make the flower stand out.
- Soft pink, cream, mustard, and sage give the mat a lovely retro look.
- Blocking helps the petals lie flat and neat.
Style ideas
This mat looks beautiful under a vase, candle, or small plant. It makes a lovely gift for someone who likes vintage-style home décor.
2. Crochet Tulip Stitch Table Mat Pattern
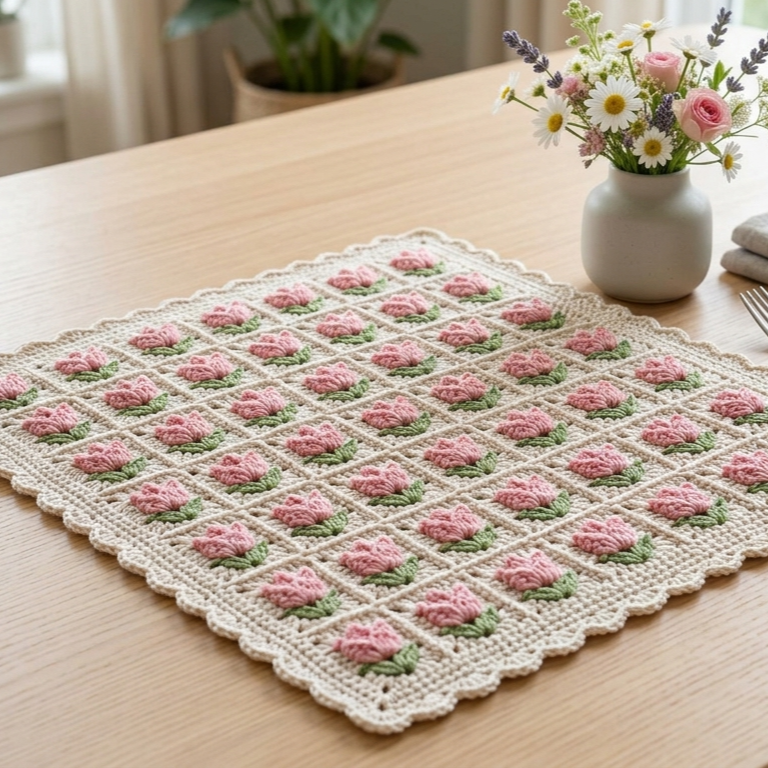
Skill level: Intermediate
Finished size: about 12 to 15 inches wide
Tulip stitch gives this mat a soft floral texture that feels elegant and handmade. It has a delicate, raised look that makes it a lovely table accent for spring or year-round use.
Materials
- Cotton yarn in one or two colors
- Crochet hook, 3.5 mm to 4.5 mm
- Tapestry needle
- Scissors
Step-by-step guide
Step 1: Make the foundation chain
- Chain the width you want for the mat.
- Make sure the chain is not too tight.
- Keep the count even or in a repeat that fits the tulip stitch pattern.
Step 2: Work the base row
- Crochet a row of single crochet or half double crochet across the foundation chain.
- This gives the mat a firm base.
- Turn your work.
Step 3: Create the tulip stitch texture
- Work the tulip stitch pattern across the row.
- Use grouped stitches and chain spaces to form the tulip-like texture.
- Keep the stitches even so the design stays neat and balanced.
- Repeat the same stitch sequence across the entire row.
Step 4: Repeat the rows
- Continue repeating the tulip stitch rows.
- You can alternate colors every few rows if you want a striped floral look.
- Keep the tension even so the mat stays flat.
Step 5: Add a border
- Work a simple border of single crochet around the outside.
- If you want a more decorative edge, use a scalloped border.
- Fasten off and weave in all loose ends.
Finishing tips
- Tulip stitch looks especially nice in soft floral colors.
- Use a solid color if you want the stitch texture to stand out more clearly.
- Block lightly after finishing to help the mat sit flat.
Style ideas
This mat works beautifully in a spring kitchen, on a side table, or beneath a small centerpiece.
3. Crochet Round Table Mat Pattern
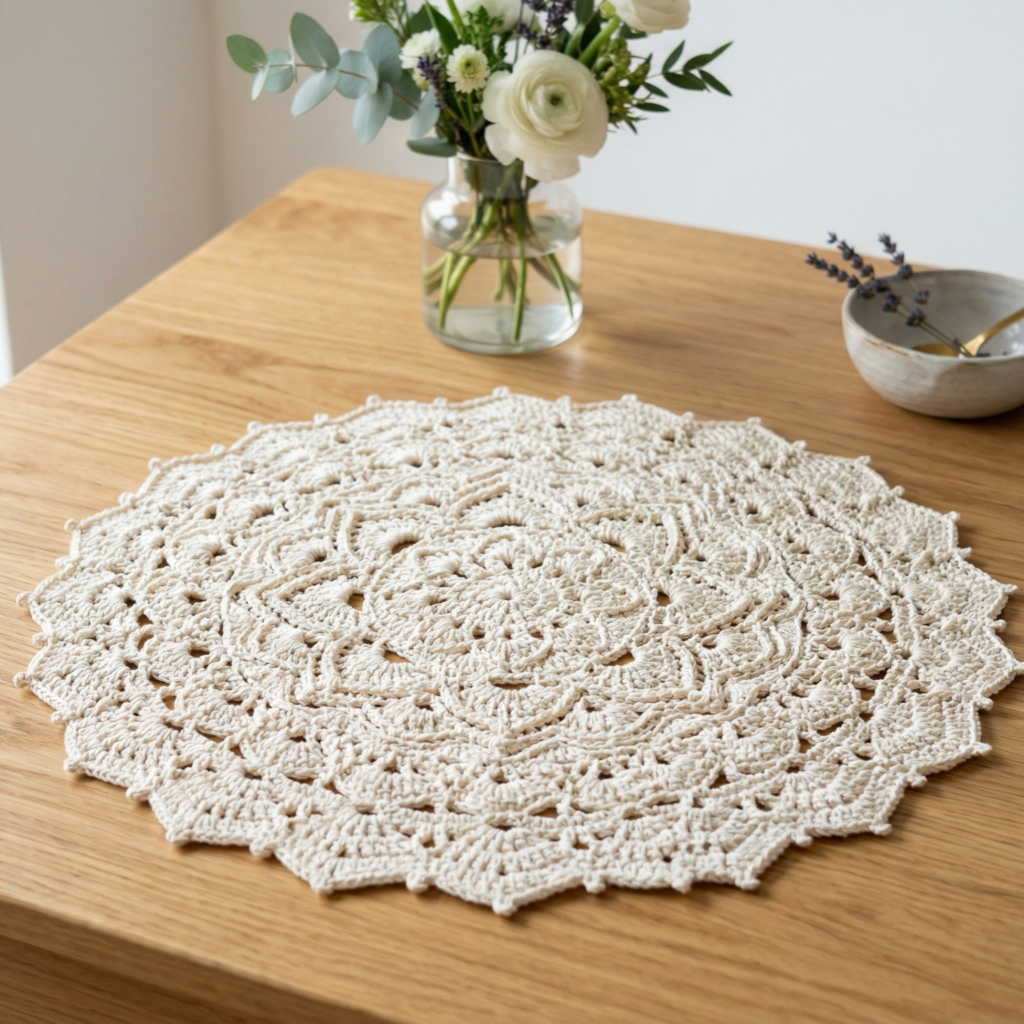
Skill level: Beginner
Finished size: about 12 to 16 inches in diameter
A round table mat is a classic crochet project that is easy to customize. It can be simple and minimal or dressed up with a border, making it a flexible gift idea for almost anyone.
Materials
- Cotton yarn
- Crochet hook, usually 3.5 mm to 4.5 mm
- Tapestry needle
- Scissors
Step-by-step guide
Step 1: Start in the center
- Begin with a magic ring.
- Work several single crochet stitches into the ring.
- Pull the ring tight and join neatly.
Step 2: Increase the circle
- In each round, increase stitches evenly around the circle.
- Add more stitches on each round so the circle expands flat.
- Check the shape as you go to make sure it stays even.
Step 3: Keep the mat flat
- If the circle starts to cup, add more increases.
- If it ripples, reduce the increases slightly.
- Keep your tension steady from round to round.
Step 4: Add texture if desired
- You can keep the mat plain for a simple look.
- Or add a round of shell stitches, puff stitches, or ridges for a more decorative style.
- Continue until the mat is the size you want.
Step 5: Finish the edge
- Add a neat round of single crochet around the outer edge.
- For a more decorative finish, use picots or a scalloped edge.
- Weave in the ends and block the mat.
Finishing tips
- Round mats are great for plates, vases, candle holders, or decorative bowls.
- Neutral shades make them look modern and elegant.
- Bright colors make them feel cheerful and handmade.
Style ideas
A round mat in cream or beige looks timeless, while a colorful version can brighten up a casual dining table.
4. Crochet Scalloped Edge Gingham Table Mat Pattern
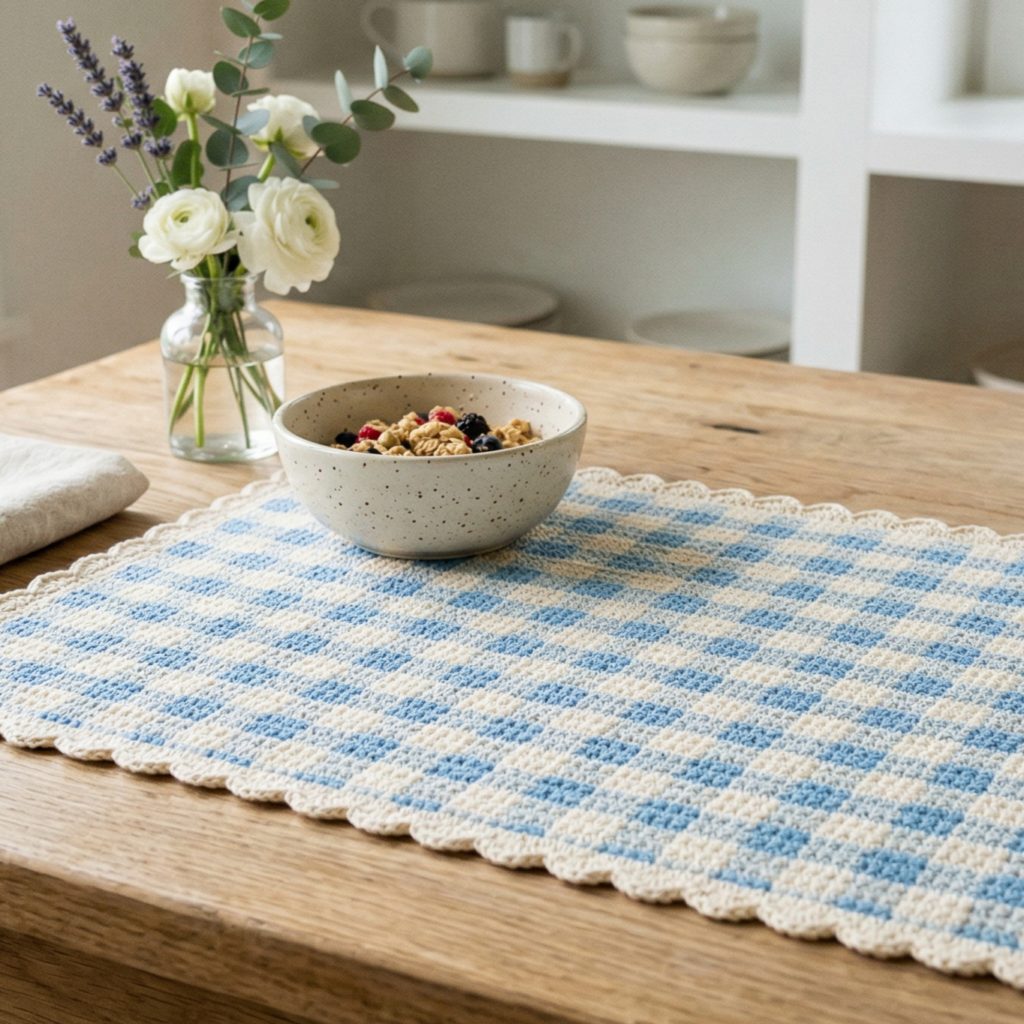
Skill level: Beginner to intermediate
Finished size: about 12 by 16 inches or any size you prefer
This gingham table mat has a cozy, farmhouse-inspired look. The scalloped edge adds charm, while the checkerboard style gives the mat a clean, classic pattern that works well in kitchens and dining rooms.
Materials
- Cotton yarn in 2 colors
- Crochet hook, 3.5 mm to 4.5 mm
- Tapestry needle
- Scissors
Step-by-step guide
Step 1: Choose your colors
- Pick two colors that work well together.
- Common combinations include cream and blue, white and red, or beige and sage.
- Decide how large you want the gingham checks to appear.
Step 2: Make the base rows
- Chain the width of the mat.
- Work a row of single crochet across.
- Alternate colors every few stitches or rows to begin the gingham effect.
- Keep the stripes or blocks even.
Step 3: Form the gingham pattern
- Continue alternating colors so the checkerboard design appears.
- Keep the color sections the same size for a neat look.
- Carry or fasten off yarn depending on your preferred finish.
Step 4: Shape the rectangle
- Continue working until the mat reaches the desired length.
- Make sure the edges stay straight and even.
- Adjust tension if the fabric starts to pull or flare.
Step 5: Add the scalloped edge
- Work a round of single crochet around the mat.
- On the next round, create scallops by placing several stitches into one stitch or space.
- Repeat evenly around the edge.
- Fasten off and weave in the ends.
Finishing tips
- Gingham looks best when the color changes are tidy.
- Scallops are prettiest when they are all the same size.
- Block the mat after finishing to sharpen the corners and edges.
Style ideas
This design is lovely for a farmhouse dining table, picnic setting, or spring gift basket.
5. Crochet Adjacent Shells Table Mat Pattern
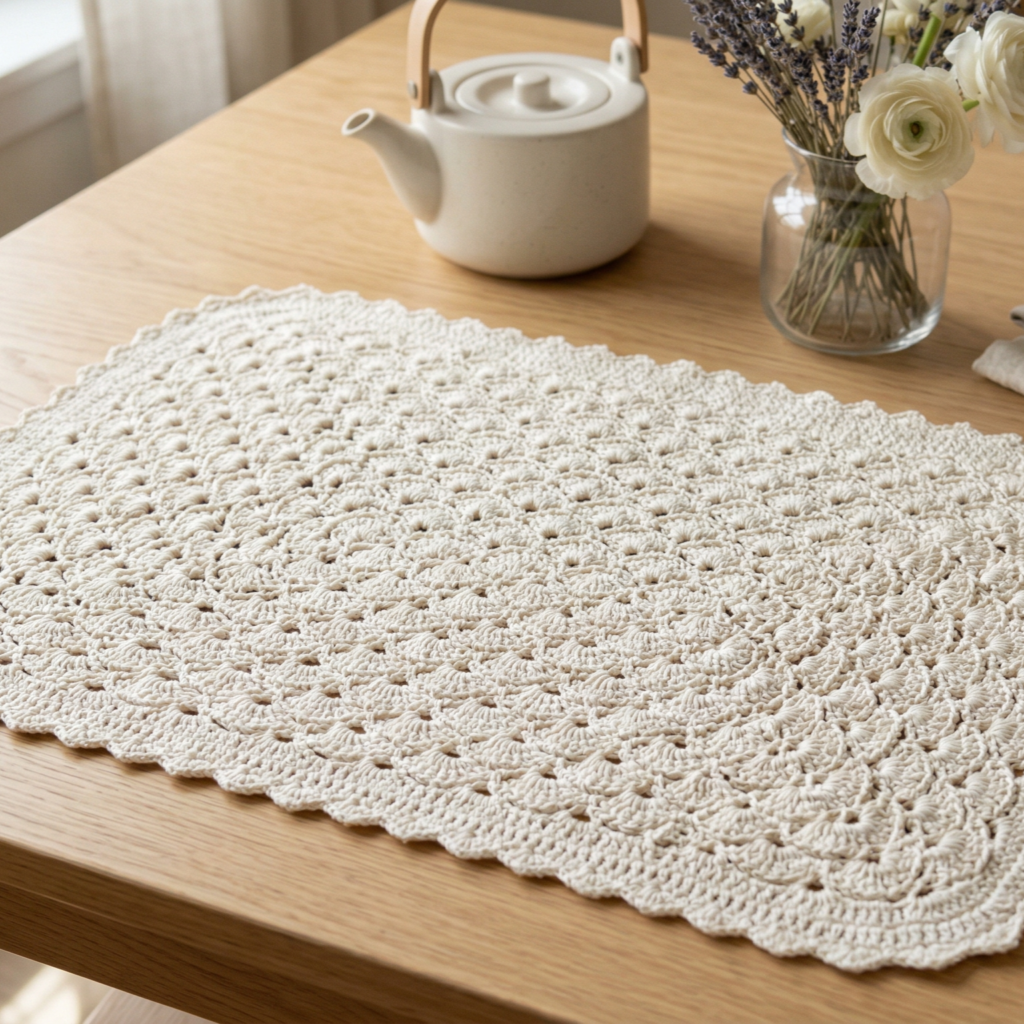
Skill level: Intermediate
Finished size: about 12 to 15 inches wide
Adjacent shells create a textured, elegant surface that feels graceful and a little vintage. The repeating shell pattern is easy to follow once you get into the rhythm, and the finished mat looks especially pretty on a table.
Materials
- Cotton yarn in one color or two complementary colors
- Crochet hook, 3.5 mm to 4.5 mm
- Tapestry needle
- Scissors
Step-by-step guide
Step 1: Make the base chain
- Chain a multiple that fits the shell pattern.
- Make the chain long enough for the desired width of the mat.
- Turn your work.
Step 2: Work the first row
- Crochet a row of single crochet or double crochet across the foundation chain.
- This creates a strong base for the shell stitch.
- Turn at the end of the row.
Step 3: Begin the shell rows
- Work several double crochet stitches into one stitch or space to form a shell.
- Skip a few stitches and place the next shell beside it.
- Continue across the row so the shells sit next to each other.
- On the next row, anchor the shells so they stack neatly.
Step 4: Repeat the shell pattern
- Keep repeating the adjacent shell rows.
- Add more rows until the mat is the right size.
- If needed, change colors every few rows for a more decorative finish.
Step 5: Add the border
- Finish with a round of single crochet along the outside.
- Add a scalloped or picot border if you want a more decorative edge.
- Fasten off and weave in all ends carefully.
Finishing tips
- Shell stitches look especially elegant in a single soft shade.
- A pale blue, ivory, or dusty rose version makes a lovely gift.
- Blocking is important because it opens the shell pattern nicely.
Style ideas
This mat looks beautiful under a centerpiece, a teapot, or a decorative lamp.
Conclusion
Crochet table mats are small projects that bring a lot of charm to a home. They are practical, beautiful, and easy to personalize, which makes them wonderful gift ideas for housewarmings, holidays, or special occasions. Whether you prefer the cheerful look of a retro flower mat, the elegance of tulip stitch, the classic shape of a round mat, the cozy style of gingham, or the texture of adjacent shells, there is a pattern here for every taste.
The best part is that table mats are easy to customize. You can change the colors, adjust the size, choose a textured stitch, or make a matching set for a complete table arrangement. Cotton yarn and careful blocking help give each mat a clean finish, so the final piece feels polished and gift-ready.