


A small crochet pouch is one of the most useful and rewarding quick projects: it’s portable, uses little yarn, makes a lovely gift, and gives you a chance to practice stitches or colorwork without committing to a large blanket. In this post you’ll find five pouch patterns — from classic granny squares to textured star stitch, an origami-inspired Kammer pouch, geometric Desert Diamonds, and a sweet Strawberry Motif pouch. Each pattern includes materials, gauge and finished size, step-by-step instructions, finishing and assembly tips (zippers, linings, closures), and creative variations.
Before you begin: choose a yarn and closure suited to the pouch’s purpose. Cotton or cotton blends give structure and washability for everyday pouches; acrylic or wool blends make squishier, cozier cases for cosmetics or earbuds. If you want a more rigid pouch, line it with lightweight interfacing or fabric.
Quick reference — tools & abbreviations
Common tools
- Yarn: see each pattern for recommendations (DK / worsted / cotton suggestions).
- Hook sizes: vary by pattern (3.0–5.0 mm typical).
- Notions: tapestry needle, sewing needle (for lining/zipper), scissors, zipper or button, small piece of interfacing (optional), fabric for lining (optional), clips/pins.
Abbreviations (US)
- ch = chain
- sl st = slip stitch
- sc = single crochet
- hdc = half double crochet
- dc = double crochet
- tr = treble (UK = treble vs US) — I’ll use US terms throughout
- BLO / FLO = back / front loop only
- inc = increase (2 sc in same st)
- dec = decrease (sc2tog)
- RS / WS = right side / wrong side
- st(s) = stitch(es)
Gauge & sizing note
- Pouches are forgiving. If exact dimensions matter (to fit a phone, glasses, etc.), make a small swatch and measure stitches per inch before starting. I’ll give finished sizes for standard small pouch (approx 4–6 in wide) and explain how to scale up.
1. Crochet Granny Square Pouch Pattern
Overview & style
A granny-square pouch is a classic, colorful option — perfect for scraps, gifts, and a boho look. You’ll make two granny panels (or one large square folded), join, add a lining or zipper, and finish with a button flap or drawstring.
Skill level: Beginner–Confident Beginner
Finished size: each granny square ≈ 4–5 in; assembled pouch ≈ 4.5–5.5 in wide × 4.5 in tall (adjust by changing rounds).
Materials
- Worsted weight cotton or cotton blend, small amounts of 2–4 colors (approx 50 g total)
- 4.0 mm (G) crochet hook
- Tapestry needle, scissors
- Zipper (5–6 in) or button + loop; optional fabric for lining and sewing thread
Construction concept
Make two identical granny squares and join three sides (or join squares side-by-side into a rectangle and fold). Add a zipper at the top or crochet a flap + button closure.
Granny square (one panel) — step-by-step
Make 2 panels.
- Round 1 — center: Magic ring; CH 3 (counts as first DC), work 2 DC into ring, CH 2, 3 DC — repeat * to have 4 clusters. SL ST to top of CH 3. (4 clusters, 4 CH-2 corner spaces)
- Round 2 — expand: Change color (optional). Into each CH-2 space: (3 DC, CH 2, 3 DC); between corner clusters, CH 1 if you want a more open square — follow your preferred granny style. SL ST to join.
- Round 3 & 4 — enlarge: Repeat Round 2 until square measures ~4–5 in. Each round makes the square larger; stop when you reach desired size. Fasten off and weave ends.
- Optional single-color border: With a neutral color, work 1–2 rounds of SC or HDC to give a tidy edge and make joining easier.
Assembly
- Option A (sewn zipper): Place RS of two squares facing inwards (if you want exterior RS inside) or RS out if using lining. Sew three sides with whipstitch. Top opening: hand sew a zipper into the top edge—tip: sew the zipper to the outside of the pouch before adding lining, then stitch lining to zipper inside for a tidy finish.
- Option B (button flap): Make a small rectangular flap: attach yarn at top center, CH 10, SC back across to base to make flap; fasten off. Sew flap to top center and make a small loop on front to fasten over a button sewn to lower front.
Lining (optional but recommended)
- Cut fabric slightly smaller than pouch interior and hem raw edges. Insert lining and hand stitch into the top seam or zipper tape for a clean interior. Interfacing on lining adds structure.
Variations & styling
- Make a larger square and fold into a triangular bandana-style pouch.
- Use textured yarn for a cozy look.
- Add a tassel or leather pull tab to the zipper.
Tips & troubleshooting
- If the squares don’t match size, adjust the number of rounds or use slightly larger/smaller hook for the smaller/larger piece.
- To avoid gaps, use tighter tension or a smaller hook when stitching with cotton.
2. Crochet Star Stitch Pouch Pattern
Overview & style
The star (marguerite) stitch forms a dense, textured fabric that looks fancy but is surprisingly simple. A star-stitch pouch is soft, slightly dense (great for sunglasses or cosmetics), and has an irresistible nibble of dimension.
Skill level: Confident Beginner–Intermediate
Finished size: approx 5.5 in wide × 4 in tall (for worsted yarn; scale by stitch counts)
Materials
- Worsted weight yarn (soft cotton/acrylic) — 60–80 g
- 4.5 mm (US 7) crochet hook (adjust to get dense fabric)
- Tapestry needle, scissors, zipper or button
Stitch notes — star stitch basics
A star stitch is built from paired base stitches and a cluster forming a “star”. One common method:
- Step to make a star: Insert hook into next stitch, yarn over and pull up a loop; insert into next st and pull up a loop — repeat across 6 loops (3 pairs). Yarn over and pull through 6 loops, CH 1 to close star. Anchor with slip stitch or SC between stars as required by your chosen variant. Star stitch instructions vary slightly; use the technique you prefer and keep it consistent.
Construction — flat panel pouch (worked flat)
- Foundation: Chain 28 (or any even number plus 2 for symmetry). This width makes a small pouch — to make larger, add multiples of 2–4 depending on the star pattern repeat.
- Row 1: Work a row of SC to create a base foundation: SC across; turn.
- Row 2: Begin star stitch: make a star over next 2 stitches, SL ST into next st to anchor — follow star stitch method that produces even stars across the row. Work to end; turn.
- Repeat: Continue star rows until panel height ≈ 4 in (or desired pouch height).
- Edging row: Finish with one row of SC across to stabilize.
- If you like a firmer opening: Add 2–3 rounds of HDC or SC in BLO to make a foldable brim.
Assembly & closure
- Fold panel in half (short edges meet). Join sides with whipstitch. Insert zipper at top or use button and loop. For boho style, add a small leather tab or tassel on the zipper.
Lining & reinforcement
- Because star stitch is textured and has nooks, line the pouch with soft cotton for smooth interior. Sew lining to zipper or slip it in and tack it down.
Variations & ideas
- Make a drawstring version: add a round of chain loops near the top as eyelets, thread a cord.
- Make a matching star-stitch coin purse (smaller).
3. Crochet Kammer Pouch Pattern (origami-inspired)
Overview & origin note
The Kammer pouch is an origami-inspired crochet pouch that often has a folded, structured look and can appear knit at first glance. It was popularized by designers who blend folded/origami shaping with crochet techniques to create a clean, geometric pouch. (Pattern inspiration and original Kammer pouch examples online: Hilaria Fina’s “Kammer Crochet Pouch”.) Hilaria Fina
Skill level: Intermediate (attention to shaping & edge finishing)
Finished size: approx 5 in wide × 4 in tall (after folding and seaming), but shape depends on your folding plan.
Materials
- Worsted or aran weight yarn for structure (cotton works very well) — 80–120 g
- Hook 4.0–5.0 mm depending on yarn and desired drape
- Tapestry needle, blocking tools, optional interfacing, zipper or magnetic snap
Design concept
Work a flat panel with strategic increases/decreases and a folding line (creases created by stitch choice or blocked fold). After finishing the rectangle, fold along marked lines to form pockets, tuck corners origami-style, and seam discrete edges to form a pouch with a tidy origami flap.
Construction — folding rectangle method (example)
- Plan your fold: Decide final pouch dimensions (W × H) and the flap depth. For a 5 × 4 in pouch with a 1.25 in flap, knit a rectangle of 11 × 6.5 in (allow seam & fold allowances). Because crochet stretches, swatch to find stitch/inch and calculate required stitch counts.
- Foundation: CH to desired width (example: CH 44 for medium). Work in rows of HDC or DC to create a dense fabric that folds cleanly. HDC in BLO can create a pleasing crease line.
- Row pattern: Work even rows until rectangle height reached. Optionally create a fold-line row by switching to a tighter stitch (SC in BLO for 2–3 rows) where you want to fold.
- Shaping for pocket: On the rectangle’s lower portion, you can create a small gusset by increasing 1–2 sts at each end for a subtle boxy bottom when folded.
- Fold & seam: Lay rectangle RS down; fold up lower edge to form body and fold down upper portion to form flap. Tuck corners like origami: fold the side corners inward and stitch small triangles to secure shape (this creates a boxed base). Seam side edges with slip stitch or whipstitch through both layers so the inner seams are hidden.
- Finishing: Add a magnetic snap under the flap or sew on a small toggle clasp. For a refined finish, add a fabric lining with interfacing to maintain crisp folds.
Tips for crisp origami folds
- Use a tighter tension or a slightly smaller hook so the fabric holds shape.
- Block the rectangle along the folder lines: dampen, fold along intended crease, and press with pins until dry.
- Add a lining with lightweight interfacing to give permanence to origami folds.
Variations
- Experiment with colorblocks: horizontal stripes that form a pattern when folded.
- Make a small wristlet with a sewn loop or add a detachable strap.
4. Crochet Desert Diamonds Pouch Pattern
Overview & style
Desert Diamonds uses mosaic or tapestry crochet to create geometric diamond motifs with a southwestern palette. It’s graphic and modern — great for sunglasses pouches or small clutches.
Skill level: Intermediate (colorwork, carrying yarn or tapestry technique)
Finished size: approx 6 in wide × 4 in tall (one panel folded) — scale with stitch counts
Materials
- DK or worsted weight yarn in 3–4 colors (base + 2–3 accent colors) — 80–120 g total
- 4.0 mm (G) hook (or as required by yarn)
- Tapestry needle, zipper or flap closure, lining fabric optional
Technique options
- Mosaic crochet (slip-stitch colorwork) produces crisp geometric shapes while only working with one color per row (good for clean diamonds).
- Tapestry crochet (carrying floats across) can create continuous colorwork rows.
Construction — mosaic stitch example (one-panel pouch)
- Graph plan: Draw a simple diamond repeat: each diamond = 8 sts wide × 6 rows tall (example). Decide how many repeats across and tall to make your panel width & height.
- Foundation: CH number of stitches equal to graph width (e.g., 64). Work Row 1 in base color: DC across.
- Mosaic rows: Mosaic technique typically uses DC rows in MC and rows of SL ST in CC where you slip stitches to create negative space. Follow a simple mosaic graph: on CC rows, slip ST where design needs background and DC where a motif appears — there are many mosaic tutorials (make practice swatch).
- Repeat diamond motif rows until panel height achieved.
- Finish panel with SC rounds for a neat edge.
Assembly
- Fold and seam sides; insert zipper. Because colorwork can be a bit thicker, you may need to use a heavier gauge zipper or sew fabric lining first and then attach zipper to lining rather than to the knit fabric.
Lining & durability
- Lining is highly recommended for colorwork pouches to protect floats and give clean interior. If using tapestry crochet, weave floats carefully and knot at color changes to avoid long floats.
Variations & palette ideas
- Desert palette: terracotta, sand, cactus green, cream.
- Make a matching eyeglass case by increasing height and adding soft fleece lining.
5. Crochet Strawberry Motif Pouch Pattern
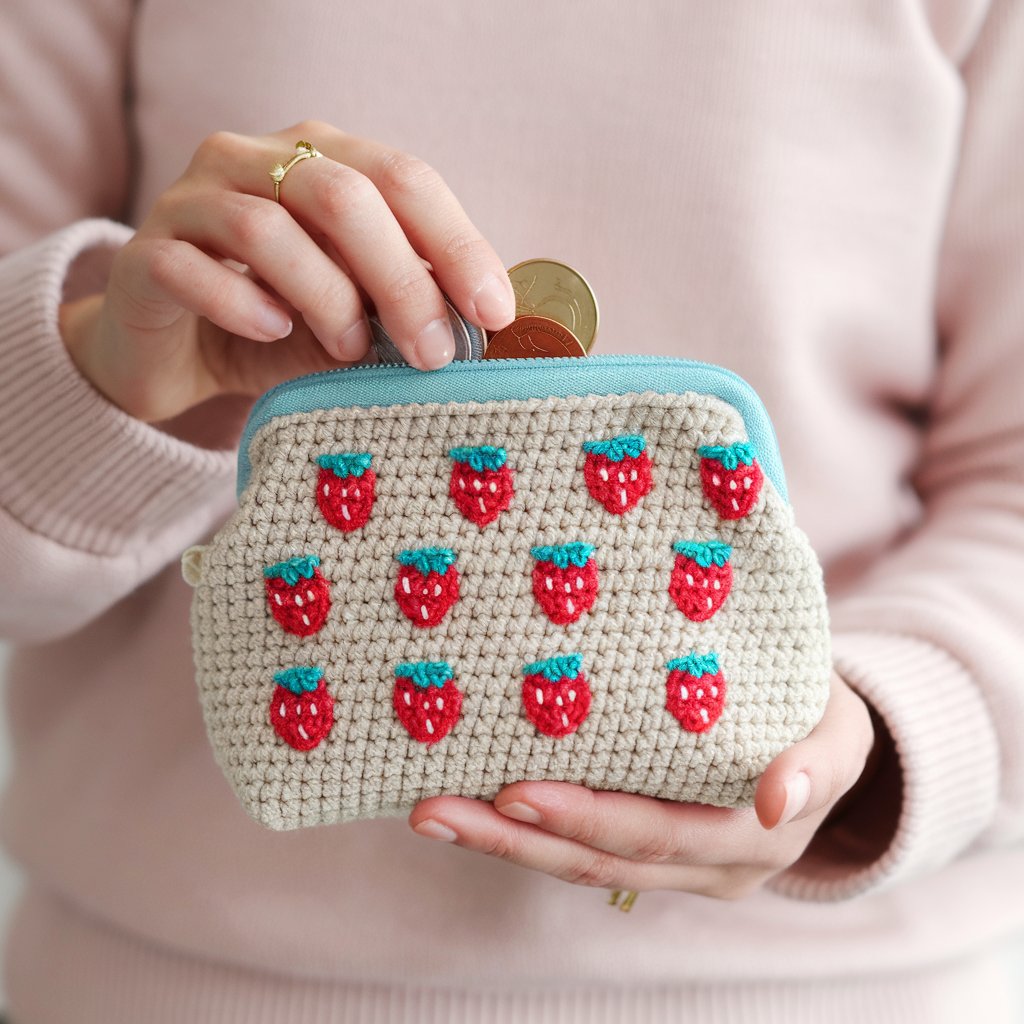
Overview & style
A playful pouch decorated with little strawberry appliqués — perfect for spring markets, kids, or as a cute coin purse.
Skill level: Beginner–Confident Beginner
Finished size: approx 4.5 in wide × 4 in tall (coin pouch) — scale by number of motifs
Materials
- DK cotton yarn: red for berries, green for leaves, cream/off-white for seeds, neutral for body (approx 70–100 g total)
- 3.5–4.0 mm hook
- Tapestry needle, small zipper (4–6 in) or snap closure, optional lining
Strawberry motif (make 6–9)
- Berry base: Magic ring, R1: 6 sc into ring (6). R2: inc in each st — 12. R3: sc, inc around — 18. Fasten off leaving tail for sewing. Shape is a rounded teardrop.
- Green leaf crown: With green, join at top of berry and CH 3; in next stitch work SC, HDC, DC, HDC, SC to make a small leaf; repeat 3–4 times around the top to create crown. Fasten off and leave long tail for stitching.
- Seeds (optional): With cream, embroider small French knots evenly spaced on berry front.
Pouch body — simple envelope pouch
- Foundation: Chain 30 (or desired width to fit a small coin purse). Work SC across for a dense fabric. Continue in rows until panel height ≈ 8 in (for folding into 4 in tall pouch).
- Edging & flap: Add extra rounds of HDC at one short end for a neat flap; or create a rounded flap by decreasing rows.
Assembly & closure
- Fold panel so flap overlaps front by 1 in. Sew side seams using whipstitch. Attach zipper along top edge if you prefer zip closure; for flap closure sew a small snap or button and loop.
- Sew strawberries decoratively onto front panel: cluster 3 small berries at one corner, or scatter six berries across the front. Sew firmly with long tails woven inside.
Lining & finishing
- Line with cotton fabric and topstitch around zipper for durability. For a softer interior, use fleece.
Variations & gifting ideas
- Make a set of 3 pouches in different sizes (coin, pouch for earbuds, small cosmetics).
- Turn into a drawstring treat bag by making round base and adding chain-stitched drawstring.
Final finishing tips (applies to all pouches)
- Zipper vs flap vs drawstring
- Zipper is most secure for coins & tech.
- Flap + snap/button gives a vintage vibe.
- Drawstring is quick and comfy for soft items.
- Lining
- Always line pouches intended for small items or heavy use. Cut lining ¼ in smaller than interior so it fits easily. Baste lining to zipper tape, then sew the zipper into the pouch opening for a tidy finish.
- Stabilizing
- For structural pouches, sew a strip of fusible interfacing to the lining before sewing it in, or crochet in a tighter gauge and use cotton yarn.
- Closure reinforcement
- Reinforce button snaps or loops with extra stitching and a small felt patch on the inside to distribute stress. For zippers, secure ends with a few hand stitches to prevent the zipper from parting.
- Care
- Cotton pouches: machine washable on gentle, reshape while damp. Acrylic blends: check label. Remove metal hardware or zip & bag before washing.
Conclusion
Pouches are fast, fun, and utterly useful: each of these five patterns gives you a different technique and aesthetic to try. The granny square pouch is a colorful classic; the star stitch pouch gives a luxe textured fabric; the Kammer pouch shows origami-inspired folding for a sculptural look; Desert Diamonds explores geometric colorwork; and the Strawberry pouch is cute and gift-friendly. All scale easily — make mini coin purses, medium organizers, or slightly larger cosmetic pouches by changing stitch counts and starting chain length.


Your point of view caught my eye and was very interesting. Thanks. I have a question for you. https://accounts.binance.info/cs/register-person?ref=OMM3XK51
Thank you for your sharing. I am worried that I lack creative ideas. It is your article that makes me full of hope. Thank you. But, I have a question, can you help me? https://www.binance.com/register?ref=IHJUI7TF
Giao diện đẹp và dễ sử dụng là một trong những ưu điểm nổi bật của nhà cái 188v. Với màu trắng và xanh biển tươi mát làm màu chủ đạo, làm cho giao diện của trang web rất dễ chịu và không nhàm chán.
Can you be more specific about the content of your article? After reading it, I still have some doubts. Hope you can help me.
Can you be more specific about the content of your article? After reading it, I still have some doubts. Hope you can help me. https://accounts.binance.info/lv/register?ref=SMUBFN5I
Your point of view caught my eye and was very interesting. Thanks. I have a question for you.
I don’t think the title of your article matches the content lol. Just kidding, mainly because I had some doubts after reading the article.
Your article helped me a lot, is there any more related content? Thanks!
Thank you for your sharing. I am worried that I lack creative ideas. It is your article that makes me full of hope. Thank you. But, I have a question, can you help me?
Your article helped me a lot, is there any more related content? Thanks!
Can you be more specific about the content of your article? After reading it, I still have some doubts. Hope you can help me. https://www.binance.info/ka-GE/register?ref=ILE8IH9H
Can you be more specific about the content of your article? After reading it, I still have some doubts. Hope you can help me.
Your article helped me a lot, is there any more related content? Thanks! https://accounts.binance.info/ar-BH/register?ref=S5H7X3LP
Your article helped me a lot, is there any more related content? Thanks!
Can you be more specific about the content of your article? After reading it, I still have some doubts. Hope you can help me. https://accounts.binance.info/pl/register-person?ref=UM6SMJM3
Your point of view caught my eye and was very interesting. Thanks. I have a question for you. https://www.binance.com/el/register?ref=DB40ITMB
Your article helped me a lot, is there any more related content? Thanks!
Thank you for your sharing. I am worried that I lack creative ideas. It is your article that makes me full of hope. Thank you. But, I have a question, can you help me?
Your point of view caught my eye and was very interesting. Thanks. I have a question for you.